In order for the temperature in the bathhouse to be maintained for as long as possible, and the costs of maintaining it to be as low as possible, bathhouses need external insulation. In addition to solving this problem, external insulation also protects the building from direct contact with cold air and precipitation, which extends the life of the building.
The order and sequence of work on external insulation depends on the type of material used for construction. For bathhouses made of logs - rounded or simply sanded - this usually involves careful sealing of all cracks and cracks: wood of sufficient thickness holds heat well on its own. Sometimes the steam room and washing room are insulated from the inside.
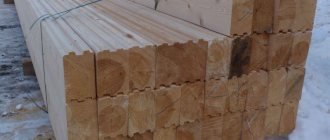
If timber is used during construction, it most likely needs to be insulated, but how depends on its thickness and region (you need to know how severe the winters are). It is imperative to insulate baths built from bricks and building blocks - they have high thermal conductivity and to ensure the required temperature conditions, the wall thickness must be at least 80 cm, which is very unprofitable from an economic point of view. That’s why such baths are always insulated.
Peculiarities
Exterior finishing is usually carried out in conjunction with thermal insulation. To save the usable area of the building, insulating material is installed on the outside of the structure. The best façade is considered to be a ventilated façade; it will reliably protect the building from cold and moisture. Cladding the facade of a bathhouse is a question that also depends on the appearance of the building adjacent to the bathhouse.
Simply put, it should be combined with the house or with the structures that exist on this territory: a veranda or gazebo, outbuildings, a guest house. It would be great if these buildings were in harmony and were made in the same style. We can only talk about design performance if the owner has a choice.
If there is a goal of an economical budget, you should choose materials according to the estimated budget. And based on this, either the bathhouse is covered with your own hands, or you need to invite craftsmen.
Sheathing materials
The traditional exterior finishing material is wood. But metal, plastic and corrugated sheets are often cheaper, so the bathhouse owner chooses them. Any option can look nice and neat - the main thing is that the owner does not deviate from the initial requirements. If you want to sheathe a building in an environmentally friendly way, you will have to give up plastic, for example.
Lining
Lining is a thin finishing board with a thickness of no more than 22 mm. This is a wood processing product. The lining got its name from ancient times, when wooden carriages still moved along the railway tracks. They were lined with smooth boards. Each sheathing element was touched from all sides, and it was decided to join with tongue and groove. Today, lining refers to 2 types of material: wood, PVC. The first option is suitable for cladding a bathhouse.
There are 4 types of lining on the market: extra (or “zero”, as experts say), A, B and C. If extra is an ideal material, then C is a budget material. In the latter case, the material may have 2 captive knots, so-called resin bags, cracks (not through), contrasting stripes and bluish spots. If the master decides to cover the walls of the bathhouse with clapboard, then, like any other wood building material, the clapboard will decrease in size over time. And the geometry of such changes can be significant. The sheathing boards located nearby will lose their places of adhesion to each other, and a gap will appear between them. And then you will have to dismantle the entire cladding.
When buying lining, it makes sense to take the material that has been kiln dried. Its natural humidity indicators will remain at the level of 10-12%, but there is no talk of critical shrinkage. If there are concerns regarding the choice of lining type, they may be unnecessary: there are no technological differences in processing during production. Each board is processed and dried equally. And what grade the finished product should be assigned to is decided during sorting.
Attention! Eurolining is not a material imported from Europe. The prefix “euro” means compliance with European manufacturing standards. The lining without the “euro” prefix is made with a focus on domestic GOST standards.
Imitation of timber
Imitation timber is one of the types of lining. The thickness of such a board is 1 cm, and the width is from 10 to 16 cm. The main difference between the material is the existing central groove, which relieves tension in the wood. That is, the service life of the finish is increased due to this feature. The main advantages of imitation timber:
But it was not without its drawbacks either. So, this type of lining must be regularly treated with antiseptics and anti-feathers. It is also susceptible to fire and, alas, does not have strong natural protection against rotting. Imitation timber can become deformed if the material is not dried enough or if poor quality raw materials are used for its manufacture.
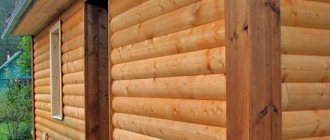
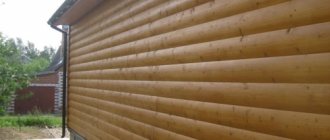
The log house of the bathhouse is sheathed with this material with a horizontal orientation, the tenon facing outward. This fastening is resistant to deformation and water ingress. Mount the material only on a flat surface, on a metal or wooden sheathing.
Before painting, the imitation wood is thoroughly sanded with fine-grain sandpaper.
Block house
This material, in turn, is a type of imitation timber. It is distinguished by the rounding of the outer side. With the factory technology of drying the panels, the standard humidity is maintained at 12%. What are the main advantages of external cladding with a block house:
But this material has almost no negative aspects that could not be called conventional. Sometimes there may be some kind of defect or undesirable effect during operation, but it is usually associated with violation of installation rules or simply with the use of low-quality wood.
The block house panels are installed on a pre-prepared frame, the minimum distance is 65 cm. The material is fixed with self-tapping screws. The finished coating needs sanding, and will also have to be treated with paints and varnishes to protect it.
Siding
Siding refers to decorative panels with the following standard dimensions: width - 22 cm and length 125 cm. Siding can be metal or vinyl. There is also a choice of colors – at least 10 shades. What is good about siding for lining baths:
But the disadvantages will also have to be listed: the fixing elements of such cladding will not be cheap. If the installation technology is violated, deformations and backlash will appear. Again, the panels can be fixed strictly to a flat surface.
To cover a bathhouse with siding, you will have to, for example, install a profile frame on a timber structure. Or you will need to make a wooden sheathing. But it’s not that difficult, it just increases the time of the sheathing itself. The surface of the walls must be treated with special antiseptics, since without this, mold and other harmful microorganisms can occupy the cladding.
Install the siding horizontally, 20 cm away from the foundation.
Other options
Not everyone likes or has access to the “beam log” option, so decisions regarding cladding may vary. They even cover the frame bath with plastic panels. This material has its advantages: it can be a nice looking cladding, low in cost, low hygroscopicity and no need for constant treatment with antiseptics. This is a frost-resistant and wear-resistant material, easy to install and maintain.
Related articles: the weaker sex is stronger than the stronger
But the disadvantages of plastic panels are significant: the material has low air permeability. It is susceptible to mechanical damage, fading and deformation. Finally, it is highly flammable and in this case releases large amounts of toxic substances. If, nevertheless, a decision is made about such cladding, plastic panels are installed on the slatted frame. The building is pre-treated with anti-fire and rotting agents.
Another interesting finishing option, which is no worse or better than many, but simply different, is finishing with warm plaster. Warm plaster is a cement-based mortar with the addition of expanded clay chips, perlite sand, powdered pumice and granulated foam. What is good about façade plaster:
Disadvantages of facade plaster:
The plaster itself is applied to an already cleaned surface either manually or by machine. Each subsequent layer is applied only after the previous one has dried.
Is it necessary to insulate?
External insulation will be mandatory only in a situation where the bathhouse at least partially performs the functions of a living space. Also, the external insulation of the bathhouse goes well with the finishing, that is, there is no need to plan a separate event for this. If the bathhouse has a place to spend the night or even a guest room, you can insulate it from the outside; if not, such additional insulation will be unnecessary.
If everything inside is insulated correctly, then additionally finishing the building with thermal insulation on the outside is simply a waste of money and time (if the bathhouse only performs its direct functions).
Carrying out finishing work using lining, block house with imitation timber
Using lining as a finishing material is the most cost-effective option for finishing work.
When purchasing finishing material, you should pay special attention to its moisture content. In order to avoid having to redo the lining over time, you should choose boards with a moisture content of no more than 14-16% for cladding.
When using raw lining for lining a bathhouse complex, cracks appear when it dries, and when using overdried material, the lining may begin to hump. When carrying out exterior finishing, a board with a thickness of 14-15 mm is used.
A more expensive finishing material is a block house. This material, when used for finishing, imitates the surface that is obtained when using rounded logs for construction
When purchasing material for finishing work, special attention should be paid to its moisture content. It is not recommended to use overdried and damp material for finishing.
The block house is installed on brick walls or on a pre-assembled sheathing if the wall plane is uneven. The technology for installing this finishing material is quite complex; for this reason, the finishing requires the involvement of specialists.
No insulation is placed under the block house. Laying insulation under the finishing material can provoke the development of wood rotting processes.
Imitation timber is a type of lining. The board of this material is thicker and wider. Imitation of timber is a planed board. This material has some versatility and can be used for both exterior and interior wall surfaces. This lining can be used for finishing walls built from any building material.
This finishing material is made from two boards that are glued together longitudinally. This structure of the material makes it possible to minimize the occurrence of deformation processes in it.
In the production process of panels, coniferous wood with a moisture content of 12 to 15% is used. The length of an imported panel ranges from 3 to 4.8 m; Russian manufacturers produce panels with board lengths from 2.2 to 6 m.
Decorative design of the front zone
The choice of the gable of the bathhouse depends on what material the entire building is sheathed, on the overall design solution and on the purposes of the finishing. For example, it should be combined with other buildings on the site, have a common style and some elements. If the gable of the bathhouse is wooden, then it can be sheathed with any material, but first the surface of the building must be waterproofed. If the pediment is brick or concrete, there are no restrictions in finishing: the surface needs to be leveled, and a sheathing must be installed under the subsequent cladding. How to finish the pediment:
The finishing material is attached to a wooden sheathing or aluminum racks; the surface must be prepared and treated with special means.
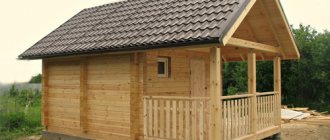
Beautiful examples
And to help you make your choice, you can look at excellent examples of the outer cladding of a bathhouse.
10 ideas for covering the outside of a bathhouse.
In the next video you will see the lining of an old bathhouse with imitation logs (before and after).
Source
How to sheathe the outside of a bathhouse inexpensively and beautifully, the better way to decorate it
When thinking about how to sheathe the outside of a bathhouse, you need to take into account several factors: the need to insulate it under the cladding, the material of the walls, the frequency of use. The financial aspect also matters, and it often turns out to be decisive when choosing finishing materials. After studying this publication, you will feel more confident in matters related to the exterior decoration of the bathhouse: the choice of cladding, its installation technology, and the installation of thermal insulation.
Is external insulation necessary?
Baths come in different types: wooden, frame, built of brick and concrete blocks. And they are used in different ways: some often and throughout the season, others only in the summer, once a week. Before you can cover the outside of a bathhouse cheaply and beautifully (or expensively and solidly), you need to resolve the issue of the need for its external thermal insulation. Then it will be more difficult to do this - you will have to remove and redo the decorative cladding.
When thermal insulation is not required
It is clear that summer baths, even those used daily, do not need insulation. But not all all-season buildings need it.
They are dressed in a “fur coat” only for commercial use, when it is important to keep warm constantly and spend less money on heating. To insulate private baths, high-quality caulking of the seams is sufficient to prevent heat leakage through the cracks. Wood has very low thermal conductivity, it “holds” the temperature inside the steam room well and does not allow frosty air from the street to penetrate. And if the frequency of fires does not exceed 2-3 times a week, there is no point in external insulation.
In such structures, thermal insulation material is already part of the structure.
If you steam no more than once a week, it makes no sense to insulate the bathhouse from the outside, regardless of the material of the walls. During this time, it will freeze through in any case, unless you maintain a positive temperature in it with heating devices. Therefore, you don’t have to worry about this and think only about how best to line the outside of the bathhouse.
When is it better to insulate a bathhouse?
It is necessary to insulate the walls from the outside if:
In such cases, external thermal insulation significantly reduces fuel consumption, which ultimately saves money and simplifies the work of the stoker. It is especially needed for buildings built from heat-intensive materials - concrete, stone, brick.
Facing brick
High-quality facing brickwork will fit perfectly into the landscape of any area in the countryside.
It will look great on a frame bath.
Moreover, lining a frame structure with brick and laying it out completely will be done completely differently. This will include parameters such as finances and your own time.
As you know, a distance is created between the brickwork and the wall, so this very distance must be filled with insulation, which will add additional warmth to the frame structure.
Types of insulation for external finishing
If you decide to insulate the walls before covering the outside of the bathhouse with corrugated board, clapboard or siding, you need to figure out how to do it correctly. Otherwise, you can end up with a disturbed microclimate in the steam room, wet walls and corroding or rotting cladding.
The choice of insulation and its installation technology depends on the material of the load-bearing walls, their heat capacity, vapor permeability and permissible moisture accumulation.
For wooden walls
Wood has high vapor permeability and quickly begins to rot when wet. This applies to both the walls themselves and the wooden external cladding. Therefore, the insulation laid between them must allow steam to pass through. And between it and the finishing there must be a ventilation gap through which the steam is released into the atmosphere. This is the basic principle of ventilated facades. Only such an exterior finishing scheme is applicable to log houses, regardless of the presence or absence of thermal insulation.
Wooden structures can only be insulated from the outside with mineral wool, since the vapor permeability of this material is higher than that of wood.
All layers of exterior finishing are visible in the picture.
It doesn’t matter what you can cover the outside of a bathhouse on top of such a “pie” - any façade material will do. But it must be selected before the counter-lattice is installed, since the recommended pitch between the racks may differ.
Articles on the topic: security video surveillance for the dacha
For concrete and brick walls
Bricks and blocks made of heavy concrete have high heat capacity and resistance to moisture, but low vapor permeability. External finishing with mineral wool insulation under a hinged ventilated façade is also applicable to such walls. But a much cheaper option is with a “wet” facade - plaster over a slab vapor-tight heat insulator.
As a rule, this is foam plastic, which is glued to the outside of the walls and secured with dowels with a wide head. Plastering is carried out on a reinforcing mesh.
If you don’t want to get involved with wet processes, you can stuff a frame onto the rough walls, put rigid insulation into its cells, fill all the joints between it and the sheathing bars with polyurethane foam, and then perform cladding on this frame. In this case, no waterproofing films are used.
For walls made of lightweight cellular concrete
According to their physical characteristics, foam concrete and aerated concrete are between wood and heavy concrete. The similarity with wood lies in the high vapor permeability of the materials, which makes it undesirable to insulate such walls from the outside with polystyrene foam. The steam released by the walls does not pass through it, but remains in the blocks, disrupting their structure when freezing.
It is better to use mineral wool with a ventilated facade or warm “breathable” plaster for this. In this case, it is advisable to protect the cotton insulation with a vapor barrier film on the side of the load-bearing wall.
Arrangement of thermal protection of walls and ceilings
Insulating the walls and ceiling of a bathhouse from the inside is similar to how it is done in other rooms, but special attention should be paid to the reliability of laying the vapor barrier layer.
Stage one - creating the lathing The procedure for how to insulate the ceiling in a bathhouse from the inside suggests that the distance from the lathing to the base of the wall or ceiling needs to be made slightly greater than the thickness of the material for thermal insulation
Stage one - creating the sheathing. The procedure for how to insulate the ceiling in a bathhouse from the inside suggests that the distance from the sheathing to the base of the wall or ceiling needs to be made slightly greater than the thickness of the material for thermal insulation.
When using galvanized profiles, this gap is adjusted using hangers, and the block is nailed down using a backing, which can be a piece of block. Galvanized hangers are also used for wooden sheathing.
The sequence for attaching the profile is as follows:
- A UD guide profile is fixed along the perimeter of the walls or ceiling, observing a 60-centimeter step. It is mounted to timber or logs with self-tapping screws, and to brick or concrete walls - with screws and plastic dowels.
- The axes of the CD profiles are marked, taking into account that the gap between them should allow the laying of heat insulation slabs without trimming. Then the hangers are attached to the wall, observing a step of 60-80 centimeters.
- To install and fix CD profiles to the hangers, use metal screws 9 millimeters long. The free edges of the hangers need to be folded.
Stage two - installation of insulation. Basalt wool in slabs is placed between the bars (profiles). The insulation of a ventilated façade or loggias is carried out in the same way. The work must be done in a respirator (gauze bandage) and special glasses. The fact is that the small fibers of this material are volatile and, when they get on the human mucosa, they greatly irritate it.
To cut the slabs, use a standard sharp knife. The insulation should not be crushed during installation. Regarding how best to insulate a bathhouse, you need to know that with a constant weight of the material, the smaller its volume, the worse its heat-insulating qualities will be.
Stage three – installation of steam and waterproofing. Strips of material are fixed horizontally from bottom to top, maintaining a 5-centimeter overlap. The foil side of the insulation should be facing inside the room.
The method of fixing the vapor barrier depends on the material from which the sheathing is made. So, before you insulate the steam room in a log bath, you need to stock up on a construction stapler. If there is a galvanized profile, the strips are secured with double-sided aluminum tape.
To create a high-quality vapor barrier, the insulation not only needs to be fixed, all existing joints must be taped with the same tape. Then moisture will not be able to penetrate the insulation.
Stage four – clapboard covering. To make the room cozy and beautiful after completion of insulation, it is necessary to finish the walls.
First, prepare the tools and materials necessary for the work, including:
- circular saw or electric jigsaw;
- drill - screwdriver;
- rasp (required when adjusting and processing the edge of the lining);
- construction square (necessary for marking boards);
- level and plumb line (they are in demand when checking verticals and horizontals);
- metal clamps for fixing wooden lining;
- copper or galvanized screws, which are needed for fastening the clamps to the bars;
- metal screws;
- wooden baseboards for finishing corners.
When carrying out work, you need to consider a number of points:
There should be a small gap between the lining and the vapor barrier layer. In addition, gaps (no more than 1-2 centimeters) are installed along the edges of the ceiling, as well as in the upper and lower parts of the walls.
The end boards in each row of the lining should be fastened with screws through and through, and their caps will be covered by the baseboard. All other boards will be held in place by clamps.
The above-described procedure for carrying out work allows you to both insulate an old bathhouse from the inside and a completely new building. Thermal protection of a bath structure is a very important stage, since the efficiency of the steam room depends on its quality. The main thing in the work is to take into account the slightest nuances and then the result will exceed expectations.
Materials for external cladding
A real Russian bathhouse is built of wood. And if it is built correctly, from high-quality material, then cladding inside and outside a timber bathhouse or log house is not needed. However, wood also ages over time, loses its appearance and requires finishing. And even more so for buildings made from other materials.
If we discard the idea of external plaster and focus on cladding technology, then it should be carried out according to the principle of a suspended ventilated facade - with an air gap between the load-bearing wall (or insulation) and the cladding material.
This is especially true for a bathhouse, since water vapor greatly increases in volume when heated, creates excess pressure and tends to escape through the walls. It needs to be given the opportunity to evaporate in the atmosphere, to erode, and not settle on structures. This is why an air gap is needed.
Therefore, any facing material described below for a bathhouse is attached to a specially mounted frame.
Vinyl siding
This is one of the best options if you need to decide how to cover the outside of a bathhouse inexpensively, but stylishly and beautifully. Vinyl wall panels are produced by different manufacturers and differ in price, color schemes, and geometric parameters. On average, they are about 20 cm wide and cost from 120 rubles for a panel 270 cm long (220 RUR/m²).
The assortment of domestic and foreign manufacturers includes many shades of siding and types of profiles. It can imitate timber, lining, block house, herringbone cladding, etc.
There are also disadvantages. If we talk about price, then the wall panels themselves are inexpensive, which cannot be said about additional elements for framing corners, openings, eaves overhangs and other structural elements of the building. They can cost the same amount as the main material.
Another significant disadvantage is the large number of scraps when the multiplicity of panel lengths and wall sizes do not match.
Finally, the recommended sheathing pitch for vinyl siding is 40 cm, which does not coincide with the frame pitch for installing insulation (50-60 cm).
The panels are mounted from bottom to top. But first, corner decorative elements are installed on the corners of the building, and a starting strip is attached along the lower installation line. The first panel is snapped onto it, and along the upper edge is fixed with self-tapping screws on the sheathing through special holes.
When they reach the window openings, they frame them with platbands and slopes, after which they continue to line the walls.
Painting work
Attention, we strongly do not recommend using paints and varnishes when finishing the steam room. When heated, many of them emit toxic gases. We do not paint our baths from the inside. But we can advise you to use water-based varnishes, SUPI water acrylic impregnations from Tikkurila, the DULUX line for saunas, and domestic SENEZH.
You will say that an uncoated floor in a bathhouse will quickly become unusable. This will not happen if you strictly follow the operating instructions - thoroughly ventilate and dry wet areas.
We suggest you read: How much money does it take to build a bathhouse?
Video description
Before covering the outside of a timber bathhouse with siding, we recommend watching a training video on this topic:
Metal siding and profiled sheet
Until recently, metal was not used as facade finishing for residential buildings and outbuildings (except for garages). But with the advent of corrugated sheeting and metal siding, everything changed. Now it is not just an inconspicuous steel sheet, but a composite material with an expressive relief and colored polymer coating, which not only gives the product a beautiful appearance, but also protects it from corrosion.
If you need to find a relatively inexpensive, practical and durable material, then you can’t think of anything better than lining the outside of a wooden bathhouse with metal sheets and panels.
Today, these materials are produced everywhere; production can be found in the nearest city or town. And order products that exactly match the length or height of your building. Most enterprises offer factory-cut siding or corrugated sheets from 50 cm to 6 meters or more in length. This makes it possible to eliminate the generation of waste even when covering inter-window partitions and other difficult sections of the wall.
Moreover, the cost of these materials is comparable to the price of vinyl siding: metal panels will cost 310-380 rubles/m², and corrugated sheets will cost 200-300 rubles/m². Additional elements for steel facades are cheaper than plastic ones, so in total the external cladding will cost less.
As for installation, the technology for attaching metal and vinyl siding is similar. But in the case of steel panels, there is the possibility of both hidden and open installation of corners, near-window strips and other additional elements.
Lining
To preserve the appearance of a traditional Russian bathhouse, when decorating the external walls, a common cladding material is used - clapboard. Eurolining is especially in demand. This is a wooden board of small thickness. Lining has all the advantages and disadvantages characteristic of wood. To extend the service life of eurolining, it is treated with antiseptics and coated with varnish or paint.
In order for the cladding of the bath to be done correctly, it is necessary to strictly adhere to the installation technology. Step-by-step execution of all operations will allow you to carry out the cladding yourself:
- Install brackets on the wall. In this case, it is necessary to observe a step that should not exceed 50 cm. The brackets must be positioned horizontally.
- Cover the outer surface of the wall with mineral mats. For fastening, use the prepared adhesive composition. The use of dowels is acceptable.
- Attach a guide to each bracket. To check the correct location of these finishing parts, use a building level or plumb line.
- Cover the insulation with waterproofing material.
- Attach the lining to the fixed guides.
Video description
How walls are covered with metal siding is shown in the video:
In contrast, the profiled sheet is attached vertically, with the sheets simply overlapping each other along the wave relief and through fixation with self-tapping screws with a rubber washer and a painted head. Therefore, the frame under it is mounted in the form of a horizontal sheathing with a convenient step of 50-60 cm.
Wood paneling
Wood is a traditional material for finishing the facades of residential buildings and baths. It remains popular, despite the emergence of cheaper and more practical analogues - vinyl and metal siding that imitates wood paneling.
Related articles: storing hoses in the country
Most often, it is chosen when you need to decide how to sheathe the outside of a frame bathhouse, since it adds another warm layer to the thermal insulation pie and fits perfectly with the wooden elements of the building’s frame.
The lining material used is mainly lining, imitation timber and block house made of coniferous wood.
This is the most affordable type of wooden panels, which can have different profiles. The cost per square meter, depending on the species and type of wood, is from 280 rubles (pine) to 700 rubles (larch).
The panels are thicker than conventional lining, and their assembled profile imitates a timber frame. Sheathing with this material will cost much more - 400-500 rubles/m² (pine) with a 20 mm thickness.
The most expensive material imitating a rounded log. Costs from 560 rubles/m².
It should be noted that these are the prices of “pure” material, which requires mandatory protective treatment against rotting and impregnation with water-repellent compounds. Therefore, the total cost of finishing can increase significantly.
Other disadvantages of wooden cladding include:
But many bathhouse fans prefer this particular type of facade decoration, paying tribute to the environmental friendliness of the material, its thermal insulation properties and unique appearance.
Sheathing with clapboard and other panels that have a tongue-and-groove connection can be done both horizontally and vertically. When installed horizontally, they must be installed with the tenon facing up so that during precipitation, moisture does not penetrate into the grooves.
Siding
Wooden cladding requires regular painting of the bathhouse surface. But the paint must first be completely removed or sanded so that the work is not spoiled. But not all owners manage to carry out repair work on time and paint the bathhouse before it becomes completely dilapidated. Therefore, such users are recommended to use materials that do not require additional finishing.
The bathhouse is lined with siding
Most often, vinyl or metal siding is used for cladding, which can also be installed on the log house yourself. This also requires the installation of a frame consisting of metal profiles. The surface of the bathhouse should be treated with protective liquids to prevent fungi and harmful insects from appearing under the casing. And once all the procedures are completed, you can proceed to installation work.
If the log house of the bathhouse is built from timber, then installation of the frame will take place quite quickly. This is due to the fact that the surface of the walls is as smooth as possible and will not require much correction of the plane. And the fastening system itself, which is based on hangers with a perforated surface, allows you to set the profile in any position and quickly fix it using self-tapping screws.
Siding finishing
Next, we begin installing the siding itself. For work, use a screwdriver, as it will allow you to quickly fasten the material with self-tapping screws. Whatever the design of the bathhouse, the first cladding details will be the guide elements. They are attached to the edges of the bathhouse, and siding is already inserted into them. Each element must have a slight backlash so that it can expand or contract when temperature changes occur. If this is not done, the lining will become deformed and the bathhouse will lose its appearance.
The ends of the cut siding should be processed with a knife or fine sandpaper so that the edges are smooth and fit freely into the grooves of the guides.
Video description
We recommend seeing how to properly sheathe frame buildings with wood:
The installation principle is that after installing the first board level, it is fixed on the groove side with nails driven at an angle or with clamps and self-tapping screws. Then the tenon of the next panel is tightly inserted into this groove and, after checking the level, secured in a similar way. This is how the cladding is installed along the entire height or length of the wall.
Internal and external corners, framing of openings are made of polished edged boards.
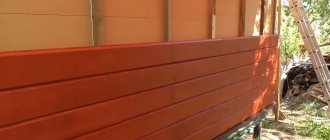
Upon completion of finishing, the facade is decorated with tinted impregnations, varnishes or acrylic paints for exterior use.
When choosing what you can use to cover the outside of a bathhouse inexpensively, it is worth considering options for finishing it with regular boards - edged or unedged. There are at least two ways to create attractive and practical facades from them.
This method involves horizontal installation of boards with overlap. The bottom board is attached to the sheathing level, and each subsequent board is laid on it with its lower edge and fixed through with galvanized nails or self-tapping screws.
Where to begin?
Step-by-step instructions on the technology for its creation will help you correctly complete a bathhouse design project. You need to prepare graph paper to draw the plan and facades of the building to scale. All drawings are done in pencil. It is better to coordinate complex projects with an architect , who will help calculate the load on the foundation and supporting structures.
Separately, plans are made for the first and second floors, plans for all internal and external walls are made, indicating the finishing materials and their quantities, a section of the floor is drawn, screeds with the required slope for draining water, walls and roofing with all layers of insulation or waterproofing.
The first step is choosing a location on the site. For construction, you need to choose the most flat site possible so as not to waste resources on leveling or transporting soil. In areas with pronounced relief, you can use this factor by choosing a building design supported on a hillside or stepped terraces.
It is not advisable to use lowlands for placing a bathhouse, since dampness will destroy the foundation; otherwise, a drainage system will be introduced into the construction work.
When inspecting the site, you must pay attention to the surrounding landscape, the orientation of the windows and the entrance of the future bathhouse. The windows of the steam room can have any orientation, but the windows of the rest room or terrace should have a beautiful view , because it is much nicer to see a garden or water surface in front of your eyes than a neighbor’s barn or fence.
We think about the route in advance. It is necessary to install comfortable, sufficiently wide and non-slip paths with lighting, since the bathhouse is mainly used in the evening.
Having decided on the location, they think about the layout. At this stage, based on the number of users, the size and number of floors of the building are calculated.
Armed with a pencil, they make several versions of projects with a different set of premises. Basic premises – dressing room, wash room, steam room. Additional – rest room, bathroom, terrace.
The bath complex may include a swimming pool, a barbecue area under one roof, a billiard room, guest bedrooms, and a spa. This list is expanded at the discretion of the bathhouse owner, his financial capabilities and availability of space. All rooms are located on one floor or some are raised to the attic or second floor. Using an attic will incur additional costs for thermal insulation.
Next, the issue of seasonality of using the bathhouse is resolved. Year-round use will require insulation of the structure, the use of materials with high strength, resistance to temperature changes, low thermal conductivity, and the ability to maintain the desired temperature conditions indoors.
What comes to the fore is the creation of a heating system using a long-burning stove, removal of the fireplace insert into a dressing room or rest room, and the purchase of stoves with a convection air or water circuit.
In a summer bathhouse at a summer cottage, materials with low thermal conductivity and good insulating properties are used only for the construction of a steam room; the remaining rooms are built from lightweight materials that do not require special insulation.
The next step is the selection of finishing materials for exterior and interior decoration. The requirements for materials for interior decoration are the same for all planning solutions: naturalness, moisture resistance, resistance to high temperatures, hygiene .
External finishing is carried out based on the finishing of the main house, if the bathhouse is located nearby. If located remotely, the bathhouse complex may have a separate design. In a small area, it is better to adhere to a single style solution for all outbuildings .
Materials are selected according to the chosen design style. A classification into modern styles, classic design or rustic style decoration is appropriate here.
Modern styles involve concrete, metal, processed planed wood, glass. Classic - brick and wood. The rural style is suitable for natural or artificial wood in all types - logs, timber, edged and unedged boards, natural stone or brick.
Video description
How to properly perform herringbone cladding, watch the video:
In this case, the vertical direction of fastening to the horizontal sheathing is preferable. The boards are attached to it with indentations from each other, after which the resulting gaps are covered with the next row of boards. The result is a staggered installation. It looks quite interesting and unusual, especially when using unedged boards.
Facade panels
If you do not have financial problems, you can cover the outside of the bathhouse with more expensive and solid materials used for finishing the facades of residential buildings. This may be justified if you want to give all buildings on the site a uniform look and style.
Such materials include various facade panels made of composite materials - fiber cement, vinyl, WPC, clinker, etc.
WPC is a wood-polymer composite made from wood flour and a polymer binder in different proportions. Such panels are characterized by high strength, low thermal conductivity, wear resistance, they do not deform, do not rot, and are easy to clean. Available in the form of hollow boards with a hidden installation system. Costs may vary depending on the percentage of components. On average it is 1200-1400 rubles/m².
The material mostly consists of cement with mineral and polymer additives, but it also contains cellulose fibers, which act as a reinforcing frame for the panels. Their surface can have different coatings and textures that imitate wood, brick and stone masonry, and other materials. They are very expensive - from 1500 rubles/m².
An excellent option for simultaneous insulation and finishing of external walls of bathhouses made of concrete blocks and bricks. These are panels made of polystyrene foam or polyurethane foam with a decorative outer surface. It can be stone chips, clinker tiles or artificial stone. Each element has grooves and protrusions on both sides, through which they fit tightly together, eliminating cold bridges. The average price is 800-100 rubles/m². Considering that it also includes the cost of insulation, it does not seem particularly impressive.
Plate materials
What is the best way to sheathe the outside of a bathhouse from timber, if the budget is limited, but it is necessary to protect the external thermal insulation from getting wet and other atmospheric influences - this question also should not confuse you. You can use inexpensive board materials - OSB or DSP (up to 200 rubles/m²). By themselves, they look unpresentable, but they do an excellent job of protecting.
Such slabs can be primed and painted in light colors, and the seams can be covered with dark wooden strips, imitating the German half-timbered style.
Both OSB and DSP, when available funds become available, can be used as a supporting base for another decorative coating - textured plaster, facade tiles or any type of ventilated hanging systems.
Preparing the structure
So what's important to know?
Stages of work
| The walls should be as smooth as possible | Only then can high-quality fastening of the sheets be achieved. If you plan to finish a wooden structure, it is better to wait for it to completely shrink. Otherwise the structure will look bad. |
| Between the caps and panels of the parts you need to leave a small space (about 1 cm) | Temperature changes can cause siding to warp. |
Having familiarized yourself with these requirements, you can proceed to preparing the bath.
Here are the important points to remember:
- There should be no cracks or holes in the walls, otherwise the panels will be attached unstable.
- It is better to choose self-tapping screws or nails made of stainless steel. They must be at least 30 mm in length and at least 8 mm in diameter.
Tools required for installation:
- Hammer.
- Spring center punch.
- Scissors for cutting metal.
- Roulette and hammer.
- Parts for fastening.
- Punch punch for perforation.
- Stapler for construction work.
Wooden siding for a bathhouse is best suited for cladding.
First, measurements are taken:
- It is necessary to measure the walls.
- Window.
- Broken and triangular pediments.
- Soffits are also calculated.
Here are instructions that will help you correctly calculate the required amount:
- Having received the overall dimensions of the walls (this includes width and height), it is necessary to calculate the working area. To do this, use the formula S= wall length * wall height.
- Using the same principle, the size of the remaining walls is calculated, then the indicators are added up and the main footage is obtained.
- Then you need to calculate the area of doors and windows. The resulting number is subtracted from the area of the walls of the building.
- The same formula is used to calculate the area of one siding panel.
- The area of the house is divided by the area of the panel, the number that is needed is obtained.
| Bath length | Bath width | Height | total area | Area of doors and windows | Quantity of material required |
| 8 | 5 | 3 | 24 | 7 | 17 |
| 9 | 8 | 3 | 27 | 9 | 18 |
| 15 | 12 | 3.5 | 52.5 | 15 | 37.5 |
Before starting work on installing siding for a bathhouse, you need to be well prepared:
- Remember that the finishing of the external walls of a wooden bathhouse begins only after it has completely settled.
- Make sure that there are no cracks in the walls of the bathhouse and that the surface is completely flat. Otherwise, the finish will look crooked and adhere unsteadily to the sheathing.
- For the sheathing you will need a punch, hammer, tape measure, fasteners, spring punch, tin snips, staple gun, punch and level.
- Fasteners (nails, screws) must be made of stainless steel. Their length must be at least 30 mm, and the diameter of the cap must be at least 8 mm in diameter.