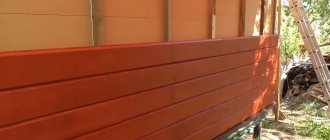
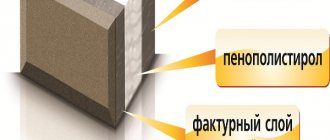
The bathhouse should be warm, cozy and clean. All this can be created using wooden finishing, the main thing is to follow the technology and choose high-quality materials. We have already written about the construction of a wooden bathhouse in this article. But we only talked about the building itself and the main nuances of the design; today we will talk in detail about the arrangement and decoration. The fact is that a bathhouse requires serious attention to materials, technology and details. Otherwise, the structure may become deformed, begin to rapidly deteriorate due to moisture and rot, and simply cause harm to your health.
Main differences
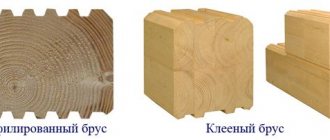
Imitation timber and lining have practically no differences, so non-professionals often confuse these two finishing materials.
It is necessary to understand the difference to choose the right product. Firstly, the thickness of the products. Imitation timber is thicker than lining: in the range from 16 to 37 mm. The thickness of the lining does not exceed 16 mm. Secondly, the installation method. The lining can be installed in almost any direction: horizontally, vertically, diagonally. Imitation timber cannot boast of such versatility - this material is only suitable for horizontal laying.
Raised beam protection
Before installation, the material is treated with protective compounds. Insecticides are used for this. These preparations protect wood from the most dangerous pests - bark beetles, bark beetles, longhorned beetles, etc. Treatment against mold, mildew, and fire retardants is necessary. The sequence in which treatment must be carried out is indicated in the instructions for the preparations.
Transparent coatings
To protect wood from moisture and other harmful effects, opaque coatings are used - for example, wax-based oils, varnishes.
Oil-wax has some advantages over varnishes:
- the product does not emit toxic substances;
- can even be used in a children's room;
- allows the tree to breathe;
- does not spoil the structure of the tree;
- penetrates deep between the fibers and protects the boards from the inside;
- Contains no aggressive solvents.
This coating can be tinted and give the wood a darker shade.
Working with wax is easy and safe
As for varnishes, any are suitable for street work. For internal ones, it is better to choose water-based products. Its heat resistance will not be superfluous, especially with increased risks of fire.
Video - Waxing wood
Reference. Some craftsmen recommend coating the wood before laying it. They say that when processing already assembled walls, unpainted areas may remain.
There is also a well-known homemade wax coating recipe. To prepare it you will need:
- beeswax - 9 parts;
- carnauba wax - 1 part;
- turpentine (gasoline can be used) - 90 parts.
The safest materials for painting timber are considered to be linseed oil, gum turpentine, and colophon resin, better known as rosin.
Rosin is a natural wood preservative
Prices for wood preservatives
Impregnation for wood
How to apply wax to timber
Work on applying wax is performed in the following order:
- Repair cracks and imperfections. If necessary, level the surface of the timber with a grinding machine or sandpaper.
- Wipe the surface, remove debris and dust.
- Wax-oil is applied with a brush. Excess is removed with a dry, lint-free cloth.
- Allow the composition to dry.
- Polish the surface with a piece of cotton cloth.
Opaque coatings
Opaque coatings are also suitable for painting. Such products provide protection, but at the same time they also hide the imperfections of the material. These include enamels, water-dispersion and acrylic paints. Before painting with such products, the wood is treated with a primer - for example, drying oil. This will reduce the consumption of paint and varnish products.
Imitation timber is an easy way to make your home attractive and extend its service life. With proper installation and subsequent proper care, the cladding will last for many years.
Criteria for selecting wood species
Manufacturers offer several options for grading boards:
- "A" - first;
- “B” – second;
- “C” – third;
- "Extra" is the highest.
What “highest” is is not specified in the state standards. This indicator is not used anywhere in the world except Russia. Domestic manufacturers often pass off “A” grade wood as “Extra”, and “B” grade boards as “A”. This is what caused the appearance of premium lining on the market. Recommendations for choosing grades are as follows:
- the interior decoration of the bathhouse can be made of second-grade boards;
- For rooms with high humidity, the presence of rot and wane in the wood is unacceptable.
The following must be taken into account:
Pay attention to the quality of the chips. The boards must have a flat and smooth surface. This directly affects the economic benefits of finishing work. If the front side of the lining is rough, finishing will be complicated by the increased consumption of antiseptic and paint materials. The moisture content of the boards should not exceed 12-16% (GOST requirement). It is visually impossible to determine whether the material offered by the manufacturer meets this criterion. Therefore, it is necessary to request documents confirming compliance with GOST. If the wood is not dry enough, there is a high risk that it will suffer during the first years of operation of the finished premises. Pay attention to the depth and evenness of the groove. These indicators determine the quality of installation
And it doesn’t matter how it will be done: using clamps, nails or staples. If the groove is shallow, there will be nothing for the fasteners to grab onto.
The finishing of the walls and ceilings of the bathhouse can be made of the best types of wood.
We invite you to familiarize yourself with a dressing room for a bathhouse with your own hands: construction, insulation and finishing
| Material | Advantages | Flaws |
| Spruce | Low price, wood does not darken over time, small number of knots, low degree of resin, dries quickly. Finishing with second grade boards is acceptable | Often leads |
| Pine | It is a source of phytoncides that heal the body, is resistant to moisture, and has low thermal conductivity. It is recommended to finish with first grade boards | Gnarly, resinous |
| Aspen | An excellent antiseptic, highly resistant to moisture, has a pleasant color tint, and is not tarry. Finishing steam rooms with aspen is a recognized option for arranging these rooms | Possible hidden rot |
| Linden | Low price, structural integrity, small number of knots | The softness of wood, which complicates the installation process and operation |
| Alder | Beautiful texture and color, high moisture resistance, low thermal conductivity, strength. Alder finishes are suitable for recreational areas | High price |
| Larch | The best moisture resistance among other types of wood, low thermal conductivity, impressive texture, small number of knots. Larch finishing is suitable for any bath room | High price |
| Cedar | The best indicators of therapeutic and health characteristics, high strength, hardness, high-quality noise absorption, not susceptible to rot and insects. Cedar finishing is the best solution for steam rooms and relaxation rooms | High price |
Which lining is better for a bathhouse?
When a person has prepared a special area for a bathhouse at his dacha, it is important now to think about finishing it from the inside. You can decorate the inside of a bathhouse in different ways; a variety of materials are used for this. It can be stone or the usual lining, which is made of wood.
Of course, lining is the ideal choice. This material is environmentally friendly and natural, therefore suitable for a bathhouse and its arrangement from the inside. Thanks to him, the room will have a beautiful view. To choose a type of lining, you need to learn about its types and characteristics.
Usually there are 2-3 rooms in a bathhouse. This is a dressing room, a steam room, and in some saunas there is also a room where you can wash. Each room has its own requirements regarding environmental friendliness and safety. The materials used for finishing should not only look beautiful, but also have excellent technical properties. However, the main requirements are resistance to high temperatures, moisture, and water.
Options for installing heated floors in a bathhouse
Heated floor systems are quite useful not only in the apartment, but also in the bathhouse. The main task here is the correct choice of type. They can be:
- electrical (using a heating cable);
- water - using a coolant heated by a boiler;
- film - a relatively new type of heating with infrared radiation.
If we talk about wooden floors, then the optimal (albeit quite labor-intensive) solution would be to use water heating. Tiled flooring is more compatible with electric heated floors using cable. Installation of infrared heaters in “warm floor” systems in bathhouses is rarely used due to their high cost. Although the energy savings of this type of device are significant compared to a cord.
The water-heated floor is made from a continuous, solid pipe, without joints
Floor
Tiled floor in the bath
The floor is finished with boards or tiles. It is better to choose a special tile that is not slippery. Otherwise, sooner or later you can get injured while taking a steam bath. The tile is durable, and this is its main advantage. You can also use tiles for walls.
Floor tiles
Larch is another good flooring material. It is not subject to rotting, so its strength and durability can compete with tiles. The only negative is the high cost of such material.
The floor is finished after it has been insulated. All surfaces of the steam room must be insulated. If the floor is concrete, then the insulation is laid between the layers of concrete. Expanded clay, crushed stone, and empty bottles can be used as heat-insulating material.
Cladding with imitation timber inside the house
High-quality imitation timber of small thickness is often used for cladding walls, niches, and ceilings inside the house. The advantages of using this finishing method are:
- the ability to hide uneven walls;
- the ability to hide communications and wires;
- environmental friendliness and ergonomic appearance;
- excellent heat retention and sound insulation;
- durability and ease of surface care.
A significant drawback of false timber for interior decoration is the reduction in the usable area of the room by 3-5%.
Varnished imitation timber
The imitation timber is mounted on the sheathing, which is done every 0.5 m. The slats can be wooden or metal. The boards are attached using climbers, which are completely invisible. When covering walls indoors, it is recommended to take into account the following nuances:
- There should be a space of 3-4 cm between the wall of the house and the imitation timber for air circulation.
- It is advisable to lay a layer of vapor barrier between the lathing slats.
- Before finishing with false timber, it must lie indoors for at least 24 hours to acclimatize.
- The finished walls are covered with wax or acrylic paint.
- For ceiling cladding, it is better to use galvanized slats, as when installing suspended ceilings.
Correctly executed cladding with imitation timber will give the house a special style and comfort. The finish will last for many years without requiring maintenance or repair.
Inside with your own hands - choose the material
The task of upholstery material when finishing a log bathhouse inside is to preserve heat and reduce electrical heating.
When choosing a material, you must understand what you need. The material must be steam-resistant, non-flammable and harmless.
Unnatural materials in the form of polystyrene foam and plastic are not recommended - at high temperatures toxic substances are released into the air.
Today, suitable options for upholstering a bathhouse with your own hands are lining, blockhouse and imitation timber. Which is better to choose?
Block house
A block house is a budget-price-quality ratio that will save money and give the bathhouse an aesthetic appearance. The composition of the material is as close as possible to a log house; only an experienced eye can distinguish them from each other. Made from coniferous wood. The block house undergoes a special drying process, hardening it from cracks and deformation.
Block house classification
- “C” class is the simplest material, surface-treated and inexpensive. May be subject to deformation after a short service life. Not recommended for finishing a bathhouse with a block house inside;
- “B” class is a material of better quality, not particularly deformed or cracked. Also not recommended;
- “A” class - well-processed, dried and polished material without unevenness or deformation, 2 - 3 centimeters wide;
- “Extra” class is the best and most expensive option.
Imitation of timber
Imitation timber is suitable for finishing a steam room, washing room, and for finishing an attic in a bathhouse - the development of this material was so successful that it began to gradually replace lining.
The material consists of wide solid wood panels with recesses for fastening.
It's all about preserving the heat of the room with the material and low price. The walls look more natural and do not crack or deform even after a long time.
Laying electrical wiring is very convenient, and installation of imitation timber is as simple as possible.
Information. In a chopped bathhouse, the finish with imitation timber protects your wallet, and the material is not afraid of moisture, ultraviolet radiation, temperature changes and time!
Not wooden
If you don’t like the interior decoration of a bathhouse made by yourself with just wood, you can dilute the interior composition with other materials. The main thing is to take into account the constant high level of moisture in the room; the materials need to be selected accordingly. Best suited:
- Porcelain tiles;
- Facing brick;
- Natural stone finishing;
- Fiberglass wallpaper;
- Majolic.
The combination of natural stone and wood will look solid. The floor will be well covered with non-slip tiles. The tiles are suitable for the washing room, which will make cleaning the room quick and convenient.
Plastic panels
Plastic panels are the cheapest option for finishing the inside of a bathhouse; today the market is rich in many options for plastic linings of different thicknesses and designs.
Installation work is done quickly and easily - all you need is a staple gun. This material withstands moisture and temperature changes well. However, plastic has significant disadvantages - the material is short-lived and toxic - the unpleasant smell of plastic fills any room. Like any petroleum product, at high temperatures plastic releases toxic substances into the air, negating all the benefits of a Russian bath.
Attention! If you decide to line the inside of the bathhouse with plastic clapboard, do it in the locker room and other places least exposed to steam and moisture (veranda, attic). You will reduce health risks while ensuring your space looks beautiful.
Sequencing
The entire process consists of seven sequential steps. Each of them is a separate action that may take some time to complete.
Preparatory work
Preparation work for finishing walls with natural imitation timber is considered to include several steps. Each of them has its own nuances and imparts certain properties to the overall design.
Preparing the boards
Before mounting on the facade, it is necessary to treat the board with an antiseptic. This will give the wood useful properties that will extend its service life.
Preparing the walls
The walls of a wooden house are covered with an antiseptic; old paint and dirt must first be removed from the surface. To do this, you can use a spatula or a wire brush. The ventilation holes are covered with decorative grilles.
Covering the bathhouse with plastic panels
To quickly and cheaply cover a frame bathhouse, you can use decorative plastic panels. The plastic facade has an attractive appearance, and its performance characteristics are not inferior to siding.
Plastic panels have the following advantages:
Despite the positive aspects, such material is not without its disadvantages:
Plastic panels are mounted on a pre-installed slatted frame. Before starting work, the surface of the bathhouse is carefully treated with compounds to protect against fire and rotting.
Specifics of wood species
Wooden building elements are made from coniferous and deciduous wood. Moreover, hardwood accounts for only 10-15% of the total volume of wooden parts. Coniferous species - spruce, pine, larch, fir, cedar - have higher strength characteristics, and load-bearing structural elements - piles, pillars, supports, frames - are made from them. Sawn coniferous trunks are used in internal and external cladding, carpentry, and shaped structures.
Deciduous wood is used as an auxiliary material when creating low-critical structures - temporary warehouses, sheds, formwork for concrete work, etc.
Table. Approximate prices for false beams from different types of wood
| Wood type | Thickness, mm | Approximate prices for 1 m2 of finished surface as of June 2020. |
| Pine or spruce | 16, 22 | 250-450 rub. |
| 28, 35 | 370-800 rub. | |
| Larch | 20 | 400-1500 rub. |
| Cedar | 12, 16 | 800-1400 rub. |
| 18, 20 | 900-1800 rub. | |
| Linden | 12, 15 | 300-800 rub. |
| 18, 20 | 1100—1900 . |
Dimensions
A standard beam has dimensions from 80 to 280 mm in width and from 80 to 270 mm in thickness with a length of up to 6 m. The width of the false beam is usually in the range from 90 to 200 mm, thickness from 16 to 45 mm, length from 1 m up to 6 m.
Manufacturing companies
from the Arkhangelsk region has its own woodworking production. By optimizing business processes, it sells quality goods without trade markups. A large assortment with different characteristics is always available in warehouses. The company delivers products to Moscow and the region using its own transport within the agreed time frame.
Uralskaya (CvetWood) has been operating since 2009. The company's factories produce imitation timber, calm and eurolining, straight and beveled planks, and fence boards. Pine is supplied from the Sverdlovsk region, larch from Angarsk. Painting is carried out in the factory on an Italian spraying machine. Another machine rubs paint into the wood fibers. A tongue and groove is produced on four sides of the board, which increases the ease of installation. We offer a board with a neat bevel cut.
harvests pine and larch wood in the Vologda and Arkhangelsk regions. The technological processing process is carried out on German and Japanese equipment. Our own vehicles deliver products to Moscow and the Moscow region.
In Russia there are still many companies producing imitation timber.
Form of false beam
Unlike a convex blockhouse, with which false beams are often compared, it has a flat surface. Chamfers are cut along the edges at an angle of 45°. After connecting adjacent planks, barely noticeable seams remain, but not the same as with eurolining. Rather, they resemble “calm” lining.
Block house on the cut
From the back side, 1 to 3 ventilation ducts are cut out, which run along the entire length of the beam.
Reference. Previously, domestic enterprises produced wooden cladding without these grooves. This led to the fact that over time the timber became severely deformed due to temperature fluctuations, swelled, and cracks formed in the wood. The wood was susceptible to rotting due to excessive exposure to moisture.
The false block has the same lock as other types of lining
The edges of the lamellas have a spike on one side and a groove on the other. These are the connecting elements of the timber. The tongue-and-groove lock solves several problems at once:
- makes the cladding windproof;
- increases sound insulation properties;
- strengthens the skin.
Prices for various types of false beams
False beam
The procedure for finishing a bathhouse with siding
Vinyl, wood or basement siding is used to clad the bathhouse. To produce vinyl material, polyvinyl chloride is used, which consists of two layers. The first of them is a durable substrate, and the second serves as a protection. Wooden cladding is resistant to temperatures and moisture, but requires additional treatment to protect against pests. Basement siding has strength characteristics, therefore it is used for cladding the base.
Frame installation
At the initial stage, wooden supports or slats or metal profile slats are laid in a vertical position at a distance of 40 to 60 centimeters. When creating a frame, corner supports are first installed. At the corners, the frame elements are connected at an angle of 90 degrees. the remaining racks are attached with straight or shortened hangers, for fastening which self-tapping screws are used. To mount the frame in a flat plane, a cord is pulled between the corner posts. When using wooden planks to install the sheathing, they are pre-treated with an antiseptic solution.
Do-it-yourself insulation laying
When facing a bathhouse with siding, glass wool, polystyrene foam, and expanded polystyrene are used as insulation, which are produced in slabs, mats, and rolls. Properly selected insulation will provide high-quality insulation. If the bathhouse is built in the southern regions of the country, then the material used is from 5 to 10 centimeters thick, and in the northern regions - from 20 to 25 centimeters. The insulation is placed between the frame slats and covered with a waterproofing film, which is attached to the sheathing with a stapler.
SAMSUNG DIGITAL CAMERA
Siding procedure
The end of the base ebb is measured with a level, on top of which the starting strip is fixed. An N-shaped profile is installed in the place where the panels will be joined. Siding is installed starting from the middle of the wall. After installing the starting bar, it is secured with self-tapping screws to the frame supports. Siding is installed from the bottom up. Each panel has special grooves with which they are fastened to each other.
Furnace installation
The stove in the steam room can be installed in iron, brick or electric. The location for it should be chosen at the bathhouse design stage. The furnace firebox can be located both inside the steam room and outside it.
Installation procedure in a steam iron stove:
install the stove on a pre-prepared base;
#gallery-5 { margin: auto; } #gallery-5 .gallery-item { float: left; margin-top: 10px; text-align: center; width: 50%; } #gallery-5 img { border: 2px solid #cfcfcf; } #gallery-5 .gallery-caption { margin-left: 0; } /* see gallery_shortcode() in wp-includes/media.php */
Base for installing the furnace
Furnace foundation - photo
they line it with bricks along the walls and inside the partition;
#gallery-6 { margin: auto; } #gallery-6 .gallery-item { float: left; margin-top: 10px; text-align: center; width: 50%; } #gallery-6 img { border: 2px solid #cfcfcf; } #gallery-6 .gallery-caption { margin-left: 0; } /* see gallery_shortcode() in wp-includes/media.php */
Brick is laid between the walls of the furnace and the timber, the cracks are sealed with basalt cardboard
The walls near the stove are protected with refractory bricks
a metal passage for the chimney is installed in the opening on the ceiling;
Installed ceiling trim
a pipe and damper are installed on the stove, a tank is connected and a double-walled chimney is brought out through the ceiling, insulating it with non-combustible material;
Ceiling trim is fully insulated
a metal sheet with a hole through which the pipe passes is fixed on the roof.
Chimney passage through the roof
Installation of an electric heater
The electric oven is installed on a pre-prepared platform or hung on the wall using special brackets. It does not require installation of a chimney.
It is imperative to observe the distances specified in the instructions from the oven to the walls and shelves.
Finish options
Interior decoration with wooden panels can be used in any private home, regardless of the type of basic building materials.
The continuous internal cladding of a frame house with imitation timber, together with the external cladding of the same material, combines high thermal insulation properties and the aesthetics of a wooden log house.
As part of a combined finish in a house made of brick or building blocks, this material allows you to create unique interiors in almost any design direction, and not just in country or rustic style.
Using imitation timber, you can highlight functional areas in the common space of a combined kitchen and living room, in a studio or in an attic.
Covering a bathhouse with a block house
It is a type of imitation wood whose outer side is rounded. The factory technology for drying block house panels provides a standard humidity of 12%.
Advantages of a block house for external cladding:
There are practically no negative aspects to such coverage. In some cases, they are associated with a violation of installation technology or low quality wood that was used for its production.
The panels are installed on a pre-prepared wooden frame at a minimum distance from each other of 65 cm. Fixation is carried out from the foundation to the roof using self-tapping screws. The finished coating is sanded and treated with protective varnishes or paints.
Preparation: calculating the working area
Before starting work, you should calculate the area of surfaces that need finishing. Lining is used for walls and ceilings, and the floor is made of boards. For high-quality finishing, high-quality wood with the lowest resin content is required. Therefore, pine is rarely a material for landscaping, as it emits resin.
The same lining is used for the ceiling and walls
The finishing of each room consists of several stages. First, the installation of the floor covering is carried out, which is a flooring made of boards with a thickness of 50 mm. The elements are laid on logs 300 mm high, which are installed on a sand cushion arranged on the ground. After this, calculate the area of the walls and ceiling, which they plan to finish with clapboard. To do this, you need to calculate the area of each wall and ceiling and add up the data obtained.
Selection and calculation of material
Larch lining is the optimal solution for finishing a steam room or washing room. Under the influence of time and humidity, its wood becomes harder, which makes the decoration of rooms durable
When choosing a lining, you should pay attention to the following features:
- lining for finishing a steam room or washing room must be marked “Class Extra” or “Class A”. This material is devoid of large knots, has a uniform structure, and a smooth surface;
- wooden elements should not show signs of rotting, cracks, or deformation. Smooth and dense lining is easy to install and looks aesthetically pleasing;
- For finishing you need not only lining, but also steam and heat insulating materials. Finishing is carried out only after installation of these layers;
- The thickness of the board must be at least 12.5 mm, a tenon of 8 mm corresponds to the depth of the groove. Material humidity - no more than 12%;
- high-quality material has a flat, smooth surface.
It is also important to correctly calculate the amount of material. Lining is often calculated in square meters. In this case, its quantity is equal to the area of the working surfaces
This figure needs to be increased by 5%, since damage to the material is possible during operation, so the lining is purchased with a reserve
In this case, its quantity is equal to the area of the working surfaces. This figure needs to be increased by 5%, since damage to the material is possible during operation, so the lining is purchased with a reserve.
The lining must have the same groove and tenon size along its entire length
For work you need bars or thin slats. If the thermal insulation of the bathhouse was carried out outside, then only the installation of vapor barrier and finishing is carried out inside. Therefore, you need to purchase a vapor barrier film that will provide comfort indoors. Otherwise, insulation is carried out from the inside and you will need insulation, a waterproofing film and bars for the sheathing.
Tools and Supplies
Construction and arrangement of any facility requires the use of reliable tools. The quality of fastening materials is of particular importance when constructing a bathhouse, because the durability of the finish depends on this.
List of tools and consumables:
- construction stapler with staples;
- roulette;
- pencil;
- building level;
- nails;
- self-tapping screws with anti-corrosion coating;
- screwdriver;
- hammer;
- hacksaw.
Tools need to be prepared in advance, and fasteners must be purchased with a reserve. This makes it possible to securely fix all materials and elements.
Scope of application of decorative boards
Decorative wood panels that imitate timber have a fairly wide range of applications.
Attic finishing
Living room design
The board is amazing for finishing large structures:
- comfortable country houses;
- presentable restaurants;
- fashionable offices.
The panels are also amazing for decorating miniature structures:
- cute gazebos;
- cozy baths;
- multifunctional outbuildings.
The main advantage of a material that perfectly imitates timber is its versatility, since it can be used for:
- external finishing – pediment, walls, foundation;
- internal cladding is the ceiling and walls.
Often, a “wooden outfit” is put on the entire structure, which makes it elegant, sophisticated and noble. However, more often individual rooms are decorated with attractive decoration. For example, the material is wonderful in:
- a relaxing relaxation room in the bathhouse;
- an elegant home office/study;
- a welcoming living room;
- graceful attic;
- amazing greenhouse.
In the interior of a particular design, false beams are incomparable, as they saturate the atmosphere of the home with harmonious notes, favorably emphasize all the advantages of the room, hiding annoying shortcomings, highlight the delicate taste of the owners, and have a beneficial effect on the human body.
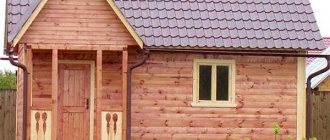
Interior decoration of a bathhouse made of timber
Interior finishing of a bathhouse made of timber with clapboard
Work order:
- We make markings for installing vertical slats. We start from the corners with a step of about 590 mm between the internal edges.
- We lay the waterproofing from bottom to top. We place the top film on the bottom with an overlap of 25-30 cm. We secure the top edge with a stapler or self-adhesive.
- We place the protective film under the racks, which we install in the corners according to the markings. Using a level or plumb line, place them in a strictly vertical position.
- We stretch the rope from below and above between the outer posts. It will serve as a guide for basing the internal racks.
- We install the internal racks.
- Align the protective film. Make sure that air does not enter the area of exposed logs.
- We place thermal insulation mats in the spaces between the racks from bottom to top. We carefully press each new mat towards the bottom one. Avoid any gaps. We level the upper mats with a knife.
- Place a layer of vapor barrier foil or polyethylene on top.
- We fix the horizontal slats. The lining strips will be mounted on them. We screw or nail the slats on top of the vapor barrier at the top and bottom of the future sheathing. We place the internal slats in increments of about 600 mm. Use a level.
- We place the first plank vertically in the corner of the wall. Its groove should face the master. The first strip is very important, since the quality of the future cladding as a whole depends on how correctly it is secured.
- Using nails or self-tapping screws along the edge, we secure the lining to each horizontal rail. Remember that the fastening caps must be completely closed when decoratively lining the corners.
- We insert the clamps into the edge of the groove of the lining and nail them to the sheathing. We do this operation with all subsequent strips. Tap the mallet against the block of wood to protect the finishing material from damage.
- We cover all the walls, fasten the baseboards and seal the corners with decorative corners.
Interior finishing of a bathhouse made of timber with facing tiles
We carry out the work in the following order:
- The walls are pre-sheathed with insulating waterproof material - roofing felt or roofing felt.
- We attach a metal mesh base on top, which we cover with a layer of plaster. The thickness of the latter should be at least 1.5 cm. We make sure that the plaster layer is perfectly even.
- Preparing the adhesive composition. You can make it yourself from cement and sand. The proportion is 1:4 respectively.
- There are three ways to lay tiles: seam-to-seam, diagonal, or staggered. We lay the tiles on the wall from bottom to top.
- Apply adhesive solution to each tile. We give the desired horizon to the tile using a rubber mallet. Press the tile evenly against the wall.
- We fix the seams between the tiles with a cross.
- Maintain an even row of tile covering. To do this, use a level or lacing.
- We collect excess glue that has protruded beyond the edges with a spatula.
- We cut the tiles using a tile cutter. We install such cut tiles in the most inconspicuous places, for example, where they will be hidden by a bench, shelf or baseboard.
Aspen
There are also many advantages here. This material will not deteriorate during drying.
Since customers often buy aspen paneling, this has made it possible to create a large assortment of ready-made panels that differ in size and shape. Many people ask what type of wood would be best for finishing a steam room, but this is all individual. Before buying a product, it is important to check it for small knots, chips, and damage. If the material is of high quality, then the finished coating will be attractive and durable.
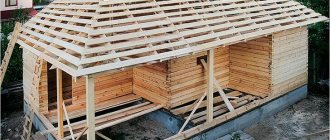
Creating a wooden base
Self-construction of a small frame bathhouse, as a rule, does not require the construction of a foundation due to its lightness. But to prevent the walls from becoming damp, you need to make a foundation.
We invite you to read: How to line a metal stove with bricks in a bathhouse?
In the case where you plan to build a bathhouse no larger than 3x4 meters in size, and the walls and roof are light, then it is enough to create a simple wooden foundation, which is secured along the edges with stakes. Such a foundation is considered a particularly good solution when carrying out construction on clayey, seasonally mobile soils that do not have excessive levels of moisture.
General requirements for the characteristics of bathhouses
The space provided by the bathhouse, measuring 4x5 m, is enough for a completely comfortable holiday for a family or a small group of 3-4 people.
In accordance with current regulatory requirements, each visitor to the steam room should have at least 1-1.2 m2 of free space if the person steams while in a sitting position. If the bath lover lies down or prefers to take some other possible position, the requirements for the dimensions of the steam room will change accordingly.
Steam room visitors
These points must be taken into account when designing a bathhouse in general and shelves in a steam room in particular. Information regarding possible body positions in the bath and recommendations for shelf sizes for each of them are shown in the following image.
Recommended shelf sizes for different body positions
Arrangement of shelves in the steam room
Regarding the area of the washing room, the recommendations are similar - at least 1-1.2 m2 for each visitor. In order to save space, the sink, as a rule, is made of relatively small sizes so that there is enough space for 1-2 visitors who come here at the same time.
A modern compact shower cabin will allow you to effectively solve the problem of distributing free space in the washroom. In general, the dimensions of the washing room can increase depending on its operating conditions. For example, if the owner decides to install a boiler here to heat water or even a washing machine (relevant when arranging a bath house), the size of the room will have to be increased accordingly.
Shower options
The recommended height of the steam room is about 210 cm, the washing room is 220-230 cm. When designing a steam room, you should adhere to the rule that there should be at least 110 cm of free space between the ceiling and the top shelf
For other types of sauna stoves, the requirements are determined by the individual characteristics of the units used.
Calculation of the minimum required parameters
Recommended steam room dimensions
To prevent water from splashing from one room to another, door thresholds are installed approximately 200-300 mm above the floor. The requirement is also relevant for the main entrance door; if the bathhouse is not equipped with a porch/terrace/veranda, then the high threshold will not allow melt water to penetrate inside the room in the spring, and will make the process of clearing snow more convenient.
Size selection
This type of finishing material does not have strictly regulated dimensions. The most common products are those whose width ranges from 110 to 190 mm, and thickness from 18 to 34 mm (although there are modifications with the same thickness as lining: 14 and 16 mm). The most popular panel thickness for interior decoration is 18-22 mm and width up to 110 mm.
If we talk about the standard version of ordinary or profiled timber, from which houses for permanent residence are built, then it has a cross-section of 150x150 mm. Therefore, the interior decoration of a house made of timber (in terms of cladding frame interior partitions) should be carried out using panels of the same width as the dimensions of the main building material.
With the choice of length, not everything is clear. There is no point in purchasing the entire batch with the same length, especially in the maximum size of six meters. Considering the length of the partitions, when covering walls inside a house, the most common panel sizes are up to four meters. It is better to calculate and select the dimensions of the molded lumber so that there are as few scraps as possible. If the length is not enough for the entire wall, then the joints can be hidden behind furniture or hidden with a fillet.
To finish the ceiling, you need to use whole panels, if possible without splicing them along the length. And they should be located in the direction from the window (if the room is corner, then in accordance with the laying of the floorboard).
Calculation of the amount of imitation timber must be carried out not only for each room, but also for each type of surface. This will allow you to optimize the cost of materials and the cost of work in general for the interior decoration of the house.
Steam and moisture protection
Finishing a wooden bathhouse is often impossible without insulating steam and moisture - these components provide a good microclimate, protecting the structure from moisture. To prevent the formation of fungus, mold, rot and other destructive factors, the structure is equipped with an insulation system from moisture and steam. From a design point of view, lining and other finishing materials make the room aesthetically pleasing, while moisture and steam tend to ruin all the beauty.
When starting interior decorating work, where to start is a simple question. After installing beacons on walls and floors, think about vapor barrier and waterproofing .
An additional heat-protective space is formed between the wall of the log house and the lining of the lining, which prevents heat from escaping, but provokes the appearance of condensation.
In addition, wood has minimal thermal conductivity, which creates a large temperature difference between the wall and the lining - steam penetrates into the joints of the lining, and when it reaches the wall it condenses, remaining on the walls of the log house. Over time, mold grows in the building and the wood rots.
Today, many materials are used for waterproofing and finishing wooden bathhouses, but not all are environmentally friendly. First, treat the sheathing and walls on the inside with an antiseptic to prevent mold and rot.
Next, materials that can withstand high temperatures will come in handy - mineral and glass wool are better suited than others. You can also purchase a more modern option - a waterproofing film, but for finishing bathhouses with wood this is not the cheapest pleasure. Insulating the walls under the lining is the right solution for waterproofing a room.
Floor waterproofing
Wall cladding when finishing a log bathhouse inside is best done after waterproofing the entire structure. Combine floor waterproofing materials with similar ones on the walls, which will provide maximum protection from moisture and steam. If the concrete floor in the bathhouse was made a long time ago, check its condition - the surface should be smooth and the concrete dry.
Important! After pouring, it takes 4 weeks for the concrete to dry completely, after which the floor must be treated with an antifungal solution, primer and coating waterproofing!
When the initial procedures for waterproofing the floor are completed, the floor is covered with rolled material and filled with screed. This is necessary both when covering the floor with wood and when finishing the inside of the bathhouse with tiles. Next, antiseptic plywood, OSB or board is laid over the waterproofing, and roofing felt is placed on top. This system is applied to the walls, connected with sealant or special tape. The joints on the floor are treated with mastic or the same sealant and the floor is equipped with a reinforced mesh and filled with concrete - screed. All that remains is to lay the outer cladding as the finishing touch to the flooring of the log bathhouse.
Important! It is advisable to carry out such extensive work on the bathhouse floor no earlier than a year and a half after the construction of the structure - after the final shrinkage of the log house.
What is a false beam
Of course, you can make the interior walls of a house or one room from real timber. The timber has good strength and a decent design. The use of such material makes it possible to solve both construction and design problems simultaneously. But it will be quite expensive. Another option is much more economical. Building structures (frame, rafters, etc.) are made from cheap boards, and the internal lining is made from false timber.
PHOTO: expert-dacha.pro Room covered with false beams
This finishing material is made in a special way from various types of wood. The outer side resembles a profiled beam or eurolining of increased width.
In the manufacture of this imitation, pine, spruce, larch, and cedar are used. The classification of false timber contains five grades - Extra, A, AB, B and C.
Alder
The lining, which is made of alder, is preferred by authoritarian lovers of relaxation in the bathhouse. The material will cost more than the previous ones, but it is considered to be of higher quality. Here the surface is perfectly smooth and there are no defects. Therefore, after installation there is no need for additional processing using a grinding machine.
This wood is used for steam rooms, which are located in elite, expensive establishments. It is popular because it has healing properties and looks very beautiful. Cedar panels are made, processed and installed quite simply; no special approach is required.
Advantages
When compared with lining, imitation timber differs for the better in the following indicators:
- greater mechanical strength;
- better thermal insulation properties (as interior decoration of the facade);
- higher level of sound insulation (when covering interior partitions).
When compared with a block house, the advantages of interior finishing of a house with imitation timber are as follows:
- it is easier to design internal and external corners;
- it is easier to install door and window frames;
- if necessary, it is easier to join individual panels along the length.
There are also general advantages of interior wall cladding with wood panels:
- no leveling of surfaces made of bricks or building blocks is required;
- the possibility of hidden wiring of electrical networks in houses made of logs, timber or SIP panels.
In addition to the thickness, there is only one external difference between imitation timber and Shtil lining: a beveled, rather than rounded, edge along the long side of the front panel. Both imitation timber and “thick” modifications of the lining have longitudinal grooves on the inside, which are designed to relieve the internal tension of the wood.
Insulation from the inside
Insulation of the structure is an important component of finishing the inside of a bathhouse with your own hands. After all, the warmer it is inside, the lower the cost of heating the bathing area - the heat lasts longer.
Complex insulation involves technology from several types of materials, where each room has a separate technology. Next, we’ll look at the pros and cons of insulating a wooden bath.
When to insulate
In ancient times, the decoration of a Russian bathhouse did not require insulation work; even the floor was simply covered with wood. But today, finding a good log house is not an easy task, and the requirements for comfort have increased, which forces us to take additional measures. Thus, its longevity will depend on the quality of insulation and moisture resistance of the bathhouse.
Mineral wool has always been a favorite means of insulation in the finishing of a bathhouse made of timber - it is an ideal bathhouse heat insulator. Fire resistance, minimal heat conductivity and environmental safety have long made this material the leader of the domestic market, which is applicable in any construction.
Attention! When finishing a bathhouse from the inside with your own hands, insulation is required only if the timber is small - in other cases, ordinary waterproofing protection and caulk are sufficient. Also, you should not resort to a too thick layer of mineral wool - a log bathhouse retains heat much better than a brick bathhouse.
Another reliable insulation material is reed slabs - a lightweight, fire-resistant and inexpensive material that does not rot when treated with a light solution of iron sulfate and lasts a long time. A layer of 15 centimeters during the interior finishing of a log bath between the inner and outer layers of the cladding guarantees excellent thermal insulation.
Advantages and disadvantages
Like all finishing materials, timber lining has its advantages and disadvantages.
Let's look at the main advantages of such panels:
- Aesthetic appearance. The material will fit perfectly into almost any interior design of the room.
- Resistance to deformation. The panels are made from durable and mechanically resistant materials.
- High resistance to rotting. Larch timber boards can be used even in rooms with high humidity levels.
- Environmental friendliness. The panels are made only from good quality natural wood.
- Low cost compared to natural timber.
- Suitable for finishing walls and ceilings of almost any type.
- Easy to install.
- Long service life, which is about 25 years, if the panels are not treated with additional agents against microorganisms and mold. Treating boards with special compounds will only increase their service life.
- Provides sound and heat insulation. However, you should not use such panels as the main thermal insulation material.
Despite significant advantages, the material has a number of disadvantages. For the most part, the disadvantages are due to the characteristics of the type of wood that was used to make the lining.
The main disadvantages of panels for timber include the following:
- Some types of wood from which the lining is made are not fireproof materials. Such products must be treated with special compounds.
- The choice of material for exterior finishing must be approached with special care. The wood must be resistant to precipitation and not fade from exposure to direct sunlight.
- Not all wood from which linings are made is characterized by good resistance to rotting and fungal formations. For this reason, it is recommended to treat the material annually with special compounds containing an antiseptic.
How to calculate the amount of material
Based on the width of the timber board, you can determine the actual amount of material required to finish the inside of the room.
It is necessary to determine the total surface area for cladding: calculate the area of each wall (minus openings), ceiling and floor. The area of each surface is divided by the area of one board.
This is how the quantity for each plane is calculated. All obtained indicators are added up. This way you can understand how many boards are required to cover the entire room. This method involves calculating the material for a monolithic coating.
If it is planned to use combined cladding, then a calculation is made of each plane that will need to be decorated with a board under the timber, and the amount of material is calculated in a similar way: each area is divided by the area of the board, the indicators for all planes are added up.
NOTE! The number of elements needed for cladding should be purchased with some reserve, taking into account defective or damaged boards.
In addition to the boards, it is advisable to calculate the number of necessary elements for decorating corners, cornices, moldings, etc. It is recommended to select materials in one batch at once so that the color of the boards does not differ.
Installation of false beams
Work on cladding with imitation timber is carried out according to the following algorithm:
- Surface preparation. At this stage, the surface is cleaned of dirt and dust and, if necessary, leveled with a primer.
- Fastening the vapor barrier film. On wooden surfaces, you can use a stapler; when facing walls made of blocks or bricks, the film is secured with lathing elements.
- Installation of load-bearing sheathing. For the sheathing you will need a beam with a cross section of 25*25 mm or a stainless metal profile.
- Laying electrical wires, designing pipeline outlets and sewer pipes.
- Laying insulation.
- Fastening the second layer of vapor barrier film with counter lathing.
- Fastening imitation timber.
- Surface treatment with protective agents, painting and/or varnishing.
External cladding of a house with imitation timberSource dysecal.bapelonu.ru.net
Decorative design of the pediment
What is the best way to cover the gable of a bathhouse? The answer to this question depends on what material was used to manufacture it and decorate the facade of the building.
The pediment cladding is made with the following materials:
The finishing material is attached to the pediment on a prepared surface, on a wooden sheathing or aluminum posts.
To decide what material to cover the facade of a bathhouse with, it is important to take into account not only your financial and technical capabilities, but also the design features of the structure. At the same time, all the work on installing the cladding can be done independently, the main thing is to follow the basic rules and recommendations.
bathhouse in Krasnoye Selo for young pioneers
Source
Finishing a timber bathhouse outside
A timber bathhouse is a lightweight, pre-fabricated structure that, if properly finished, can serve you for many years without the cost of repairs.
In order to increase the durability of any wooden building, it is necessary to protect the wood from the effects of adverse environmental factors - ultraviolet radiation, freezing, moisture, as well as the destructive effects of microorganisms leading to rotting.
When can I start finishing the exterior of a timber bath?
As has already been written in articles about installing windows in a log house and installing doors, during the first time after construction, the log house is subject to deformations resulting from shrinkage.
How to decorate the walls and façade of a timber bathhouse?
Most often, the finishing of walls and facades made of timber involves mechanical processing (grinding), after which, to give the bathhouse a beautiful appearance, the surfaces of the walls are coated with special compounds that resist the proliferation of microorganisms inside the wood, protecting wooden walls made of logs or timber from fire, and also emphasizing the texture wood fibers.
One of the publications has already described in detail the process of sanding a log house. If you haven’t read it yet, we recommend that you read it to find out how to choose the right tool for sanding walls, how to sand a log house, and how to treat the wood after sanding in order to give it a beautiful appearance. , highlighting the texture and protecting against rotting.
Along with sanding, after shrinkage is completed, it is recommended to re-caulk the log house to seal any leaks that have appeared between the rows of logs or beams.
With this you can finish the exterior finishing of the timber walls. Well-polished wood and treated with special compounds can maintain a beautiful appearance for many years.
The most budget-friendly option could be finishing with vinyl siding, which protects well from snow, rain and solar radiation, and also gives a bathhouse made of timber a beautiful modern appearance.
Installation of beacons - how to do it in log and lumber
The finishing of a wooden bathhouse begins with lining and tiles - this is the most suitable option for beautiful room cladding. Installation begins with wall sheathing, which consists of wooden or metal slats, called beacons, and self-tapping screws. The frame makes all subsequent work easier, allowing you to lay beautiful tiles on the floor and cover the walls with neat clapboard.
When lining the bathhouse, during lathing, a level and a pencil will be indispensable. Decide on the direction of the lining and its location - horizontal or vertical. When the work plan has been outlined, you need to draw the walls and begin installing the beacons.
General concepts
When finishing a bathhouse with wood, special limiting strips are used to cover the lining - installation takes a lot of time, but subsequent work goes quickly, and the end result is pleasing. Most often, beacons made of aluminum or wood are installed on walls - beacon slats. When lining a bathhouse from the inside, this design has a number of advantages:
- Can be mounted on walls without any problems;
- Fastened with self-tapping screws, nails, dowels;
- Can be purchased at any building materials store;
- Immediately after completion of installation, you can proceed to the final stage of cladding the walls of the bathhouse;
- During the installation process, you first need to mark the markings with a level and a pencil, and then simply screw on the frame of the beacons.
Wooden baths insulated from the outside
The most popular were and remain bathhouses built of wood. The walls of a wooden bathhouse have the ability to “breathe” and therefore perfectly regulate the air humidity in the room. To ensure that the wood from which the bathhouse is built retains its valuable properties, insulation is made using natural materials - flax wool, jute and flax felt, red moss or a mixture of the above materials.
Insulating the walls of a bathhouse from the outside does not require special professional skills. With the help of inter-crown insulation, cracks and gaps are caulked. The most convenient insulation materials are made from flax - they are soft and elastic, thanks to which they lie in an even layer. Insulation with jute will take a little longer - it is hard and brittle.
An important point is that the baths are insulated during the construction process, and not after its completion. The insulation is placed between the logs, which makes the structure not only warmer, but also much more durable and strong. After the roof of the bathhouse has been installed, the resulting gaps and grooves are re-insulated.
We recommend you read additionally: Insulating a brick bath.
Vapor barrier, insulation and vapor barrier
Foil and glassine will help you install a vapor barrier for the bathhouse, and jute, stone wool or foamed propylene with foil will greatly insulate the structure, which will allow you to use the bathhouse all year round.
A vapor barrier is necessary if there is no air circulation in the room, which is rare in log structures—lining is often sufficient.
Why you should choose imitation timber for finishing the inside of a country house
The main advantage of interior decoration of a house using imitation timber is the environmental friendliness and naturalness of the material. A favorable microclimate is created in the room. Often this material is used to decorate walls made of blocks or bricks. It also has the following advantages:
- strength, durability (with proper installation and processing, the finish will last more than 20 years);
- hypoallergenic;
- minimum consumption of panels with correct calculation;
- thermal and noise insulation;
- ease of installation;
- resistance to external negative influences;
- low thermal conductivity;
- variety of shades.
The interior decoration of a house made of this material is characterized by a fire hazard, like other wooden products. Before installing the imitation in wet rooms, it must be treated with antiseptics and protective compounds.
Features of the external design of the bathhouse
Combined finishing - corrugated board and wooden lining
To make the boards and lining look more solid, they are tinted with stain and varnished. They use compositions based on ethylene glycol and cover the surface in several layers, depending on the desired effect. Not all species require refining, for example, larch, birch, pear, and apple trees have a beautiful pattern; their cut is only coated with three layers of varnish.
Exterior decoration includes:
For these works, materials similar to the main covering layer are used, or combinations of compatible types are used. For wooden walls, carved elements are used, which are placed around windows, doors, and on the ridge of the roof. The pediment in front of the cladding is also insulated from moisture and heat loss.
The base is often made of a material that creates visual solidity as a pedestal. For example, they use siding and corrugated sheets with a pattern of natural stone, while the walls at the top are finished with material imitation wood, and a block house and lining are installed.
Lining the log house with wood inside
The interior decoration of a timber bathhouse is divided into three stages.
- The interior decoration of the bathhouse consists of lining the walls, ceiling and floor. Before starting this work, it is necessary to carry out electrical wiring. It is prohibited to use linoleum and paint coatings. Before covering, perform heat treatment;
- Are you finished decorating the inside of the bathhouse with your own hands? It's time to install the boiler and hot tub or pool. If you prefer a Turkish bath, install a heat generator, aromatherapy and ventilation;
- All that remains is to create a cozy interior in the room and install suitable furniture - beds, cabinets, shelves and tables.
If you are decorating the inside of a bathhouse with your own hands, follow the following sequence:
- Installation of insulating materials;
- Carrying out vapor barrier;
- Installation of an air gap;
- Covering the room with clapboard.
Differences in premises (rest room, washing room, steam room)
A national Russian bathhouse must have: a locker room (rest room), a steam room and a washing room. Of course, a kitchen, a swimming pool and a billiard room would not hurt, but these rooms are secondary. Each component of the bathhouse has its own unshakable rules: the floors in the washing room must not be slippery, the steam room must have microcirculation of air, and the relaxation room must absorb excess steam and water.
Steam room
Where to start finishing the inside of a bathhouse is from the steam room.
Lining is a good choice of materials - it will visually make the walls smoother, and the cladding method will give the room good air circulation, which will eliminate the appearance of condensation.
Installation will not be a problem. Not least important is the quality of the wood - only well-dried and sanded material is suitable for a bathhouse.
In a room where temperatures can reach 120 degrees Celsius, damp wood is not helpful.
Attention! Avoid stain, paint, varnish and other similar materials for finishing the inside of the bathhouse - at high temperatures, the coating will emit toxic substances, which will harm your health.
Washing
Here it is customary to take a break from the high temperatures by taking massages and body care products. That is, the most comfortable conditions are required. Therefore, the best material for the interior lining of a bathhouse will be ceramic tiles or coniferous wood, saturated with water-repellent resin, which will prevent the material from rotting. It is good to fill the floor of the washing room with concrete, and lay tiles or wooden beams on top.
Restroom
In the relaxation room, the body cools down, eats food and recovers from bath procedures. However, high air humidity does not go away, which needs to be leveled out. The interior decoration of a bathhouse made of timber made from deciduous and coniferous wood will help here. Natural stone, porcelain stoneware, majolica and decorative plaster will make the room beautiful and moisture-resistant.