A bathhouse is the best place to relax with friends, especially if it is located on your property. Of course, it’s interesting to build it yourself, without involving builders.
The most problems arise with finishing a steam room in a bathhouse with your own hands, but in this article you will find all the instructions for successful planning.
You can see photos of new items and videos, read about the interior design of houses and apartments, see options for the ideal combination and learn about recommendations from professionals on the information portal “Interior Design”
Selection of finishing material
A wooden finish for a steam room in a bathhouse is desirable, because wood does not heat up like stone or concrete. It is also better to forget any other substitutes (plastic, ceramics) - they are not intended for such conditions.
Please note that we are talking specifically about interior decoration. A DIY steam room can be made of brick, aerated concrete or reinforced concrete.
It is also worth remembering that the steam room in the bathhouse is not suitable for every breed. It makes sense to use:
- Lipa. The material is cheap, durable and easy to process (planing, grinding). It is susceptible to rotting, so generous treatment with an antiseptic is required.
- Larch. It does not rot, is a durable and ageless species, which is perfect for a bathhouse. The downside is that it is very dense and difficult to process. However, a good power tool solves the problem.
- Cedar. Solid, durable (more than 30 years) and beautiful breed. It almost does not heat up, does not rot or crack, which is what a steam room requires. The downside is that it is very expensive, even the Siberian variety is not affordable for everyone.
Birch, pine, spruce, etc. It's better not to use it. A steam room in a bathhouse is a place with high humidity and temperature. Birch will quickly begin to rot, and conifers will release a lot of resins.
What won't work
No matter how high-quality and correct from the point of view of work technology your finishing is, the following materials are completely unsuitable for steam rooms and bath rooms:
- Linoleum covering;
- Plastics;
- Pine boards;
- Wood slabs.
The listed types of materials are characterized by insufficient resistance to high temperatures, and plastic and linoleum will even emit harmful substances. Pine is characterized by increased release of resins.
Installation and thermal insulation of the steam room
Before planning a bathhouse, think about thermal insulation. Firstly, it will take away a few centimeters from each wall.
If you have a 2x2 steam room, this is an impressive reduction in space.
Secondly, the material must be suitable for baths.
If the size of the steam room in the bath allows, it is better to take technical insulation with a foil layer.
It is also a heat and vapor barrier.
Ceiling
First you need to cover the ceiling with a layer of waterproofing.
Since the steam is hot, condensation can form behind the vapor barrier layer - an excellent place for mold and bacteria.
Any waterproof mastic will do.
Then logs (wooden blocks) are attached to the ceiling. They are installed with a gap the width of the insulation.
Mineral wool is placed between the bars and fixed with plastic dowel-nails (popularly called “mushroom”). You can do without logs and simply attach the insulation to the ceiling. In this case, cover all joints with aluminum tape.
Stan
Similarly: waterproofing, and then foil insulation.
You can fix it using the same dowel nails or, if the walls are wooden, using a furniture stapler.
Floor
If the floors are originally wooden, then the step-by-step process looks like this:
- First, the logs are laid. Thermal insulation is placed on the base of the floor. Ordinary expanded clay or even sand will do. It fills the space between the joists in the level.
- Then comes the “first floor”, which is covered with full foil insulation and waterproofing.
- Then the finishing coat is applied.
Please note that this reduces the height of the steam room significantly – by 5-7 centimeters.
For a concrete floor, the step-by-step process looks like this:
- Waterproofing is laid directly on the concrete base. Any bitumen mastic will do.
- Then logs are installed into which the insulation and vapor barrier are laid.
After this, the finishing floor is laid.
Wall insulation
Step-by-step instruction:
- We attach the foil to the walls using a 40 mm horizontal beam;
- We place a sealant between them (penotherm is suitable);
- We stretch a layer of foil over everything we have. A construction stapler is suitable for fixing it;
- Using aluminum tape, we isolate the existing joints;
- Then we attach the blocks vertically;
- We begin facing work.
We talked earlier about how to carry out decorative finishing and what materials are suitable for this.
Treating wood with antiseptics
Before laying, all (!) wooden surfaces must be treated with an antiseptic and fire retardant.
Rot and parasites can be found both in the casing and in the benches.
Any antiseptic will do, the main thing is that it is well absorbed by the wood. For example, Ecosept 200, specially designed for baths and saunas. It can even stop the processes of rotting and decomposition that have begun.
As fire retardants, also take any composition you like.
Please note that liquid glass will not work! After drying, it becomes a hard, airtight crust, destroying all the properties of the tree.
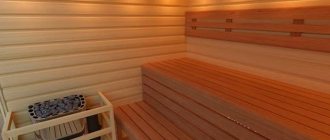
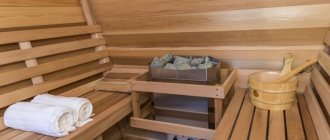
The interior should please
The most optimal wood species for each room are described above.
It is impossible to imagine the vaping process without a wonderful woody aroma.
Of course, it is very difficult to get by with wood alone in finishing a bathhouse. For example, it is better to use ceramic tiles for floors, especially in the washing area. In order to make such a surface safer, a wooden grate should be installed on top of it.
If you still want to completely decorate the washroom as wood, we recommend treating the boards with a special varnish, the effect of which will be no worse than that of tiles.
To give the room an unusual touch, you can make unusual wooden lamps yourself.
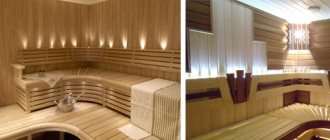
DIY steam room design in a bathhouse
Ceiling finishing
After insulation, rafters are mounted on the ceiling to secure the cladding. If the size of the steam room is modest, you can use a regular 5x5 beam.
If logs were previously installed for installing insulation, then you can attach the lining directly to them.
The lining has special locks at the ends (tongue-and-groove technology). When the first planks are fixed to the ceiling with self-tapping screws, the subsequent ones are simply placed on the ridge and also secured with screws.
Wall decoration
The fastening is similar to the ceiling. Logs are installed on which the lining is fixed with self-tapping screws. But here you need to be careful, since here the planks will expand from moisture, and using varnish or oil in such conditions is pointless.
Always leave a small gap. With longitudinal expansion, the board will not rest against the ceiling and will not be deformed.
Floor
The design of the steam room in the bath includes the following types of flooring:
- Wood. It can be leaky (there is a gap of up to 3 centimeters between the boards) and non-leaky (the boards lie close together). Effectively removes water, does not heat up and is compatible with walls.
- Ceramic. Tiles are more often used in public saunas. It is not afraid of water, does not crack and lasts a long time. For this, it is necessary to prepare a concrete screed in advance, and insulation of the floor, in this case, is not required.
How to choose glue?
When working with tiles, you should use a high-quality cement-based adhesive. It not only holds the tile well, but also allows you to attach it even to an uneven surface, since its leveling occurs directly during installation, and this is very convenient and even allows you to control the level of inclination.
Craftsmen often prepare the adhesive composition themselves. It's not difficult if you know all the proportions. Most often, 4 parts sifted sand is used for 1 part cement. Sometimes the amount of the latter can be increased to 6 parts, but this depends on the type of tile laying. Most often, craftsmen lay facing tiles seam by seam, diagonally or in a running pattern.
Efficient ventilation
There is enough natural ventilation in a Russian bath. That is, periodically just open the door and the window on the opposite side - that’s enough.
In the sauna the situation is different. This requires full ventilation, which will work without your intervention.
There is nothing complicated about it: look at this picture. A tube is installed at the bottom for air inlet near the stove. On the opposite side, 2 more pipes for blowing are mounted near the ceiling. The size of the sauna does not matter; even in a small room there will be good circulation.
Nuances when working with the floor
When tiles are laid on the floor of a washing room or shower, the first thing to do is to observe the slope. This is very important, otherwise the water will stagnate in the room and will not leave on its own through the drain.
It is advisable to make markings using a strip or lacing before starting work. This will help you see the required slope more clearly visually.
To maintain the seams, which are a prerequisite for floor tiles, it is necessary to use special crosses 3 mm thick. If you ignore this rule, then over time, due to strong temperature changes and high humidity, the tiles will simply crack and begin to peel off.
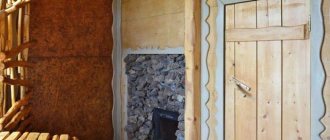
Furnace installation
A brick and stone oven is laid immediately after the foundation has solidified.
If it is iron, then the step-by-step installation instructions look like this:
- A steel sheet is laid on the floor, wider than the stove itself by 20 centimeters on each edge.
- It is covered with bricks on top.
- A hole is made in the ceiling for the chimney pipe.
- The chimney pipe is laid. Thermal insulation is required on top of it.
Ceiling insulation
Insulating the ceiling in a steam room usually requires much more materials than insulating walls or ceilings. This is explained by the fact that steam, by its nature, rises very quickly to the ceiling and, in order to avoid its cooling, sufficient attention should be paid to the thermal insulation of the ceiling. The step-by-step instructions are as follows:
- We cover the ceiling of our steam room with special overlapping roll paper;
Insulation of the ceiling of a steam room - We fasten it with a wooden beam, between which the insulation will be fixed;
- Using foil and adhesive tape with the addition of aluminum, we process all parts of the ceiling so as to remove excess gaps;
- We fix thin blocks on top of the foil layer to create air exchange;
- Finally, we carry out decorative work.
Design options for steam rooms in a bathhouse, photo gallery
You can see beautiful photos of the steam room for inspiration and ideas below.
The main reasons for using protective refractories
Installation of refractories is not always necessary. It is done if a safe interval according to fire standards is not ensured. Before purchasing refractory material, check to see if the stove is at a sufficient distance.
Sufficiency is determined by the material used to make the stove:
- for an unlined metal stove there must be a space of 1 m to flammable objects;
- for metal lined – from 70 cm;
- for brick - from 32 cm.
Expert opinion
Igor Lebedev
Ask a Question
In spacious rooms it is easy to follow safe markings, but in small rooms it is not. For this reason, fire-resistant screens, slabs, and rolls are used.
According to the method of heat transfer, heat-reflecting types are distinguished (direct infrared rays into the middle of the room) and heat-absorbing types (due to chemical and physical characteristics).
There is a separation from the raw materials used in production. Highlight:
- Inorganic - basalt, fiberglass, rock wool, honeycomb plastics, polypropylene, concrete-cellular tiles, vermiculite treated with special impregnation, foamed perlite.
- Organic - have low heat resistance and are used for low temperatures. These include expanded polystyrene.
- Mixed - include organic and inorganic compounds. These include silica, asbestos-cement, asbestos-lime types.
What are you planning to cover with fireproof material?
fireplace stove
When required
There are times when there is no need to protect walls. If the stove is located at a safe distance from the wall from a fire safety point of view, the installation of protective screens and other measures can be neglected. The distance from the walls that is required to reduce the heat from the source varies:
- A stove laid in a quarter of a brick should be located no closer than 35-40 cm from the wall;
- A metal stove without lining should be placed a meter away and no closer;
- A metal one with a lined furnace can be installed 70-75cm from the wall.
However, not every steam room has the opportunity to fulfill these requirements, due to the small area. The layout of steam rooms with an area of 6-8 m² can hardly accommodate the necessary set of items for the steaming procedure. Therefore, the need to insulate walls with special sheathing is relevant.
Basalt cardboard characteristics
The main difference of this material is its high thermal insulation and sound insulation. It is non-flammable, fire-resistant and fireproof. At the same time, basalt cardboard has extremely low hygroscopicity, in other words, it is not able to absorb moisture from the air. The temperature of use of this material is +500 degrees, while for a short period it can withstand up to +700 degrees. Another reason why cardboard should be used in a bathhouse is that it has excellent vapor permeability. It has increased resistance to microorganisms and rodents, does not crumble, does not rot, and is resistant to vibrations and thermal-oxidative aging. The approximate service life of this material is 50 years.
At the same time, basalt cardboard is very easy to cut; this can be done even with a simple knife. The sheets bend well and can take any shape, which allows for excellent thermal insulation of the bath room. Parts made of such material can be fixed using special glue
When cutting, it is necessary to take into account the shrinkage of the cardboard, which can occur from exposure to elevated temperatures. In case of high humidity, the sheet may bend, but after drying it will return to its previous shape. In total, it can withstand more than two thousand cooling and heating cycles
In total, it can withstand more than two thousand cooling and heating cycles.
Cleaning loose tiles
If there is a supply of facing material, then use it, or buy the same ceramics; if not, the fallen off finishing is cleaned of the solution. To do this effectively, in a ceramic-friendly way, use an angle grinder with a dry cutting disc. The tiles are soaked in water for half an hour to soften the glue and reduce the amount of dust. Then the ceramics are laid face down on a flat wooden surface, pressed with a clamp through a rubber pad and the old mortar is cut off or ground off at an acute angle to the surface. The edges of the tiles are cleaned of grout with sandpaper.
Laying restored tiles
Laying ceramics is done from the bottom up, maintaining a given gap between the tiles by inserting fixing crosses. A layer of tile adhesive is applied to the back surface of the product, slightly thicker than under the border tiles. The sheet is applied to the surface at the installation site and pressed to the level of the old cladding. Excess adhesive squeezed out from under the tiles is immediately removed. To properly glue the last tile, a layer of glue is placed on its back surface more accurately, since it is difficult to squeeze out excess through narrow joints with adjacent products.
The tile may fall off the wall or floor along with the glue and from the glue
After 1-2 hours, when the glue has set, the tile joints are cleared of mortar to perform grouting, which can be done the very next day.
If the wall or floor cladding was repaired in the kitchen, bathroom or toilet, then the tile adhesive and grout mixture should be selected from the “moisture resistant” group, which also contains antifungal additives.
To ensure that the repaired section of the wall or floor does not stand out from the general background, you can partially remove the old grout from the seams on the old cladding and rub the joints with fresh grout used for repairs.
We ensure the strength of the future coating
Since it is unlikely to be possible to glue tiles onto tiles in the bathroom over an old glossy coating, it should be pre-treated. How? There are three ways to solve the problem.
It is necessary to remove the gloss from the old tiles. It's long, hard, and there's a lot of dirt left behind. Then you need to make notches on it (the same disadvantages) or treat it with a special compound. The third method involves purchasing a primer, which is quite expensive. But since even the most frugal owner will not be able to glue tiles onto tiles in the bathroom without any financial outlay, it is wiser to stick with this option. But the process will not take either time or effort. This miracle remedy is called “Concrete Contact”. The primer will make the old tiles rough and provide excellent adhesive properties to the base. The composition is applied with a brush or roller. The main thing is to maintain the exposure time, that is, let the primer set well and dry. Which will take about six hours, no more.
Preparation of mortar for masonry
You can purchase a ready-made solution in a store or use a sand-clay mixture. To determine the best ratio of sand and clay, make a small batch from which a cylinder or bar is formed
Pay attention to the possible appearance of cracks, the absence of which is an indicator of quality.
Preparing masonry mortar for a stove in a bathhouse
It is preferable to use clay used for masonry from deep layers, without earthen and mechanical impurities.
To give the clay the required consistency and plasticity, it is kept in water for several days, after which it is ground through a sieve to remove debris. A 1:1 proportion of clay and sand is considered good; liquid is added to it in small portions. A high-quality mixture does not stick to the trowel and does not drip from it. When running a trowel over the solution, the mark left behind should not blur or have a torn structure. To improve the quality of the masonry, add rock salt at the rate of 0.1 kg per bucket of finished mortar. It is also good to add cement and fireclay powder.
Fire resistant structures
A special heat-resistant cladding is used as protection for the walls. To do this, the fire-resistant cladding is covered with heat-resistant tiles. Non-flammable glue is used for its installation. The following facing materials have good fire-resistant qualities:
- terracotta tiles;
- tiles;
- porcelain stoneware;
- soapstone and so on.
In addition, fire-resistant plasterboard, mineralite, glass-magnesium sheet and other fire-resistant boards for a bathhouse can be used as fire-resistant protection for walls. It must be taken into account that for each type it is necessary to provide ventilation in the form of a gap at the bottom. Practice shows that the use of cladding as heat-resistant protection for walls in a bathhouse has almost the same thermal characteristics as reflective cladding. The only drawback is the cost, which is several times higher than standard options.
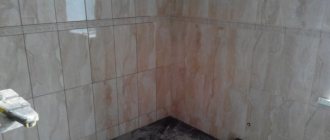
Decoration of the washing room
The finishing requirements for the washing room are less stringent than for the design of a steam room. But although this room does not have such high temperatures, the humidity is always very high. Thus, finishing materials are selected taking into account humidity. Experienced craftsmen recommend giving preference to natural, environmentally friendly, breathable materials. Wood has these properties. But other materials are also often used, for example:
- stone;
- tile;
- plastic.
Plastic materials should be treated with extreme caution. They should only be of the highest quality, preferably certified. Because in sauna conditions, heated plastic can emit odor or even release toxins.