Do-it-yourself interior decoration of the dressing room + instructions
The bathhouse is a place for restoring health and relaxation. For this reason, decorating the inside of the dressing room with stone or block house is becoming increasingly popular. This is due, first of all, to the safety and environmental friendliness of the material for human health.
Bath finishing technology has its own characteristics, and in order to carry out high-quality installations, you need to familiarize yourself with them in detail.
Erection of the roof for the dressing room
- We install the mauerlat and floor beams on the supporting boards of the frame.
- We install the outer rafter elements. At the base of the bathhouse we attach the truss to the pediment.
- We stretch the cord between the outer structures and fix the intermediate rafters in increments of 0.4-0.6 meters.
- We fix the vapor barrier membrane from the ridge to the mauerlat with an overlap of 15-20 cm. We glue the joints with sealing tape.
- We make transverse lathing from beams with a cross-section of 5 cm2.
- We lay the insulation tightly between the sheathing bars.
- We fix the waterproofing film on top with a construction stapler. Carefully glue the joints.
- We stuff the slats 2-3 cm thick to provide a ventilation gap.
- We lay the roofing material from top to bottom.
Please note that for a more aesthetic appearance, the dressing room must be covered with the same material as the entire bathhouse.
Thermal insulation of bath ceiling
Before making a ceiling in a bathhouse, select insulation for it. The following heat insulators can be used:
- Jute insulation is considered the best option for ceiling insulation. Does not rot, is not affected by high temperatures, maintains a healthy atmosphere in the building. This is a natural material without synthetic additives. To insulate the ceiling, jute insulation 6 mm thick is used, the material density is 600 g/m. The fiber length of high-quality insulation is 2-3 cm.
- Mineral wool slabs and mats are also used as insulation. This is a lightweight, durable material, considered a classic option for thermal insulation.
- Expanded clay is an inexpensive material, but it must be poured at least 30 cm thick, so the ceiling is reinforced with powerful beams. For expanded clay insulation, it is necessary to make a rough ceiling from boards, onto which the insulator is poured.
- Glass wool, tow, felt, and moss are also suitable. These materials allow air to circulate freely and are well compacted.
To insulate the ceiling in the dressing room and rest room, you can use heat insulators made from plastic - polystyrene foam, perlite, honeycomb. These materials are not used in the steam room or washing room.
Disadvantages of natural insulation:
- May be affected by moths.
- They dry out quickly.
- Installation takes a long time.
- For installation, use only dry samples, otherwise they will rot.
- Natural ingredients are often impregnated with chemicals that are harmful to humans.
Do not cover the top of the insulation in the washing room with anything, otherwise it will not dry.
The design of the ceiling in a bathhouse made of reinforced concrete slabs has its own characteristics. If the walls of the bathhouse are made of brick and the ceiling is made of concrete slabs, insulation of the ceiling is carried out as follows:
- Fix 10-15 cm thick mineral wool from below to the slab in any way.
- Cover the cotton wool with aluminum foil.
- Along the perimeter of the wall, under the ceiling, secure 10x10 cm beams, which will serve as support for the sheathing.
- Place lining lathing on the beams in increments of 50 cm.
- Cover the ceiling with clapboard.
- From the roof side, lay a layer of insulation 10-15 cm thick on the ceiling. Lay planks on top of the insulation, then the attic can be used to store bath utensils.
- It is not necessary to waterproof the attic floor; waterproof material under the roof is sufficient.
- If the steam room and washing room are separated by solid walls, instead of foil, you can use another, cheaper vapor barrier material.
Exterior finishing
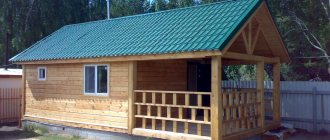
In many cases, the outside of a bathhouse-type building should also be improved. Especially if you used, for example, dull aerated concrete blocks to save money. (See also the article Peculiarities of finishing of aerated concrete.) You still have a chance to give the bathhouse the appearance of a real log house. To do this, the dressing room is finished with a blockhouse, which perfectly imitates rounded logs.
Sample of blockhouse panels
The work is carried out as follows:
- We install a sheathing made of wooden beams 40 mm thick. Since our goal is to imitate a log house, we mount the planks vertically.
Scheme of lathing and subsequent installation of a blockhouse
- We check the evenness of the frame with a building level and level it if necessary.
- We lay insulation between the slats.
- We staple a layer of plastic film on top of the insulating material to create waterproofing.
- We fasten the first panel at the bottom using clamps.
- We insert the next one with a tongue into the groove of the previous one and also fix it to the sheathing.
- In the areas of door or window openings, we trim using an electric jigsaw.
Photo of the cut panel
- So we fill the entire wall.
Outwardly indistinguishable from a real full-fledged log house
Measurements to find and eliminate irregularities
First, the ceiling in a Russian steam bath is measured diagonally to determine the perpendicularity of the walls. To identify problem areas, you should use a square and measure the distance between pairs of opposite walls. If the length of the walls differs by a couple of centimeters, you can move the lining strips by a few millimeters.
We suggest you familiarize yourself with How to brew a eucalyptus broom for a bath
Even a millimeter offset results in an alignment of 1 centimeter after 10 rows. With this method of eliminating inaccuracies in the location of opposite walls of the room, it is important not to overdo it, so that the offset does not begin to form on the opposite side.
Requirements
Before building a dressing room, you need to study the requirements that the room must meet:
- There should be enough space in the room. One person needs 1.5 meters of free space.
- If the bathhouse will be used in winter, the rest room should be heated to make it comfortable to be inside.
- A high-quality ventilation system must be installed inside - natural or forced.
- The room should have furniture installed for a comfortable stay.
- The light in the recreation area should not be too dim or bright.
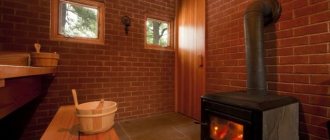
Often the furnace channel with the firebox is discharged into the dressing room. In this case, the area around the firebox door must be fenced off. This space should not be subtracted from the free space.
How to wash in a bath - procedure
Let's figure out how people usually behave in a Russian bathhouse. What procedures are taken here, in what order does all this happen.
This ritual looks something like this:
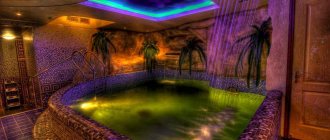
If you have a bathhouse, finishing the washing room is a relevant topic for you, because this room has its own special purpose. Here you can quickly cool your body in the shower, or simply douse yourself with a bucket of cold water after the steam room. Many people, taking into account these features, even organize a small swimming pool here. And here you can read about the decoration of the steam room; Such buildings are usually made exclusively for oneself - that is, it is quite possible to cope even on one’s own.
Only then do they take into account everyone else - who may also visit your bathhouse at your invitation. By the way, you can ask these people for help when finishing
It is not so difficult for several adults to build a pool, and the pleasure when a person lies in cool water after a steam room is incomparable to anything else; It is customary to look into the relaxation room in the intervals between the pool and steam room. Here you can talk about something with your guests, chat, sit on a sofa or bench.
Other materials for bath lining
Most often, owners use clapboard to cover the walls of a bathhouse, although there are other options besides it. It can be:
- planks;
- boards;
- planks;
- synthetic materials.
Sometimes, when for some reason the owner does not want or does not want to use the most popular materials, he can sheathe the internal walls of the bathhouse with foil
But if it is important for you that such an important stage as covering the internal walls is carried out according to all the rules, then you should follow the recommendations of professionals
In fact, foil has been used for lining bathhouses for decades. Owners who are supporters of this material say that they chose foil for a reason, because with its help you can reduce heat loss, and this is a serious cost savings. If you decide to simply cover the room with foil before installing the lining or other material, you will not achieve the desired effect. Therefore, even if there is a layer of foil on the walls, you will not achieve a heat-saving effect.
Also, owners who choose foil for lining a bathhouse explain their choice by the material’s ability to perfectly insulate steam. It’s impossible to argue with this, but there is a serious drawback of foil here - it blocks access to air molecules. This situation becomes dangerous for people in the steam room, who may suffocate. As a result, they deprive themselves of the opportunity to fully enjoy bath procedures.
As an additional reason that explains why you should not use foil to decorate the interior walls of a bathhouse, it is worth mentioning the presence of harmful substances in the composition:
- formaldehyde;
- phenol;
- benzene, etc.
If you wish, you can abandon foil and use synthetic substitutes that are so perfect that their properties can compete on equal terms with wood.
The best wood for finishing a bath
How to decorate the walls in the bathhouse in order to maintain aesthetics and not degrade the quality of steam? Natural wood, which has an aesthetic appearance, low thermal conductivity, pleasant texture and wonderful aroma, is the most popular finishing material. But it is worth remembering that not every type of wood is suitable.
room background for photoshop selfie
You need to be especially careful when choosing wood for finishing a bath in a steam room, where the humidity and air temperature are constantly high.
Due to changes in temperature and humidity in the relaxation room, steam room and dressing room, a certain finishing material is suitable for each of the rooms.
What kind of wood to use for a bathhouse and what should you give preference to - deciduous or coniferous wood?
The best wood for the “heart” of a bathhouse - a steam room - is hardwood without resin and knots (they fall out of the board when heated), so high-class lining is purchased for lining the steam room. But pre-treated Canadian cedar is also suitable for a steam room. The most commonly used are linden, alder, aspen and exotic wood - abash.
Linden has an aesthetic appearance. It does not darken over time, has low heat capacity and density. The wood heats up quickly, but does not burn the body when touched.
Aspen was traditionally used by the inhabitants of Siberia. This durable wood is difficult to split or splinter, making it suitable for long-term use. In addition, aspen has bactericidal properties.
Alder has water-repellent properties. It is beautiful and pleasant to the touch, and emits a light, unobtrusive aroma.
Abash is excellent for making shelves because it does not heat up excessively even in extreme heat, and when it comes into contact with the human body it takes on its temperature. In short, it provides absolute comfort.
Which tree to choose?
The steam room is a fairly humid room. It is necessary to select a moisture-resistant, strong, durable material with low thermal conductivity. The choice must be conscious and useful.
The variety of trees is responsible for the aesthetic appearance of the room. After all, each board has a different color and shade. For example, oak is darker, linden is light. The interior of the sauna depends on this.
The right type will create a relaxing atmosphere when vaping and fill the room with a pleasant aroma. There are several options for cladding products:
- Alder;
- Linden;
- Oak;
- Aspen;
- Pine;
- Cedar.
Each tree has different characteristics. We write the advantages and disadvantages below.
Tips and tricks
It is correct to start creating a bathhouse finishing project when it has already been erected and all the premises have been allocated. Since it is more convenient when choosing materials to rely on known data on the area of the bathhouse premises.
For a specific room, you can create several options, thus giving you a choice. Determine the best option, and only then start calculating the footage of the necessary finishing bases. Do not forget that in addition to finishing basics, hydro-, steam- and thermal insulation will be required. Decide on lighting fixtures. They should be safe for the bath, but bright enough.
Follow the sequence of finishing activities:
- Installation of electrical wiring. The wires are passed through hydro- and vapor barrier.
- Determining the location for the oven. Its finishing is carried out taking into account fireproof technologies.
- Installing the sheathing on the walls and ceiling, secure the first layer of vapor barrier.
- Install insulation. Choosing materials that are least responsive to elevated temperatures and humidity.
- Place a second layer of vapor barrier on top of the insulation.
- Secure foil film or other reflective material.
- Arrange the base and walls for the stove.
- Lay out the floor.
- Install the frame and door.
When installing electricity, take into account the even distribution of devices throughout all rooms of the bathhouse. Lighting should be sealed, preferably with lamp protection from moisture. Wooden shades-screens can serve as protection. They will maintain the overall natural style and dim the bright light of the lamps.
Purpose of the dressing room
A person enters this room by opening the entrance door to the bathhouse. Despite its small size, this room traditionally performs several functions:
- first of all, this is a locker room where a person prepares for the bath procedure and can carefully hang his things;
- here the steamed visitor takes a breath between visits to the steam room;
- it can be combined with a relaxation room and used as it after all procedures are completed;
- The firebox door usually opens into the dressing room, which means it contains the firebox loading area and a place to store a portion of firewood to maintain combustion throughout the entire procedure.
In essence, the dressing room is the space between the open air and the steam room. On the one hand, cold streams rush here through the doorway, and on the other, hot steam from the steam room is periodically carried out. The following influencing factors are identified: a significant temperature difference, moisture in the form of steam condensation and carried on a wet body, as well as possible emissions from the furnace firebox. Taking into account the purpose of the dressing room, the following basic requirements are imposed on it.
- The temperature must be optimal. A person should not feel cold when undressing, and should not strive to rush outside quickly after getting dressed.
- The air in the room should allow you to relax comfortably, i.e. it is necessary to provide fresh air flow.
- Drafts and penetration of cold air into the undressing area are not allowed.
- The area of the premises must be sufficient for the installation of the necessary furniture and equipment, as well as for the movement of people. The firebox should not cause inconvenience or compromise safety.
Advantages of a separate washing room
According to the standards, the washing room should be organized in a separate room, closed from the rest room and steam room. It is possible, if space does not allow, to combine these zones, but make a small fence to make the interior more comfortable. The basis of the finishing in the bathhouse is wood, but the washing installation requires additional materials - tiles and protective curtains.
A sink finished with wood looks organic
It is important to remember that a combined washing room and steam room saves space, but the design is less comfortable. The interior of the bathhouse as a whole begins with the washing area, since it is located right next to the entrance
Advantages of a separate sink:
In turn, the combination will save money on materials and firewood, since there will be no need for additional heating of the sink.
Materials other than wood are often used in the washroom.
It is important to remember that high-quality and powerful ventilation is necessary here, so maximum attention must be paid to it. For comfortable accommodation in a room shared with a steam room, it is recommended to arrange them at different levels
What is the purpose of foil?
To achieve effective energy saving in a bathhouse, you will need to not only insulate it, but also use reflective material in the form of a special foil film. Masters claim that it helps return up to 95% of the heat into the room.
The result is that fuel for the stove is saved and the duration of the fire is reduced.
For baths, aluminum foil with a thickness of 30–300 microns is used. It is used in combination with other insulation or is already fixed as its top layer.
Therefore, before covering, they first attach insulating material to the walls and ceiling, thanks to which the heat does not escape beyond the bathhouse. An insulated steam room heats up faster and retains heat longer.
The following are the advantages of foil:
- It acts as a vapor barrier and blocks the access of moisture to the insulation. The generated steam remains on the walls of the steam room.
- Its service life exceeds 50 years. Wooden elements will begin to rot faster than the foil layer will deteriorate.
- Excellent sound insulation. Foil can absorb up to 70% of all sounds and noise.
- Fireproof raw materials. Does not burn. It will become an obstacle to the spread of fire.
- Bathrooms warm up faster and take longer to cool down.
- If you fix the insulation with a foil layer, then the foil will prevent it from falling off.
Among the disadvantages, the following should be noted:
When there is a difference in temperature outside and indoors, condensation appears on the surface of the material. It is important to leave a gap for ventilation before covering. If this is not done, the resulting condensate will begin to be absorbed into the sheathing, which will lead to rotting of the lining. Foil has poor throughput
As users say, she is not breathing. Therefore, the rooms must have good ventilation, both forced and natural (windows, doors). Aluminum particles accumulate in the lungs, causing various respiratory diseases. But if you use the sauna periodically, the risk of harm to health is minimal.
Nuances in arrangement
What the washing compartment of the bathhouse will look like and what elements will be present in it must be thought out in advance. First of all, it is necessary to provide a device for the flow of water into the bathhouse, how it will be heated and a method for draining it. Ventilation is also of no small importance in the washing section of the bathhouse, since moisture and high temperature are constantly present there. With high humidity in the bath, there is a risk of mold and mildew.
Next, we determine the dimensions of the washing compartment of the bathhouse. Here you need to decide exactly how many people will wash in the bathhouse. It is traditionally believed that there is approximately up to 1.2 m2 per person. But in principle, everything is decided by the tastes and capabilities of the bathhouse owners.
We recommend: Features and advantages of a wooden bathhouse made of timber
As for the material, the interior finishing of the sink should be made only from natural materials.
Wood finishing
In the washing section of the bathhouse it is necessary to use coniferous wood. Since the bathhouse has a high level of humidity, and the peculiarity of these rocks is the resistance to moisture due to the resin content, which prevents the material from rotting. In order to provide greater protection, the wood should be treated with special products.
Facing tiles in the washing compartment of the bathhouse
This is one of the most durable materials. It is distinguished by such characteristics as durability and ease of maintenance. The variety of materials is very large, both in color and in original design solutions. The sizes of the tiles are also different and you can choose any one if necessary. The disadvantages of this material are that the surface of ceramic tiles is very slippery. Recently, types of ceramic tiles with special characteristics have appeared that allow them to be used for finishing in a bathroom or bathhouse. But, nevertheless, in order to avoid injury, it is better to additionally use wooden grates or rubber mats on the floor in the washing compartment of the bathhouse.
Application of natural stone
It is used much less frequently due to its high cost. Most often, this type of finishing is performed in combination with ceramic tiles or wood. The advantages of this material include its durability, strength and environmental friendliness. But the downside is that working with this material is quite labor-intensive and can hardly be done without the help of specialists. It is much easier to work with artificial stone. It is very light, and finishing the walls of the bathhouse yourself will not be difficult. And in price it wins compared to natural material.
Lining and PVC panels
The characteristics of natural materials were presented above. But in some cases, artificial ones can also be used. These include lining and PVC panels. First of all, this material is affordable. It also wins in terms of installation method. But it is significantly inferior in environmental friendliness and resistance to mechanical damage.
The use of materials such as fiberboard and chipboard, as well as impregnated wood, is strictly prohibited. At elevated temperatures, these materials begin to release substances harmful to the human body.
Source
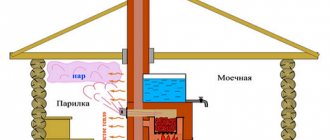
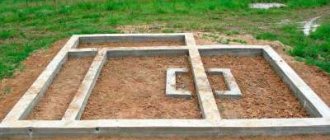
Building a roof: the best option
In order to attach a dressing room to a finished bathhouse, a pitched roof is often used, which is easily attached to the main one, then covered with a similar material. But there is another way - they extend the main one further; this option is more preferable. Work plan:
- The Mauerlat is attached to the top frame, then the floor beams are installed.
- Trusses are made from rafters, the first two are installed at the edges. At the junction of the bathhouse with the dressing room, the truss is attached to the pediment.
- A cord is stretched between the outer trusses of the dressing room, with the help of which the intermediate elements of the roof are correctly installed. Their pitch varies depending on the size of the future room - from 40 to 60 cm.
- The vapor barrier material is laid and fixed, the overlap is 15-20 cm. The joints are glued with sealing tape.
- The counter-lattice is made from timber with a cross-section of 5x5 cm.
- Insulation is laid on it, and a waterproofing film is placed on it. The joints are glued.
- For the roof, lathing is installed, the thickness of the slats is 2 or 3 cm.
- The roof is being installed.
The roofing material should be the same as that of the bathhouse, otherwise the appearance of the new, but thoroughly “recovered” bathhouse will not be very aesthetically pleasing.
Ceramic tiles comfortable comfort
The washing room is capable of accumulating a large amount of dirt, since it is completely removed by humans here. And the bulk settles on the floor, which requires regular maintenance. And ceramic tiles are perfect for this purpose.
We will start installing the floor in this section of the bathhouse from the center of the room. This is necessary to obtain a beautiful finish in the washroom. Since the base slope will already be ready, we only have to do the finishing coat. For this we need:
Finishing inside the dressing room
Typically, the finishing material here is lining, and both coniferous and deciduous wood can be used. But even those that successfully resist moisture require mandatory treatment with a fire retardant and antiseptic.
Covering the floor
So:
- Beams are placed on the waterproofing, their thickness is 3-4 cm, the pitch is from 30 to 40 cm.
- The floorboards are attached to the beams using the tongue-and-groove method; near the walls this is done with self-tapping screws, the heads of which must be deepened.
- Rubber mats are used as an additional covering.
We are working on the ceiling and walls
First they tackle the ceiling, then the walls. The work goes according to this scenario:
- the sheathing is installed;
- the first element is attached to the wall opposite the entrance using a nail driven in at an angle of 45°;
- after checking the level, the following parts are installed;
- beams, the thickness of which is 4 cm, are attached to the wall;
- the covering starts from the corner, the actions are similar to ceiling installation;
- The last stage is fastening the skirting boards and installing the platbands.
The dressing room is ready, now all that remains is to think about how to decorate its interior. Others believe that we should not forget the traditions of our ancestors, while others strive for novelty in everything.
It’s not difficult to build a dressing room in a bathhouse with your own hands, and if you built the bathhouse yourself, then the operation won’t even take you much time.
There were plastic panels in the bathhouse.
ons wrote: I had the idea of lining the sink with the same clapboard with good impregnation from moisture, but I could not solve the issue of the tightness of the wall-floor joint.
. It seems to me that the issues of hydro-protection are very far-fetched and exaggerated! Of course, for complacency, you can stick on all sorts of protections and films, and for aesthetics, plastics, but I repeat, this tree has been tested for centuries and, to my taste, it is both aesthetically pleasing and reliable. The main thing is that you have time to dry out in time after the procedures (a couple of logs in the stove after washing, ventilation). Cover the floor-wall, as well as the floor-ceiling, with a strip of foil and cover with a beautiful board, like a plinth!
helmutivan wrote: Glue the floor-wall, as well as the floor-ceiling, with a strip of foil and cover it with a beautiful board, like a plinth
I still can’t figure it out. Most likely, I will not touch the screed and tiles. For example, I’ll run clapboard along the wall. Please advise how to SPECIFICALLY make the joint between the floor and the wall lining to ensure real tightness. Now the half-plastic gap is sealed with sealant plus a plastic plinth with rubberized edges on top. Those. when at peak moments there is up to a centimeter of water on the floor, nothing gets on the wooden base.
ons wrote: I still can’t figure it out. Most likely, I will not touch the screed and tiles.
. Sorry, I didn’t understand that your wooden floor was walled up under the tiles. I thought it was just a board, and I advised covering the ends of the floor with foil from the walls. But in your case, what’s so bad about water flowing from the walls onto the floor? And how much of it will be there? “I hope there is a hole in the floor (ladder)? What kind of tightness do you need?, on the contrary, place the lining 1-2 cm above the floor, and cover it for aesthetics. It will stand for a long time. Well, in general, there are all sorts of Tikkurills for baths and saunas. (SUPI -SAUNA) In small jars for walls and ceilings. The wood remains white, for me in a year (not a period, of course) it’s as if it was planed yesterday.
The sealing of the screed does not fit onto the wall. The role of waterproofing the lower part of the wall was performed by sealant along the plastic seams and also by the baseboard. If I raise the paneling so that the bottom edge does not get wet, I still need to seal the joint with something. Another thought arose to leave the bottom of the wall under the plastic (i.e., without violating the tightness of the floor-wall joint). There is no heat there and it won’t hurt him. But then how to make a competent joint between plastic and lining on the wall itself? There is something like a z-shaped corner, so that the corner itself is covered with overlapping plastic, and the second “tail” of the letter Z is under the lining. Then nothing will get caught in the plastic. Yes, I also forgot to add that there is no wall directly behind the plastic (sheathing along the log house), therefore it is impossible to seal it by simply covering the seam
ons wrote: that’s why you can’t seal the seam by simply covering it
. You are making life too difficult for yourself. IMHO. of course!
2ons Everything is logical and predictable. When the door is opened, hot air from the steam room enters the washing room and collects at the top, melting the plastic panels.
Accordingly, it is necessary to either install a ventilated vestibule or use heat-resistant materials.
sgtNemo wrote: either use heat-resistant materials
So I'm trying to explore my options.
sgtNemo wrote: Everything is logical and predictable. When the door is opened, hot air from the steam room enters the washing room and collects at the top, melting the plastic panels.
I completely agree, if you make a shower room from plastic materials, then you need to separate the steam room and shower room with an intermediate room (locker room or rest room), but in your case the layout has already been done and in addition to the damage from hot air in the form of distorted panels, you also inhale their aroma. They were warped due to a direct blow from hot air (perhaps this would not have happened if they had covered it with wood) i.e. It is quite enough to waterproof the walls with the floor in the shower room with a material that is more or less stable in temperature and cover it with clapboard as a heat insulator (in case of rotting, replacement is possible). For protection, coat with special compositions, sold for steam room walls, I don’t remember the name but it was mentioned on the forum (based on PVA). It is advisable not to use plastics in the steam room and adjacent rooms, they still evaporate their aromas, it is not immediately noticeable, but gradually discomfort will be felt. I myself decided differently: the floor in the shower is wood, the floor frame is separate (if it rots, I’ll replace it), the walls are made of ordinary pine lining with impregnation (also with the possibility of replacement), a large trough with a curtain, the wood on the floor is not cold for your feet, the walls are also warm, you can lean against Behind the clapboard on the walls there is a layer of waterproofing below the floorboard, so that the walls themselves are protected. I’ve been using it for several years now, I recently opened up the floor to redo the drainage system, and inspected it for rot, everything is clean.
Source
Features of the interior design of the dressing room
Decorating the interior of a dressing room in a bathhouse does not require any frills if we are talking about a chopped wooden bathhouse (read: “Chopped bathhouse - construction rules with examples”). The main task when finishing a log house from the inside is its thermal insulation and the treatment of wood with various impregnating compounds that extend the maximum service life of the material. If we are talking about finishing old buildings, brick buildings, etc., then the dressing room needs to not only be improved functionally, but also its decorative design needs to be updated.
It is worth saying that the amount of materials used in finishing the dressing room is limited due to the high humidity inside the bathhouse. However, this does not prevent you from creating a high-quality design for the dressing room, which will look original in the photo and upon visual inspection.
What is rubber paint
This material was introduced to the construction market relatively recently, but has already gained high popularity. This paint and varnish material is universal and can be applied to almost any surface in rooms with high humidity conditions. When the paint hardens, an elastic layer is formed that is resistant to stress, cracking and peeling during use.
No preliminary work is required to prepare the coating for applying rubber paint. You can limit yourself to only the simplest leveling of defects and cleaning from dust, dirt, stains, etc. If necessary, the surface should be strengthened with special deep penetration compounds.
You can apply rubber paint just like regular paint, using a paint brush or roller. Spacious rooms can be easily processed using a spray gun (paint gun).
Floors in the waiting room
The process of finishing floors in dressing rooms must take into account the fact that this room is characterized by a high level of humidity, which can cause a rotting process, which can only be prevented by high-quality waterproofing and properly arranged water drainage. It is best if the flooring is made of natural materials. Perhaps even with insulation or a built-in “warm floor” system.
The design of the floor in the dressing room may be different, but regardless of the final choice, a plant layer at least fifteen centimeters deep must be cut and removed. In the event that you have to raise the floor level or level its surface, you can use the backfill method with heavy tamping - earth, slag or expanded clay. The most important thing is that in this case the floor level can be raised no higher than the level of the building’s foundation.
Perhaps the easiest way to create floors in this type of room is to go with the earthen version. Unfortunately, under constant exposure to moisture, they can become ordinary dirt, since the soil will allow water to pass through in any case. Therefore, a more optimal option is a clay floor, which allows a minimum amount of moisture to pass through.
Lining is the most popular finishing material
This material has proven itself to be the best, since there are three main categories A, B and C, which leads to a wide price range. Accordingly, each owner will be able to choose the optimal material for himself. The lining is laid horizontally, which provides maximum moisture protection, preventing liquid from penetrating into the joints between the boards.
The lining is made from natural wood of various species. The thickness of one board can reach from 1.1 to 2.2 centimeters. The most popular options for covering a dressing room are those with a thickness of 1.4 and 1.6 centimeters. The lining can be installed on a flat base without sheathing. If there is a high level of humidity in the elevations, then lathing is required. The step between vertical slats should be from 0.6 to 1 meter.
The board of the material has a special groove and tenon, which allows installation of the flooring very simply and with the maximum level of joining of the boards. The highest quality type of material is eurolining, manufactured according to European standards. Special milling channels are applied to the back side of the boards, which allow the floors to be effectively ventilated from moisture.
Characteristics of wood
Linden. This type is familiar to practically everyone. Its positive qualities were already familiar to our ancestors, who made many household items from linden, etc. This wood does not absorb moisture, has a pleasant aroma and light color. Linden is one of the most popular materials and copes with the task perfectly. Does not swell or deform during use.
Aspen. Most consumers prefer aspen. It is durable, does not rot, and does not change its appearance for a long time. Does not contain resins or other substances harmful to health. Often used for interior decoration of saunas and other places with high humidity.
Pine. For rooms with a stable temperature, pine is used. Dressing rooms and rest rooms are lined with it. This wood does not crack, is durable with a pleasant aroma. Many people consider pine to be a harmful material because of the resins it produces. But that's not true.
Interesting to see:
Oak. Of course, this white wood is a more suitable option for interior decoration of baths. But not everyone can afford it. In the operational environment it has proven itself to have a long service life, high strength, and resistance to rotting. It has virtually no disadvantages. At high temperatures, they release favorable odors and substances that improve human health.
The variety of cladding materials opens up enormous possibilities for the consumer. Wood is easy to work with. It is quite easy to cut and performs health-improving functions well. Having chosen the right product, the steam room will have a fairly high attendance, having a great impact on the health of clients. Only natural substances are placed in these rooms.
How to line the inside of a bathhouse inexpensively?
Construction of a bathhouse is a rather complex undertaking, since the owner has to solve many issues.
Among them is how to line a bathhouse from the inside. This decision must be taken seriously, since there are many different materials for cladding. Moreover, attention should be paid not only to the appearance of the material, but also to its quality characteristics. Don’t forget about cost - the material you choose must have the optimal price-quality ratio. Most owners believe that it is almost impossible to find such material, however, this is not so. There are certain nuances, knowing which you can easily solve this problem.
It should be said that almost any material is suitable for finishing a steam room However, it must meet certain requirements - be moisture resistant, have a low level of thermal conductivity, be resistant to rotting and be easy to restore. Today, wood products have all the necessary characteristics. Among them, the most famous are lining, panels, boards, planks and slats. And the buyer only needs to select the type of material. To make the right decision, you need to take into account, in addition to cost, the water-repellent characteristics and service life of the material.
Features of the floor
It in the dressing room should be warm enough so that a person can move around it barefoot. Another mandatory condition: the floor should not be slippery even for wet feet. In addition, the necessary moisture resistance of the coating must be provided.
A wooden floor satisfies all requirements. It can be arranged in this order.
- Laying roofing felt waterproofing on a bed of sand and clay.
- Installation of a system of logs made of wooden beams measuring at least 10x10 cm. All wooden elements are thoroughly impregnated with a composition that protects against rot and mold.
- Filling with insulating material (ash, slag, expanded clay).
- Subfloor flooring. It can be made from unedged boards and even slabs with a thickness of at least 20 mm.
- Laying protective covers: thermal insulation layer of mineral wool, polyurethane foam, expanded polystyrene; waterproofing and vapor barrier with foil coating.
- Finished flooring made of boards.
Coniferous wood is quite suitable for arranging the flooring in the dressing room, but it is best to use materials with increased hardness and moisture resistance - larch, oak.
The floor in the waiting room covered with ceramic tiles is only permissible if a “warm floor” system is installed. You can use water or electric heating. The construction is made in this order.
- Applying a cushion of sand and crushed stone 35-45 cm thick.
- Laying waterproofing and reinforcing mesh.
- Pouring concrete screed.
- Laying water heating pipes or electric mats.
- Installation of a system of logs made of wooden beams.
- Laying a subfloor from unedged boards and waterproofing.
- Laying sheets of chipboard or plywood, followed by putty and primer of the surface.
Washing room in the steam room
In this case, the facing material will have to face higher temperatures. The washing room becomes an extension of the steam room, so the heat will also affect the finishing of the washing compartment of the bathhouse. To avoid problems during operation, it is recommended to choose coniferous wood as a material, both for cladding walls and ceilings. But you can also choose deciduous, moisture-resistant ones, such as oak or cedar. Finishing work begins after the wooden frame has shrunk. This rule is not relevant when building a bathhouse made of brick or lightweight concrete.
Finishing a washing room in a wooden bathhouse begins with the outer and inner caulking of the walls. It must be done efficiently to prevent cold and drafts from entering the room in the future. Wooden lining is most often used for cladding. The work is performed in the following order:
Polyvinyl chloride wall panels for dressing room decoration
PVC is one of the most practical and cheapest materials, sold in a wide color palette, which allows you to decorate a beautiful dressing room with a certain style at minimal cost. Another advantage of this material is its ease of installation. The work of installing it is within the capabilities of every person with a basic set of construction skills.
Such panels can be mounted on smooth wooden walls without the use of a special frame. The work uses specialized fittings and guides that hide the joints between the panels. The material is cut to the required size using a sharply sharpened construction knife.
Finishing materials and stylized furniture
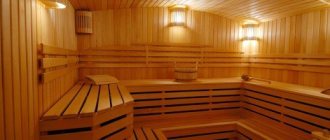
Initially, only benches were placed in the dressing room, and the walls were not decorated with anything - just a log house. Today, even in a miniature bathhouse with a small area, everyone wants to achieve maximum comfort. And all because the functional purpose of the steam room has long ago changed: they no longer come here just to wash and do laundry; on the contrary, a Russian man will spend his last money on building a bathhouse and going there every weekend with a large group of friends. This is stress relief! Therefore, the dressing room no longer serves only as a wardrobe or hallway - if it is impossible to build a full-fledged rest room, comfort can be achieved in it using all available methods.
The most popular finishing for dressing rooms is lining and stone (although the latter can be seen more and more often only in photos than in life). Moreover, now you can use pine lining of the lowest class - there is no such heat in this room, the resin will not flow, and the knots with their resin pockets look like decor. The only thing is that you need to process the paneling here twice, like in a washing room (there is still humidity in the dressing room), and still refuse the birch.
Rattan wicker furniture is also especially good - it doesn’t take up much space, it’s inexpensive, and it’s easy to care for. Only then you will also have to get rid of the humid air using modern methods - the same ventilation or a special air dryer.
As for the design of dressing room furniture specifically, the so-called “goblin style” is in great demand here - benches and a table of rough design, ornate natural patterns, carved forest elements on wood, mirrors and paintings framed by driftwood painted with dark varnish. The style of the goblin in the dressing room gives the impression that you have just entered some forest house and now a fairy tale is about to begin. Cute and quite Russian style.
Insulation materials
A comfortable microclimate in the dressing room can only be achieved through high-quality insulation. The thermal insulation material for the floor can be extruded foam, mineral or basalt wool. Typically, insulation is laid out in the space between the finished and white floors. A mandatory factor is the use of vapor and waterproofing materials.
Ceiling insulation is a necessary condition for reducing heat loss in a bathhouse (especially if we are talking about buildings with a cold attic). For thermal insulation, you can use basalt wool, as well as expanded clay of different fractions. Large granules provide thermal insulation, while small ones fill the space between them. Instead of expanded clay chips, clay or sawdust is suitable.
To increase the thermal efficiency of walls, mineral wool or foil foam is usually used. They are laid between the sheathing and finishing material.
A more modern heating option is to install a heated floor system. This can be a water or electric modification.
As a rule, installing a heated floor alone is not enough to heat a room, so you can use it to organize a convection heating system. This method can only be implemented when installing a water system. The heated floor is connected to installed radiators. The heating liquid (usually water, less often antifreeze) circulates through pipes under the floor covering and radiators, this allows you to achieve a comfortable temperature in the dressing room.
The choice of underfloor heating system should be approached responsibly. Each variety has characteristic advantages and disadvantages. If we talk about electric models, then an infrared floor is preferable, as it is as safe as possible in conditions of high humidity. It is capable of warming up a medium-sized dressing room in 15-30 minutes.
Another option to heat the dressing room is to use a special design of a sauna stove. Its heating part is located in the steam room, and the combustion part is moved outside the steam room (for example, into the dressing room). The firebox is designed to resemble a fireplace (a portal and appropriate decorative elements are used).
Closed fireboxes equipped with doors with a glass window allow you to enjoy the warmth and glow of the fire. The glass in such designs is thick (up to 8-10 cm), heat-resistant. This allows us to declare its safety. The presence of a self-cleaning system prevents the appearance of soot on the surface of the glass.
Successful design solutions
Fortunately, the internal type of finishing of the dressing room is by no means limited to the standard set of actions affecting the aspect of insulation and cladding. In order for your stay in the bathhouse to be as comfortable and enjoyable as possible, the dressing room must be thought out to the smallest detail. Often, the classic style of a Russian bathhouse is used to decorate this room, creating an authentic atmosphere and special comfort.
If we are talking about a small room, then you will have to equip it with the help of stools and clothes hangers. This is the practical side of the issue. Aestheticians will add thematic paintings or various bath paraphernalia hung on the walls to the design. If the dressing room is quite large, then the choice of furniture expands significantly. Take a closer look at the option with sofas, the finishing of which is made of faux leather. You can complement the interior with wooden chairs or benches made in the same theme.
Construction of frame structure
Before installing a wooden structure, all elements are carefully treated with protective and antiseptic compounds for wood.
Assembly is performed in the following sequence:
- Installation of the bottom trim from bars with a cross-section of 10 × 10 cm.
- Installation of corner posts, checking the correct installation of each element using a level.
- Installation of intermediate racks in 80 cm increments.
- Making the top trim from bars with a section of 8 × 8 cm.
- Installation of bracing strips in the outer corners to increase the rigidity of the finished structure.
- Fixing floor joists from unedged boards.
- Installation of elements under openings for doors and windows.
- The internal lining of the finished structure is made of membrane material, which provides protection from the penetration of wind and moisture.
- External wall cladding.
How to mount the faucet
Tapes and adjustable wrench for installation
One of the most difficult operations, several parameters must be observed simultaneously: the horizontal position of the corners with external threads and the distance between them. The mixer is fixed to the wall elbows, and it must be in a strictly horizontal position. How to get the job done the first time? Begin precise position control after both pipes have passed the last turn.
Installation of a crane using eccentric adapter bushings
Step 1. Find out the distance between the ends of the elbows and the exact location of the mixer installation. Remember to add 15 mm on each side for the length of the weld.
Step 2. Weld the top ends of the pipes, then attach end angles with internal threads to them.
Step 3. Temporarily screw the faucet to the fittings, lean it firmly against the wall and mark the position of the mounting holes.
Step 4. Dismantle the mixer and, in turn, firmly fix each of the two threaded end angles with self-tapping screws.
Step 5: Using sealing tape, screw the faucet into place.
New eccentric
We tighten the eccentrics
When tightening both eccentrics, make sure that they end up at the same level
Decorative plugs
Mixer installation
If it is difficult for you to do such work or you plan to connect other plumbing equipment to the mixer, you can use a mounting strip to mount it on the wall. It has standard distances between threaded connections. The end outlets of the installation strip can be temporarily plugged with special plugs or the continuation of the pipelines can be immediately connected.
Installing the faucet mounting plate
Do not rush to solder all connections one by one. There are often cases when you need to skip one spike, perform the next one, and then return to the missed one. The fact is that you have to put soldering irons against the wall, and this is not always convenient; previously installed pipes and connections can interfere. In such cases, you need to first weld in the most inconvenient places, and then work in easily accessible ones.
Installing a faucet in a washing room
End mounting plate
Intermediate mounting strip
If you have problems of this kind and you don’t know how to solve them, don’t get upset and don’t waste time coming up with different options. It is better to cut a section of pipe, solder the two ends separately, and then use a coupling to connect the cut parts. We don’t argue that the additional coupling does not serve as decoration, but it is better to go this route than to redo the installation work.
Installed mixer
Features of construction
The best option is the presence of a dressing room in the original building design. However, subsequent extension of the premises is allowed, which is usually carried out using a frame structure in several stages:
- construction of a foundation, usually strip or pile;
- construction of a frame with load-bearing elements made of timber;
- installation of effective thermal insulation of floors, walls and ceilings, for which modern insulation materials are used, for example, foil-coated Nanoizol in combination with mineral wool from well-known brands URSA or KNAUF;
- installation of the roof, the choice of design of which is made by the customer, taking into account how the roof of the bathhouse is made;
- installation of a ventilation system, which is a prerequisite for long-term operation of the building. Effective ventilation prevents the formation of condensation and maintains a humidity level that is favorable for wood.
When constructing a dressing room, special attention should be paid to two main issues - proper insulation and ventilation
During the work process, it is extremely important to find a balance between the operation of the two systems, which will simultaneously ensure the energy efficiency of the building, guaranteeing a comfortable stay for visitors, and maintaining an optimal humidity level indoors
“The theater begins with a hanger, and a bathhouse with a dressing room”
It is better to enter the bathhouse from the south so that the snow melts faster and the door is less likely to be covered with snow. The dressing room serves as an obstacle to the entry of cold air into the steam room and must retain heat inside the room, which is why the windows and doors are small in size. The door from the dressing room to the steam room is opened inside the dressing room, which protects clothes from excess moisture. The area of the dressing room can be of different sizes, usually no more than 6 m². How to decorate a dressing room and does it need to be insulated? The usual items in this room are hangers, a bench, there can be a table and a shelf in the corner as a means of additional hygiene. A refrigerator and TV are also an excellent choice, but you can only dream about this, and for many these delights are inaccessible. Why focus on the worst, thoughts are material, and we only need the best.
Block house
There are several types of blocks:
- natural - made from deciduous and coniferous trees;
- metal - made from galvanized steel;
- acrylic - based on polymer resin;
- vinyl - made from PVC powder.
Any type of block material is suitable for finishing. You should prepare screws and 6-7 mm clamps for fastening, mineral wool as insulation, log parts for creating sheathing, a membrane with vapor barrier properties, a waterproofing agent, antiseptic impregnation and fire retardant, which are used to pre-treat the wood elements. Cladding stages:
- Secure the vapor barrier film in a horizontal position. Secure it with staples or a construction stapler.
- Install the assembled sheathing in a horizontal position. It is attached to the wooden base with self-tapping screws and nails. It is advisable to fix it to a brick wall with dowels for frames. In the latter case, it is necessary to pre-drill the recesses.
- Lay insulation in the spaces between the beams.
- Use a stapler to secure the waterproofing material.
- Build a similar sheathing on the main frame, placing it in a vertical direction.
- Cover the outer surface with block houses. The direction of installation is from bottom to top horizontally.
- Using clamps, secure the panels.
- After completing the finishing work, hide the screw heads using sawdust paste and PVA glue. You can also use special plugs and leftover block materials.
- Place plinths in the corners. Decorate windows with slopes and doors with cash.
Blockhouse cladding
How to line the inside correctly if the bathhouse is made of bricks or blocks
Brick buildings are the coldest, blocks made of foam concrete are still better thermally insulated, but in general both of them need additional thermal insulation, so there is no option when you simply make a sheathing on a brick wall and start installing lining on it. Because it would take a very long time to heat such a bathhouse.
Therefore, it is possible to properly sheathe the inside of a brick bathhouse with clapboard only on top of a thick (depending on the cold of your area) layer of insulation. Since mineral wool is most often used, it is worth proceeding from its popularity. Below we will give an example of the entire “pie”, with insulation and lathing for the lining in the bathhouse.
External cladding
Functions of external cladding:
- Decoration of the building;
- Extending the service life of enclosing structures.
Boards
Pine and spruce lumber are used for the exterior cladding.
A frame wall can be easily recognized by the horizontal arrangement of the boards: this way they ensure the rigidity of the entire building, maintaining the correct geometry of each wall.
Before finishing a bathhouse made of timber, finishing a log bathhouse, the boards are connected over a windproof membrane:
- Butt;
- Overlapping;
- At a quarter;
- Tongue and groove connection.
The fastening of the sheathing to the frame posts is 60 mm nails.
Information. Before purchasing a cladding board, measure the area of the walls to be covered, add 15–20% to the resulting figure and obtain the calculated cladding area.
Sheathing boards are protected by impregnation with fire retardants, antiseptic, and painted.
Plaster
You can plaster not only stone, but also frame-cladding exterior walls. Then the frame is reinforced with jibs, and oblique lining made of chipped boards is stuffed onto it - this will ensure the rigidity of the frames. The lining is filled with plaster shingles (“shingles”, “shingles”, “drazga”, “splints”, “cod” - thin, plucked strips of wood).
The plaster is placed on the outside and on insulation - mineral wool of suitable strength, capable of absorbing the load from the plaster layer.
Non-asbestos slate, cement particle boards
Fiber cement sheets are flat slates that do not contain asbestos. A concrete sheet reinforced with fiberglass mesh is called an “aquapanel”.
Fiber cement sheets are dense, have a uniform structure, are not hygroscopic, and are good for external cladding of a frame house for tiling.
Non-asbestos slate and DSP are attached to the frame with galvanized self-tapping screws.
The joints of the sheets are secured with sickle tape using tile adhesive, the edges (at the corners of the bathhouse, in the openings) are reinforced with a painting profile.
The adhesion of cement products is increased with a penetrating primer.
Panels, slabs, sheets are installed strictly vertically on the bathhouse frame, otherwise the casing risks “collapsing”.
Ceramic surface
Mineral products for outdoor use:
- Facing brick, facing ceramic stones;
- Large-size ceramic slabs, glazed or unglazed;
- Facade ceramic tiles;
- Carpets made from façade ceramic tiles (up to 1.15 m2 in area) are small tiles or tiles glued to wrapping paper with bone glue.
Brick facing is created during or after the construction of the walls and rests on the foundation. Ceramic slabs have a thickness of about a centimeter, are produced in square, rectangular shapes with side lengths close to a meter, half a meter and multiples of the traditional frame strut spacing - 0.6 m.
Frost resistance of large-size facade ceramics is 50 cycles, water absorption is not higher than 1%.
Ceramic tiles for external cladding have 15 standard sizes, divided into 2 groups:
- Facade (water absorption 2–9%, frost resistance of at least 40 cycles);
- Basement (2–5%, 50).
Both wall panels and blocks are covered with tiles. In unheated, damp rooms they are also used to decorate the internal surfaces of walls.
Block house outside
If you line the bathhouse with a block house from the outside, the building will resemble a log house: a block, frame bathhouse will harmoniously fit into the system of buildings made of rounded logs or calibrated timber.
Unlike traditional lining, the block house is available in different widths - from 11 to 19 cm. Installation of wooden products on the sheathing is more durable: the gap will create conditions for ventilation of the wall and cladding. Impregnation with anti-rot compounds and fire retardants will extend the service life of the cladding board. Sheathing and lining the outside of the bathhouse, competent finishing of rooms with different operating conditions is the key to safe, long-term and efficient operation of the bathhouse.
Ceiling and wall cladding
Bathhouse, washing room finishing - this is what we are talking about in detail today. Everything related to drainage was discussed above. Now is the time to think about the ceiling and walls.
Bathroom washing areas are often finished with tiles. This material is chosen because it has a reputation for being practical, durable, and hygienic - because it is not difficult to care for during use. Ceramic tiles have been used for decades, they have successfully passed all strength tests - no one will argue with this.
And yet, why is it worth using ceramic tiles and their different types?
Finishing the inside of the washing bath involves the use of moisture-resistant materials. Hygienic standards assume that the walls in the washing area are covered to a height of at least 180 cm. The entire space above is usually whitewashed, plastered, and painted with various water-repellent compounds.
The room is completely ready for water procedures
After all this, you can perform the final screed with sand and cement. And at this point, it is quite rightly noted that the finishing of the washing room in the bathhouse is completed and the room is completely ready for active use.
We create an interior in Russian style
Various accessories will help you create a truly Russian interior. You can hang bath brooms, wickerwork, and carved paintings on the walls.
Tapestries made of medicinal herbs and roots will decorate the walls of the steam room and add pleasant aromas. You can make them yourself using a reed.
Tapestries made from various herbs are not only beautiful. Due to the content of medicinal herbs, they are able to have a healing effect. This is how a willow rug treats skin diseases and helps against sweating and various inflammations. Tansy helps with joint pain and works great against migraines if applied to the head as a compress. Nettle towels have a tonic effect. A mix of wormwood, mint, yarrow, St. John's wort will help get rid of harmful microbes and calm the nerves.
Tapestries made on reeds are quite durable. But such products should be avoided from exposure to the sun. And to enhance the aroma, herbal products can be sprinkled with water or placed in a steam room.
Jars with sand or sea salt will look interesting. There are many instructions on the Internet for making them. Only fine sand or salt is suitable for work. You can color them using crayons. The more colors, the more interesting the work.
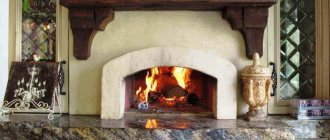
What is a Russian bathhouse without a stove?! A sauna stove can also be decorated in a very interesting way. For example, cover it with tiles and give it the spirit of noble antiquity.
Light wood species, forged products, and accessories in ethnic style are suitable for decoration.
An original solution to make a Japanese-style bathhouse. Instead of the usual washing compartment, a wooden furaco font is installed. It consists of two parts. In the first part there is a bench, in the second there is a heating product..
There are many interesting design projects in which you can decorate a bathhouse. All in your hands.