Not every summer cottage has a bathhouse. Many land owners are scared by the high price of this building, although you can build a steam room yourself. Read about what a do-it-yourself frame bath is and what costs it will require!
Construction of a frame bathhouse 3x4, 4x4, 3x3: advantages of self-construction with video
A self-built frame mini bath has a number of advantages:
• Affordable price, since materials are cheap, and construction plans and drawings can be found on the Internet. • A frame bathhouse can be erected with your own hands in the shortest possible time. • The design does not shrink, communications are easy to lay. • A variety of interior and exterior finishing options to suit any budget.
Drawings for a mini bath with photos: choosing the optimal type of construction
Panel or frame mini baths can have different sizes and different numbers of floors. But the more floors, the greater the load on the foundation, which means the price of the latter increases several times. We invite you to consider construction projects with drawings and choose the optimal type of your future steam room.
Photo drawing for a 3x4 mini bath:
Photo drawing for a 3x3 mini bath
Or:
Photo drawing of a 4x4 bathhouse
Bathhouse projects 6x4
Waiting room
A frame one-story house with a bathhouse, like a multi-story building, requires the organization of a dressing room in the appropriate room. This room is a changing room. It is advisable to install benches here for the convenience of changing clothes, and put lockers or nail hooks for clothes.
To build a frame house with a steam room, you need to become familiar with construction techniques. The work can be done with your own hands, but it is recommended to invite professionals to arrange some communications. This will require additional costs, but will guarantee quality work.
Do-it-yourself mini panel bathhouse, or where to start construction?
You could choose a drawing for a 3x3, 4x4 or 3x4 mini bath, but before construction you should take into account 3 main rules.
Rule 1: insulation of a mini bath
Insulation is the key to a warm steam room and normal air exchange, and it’s better not to save money here. Insulation is carried out using 2 materials:
1. Fiberglass.
2. Mineral wool.
A structure insulated with these materials will ensure a comfortable temperature and will not break your budget.
Rule 2: vapor barrier
Without a vapor barrier, there is no heat in the mini bath, and in the cold season the structure will collapse under the influence of condensation, which is a significant disadvantage of independent design.
To prevent the formation of condensation, it is necessary to use glassine or vapor barrier films. After you have completed the insulation, a film is laid, and the inner lining goes on top of it.
Advice! Never use roofing felt as a vapor barrier. When heated, the material emits a strong chemical aroma.
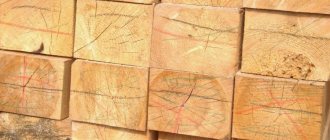
Rule 3: choosing high quality wood
A 6x4 frame bathhouse is built with your own hands from perfectly dried boards. You can take those that are available, but it is better to purchase wood from the following species:
• Aspen or linden. • Larch.
Important! The listed wood has low thermal conductivity, and buildings made from these species do not deform even after 3-5 years of active use.
Drain arrangement
The arrangement of drainage from existing water intakes must be taken care of at an early stage of construction of the bathhouse.
Drain arrangement
Firstly, it is necessary to lay a sewer pipe with a slope of 1 meter 3–5 cm. Such a pipe should come from the shower and from the water drain tap from the pipeline system. It is located at the lowest point of the pipeline. Such a tap is needed to drain water from the system and preserve the bathhouse for a long period, for example, throughout the winter. It is better if the drain pipe does not have branches or turns. A straight pipe is a way to avoid blockages. The diagram shows how best to connect two water intakes into one system.
Making a gasket for a sewer pipe
Pipe system
Draining
It is better to connect the sewer pipe to the septic tank so that the drain water does not go into the ground.
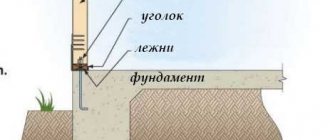
Construction of a bathhouse: first stage - foundation with video
A panel bathhouse of any size begins with laying the foundation; we will tell you about the foundation for a one-story building. You will need:
1. Asbestos-cement pipes 4 m long, 100 mm in diameter.
2. Drilling wells according to pipe sizes. The diameter of the well is about 200 mm and the depth is 1.5 m.
3. The purchased pipes are inserted into the well; they can be secured with sand.
4. After laying, the pipes are cut to the mark, and then prepared cement mortar made according to the classic recipe is poured into them: water, crushed stone, concrete, sand.
After laying the foundation, piping is performed, which will require:
1. Board with a section of 50x100 mm.
2. Antiseptic, which is used to treat the boards 12 hours before the start of construction.
After preliminary preparation, the future walls must be marked, then the boards are laid along the outer contour.
Advice! Lay the boards with the outer edge, securing the joints with nails. Check the evenness of the filling with a level; if unevenness is detected, it is corrected by laying a layer of construction roofing felt.
Next, intermediate racks are installed, taking into account further cladding and installation of the heat-insulating layer. It is recommended to secure the logs and axles with metal plates, previously walled up.
The resulting piping is again treated with special solutions, which will further protect the bathhouse from rotting.
Video
Shower stall
A frame house with a turnkey sauna requires the installation of a shower stall in the washing room. It is necessary for performing hygiene measures after the steam room.
Draining
Water drainage is arranged at the stage of foundation construction:
- A waste pit is made at the location of the bathhouse;
- A trench is led from the pit into which a pipe is installed to drain water, and a slope of 5 degrees is made;
- The pipe is wrapped in heat-insulating material to protect against freezing;
- When removing soil under the foundation, an angle of 11 degrees for drainage should be taken into account;
- The trench is filled with crushed stone or filled with concrete to maintain an angle of inclination that allows water to drain.
Shower cubicle.
Water supply
A Finnish frame house with a sauna or a building with a Russian stove will not fully function without water. Before installing a water supply system, you should decide which source will supply water to the house. This could be a central water supply, a well or a well.
If it is possible to connect to a central water supply, this would be an ideal option. If this is not possible, you will have to use a well or well. To ensure uninterrupted supply of water to your home, you will need the following equipment.
- Pump;
- Pipeline with wiring;
- Water heater;
- Cranes.
To supply a frame guest house with a bathhouse or other similar structure with water, you must adhere to the following rules for arranging a water supply system.
Bathroom.
- Measuring the depth of a water source;
- Installation of a pump and water intake pipe into a well or borehole;
- Pipe verification;
- Insulation of the pump and the rest of the water supply system to prevent freezing;
- Installation of a system in a bathhouse, which includes connecting pipes and fixing taps;
- Running water.
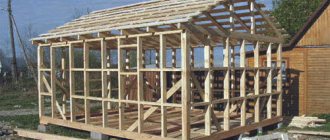
Construction of a bathhouse stage two: erection of walls with video
When constructing walls, the center gap plays a huge role. The future panel bath should have a gap of 0.6 m in the case where the opening and connection with other walls are not planned. If there is an opening or a docking, then the panel bath has an interaxal gap of 0.4 m more.
Advice! The distance between the posts directly depends on the size of the window and door openings. In those places where frames or slopes are connected to a lintel or wall, the construction of an additional rack is required. Then the elements are secured with nails and checked with a level for leaks.
The walls are built like this:
1. Assembly begins by forming a corner.
2. The wall of the bathhouse, which will be connected to the frame, is assembled first. After construction, it is checked for verticality; if the result is good, the walls are connected and strengthened with temporary struts.
3. Other frames are installed at right angles, after which they are secured with strapping and nails.
4. The panel bath must be covered after the frame has been completely secured.
Video
Recommendations for choosing material
Followers of traditions are recommended to build a bathhouse from high-quality coniferous wood. This material is not fragile, and most importantly, it lasts a long time. The needles are also distinguished by their environmental cleanliness and low thermal conductivity, that is, they do not release heat and at the same time interfere with air exchange. A unique property of this tree is its resistance to various climate conditions.
Such a wooden building must stand on a reliable foundation
For construction, you can take one of two types of coniferous wood:
- rounded round logs;
- solid beams.
Experienced builders advise building a bathhouse from beams, since this material is cheaper and it is much easier to build walls from it. In addition, timber construction works well without a bulky foundation.
The timber structure looks simple, but is easy to assemble
If you opt for rounded logs, you may be severely disappointed: a log structure takes a long time to settle, which is why it will not be possible to put it into operation earlier than a year and a half after construction. Unlike a log bathhouse, a timber structure can be safely used six months after the completion of construction work.
When purchasing beams, you should use a tape measure to check the material for compliance with the specified dimensions, and then make sure that the building materials are of good quality. To do this you need to do the following:
- visually examine the material and remove defects from the prepared batch, that is, bars whose color is uneven or unnatural and indicates poor drying of the product;
- see if there are any building materials with large cracks, bluish spots, wormholes or other damage among the beams, and put them aside;
Every beam needs inspection
- pay attention to the edges of the material and make sure that the growth rings on both sides are exactly the same in size.
Stage three: floors and their installation
Floors in a panel bath are extremely easy to install:
• Take bars with a cross-section of 5x5 cm and attach them to the bottom of the joist. • A subfloor is laid on top of the timber. • The subfloor is insulated with roofing felt, a 10 cm layer of mineral wool or slabs of the same insulation. • A vapor barrier film or parchment is additionally installed on the insulation, after which a board is laid for the finished floor.
Advice! It is recommended to lay exhaust pipes under the floors of the bathhouse, which will remove excess moisture and prevent the formation of condensation.
Bathhouse construction stage four: roof
The roof of the panel bath is erected as follows:
1. 15x15 cm beams are laid on the top frame. The distance between the beams should be about 50 cm.
2. Temporary flooring is mounted on the ceiling beam; the thickness of the boards is 50 mm.
3. Next comes the installation of rafters for a low ridge. If the ridge is high, then the rafters are mounted from below or special scaffolding is used.
4. The last step is the installation of roofing material.
Advice! A frame bath requires a ventilated attic, and to build it, the sheathing is mounted on top of the rafters. If the roof is soft, then the sheathing is solid. When the roofing material is metal tiles, the sheathing pitch is 35 cm, and with slate it is 65 cm.
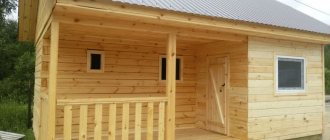
Veranda
The next stage of bathhouse construction is the construction of a veranda. It will require a shallow columnar foundation. Next, a base is made from the boards; for this, they are placed on the end, this way deflection will be eliminated.
Construction of a veranda
Columnar foundation for the construction of a veranda
Then the frame of the side structure is assembled, consisting of vertical supports and an upper cross member; it will bear the main load of the veranda roof. The frame is attached to the base using anchor bolts.
Assembling the side frame frame
Making a vertical support
Connecting elements are installed between this frame and the roof of the bathhouse, which are covered with lathing. Roofing felt is laid on top; slate or other roofing material can be fixed on top.
We make the roof of the bathhouse
Lathing
Ruberoid
A deck of boards is attached to the base of the terrace. The existing voids in the frame of the side part are filled with blanks with a decorative wooden lattice.
Making the base of the terrace
Plank flooring
Painting the boards
Side finishing
Filling the voids on the side
Making a roof
Roof finishing
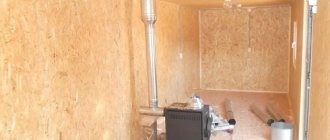
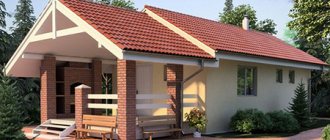
External and internal finishing
That's it, your bathhouse is basically built. All that’s left to do is complete the exterior and interior decoration. External finishing of baths and saunas is never done with varnish or paint. The latter release toxic substances when heated, so it is better to use wood. In the steam room, the walls are covered with glassine, and ordinary foil is suitable for the walls.
It is preferable to sheathe and insulate the bathhouse according to the principle of a salty pie:
• External lining. • Vapor barrier layer glassine. • Insulation with mineral wool or fiberglass. • Polyethylene film for additional vapor barrier. • Internal lining or wood panels coated with varnish.
Also for exterior decoration you can use:
1. Lining is the cheapest decorative material for interior and exterior decoration of a bathhouse. It is placed horizontally; glassine is most often used for vapor barrier.
2. Thermal panels. This design consists of mineral wool, polystyrene foam and 2 layers of PVC. The outer side of the panels is very decorative, most often sprinkled with stone chips. The panels are secured using self-tapping screws attached to the façade profile.
Video
Design Features
A frame bathhouse is a structure whose walls are formed by a load-bearing structure in the form of a lattice made of edged boards. All gaps are filled with heat insulation (mineral wool, polystyrene foam, other insulation materials), and the outer and inner surfaces are sheathed with sheet materials (chipboard, OSB, plywood, etc.). The main task is to fill the gaps tightly - there should be no gaps, cracks or other voids.
The walls of the frame bath are impenetrable to water vapor. There will be high air humidity in the room. This is normal for a Russian bath, but undesirable for a sauna. This must be taken into account during the assembly process and high-quality ventilation must be included in the project in advance. Removing excess humidity will make the air drier and increase the comfort of bathing procedures.
Heat-saving capabilities of walls
At first glance, frame walls may seem too unreliable. Mechanically, this impression is not far from the truth.
The entire load-bearing capacity is determined by the dimensions of the frame boards and the strength of the sheathing (as an additional element). However, even this strength is quite enough for the assembly of one- or two-story residential buildings.
The heat conservation of a frame bath is its strong point. The thickness of the walls is, in fact, the thickness of the insulation, which makes up the entire volume of the frame cavities.
It is known that 8 cm of polystyrene foam has the same thermal resistance as 121 cm of brickwork. This means that a wall 15 cm thick (this is the usual width of the edged board from which the frame is made) is equal in thermal resistance to a brick wall 2.5 m thick. It is slightly inferior to mineral wool foam, and penoplex is superior to it - brickwork 121 cm thick will replace only 5 cm heat insulator.
Such a high ability to save heat, combined with a record low weight of the walls, became the reasons for the high popularity of frame baths. Despite the relatively short service life, users often choose this particular design option.
The high speed of construction, the ability to avoid excavation work, the efficiency and maintainability of a frame bath are highly appreciated by users.
Let's sum it up
Building a panel bathhouse with your own hands allows you to save up to 60% of the amount that you would pay to the builders and project developer. If, when ordering from a construction company, a budget version of a panel bath will cost 150 thousand rubles, then independent construction will cost 60-75 thousand rubles. We wish you successful construction, inviting you to view a photo report of the construction of frame baths using our advice!
Cost calculation
How much does it cost to build a bathhouse? Before starting construction, it is necessary to calculate the estimate. This is required to make it easier to calculate upcoming expenses. To do this, you need to make a list of works:
- Creation of a planning bath project. In this matter, you cannot do without the services of an architect. He will independently make and prepare all drawings in accordance with the client’s conditions. A typical bathhouse design 6 m by 6 m will cost 8,000 rubles.
- Foundation. The cost of the necessary materials will depend on the point of purchase.
- Walls and roof. To do this you will need to buy a roofing covering.
- Communications. These include conducting electricity and water. This is one of the most important work during construction.
- Furnace installation.
- Carrying out finishing work.
In addition, funds will be needed to heat the bath and insulate it.
Of course, preparing an estimate and the cost of construction will not show the exact costs, since the prices of the materials used vary.
Undoubtedly, self-construction will cost much less than professional construction (specialized companies require at least $20,000 for the construction of a bathhouse).