OSB for baths
OSB or oriented strand board is a dense sheet building material that is widely used in frame construction, installation of partitions and arches, and for cladding buildings. Most often, frame country houses and bathhouses are built from OSB. This is an inexpensive and quick construction. However, many people still have the question: is it possible to line a bathhouse with OSB from the inside?
To answer this question, you need to study the composition of the material. The panels consist of several perpendicular layers of pressed wood chips with the addition of formaldehyde resins containing paraffin. The binder component gives OSB resistance to moisture up to 60%, as well as to high temperatures - up to +20 degrees. In the bathhouse, these indicators are much higher (up to +80 degrees, humidity - up to 100%). Only natural wood with an integral structure can withstand such changes without deformation. Moreover, at high temperatures, OSB begins to release harmful formaldehydes, which can cause poisoning, headaches and nausea.
Due to these characteristics of the sheets, they are not recommended for use for interior finishing of rooms with high humidity and temperature changes. However, OSB can be used in the rough finishing of baths for further cladding with tiles or clapboard. This will prevent the release of harmful substances and destruction of the panels. For such construction, you need to choose moisture-resistant OSB-3, which can be used in rooms with high humidity, or OSB-4, designed for work in conditions of high humidity. The sheets are additionally protected with a vapor barrier membrane and waterproofing film. OSB cannot be used for installation of subfloors due to flowing water.
It is possible to build a frame bathhouse from OSB boards. The material is suitable for the construction of frames and external cladding of buildings. However, due to the peculiarities of the composition of the slabs, it is not recommended to use them for finishing in damp rooms. It is allowed to use sheets for rough finishing with additional protection with waterproofing materials and further cladding. In this case, being in the bathhouse will be safe, and the panels will not be deformed.
Source
Is it allowed to use OSB when finishing the inside of a bathhouse?
Is it possible to use OSB board for interior decoration of a bathhouse?
Most likely you are interested not in the rough finishing, but in the finishing of the bathhouse with OSB 3 sheets (moisture resistant). The material consists of 90-95% sawdust, the rest is a polymer thermosetting resin containing paraffin, which imparts increased moisture-resistant properties to OSB. The expected level of constant humidity during OSB operation should not exceed 60%, temperature – about +20 °C.
In the bathhouse, except for the locker room, the humidity reaches 100%, the temperature is +80 °C. Only natural wood, but not its derivative, can withstand such changes without deformation or delamination.
In addition, under these conditions, the release of harmful substances contained in OSB, such as formaldehyde, ammonia, and phenol, sharply increases. Therefore, instead of a pine aroma, you will get poisoning, accompanied by headache and nausea.
Another thing is the use of OSB 3 for walls and ceilings for finishing with tiles or clapboard.
The sheets are protected on the outside with a vapor barrier membrane, and on the inside with a waterproofing film. You cannot make a subfloor from OSB boards in a bathhouse.
Interior decoration of a bathhouse - what is used besides lining?
Bath buildings are built from logs, concrete and cinder blocks, bricks and other building materials. The lining of the interior with clapboard remains unchanged. In this article we will tell you what other finishing and decorative products can be used in a bathhouse.
In addition to lining, what can you use to cover bathhouse buildings?
The choice of finish depends on the purpose of the room. Inside the building, in addition to the steam room, there is a relaxation room, an entrance hall (dressing room), a bathroom or a washing room. If desired, the project includes a terrace, a residential attic, or several square meters for a small pool.
Lining is a universal material; with proper processing, it can cover all walls and ceilings, but it will turn out too monotonous. Therefore, diverse interior decoration of the bathhouse is chosen.
Already from the name it is clear that this room is periodically maintained at 100% humidity and high temperature. We need a finishing material that can withstand such changes and also does not emit substances harmful to humans during heating: formaldehyde, ammonia, phenol and others.
4. Rest room.
Lining - pros and cons
Summarizing the above, it is worth noting that a bathhouse cannot do without lining. This is the best finishing material, as it has a unique set of positive properties:
Among the disadvantages, it is worth noting that the lining is susceptible to rotting and woodworms, but the problem can be solved - it is enough to treat the surface with special protective compounds for baths and saunas in order to forget about problems with wood for 3-5 years.
Below, watch a useful video about what materials can be used to cover a bathhouse.
Installation and insulation of floor coverings
Bars with a cross-section of 5x5 centimeters are nailed to the bottom of the logs in the main rooms of the bathhouse building. Rough coating boards are mounted on top of them, then roofing felt (for waterproofing), followed by mineral wool slabs 10 centimeters high or expanded polystyrene. Before laying the final finishing material for the floor, glassine is laid (to provide a vapor barrier).
The floors in the washing area can be arranged differently:
- To ensure that the floor surface is warm in any weather and dries quickly, a separate foundation should be created around the perimeter of the room.
- The soil is removed to a depth of 50 centimeters and a 10-centimeter layer of gravel and sand is poured into the resulting trench. If water enters such a drainage hole, it will go into the ground and a pit will not be required.
- For this floor, it is advisable to use asbestos-cement pipes with a diameter of 10 centimeters. They are laid directly on the foundation and filled with concrete so that they do not move.
- Then a 4-5 cm thick edged round board is laid on the pipes, maintaining a gap of 6-7 millimeters and using rubber gaskets, which are fixed with nails.
- Then the floor material is pressed down with baseboards.
Improvement of the bathhouse premises of a frame bath from the inside involves carrying out work to prevent the accumulation of moisture as a result of temperature changes. The fact is that it is very hot inside the structure in the winter, and the weather outside is cold. Hence the need to install a vapor barrier. The simplest solution to this problem is to lay polyethylene film under the interior trim with clapboard.
You should approach the work of covering the steam room room responsibly. In this case, you will need a high-quality vapor barrier made of glassine, aluminum foil, polyethylene film, etc.
It is not recommended to use materials such as roofing felt or roofing felt in a steam room, since under the influence of high temperatures they will begin to emit an unpleasant specific odor. Experts recommend using Ursoy roll material 50 millimeters thick for internal insulation of frame baths.
It is laid out between vertical posts, secured with nailed slats. In some places, the heat insulator can be fixed to external boards, but using special nails with a rubber washer above the head.
As a result of the work done, you should get some kind of cake for the walls of the bathhouse from the following layers:
- external lining;
- glassine;
- insulation;
- polyethylene film;
- internal lining.
The main point that should not be forgotten is the need to leave a 5 cm air gap.
Particular attention is paid to the steam room, where it is important to ensure the “thermos effect”. For this reason, it is recommended to place the heat insulator with foil inside the room. On the ceiling you need to use not only foil Ursa, but also regular insulation, laying it in a layer of 5 centimeters.
As for the walls and ceiling of the steam room, it is advisable to use aspen lining, which has healing properties, for finishing. Boards, namely poplar or tongue-and-groove linden, are also suitable.
Is it possible to sheathe the inside of a bathhouse with an OSB board?
One of the main stages in the construction of a frame bath is its interior decoration , because it is a complex and labor-intensive job.
It must be said that often the bathhouse is not limited to the standard set of four rooms - a dressing room, a relaxation room, a washing department and a steam room .
Everyone’s financial capabilities and desires are different; some will want to have a veranda or attic, a separate room for a swimming pool or gym, which also needs to be equipped and finished (finishing a turnkey bathhouse).
Our company offers its services for interior finishing of wooden baths (frame baths, baths made of timber, logs, etc.), as well as stone ones (brick and block) in the cities of the southwestern Moscow region - Naro-Fominsk, Troitsk, Podolsk, Vnukovo, Odintsovo, Krasnogorsk.
1. Options for choosing materials for finishing 2. Finishing with clapboard 3. Finishing with plasterboard 4. Finishing OSB 5. Finishing the washing room
Options for choosing finishing materials
Having finished building the walls and partitions of the bathhouse, you need to start installing the ceiling, which can be insulated using a layer of sawdust, peat or expanded clay as the cheapest materials. The finished floor is made of floorboards, under which foam plastic or mineral wool is laid. The roof is usually constructed with a pitched roof; this significantly simplifies and reduces the cost of construction.
If we consider options for the interior decoration of a frame bath, we have to choose between: - lining; - plasterboard;
The lining looks most preferable. Finishing a bathhouse with wood material is convenient, environmentally friendly and beautiful. Drywall is the cheapest finishing material. It is easy to install and dismantle. OSB makes the wall frame rigid and durable. Wall-mounted bedside tables can be mounted on walls covered with OSB without fear.
Clapboard finishing
Wooden lining is an ideal finishing material for a frame bath. It creates the effect of a mansion where it is pleasant to relax and steam. Due to its environmental friendliness and affordability, pine lining remains the most popular finishing material for all types of baths. Most often, preference for a bathhouse is given to cedar, aspen, and linden. Larch, oak and ash lining is used less frequently due to its high cost.
OSB plate for frame bath
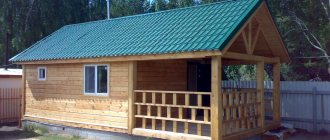
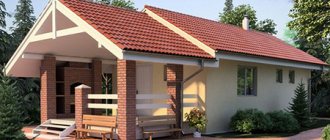
Do-it-yourself frame bathhouse with a gable roof I would like to present to your attention a photo project for building a frame bathhouse with my own hands. A frame bathhouse is not a difficult and entertaining project to build with your own hands. It doesn’t take much time to build compared to a bathhouse made of timber, and the price is an order of magnitude lower. I have a good attitude towards frame technologies, since they combine low cost, cleanliness during construction, and probably not least, speed of construction. Actually the project itself.
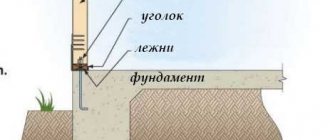
Step 1 Foundation for a frame bath
I will again use a lightweight foundation; in frame one-story construction, this is, in principle, not particularly important if you have deep groundwater, if groundwater is nearby, then the foundation should be made like a “slab” or strip. For a frame bath, you can use columnar, strip, pile-grillage, screw, or a simple support made of expanded clay or concrete blocks. You may have a question, Why don’t I use a columnar one? The answer is simple, so as not to have to worry about the base later. Don't forget to make vents into the underground space.
Step 2 Bottom trim of the frame bath
After laying the foundation, we begin to manufacture the lower trim. There are several types of lower harness, which one to choose and how to assemble it is up to you. I, in turn, can only give you food for thought and a link to familiarize yourself with the types of lower harness and how to assemble it. I will make the bottom trim from timber, since in my opinion there will be less fuss.
Step 3 Floor for a frame bath
After making the bottom trim, we proceed to installing the floor joists. Since we are building a bathhouse, the floors must be removable in order to avoid unnecessary unnecessary movements in the future. To implement this idea, I nailed another board along the inner perimeter of the lower beam frame. The floor will be attached to it.
installing floor joists
Next, we lay the floor joists in increments of 50 cm. To be sure of the reliability of this design, we placed expanded clay blocks under the floor joists. In other words, they made a columnar foundation out of them.
fixing floor joists
To save time at this stage of construction, we will attach the floor joists to these fasteners. Sold in stores.
interfloor covering
Let's start laying the floor. In this project I use OSB sheets with a thickness of 12 mm. We will lay OSB in two layers and in a checkerboard pattern. To secure the sheet completely, we install jumpers between the floor joists where necessary. We will treat the first layer of OSB with a bitumen primer on both sides. to avoid all kinds of rot and extend the life of the floor.
OSB floor
This is what we should get in the end. Since the walls are 15 cm thick, we left space for them on each side of the bottom frame. Now the floor can be dismantled without dismantling the walls.
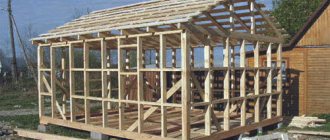
Step 4 Walls for a frame bath
We will assemble the walls according to the principle of a box, and it will consist of a lower board, an upper board, racks and jibs.
window opening and jibs
We assemble the walls on the floor, and then, with the help of friends, we install them and secure them to temporary jibs.
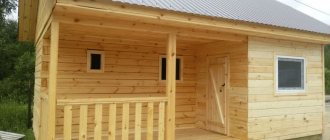
assembled walls
To come in
Already registered? Sign in here.
Related publications
On a pitched roof, you can use turf as a roofing covering, laid in two layers: the bottom of which is laid with the roots up, and the second with the roots down. Caring for such a roof is similar to caring for a regular lawn. Such “green roofs” are quite popular in Europe, but are not widely used in our country, although they were used everywhere in ancient Rus'. Basically, the roofs of the baths are constructed as gable roofs with an attic. The attic is good for drying bath brooms, storing household equipment, and in rainy weather it is an excellent place for drying clothes. The attic also provides additional thermal insulation for the bathhouse.
Shed roof of a bathhouse When building a bathhouse, many decide to build a shed roof. Unlike other types of roofs, making a shed roof is much easier. So, for its arrangement there is no need to erect a complex rafter system. And if the bathhouse is attached to another building, then such a roof will be a continuation of the existing one. But despite the apparent simplicity in its manufacture, it is important to take into account a number of nuances, for example, the slope of the roof. The pitch of your roof is determined based on several factors, such as how much snow and wind load there is in your area. The selected roofing material also influences the determination of the angle. If there is a large amount of snow in your region, then the angle of inclination should be made steeper from 15°. This will allow the snow to quickly melt off the roof and also make it easier to clean. If strong winds prevail in your region, then the roof, on the contrary, needs to be made more flat. Below is a diagram indicating the permissible roof slope angle for a particular roofing material:
Design Features
A frame bathhouse is a structure whose walls are formed by a load-bearing structure in the form of a lattice made of edged boards. All gaps are filled with heat insulation (mineral wool, polystyrene foam, other insulation materials), and the outer and inner surfaces are sheathed with sheet materials (chipboard, OSB, plywood, etc.). The main task is to fill the gaps tightly - there should be no gaps, cracks or other voids.
The walls of the frame bath are impenetrable to water vapor. There will be high air humidity in the room. This is normal for a Russian bath, but undesirable for a sauna. This must be taken into account during the assembly process and high-quality ventilation must be included in the project in advance. Removing excess humidity will make the air drier and increase the comfort of bathing procedures.
Heat-saving capabilities of walls
At first glance, frame walls may seem too unreliable. Mechanically, this impression is not far from the truth.
The entire load-bearing capacity is determined by the dimensions of the frame boards and the strength of the sheathing (as an additional element). However, even this strength is quite enough for the assembly of one- or two-story residential buildings.
The heat conservation of a frame bath is its strong point. The thickness of the walls is, in fact, the thickness of the insulation, which makes up the entire volume of the frame cavities.
It is known that 8 cm of polystyrene foam has the same thermal resistance as 121 cm of brickwork. This means that a wall 15 cm thick (this is the usual width of the edged board from which the frame is made) is equal in thermal resistance to a brick wall 2.5 m thick. It is slightly inferior to mineral wool foam, and penoplex is superior to it - brickwork 121 cm thick will replace only 5 cm heat insulator.
Such a high ability to save heat, combined with a record low weight of the walls, became the reasons for the high popularity of frame baths. Despite the relatively short service life, users often choose this particular design option.
The high speed of construction, the ability to avoid excavation work, the efficiency and maintainability of a frame bath are highly appreciated by users.
Exterior decoration
Above we learned how to decorate a bathhouse from the inside, now it’s time to take care of its appearance. After all, it is not always possible to build a bathhouse from profiled laminated timber or facing red brick, which do not require any additional finishing.
If you decide to build a building using frame technology using OSB boards, then the bathhouse is finished with siding. Thanks to this material, even the most unprepossessing room acquires an excellent appearance.
Siding will additionally protect the walls from precipitation, increase the service life of the building and reduce the cost of its operation. This type of finishing is now relevant and popular due to its low cost and ease of installation, which can be done with your own hands without inviting professionals.
Facing the sauna with siding
Exterior wall decoration
As practice has shown, the construction of frame baths is best done from OSB boards. The fact is that they are multi-layered and do not move or warp, as happens with natural wood. But a bathhouse made of OSB or other materials needs external finishing. One option is plastering or painting.
The modern construction market offers a huge selection of finishing materials, and therefore it does not matter how simple the design of the bathhouse is from the outside, since it can be given an expensive appearance.
The most popular and in demand of them now are:
- Lining . This decorative finishing material is the most accessible and easy to install for external upholstery of frame baths. Such buildings look very solid. On the external wall, the lining is placed horizontally after waterproofing has been made from glassine, the sheets of which are fixed overlapping and the edges are taped. If the work is done efficiently, unnecessary moisture will not be able to penetrate inside the bathhouse.
- Thermal panels . Often the construction of a frame building requires wall insulation, which can be done with their help. Thermal panels have a three-layer structure. It contains thermal insulation material (mineral wool or polystyrene) between two polyvinyl chloride layers. The surface of thermal panels, as a rule, looks like masonry and is sprinkled with compressed stone chips on top. The panels have mutual grooves, and after they are laid, a monolithic pattern is obtained, reminiscent of brick or stone walls. The finishing of the façade of the bathhouse is carried out using ordinary self-tapping screws - they will fix the material to the profiles.
- Facing brick . Brickwork fits perfectly into the landscape of any garden or summer cottage on which a frame bathhouse is being built. An even row always looks beautiful on a bathhouse building. The cost of facing a frame structure with brick will be much cheaper than building an entire bathhouse from it. In addition, additional insulation can be laid between the brick trim and wooden walls.
- Vinyl siding . This is the most popular modern cladding material used for cladding frame bath buildings. Siding has an affordable price and is easy to install. In addition, the market offers a wide selection of textures, colors and thicknesses of products.
- Block house . A frame bathhouse, the façade of which is lined with this latest material, looks like a log structure. It is almost impossible to distinguish such a building from a real log house.
Installation technology
To install OSB boards correctly, the process should be divided into stages. This will allow you to carry out all procedures efficiently and avoid problems in the future.
Preparatory work
Preliminary activities include the following:
Before laying the slabs, it is necessary to carry out preliminary measures on the ceiling surface. Correctly carried out preliminary work allows you to avoid problems in the future.
Sheathing device
To ensure that the ceiling made of OSB slabs is extremely smooth and reliable, it is erected using lathing. The creation technology is as follows:
The sheathing is a special frame onto which OSB boards are subsequently attached.
You should know! A significant disadvantage of using plastic dowels when working with concrete structures is their weakening during a fire, which can lead to collapse and blocking the exit.
Fastening the plate
OSB is attached to the ceiling with great care; any inaccuracies will lead to distortions. For ease of fixation, the parts are drilled out in several places, this will allow you to quickly install the self-tapping screw. The material must be hemmed according to a certain pattern:
The fastening should not be done close to the wall; you need to leave a small gap. For a good fit, you can use slabs with a locking connection. They are suitable for situations where it is necessary to obtain a surface that will be decorated with transparent compounds.
Internal wall cladding
This process, just like the procedure described above, requires the preliminary construction of a frame, for which the same wooden beams or profile are used. the metal version will serve as an example for arranging the sheathing , since the wooden frame was discussed earlier. Finishing walls with OSB boards consists of the following steps:
- The first step is, as always, marking.
If the wall is uneven, you should find the part that sticks out the most, from which you should start. Lines are drawn along the wall, after which the starting UD profile is attached to the floor and ceiling using self-tapping screws or dowels.
The installation of the slabs is carried out in accordance with the rules mentioned in the instructions for the construction of partitions.
Brief characteristics of OSB
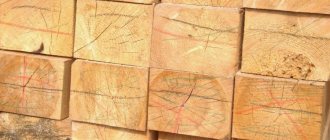
Oriented strand boards are a construction and finishing material, 86-90% consisting of large finely planed wood chips up to 25 cm long and chips no more than 4 mm thick. The remainder of the total mass is thermosetting synthetic resins, special additives and additives.
OSB 3 is the most widely used
Manufacturers offer 4 types of slabs for different purposes:
Basic physical and technical characteristics of OSB are given in the table below:
| Name | Standard | Data |
| Dimensions, in mm: LengthWidthThickness | 2440-2800590-1250from 6 to 38 | |
| Modulus of bending strength, N/mm²: longitudinal axis transverse axis | EN 310 | 18-359-17 |
| Transverse tension, N/mm² | EN 310 | 0,75-0,34 |
| Swelling in 24 hours when completely immersed in water, % | EN 317 | 6-25 |
| Level of formaldehyde release, mg/100 g. | EN 120 | 6.5 and above |
The advantages of OSB are widely known thanks to advertising:
SIP panels are another very common option for using OSB
We also note as a plus the low coefficient of change in geometric dimensions due to changes in temperature and humidity. Thanks to this characteristic, the material can be installed with minimal gaps around the perimeter of the room.
Now let's look at the disadvantages of OSB:
The disadvantages of the material are not limited to this list. According to marketing research, potential buyers consider the harm of these stoves to human health to be the biggest drawback. The main criterion here is the concept of “environmental friendliness”. Let's take a closer look.
Is it possible to sheathe an OSB ceiling in a bathhouse?
Finishing the ceiling from OSB slabs began relatively recently.
Many people still don’t know this material. Now we will tell you what this structure is, what it consists of and how the ceiling is finished with OSB slabs.
OSB boards, their advantages and disadvantages
Let's first figure out what kind of material this is and determine where it should be used. After all, this is a rather important question, where and how such a finish can be applied.
This material is pressed chips. Its structure consists of three layers of coniferous shavings.
Advantages of OSB boards
- The entire slab is impregnated with resins and wax, which makes it moisture resistant. Modern technologies are used in production, which makes the material homogeneous and void-free.
This design is perfect for finishing an attic.
General view of OSB boards
- The low price, which is much lower than analogues, can also attract consumers
- You will not need to do ceiling plastering and various leveling, this is not important for this type of finishing:
- You can also immediately insulate the ceiling, if, of course, the structure itself allows it.
Flaws
There are also negative points to consider.
- The plate is made on an adhesive basis and contains phenol, which is a rather harmful substance for human health.
Attention: There are not enough raw materials for the production of this material; many have begun to make this material in an artisanal way. And therefore the production is carried out with violations.
Therefore, when purchasing this material, check with the seller for certificates of quality and compliance.
We carry out finishing with OSB boards
Now we know what this material is and its components. It should be said that as a final finish, these slabs can be used to finish the ceiling in a country house.
But they will serve as an excellent base for attaching other facing materials. Moreover, this material itself will serve as insulation and create a perfectly flat surface.
Surface preparation
As in any work, the mounting plane must be properly prepared in this case, otherwise the configuration of the ceiling may be disrupted. The correctness of fastening will depend on this, which in turn will completely determine the durability of the structure.
- First of all, we inspect the ceiling and remove the previous covering. There is a separate article on this topic on our website. It should be said right away.
That the finishing of the OSB ceiling can be done when finishing a new building and the previous plane can be covered. Therefore, we will make amendments to both options
This will significantly extend the service life of the entire product. If you are finishing an old ceiling, then you should treat the surface with antifungal materials, which you also purchase in advance.
Attention: Immediately during work, you should correctly calculate the height of the ceiling mounting. If you use insulation, then you need to take into account that the material should not be pressed against the ceiling.
A gap of about one cm should be provided. The insulation must lie tightly, but not be deformed, otherwise it will lose its properties.
Installation of sheathing
This is a rather important part of the work, which will determine the geometric shape of the entire plane. The fastening must be strong enough to support the weight of the entire structure.
This is not a PVC ceiling finish; here the fastening is done to the frame.
Attention: This can be done using a metal corner or a wooden beam. If you decide to use the second option, then you should prepare the material correctly.
Before use, all parts should be treated with antiseptics, which should be purchased in advance. Before work, the material must be allowed to dry completely.
Buy timber only with a moisture content of up to 12%.
- Regardless of the frame material, we cut the elements to the required size. Remember, the fastening should not be done tightly to the wall.
Don't make a big gap. Cut and fasten.
For a wooden plane, you can limit yourself to making connections using self-tapping screws. For brick and concrete finishing, we use a hammer drill and make connections using dowels.
You should not use them from kits. You need to separately purchase plastic pacifiers and a couple of mm screws for them. more from the plastic hole
And the fastening is done at a distance of 50 cm. Therefore, according to these data we make the fastening.
Installation of wiring
This issue should be thought through in advance and lighting fixtures purchased. Also correctly calculate the cable cross-section.
It shouldn't be close to each other. Allow for a 20% increase in clearance.
- First of all, we determine the location of connection to the network. It must be selected so that there is free access.
This will be useful in repairs. Immediately think about installing a step-down transformer; this will be required when using energy-saving lamps.
Distribution boxes should be installed in this place
Attention: To make connections, purchase terminal blocks in advance. Do not fasten using twists, this is not safe. The terminal blocks will provide a reliable and high-quality connection.
After attaching the sheets, this will be difficult to do.
Installation of slabs
This work is carried out according to some rules that are worth following. Then the finishing will be done with high quality.
Attention: When attaching slabs, always be aware of the gaps. The material expands when heated. The slab is still not such a rigid structure.
Therefore, exposure to heat and moisture greatly affects it. When fastening, maintain a gap of 3 mm.
And this will save you from many troubles.
- When making fastenings, use self-tapping screws not for drywall, but for metal. They are more durable. Make sure the mounting is perpendicular.
To hide the cap, chamfer on the plane
Use gaskets for this
Joining sheets is carried out only on a solid surface
- Never make fastenings without first trying on the element. First you need to measure and adjust and only after that make the connection
- In the places where the lamps are output, we do the following. First, we try it on and mark the installation.
After this, we place the sheet on a flat surface and make a hole using a drill with a crown. Just buy it in advance of the required diameter.
Never press hard. Do everything smoothly. Otherwise, the material will bite and tear out
They just sit on the glue.
The finishing of the ceilings on OSB slabs has been completed. Now you can finish the plane, or leave it like that.
In any case, you have a high-quality ceiling. For additional information, you can watch the video on our website.
Painting and priming of OSB ceilings and walls
The growing popularity of oriented strand boards, which are used as an inexpensive material in construction or renovation work, often leads to questions about how best to finish the resulting structures.
One of the simplest ways to solve this problem is painting or varnishing. However, paint for OSB boards should be selected based on the characteristics of their surface and take into account the characteristics determined by the method and place of production.
Preparing the OSB surface for painting
OSB-3 boards are most often found on sale (sandwich panels are also made from them). This class of OSB panels is characterized by increased resistance to moisture due to the coating of the surface with water-repellent materials containing wax or paraffin. In view of this, simply painting OSB without additional processing of its outer edges does not provide the necessary adhesion to the base and can lead to paint dripping. Preparation for applying the decorating coating must be done in the following sequence:
- Leveling the surface. It is necessary to carefully examine the outer layer of the finished structure. All irregularities and defects are removed by grinding or putty.
OSB seams sanded
OSB primer will help prevent stains from appearing on the finished surface.
This is necessary to reduce paint consumption, apply it more evenly and prevent stains from appearing from the various components contained in the slab.
The primer for OSB must have an acrylic or gypsum base; water-containing compounds should not be used, as they can lead to swelling of the slab.
Before applying the primary coating, it is advisable to treat the surface with sandpaper to remove the protective layer of varnish or wax.
OSB painting
The production technology of OSB boards involves the use of specially processed chips from various types of wood (aspen, maple, poplar or pine), which occupies about 90% of the total volume of the product. Therefore, the answer to the question of how to paint an OSB board. quite simple: all products intended for the final finishing of wood products are suitable.
When working with paint and varnish coatings, it is necessary to strictly follow the manufacturer's instructions and carry out test painting of small areas of the surface to determine the compatibility of the materials used.
Depending on the requirements for the appearance of the treated surface, you can use:
- Varnish. For finishing with varnish, it is advisable to use sanded OSB-3 sheets. If this is not possible, it is necessary to level the surface using sandpaper (grain size P60).
Varnish treatment allows you to preserve the color and original texture of the material, obtain a smooth, beautiful surface and reliably protect it from environmental influences.
It is best to use acrylic or oil-based varnish, since water-based coatings can cause swelling and deformation of the slab plane.
Painting the board on one side can lead to bending and swelling of the fibers, so it is better to cover the entire surface at once, including the ends and the inside.
In addition, it is very important to ensure that there are no channels or pores where water can collect, which can deform the slab and cause it to warp when frozen. To avoid this, it is advisable to seal the joints with special decorative elements. The paint must be applied in several thin layers, with breaks for drying.
Painting is far from the only way to solve the problem of finishing an OSB board. But this is one of the most convenient and economical options for applying a protective coating.
Flaws
There aren't many of them. First of all, it is worth noting the low degree of environmental friendliness of slabs from the middle and low price categories. To get building materials that are safe for health and suitable for residential premises, you will have to pay a little more. Better yet, check the quality certificate, which must be attached to each batch of goods. The fact is that during production, resins are used that contribute to the formation of gases hazardous to human health. The most famous of them is phenol. The higher the quality of the product, the less harmful emissions there will be.
OSB is not suitable for use in rooms with high humidity - in a steam room, bathroom or toilet. Heat and steam can cause deformation.
OSB processing leads to abundant dust formation, so it is better to prepare a mask before work.
One way or another, this design has significantly fewer disadvantages than advantages.
Advantages and disadvantages of OSB boards
According to builders, finishing walls with OSB boards has a number of advantages:
All these properties make the material suitable for external and internal work. However, when choosing, you should pay attention to the reputation of the manufacturer. Some companies do not follow technology in order to save money, so their products turn out to be of poor quality from an environmental point of view. Such stoves can emit harmful substances. Any OSB product does not allow moisture and steam to pass through, so in rooms with such finishing it is worth taking care of adequate ventilation.
Source of the article: https://dom-srub-banya.ru/obshivka-bani-osb-panelyami/
Arrangement of the rest room
The main thing here is not practicality, but comfort, a relaxing atmosphere, and ergonomic design. The most affordable way is to sheathe the room with pine boards. They do not rot, dry quickly, and look beautiful. Based on the durability of the material, it is better to choose boards made from Scandinavian pine. A pleasant light pink shade will eventually become covered with an original patina and will give the room even more coziness.
Budget materials for a relaxation room also include laminated, polyvinyl chloride MDF panels, quartz vinyl tiles, fiberglass wallpaper, decorative plaster, tiles with a stone, brick or wood pattern. In general, everything will depend on the imagination of the owners and the style in which the room is intended to be decorated.
There are also compositions (two-component paints) that completely imitate wood on any surface (mineral, old wood). The inside of a brick or concrete-block bathhouse is finished with OSB or gypsum board panels, primed and puttied. Then paint is applied.
Installation of a heated floor system
The presence of a heated floor promotes the rapid evaporation of moisture from the heated floor surface. This type of floor dries quickly and mold and mildew do not have time to form on it. And the constantly warm surface is very comfortable for bare feet! These reasons determined the choice of electric flooring for the steam room, washing room and rest room.
To facilitate cable installation, a 50x50 mm masonry mesh is laid on the surface of the vapor barrier. The mesh parts are connected with wire.
Installation of masonry mesh for vapor barrier
The cable was secured with 100 mm ties. A heated floor sensor is installed in the wall.
Laying underfloor heating cables on a grid
Installation of a heated floor sensor on the wall
Before pouring the mortar, the masonry mesh was raised 1 cm from the floor. To do this, pieces were cut from the remains of foamed polyethylene (left over after insulating plumbing pipes) and placed under the mesh. You can use any other material that does not wrinkle, does not bend and holds its shape.
The thickness of the floor screed is 30 mm. In the steam room, relaxation room - without a slope, in the sink - with a slope of 5 mm/1 m towards the drain. To form a flat surface, beacons were used - a U-shaped profile 19x20mm. First, wood grouse were placed on the floor surface using a laser level, and beacons were laid on top of them.
Exposed beacons for screed installation
The screed was filled with a cement-sand mixture with a plasticizer (PVA glue) and fiber (reinforcing additive). Mixed in a concrete mixer. The solution turns out to be gray, dense, and almost as strong as metal.
The next day, the beacons were removed from the fresh screed and the wood grouse were unscrewed. The resulting holes are filled with mortar and rubbed flush with the hardened screed. Afterwards, the screed is moistened with water and covered with a film to prevent cracking. The film is removed after the screed has completely hardened. I did it after 5 days.
Screed device for subsequent tiling
Construction of the truss structure
Typically, boards with a section of 15x5 centimeters are used for floor beams and rafters in frame baths. They are placed on the edge and fastened together. As a result, a distance of 10x12 centimeters is obtained between the rafters. In a vertical position they are fixed with “kerchiefs”, and on top they are combined with a ridge beam of a similar section.
The beams extend outward approximately 40 centimeters. The sheathing is made from boards 25 cm thick, it is laid in the direction from the ridge.
An example of a floor arrangement in a frame bath: ecowool + cable underfloor heating system
The floor in the bathhouse should be warm, not rotten, and not absorb water. Such a floor is not difficult to make in a log house. What to do if you have a frame bath? After many days of deliberation, it was decided that in my frame (6x4.5 m) the floor would be multi-layered, with OSB lining and an installed electric heated floor system. This will make the surface comfortable and speed up its drying between procedures. Where the stove is installed on the floor, to evenly distribute the load, it is necessary to install a concrete support slab.
I will describe the entire process of installing such a floor. At the beginning of construction there was a columnar foundation and a wooden grillage on it.
Construction of a columnar foundation
This type of foundation for a frame bath is made in the presence of high groundwater. They build a columnar version of the foundation without the involvement of special equipment and a team of workers (for more details: “How to make a columnar foundation for a bathhouse - types of construction options”). You need to have a drill, plastic or asbestos pipes at your disposal and be able to mix cement mortar.
If you are building a frame bathhouse with your own hands, step-by-step instructions for arranging a columnar foundation look like this:
We suggest you read: How to insulate a bathhouse from the inside with your own hands
Strip foundation
Such a foundation is installed when there is heaving soil on the plot.
The work on its construction is carried out step by step:
- Markings are made on the site and a trench is dug, the width of which is 40 centimeters and the depth is approximately 50 centimeters.
- The hole is filled with sand layer by layer until the ground level is reached, compacted each time and watered with water to ensure compact shrinkage.
- They construct formwork 50 centimeters high and 30 centimeters wide. For greater strength, it is reinforced using rods and metal pipes.
- Pour the concrete solution in several approaches (without allowing the previous layer to dry) or at a time.
- Roofing felt is laid on top of the concrete to waterproof the frame walls.
Projects and drawings of a two-story frame bathhouse provide for the provision of the most reliable support on any type of soil, with the exception of floating ones. The base is a prefabricated strip foundation.
Dressing room and its proper ventilation
A steam room is never a separate element in a bath system; it is necessarily combined with several functional rooms. Since a dressing room is a mandatory structure for a bath complex, it is also necessary to comply with all comfort conditions. Ventilation in the dressing room is designed to provide this room with an influx of clean, oxygen-enriched air. A constant flow of air in the dressing room is also necessary for effective drying of bath items.
Several systems are suitable for ventilating the dressing room: mechanical (forced), natural and combined. Forced mechanical ventilation consists of installing a fan in the room, which will pump clean air into the room.
The natural way of ventilation is to ventilate the room through open windows. It is advisable to open both windows and doors in the room at the same time.
A combined air ventilation system consists of installing a forced system for injecting clean air and exhausting exhaust air through the toilet or washing room.
What is OSB board?
OSB is an oriented strand board. The material consists of panels made from pressed shavings of coniferous and deciduous trees. Chip sizes can range from 60 to 150 mm.
OSB boards have high strength and density due to the combination of several layers. In the middle, the chips are located across the sheet, and in the lower and upper layers - along.
All layers of material are pressed under high temperature and pressure and impregnated with waterproof resins and paraffin. Used as a binder
The finished slabs have a uniform structure - without cracks, chips or cavities.
How to build a frame bathhouse with your own hands - construction instructions
And so we have already looked at what inexpensive foundations for frame buildings there are. Now we will look at a photo report on how to build a frame bathhouse with your own hands. In our difficult times, not everyone can afford a house with the use of explosion-resistant technologies that can withstand a direct hit from an atomic bomb. And so let's get started.
Constructing a frame bathhouse with your own hands is a completely feasible task. It still needs to be properly insulated and insulated from moisture penetration. It is easier and faster to erect a frame structure than a similar structure made of logs or bricks.
Any home craftsman will be able to cope with such work, since he will not need to order drawings, will not need to equip a serious foundation and will not need to purchase expensive building materials.
The frame bathhouse in the photo has a significant advantage - the structure is light in weight, which means it will not shrink during operation. Among the disadvantages, it should be noted that during precipitation, moisture penetrates through the cracks of the frame and then accumulates inside it. This problem should be solved in advance.
Purchasing turnkey frame baths: projects and prices of structures
Many companies offer ready-made frame bathhouse projects of various layouts and sizes for sale. Not everyone has the opportunity to assemble and install a structure with their own hands: some do not have the necessary skills, others simply do not have the time to assemble it themselves. By purchasing an inexpensive turnkey frame bathhouse, you can save time, money, and at the same time acquire a guarantee of the reliability of the construction.
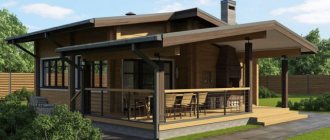
Project of a turnkey frame bathhouse 4x9 m with a relaxation room and a terrace
For the convenience of users, manufacturers post projects, photos and prices of frame baths on their websites. By visiting the site, you can find complete information about finished structures, indicating dimensions, prices, specifications of materials and services included in the price of the kit. If you do not find a suitable one among the indicated projects, you have the opportunity to make additions to the existing drawings or offer your own sketch according to which the project will be carried out.
A convenient search system allows you to quickly find your favorite option for an inexpensive turnkey frame bath. It is possible to search for a structure by appearance, size, layout, and also select a model with a terrace or a residential attic. Companies offer services for laying the foundation, assembling the structure on your territory, and transporting the object to the site. Seasonal discounts and other bonuses are not excluded when ordering a frame bath.
Prices for turnkey frame baths (for models from different manufacturers) are shown in the table:
| Manufacturer | Project name, dimensions, m | price, rub. | |
| For seasonal use | For year-round use | ||
| SC "Estate" | "Julia", 4x4 | 198100 | 273100 |
| SC "Estate" | "Fun", 6x6 | 315900 | 422900 |
| BK1644 with veranda, 4x4 | 400100 | The price for additional insulation will be confirmed with the manager | |
| BK1568 with terrace, 6x4 | 495100 | The price for additional insulation will be confirmed with the manager | |
| LLC "Master" | "Lada", 6x3 | 340000 | |
| SC "Dachny Mir" | KB-7 with attic and terrace, 6x9 | 590100 | |
| SC "Teremok" | B6607, 6x6 | 315100 | |
| SC "Teremok" | B6901, 6x9 | 600100 | |
The price of the basic set of frame baths does not include the cost of the stove. Manufacturers offer the customer several modifications of sauna stoves. It is possible to install your own version of the furnace or boiler.
Helpful advice! The cost of installing heating equipment can be discussed with the work team before purchasing a turnkey frame bathhouse.
Bathroom trim
What material is suitable for tiling a bathroom or sink - tiles or porcelain stoneware. Unlike wood, ceramics will not require constant treatment with moisture-protective and bactericidal agents.
Glass-magnesite boards are no less popular. This is a durable, moisture-resistant, non-flammable, non-toxic material that is not susceptible to the development of fungus or mold.
You can also use decorative moisture-resistant plaster, plastic panels, plasterboard and glass magnesite for walls and ceilings, followed by the application of waterproof solutions. PVC, slatted pebbles and fiberboard are also allowed. However, it is necessary to take care of complete thermal insulation of the steam room.
In addition to tiles, you can lay moisture-resistant laminate or panels based on composite plastic on the floor. But tiles will be more practical and durable. Wooden shields are placed on top of it to prevent slipping. What interior to create in the washing room in the photo below.
How to sheathe OSB outside and inside the house, tips and instructions
Today OSB panels are so popular that they are often used in repairs and construction for both interior and exterior decoration. Of course, with the right approach, it is even possible to paint OSB, or plaster on OSB, or stick wallpaper, but all this is not very reliable, and the result will even be costly. If you try hard, you can even lay tiles on this material, but how long it all lasts may depend on many factors, and such finishing is not at all applicable for exterior work.
Varnishing
Varnishing or varnishing is a method that allows you to preserve the appearance of the slab and increase its moisture resistance. It is suitable for finishing walls in damp rooms. Before applying varnish, it is recommended to level the surface properly using sandpaper and prime it.
Priming OSB boards. You can use a brush or a paint roller.
How to choose a primer and apply it to the OSB surface can be found in more detail in the article: OSB primer.
Coloring
Painting is the simplest and most affordable option. To do this, use water-based paints (water-based, acrylic or latex paints). They allow steam to pass through perfectly and thus provide a good microclimate in the room. Before proceeding directly to painting the surface, it must be properly prepared. First, two layers of primer are applied and then leveled using wood putty. After this, paint should be applied.
More details about the types of paints used and the technologies for their application are described in a separate article: painting walls made of OSB sheets inside the house.
Wallpapering
Gluing wallpaper is a complex process that requires strictly maintained technology. First, two layers of primer are applied to the OSB board, then putty and only then wallpaper glue with the addition of PVA. This will give the adhesive greater strength and a guaranteed result. More information about gluing wallpaper on OSB boards can be found in the article: how to glue wallpaper on walls made of OSB sheets.
Base trim
A layer of roofing material must be laid on the installed pillars as waterproofing. Next, the base piping is installed. To do this, take a 120x120 mm beam and soak it with an antiseptic. It is better to use softwood such as pine or cedar. The beam is laid around the entire perimeter and fastened using the “half-log” method - half of one beam is sawn off from the top, and from the second from the bottom. When connected, a flat plane is formed. The piping, checked using a level, is attached to the pipes with anchors.
Bathhouse exterior design
A bathhouse made of panels can have a different architectural appearance. The most popular exterior design options:
- Bathhouse finished to look like timber or logs. An original combination of light window and door openings, a porch and a roof canopy with a log facade. Decoration of the base and chimney with brickwork.
- Bathhouse with plastered walls. The external walls are finished with colored plaster - from light to dark tones. Decorative elements can be made in dark colors to create contrast. An open porch or terrace will harmoniously fit into such an exterior.
- Bathhouse with a finish that imitates a log. The external walls are finished with log-like material, which gives the building an attractive appearance. The roofing material used is soft tiles or ondulin. The elements of the drainage system are made to match the roof.
Is it harmful to use slabs for interior decoration?
The possibility of using OSB for interior decoration depends on the labeling of the product, which in turn is determined by the amount of synthetic resins in the material, which emit harmful fumes during operation.
The largest amount of toxic substances (from 10 to 30 mg per 100 g of dry matter) is contained in slabs of class E2 and E3. OSB panels marked E0 and E1 contain a minimum proportion of harmful components - from 6.5 to 10 mg. These are, as a rule, products of foreign manufacturers: Glunz (Germany), Norbord (Canada), Egger (Austria).
Thus, the products of the last two brands are most suitable for use for interior decoration.
Materials of class E2 and E3 can only be used for outdoor work.
To protect yourself from purchasing “hazardous” material, it is worth considering some points that partially determine the correct choice of OSB:
- the smell of stoves. With a high content of harmful substances, the material smells strongly of formaldehyde and cheap plastic;
- products must have a certificate certified by a seal from the manufacturer or supplier. A copy of the document can be requested from the seller;
- It would also be a good idea to inspect the packaging, if available. Products from serious manufacturers are usually labeled and equipped with information inserts.
How to finish the slab indoors?
The interior decoration of wooden country houses as in the photo can be completely different in cost and design. Various materials are used to finish surfaces made of OSB sheets. Let's consider them further.
Can. Moreover, for this it is not necessary to use a metal profile, but simply screw the material to the base with self-tapping screws.
The main thing here is that the level of humidity in the room is not high, since otherwise this can lead to deformation of the OSB and, consequently, the plasterboard sheathing itself. Self-tapping screws are screwed in around the perimeter and in the center of the gypsum board in increments of 10-15 cm.
Varnish increases the moisture resistance of OSB boards. This finishing method is good for use in damp rooms. The boards can be painted with any varnish intended for natural wood. The surface is cleaned of dirt, degreased, sanded and treated with a primer. Varnished OSB has a smooth surface, but retains its texture.
Acrylic paint is also a good option for finishing OSB. It rolls well over the surface with a roller and forms a durable and “breathable” coating.
To get the best effect, it is advisable to paint in two layers.
Putty materials do not adhere well to wood. Therefore, it is best to use compounds that have maximum adhesion to wooden surfaces. These can be dry mixtures “Rodband” or “Goldband”, containing polymer additives and most suitable for working with wood. Vitonit KR can be used as a finishing putty.
Before puttying, OSB is primed with a special compound, to which glue, interlining and a little putty mixture are added. If this measure is neglected, the base impregnation may bleed onto the finished surface, causing the finish to become stained.
For plastering OSB, it is best to use a special mixture. For example, Knauf Sevener. The plaster finishing technology itself includes the following steps:
- The joints between the slabs are puttied and covered with sickle tape.
- The surface is treated with a primer (you can take Knauf Tifengrund).
- Apply the first layer of plaster and embed the reinforcing mesh into it.
- A covering and leveling layer is applied on top.
If the slabs are smooth (polished), wallpaper can be glued directly onto them. Otherwise, you will have to plaster and putty the surface, doing this using the technology described above.
Fiberglass wallpaper is glued to special compounds. In this case, the dry mixture “Methylane Fiberglass Premium” and the granular composition “Methylane Granulate Premium” are suitable.