The popularity of frame technology is explained by lower construction costs and high speed of construction. Both commercial structures and residential buildings are built on it. Frame baths are especially in demand today. You can easily build them yourself on your own country plot. A 5x5 frame bathhouse is one of the popular construction options that you can build with your own hands.
Where to start building a bathhouse
Before starting the construction of a frame bath, it is worth planning the placement of the building. Pay attention to the following features:
- It is important to determine where the bathhouse will be located - separately or near the selected building on the site.
- Choose a place to install a bathhouse, taking into account the location of utility networks, and also mark the routes for laying communications.
- Find out the soil characteristics on the site in order to choose a foundation.
- Develop a new or choose an existing bathhouse project, taking into account your own requirements.
Advice!
The more detailed the bathhouse design is, the easier its implementation will be. Many organizations offer ready-made projects. You can also order an individual project from them. The minimum size is 3x4 m. The optimal aspect ratio of the bath is 5x5 m.
Own bathhouse project
In order not to waste time creating drawings, you can choose an already created project as a basis. In this case, the layout of the frame structure must correspond to the building area. Then it remains to make some amendments to it.
For a future frame building project, it is important to consider:
- layout - it is important for the rational distribution of space;
- costs for the construction and operation of a frame bath;
- terms of work;
- features of the foundation structure.
All interior spaces are arranged in accordance with the number of pieces of furniture and their sizes. For example, when creating a drawing of a frame structure, the length of the benches is taken into account. To make it comfortable to sit in the relaxation room after taking water procedures, a table, sofa and armchairs are installed in it.
It is important to correctly determine the location of the dressing room in the frame structure. It is designed in such a way that cold air does not enter the bathhouse when the doors are opened. In the washing compartment of the frame structure, a location for a water tank should be provided. The brooms are dried in a warm attic. Comfortable relaxation is possible by creating a veranda or terrace.
Construction of a foundation for a country frame-panel bathhouse
The usual construction of a strip foundation for a building requires 1/3 of the total financial costs for construction and the same amount of time. Due to the fact that our construction will be lightweight, the foundation can be carried out according to a simplified scheme, but a strip or pile structure would lead to an unreasonable increase in the cost of the entire construction. We will make the supporting part of the frame from “bald” car tires filled with crushed stone. After construction is completed, the tires should be protected from sunlight. This will prevent them from breaking. Features of constructing a foundation for a bathhouse in the country:
- After breaking down the perimeter of our bathhouse, the plant layer of fertile soil is cut off from its inside and carefully moved to the garden. As a result of this procedure, you should get a mini-pit 3.5x5 m with a depth of 0.15 m.
- Its bottom is compacted by rolling a heavy steel barrel over it. Then the entire area needs to be covered with fine crushed stone and also “rolled”. As a result, we received a dense crushed stone cushion for the bathhouse in the country, which in the future will evenly distribute the entire load from the structure.
- It is necessary to hammer one peg into the places where the tires will be installed.
- Then the tires are laid throughout the area so that the center of each of them coincides with the peg. The future foundation must be leveled in a horizontal plane. For this, a flat board 4 m long and a building level are used.
- After all the tires are leveled, a pad of any waterproofing material is placed inside each of them to prevent rubble from spilling out when working with the tires. All tires are covered with crushed stone in layers, with each of them compacted.
- Backfilling must be stopped before reaching the edge of the inner rim 5 cm. The crushed stone inside the tire is moistened, and its entire internal cavity is filled with Knauf cement mixture with the addition of filler. Thus, all lying tires should be filled to the very top at the same level.
- After polymerization of the concrete mixture, we obtain a durable layer in the rubber “formwork” that transfers the load to the crushed stone cushion. The rubber of tire beads serves as a compensator for periodic freezing and thawing of the soil.
As a result, when constructing such a foundation, we almost avoid excavation work and have a small consumption of materials: car tires d = 70 cm - 10 pcs., crushed stone - 3 m3, KNAUF mixture - 75 kg, roofing felt - 1 roll. The beam of the lower trim of the frame is installed on supports made of tires.
Advantages of frame structures
The construction of a frame bath requires compliance with certain rules. Such a structure consists of a supporting structure, which is covered with OSB panels. Insulation and vapor barrier are laid between the wall slabs.
Advice! You can save on building a frame structure by choosing straw or sawdust for insulation.
A frame bath made of similar materials is light in weight and therefore does not require the creation of an impressive foundation. It is easy to build it yourself.
The obvious advantages of frame construction are:
- low costs for foundation construction;
- all work can be done independently, without using heavy equipment;
- short construction time.
Frame technology also has its disadvantages that require mention. The main disadvantage of such baths is their increased fire hazard. For this reason, it is better to carefully treat all structural elements with refractory compounds. For wiring in a frame structure, non-combustible casings should be selected.
Important! In a frame bathhouse, special attention is paid to moisture insulation of the walls. Mineral heat insulators perfectly absorb moisture, as a result of which their positive properties are lost.
Preparation for work
If you have already decided to build a bathhouse yourself, then you should outline a construction plan.
Option for the design and layout of a frame two-story bathhouse 6x6 m
Planning the construction of a future bathhouse is best divided into stages.
Choosing a site for construction
- It is advisable that the plot of land for the construction of a bathhouse be located close to utilities. It is worth considering proper drainage. If there is no central sewer pipe, then it is worth deciding on a place for a cesspool.
- It is also advisable to have a source of water supply close to the bathhouse itself. After all, any operation of buildings should be as convenient as possible and not require daily efforts to deliver water.
- If you plan to install a gas stove in a bathhouse, you should bring the building as close as possible to the gas pipeline in accordance with building regulations, since connecting to gas networks may require considerable financial investments.
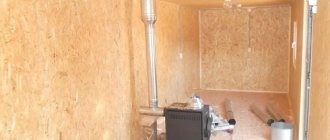
Installation diagram of a gas stove in a frame bath - When choosing a wood-burning stove, it is advisable to have a free area near the bathhouse for storing logs.
- Special attention should be paid to the soil under the bathhouse. Depending on the quality of the rock, special knowledge may be required to solve a number of technological problems associated, for example, with swampy or silty terrain. It is possible that the bathhouse will be installed in a low area, which will contribute to the accumulation of moisture in the soil and under the flooring of the bathhouse. Dampness will significantly shorten the service life of wooden bathhouse structures.
Selection of oven
An important issue is the choice of stove (gas or wood-burning). Its power also matters. Bathhouses with dimensions of 6x5, 6x6, 6x8 m do not require the purchase of a powerful stove, but if these are two-story buildings or a frame bathhouse with an attic, then it is worth thinking about a more serious device.
Project of a frame bathhouse 6x8 m with an attic
It is always worth remembering not only comfort, but also maintenance costs. So, heating costs increase with size. A one-story bathhouse measuring 6x6 m will always consume much less than a two-story bathhouse 6x8 m;
Bathhouse project, ventilation and chimney
To comply with the necessary standards, it is worth purchasing a project for the required bathhouse. As a rule, specialized companies always have standard drawings available for the smallest bathhouses measuring 4x2, for large two-story buildings 6x8 or bathhouses measuring 6x6 m. The only thing that distinguishes them is the cost.
To prevent the appearance of mold and fungi in the bathhouse premises, it is worth considering a supply and exhaust ventilation system.
You should definitely think about how to properly and competently make a chimney and finishing around the stove.
Set of tools
Immediately before starting construction, you need to purchase all the necessary tools.
A complete set of tools for frame construction
- Hand tools for working with finishing materials, excavation, facade, roofing work (hammers, stationery knives, shovels, picks, hacksaws, screwdrivers, etc.);
- a measuring tool that is necessary when planning the territory (tape tapes, squares, levels, etc.);
- power tools (perforator, concrete mixer, drill, screwdriver, circular saw, grinder, grinder, jigsaw, etc.);
- extension cords;
- stepladders and ladders.
Purchase of building materials
At the end of the work planning, all necessary materials should be purchased according to the project. There are two ways to build a bathhouse. To build a frame bathhouse, for example, measuring 6x6 m, it is enough, according to the project, to order the entire structure at the factory and then simply assemble it later. Moreover, many note that in some cases this option is even cheaper than when a person builds everything himself. The second option is to calculate everything yourself.
- For pouring the foundation: reinforcement, crushed stone, sand, M400 concrete and formwork.
- The frame of the bathhouse is built from timber measuring 50x100 and 50x50 m, which are connected to each other through special locks and fasteners.
- The frame is sheathed with various sheet materials (either OSB board or glass-magnesium sheets). These materials have already proven themselves in the market for their moisture-resistant and fireproof properties.
Scheme of arrangement and finishing of a frame bath - Sealing and sealing of cracks is carried out with non-flammable foam. Additionally, all walls are sheathed with special protective vapor-waterproofing films. Waterproofing of the foundation and base of the bathhouse is done with roofing felt. All external walls and ceilings are filled with insulation: either mineral wool or liquid thermal insulation fillers.
- All lumber is treated with special primers and paint coatings. Bitumen mastic is applied to the base of the bathhouse;
- The roofing will also need a vapor barrier, and as an economical option, you can use a profile sheet for roofing.
Upon completion of the preparatory work, the most interesting stage begins - the construction of the bathhouse itself.
Ready-made baths
It is not always possible to start building a bathhouse with your own hands. In this situation, they buy a ready-made structure. The kit includes the following items:
- mounting beam - it is used to create a frame;
- fastening kit;
- flooring material;
- roofs;
- wall panels;
- documentation package.
The set of documents contains project drawings and a description of the assembly instructions.
Attention! The walls in already manufactured baths are made of SIP panels, which facilitates the assembly process.
Sheathing the walls - the final stage
For exterior wall cladding, it is best to use OSB-4 with a thickness of 12-15 mm. The sheets need to be cut so that the edges fit on the rack. There should be no hanging edges. In the locations of window and door openings, it is necessary to make cutouts using a jigsaw or hacksaw.
To fasten the sheets, use phosphated self-tapping screws 60-70 mm long. The distance from the edge of the sheet to the screw should be 10 mm. The fastener spacing along the edges should not exceed 150 mm. In the center of the sheets, the screw pitch can be increased to 300 mm.
Wall cladding
Be sure to provide a distance of about 5 mm between the edges of the sheets, i.e. the so-called expansion joint. If this is not done, the sheathing sheets may become deformed as a result of thermal expansion. All seams must be filled with foam. Cover the gables of the building in the same way. Then the walls can be finished with any “dry” facade finishing materials, such as lining, siding, thermal panels, etc. Line the walls with clapboard on the inside. If you don’t know how to attach lining to a wall, read the article on this topic.
That's all the main points of frame construction. Even if you are a beginner, you can build a small sauna box in one to two weeks.
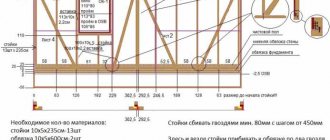
Materials
Materials are prepared in advance so that there is no need to purchase them in addition. For any frame bath you need:
- Material for creating a frame. Often a beam with a cross section of 100x150 mm is chosen for it. Crossbars and slopes are created from 80x80 mm timber.
- The rafter system is erected from 150x150 mm timber. The finishing coating is made from soft tiles. It is important to choose a material that does not place a large load on the frame walls. For this reason, you should not pay attention to ceramic tiles.
- The sheathing of the roof and walls is created from 20 mm slats.
- OSB panels are used to cover the walls. They are also laid as a base under soft tiles.
- An edged board treated with antibacterial and fire-resistant compounds is suitable for the floor.
- Imitation of timber is often used for external cladding, and lining for internal cladding.
- The frame bath is insulated with mineral wool with fire-resistant properties. What the thickness of the layer will be depends on the climatic conditions of the region. It is best to choose basalt wool with a thickness of 15-25 cm.
Important! It is better not to use polyurethane foam for insulation. At high temperatures it begins to melt. In addition, this material is flammable.
You will also need to prepare nails and screws of various lengths. Given the high humidity inside the bathhouse, galvanized fasteners should be used.
Installing an attic roof
As an example, let's look at how to build an attic roof, since it allows you to get an almost full second floor with a minimal increase in financial costs. If you are interested in building a gable or hip roof, check out other articles on our portal.
For the attic roof you will need the following materials:
- timber 100x150 mm for racks;
- boards 150x50 mm for rafters;
- boards 150x20 mm;
- slats;
- superdiffuse membrane;
- roofing material.
The work begins with the installation of the supporting structure. For each truss, two racks are installed, which are connected at the top by beams. Those. Under each truss there is a U-shaped supporting structure.
When installing the supporting structure, it is necessary to correctly determine the position of the racks. Since the rack with the lower rafter and mauerlat (floor beam) forms a rectangle, the distance from the wall to the rack depends on the height of the attic and the angle of inclination of the lower rafter. Knowing the angle of inclination of the rafters and the height of the rack (determines the height of the attic room), you can calculate at what distance from the edge the rack is installed using the Pythagorean theorem, i.e. you need to find out the length of the smaller leg.
Frame for the roof of the bathhouse
Secure the posts to the frame and floor beams with self-tapping screws and angles. Additionally, reinforce them with braces. Then connect both posts with beams. Using this principle, install U-shaped parts on all floor beams. Connect all the resulting load-bearing elements at the edges with purlins, as shown in the diagram above.
Now you can install the lower rafters. They are cut from below and attached to the harness, and from above - to the purlin, in which the grooves are pre-cut. Next, you need to secure the racks in the center of the jumpers of the U-shaped parts. The height of the racks determines the angle of inclination of the upper rafters. Connect all the posts with a ridge girder.
To complete the attic frame, install the upper rafters, which rest on the lower and ridge purlins. First, cut the grooves for the rafters in the purlins. Immediately waterproof the roof - secure the super-diffuse membrane to the rafters with a stapler. Place a special self-adhesive tape over the staples to ensure a tight connection. Please note that the membrane sheets should overlap each other by 20–25 centimeters.
A superdiffuse membrane is capable of transmitting moisture in one direction. Therefore, it should be located on the roof with the smooth side outward and the rough side inward. If it is not secured correctly, moisture can penetrate deep into the insulation, as a result of which it will lose its thermal insulation properties.
Be sure to secure the slats on top of the rafters, which will serve as a counter-lattice. Then attach 150x20 mm boards perpendicular to the slats. As for the sheathing pitch, follow the recommendations of the manufacturer of the roofing material you purchased for the bathhouse.
The roofing covering is mounted on top of the sheathing according to the standard scheme - sheets of material must overlap each other lengthwise and crosswise. Screws or nails are located at the crest of the wave.
Algorithm for building a bathhouse
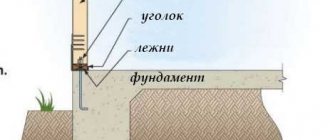
A column-type base is best suited for a frame bath. It can be built using asbestos-cement pipes. You will need elements with a diameter of 20 cm and a length of 2 m. They should be buried in the wells to 1.5 m and filled with concrete-crushed stone mortar. The number of pillars varies depending on the size of the structure. For a 3x4 m frame bath you will need 12 pieces. When building a 5x5 m bathhouse, you need to prepare 18 pillars.
After installing the bathhouse supports, a timber frame is attached to them. The elements are fastened with nails. Roofing material must be placed under the strapping beams to ensure waterproofing.
Important! To ensure the tightest fit of the strapping to the foundation of the bathhouse, it is attached to the supports on metal corners.
Logs from boards are laid on the frame - they will be the basis of the bathhouse floor. The frame is treated with an antiseptic and fire-resistant agent. The installation of bath walls is carried out in the following order:
- Supports are installed in the corners, between which intermediate posts are placed.
- The sauna wall cladding sheets are secured to the racks with self-tapping screws.
- After finishing the sewing of the walls, openings for doors and windows are formed.
Important! When sheathing the walls of the bathhouse with OSB sheets, you should check their correct location. To do this, use a level.
The rafter system for a frame bath is assembled on the ground and then raised to the roof. Only then the sheathing is attached and the roofing is laid. After installing the main frame, doors and windows are installed. To build a frame bath yourself you will need:
- three days to install the foundation;
- three days to install the frame with the walls;
- two days for the rafter system;
- two days for laying the roof, installing windows and doors, as well as finishing.
Knowledge of these features helps to design and build a durable and practical bathhouse for the whole family.
Do-it-yourself frame bath: projects and their features
In order to draw up a drawing, it is not necessary to hire specialists. You can easily find free drawings and photos of frame bath projects on the Internet. In this case, you can also see how such a bathhouse will look, read reviews of people who built specific projects, and find out their opinion. If you haven't found the perfect option, you can always make changes to the finished project.
If you are not confident in your abilities or want to make a building with a complex design, then you can order panel bathhouse projects; their prices are quite affordable. The advantage of ordering a project is that in this case all your wishes, as well as the features of the landscape, will be taken into account.
The simplest designs of frame baths include a steam room, a shower and a dressing room, which also serves as a relaxation room. This option is compact, easy to implement and low cost.
Of course, a more convenient and comfortable option would be a bathhouse with 4 rooms, in which the dressing room and rest room are separate rooms.
The choice of bath size depends on the size of the area. If you own a large area, you can afford to make a spacious bathhouse, but the main thing is not to overdo it. The larger the steam room area, the longer it will take to heat up, which increases fuel consumption.
When choosing a frame bath project, you also need to focus on the number of people who will visit it. It is better to choose an option with a reserve; if in the future the company increases, it will be difficult to remodel the bathhouse.
Projects of frame baths with a terrace are very popular. A terrace is an additional area that can replace a recreation room. A table and seating are usually placed on it. If you make a large terrace and install a stove, you can cook meat outdoors even in rainy weather. The roof will protect from rain, and the walls from wind.
We recommend reading:
Frame bathhouse with attic: advantages, projects and photos
You can also find and download a project for a frame bathhouse with a swimming pool. Such drawings are especially relevant for those who do not have a lake or river near their site.
The pool can be located outdoors or indoors, and it can also have different sizes. If the size of the plot does not allow you to install a swimming pool, then it is better to limit yourself to a bathhouse.
If you often have overnight guests, then it would be wise to build a bathhouse with an attic. In this case, the second floor will become a full-fledged room where you can accommodate guests for the night.
Of course, the more additions, the more expensive the bathhouse. But if you make a bathhouse with a relaxation room, a barbecue, and a swimming pool, then it will turn into a whole recreation complex. Imagine how much pleasure you and your family or friends will have going to the bathhouse, where you can not only take a steam bath, but also swim in a refreshing pool, eat barbecue and breathe fresh air.
Today, projects of frame bathhouses are also gaining popularity. By erecting such a structure, you immediately provide yourself with both a full-fledged home to live in and a bathhouse. This design is especially relevant in a summer cottage.
A house with a bathhouse under one roof is an economical and rational option. To build it, you need less materials, it will take up less space, and it is also easier to install wiring and a water supply/sewage system.
3x4 frame bath project
Option for small plots of land. It is designed for just a few people and is suitable for a small family. Such a bathhouse will have a low cost and will be easy to assemble. It usually does not have a separate rest room; it is either replaced with a veranda or combined with a vestibule.
Below are projects and photos of a 3x4 do-it-yourself frame bath:
Just look at the photo of the 3x4 frame bathhouse project to see that such a bathhouse has two important advantages: it is easy to build, and its construction does not require a large budget.
Of course, such a bathhouse cannot boast of a large area, spacious rooms, and a large company will not fit in it, but if you are going to go to the bathhouse alone or together, then it is the best option.
A 3x4 m bathhouse will fit even in a small area; its construction requires few materials, which significantly reduces the cost of construction. The bathhouse turns out to be light, so a simple budget foundation will do.
In addition, a 3x4 bathhouse is easier to build; there is no need to hire specialists; you can build a bathhouse with your own hands.
Frame bathhouse project 5×5
The spacious bathhouse has four separate rooms: a steam room, a washing room, a vestibule and a relaxation room. These dimensions of the bathhouse are considered optimal; it is suitable for a medium-sized area. A project of this type may also include a veranda or second floor.
6×6 frame bath project
This is a spacious option, which usually includes a terrace. It will be comfortable for a small group to relax in such a bathhouse. It has all the necessary premises. A project of this size is convenient and makes it possible to change the size of the premises depending on personal needs.
A properly designed frame bathhouse project is a guarantee of easy construction and excellent results. The more detailed it is, the easier it will be for you during construction. The project will help you avoid mistakes and unnecessary expenses. Be sure to decide on the location of partitions, windows and doors, sauna stoves, and shelves. A pre-prepared construction plan also makes it possible to calculate the required amount of materials.
We recommend reading:
Frame bathhouse with attic: advantages, projects and photos
If you find it difficult to make a drawing yourself, you can order a turnkey frame bathhouse project, the price is low, and you will be sure that the construction will be reliable and will meet all established requirements.
Internal and external decoration of the bath
For the exterior finishing of frame baths, imitation timber or siding panels are used. Interior decoration requires special attention. First you should choose a lining. For the rest room and vestibule, you can choose pine. It requires no maintenance and looks quite impressive.
The steam room is decorated with linden or larch. These breeds are not afraid of high temperatures and are able to retain color. Sometimes other wood is chosen:
- Abashi is a tree from tropical forests that has low thermal conductivity;
- cedar – when heated, it begins to release essential compounds that are beneficial to the body;
- Aspen – this tree is resistant to rot and mold.
Important! The lining is attached to the vapor barrier in such a way that there is a gap between the wood and the foil material.
We insulate the walls, roof and floor of the bathhouse
To insulate the walls you will need:
- basalt wool with a thickness of 150 mm and a density of 25-35 kg/m3;
- vapor barrier film;
- moisture-windproof membrane (super-diffuse);
- wooden slats.
To vapor barrier a steam room, it is more advisable to use foil vapor barrier material. It will not only protect the structure from moisture, but will also reflect heat into the room.
Let's start with insulating the walls from the inside. To do this, apply self-adhesive double-sided sealing tape to the racks. Then glue the waterproofing film to the tape. Be sure to place the canvases with an overlap of at least 15 centimeters. Seal the joints with double-sided sealing tape. Additionally, secure the foam with a stapler. The result must be an absolutely sealed circuit, otherwise moisture will penetrate inside the walls and the frame will quickly become unusable.
Insulation of bath walls
Then lay mineral wool slabs into the frame space. Make sure that the insulation fits tightly to the structural elements and to each other. Carefully fill all the resulting cracks with cotton wool scraps.
Next, you need to secure a moisture-windproof membrane on the outside of the walls. It is installed according to the same principle as a vapor barrier - a sealant is glued to the racks, then the membrane itself is attached using a stapler. On top of the film on the racks it is necessary to fix slats with a thickness of at least 20 mm. Place the same slats on the racks on the inside of the walls; they will serve as lathing for the lining.
The same technology is used to insulate the roof - mineral wool is laid between the rafters, then covered from the inside with a vapor barrier. A lathing for lining or other finishing materials is mounted on top of the vapor barrier.
The floor is insulated a little differently - first of all, you need to make a rough flooring between the floor beams from the boards. Then a waterproofing film is laid on the beams and flooring (you can use a regular vapor barrier). Logs are laid on top of the film as when installing a regular floor.
Insulation is placed in the space between the joists. You can use any material, both slab and loose, such as ecowool or expanded clay. Another layer of film is laid over the logs and then the flooring is made of boards.
To insulate the ceiling, attach a vapor barrier on the side of the first floor, and then make a rough ceiling from the boards. Then, on the second floor side, you need to fill the space between the beams with insulation. A vapor barrier and plank flooring are laid on top of the beams.
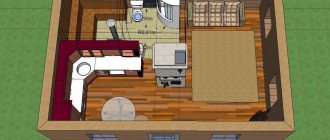
A simple project for a 5x5 frame bath
When creating your own bathhouse, you should pay attention to existing projects. The spacious 5x5 frame building has several types of premises:
- vestibule – clothes hangers and a refrigerator are placed here;
- a relaxation room in this room should be equipped with a table and a sofa;
- washing - it should warm up well;
- steam room.
The steam room in the bathhouse should be finished with aspen clapboard. A corner shelf with dimensions of 90x270x270 cm is installed in this room. An additional narrow shelf is also installed in the steam room. The oven is lined with 120x120 cm bricks. A small window is made in the steam room, 30 cm wide.
In the washing compartment it is convenient to place a shower stall 90x90 cm. There is also a 90x200 cm lounger and a hot water tank. The relaxation room in the bathhouse is made spacious - 190x320 cm. A table with a sofa is installed in this room. The window in the rest room is made large so that a lot of light enters it.
A 5x5 frame bath is installed on a columnar foundation. This is due to its low weight and low load on the ground.
Main rooms in the bathhouse
Each type of bath includes the following functional premises:
- dressing room (dressing room);
- steam room;
- washing room;
- restroom.
Dressing room (locker room)
The dressing room is also called a vestibule. Here visitors leave their clothes, brooms and firewood are stored here. The dressing room performs a number of functions :
- is a zone with a buffer function that equalizes the temperature transition from the climate outside to the temperature inside the bathhouse;
- serves as a place for drying firewood;
- often also serves as a room in which to rest.
The dressing room door should open outward.
Steam room
This room is the main, base room of the building. This is where the highest temperature is maintained and where the furnace is located. In the corner of the steam room there are stones that create steam. There should be a heat-resistant coating underneath.
There are also benches arranged on steps. Two, as a rule, are intended for sitting, one for lying. When arranging a steam room, you need to think through the nuances:
- the material with which the ceiling and walls are sheathed is characterized by certain thermal insulation properties, taking them into account, the depth of thermal insulation of the rooms is calculated, and constructive techniques are used;
- The effective operation of the ventilation system is ensured by a special box or swinging window with double glazing. The location of the window is opposite the stove;
- the doorway is designed with a higher threshold: this way, cool air does not pass under the door and thermal efficiency is not reduced. The door itself swings outward;
- The steam room and washing room must be separated, otherwise the quality of steam and temperature decreases and fuel consumption increases.
Wash room
The washing room, often a shower stall, is located near the steam room . If the size of the building allows, these zones are separate from each other; in small buildings they are combined. In large buildings, a swimming pool or plunge pool is also equipped here.
The average area of the washing room is 2000x2000mm, then there is a place to take water procedures and place containers with water, hot and cold.
The window is built one and a half times larger than the window in the steam room. The doorway has also been enlarged – 1800x800mm to provide greater comfort. The requirements for heat conservation are lower than in a steam room. The threshold is made high, and the floor is laid with special tiles to prevent slipping and related injuries.
Restroom
Designs of bathhouses with a relaxation room give room for imagination. When there is only one recreation room, it can be made multifunctional through zoning . Eating, drinking tea, watching TV, billiards - all this happens in one room. Zoning is done using partitions, windows, furniture, and finishing materials. Additional comfort will be created by a fireplace in the corner and a couple of armchairs in front of it.
Adviсe
When building a frame-type bathhouse, you should follow the advice of experienced builders. This will help build a durable building. It is important to follow these recommendations:
- It is worth very carefully securing the vapor barrier layer at the junction of the walls and floor of the bathhouse. This affects the durability of the building.
- Additionally, you can create reliable thermal insulation for a frame bath from the street side. To do this, additional layers of hydro- and thermal insulation are attached under the lining of the bathhouse.
- The inside of the bathhouse lining should not be painted or opened with varnish compounds. Such compounds can release toxic substances.
The ceiling and flooring in the bathhouse are insulated with special diligence. It is necessary to use the same materials that were used to insulate the walls. A frame bath is a profitable and forward-thinking solution. Its construction will not take much time. If you develop a bathhouse design in detail and prepare all the necessary materials, you will be able to build a bathhouse quickly and efficiently. Such an object will become a source of pride for the owners of the site.
Flaws
In addition to many advantages, when constructing a frame building there are also some disadvantages:
- The construction of the building itself requires little money compared to other buildings, but it requires considerable cash injections for finishing and insulation (insulation may be inexpensive, but membrane films also cost money;
- The process of closing the insulated frame should be completed within 1.5 - 2 weeks (or even faster, until the insulation gets wet and is not torn by the wind);
- The impossibility of using inexpensive cotton wool and polystyrene foam for insulation (this is a plus about environmental friendliness);
- Finishing with slabs is not recommended in most cases; a ventilated façade is needed.
High cost of finishing
As described earlier, despite the seemingly cheap construction of a bathhouse at first glance, its finishing requires significant costs. Finishing, both external and internal, is the most expensive of the entire process of building a frame bath.
Requirements for the quality of insulation
The disadvantage of the “frame” is the impossibility of using cheap materials as insulation. Only high-quality and therefore more expensive insulation options are suitable.
We also recommend reading the following materials:
- Insulation of the walls of a frame bath;
- Insulation for the walls from the inside and what kind for the steam room;
- Which insulation is better, and also about foil and foil.
Speed Requirements
The construction takes a little time from the developer, but requires proper treatment (the insulation must be closed, otherwise it will get wet - as a result, you will have to buy it a second time, since it can be easier to throw it away than to dry it).
Ventilation requirements
Ventilation is simply necessary for frame construction. Ventilation maintains the necessary microclimate in the building at any time of the year. Unlike hygroscopic wooden walls, frame walls with their vapor barrier create the effect of a “plastic bag” in the bathhouse, similar to a greenhouse or greenhouse. It quickly becomes hot, but at the same time stuffy, you can simply suffocate if there is no ventilation.
We recommend reading about ventilation: in the steam room, diagrams and design, how to do it correctly.
Vapor barrier requirements
The bathhouse requires masterful work with membrane film. If the insulation is carried out with breaks or the joints are poorly sealed, the insulation will get wet and simply stop working.
Shrinkage
The insulated frame must be “closed” within two weeks. The actual shrinkage of raw lumber or “natural moisture” may take a slightly longer period. When the frame boards dry out, construction defects may appear: cracks, film breaks, and cold bridges may appear.
Weakness to wind and snow loads
Despite the fact that the frame is resistant to seismic activity, it is weak against snow and wind loads. The consequence is that the frame should be built in certain areas of the country where these weather conditions are least likely to manifest themselves or allowances should be made for them, which will increase the cost
This disadvantage should definitely be taken into account by everyone who wants to build a frame building.
Fast cooling
Despite the fact that the frame warms up faster, it cools down no slower than its “brothers” (stone, wood), but rather even faster. The reason is the same low heat capacity. The beam, log, stone must first be heated, while the “plastic bag” of the frame does not heat up, but only the air in it heats up. But even when the furnace stops, this air cools down quickly (after all, we will do ventilation, where without it, see above), and massive traditional materials can release the accumulated heat for a long time.
When choosing, you should take this fact into account.
conclusions
It’s quite simple to build a 5x5 frame bathhouse on your site. A light columnar foundation is chosen as the base. The walls are made of beams and OSB panels. It is important to properly waterproof the grillage and roof elements. This will extend the life of the building. Based on ready-made projects, you can create your own drawing of a frame bathhouse that meets safety and cost-effectiveness requirements.
Recommended Posts
Decorating the inside of a bathhouse with your own hands
How to build a cellar under a barn with your own hands
Bathhouse project with a terrace or veranda
Arrangement of a cellar in the garage for storing vegetables
How to make shelves for a garage with your own hands
How to arrange a garage with your own hands
Frame material
Main raw materials:
- beam;
- metal profile.
Let's look at the pros and cons of using each material for the frame.
Wooden beam
It is often used as a raw material for the frame of houses, verandas, and baths.
The thickness (section) of the beam is selected in accordance with the load-bearing capacity of the structure, the type of heat-insulating material.
Wood raw materials are purchased, impregnated at the factory, or treated with antiseptics independently before installation. The costs in both cases are almost the same. But if you buy ready-made timber, you will save time.
The frame consists of an upper and lower frame.
If the bathhouse is insulated, then the thermal insulation layer is made less than the thickness of the timber.
Advantages of a wooden frame:
- convenience and ease of material processing and installation;
- affordable price;
- environmental friendliness of the material;
- attractive look.
The main disadvantage is the limited service life and the need for periodic maintenance of the wood. In addition, we must not forget about the high probability of shrinkage.
Metallic profile
Masters call such structures LSTK - light steel thin-walled structures.
The raw materials are profile pipes, channels, angles (optional).
It is best to take profile pipes with a cross section of 60×60 mm, 100×100 mm.
The metal frame is compatible with any type of foundation. It is not used so often for arranging baths.
The key factor that affects the cost of the structure is the profile section. The larger the cross-section, the more difficult it is for the pipe to bend, so the cost of the work increases.
For the outer cladding of the frame, corrugated sheeting, siding, and PVC panels are suitable.
Among the advantages of a metal frame structure:
- Quick installation.
- Possibility to assemble the building at any time of the year. Metal is not afraid of temperature changes, while a bathhouse made of brick or aerated concrete needs to be laid out only at above-zero temperatures, otherwise the masonry mortar will lose its properties.
- Does not shrink throughout the entire period of use.
- Provided high-quality anti-corrosion treatment has a long service life.
- Light weight simplifies the process of transportation and installation.
- Low price compared to stone and brick baths.
The downside is the need for high-quality anti-corrosion treatment of the metal. Otherwise, the metal will begin to rust.