We design ourselves: modern types of baths
Ready-made design documentation for a bathhouse made of timber with an attic or any other can be purchased at special bureaus or completed independently. In the second case, any standard project for the selected size of the building will come to the rescue.
Before starting to design a bathhouse based on a frame, key issues are resolved:
- find the most rational location of the building, taking into account convenience and simplicity for the provision of water, sewerage and lighting communications;
- plan the size of the future building;
- at the selected location, study the composition of the soil and differences in the ground surface. These factors will be decisive in choosing the type of foundation;
- solve the need to build 2 floors, an attic and the construction of external elements such as a veranda, terrace;
- determine the type of roof. Options for single-slope, double-slope and multi-slope structures are being considered.
When choosing the number of roof slopes, the size of the bathhouse, the climatic features of the area, the distance to other buildings, and the type of coating are taken into account.
The finished project will become an assistant in the rational distribution of spaces and the choice of building materials. Photos of bathhouses will also help you decide on your preferences.
Preliminarily think through the internal layout of the bathhouse in terms of functionality. Determine the installation location of the stove. It determines how the chimneys and ventilation will be located.
At the design stage, the issue of choosing the materials from which the structure will be built is decided and the approximate cost of construction is calculated. The more detailed the design of a frame bathhouse is developed with your own hands, the easier it is to make adjustments to it if unforeseen circumstances arise.
Option 4*5 m
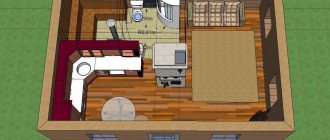
The building, measuring 20 m2, is compact and suitable for a bathhouse consisting of three rooms:
- rest rooms;
- steam rooms;
- sanitary room with toilet and shower.
When determining the dimensions of interior spaces, the calculation is made not for the “pure” size, but taking into account the thickness of the partitions and walls.
The most suitable area for a relaxation room is 7-8.5 m2, for a steam room - up to 5 m2, for a bathroom - at least 2.2 m2. The small size of the building does not require a dressing room. The steam room houses the heater and the entire main surface of the stove. A firebox is brought into the rest room, which also plays the role of a heating device. To prevent cold air from entering the bathhouse from the street, it is necessary to provide a closed porch.
Consumables and elements of a 4*5 m bath:
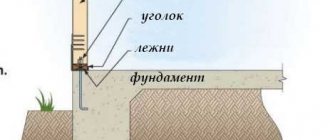
- The foundation is a strip foundation buried 70 cm and a plinth height of 40 cm. Its arrangement requires a gravel cushion up to 20 cm thick.
- The frame consists of posts and trim along the upper and lower edges of the structure. It is optimal to use boards 100*50 mm.
- The roof is gable with a rafter system made of 150*50 mm boards. Laying pitch 580 mm.
The cladding is selected depending on the required level of thermal insulation.
Option 6*6 m with veranda, balcony
The size of 6*6 m gives space for imagination. The design of such a bathhouse can include the following premises:
- terrace or vestibule;
- rest room and bedroom;
- steam room;
- full bathroom;
- washing room
Linear dimensions require the use of standard length lumber, which reduces the cost of construction due to the small amount of waste.
The washing room can be made extremely large with direct access from the steam room and place sun loungers in it. In another version of the project, it is planned to separate the washing room and the steam room with a small corridor connected to the rest room. In this case, the washing room will be somewhat smaller.
Option 6*3 m: design with terrace
The design of a 6*3 m bathhouse with a terrace comes in two versions:
- The terrace is not included in the area of the building and its size is planned separately. In this case, the overall size of the building will increase by the area of the veranda.
- The terrace is part of the common building. Then all interior spaces will be smaller.
The small size of the bathhouse will not allow you to equip a full-fledged bathroom. The stove will be heated from the rest room.
Choose a compact stove, perhaps the model will be narrow and elongated upward.
Moving the terrace beyond the foundation of the main building will allow you to allocate a small space from the rest room for a vestibule . Then it is possible to take a steam bath in winter. Approximate dimensions of interior spaces:
- steam room – 3.5 m2;
- shower/washing room – 1.8 m2;
- relaxation room – 8.5 m2;
- vestibule – 2.6 m2;
- outdoor terrace – 11 m2.
To form the frame you will need a beam of 100*150 mm. They are strapped and floor joists are installed. For the roof, use 150*40 mm timber for the ceiling. The rafter system is laid from edged boards. A board with a size of 100*50 mm is suitable for this. The material for cladding and roofing is selected depending on personal preferences and climatic conditions.
Option 4*4 m with terrace
This size of the building assumes only an external, attached terrace, but under a common roof and on a common foundation.
An area of 4*4 m is larger for dry saunas. For Russian baths, this is not the most comfortable option.
The project involves dividing the common space into two parts of 8 m2 each and adding a terrace up to 6 m2 in size:
- A relaxation room after the steam room, also known as a dressing room.
- Steam room and sink.
The steam room should be made larger than a washing room. Then it will be possible to accommodate two people.
Option 5.4*6.3 m
A bathhouse with a total area of 34 m2 may have a built-in terrace. In this case, up to 2/3 of the total area is allocated to the interior. A typical project suggests the following room sizes:
- for relaxation in 11-12 m2;
- for the steam room – 5 m2;
- for sanitary needs - up to 6 m2.
The rest of the space will be occupied by the terrace. It is convenient to make part of the terrace closed so that warm air does not immediately escape into the street.
If a veranda is not planned, then a dressing room with an area of 5.4 m2 is made and the presence of a bathroom can be planned.
Remember about floor insulation
When figuring out how to build a sauna with your own hands , you definitely need to pay attention to the insulation of the floors, because the cold often comes from below.
A win-win solution would be to use two layers of different materials. Such projects meet all basic needs; all that remains is to figure out how to do this taking into account frame technology.
The main advantages of frame technology
Advantages of frame buildings:
- the design is simple and it is possible to design and build it yourself;
- the building does not shrink and finishing work and installation of equipment begin immediately after the main construction;
- construction proceeds quickly, without restrictions on the time of year;
- the lightness of the design makes it possible to install any type of foundation;
- Any materials for cladding are suitable. Everything depends on material capabilities;
- environmental friendliness of the building;
- economic benefit in comparison with stone and brick buildings.
To perform the work, it is not necessary to involve heavy equipment and a whole team of workers. Simple construction tools and a maximum of one assistant will do.
Construction of a bathhouse stage two: erection of walls with video
When constructing walls, the center gap plays a huge role. The future panel bath should have a gap of 0.6 m in the case where the opening and connection with other walls are not planned. If there is an opening or a docking, then the panel bath has an interaxal gap of 0.4 m more.
Advice! The distance between the posts directly depends on the size of the window and door openings. In those places where frames or slopes are connected to a lintel or wall, the construction of an additional rack is required. Then the elements are secured with nails and checked with a level for leaks.
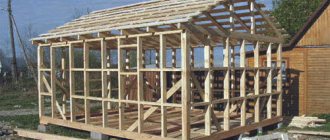
The walls are built like this:
1. Assembly begins by forming a corner.
2. The wall of the bathhouse, which will be connected to the frame, is assembled first. After construction, it is checked for verticality; if the result is good, the walls are connected and strengthened with temporary struts.
3. Other frames are installed at right angles, after which they are secured with strapping and nails.
4. The panel bath must be covered after the frame has been completely secured.
Video
What disadvantages do we take into account during construction?
Like all wooden buildings, a frame bathhouse will have an increased fire hazard. The design should take into account additional treatment with special compounds that will reduce flammability. Insulation materials are selected from the point of view of combustion resistance.
When building frame baths, you cannot skimp on the quality of electrical work. Electrical wiring is placed in non-flammable casings. When installing any electrical appliances, grounding is required.
High humidity in the bathhouse can lead to the destruction of mineral insulation if it is not covered with a vapor barrier. Therefore, it is recommended to use more functional materials as insulation.
All of the above disadvantages lead to higher construction costs.
Wiring
The bathhouse requires electricity, but taking into account the humidity and temperature, its arrangement is quite dangerous. The thickness of the walls of the frame bath allows you to reliably hide communications. The wiring must be carefully insulated according to all standards.
You should immediately think through the lighting system and installation plan. Often the wires are even stretched outside the bathhouse, hidden in special boxes under the roof canopy or along the bottom in order to avoid exposure to elevated temperatures.
Necessary materials.
A building built on a frame consists of the following elements:
- timber frame;
- cladding from finishing materials on the inside and outside;
- laying insulation, vapor barriers between parts of the sheathing;
- foundation of any type. The most commonly used are shallow belt or pile ones. Depending on the project, other types may be used.
Each element can reduce the cost or, on the contrary, make the final product more expensive, due to the selected materials.
To assemble the frame and floor joist rafter system, timber from high-quality tree species with parameters of 100*150 mm is used. The stability of the structure can be increased by using 150*150 mm bars. Modern technologies offer laminated veneer lumber. For the remaining elements, smaller beams are selected. Any lumber or plywood is suitable for sheathing.
The following can be used as roofing material:
- roofing felt;
- corrugated sheeting;
- folded covering;
- metal tiles;
- Euro slate.
Ceramic tiles are very heavy and will create additional stress on the foundation.
Apart from the joists, the floor has a rough covering. It can be plywood, any type of board, special boards. Materials that imitate natural logs have worked well as external cladding. Various types of lining can be used inside.
All wooden elements must be treated with fire retardants and antibacterial mixtures.
Insulation materials are selected that are resistant to rotting and burning. These are mainly mineral wools. The insulation layer is determined by the climate of the region where construction is taking place. If other types are chosen, you must read the instructions so that they are resistant to high temperatures and do not support combustion.
Additionally, mounting materials and interior finishing are purchased. Principle of choice: lightweight, moisture-resistant, fireproof.
Warmth and waterproofing of buildings
The frame structure is lightweight, so in order not to accidentally deform the walls, appropriate thermal insulation is needed.
There are a number of criteria that a bath insulation must have: good thermal insulation, high resistance to humidity and high temperatures, and environmental friendliness.
Let's consider the most popular types of insulation for frame baths.
Mineral wool. The wool itself is light, but the facing material can make it significantly heavier. Mineral wool has good insulating properties. It is resistant to temperature changes and humidity does not harm it.
Reed insulation. Natural and environmentally friendly material. Has good thermal insulation. Release form: slabs 15 cm thick. Suitable size for insulating a frame bath.
Sawdust-gypsum insulation. The sawdust-gypsum composition can be made independently. A budget option that is not inferior in quality. For mixing you need a ratio of sawdust to gypsum of 10:1.
Expanded polystyrene . Insulation, which is inexpensive, easy to use and has good thermal insulation properties. Resistant to moisture, but very flammable. Therefore, it cannot be installed near a stove.
Wall insulation is a kind of pie. At the same time, it is very important to follow the insulation procedure in order to avoid loss of precious heat.
Waterproofing in a bathhouse is no less important than thermal insulation. Firstly, without protection from moisture, any insulation will deteriorate over time and lose its ability to retain heat. Secondly, without protection from moisture, the heat-insulating material will begin to rot and mold, damaging the frame of the bathhouse itself.
To protect against steam, you can use foil, glassine (inexpensive but environmentally friendly material) or polyethylene. The material must be laid overlapping, gluing the joints with construction tape.
What is the sequence in laying the roof?
- We lay the film on the rafters, starting from the bottom. The film overlaps so that the top layer overlaps the bottom layer by 10-15 cm.
- Next, we place the main lathing 2 cm thick on the counter-lattice. We fill the boards with an offset. In the first row, the whole board goes, say, on the right side. In the second row she is on the left. This will strengthen the structure and add rigidity to it.
Important point
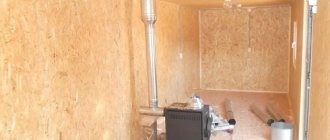
We will lay an OSB board on top. It measures 2.5 x 1.25 m.
It is very important that the joint between the slabs falls clearly on the sheathing board. I foresaw this and calculated at what intervals I should fill the sheathing
I foresaw this and calculated at what intervals I should fill the sheathing.
The same applies to the joint of the sheathing boards - they must be joined on a block.
OSB was installed.
We will lay a good thick lining carpet on top of it. And only on top of it will we lay soft tiles.
That is, the roofing “pie” itself - underlayment + soft tiles - turns out to be quite thick.
Before laying the carpet, we fill the drip lines.
Starting from the bottom we lay the lining carpet. They rolled out one path, nailed it down, and rose higher. And so on to the very top. Then on the other side.
The next step is to install the end strips and begin laying the tiles.
We coat the sides and bottom with bitumen and lay the tiles overlapping.
Be sure to make exits to the roof for the chimney and ventilation.
The sequence is as follows: we lay these elements on top of the roofing carpet, coat everything with mastic, and additionally screw it all down.
And it is very important that the topmost layer of the carpet (which comes from the ridge of the roof) overlaps these elements. And only after this we lay the roof, nail our tiles
Starting, again, from the bottom. We stretch the lace or fishing line so that everything goes exactly in a row, and slowly get to the top
And only after this we lay the roof and nail our tiles. Starting, again, from the bottom. We stretch the lace or fishing line so that everything goes exactly in a row, and slowly get to the top.
Arrangement of the roof structure
Arrangement of the roof structure
Make a template for assembling rafter structures. All elements of the rafter system are assembled below, on the ground, and, ready-made, rise up. Each element of the rafter structure must be installed above its own post.
It is better that the roof of the frame bath is ventilated. Place ondulin or other material with suitable properties between the counter beam and the rafters. Nail the sheathing directly to the beam.
Cover the gables with pre-prepared sheets. Typically, OSBs that you are already familiar with are used.
Arrangement of the roof structure
Project design
The project allows you to document ideas, decide on size and materials, and also calculate the amount of building materials and budget.
Owners should choose the size of a frame-panel bathhouse based on the number of people in the family and the availability of free space on the site. The latter is often in short supply, especially in dacha cooperatives. For a small area, a standard 3x4 bathhouse design is suitable. But it should be remembered that a comfortable stay in it is possible only for two people at the same time. Therefore, for large families it is advisable to take a closer look at 4x5 or 4x6 projects. The sizes can be any at the discretion of the owner. The main thing is that there is a place to build. A small 3x4 bathhouse with a single room for a steam room, changing room and shower is not very convenient. Therefore, it is advisable to divide it into several rooms, albeit small ones.
Heating is usually done with a wood-burning stove, which is made of brick or cast iron. Does it make sense to connect gas heating? Some owners do this to make it easier to control the temperature.
A building for economic purposes, including a bathhouse, which is erected on a land plot, is subject to state registration. To do this, you need to contact Rosreestr after construction is completed and enter information into the Unified State Registration Register.
Foundation
At this stage, we should talk separately about all the execution steps, because this is not the easiest thing:
- We fence off the perimeter of the future bathhouse with pegs;
- We dig a ditch with a depth of about half a meter;
- The width of such a ditch should not be narrower than 0.4 meters; it is usually determined individually based on the parameters of the entire building;
- We fill one third of the entire depth with sand. Fill with water and compact the wet sand;
- Pour the gravel mixture on top of the sand. You can initially use a gravel-sand mixture and compact the entire volume;
- We form the formwork and fill it with concrete;
- We make insulation from roofing felt;
- We wait until the foundation is completely dry. This usually takes about a week. Experienced craftsmen advise leaving a gap of two weeks for the concrete foundation to dry and shrink.
Finishing
Wooden floors are impregnated with linseed oil to reduce moisture penetration. Concrete floors are finished with ceramic tiles and porcelain stoneware with a rough surface. For the manufacture of benches and wall decoration, only hardwood is used to reduce the release of resins into the atmosphere of the room.
Coniferous wood is not used for making bath furniture, covering walls, or ceilings. Benches, benches and shelves are impregnated with oil or combined with wax. Do not use varnishes and synthetic dyes, the fumes of which in the heat will harm your health.