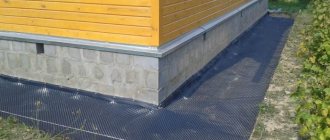
Protecting the structure from moisture is the key to the integrity, reliability and long-term functionality of the building.
The lower crowns most often become unusable due to moisture that rises from the foundation. Before installing the lower crown, it is imperative to carry out high-quality primary waterproofing of the log house from the foundation. This stage of work will protect the wooden elements from destruction.
Objectives of horizontal waterproofing
Installing waterproofing is considered a troublesome undertaking, but not a single house will last long without it, even if it is built on a mountain and the groundwater lies at great depths.
There will always be reasons for condensation and moisture penetration into structural elements. Indeed, in addition to groundwater, there is also rain and melt water, which have an equally destructive effect on the foundation and walls of the building. Horizontal waterproofing is installed between the brickwork and the foundation during the construction stage. Of course, there are ways to do this after the walls have been built, but they are either too labor-intensive or too expensive
A decision to save on materials or simple forgetfulness of the “masters” can lead to significant problems and difficulties in the future, so the importance of a moisture-proof layer should not be ignored
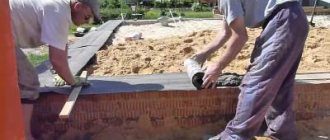
The lower horizontal waterproofing is laid at the level of the base of the foundation, but this article is not about it, but about the upper insulating layer. When constructing it, roll materials are used, such as roofing felt, roofing felt, glass insulation, waterproofing, rubemast, etc. To create a waterproof carpet between the foundation and the brick or block masonry, you must:
- level the upper surface of the foundation with mortar;
- lay the waterproofing material in two layers.
For reliability, roofing felt can be fixed with hot bitumen. In this case, it is recommended to apply the mastic directly onto the prepared canvases, and after laying, press it with a semi-rigid roller. If there are crumbs on the rolls, the surface should be cleaned first, otherwise the joining will be of poor quality.
In the absence of a basement, double horizontal waterproofing of the walls is performed:
- the first layer is between the foundation part and the masonry of the base;
- the second layer is in a brick or block wall, not reaching the lower level of the first floor ceiling or joist about 10-15cm.
Strips of roofing felt or other rolled material are laid flush with the masonry, but they may protrude somewhat beyond the walls. To achieve a neat appearance, it is recommended that the straight edges of the canvases cut lengthwise be oriented outward, and the “torn” side should be oriented toward the inside of the house. In addition, it should be taken into account that the material must be overlapped along its length.
A successful combination of vertical and horizontal waterproofing of a house ensures maximum tightness of structures. And the absence of moisture in them can guarantee a long life of the house and the impossibility of the appearance of dampness and fungus in the interior of the building.
Sealing tapes
One of the most economical and effective sealing methods is butyl rubber-based tapes. They have all the necessary qualities: Polyurethane sealant forms an elastic seam that prevents moisture from entering the building.
- Butyl tapes are resistant to low temperatures and ultraviolet radiation. Liquid sealants may harden and crack when exposed to atmospheric conditions. Sealing tapes do not have this property. Therefore, the service life of these materials is much longer than that of their analogues.
- Easy to install. To attach the tape to the desired surface, simply apply it and press down. This ease of use is due to the good adhesiveness of the material.
The range of tapes is quite diverse.
The most popular tapes are KISO-358 tape - butyl rubber material with an adhesive applied on both sides. This makes the tape excellent for sealing joints between roofing sheets. If the roof is covered with corrugated sheets, the sheets of which overlap, then the tape is glued to the border of the sheets: between the previous and the next. This action serves as an excellent barrier against water flow between roofing sheets. This tape is perfect for attaching roofing films and other heat-insulating materials. It leaves no gaps, which prevents the loss of heat and moisture in the room. KISO-501 is another type of sealing tape, which has adhesive on one side and aluminum foil on the other. This material is intended for repair work, such as: closing small holes, cracks, rusty places. The tape is used to seal the space between the roofing material and the chimney. This self-adhesive material also perfectly protects fasteners from corrosion and cracks. To do this, the fastening area is covered with tape, which isolates the penetration of moisture.
The cantilever roof is an independent structure, its frame is fixed only to the wall, not attached to the balcony, it is easier to install, and its repair will cost less.
Technology of laying timber on the foundation
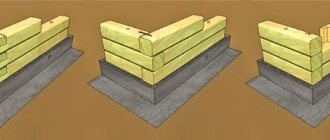
The lower crown can be attached to the foundation in two ways: from above or from below. In the first case, fastening is performed with anchor bolts. Through holes are drilled in the timber. Holes are also prepared in the concrete foundation in appropriate places. Their depth is selected to match the length of the anchor bolts, taking into account the cross-section of the beam.
In places where drilling is done, the moisture-proofing layer will be damaged, so before laying the first row, it makes sense to apply an additional amount of mastic at the fastening points.
Fixation from below involves the use of embedded elements installed at the stage of pouring the foundation. You can use through threaded studs and pieces of reinforcement.
Double harness
This type of strapping involves the use of two rows of wooden beams of different sections. The structure can be fixed to a screw foundation in two ways:
Threaded connection
They place roofing felt under the supports, place a beam with a cross-section of 20 × 20 centimeters on the screws and tap it with a hammer. In the corner parts, wooden products are fastened using a metal corner and self-tapping screws. The second row of strapping is secured using through metal pins.
Clamps
When fixed to clamps, the first row of timber with a cross-section of 10 × 15 centimeters is laid edge down. The joints of the elements are made in a checkerboard pattern; they should not coincide. The harness is attached to the piles using U-shaped bar clamps. They are mounted on the previous element.
At the final stage of work, the structure is tested for durability, and corrections are made if necessary.
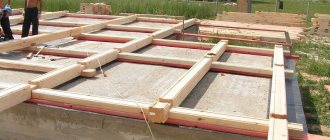
Laying the first crown
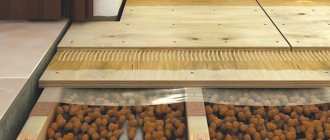
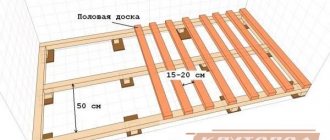
The technology for installing the bottom row of a timber house requires a certain sequence of work. Firstly, antiseptic-impregnated slats 10-15mm thick are laid on the foundation on top of the waterproofing layer in increments of 25-30cm. The gap is subsequently filled with polyurethane foam. Next, the first crown of the timber house is mounted on them. At the last stage, the horizontality of the laid beam is checked using a construction or laser level. If necessary, the spatial position of the crown is adjusted until the required results are obtained.
The first row of timber should be laid taking into account the correct design of the corners. One side must be strictly perpendicular to the other, with the exception of projects involving a complex house shape in plan. After installing the lower crown on the foundation, the correspondence of the dimensions of the diagonals between opposite corners is also checked. If the structure is rectangular, then both lengths should match.
How to correctly lay the first crowns on the foundation
Laying the first crown of timber - secrets and tricks
Before starting to build a house, everyone has a question: how to lay the first crown of timber? It is necessary to lay the first crown of a house made of timber as thoroughly as possible, with mathematical calculations, so that the walls of the future house stand perfectly exactly at an angle of 90 degrees. This is not too difficult to do - the main thing is to take your time and prepare very well for this work.
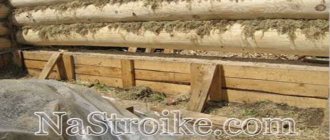
Before laying the first crown, it is necessary to lay at least two layers of waterproofing, then a backing board and then another layer of the same waterproofing.
Waterproofing between the log house and the foundation
Before laying the timber, ensure maximum waterproofing of the foundation. To do this, lay the roofing material twice, and then lay the glass insulation once. All laid layers must exceed the width of your foundation by 25 centimeters along its entire perimeter.
The beams being laid must touch each other as tightly as possible; in no case should even the slightest voids be left in the wall, especially its lower part. After all, it is on this part that the floor is subsequently hung and all serious loads are placed on it.
The beams need to be fastened together on metal dowels to a depth of 3 centimeters, and they are finished off with a wooden mallet. If the beam has a slight bend, lay it down with its even edge. There are cases when the connection of the lower beams requires additional fastening using staples or nails (they need to be installed through 2 crowns).
Before laying waterproofing on a roofing felt foundation. check that its upper plane is strictly horizontal. You need to check the horizontal position with your own hands using a hydraulic level, since a simple level often gives a large error. The difference should not be more than 1 cm over the entire plane of the foundation. If the difference in level is greater, level the surface with mortar or an additional layer of waterproofing.
Laying the first crown of the log house - assembly diagram
Before laying timber on the foundation, we need to take care of the durability of our structure. To do this, we lay out slats pre-treated with an antiseptic, approximately 10-15 mm thick. The distance between them is 25-30 cm.
- Well, we put our first layer of beams on top of the exposed slats.
The slats are necessary to prevent the crown from coming into contact with the foundation. This trick will greatly increase the life of the log house, thanks to additional protection from rotting, and we fill the gap between the timber and the foundation with polyurethane foam.
Homemade canvas
To make tiles with your own hands, you will need plastic molds for pouring. They can be disposable or reusable, soft or hard, shaped or of a strict geometric configuration. Food packaging also comes in handy here.
The AliExpress website offers a wide range of such shapes: multifaceted, brick, turtle-shaped, human feet and others.
Adding coarse gravel, other reinforcing fractions, special plasticizers, and coloring pigments to the cement mortar will help increase the strength and aesthetics of such workpieces. Such technologies are known and have been tested many times by hardworking summer residents. A competent, thoughtful approach to the stamping process and the low cost of consumables provide craftsmen with the opportunity to obtain raw materials in unlimited quantities, which are not inferior to purchased products in terms of technical properties.
When poured directly on the ground without the use of a backing, the concrete becomes only a temporary and minor barrier to weeds.
Forms generously greased with machine oil or covered with cellophane are placed on a vibrating table and carefully filled with prepared cement mortar. A vibrating table can be made from a spacious stand attached with springs to a driving mechanism, for example, an electric motor from a tool sharpening machine, a motor removed from a circular saw or a washing machine. It is desirable that the engine speed be from 1800 to 3000 per minute. Vibrocompression (manual or mechanical) is carried out to compact the mixture and release air bubbles. After shaking and shrinking the mixture in the molds, it is left to dry for a day until completely hardened on racks or chipboard sheets arranged in layers. It is not recommended to keep the workpieces in this form for longer, otherwise it will be difficult to get them out without damage or chips. After removing from the molds, the blanks are finally dried in air at positive temperatures (from 10 to 20 degrees).
How to ensure rigid fixation?
Formwork diagram for the foundation.
Such a system is formed from foundation bolts embedded in the top layer of the foundation during the pouring process. To do this, immediately after completion of pouring, foundation bolts with conical ends are immersed into the upper layer of the foundation for at least a third of their length in increments of 0.5 m. In this case, it should be possible to fix each laid crown with at least two bolts.
Before installation, it is necessary to prepare the lower crowns by drilling holes in them. The pitch of the holes must coincide with the pitch of the bolts embedded in the foundation, so that their studs can fit into the holes directly during installation. The crowns are adjusted to the size of the foundation if the log house will be forced into a “paw”, or left with a reserve if it is planned to force the log house into a “bowl”.
The crowns are secured to the foundation with locknuts; wide washers are first placed under them for better fixation. Moreover, in order to avoid distortions, the nuts must be tightened sequentially along the entire perimeter of the foundation, turning each no more than 2-3 turns.
Types of foundation.
The scheme for fastening the crowns on a pile or pile-screw foundation looks a little different. To attach the first crowns to such a foundation, special caps resembling the letter “P” in appearance are mounted on piles sunk into the ground. Their side plates are pre-provided with holes for fastening.
In the heads mounted on piles, a sheet of roofing material is laid in 2-3 layers and only then - the crowns. The timber is placed in the grooves of the heads, connecting it at the corners into a “claw” or into a “bowl”, and fixed with screws or studs and locknuts. In the latter case, it is necessary to additionally drill through the entire crown, and the pitch of the holes in the crown must exactly coincide with the pitch of the holes in the head.
Overhead installation for forcing log houses is used much more often, since when it is performed, there is no rigid fixation of the log house to the foundation, and the immobility of the lower rims is ensured by the very weight of the log house. With this method, laying the first crown on the foundation is carried out according to the same scheme as with rigid fixation, with the exception of the use of foundation bolts and nuts.
First row mounting options
Before laying the first row of a timber frame or the bottom trim of a panel, frame or panel cottage, you must consider:
- lower crowns more often require replacement;
- therefore, it is necessary to ensure maximum maintainability of the structure during subsequent lifting with jacks.
To do this, two methods of fixation with embedded elements are used:
- dowels - during concreting, reinforcing bars are embedded into a monolithic grillage, tape or slab, on which the timber is supposed to be placed;
- studs are also placed in the reinforced concrete structure when pouring, so that their height is sufficient for the lumber to pass through for tightening with nuts.
Options for corner and transverse connections of timber. The first row must also be fastened using such connections.
When using screw piles with plate or U-shaped heads, the lower crown can also be replaced after the service life has been exhausted. Rigid fastening of lumber into concrete with anchors has zero repairability.
Attention! Regardless of the type of foundation and the method of fastening the first row of timber or log house, it is necessary to take care of the cut-off waterproofing between the foundation and the wooden wall; any waterproofing roll material laid in 2 layers is suitable for this.
Installation of timber on a concrete plane
The main advantage of foundations with a continuous supporting surface (slab, grillage, strip) is the ability to adjust the first row of timber in the horizontal plane. Fastening the crown/timber beam is possible in several ways:
- from below - mortgages are mounted into the foundation, holes are drilled in the lumber in place;
- from above - fastening with anchor bolts through the timber, again in place.
Fastening with studs.
In the first case, a pin can be used that passes through the beam, which is attracted to the foundation by a nut recessed into the body of the lower crown. Excess threads are cut off with a grinder. To prevent the nut from crushing the wood, wide washers are used.
Another option is a dowel:
- the embedded vertical reinforcing bar is cut to 2/3 of the size of the beam so that it does not pass right through it;
- a blind hole is drilled in the lower crown;
- lumber is put on rods.
This method allows you to eliminate the displacement of the beam in the horizontal plane.
In the second option, in order to properly attach lumber to a concrete surface, it is necessary to lay timber on all walls, connect the crowns with locks, and check the coincidence of the diagonals. After that, all that remains is to drill holes through it, hammer in 12 x 129 mm anchors with larger washers, and tighten the nuts with a wrench.
Fastening the timber to the foundation with anchor bolts.
Attention! The only drawback of the anchor method is zero maintainability. When replacing a rotten lower crown, you will have to cut it into pieces for dismantling. It will not be possible to install a new beam using the same method.
Laying timber on concrete pillars, piles
To mount the first row correctly on reinforced concrete piles or poles, only anchors are used. It will be possible to secure the first crown correctly only after assembling all the elements with locks. It is forbidden to make joints in a canopy; after assembling the lower rim, it cannot be lifted manually in order to put it on embedded pins or dowels.
Grillage using standard screw pile heads
Pile-screw foundations are often used for wooden houses. Therefore, technologies that make it possible to correctly fasten the bottom trim beam horizontally or the half-timber posts vertically are of interest to individual developers. Headings will solve several problems:
- expansion of the supporting surface - at the junction points, each crown can be placed on a plate, rather than joined in a canopy;
- the possibility of fastening with self-tapping screws - these hardware are much cheaper than anchors, the maintainability of the lower elements of the building is maintained.
Fastening to screw piles.
If the top of the pile is far from the ground, the easiest way is to weld a plate onto it. When the height of the pile field is 0.4 - 0.5 m from the blind area, it is inconvenient to make a ceiling seam in place; reinforced heads are used - a piece of large diameter pipe with a welded plate, reinforced with gussets.
In any case, the supporting surface turns out to be flat; the plates have holes or additional holes are made through which they are fastened with self-tapping screws. The first crown can be easily changed during operation if necessary.
Attention! The vertical beam posts of the half-timbered structure are attached to the pile-screw foundation only in U-shaped heads. In monolithic strip and slab foundations, they are mounted with embedded elements, which also have a U-shape.
Grillage on U-shaped heads
Manufacturers of screw piles took into account the peculiarities of technologies for constructing houses made of wood. For ease of fastening, there are U-shaped heads made of channel bars, between the shelves of which it is convenient to lay timber. In this case, fastening methods become much more convenient:
- the crown is placed inside the U-shaped head;
- fixation is carried out with self-tapping screws through the side flanges of the channel.
The framing bars can be secured only after the laying of all sides of the lower crown has been completed and the diagonals of the building have been verified.
Attention! U-shaped heads are used only on straight sections. It is impossible to mount them in wall joints, so either plate heads or bent plates are used, the shelves of which are located outside the frame.
Thus, the choice of method for attaching the lower beam of the “frame” frame, a house made of SIP panels, or the lower crown of a log house depends on the type of foundation. First, lumber is laid on all sides, locks are made in the corners, T-shaped wall joints, and diagonals are measured. After this, the beam can be laid and secured with self-tapping screws, anchors, or put on metal dowels.
Advice! If you need builders to build a foundation, there is a very convenient service for selecting specialists from PROFI.RU. Just fill out the order details, the experts will respond and you can choose who to collaborate with. Each specialist in the system has a rating, reviews and examples of work, which will help with the choice. Looks like a mini tender. Placing an application is FREE and does not oblige you to anything. Works in almost all cities of Russia.
If you are a master, follow this link, register in the system and be able to accept orders.
How to lay a crown beam on a foundation
When laying the tying crown on a strip foundation, you may encounter unevenness on the base, reaching 10-15 mm. Such irregularities are eliminated by increasing the thickness of the mastic layer of waterproofing. The best solution for laying the first crown of timber on the foundation is an even and horizontal grillage.
Attaching a crown made of timber to a plinth is done in various ways:
- In strip foundations and concrete grillages, anchors with a diameter of 12-16 mm are poured every 1.5-2.0 m; the crown is attached to the strip base with an anchor bolt with a nut;
- Square plates are welded onto metal piles, the grillage and frame row of timber are fastened to the plate with a through bolted connection, the nut is located in the lower part of the fastening.
The next crowns of the log house are attached to dowels, the dowels are installed vertically with tension in specially drilled holes, the edges of the dowels are recessed and do not protrude above the surface.
Professionals recommend paying attention to the leveling of the casing; when setting the horizon, the height is adjusted with wooden wedges between the plinth and the first beam, and the resulting voids are sealed. The operation is performed using a building level
After leveling is completed, the nuts on the anchor fastening are tightened and fixed.
What is better to put between the timber to seal the gaps?
A log house or a house made of timber requires high-quality insulation. Some modern technologies make it possible to do without gaskets between the crowns, but in most cases the use of inter-crown insulation is mandatory
In order for the house to be truly warm, it is necessary to pay due attention to sealing all gaps
Jute rope is not squeezed out during the shrinkage of the log house, retains heat well and is resistant to mold formation.
The modern market is replete with offers of various materials for caulking, and it may be difficult for an ordinary buyer to make a choice as to how to insulate his house from timber or logs. In order to decide, you need to know the features of traditional seals and more modern tape materials that can be placed between beams or logs.
Traditional seals
Caulking methods.
This group includes natural materials such as tow, sphagnum and fluffed pine wood. Very often log houses are insulated with tow. After completing the assembly of the walls, it is driven with a special tool into the cracks between the logs simultaneously from the inside and outside to avoid possible distortion of the wall.
If the caulking work is carried out at the proper level, the height of the walls increases by about 10 cm. The process of shrinkage of the house leads to squeezing out the tow from the gaps, so after a year or a year and a half, re-caulking is carried out. It is not advisable to seal the gaps with tow between the beams.
Such designs are characterized by small gaps, into which it is very difficult to evenly lay tow.
Sphagnum moss is not susceptible to rotting and protects wood from this process. However, its disadvantage is its fragility - the moss crumbles, which does not allow repeated caulking. Cellulose, or fluffwood, consists of fairly short fibers. If such a seal accidentally gets wet, it immediately shrinks and loses elasticity, which reduces the tightness of the seals. The main condition when using fluffed wood is that it should not protrude from the grooves or get wet.
Tape seals
Caulking tools.
Modern technologies make it possible to significantly simplify the process of sealing inter-crown gaps.
Depending on the type and quality of building materials, the tapes can be laid in several layers, providing the required thickness of the gasket.
Such insulation materials include jute, linen and flax-jute tapes, produced in the form of canvas or thicker felt.
Jute tapes, unlike any other materials, completely cope with excess moisture, providing protection from its effects.
Methods for laying the inter-crown seal: 1 – without bends; 2 – with double-sided bend; 3 – with one-sided bend.
Linen materials can be placed both between logs and between beams. This insulation is soft, lightweight and easy to install. However, the low lignin content (3%) makes its use undesirable in areas of constant or periodically heavy exposure to moisture.
Flax-jute tapes combine the characteristics of the two previous materials: the excellent insulating properties of jute and the softness of flax. It is worth knowing that the highest quality materials for insulating houses are those whose flax content does not exceed 20%. This compactor is successfully used for rounded logs and timber.
The undoubted advantages of tape insulation are:
- excellent sealing due to uniform laying and density of the material;
- good leveling of uneven logs;
- high mechanical strength and very low water permeability;
- protection against rotting and biological destruction of wood;
- do not crumble, are not damaged by insects;
- due to the high content of lignin, which connects cellulose fibers in wood, they are excellent for wooden houses.
How to insulate a log house or log house is up to the owner to choose. Wood is the most environmentally friendly and most suitable material for housing construction. To preserve its qualities to the fullest, you should give preference to insulation materials made from natural materials. It is also worth remembering that the durability of a wooden house largely depends on how high-quality the inter-crown insulation is.
Briefly about the main thing
The timber that will be laid on the foundation must be of high quality - without knots, blue stains, with tightly lying annual rings. Antiseptic treatment is required.
The smoother the foundation on which the timber will be laid, the higher the quality of the work as a whole.
The timber is attached to the foundation with studs, dowels or anchors. The choice of method depends on the skills of the master.
The beams are attached to each other in different ways - depending on whether it is an angle or a longitudinal connection. Popular methods are root tenon, dovetail, bowl, oblique lock and others.
Ratings 0
Timber quality
Lumber for the first crown must be selected taking into account certain requirements. It should not have knots or blue spots, and all four surfaces should be smooth, without nicks, depressions or sharp bends. The timber must be pre-treated with an antiseptic and fire retardant. Even if the seller assures that the material was impregnated under production conditions, he will not be able to provide truthful information about the thoroughness of processing, the circumstances and shelf life of the timber. So it's better to play it safe.
When buying solid wood timber, you need to pay attention to its cross-section. High-quality material has an average core location and annual rings evenly moving away from the center
When drying lumber with a different “pattern”, problems may arise associated with various deformations of the wood - bending, twisting, severe cracking, etc.
You can hear different opinions about applying a film-forming composition to the ends of solid timber. Some opponents argue that cross-sections need to be “sealed” immediately so that moisture does not leave the wood too quickly. Others give arguments about the inadmissibility of such actions, although they agree that the ends need to be covered. For these purposes, they recommend using clay, lime or water-based emulsion. The film prevents moisture from escaping naturally, resulting in the formation of pockets of rotting inside the trunk. In fact, both sides are right to some extent.
Water vapor condensation and other problems
In a living room, the rafter system experiences alternating exposure to hot and cold air.
Therefore, the appearance of water vapor condensate on the surface of a metal rafter system is almost inevitable. As a result, corrosion processes begin and the metal rusts. Without proper treatment and proper care, serious roof repairs will be needed within a few years, so when installing metal rafter systems, you should strictly adhere to the technological process. All metal parts must be treated with an anti-corrosion primer and painted. In addition, a metal rafter system is quite expensive. In addition to the cost of the structure itself, one should take into account the costs of delivering it to the construction site, lifting rather heavy elements to the installation site, the cost of treating the metal with protective compounds, painting, etc. Finally, it is necessary to calculate whether the foundation of the house will withstand the load in the form of metal rafters. The heavy weight of the metal trusses from which the rafters are made can play a cruel joke on the owners of the building in the event of a fire. Within a quarter of an hour after a fire in a building, heavy roof beams can collapse, after which large-scale restoration work will be needed. Fastening metal rafters to each other
- acrylic is destroyed by sudden changes in temperature, it is not plastic, seams treated with this composition will begin to leak over time;
- silicone is not flexible enough, cannot withstand heavy loads, and is not recommended for outdoor use;
- thiokol is made from two components, but is inferior in strength to silicone;
- polyurethane is very plastic; when purchasing, you need to pay attention to the brand of sealant that can withstand exposure to ultraviolet rays.
Is foundation waterproofing necessary before installing timber?
A layer of waterproofing is absolutely necessary before laying the bottom row of timber walls. A moisture barrier will prevent the wood from absorbing excess moisture.
Even well-dried timber contains about 15% water. An increase in humidity does not pose a threat to the safety and strength of wall materials.
However, when there is an excess of water inside the wood, optimal conditions are created for the development of mold. In the process of life, bacteria will inevitably damage the log. And this is already fraught with a deterioration in aesthetics and a change in the geometry of the beam, and a decrease in its mechanical strength.
Advice from gardeners
Experienced gardeners say that rational organization of paths saves time and simplifies the care of crops in the garden. There is no need to chase expensive newfangled materials: paths that can be removed and moved to another place are more convenient and practical to use.
Some ideas look great in photos, but turn out to be completely unsuitable for real life. You need to try each project on yourself, on your site, and decide whether it is advisable to implement it.
Typical construction mistakes
Well, our work was going smoothly:
- Removed excess soil from under the joists.
- The entrance to the steam room has been moved.
- The electrical was redone.
- They installed a sewer system.
- They hid the water pipes.
- The floors were insulated and a base was laid under the screed.
- The water floor pipes were laid.
- The doors were reinstalled.
- We soaked the walls of the washing room twice (so as not to absorb moisture from the screed).
- We cut a window in the steam room.
- A new vapor barrier was installed.
- They poured the screed.
- And we left for a technological break, having repaired the customer’s snowmobile before leaving, which he was very happy about.
A few days later the team returned and continued work.
Washing room:
- They erected a frame wall and covered it with imitation timber.
- The floors were covered with porcelain stoneware.
- Drywall was secured to the walls on guides and the area was lined with washable tiles.
- We came up with and installed a folding shelf (an example of how even in a small room you can create conditions for showering, washing, and massage treatments).
Steam room:
- The floor and side were covered with porcelain tiles.
- They put up a “floating” frame.
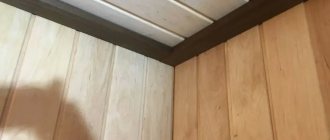
- The steam room was lined with natural linden block house.
- We made shelves, a bench, and installed faucets.
- We mounted a decorative shutter on the window, installed lamps, lampshades, and hung decorative branches.
- On the outside, we interestingly decorated the hole from the removed vertical beam at the entrance to the steam room.
And again a break - for technological drying of the block house and its drying out. But they didn’t leave right away - the customer asked to impregnate the entire bathhouse from the inside, having seen how the guys had impregnated the walls of the washing room and the frame wall. While the material was drying, not entirely pleasant news arrived: the hackwork of the furnace installers still made itself felt. During one of the furnace fires, the wall above the furnace firebox began to smolder closer to the rest room. Only the customer's observation saved the fire. And the efficiency with which the Tajik assistant cut out the smoking crown from the side of the rest room.
And so we came for the third time. Everything is almost “native”. The heating works great. The Asian gatekeeper even overdid it - all the rooms of the bathhouse (the rest room, the toilet, and the kitchen) were heated to 45 degrees! Platbands, cladding, etc. It just got twisted in places.
Well, nothing - a couple of hours to eliminate the consequences of the flood, a few hours to caulk. An hour to clean the bathhouse and surrounding area, loading tools into cars. And then 2 hours of steam testing with the permission of the owner of the bathhouse (the stove began to be heated in advance). It turned out beautiful and functional! A real Russian “steam log cabin” - hot, but not harsh, embracing warmth from all sides - from the stove, from the wall, and from the floor.
There is a choice of water here - ice or boiling water, there is also a window for ventilation or breathing (not necessary - lower the shutter and it will be as if it never existed), smooth lines of transition between wood and stone, soft light and wide warm shelves complete the atmosphere of complete relaxation. Need to take water treatments in a cooler place? Please! The shelf can comfortably accommodate an adult lying down or three people sitting. Underneath there are 2 hygienic showers - cold and hot. You can also take a “blow” of water from a sprinkler while sitting.
Or you can fold back the shelves, go into the shower corner and shower while standing. Or just take a shower. Water does not stagnate on the floor - 2 drain ladders are made. The bathroom is equipped with everything necessary - toilet, sink. At the customer’s request, a washing machine was also installed there. The boiler remained in its original place. All pipes are “hidden”.
And, importantly, we managed to get everything done before the end of winter! But the owner of the bathhouse had a cherished dream - this winter to have time to dive from the bathhouse into the snow. It turned out to be heartwarming, just as a bathhouse should be! * the only controversial solution is backrests made from boards on the walls
They were installed at the request of the customer. But it won’t take long to dismantle them if the owner of the bathhouse makes such a decision
* the only controversial solution is backrests made from boards on the walls. They were installed at the request of the customer. But it won’t take long to dismantle them if the owner of the bathhouse makes such a decision.
TECHNOLOGY OF LAYING BEAM
Timber laying scheme
The best of them are considered to be smooth, with the least number of knots and without a tint of blue.
When choosing timber, you should pay attention to the annual rings. Preference is given to bars with the highest ring density
Ecophon Focus
Laying timber cannot be carried out at a high level without a high-quality foundation. The ideal option is a concrete monolithic slab, but the high cost of the material in most cases makes its use impossible. The exception is mobile soil, where it is impossible to build a foundation of any other type.
Quite often, to build a wooden house from timber, a strip foundation is used, the height of which above ground level should be at least 0.5 m. The elevated part is made of brick.
- Before the beams of the first crown are laid, the side that will be located inside the room is first determined. The side of the beam on which there is a visible defect will be directed upward. The side of the beam that has convexities will be the side. In the process of laying timber, it is necessary to take into account its shrinkage, according to which the final cladding of the house is carried out after 1-2 years.
- The timber of the lower crown is coated with mining, the rest of it is treated with special antiseptic compounds.
- To lay the first crown of a wooden house, everything is carried out quite thoroughly, making all the necessary mathematical calculations. This is necessary to ensure that the walls of the new house are strictly at an angle of 90°. The most important thing is to take your time at this stage and do everything with maximum accuracy.
Choosing a sealant
The most flexible polyurethane sealant If the balcony is leaking, you need to fix the leak urgently. There is a wide range of sealants on the market, so how can you avoid making a mistake when choosing.
- acrylic is destroyed by sudden changes in temperature, it is not plastic, seams treated with this composition will begin to leak over time;
- silicone is not flexible enough, cannot withstand heavy loads, and is not recommended for outdoor use;
- thiokol is made from two components, but is inferior in strength to silicone;
- polyurethane is very plastic; when purchasing, you need to pay attention to the brand of sealant that can withstand exposure to ultraviolet rays.
Polyurethane sealant is the most suitable for performing work on.
Let us consider, as an example, the installation of a metal truss structure for a roof, the angle of inclination of which is 22-30º, the roofing material is iron, slate or ethernite:
Waterproofing materials for log houses
The waterproofing of the foundation itself, as well as the protection that allows you to keep the log house dry, is carried out by several types of materials:
- Hot bitumen.
- Anti-corrosion coating.
- Penetrating mastics.
Of course, each insulator is selected in accordance with the parameters of the building material.
The foundation of a wooden house between the base and the first crown is best treated with bitumen mixtures. This will provide good protection and will look more natural. But often such insulation is performed using penetrating mastics, which are produced in liquid form. True, after processing you should not forget about the gap that appears when the log house is laid on the base of the house.
Base insulation
Before laying the first crown, the upper foundation surface is leveled even if there is a centimeter deviation of its level from the horizontal plane. Afterwards, waterproofing material must be laid.
Waterproofing the foundation under the lower beams of the building
The first crown must be placed on top of the waterproofing. This is due to the fact that capillary moisture reaches the lumber from the soil through the monolithic base. The wood quickly rots and the building requires repairs.
How to properly lay a log frame on a foundation
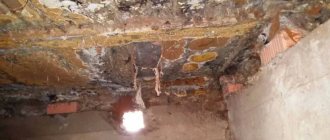
The condition of a wooden house is assessed by the three lower crowns of the frame: if the wood is different in color, we can say with confidence that the house was not built correctly. Upon closer examination, a black mold coating will be found on the surface of the timber. The cause of these problems must be sought in the mistakes made during the construction of a wooden house. Professionals believe: only a correctly laid crown molding will ensure a long and trouble-free “life” of the building, and the owners will have comfortable living conditions.
Among the troubles that can arise as a result of improper laying of a log frame on a foundation are the following:
- The lower corners of the log house freeze, the floors in the house are cold in winter;
- There is high humidity in the underground space, condensation forms;
- Wetting of the lower crowns of the log house, the appearance of fungus and mold;
- Skewed structure.
All these troubles can be avoided or minimized by following the rules for laying the casing; this operation is called tying the foundation, and the casing is called strapping. The frame is the load-bearing base for the walls of the building; logs for the floor and for internal partitions are cut into this structure. For buildings erected on columnar or pile supports, the flashing crown can be used as a grillage. In this case, a double harness is needed.
Why is it needed?
According to the construction technology of the log house, there is no additional layer between the base and the tree. The waterproofing layer performs an anti-filtration function , protecting against aggressive environments, as well as an anti-corrosion function, preventing the damaging effects of moisture.
The lower crown of the frame is in contact with the concrete foundation, which, in turn, is in direct contact with the ground. Concrete and wood differ in their level of hygroscopicity and, accordingly, interact differently with moisture.
At the points of contact between the frame and the base, the tree absorbs moisture and the process of rotting begins. A properly installed waterproofing barrier provides a seal between the foundation and the walls and protects the wood of the lower crowns from damage.
Final stages of installation
When the beams of the lower crown in the corners were fastened with dowels or nails, the anchor is usually not installed. In the future, the first anchors will be installed on the inner contour of the foundation strip.
- There should be at least 2 anchor bolts on one piece of wooden beam, but provided that the house has short walls.
- Using a building level, carefully check the diagonals and angles of the lower crown. All existing irregularities are eliminated with an electric planer.
- After the beams are attached to the foundation, they begin to install the vertical posts of the house frame.
The issue is controversial and has both supporters and opponents. Despite this, experts argue that fastening is mandatory, since the foundation tends to be in motion; it is often said that it “walks.” The rigid fixation of the lower frame completely absorbs any movement of the base.
In the most critical situation, the lower crown of the beams can move slightly to the side or tear out the anchor. That is why fastening the timber to the surface of the foundation guarantees the stability of the entire structure.
In some cases, the lower crown of the frame is not attached to the foundation, since this is considered unnecessary. Under the weight of its own weight, a house made of beams will stand quite firmly without anchors. Corner joints are created without the use of special locks, and the beam itself is joined through the ends. This method allows, as necessary, to replace any part of the timber without dismantling the corners.
Why are paths between beds needed?
Paths between garden beds are necessary for many reasons. First of all, arranged row spacing allows you to approach the plants growing in the beds in order to water, weed, prune, loosen or mulch the soil, harvest, or treat against pests or diseases.
The paths left between the beds are trampled and overgrown with grass. But if you put special materials in the garden or use those at hand, you can build not only a useful, but also a beautiful landscape element.
INSTALLING BEAM ON THE FOUNDATION
After the foundation has been insulated, the installation of the lower piping begins.
The beams installed on the foundation should fit fairly tightly to each other without creating a minimum space between them. This is especially true for the lower part of the frame, where the floor will be created and where significant loads will be placed.
The beams are fastened together with metal dowels, which are achieved using a wooden mallet. In some cases, if necessary, the beams are additionally fastened with staples or nails.
Scheme of fastening the bars to each other
The joining of the lower crown beams to each other occurs by picking at the corners using any of the existing methods:
- “in half a tree” - a variant of laying beams, in which the upper half of the array is removed in corner joints on one beam, and the lower half on the other;
- “into the paw” is the most common way of connecting beams, which is the opposite and does not include the end part of the log protruding beyond the level of the wall.
Nuts and wide washers are used to secure the timber to the surface of the foundation. A wide washer will expand the area of contact of the nut with the surface of the wood. You only need to use a hex nut, and square or round nuts are not suitable for such purposes. If you use narrow nuts to fasten the beams or do not use them at all, then during installation work it will be quite clear that the nut will completely sink into the surface of the beam and the connection of the house frame elements will be unreliable and short-lived.
Is foundation waterproofing necessary before installing timber?
A layer of waterproofing is absolutely necessary before laying the bottom row of timber walls. A moisture barrier will prevent the wood from absorbing excess moisture.
Even well-dried timber contains about 15% water. An increase in humidity does not pose a threat to the safety and strength of wall materials.
However, when there is an excess of water inside the wood, optimal conditions are created for the development of mold. In the process of life, bacteria will inevitably damage the log. And this is already fraught with a deterioration in aesthetics and a change in the geometry of the beam, and a decrease in its mechanical strength.
How to lay a crown beam on a foundation
The strapping is cut using the half-tree method, the connection in the corners is made “in the paw”. This method of laying corner joints is the most reliable and can withstand multidirectional loads. The laying of corners and the connection of beams in subsequent crowns can be done in any way.
When laying the tying crown on a strip foundation, you may encounter unevenness on the base, reaching 10-15 mm. Such irregularities are eliminated by increasing the thickness of the mastic layer of waterproofing. The best solution for laying the first crown of timber on the foundation is an even and horizontal grillage.
Attaching a crown made of timber to a plinth is done in various ways:
- In strip foundations and concrete grillages, anchors with a diameter of 12-16 mm are poured every 1.5-2.0 m; the crown is attached to the strip base with an anchor bolt with a nut;
- Square plates are welded onto metal piles, the grillage and frame row of timber are fastened to the plate with a through bolted connection, the nut is located in the lower part of the fastening.
Holes are drilled for the fasteners with a margin of 3-4 mm, and flax tow is stuffed into the gap.
The next crowns of the log house are attached to dowels, the dowels are installed vertically with tension in specially drilled holes, the edges of the dowels are recessed and do not protrude above the surface.
Professionals recommend paying attention to the leveling of the casing; when setting the horizon, the height is adjusted with wooden wedges between the plinth and the first beam, and the resulting voids are sealed. The operation is performed using a building level
After leveling is completed, the nuts on the anchor fastening are tightened and fixed.
INSTALLING BEAM ON THE FOUNDATION
After the foundation has been insulated, the installation of the lower piping begins.
The beams installed on the foundation should fit fairly tightly to each other without creating a minimum space between them. This is especially true for the lower part of the frame, where the floor will be created and where significant loads will be placed.
The beams are fastened together with metal dowels, which are achieved using a wooden mallet. In some cases, if necessary, the beams are additionally fastened with staples or nails.
Scheme of fastening the bars to each other
The joining of the lower crown beams to each other occurs by picking at the corners using any of the existing methods:
- “in half a tree” - a variant of laying beams, in which the upper half of the array is removed in corner joints on one beam, and the lower half on the other;
- “into the paw” is the most common way of connecting beams, which is the opposite and does not include the end part of the log protruding beyond the level of the wall.
Nuts and wide washers are used to secure the timber to the surface of the foundation. A wide washer will expand the area of contact of the nut with the surface of the wood. You only need to use a hex nut, and square or round nuts are not suitable for such purposes. If you use narrow nuts to fasten the beams or do not use them at all, then during installation work it will be quite clear that the nut will completely sink into the surface of the beam and the connection of the house frame elements will be unreliable and short-lived.
Reasons for the need to arrange row spacing
For those gardeners who every year completely dig up the plot with a cultivator or walk-behind tractor and change the location of the beds, this issue is not so pressing. Covering the passages with any kind of non-decomposing material would complicate the digging process, so the paths are mulched with hay and grass clippings. Beds with fences require a different approach, since mowing in narrow rows is not very convenient.
Overgrown paths don't just make it difficult to care for garden crops. Weeds grow into the beds with their roots, shed seeds, taking over the territory for themselves, taking away nutrition from the planted vegetables. This affects the quality and quantity of the harvest, negating the gardener’s efforts in loosening, weeding, fertilizing, and watering.
Summer residents who come to the site once a week sometimes fail to see the planted vegetables in the riot of weeds.
Cleared of weeds, the bare earth turns into a slimy abyss in bad weather. In the heat, the mud mess dries out, forming a hard, airtight crust; in addition, it is trampled underfoot. Under the compacted layer of soil, the roots of cultivated plants begin to suffocate. Faced with such a problem for the first time, plot owners initially find a way out by covering the rows with all sorts of available materials.