A good-quality wooden bathhouse has long become an integral part of many people’s leisure time. But, in addition to a feeling of satisfaction, it also brings headaches to its owners. Wood and water are not the best of friends. When exposed to moisture, floorboards become unusable over time. And wood wears out quite quickly from mechanical stress. There is a need to repair the floor: from replacing several floorboards to reconstructing the entire flooring as a whole.
Is it possible to avoid this? Certainly! Today there are a number of different solutions, but I would like to focus on one. This is laying tiles on a wooden floor in a bathhouse. And we’ll talk about how to properly lay tiles on the floor in a bathhouse in this article. How to combine seemingly incompatible things, which tiles and adhesive mixtures to choose for this, how to organize the work correctly? Discuss all the subtleties and nuances of the technology, hear the opinions and advice of experts.
The only thing is that we will decide right away in which rooms you need to lay tiles on the floor in the bathhouse, and in which there is no need for this. We will talk about those rooms in which water is intensively used. The floor in the steam room should be wooden, so we will not take it into account in the future.
The need for a floor slope in the bathhouse
Before laying tiles on the floor in a bathhouse, it is important to correctly calculate the required slope of the surface, which will be obtained after finishing it with the finishing material. If it is insufficient, then all the water from the floor tiles will not flow into the drain system. If there is a large slope, it will be necessary to increase the estimate for construction and finishing work on installing the floor.
Therefore, to solve this problem, professional help is required, as well as to perform all other rather complex work. An error in their implementation will lead to a deterioration in comfortable conditions when using bathhouses and even to the destruction of the building structures of the structure.
If the floor is sloped, then the following problems can be solved:
- slow down the process of deterioration of the floor finishing material;
- prevent water accumulation on the floor surface;
- ensure accelerated drying of building structures;
- reduce the likelihood of mold and fungal growths.
Mold and the beginning of destruction of structures under the floor of the bathhouse Source disinsection-moscow.rf
The slope of the floor in the bathhouse can be created even at the stage of construction of the rough foundation. When performing such work, a large number of technological nuances are taken into account. Therefore, calculations are performed first. Designers do this at the stage of developing a bathhouse project or after the construction of the building and its owner contacts a specialized organization.
Advice from the experts
There are no high temperatures in a brick washing bath, but the materials are affected by moisture. Therefore, the walls can be finished with tiles. The surface is first leveled with plaster. The layer is applied with a thickness of 15 mm. Once the ceramics have been laid, the solution is removed with a rag if it gets on the surface of the cladding.
The foundation, floor, walls, windows - all these are parts of a single whole - the baths. Therefore, for its finishing it is better to use materials that combine with each other. For cladding walls, for example, you can use clinker tiles for interior work, and for arranging the foundation, clinker for difficult operating conditions.
Preparing the base for a tiled floor
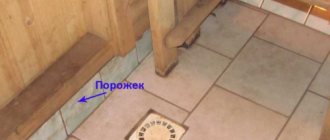
Before laying tiles on the floor in a bathhouse with a slope towards the drain, specialists always level the surface of the base. During such work, the required slope may even be created towards the drain hole. The need to carry out such an operation depends on the features of the construction and/or decisions made in the design of the facility.
Concrete base
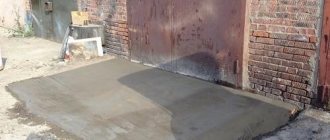
In a bathhouse, concrete is often poured when arranging the base for floor tiles. This is the optimal solution. The reason for this is the good frost resistance and high degree of flexibility of concrete. A base made of this material does not rot or deform and will last at least 40 years if properly installed. Moreover, it can be done immediately with the necessary bias.
Concrete floor base with a slope in a shower bath Source texnotoys.ru
The concrete base for a tiled floor is a screed. It can be performed in all wet rooms of the bath. If laying is carried out on the ground, then the angle of the floor is created due to the slope of the soil. When work is carried out on small areas, in this case the slope is ensured by changing the thickness of the underlying layer.
When installing a concrete base, specialists take into account the specifics of a particular bathhouse. Features of the building, the climate of the area and construction requirements affect the materials used. Most often, concrete floors under tiles are poured on the ground or joists.
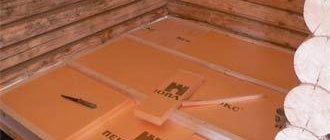
Regardless of the option, specialists must insulate them when using penoplex foam up to 50 mm thick. Polystyrene foam can also be used. However, its thickness is usually 100 mm. Porcelain stoneware is also often used for these purposes. It is laid approximately 150 mm thick.
Laying insulation when constructing a concrete base Source mtdata.ru
Professional stages of creating a concrete base
The work is carried out during the warm period. Before pouring concrete, a drainage system is laid in the prepared trench. It is laid to the sewer pit. Specialists also, at the initial stage, before making a final decision on how to lay tiles on the floor in the bathhouse, determine together with the customer what type of slope will be created. One of its types is called an “envelope”, and the other is a drain in 2 planes.
When creating a base on the ground, craftsmen perform the following work:
- Remove the top layer of soil.
- Compact the recess.
- Cover the drain hole to prevent unintentional clogging of the system.
- Create a box from boards and install it around the drain hole. This will allow, if necessary, to subsequently replace the drain head with a similar product, but with a higher or lower height.
- Fill the created depression in the soil with sand, and then compact it. The thickness of this layer is usually from 100 to 120 mm.
Important! During compaction, the sand is moistened. Moreover, it does not contain any impurities, including silt and clay.
Compaction of moistened sand Source bomond-club.com.ua
- Fall asleep and compact the crushed stone. After that, he is slammed into the sand. The result is a layer approximately 150 mm thick.
- Remove the box made of boards that protected the drain pipe.
- Fill the empty space around the drain with a solution of cement, sand and foam chips.
- Roofing felt is laid overlapping on a compacted layer of sand and crushed stone to prevent the penetration of moisture from the concrete solution. The joints of the waterproofing material are coated with bitumen. In this case, the roofing material is placed on all walls of the room to a height of approximately 200 mm.
- Cut a hole in the roofing felt under the ladder and install its lower part.
- A metal reinforcing mesh is laid, the individual parts of which are connected with wire.
- Beacons are fixed with plaster to level the concrete solution. They are installed from each other at a distance of 1500 to 2000 mm.
- Prepare a solution for the subfloor using waterproofing additives. Additives protect metal fittings and the base as a whole from the negative effects of water.
Preparation of mortar for the subfloor Source ooo-dsk.ru
See also: Catalog of companies that specialize in finishing materials and related work
- Pour the solution, level it and, if necessary, adjust the slope using a building level. This process is accompanied by compaction of the mixture to eliminate cavities with air. The thickness of such a layer is at least 50 mm. It hardens in about 10 days. This period depends on the temperature and humidity in the room.
After the first layer of concrete has cured and before laying the tiles in the bathhouse, craftsmen lay thermal insulation. Then it is covered with a reinforcing mesh, on top of which beacons are installed. Then a leveling screed with a thickness of 50 to 60 mm is poured. This is the second layer of concrete mortar, which is compacted and leveled along the beacons to obtain uniform density and remove voids. Finally, specialists apply a waterproofing impregnation to the subfloor.
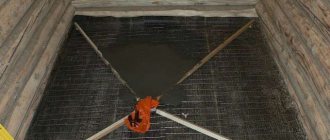
Wooden non-leak base
If it is decided to make the base from wood, the structure must have a non-leak design. To make such a subfloor, only boards are used, and not sheet wood material. The reliability of the entire structure can be ensured if each of its elements has high strength.
Construction of a wooden non-leaking floor with a slope Source stroyday.ru
Despite the complexity of the work, professionals lay tiles on wooden floors after eliminating the mobility of individual elements. During installation of floorboards, a certain slope towards the drain is maintained. Professionals perform this work in the following sequence:
- remove dirt from the rough surface and install a drainage system;
- pour the screed at an angle if it is provided for in the project;
- allow the concrete structure to harden for 10 days;
- install the boards in accordance with the slope of the screed.
When constructing a leak-proof wooden base, the floorboards are laid tightly together. The result is a warm structure, because insulation material is placed in the underground space. This could be expanded clay, expanded polystyrene, and so on. In this case, the boards are laid on the logs.
Experts use several technologies for preparing the wooden base before laying the tiles in the bathhouse at a slope towards the drain. The most common method is the “dry” method. When using it, OSB sheets, waterproof plywood or gypsum fiber board are laid on a rough wooden floor.
Preparing a rough wooden base using GVL Source chudopol.ru
Advice! It is not recommended to lay chipboard in the steam room, because it can release hazardous substances when heated.
Craftsmen must waterproof the rough structure. For this, bitumen and roofing felt are used. The sheet material is attached with self-tapping screws, the heads of which are recessed into the coating, and the seams between its individual parts are sealed with sealant. At the end, the structure is coated with a primer. It will increase the adhesion of the sheet material to the tile adhesive and topcoat.
Professionals can also prepare the rough wood base using the “wet” method. When using it, a screed is created on top of the laid boards. The thickness of the concrete layer is no more than 50 mm. The technology also involves installing a damper gap along wall structures. Its width ranges from 10 to 20 mm.
Craftsmen always cover the wooden base with waterproofing. This can be plastic film, roofing felt or bitumen. Waterproofing also protects the lower parts of the walls. The height from the floor of such areas is 100-120 mm.
Waterproofing a wooden subfloor Source buildup.ru
Experts also use damper tape. It is fixed along the walls. Reinforcing mesh is also used. The screed itself is most often created when using a leveling mixture. To prepare it, craftsmen use two parts of liquid glass, the same amount of sand and half as much water.
Benefits of brick
This solution can be seen in almost any bathhouse. The brick finish protects the wall from overheating. Very often this protection is made even more powerful and extended to the floor. Finishing the stove in a bathhouse with brick performs both a protective and decorative function. For it, the same type of brick is taken as for the rest of the stove, or another facing brick of the required appearance is additionally purchased.
The rules for brickwork for walls, the stove and the protective portal around the stove are general.
Strict adherence to row levels and neat and thin seams are necessary.
On the walls and in the oven, bricks are laid with overlapping seams. If the portal is laid out in one layer, then it is not at all necessary to comply with this requirement. This is why you can often see protective portals where bricks are stacked on top of each other.
The horizontal row is checked by level. Covering the wall with bricks is plumb. For a corner stove, three planes are laid out with bricks, two on the walls and one on the floor.
Attention! A more durable option would be to lay them in one layer with a parquet pattern or according to the usual pattern, as for a half-brick wall.
For a stove near the wall, there are only two, of which one is located on the floor, and the second is on one wall. Brick, even if it is laid in one layer, has good thermal insulation ability. Its masonry is carried out directly on wooden walls and floors without other fire-retardant insulation.
It is advisable to lay out the horizontal part of the portal in one row between the foundation of the furnace and the subsequent masonry next to it. This advice should only be followed with brick sauna stoves. It is not suitable for metal ones.
Important! When finishing with ceramic tiles, decorative plaster or steel sheets, the use of additional thermal insulation materials is mandatory.
In baths, thick fireproof cardboard, mineralite or basalt wool are most often used. There are also basalt cardboard and other materials that are a variation of the previous ones. Minerite is the most preferred. These are ready-made boards specially designed for thermal protection in areas around stoves.
Types and features of sloped floors
The type of slope is selected during the design of the ramp floor. The installation of this element is carried out in all rooms where water regularly enters the floor tiles. A ramp is an inclined part of the floor. Thanks to the slope, water flows into the drain. The required angle is formed using the backing layer. At the same time, the installation of floor ceramics differs in a number of features.
Floor made of 6 inclined parts - ramps Source vse.kz
Pros of using tiles
Ceramic tiles, currently available in a variety of modifications and design solutions, are distinguished by almost ideal technical characteristics in terms of finishing wet rooms with elevated temperatures:
- Resistance to the development of mold and fungi;
- Possibility of combination with modern underfloor heating systems;
- Moisture resistance;
- No release of toxins when heated;
- Durability;
- Resistance to temperature changes;
- Ease of care;
- Easy to install yourself;
- Affordable cost;
- The ability to implement even the most creative design solutions that give unique individuality to interiors.
The only drawback of the material is its fragility, which requires maximum care when working with it.
The nuances of laying ceramic tiles at an angle
Before laying tiles in the shower on a sloped floor or in any other bath room, professionals always first create a waterproofing layer on an already prepared base. Thanks to additional protection, water will not wash away, for example, a concrete structure.
Usually craftsmen lay tiles away from the walls. If there is a horizontal frieze, its lining is first performed. Only then do they lay the ceramics on inclined surfaces along which water flows into the drain.
The “envelope” type layout begins with the sides representing the bases of triangular or trapezoidal surfaces. First, be sure to fix the tiles that do not need to be cut.
Laying the material begins exclusively from the center of the base. If an even number of ceramic pieces are placed in one line, the triangular inclined surface is divided into two equal parts. Each of them is lined separately.
Laying tiles on a slope on the floor with a drain Source mega-santehnika.ru
Required Tools
Before starting any work, you must prepare all the necessary tools in advance. You need to work concentratedly and measuredly, and not rush around headlong in search of missing equipment. What you will need for this job:
- Crowbar, nail puller, heavy hammer, hacksaw for dismantling the old floor or its fragments for subsequent replacement.
- Rule, level and tape measure for arranging a new coating and marking it.
- Glass cutter, tile cutter and grinder with discs for cutting ceramics.
- A drill with a mixer attachment and a container of sufficient volume for stirring assembly mixtures.
- Roller or brushes for priming.
- Convenient spatulas, trowel and comb for applying adhesive.
- Rubber hammer for shrinking and leveling tiles during installation.
- A set of rubber spatulas and rags for working with grout.
When selecting a comb, remember that for tile sizes from 5x5 to 15x15 cm, the tooth width should be 3-6 mm. For squares with a side of 25 centimeters, the tooth will be 8, and for 30 - 10 millimeters. If you need anything else, think about it in advance and put the tool so that it is always at hand.
Video description
You can get acquainted with the process of laying tiles from a ladder onto a pre-prepared screed with a slope in this following video:
However, professionals carry out the work of tiling a sloping floor with ceramic tiles as follows:
- first, cover the far triangular surface opposite the entrance door to the room with tiled material;
- then the tiles are laid on the left and right sides of the ladder;
- then the ceramics are placed on the last sloping section of the floor near the entrance;
- at the end of the process, the surface directly next to the drain is coated.
Thanks to this sequence of work, the master moves less on the facing material, the glue under which has not yet reached its maximum strength. At the same time, during the masonry process, experts pay increased attention to the watershed lines of the floor with expansion joints, as well as cuts and joints between the ladder and the tiles. After all, such places are most susceptible to damage of various types.
To increase the strength of the seams, they are reinforced using metal profile elements. In this case, the gaps themselves are first filled with bitumen, which is preheated. Such a mass, when cooled, can reduce the negative impact of loads.
Metal profile for protecting tile joints Source profil-mo.ru
Lining of cuts
Craftsmen perform this work after laying all the solid ceramics and drying the glue underneath. In the process, specialists use exclusively individually cut tiles for a specific location. At the same time, the tile material is distinguished by its decent thickness and high strength. Therefore, only experienced craftsmen can cut floor ceramics efficiently. Moreover, they use a special tool.
How to prepare walls
Before starting work, the surface of the brick (cinder block) masonry must be prepared, namely: clean it of layers of fat (if any), dirt and dust. After this, after wetting the surface of the wall with a simple household sprayer, it is necessary to level out all roughness, sharp changes and depressions larger than 10-15 mm with the solution. In a word - do rough plaster. Next, you need to make small notches on the plaster to better attach the tiles. For work, use a simple spatula or trowel.
If the walls of the bathhouse are made of timber, then it is necessary to waterproof these walls. For such work, a simple roofing material is suitable, although you can use other rolled material. After this, it is good to secure a reinforced mesh onto the roofing material (you can use a chain-link mesh with a fine mesh). The plaster must be applied over a metal reinforced mesh using cement mortar 15-20mm thick.
Briefly about the main thing
Before laying tiles on the floor in a bathhouse with a slope under the drain, choose the option of laying out the ceramics. The tile material is laid with a break in two planes and using the “envelope” method. In the first case, you have to trim the ceramics less.
Before work, prepare a leak-proof wooden or concrete base. In this case, the concrete subfloor is poured in two stages with sequential filling of sand, crushed stone, laying of waterproofing, reinforcing mesh, insulation and application of waterproofing impregnation.
When constructing a wooden base, only boards are used, and it is prepared using waterproofing and sheet material. A wooden subfloor can also be leveled using a screed no more than 50 mm thick.
Ratings 0
Markings to pay attention to
When choosing tiles for a bath, you need to pay special attention to the markings on product packaging. What exactly do you need to know?
- The “T” marking indicates that the tiles are resistant to high temperatures.
- The designation “R” indicates whether the tile in front of you is glossy or matte. Next to the letter there will be a certain number, and the higher it is, the less slippery the tile is. For example, glazed tiles will be designated R9, R10, but matte tiles will be designated R11, R12, etc. Also, if the product is slip-resistant, you can see on the packaging an image of a foot stepping on the tile.
- Frost resistance and resistance to temperature changes are also important. The first criterion is indicated by a snowflake (sometimes two), and the second by a sun icon. It is also possible to indicate additional information, which is indicated by the letters “A” and “B”: the mark A I and B I indicates the possibility of using the tile even for the exterior cladding of a building, that is, it has high frost resistance. The A II and B II marks indicate average frost resistance, but tiles with the A III and B III marks can only be laid indoors.
- It is also worth paying attention to the abrasion resistance of the tiles - this criterion is indicated by the letters PEI and the image of a saw blade. If there is a number next to such a mark, it will be easier to determine whether the tile is suitable for you: 1 indicates the possibility of use in a bathroom, toilet (not suitable for a bathhouse), 2 – for use in corridors, a dressing room, 3 is suitable for any room in a bathhouse, and 4 and 5 can be found less frequently, since these are industrial options.
Markings that can be seen on tile packages
Materials
There are only so many building materials you can use in a steam room. And since we are talking about finishing, there are even fewer of them. (For those who would like to learn more about insulating a bathhouse, we recommend this article.) These are wood, stone and tile. Plastic, glass and metal are not used in the steam room, or are used little (glass is a window and, possibly, a door, for example).
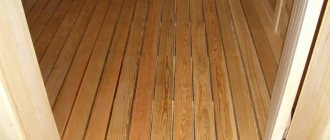
Tree
linden shelves, Extra grade
It can be called the main material, because it is suitable for finishing floors, walls, and ceilings, and can also serve as a material for doors, door frames, and window frames.
Wood varies by wood species and lumber types.
The types of wood recommended for finishing a steam room with your own hands are deciduous species, for example, linden, aspen, alder, ash, oak. The latter is not afraid of water just like larch, but (like larch) oak cannot be called cheap.
Linden is perfect for a bathhouse - its thermal conductivity is low, and its volume changes little from water, which makes it especially suitable for making doors, but it also has unpleasant properties. The wood is soft, not very dense, so it is easily damaged by fungi and bacteria, not to mention insects and rodents.
The linden tree must be protected - use coatings that are acceptable for a steam room so that the walls, say, made of linden lining, will last longer.
ADVICE! However, it is better not to use linden for flooring; it is too soft a tree for such purposes.
Aspen is also an excellent option for a steam room - an inexpensive tree whose density is closest to the overly praised abash. Aspen has approximately the same characteristics as linden; it is also prone to rotting and needs protection.
In the photo: lining, this type of lumber is most often used for finishing the inside of steam rooms and bathhouses.
Stone
Stone in the steam room is found not only in heaters or in the lining of stoves, but also on the walls.
The corner in which the stove is located needs to be made fireproof, so why not decorate it with natural stone tiles or pebbles and cobblestones beautifully laid in mortar? True, it is better to cut the pebbles on a stone-cutting machine, and then put them in the solution with the flat side facing the wall. This way you can make a whole panel of stone.
We do not recommend making a “corner” from a stone exactly the same color as the stove surround (if there is one) - this will purely visually unite the stove and the corner; it is better to play on contrast or a play of color and texture.
The main difference between laying stone tiles in a steam room is that here, in addition to moisture, it will also be subject to strong heating, and when the bath is lit, it will also be subject to rapid temperature changes.
Ceramic tiles
In the previous chapter, we did not talk about the fact that natural stone can be used as a floor covering, because the material is quite expensive. But ceramic tiles are quite suitable for finishing the stove “corner” and for the floor.
IMPORTANT! However, glazed ceramic tiles in a steam room should not be used either near the stove or on the floor - for various reasons. The basis of the glaze is glass, and here it is not heat-resistant, so it will deteriorate from the heat of the stove
And you shouldn’t use it on the floor because of the smoothness of the glass glaze - you can easily slip.
The best option for a steam room would still be Metlakh tiles, which can easily withstand high temperatures and have a surface rough enough to be installed in bathrooms for a long time. In addition, nowadays the color range of these tiles has expanded significantly, and can be matched to the overall design. Not to mention the variety of patterned options.
ADVICE! If you are not sure about tiles, use traditional ladders - wooden gratings for your feet.
In general, we will try to persuade you a little about choosing such a covering in the steam room. The main argument is that wooden floors will fail faster than tiles, unless, of course, they are made of larch. Ceramics do not need to be treated with any compounds, it is fireproof, does not rot, does not darken, and it is easier to clean such a floor.
Application of basalt cardboard
The fibrous material was developed exclusively as an environmentally friendly insulation material. However, due to its high physical characteristics, it began to be used not only to reduce heat losses, but also for other purposes.
Carrying out thermal insulation
Basalt cardboard is an environmentally friendly and absolutely safe insulation material, which is recommended for use in residential premises. The material is used to cover loggias and balconies, as well as entrance door panels. Almost zero hygroscopicity allows the use of fibrous insulation sheets in stainless steel screens for saunas and baths.
The heat insulator is suitable for external and internal insulation of building envelopes built from timber or chopped logs. Basalt cardboard is used for cladding interfloor floors in industrial and residential buildings. Often, fibrous heat insulator is also used for floor insulation, when assembled using the “warm floor” system.
As a soundproofing material
The structure of basalt cardboard provided the heat insulator with the ability to absorb noise in the low, medium, and high sound range. Fiber sheets are often laid between gypsum board and gypsum board. This allows for a good level of sound insulation. Fiberboard is included in many noise-absorbing materials, especially panels. It is also installed when floating floors are installed. Thus, this type of insulation is used to soundproof the surface of the floor and walls.
Application for household equipment
Fibrous material is used for insulation in various types of cooling and heating structures to protect against the temperature influence of the environment. Basalt cardboard has become a safer alternative to asbestos sheets. It does not contain harmful substances and does not lose its performance properties when used in the lining of chimneys and pipelines. Heat-resistant substrates are also made using fibrous sheet cardboard. They are used in stove structures, as well as in the arrangement of floors, ceilings and walls. The insulator is used to wrap heating elements in boilers for both industrial and domestic use. Dense basalt sheet is used for thermal insulation of frying ovens, kitchen gas and electric stoves, refrigerators and cold rooms. The material is also used to wrap water pipes and air ducts in supply ventilation systems.
Grout
In order for the spacer seams to be of high quality and durable, the grout must be compatible in composition with the glue and meet the same operating requirements: be moisture-resistant, plastic, and resistant to temperature changes.
When choosing a grout, a specific criterion is taken into account - the permissible width of spacer joints. The manufacturer indicates this information on the packaging. This indicator is taken into account when choosing the size of spacer crosses.
There are two types of grout - cement-based and epoxy.
Table 2. Types of grout
| View | Characteristic |
| Epoxy grout | This is a two-component solution consisting of epoxy resin and hardener. It costs more than cement. Work is difficult with seams less than 6 mm and tile thicknesses over 12 mm. The advantage lies in the high decorativeness of the material, a variety of shades and fillers. Such seams are very strong and durable. |
| Cement grout | It is produced in the form of a dry mixture, which must be diluted to a working consistency using water or liquid latex. Ready-to-use grouts are more expensive, but eliminate incorrect preparation of the composition, since all components are mixed in the proportion recommended by the manufacturer. All grouts of this type consist largely of cement and differ only in additives. Such seams lose their attractiveness over time due to the presence of pores that absorb dirt. |
When choosing the width of the seam, you should take into account the visual effect and the difficulty of filling the space qualitatively
It is important to fill the seam to its full depth - only this will ensure its protection from moisture
Table 3. What should be the width of the seam?
| Tile type | Seam width, mm |
| Made by pressing with the length of one side up to 10 cm | 1 – 3 |
| Made by pressing with a length of one side of more than 10 cm | 2 – 8 |
| Made by extrusion with one side up to 30 cm | 4 – 10 |
| Made by extrusion with one side over 30 cm | 10 |
| Clinker | 8 – 15 |
| Mosaic | 1 – 3 |
For use in bathhouses, craftsmen recommend the following types of grout.
Table 4. Bath grout
| Illustration | Characteristics | Average cost (as of May 2021), rubles |
| Ceresit CE 33 | the base of the mixture is cement; type – dry mixture; seam size 1-5 mm; solution viability 1 hour; hardening time 24 hours; operating temperature -50–70 °C; application temperature 5–30°C; consumption 0.4–0.7 kg/m²; water consumption per 1 kg of mixture is 0.33 l; density 1.75 g/cm³; packaging: 2 kg; frost resistance F100. | 179 |
| Ceresit CE 40 | the base of the mixture is cement; type – dry mixture; seam size up to 10 mm; solution viability 2 hours; hardening time 8 hours; operating temperature -50–70 °C; application temperature 5–30°C; consumption 0.4–0.7 kg/m²; water consumption per 1 kg of mixture is 0.32 l; density 1.75 g/cm³; packaging: 2 kg; frost resistance F100. | 315 |
| Mapei | the base of the mixture is cement; type – dry mixture; seam size 2-20 mm; solution viability 0.3–0.4 h; hardening time 3 hours; application temperature 5–35°C; consumption 0.2–5.1 kg/m²; water consumption per 1 kg of mixture 0.23 l; packaging: 2 kg; density 1.98 g/cm³. | 279 |
| Kerapoxy | base – epoxy 2-component; type of mixture – ready-mix; solution viability 0.8 h; hardening time 24 hours; operating temperature -20–100 °C; application temperature 12–30°C; consumption 0.3–2.4 kg/m²; density 1.55 g/cm³; packaging: 5 kg; suitable for exterior and interior use, has increased moisture resistance, chemical resistance. | 2752 |
The color of the grout is selected depending on the desired effect - a contrasting seam will highlight the tiles, and the shade chosen to match the material will make the floor covering visually monolithic. On the practical side, the grout is darker and several shades darker than the facing - it will lighten over time. But on light-colored grout, a characteristic yellow-cloudy coating will inevitably appear, which forms during the operation of the bathhouse. Such grout will quickly look unsightly.
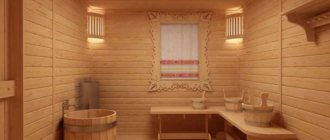
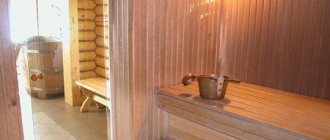
Interior Design
As a rule, two tiers are built inside the sauna for sitting and lying areas. Right angles between the walls and benches allow you to fully utilize the steam room area. All benches are made exclusively from wood. Spaces of 1.5-2 cm are left between the boards to ensure ventilation of hot and cold air in the sauna.
The width of the top shelf should be at least 50 cm so that a person can lie on it comfortably. Additionally, the front of the bench is equipped with a stand on which you can rest your feet. A distance of 70 cm should be left between tiers.
100-105 cm are left from the top bench to the ceiling so that a person can feel the maximum effect of the sauna. If the size of the room allows you to place shelves in only one tier, it should be taken into account that a very tall person, when sitting on a bench, should not reach the ceiling.
There is no plunge pool or buckets of water placed inside the sauna, since the shower and relaxation room are located separately. There are enough showers in small rooms. But equipping a swimming pool will be very useful if you have a large area. This way out is not only healthy, but also pleasant.