Proper drainage of water from the bathhouse is one of the most important points during construction. Its durability, the absence of harmful odors of raw materials or fungus, and how often the foundation will subsequently have to be repaired directly depend on this. In this article, we invite you to understand the various options for constructing a drainage system.
Bath drain: what needs to be taken into account?
Sewerage installations are carried out at the beginning of construction. If we talk about a bathhouse, then the project needs to be prepared in advance, and you can start working immediately after pouring the foundation.
Buying sewer pipes is the first stage. The most suitable materials are polypropylene products with a diameter of at least 110 mm. For small buildings, which also do not have “their own” toilet, 50 mm is enough. A slope when laying pipes is required: a single horizontal section will negate all efforts: the water here will constantly stagnate. It is better to install a sewer drain equipped with a mechanical, odor-blocking, anti-freeze device on the floor of a bathhouse or in a pit.
Many factors are taken into account. For example, you need to consider the following questions:
- operational loads on the structure: only during the summer season or all year round;
- the number of people who will take a steam bath at the same time;
- soil characteristics and freezing depth;
- depth of aquifers.
Conclusions are drawn after an unequivocal answer to each of them. For the summer version of the bathhouse, it is easiest to arrange a drain. If it is to be used in all seasons, it will be necessary to determine the best method - effective and profitable.
Swampy, clayey soils and groundwater lying close to the surface do not provide much room for thought: there is only one option left - a volumetric sealed structure.
Selection of sewer pipes
To equip the drainage system, standard plastic sewer pipes with a diameter of 50-100 mm are used. Gray polypropylene pipes can be used inside the bathhouse. Channels of 50 mm are usually laid from each water collection point to the outlet.
Two types of pipes for internal and external communications
For external communications, orange PVC pipes will be required; they are used to equip sewer systems laid directly into the ground, without insulation and the use of concrete trays. The outlet pipe is selected with a diameter of at least 100 mm.
The drain for water from the steam room or other compartments in the bathhouse will be connected to the general sewer system, as a result, a 50-100 mm adapter will be required, and in addition, a groove will be made for the pipe space ventilation equipment. If you plan to use the bathhouse in winter, then the communications will, at a minimum, need to be insulated in the area from the wall to the multi-chamber septic tank and equipped with a cable heating system.
Methods for organizing drainage
On the one hand, arranging a drain in a bathhouse is a rather labor-intensive process, but such hydraulic structures cannot be called super-complex structures that cannot be made with your own hands. There are several options for organizing drainage:
Drainage pit
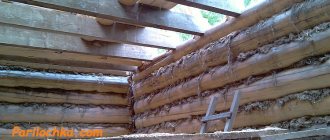
This is the easiest and most inexpensive way to get rid of dampness. However, it is only suitable for a small family of 2-3 people. In this case, the drain is installed directly under the bath room. The walls of the pit are often lined (for example, with brick), and a layer of filtering building materials - gravel or crushed stone - is poured onto the bottom.
Sealed drain pit
To equip it, a pit is dug and a relatively large container is installed in it to collect wastewater. After filling it to a certain point, they call a sewer truck to pump them out. This type of pit is called a cesspool; it is suitable for those areas where the aquifers are shallow. This option for organizing drainage guarantees the absence of negative consequences for the soil, but it is not very convenient and not at all economical.
Septic tank
This design is the best solution for a large family, as it makes it possible to collect a considerable amount of waste flowing from the bathhouse and residential building. This system includes at least two cameras that differ in functionality. The first chamber is absolutely sealed, its purpose is the primary purification of waste from large debris settling to the bottom, clarification of water, its biological purification thanks to anaerobic bacteria.
This chamber is connected to the second container by an overflow pipe. This compartment is already a drainage well, where water from the bathhouse undergoes secondary purification and is absorbed into the ground. A septic tank with three compartments is an option that provides better quality work. The remaining suspensions finally settle in the second container, and here the clarified water is purified by microorganisms before entering the third, drainage chamber.
A septic tank is the most efficient system. For this reason, this design is the most expensive way to organize a drain in a bathhouse. You can install factory equipment, but it is not very difficult to create such a septic tank yourself.
Where will the liquid be drained?
There are different types of pits for draining liquids, each of which has certain features.
cesspool
The simplest option for a pit for draining liquid. More often the cesspool is located outside the bathhouse. You can dig a hole yourself. It is recommended to reinforce the walls with rings of concrete or other durable material. At the bottom of the pit there should be a filter layer made of natural materials. Additionally, you can fill in a layer of fine crushed stone, broken bricks, and concrete fragments.
If the filter layer is too dense, the accumulated water from the pit must be pumped out using special equipment.
Sewerage
This option for draining liquid is relevant if there is a central sewage system next to the bathhouse. The outflow structure must be connected to a pipe through which sewage flows from other houses. To connect the drain to the public sewer, you need to contact the local administration and coordinate the work.
Special tank
A modern version of tanks for draining liquid from a bathhouse is a septic tank. Kinds:
- Single-chamber - a simple design with one container for draining water. It may have a built-in filter through which the liquid goes into the soil or be closed. The second option is inconvenient, since you need to periodically drain the chamber of accumulated water. The main disadvantage is soil contamination with soap and various chemicals.
- Double-chamber - a complex design with two containers. The first contains special bacteria that gradually dissolve dirt, debris, skin particles, and chemicals. After filling the first chamber, it enters the second, where it passes through a filter system. Clean water is released into the soil.
You can assemble a septic tank yourself, but it is expensive.
Varieties of plums
There are three ways to organize water flow:
- dumping into the ground is quite convenient if the building is placed next to a body of water (as is often done). However, when using detergents in a bathhouse, this option is unacceptable; wastewater with chemicals cannot be discharged into the ground directly, without treatment;
- installation of a septic tank on the site. For a bathhouse built next to a residential building, the drainage from which is carried out into a septic tank, this is the best option. The main problem is that it is necessary to take into account the additional volume of sewage water immediately when purchasing and installing a septic tank, otherwise it will fill much faster than planned at the design stage;
- connection to the centralized sewer system. The most complex option in terms of labor and money, but it practically does not limit users in terms of the composition of waste water and its volume.
The choice of device type depends on several important factors.
- the nature of the building and its location. For a bathhouse built within the city, next to city centralized communications, it is only possible to discharge into a centralized sewer or septic tank. In conditions of dense development, the discharge of water into the ground is unacceptable, since it can lead to soil destruction not only in one’s own area, but also in neighboring areas, and an unpredictable rise of upper groundwater;
- foundation structures. For strip and slab foundations, an existing basement or underground, wastewater must be collected in a single reservoir and drained from there through a pipe. Discharge of liquid directly through the floor into a pit or directly into the ground is only possible when constructing a bathhouse on a columnar or pile-screw foundation;
- type of soil. For clay soils, heavy loams and other soils with a high ability to absorb moisture, the discharge of water onto the soil surface will lead to erosion of the foundation, destruction of supports, flooding of basements and deterioration of the soil condition in the area as a whole.
Conclusion: direct discharge of wastewater from a bathhouse into the ground is possible in a pile structure located on the shore of a reservoir, provided that chemical detergents are avoided and the soil is dense and not prone to erosion. In other cases, it is necessary to organize discharge using a pipeline into a sewer or septic tank.
What needs to be done before construction begins
The neck of a hole filled with soil
Everyone knows that the construction of any object or communication must begin with design. The construction of a treatment plant for a bathhouse will not be an exception.
GWL assessment
First of all, you need to find out at what level the groundwater lies. If this level is high enough, then the construction of a traditional drainage pit will have to be abandoned, since it will be filled with soil water.
How can you determine at what distance from the surface soil waters lie? As a rule, to obtain this information it is necessary to carry out a hydrogeological study, including drilling ores. However, a preliminary assessment of the situation can be made using ancient folk methods:
- If there are wells nearby, then based on the level of water in them, one can draw a conclusion about the groundwater level.
- Another sign is that with a high groundwater level, many plants grow on the site that need moisture in large quantities. For example, horsetails, coltsfoot, reeds, sedge, etc.
Brick drain pit
Determining the volume of chambers and other construction nuances
The volume of the receiving chambers depends on the size of the bathhouse - the drainage pit should be larger the larger the number of people who will use the washing room.
If the volume of the pit is insufficient, the wastewater simply will not fit in it and will flow over the edge. Also, you should evaluate the quality of the soil on the site; this determines whether it will be necessary to strengthen the edges of the pit.
The location of the treatment tank should be determined in advance. As a rule, it is recommended to place the pit at a distance of 2-2.5 meters from the bathhouse. Otherwise, it will be difficult to build a pipeline with the required slope.
Drainage system in the washing room
Washing room in a bathhouse with a leaky wooden floor
Traditionally, a Russian bathhouse consists of two rooms - a dressing room and a steam room, combined with a washing room. The layout of modern analogues of Russian baths is represented by such premises as:
- the waiting area;
- washing room;
- steam room
The first room does not require drainage. The technology for drainage in washing and steam baths depends on the type of floor in a particular room.
Typically, the floor in a bathhouse comes in several types:
- pourable - a lag floor structure used in regions with a relatively warm climate and sandy soil. The plank flooring is laid with a small gap, which ensures unhindered drainage of waste water directly into the ground. In the central regions of Russia it is practically not used
- leaky - a wooden plank floor with a structure on logs, fixed to the supports of the load-bearing base or the lower crown of a wooden frame. The drainage drain is mounted at the lowest point of the floor, where dirty water flows after seeping through the gaps between the floorboards. Optimal design for baths on a columnar foundation;
Washing room in a bathhouse with a concrete floor and grated flooring - non-leaking - a monolithic and sealed concrete floor, poured with a slight slope towards the center or the far wall of the room. In the first case, the drain ladder is mounted directly into the concrete screed. In the second, along the edge of the wall there is a drainage chute connected to a drain. A non-leaking floor is installed in bathhouses and saunas on a strip-type base.
We recommend: Wet facade insulation technology - instructions for independent implementation
With the exception of the pouring floor, the internal part of the drainage system is represented by a drain for collecting water and a drain pipe. The outer part of the sewer system, depending on the size of the building, the type of soil, and the depth of soil freezing, can have a different appearance.
For a small bathhouse used once a week, a simple drainage system with a small drainage hole located under the floor structure or in close proximity to the building is sufficient. For a bathhouse designed for a large family, which can be heated once or twice a week, a more complex sewer system with a drainage well will be required.
Branch laying
All DIY work is doubly interesting when you know what needs to be done. The process of laying a drainage system from a bathhouse to a sewer pit is carried out in several stages, and the first, laying the outlet sleeve into the foundation, is carried out at the stage of pouring the latter.
When the bathhouse is built, a drainage hole is prepared and a drainage pipe is installed at an angle to it. Accordingly, the trench is dug from the building to the same depth and the closer the distance to the drain, it is increased. It is not necessary to protect the drainage system, but it is advisable. By insulating the floors in the bathhouse, you can additionally protect the pipe to the point where it exits through the foundation. The trench is buried, and so is the sewer pit.
In the washing compartment, when laying the floor, an inclination is made towards the installed drainage pipe. This is easier to do in a concrete coating than in a wooden one. When pouring a monolithic base, it is necessary to ensure that the floor does not have holes in which water will stagnate. A special siphon with a mesh is installed in the place where the drain is installed. It is attached to the base and after the concrete has hardened, finishing work can be carried out. The drain is ready. After commissioning, you only need to check the tightness of the siphon pipes that drain water from the washing compartment.
The siphon for draining can be small or as shown in the figure. This option is more convenient for large wash compartments.
Classification
Water drains from the bathhouse are classified depending on the design and the presence of automatic mechanisms. Each of them has features.
Non-pressure
Non-pressure devices are simple structures that are installed in small baths. Suitable for steam rooms in which water procedures are performed simultaneously by no more than 2 people. The liquid flows down the drain as the floor is covered. The more it is, the faster the liquid will drain.
Pressure
Complex design for water drainage. The system is equipped with an electronic liquid suction mechanism. The water dressing room can bathe many people at the same time. Water will not be able to overflow the thresholds of the room.
Mortise
A semicircular drain, which is made of thick plastic, metal, concrete. The drain is located above the surface of the earth. You need to make a recess under the place for liquid drainage. Otherwise, the water will spread throughout the summer cottage.
Design from the outside
The calculations use the size of the steam room, frequency of use in the future, and type of soil. Each of the water intake designs has its own installation nuances. A drainage well is used most often because of its basic design for personal use in summer cottages. The tank for wastewater treatment is enough for a group of up to 6 people to visit the bathhouse.
A professional design team will help determine the optimal size of the well in the conditions of a particular site. You won’t have to overpay for extra material and square meters of work by the installers.
Constructions that use a septic tank are sold ready-made. The volume of the tank varies depending on the number of possible visitors to the bathhouse. For a large family of 6-7 people, the average capacity of the tank should be at least 1.5 m3 per day.
Do-it-yourself sauna drain: step-by-step guide
This, along with the stove, is the most important component of the bathhouse. If possible, it should be done simultaneously with the construction of the foundation and insulation of the subfloor, before the construction of the log house. First, we need to choose the type of drain based on the general design of our bathhouse, the design of the floor, the presence of a particular sewer or drainage system and our financial capabilities.
Initial conditions
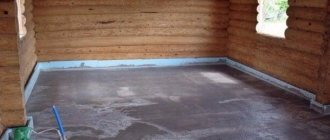
Let's say we have: a strip shallow concrete foundation, a log frame, a shallow underground and a pouring floor. This is all done before the flooring is laid. Let us take it for granted that at the stage of constructing the foundation we did not lay pipes there. This means we can make a simple drain located in the underground.
Drain in the washing room, pit and sewer, top view
The drawing shows expanded clay insulation with a concrete screed and a simple water seal, and if you have minimal welding skills, it doesn’t cost anything to make. But we will still use a ready-made modern ladder, it will be more reliable.
Future drainage taking into account the pouring floor and a nearby absorption pit
Another example of a simple water seal.
This design doesn't even require welding
Required materials
| Position | Name | Specification | Quantity | Unit price | Final price | Note |
| 1 | Cement | M400 | 150 kilograms (3 bags of 50 kilograms each) | 245 rubles | 735 rubles | For screed, and a small amount for concreting the cover of the absorption pit |
| 2 | Sand | Fine river | 450 kilograms (18 bags of 25 kilograms each) | 40 rubles | 432 rubles | For cement mixture |
| 3 | Liquid glass | 10 liter jar | 249 rubles | 249 rubles | For waterproofing | |
| Polypropylene fiber fiber | 0.5 kilogram | 294 rubles | 197 rubles | For reinforcement | ||
| 4 | Expanded clay | 500 kilograms (10 bags of 50 kilograms each) | 180 rubles | 1800 rubles | ||
| 5 | Sand-crushed stone mixture | 3 ton | 900 rubles | 2700 rubles | For underfloor cushion and absorption pit drainage | |
| 6 | Old car tires | On average 30 pieces | For absorption pit | |||
| 7 | PVC pipe with socket | Ø 110×3.2×3000 mm | Minimum 3 pieces | 430 rubles | 1290 rubles | For external sewerage |
| 8 | Viega Advantix shower drain with dry seal | 1 piece | 2200 rubles | 2200 rubles | ||
| 9 | Beam or board for joists | 100x100x6000 mm, or 40x100x6000 mm | 1 piece each | 450 rubles or 130 rubles | 450 rubles or 130 rubles | Preferably larch |
| 10 | Edged board | 25x200x6000 mm | 10 pieces | 370 rubles | 3700 rubles | |
| 11 | Self-tapping screws | As needed, but not less than 2 kilograms |
Calculation of the required material
Pipe and tee made of polypropylene for laying the drain
The amount of material required to install the drainage system is selected according to a previously drawn up project. For example, to install the internal part of a drain measuring 5x5 m you will need:
- drain with direct outlet 105×105/50 mm;
- PP socket pipe Ø50, length 500 mm;
- straight pipe PP Ø50, length 1000 mm;
- straight pipe PP Ø50, length 2000 mm;
- adapter coupling 50–110 mm;
- PP outlet 45o.
If necessary, a polypropylene bend at 90° is used. The length of the pipe for connecting the drain can vary from 500–1000 mm depending on the height of the floor. If necessary, the pipe is trimmed. A product 2000 mm long is used as a drain pipe. When laying external communications, PVC pipes up to 3000 mm long are used.
Required Tools
- Welding machine (optional)
- Construction mixer (or container for mixing concrete)
- Bayonet and shovel shovels
- Trowels
- Hydraulic level
- Saw
- Planer, jointer
- Hammers
- Kiyanka
- Nail puller
- Gas keys
- Pliers
- Screwdrivers
- Roulette
- Carpenter's meter
Required Tools
We will need the following items from the tools:
- rubber hammer (useful for driving pipes into each other);
- shovel;
- Bulgarian;
- putty knife.
A grinder will be needed to cut an opening in a metal underground tank through which the drain pipe will enter.
Autonomous sewerage system with settling well
The first and most labor-intensive method is a filtering settling well based on an autonomous sewer system. Here the system consists of two tanks, preferably made of plastic. The first tank filters wastewater from coarse particles using a simple mesh filter installed in the tank. The second tank carries out a second stage of wastewater treatment before sending it to the waste pit. But for any option of drainage with sewerage, a special floor design in the bathhouse is required.
The whole point of such a floor is to tilt towards the center of the room at the initial stage of construction. A fitting is mounted in the center of the floor, which fits closely to the connector in the floor, tightly sealed with sealant around the installation site. The fitting funnel is selected within 5 cm, with slight deviations. Drain pipes from all rooms, if several, are connected by a splitter. But it is worth knowing that the construction of a cesspool is advisable only in the case of deep groundwater , at least 4-5 m deep. Otherwise, your pit will be flooded all year round and the smell of putrefactive bacteria from it will haunt you until each subsequent cleaning. If the conditions for the waste pit are favorable, then the second point in calculating the drainage will be to determine the volume of the pit according to several criteria: the number of people in the bathhouse, frequency of use and water consumption.
Next, when the drainage project is ready, the location of the pit is calculated: it should be no further than 2 meters from the bathhouse. If the drain is placed too close, there is a possibility of water penetrating into the foundation. If it is too far away, then it will not be possible to make a sufficient slope for water to drain naturally.
When laying the foundation, you most likely have already become familiar with the type of soil on the site and its properties. When creating a drainage pit, it is important to understand the physical properties of the earth , since taking this into account, accompanying measures will be selected to strengthen the pit frame. However, if the soil is not loose and does not crumble, then nothing will need to be strengthened . But excessively dense clay soil also has a disadvantage in the case of drainage - it does not absorb well. Sometimes in areas there is a successful combination of fairly dense soil with good absorbent properties. Then work with the hole will be limited to the fact that you just need to dig it and arrange filtration according to one of the described methods. But such conditions occur very rarely. Most often, the soil crumbles and you have to resort to strengthening the boundaries of the pit. For strengthening, they often use brickwork with gaps to absorb water, or wild stone (any waterproof material). The simplest option is to use a large plastic tank with many holes as the inner frame of the pit.
It is also important to choose the optimal size for the holes in the tank. The optimal shape for the tank in this case is a streamlined cylindrical one, since it best holds the pressure created by the water. It is also necessary to provide the pit with a heavy concrete or iron ceiling.
When the tank is ready, filtration material (broken brick or crushed stone) is poured into the bottom of the pit, and then covered with a layer of sand. The waste pipes, previously connected under the floor of the bathhouse into one, are discharged at a slope to the pit. Moreover, the optimal slope required for rapid drainage varies within 1 cm per 1 meter of pipeline.
ascona white dacha mega location
Wastewater disposal method
The design of the drainage system for draining waste water from the washing and steam rooms is selected taking into account the type of soil on which the structure is built and the intensity of use of the bathhouse. Each of the designs has its own characteristics, advantages and disadvantages.
Pit under the bathhouse
Pit under the bathhouse with a stone for draining water
A shallow hole dug under the floor of a washroom. 2/3 of the pit is filled with filtering components - crushed stone, slag, aquifer sand. This natural filter traps large particles, purifying the water, which is then absorbed into the lower layers of the soil.
The advantages of this system include:
- does not require the use of a piping system;
- ease of installation, cleaning and maintenance.
The main disadvantage of drainage in the form of a pit is that it can only be used for bathhouses on a columnar foundation located on sandy soil types. With frequent use of the bathhouse, the soil may become oversaturated with moisture - the water will not have time to spread throughout the soil, which will lead to its stagnation inside the pit.
Drain well
Drain well made of reinforced concrete and plastic septic tank
The outer part of the drainage system is made in the form of a pipeline and a sealed tank filled with wastewater coming from the bathhouse. To construct the reservoir, well rings and a plastic or metal septic tank are used.
As the wastewater fills, the tank is cleaned. To do this, water is pumped out using a vacuum truck and taken to a treatment plant, or a septic tank is filled with biological products that filter the water, after which it is transported through a special pipe to the lower layers of the soil, where it is gradually absorbed.
Among the advantages of a drain well are:
- ease of installation on a site of any size;
- the well does not require periodic cleaning;
- relatively low cost.
For proper functioning of the drainage system, the septic tank must be located below the level of the bathhouse. This will ensure natural and unimpeded flow of waste water. There must be free access to the location of the septic tank, otherwise a sewage disposal truck with a large tank will not be able to drive up to the required distance to pull the water intake hose.
Filtration well
Three-well filtration tank system
It is a well filled with fine-grained crushed stone, finely crushed brick or slag. Waste water removed from the washing room and steam bath enters the well and passes through the filter material.
As a result, a small layer of sludge and a large number of beneficial bacteria are formed that purify the water. After gradual purification, the water leaves naturally or is used for household needs for watering and irrigating the soil.
Among the disadvantages, it can be noted that the filter layer quickly becomes dirty with frequent use of the bath and requires replacement. This is a very labor-intensive process, since crushed stone or slag will have to be removed manually. Despite this, this technology is optimal for draining baths designed for a family of 4–6 people.
Ground filtration
Soil filtration using the example of a closed boiler and distribution pipes
We recommend: How to close vents in the foundation for the winter
A drainage system consisting of a closed septic tank, where wastewater accumulates, and sewer pipes through which water is drained after it is purified. Pipes are installed over a small area - this ensures uniform flow and absorption of water.
The advantages of ground filtration include:
- complete autonomy;
- possibility of water intake from several points;
- high degree of purification.
Compared to other methods of draining waste water, ground filtration requires the use of a large area of land where water will be absorbed. It is better to carry out installation work at the stage of construction of the bathhouse, when the area adjacent to it has not yet been developed.
For installation, you will need to dig a fairly large pit for installing a septic tank, which requires the use of large construction equipment and special equipment.
Internal drainage system for a bathhouse: important design details
The drain is equipped taking into account the type of floor covering. It should be arranged so that moisture does not accumulate in the room, which can provoke the development of fungal infections and mold. There are two standard schemes for implementing sewerage in a bathhouse.
So, depending on the type of plank floor, the internal drain is arranged in this way.
- Leaky wood floors are the most popular as they are the easiest to form. They are made of boards that must be laid at a distance of approximately 5 mm from each other. This way, water can flow through the cracks and enter the hole without obstacles. Such a floor can always be disassembled in order to dry the boards if necessary. This coating has no slope, because the water simply soaks into the ground under the bathhouse.
- Leak-proof wooden floors are installed with a slope that directs liquid into the drainage basin and then into the sewer system.
Concrete floors are the most durable, easy to maintain, reliable and durable. The best option for a bath of any size. They also have a slope towards the drain, which facilitates the unhindered flow of liquid to the selected type of drainage system.
Floors in the bathhouse
External drainage system for a bath: pros and cons of all types
A settling well is a sealed pit made of reinforced concrete, in which the water flowing from the bathhouse through the drain will settle. As it fills, it is necessary to pump out the liquid using specialized equipment. The advantages of a drain well for a bath include:
- low maintenance requirements;
- minimal cash costs for implementation;
- simplicity.
The disadvantage of this design is that you will have to systematically pump out the liquid from the well. Also, in order for the sewer trucks to enter, it will be necessary to organize access to the sump. The well itself will have to be installed at the lowest point on the site.
A drainage structure with drainage for a bath consists of a pit with filter elements. They clean wastewater from contaminants. The role of a filter in such a device can be played by brick waste, sand, slag, and crushed stone. The advantages of such a system include the simplicity of construction and its low cost. The disadvantages are the need for regular cleaning or replacement of filter media.
The next type of drain in a bathhouse is a pit, which consists of a hole dug directly under the floor of the bathhouse. At the bottom there is a filter of natural origin, which is capable of passing liquid through itself and gradually sending it into the deeper layers of the soil. The advantages of such a pit include its low price and the absence of the need to form a sewer pipe system. The disadvantage is reduced throughput. Can only be used on lands that are highly permeable to moisture. The design is unsuitable for a bathhouse with ceramic tiles on the floor.
The soil filtration system is a septic tank with pipe outlets. They first take in the water and then purify and release it. Such a filter is formed with a certain slope so that moisture can be completely absorbed.
Pros.
- Completely autonomous.
- Suitable for forming a “receiver” of liquid from several points simultaneously.
- If you install an anaerobic septic tank, the system can purify even very heavily polluted waters.
Minuses.
- It is necessary to allocate a separate place on the site for a septic tank.
- Installation is labor-intensive: you will have to dig up a fairly large amount of soil.
- The filter system consists of several dozen expensive elements.
An alternative option for any drainage system for a bathhouse would be to connect to a regular sewer system. There is no need to construct any auxiliary devices for receiving, cleaning and draining water. But you have to pay for the services of a special team of workers and fill out additional documents.
Septic tank with pipe outlets
Pit against sewer
The drainage device in the bathhouse may provide for the discharge of wastewater into a drainage pit or a centralized sewer system. What is good about the first option, and how is it inferior to the second:
- Water disposal in the bathhouse into an individual septic tank will allow you not to depend on the bureaucratic machine of Gorvodokanal and municipal authorities. No approvals of technical documentation, permits, or projects are required. We rely only on ourselves, our own knowledge and strength. In most cases, this is the key and most decisive argument.
- There are no recurring monthly wastewater charges.
- There is no need to worry about the periodic occurrence of congestion and other unpleasant consequences of using the domestic sewer network. The negative consequences are especially pronounced during periods of heavy precipitation. The situation is aggravated by the insufficient cross-section of the designed highways with a steady increase in the number of subscribers. The quality of technical implementation of communications in compliance with mandatory slopes, clean connections, and angles is far from the strongest side of our public utilities.
- In most cases, the amount of work and the level of costs for connecting to a centralized network exceeds the same figure for arranging your own localized septic tank.
Important! The elimination of accidents and malfunctions of the sewer network is entrusted to the repair departments of the city water and sewerage system, and the quality of work performed and their efficiency have long become “legendary”.
At the same time, a drainage pit for a bathhouse can be fraught with inconvenience in use, and even certain threats:
- When arranging a drain for a bathhouse with your own hands, special attention should be paid to the structure of the soil at the site of the septic tank. In certain cases, the so-called “saturation” of underlying soils with moisture may occur, as a result of which they acquire the properties of quicksand, with a sharp loss of their bearing capacity;
- The pit must be located at a distance of at least 4500 mm from the bathhouse foundation line. Some practicing experts profess the following rule: the edge of the drainage pit should be located from the foundation line of the bathhouse at a distance no less than the full height of the building - from the base of the base to its ridge;
- A drainage pit can have a negative impact on natural sources of water supply, such as wells, wells, and springs. We have already talked about the rules for placing infrastructure within the site here;
- A well-equipped pit with a large internal volume is a serious structure that requires a large amount of excavation work and subsequent disposal of the excavated soil;
- An insufficiently insulated pit can serve as a source of an unpleasant odor, a concentration of problems of a purely sanitary nature, for example, in a number of regions - a breeding ground for mosquitoes;
- If the soil at the site where the pit is laid is not endowed with sufficient drainage capabilities, its volume is small, and the drainage in the bathhouse is plentiful, you must be prepared for the fact that the costs of the services of a sewage disposal tank will become a constant line of expenses, which in some cases will exceed payments to the city water utility. payment for sewerage.
By the way! Let's be honest. In most rural and suburban areas, residents know about the centralized sewer network only by hearsay, and a drainage pit remains the only option for implementing such a project as draining water from a bathhouse with your own hands.
Somewhat special is the performance of work in such a context as a drain in a bathhouse on screw piles. What's the point here? Screw piles directly act as a load-bearing unit, which absorbs and evenly distributes the static load of the structure. There is no extended line of contact with the ground; such a structure is less susceptible to erosion, as is the case with a strip foundation. Therefore, in some cases, the cesspool is located directly under the bathhouse. The only condition is that it is necessary to provide the opportunity for convenient access to the service hatch from the side of the vacuum trucks. The vacuum barrel hose is not flexible or movable enough to be used in very tight spaces.
If we dwell a little more on the issues of arranging a septic tank, then it is probably necessary to note another simple and effective design, such as a drainage pit made from tires for a bathhouse. In rural areas, and even more so in a summer cottage, when setting up a full-fledged pit is difficult, waste tires from trucks can be used as the main elements forming the circumference of the pit. A large number of standard sizes will allow you to design a pit of a wide variety of sections, and if luck smiles and you manage to get tires from agricultural machinery, then with a small budget you can build a pit of a decent cubic capacity, which can serve a bathhouse that is used not from time to time, but constantly. The most common are front and rear tires from tractors T-150K, K - 700, K-701, rear tires from YuMZ - 6, MTZ - 80/82.
A word from Experienced! When mounting tires in a pit set, it is worth using a simple, low-capacity hand winch on a simple crossbar. Firstly, this is correct from a safety point of view, on the other hand, it will allow installation with high precision. For some tire sizes, manual laying is akin to a feat of labor. To understand the situation, just look at the dimensions and weight of the tire from the same K - 701 “Kirovets”.
The outflow of water from the bathhouse into the sewer system
If there is a running central sewer system at the location of the bathhouse, then the optimal solution would be to drain the water directly into it. However, all plumbing work and organization of drainage in the bathhouse must be done before laying the final floor covering.
At the lowest point of the floor, which is located on a slope, a PVC gutter is installed that is resistant to high temperatures. The slope of the gutter should be towards the outlet pipes. Before cutting into the central sewer system, you must obtain special permission from the company servicing it.
You will need to obtain a number of documents:
- a concluded agreement with a design bureau authorized to carry out installation and excavation work, which is confirmed by certificates;
- consent signed by neighbors to carry out any work on the site.
In order to always be able to access the connection point and make repairs, it is necessary to provide an inspection well. It is the main condition for obtaining permission to tap into the sewer system.
The air in the steam room will always remain fresh and fragrant if you follow a number of useful tips when installing the drain:
- If water is to be drained into the sewer system from several points in the bathhouse, then each drain hole must be equipped with a water seal, in particular, a siphon of any design. This device prevents unpleasant odors from entering the room by means of a water plug inside it.
- Ventilation of the sewer system, carried out from a 5-centimeter pipe leading to the roof of the bathhouse, serves the same purpose.
Thus, following the instructions, you can drain the bath yourself to ensure long-term and hygienic operation of the bath.
- Useful information about the bath
- Types of baths
- Foundation and floor
- Water and light
- Finishing
- Installation and repair
- Doors and windows
- Furnaces
- Chimney and roof
System installation
To assemble a system for draining water from a bathhouse, you need to take into account some nuances, know the basic elements of the design, and understand how it works.
Design
You can make high-quality drainage only by knowing the general structure of the floor. You need to think about the location of the drain hole. During construction, the floor must be made on a slope. The drain hole should be located at the lowest point.
When designing a drainage system, it is recommended to draw a drawing that will indicate the elements, dimensions, location of pipes, holes, and a pit for water.
Materials and tools
Consumables and tools:
- plastic pipes;
- couplings;
- drain grate;
- plastic bends;
- bayonet, shovel;
- grinder with metal discs;
- sharp knife;
- building level.
Step-by-step installation
- Dig a trench 60 cm deep. You need to start work from the building and finish near the reservoir into which the water will drain.
- Each meter of pipeline must be sloped 2 cm more than the previous meter. This way the water will flow without difficulty into the drainage hole under the bathhouse.
- Pour a 10 cm thick layer of sand onto the bottom of the trench, but the slope should not change.
- If the foundation is strip, you need to drill a hole in its wall for installing a drainage system. Fix a layer of polyurethane around the installed pipe. It will serve as insulation.
After installing the pipeline, you need to check it for leaks. To do this, it is recommended to drain 5–10 liters of liquid through the drainage system. If there are no leaks at the joints, you can begin backfilling the trench.
Also, attention should be paid to independently arranging a pit for draining liquid from the bathhouse. Stages:
- Dig a round hole 1–2 meters deep.
- Purchase concrete or plastic rings for constructing a drain well.
- Place the first ring in the hole and continue digging until all the rings are inside.
- Pour a layer of fine crushed stone 30 cm thick onto the bottom.
- Place the drainage well cover on top.
All that remains is to bring the drain pipe to the hole and seal the joints.
Thermal insulation
If the drain will be installed in a cold climate zone, it must be insulated. For this it is recommended to use mineral wool. The tubes are wrapped with it. The insulation is secured on top with a frame made of stainless steel sheets.
Practical recommendations for arranging a drainage system in a bathhouse
In this section we will get acquainted with the practical side of the issue, how to properly drain a bathhouse.
At the design stage
Proper drainage in a bathhouse requires elaboration of its design long before construction, even at the design research stage. What to consider and what to pay attention to:
- The total amount of recycled water, both at a time, during one bath day, and in general - for a month or a calendar year.
- Characteristics of soils, their drainage capacity, depth of groundwater. Very often, a tendency can be observed when, in the spring, groundwater comes close to the surface, almost to a depth of 40 - 50 cm from the control line, and then, until late autumn, it goes down and does not manifest itself in any way until the next period of snow melting and heavy precipitation.
- Number of water collection points, nature of wastewater. It’s one thing to drain only water from a bathhouse, albeit somewhat contaminated with detergents; another thing is to drain wastewater from the kitchen block of a bathhouse, which often hosts noisy companies accompanied by a hearty feast. We definitely take into account the presence of a bathroom in the bathhouse. Its presence changes the structure of the wastewater. Here you need to figure out whether you need a drain in the steam room for yourself. It is this position that will determine the further progress of work in the most critical room of the future bathhouse.
- The type of foundation used, the nature of heat and waterproofing, types of finishing work when arranging a bathhouse during finishing operations.
- Finally, we assess the risks of using a bathhouse during the cold season. How severe are the frosts, what is their duration, at what depth is the point of guaranteed freezing of the soil.
In the vast majority of cases, a sober design calculation will eliminate problems, both at the stage when we are just draining the water from the bathhouse with our own hands, and during the further operation of the bathhouse structure.
Construction site arrangement and foundation laying
What we do here:
- We clear the site of unnecessary elements, debris, and vegetation. We evaluate the terrain;
- If necessary, we carry out planar planning;
- We make markings and make a linear connection of future objects to the terrain;
- We calculate the rational location of septic tanks, highways, coordination of water supply and sewerage communications. The distance of sewerage nodes from water supply facilities, site boundaries, roads, within the limits of SNiP requirements;
- When building the foundation, communication and technological channels are immediately laid. This will save you from the unpleasant and difficult work of punching them into a ready-made and formed concrete mass. In the foundation for a bathhouse with a drain, sections of strong metal pipes are simply laid at the required points, which can later be used as safety sleeves.
We recommend: Cork flooring
If underground communications are being installed at this stage, then do not forget about installing damper pads in the trenches. For a plastic pipe with a diameter of 152 mm, running at a depth of 1200 mm in clay or loamy soil, the thickness of the sand cushion should be about 180 mm. This will allow automobile and construction equipment with a total weight of 18 - 22 tons to pass through the trench without consequences. Heavier special equipment is unlikely to be used in the construction of bathhouses on construction sites.
Stage of construction of the main load-bearing structures
At this time, the main attention should be paid to the question of how the bathhouse and drainage correspond with each other. It is necessary to avoid crossing drain pipes and gutters with fundamental elements such as floor joists. At the same time, the slope angle of the gutter is set, turns, junctions, and overflows are designed. If the optimal slope angle cannot be maintained without contact with one or another obstacle, then it is better to go in the direction of increasing the fall rather than reducing it and causing the risk of congestion, especially if the bathhouse is equipped with a bathroom and a kitchen unit. Also at this stage, emergency discharge points for coolant from the heating and hot water supply system into the sewer network are drawn up.
Let's start with a plan
For most owners of private houses, building their own bathhouse is an impossible dream.
And the main reason is lack of knowledge. Where to begin? But here everything is simple, just like “the theater begins with a hanger,” and construction begins with the foundation of the entire building. But when building a steam room, you should consider a system for draining water from the room, so the foundation for a bathhouse with a drain should be made simultaneously with the drainage system. Before starting construction, a rough list of questions is drawn up, for example:
- what is the area of the building;
- type of soil on the site;
- how many people will the steam room be for?
- frequency of use of the bath;
- will a bathroom be installed?
- what type of steam room and washing room to choose, combined or separate;
- is there a central sewerage system and how far is it located?
- how to organize drainage in a bathhouse in the correct way.
Having given answers to the questions posed, it will be easier to choose the option for laying communications that are provided in the article.
Tips for use
If you have done everything correctly, ensured the slope and evenness of the pipe run, if the pipe is laid below the freezing point of the soil and has a sufficient diameter, and the hole is deep and has enough drainage, then operation will be problem-free. But if they arise, then there are ways to solve them.
Dirt in the drain
Hair, some dirt, and residues from bath procedures may go down the drain. Everything is easy and simple here: the pre-designed floor boards are removed, the ladder is removed and cleaned. If the blockage is in the pipe, then it is not long at all, and the blockage can be removed with an ordinary brush on a pipe cleaning wire. It is not advisable to use chemical cleaning agents - nevertheless, this water will somehow end up on your site.
The pipe freezes in winter
When the drain pipe lies with too little slope or wave, water remains in any bend and freezes. This prevents free flow, and the pipe freezes along its entire length. In addition, water may stop flowing and freeze even with a normal blockage. Ice in pipes has a larger volume than water and can rupture them. Therefore, if the pipes are frozen, you need to defrost them urgently.
- With the drain removed, boiling water is poured into the pipe with an Esmarch mug (in common parlance - an enema).
The enema defrosting method is the simplest, and the tool is always at hand - A steam generator is a luxurious tool: we insert the hose of the device into the pipe, and high-pressure steam very quickly defrosts all the ice plugs.
A steam generator is the fastest way to defrost pipes - As soon as the pipe has thawed, you need to dig it out as quickly as possible and insulate it with insulation products.
Video description
Installation of a drainage well:
Ground filtration
This is an optimal drainage system that can be used as a general sewer system for the entire site. Wastewater is transported through inclined pipes into a septic tank, where it is purified and distributed through several pipelines. They take it to the garden to organize irrigation, or accumulate it in a prepared tank. In some designs, the filtered liquid is simply poured into the ground and absorbed.
sauna gazebo barbecue projects under one roof
Advantages of the soil system:
Flaws:
How to install the system step by step:
The gravel layer will need to be changed periodically (every 10-12 years)
Design is carried out not only from the side of the site, but also inside the bathhouse.
How to drain a bathhouse under the floor
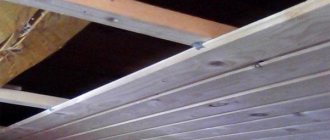
The easiest way to assemble a prefabricated gutter is from bent galvanized metal. To prevent the channel from deforming under load, it must be laid between two joists, as in the photo.
Drainage gutters can also be made from metal; this is easier than sewing up the lower planes with a slab, insulating them and gluing a film.
Each such gutter will need to be made according to the size of the span between the beams. The side edges are bent upward vertically by 3-5 cm, after which the sheet is nailed to the sides of the logs.
The bottom edge of the tray should overlap the central drainage channel.
Advice! Before nailing the floorboards, check the functionality of the drain; to do this, it is enough to spill a few liters of water on each tray. The liquid should go to the wall without any residue.
In the center or at the end of the collection gutter, depending on how the water flow is organized, a drain is cut in, a corrugation is connected to its outlet pipe, and then a drainage system is assembled from sewer pipes.
At the installation site of the ladder, a hatch is cut out through which you can control the operation of the entire drainage system in the bathhouse.
Through the hatch it is convenient to close the drain valve for the winter
Ground filtration method
In this method, the main thing is the organization of a pipe system through which the liquid will be supplied to the sewer. The system will be distributed over the entire area of the site so that the water has time to go through several stages of filtration before draining.
Filtration is carried out according to the principle of drainage: the first stage is to install a grate on the pipe (in the initial section) to catch large waste. Then, in the future, the water flows through a section of pipes covered with large filter material. The last stage is a fine filter, that is, coarse sand.
Thus, the water from the drains will be filtered throughout the entire site while simultaneously creating an additional source of irrigation . This method is suitable only in case of low groundwater, since the location of the pipes must be more than 0.5 meters above the water level.
Options for arranging a drain well
The drainage system from the bathhouse also includes a drain well. Experts offer several ways to construct such wells.
These can be plastic or metal containers, reinforced concrete structures. The main condition for the proper functioning of the structure is the chosen location. The drain well should be located at the lowest point on the site so that water can flow by gravity from the bathhouse. When choosing a location for a future structure, you need to take into account the possibility of unhindered access for a sewer truck.
How to make a drain well?
- We need to dig a hole. This process is performed independently or by calling an excavator. The dug hole should have smooth edges and not crumble.
- Bottom preparation. In order to easily and smoothly clean the bottom in the future, it needs to be made at a slight slope directed towards the hatch. A sand cushion and a layer of concrete are placed at the bottom of the pit.
- When the concrete bottom is dry, you can proceed to laying the brick walls. The best choice would be red brick. The thickness of the masonry should not be less than 0.25 m. When carrying out the masonry, it is worth leaving a hole for the entrance of the sewer pipe.
- The brickwork must be carefully sealed.
- A hatch is installed on the completed well and filled with soil so that there is only one hatch on the surface.
If it is possible to buy reinforced concrete rings for a well, this will speed up and facilitate the work process.
Drainage structures in a bathhouse are systems without which it does not function.
By studying in detail all the tips and recommendations given above, you can easily build a drainage system and well yourself, while saving a significant amount.
Drainage sewer for a bathhouse
Perform the work in the following order:
- At a distance of 1–1.5 m from the foundation, dig a hole with a depth of 50 cm greater than the freezing level. The minimum diameter of the hole is 1 m (for a small number of washables).
- Fill the bottom with crushed stone or expanded clay.
- Make sure that the soil is dense and the walls of the pit are not crumbling. If the soil is loose, lower an iron or plastic barrel into the hole, after cutting out the bottom. You can also put several car tires in the hole.
- Between the well and the bathhouse, dig a trench sloping away from the bathhouse and lay sewer pipes. Connect one side of the product to the washing drain pipe, and lead the other into the pit.
- Cover the pit with a lid.
- Fill the well with soil and compact it.
Floor with drain: work order
Although the designs of drains are different, all floor-mounted models are installed according to the same principle - the sequence of work is the same.
It is much more pleasant to stand on a warm floor in the shower, which is why a floor with a drain is most often made with a layer of thermal insulation. The best thermal insulation material for this is high-density extruded polystyrene foam. It does not absorb water, does not rot, has excellent thermal insulation characteristics, and can withstand loads normally (it will withstand the weight of the screed and tiles without problems).
You can make a floor with a drain in the shower with your own hands
It is more convenient to work with a level (laser level) that has a plane builder function. It will make the work much easier.
Preparatory work
The first step is to remove a branch from the sewer riser where the water will flow. The sewer pipe is laid with the required slope (2 cm by 1 meter), the socket is placed at the intended location of the drain connection. After the sewer outlet is installed, take a drain and make preliminary markings - you need to mark the height of the screed on the walls of the shower stall:
- We install the level so that it marks the axis of the drained sewer pipe.
- We position the drain so that its axis is approximately 1.5 cm higher than the axis of the sewer pipe (see photo).
The axis of the drain should be slightly higher than the axis of the sewer pipe - After this, we raise the leveling beam to the installation height of the ladder grating (taking into account the fact that another grate will be installed - add its thickness).
- Since normal water flow requires a slope. It is made 1-2 cm per meter long. From the existing ladder grating line upward, set aside the required distance.
Mark the line for laying the screed on the walls - Based on the mark found, we set the leveling beam. This will be the level of screed that must be maintained along the walls. You can draw this line with a pencil or marker.
Now you can measure the height to which you will need to raise the floor in the shower stall. It largely depends on the parameters of the ladder (its height). Based on the obtained figure, it will be necessary to plan the layers of screed and their thickness.
Determining the thickness of screed layers
Usually it is assumed that polystyrene foam 5 cm thick is placed in the screed. The minimum thickness of the screed is 3 cm (more is possible, less is not). This is in the center near the drain; towards the edges it becomes thicker (the required slope is created). From the existing screed height line, we put the resulting figure down (add the thickness of the polystyrene foam and the screed). It will be necessary to bring the rough screed to this level.
From the existing height of the screed we set down the thickness of the insulation and DSP
To reduce the load, the rough screed is made of lightweight concrete. It can be foam concrete or expanded clay concrete. Wet work can be minimized. To do this, you can lay foam blocks at the missing height and fasten them with reinforcing mesh. You can pour a 3 cm layer of DSP on top.
When installing such a base, a damper tape is needed along the walls. Since in the presence of polystyrene foam or any other insulation, the floor may sag a little, it must be made incoherent with the walls. This is why you need a damper tape. It is placed around the perimeter of the base. In height it should be 1-2 cm above all layers.
You can use a special damper tape, or thin foam plastic (1 cm thick or less). Even corrugated cardboard will do. The remaining tape is then cut flush with the screed. She did her job - we got a floating slab.
The poured screed must stand for at least a week - the concrete must gain at least 50% strength. After this, you can continue working.
Waterproofing
To prevent the drain floor from leaking, the shower stall needs good waterproofing. It is better to make it multi-layered. One of the layers can be done at this stage.
Coating waterproofing is usually used. This could be bitumen mastic or special waterproofing for swimming pools. It is applied with a brush in several layers, extending onto the walls at least 30 cm. These mastics form an elastic, waterproof film on the surface without seams or joints. This type of waterproofing is highly reliable.
Particular attention should be paid to the processing of corners. They can even be glued with a strip of rolled waterproofing (such as Gidroizol, etc.). Apply the first layer of coating waterproofing to the walls, then glue the joint between the wall and the floor with roll waterproofing (set on the same compound), and apply another layer on top.
Multi-layer waterproofing is more reliable
For those who like to do everything with a margin of safety, the first layer of waterproofing can be laid even under the first corrective screed. All rules remain the same as described above.
Instead of coating waterproofing, you can use roll waterproofing. But you will still have to lay it on bitumen mastic, lubricating it well and pressing the seams. The approach to the walls is approximately the same - about 30 cm. If the width of one roll is not enough, the panels are laid with an overlap of 15 cm, they are well coated with mastic.
Choosing a place to install a drain ladder
To ensure that the tiles on the floor of the shower stall look at least normal, it is better to position the drain grate symmetrically relative to the tiles. Therefore, first, dry, lay out the tiles on the floor (taking into account the seams). When laying out, remember to step back a little from the walls - by the thickness of the tiles and glue.
It is not at all necessary to make the drain in the center - it can easily be moved to any wall. In this case, the far wall from the entrance was chosen to reduce the possibility of water spilling out of the booth
Next, we choose the position of the ladder so that everything looks good and, at the same time, it is necessary to make a minimum of trimmings. Not only do they take up time, they also spoil the view.
Installation of drain and insulation
The next stage is installing the drain and laying thermal insulation. A drain is placed at the selected location, it is connected by a pipe to the sewer outlet (during installation, do not forget about the slope). After this, insulation boards are laid. It is cut so that the installed ladder can be covered. A damper tape is also required around the perimeter. This time it is better to make it also from polystyrene foam, but taking a thickness less than -2-3 cm is enough. At this level, polystyrene foam will still prevent heat loss into the walls.
Gangway installation
The joints of polystyrene foam are glued with tape (so that moisture does not leak out of the concrete). If there are large gaps, they can be tightly packed with scraps and then sealed.
Filling the screed
A reinforcing metal mesh is placed on the laid insulation. A ready-made mesh of steel wire with a diameter of 3 mm and a pitch of 10 cm is sufficient. It is cut to size and laid on polystyrene foam. Next, they begin to install beacons.
The floor with the drain must be sloping towards the drain. To do this, you need to set up beacon strips. You can use standard beacons (from a hardware store) or wooden planks. They are installed so that their surface sets the required slope.
When the preparatory work is completed, the ladder bowl is oriented along the walls. This can be done using a square. At the same time, you need to align the measurements as you determined during fitting.
Fill the floor with a drain and an installed drain with ordinary cement-sand mortar (for 1 part of cement of a grade not lower than M400), 3-4 parts of coarse sand. To give the coating water-repellent properties, you can add appropriate additives.
The poured solution is left to “ripen”. This usually takes 28 days. In this case, you need to take care of the screed: maintain stable humidity, avoid low temperatures (optimally around +20°C), and avoid exposure to direct sunlight. The easiest way is to cover the piece with matting (an old bag) and/or film. For the first 4-5 days, the surface must be moistened daily. It is more convenient to do this on matting - there are no traces of drops left. After 28 days, you can complete the finishing - laying the tiles.
Construction of a pouring floor
When installing a drain, it is not necessary for the floors to be warm. This means that they do not require laying a thermal insulation layer inside the structure. Installation of flooring boards consists of fastening them around the perimeter using additional cranial bars. The created structure can, if necessary, be easily dismantled and taken outside for ventilation and drying, which will extend its service life.
Lags
Before you start laying the logs with your own hands, you need to prepare a place for them. Be sure to put a double layer of waterproofing
Particular attention should be paid to the installation technology: these elements must be installed strictly horizontally with a slight slope towards the waste water collection site. The slope is made by cutting down the logs, gradually reducing their height by 2-3 mm in the direction of the wastewater collection point
Ultimately, the required floor slope should be obtained, which should not exceed 10°.
When laying floorboards on leaking floors, there is no need to use fasteners. To properly carry out this work, it is necessary to take into account a number of important points, which are determined by the specifics of pouring floors:
- It is unacceptable to begin laying boards of a leaking floor until a water receiver has been installed.
- The flooring used simultaneously serves as a waterproofing material for the bottom floor of the bathhouse.
- When laying boards, it is imperative to maintain a gap size, which should be at least 5 mm. This will be enough so that water can naturally drain down even if the flooring swells significantly.
- It is mandatory to wrap the support posts for the logs with a double layer of waterproofing.
Support posts
For the manufacture of lag support columns, 250 x 250 mm bricks are used. These supporting elements are installed on a sand or concrete pad, maintaining a step of 0.8-1 m between them. Upon completion of installation, they must be plastered, and the ground between them covered with roofing material.
If everything is done correctly, then the distance between the lowest point of the surface of the leaking floor and the roofing felt laid below will be at least 300 mm. This requirement can be met due to the logs, which are laid on support posts.
Installation of external sewerage - choosing a place for a septic tank
Bath drains are made in the same way as for a residential building. If possible, it can be connected to the existing network, and if a local wastewater treatment system is installed on the site, then to it.
First of all, the nature of the soil under the septic tank matters - clay, sand or crushed stone. If the soil consists predominantly of clay, which has low water permeability, then filtration will not occur.
Watch the video
Laying pipes for external sewerage in a private house
A filter well as part of such a septic tank will only pollute the surrounding space, and it will have to be used as a simple cesspool.
If the aquifer reaches a depth of 2.5 meters during the period of maximum level rise, a septic tank cannot be installed in such a place; the thickness of the filter layer will not be enough.
Construction of a local treatment plant
The main components of such a device are the following components:
Storage septic tank - serves to receive wastewater and its primary processing with bacterial agents. Live cultures of anaerobic and aerobic bacteria are sold in specialized stores in construction markets.
In the process of bacterial treatment, the volume of the contents of the septic tank noticeably decreases, and the emission of odor is significantly reduced.
The contents are partially purified, since some of the contents are in the form of solid fractions.
- In the next section of the septic tank, which is most often a filter well, additional wastewater treatment is carried out by filtration as it passes through the ground. The filter layer consists of blast furnace slag, gravel and broken brick, which is an excellent adsorbent.
- Another method of wastewater treatment is aeration. It is produced by purging the contents of the septic tank with air, during which the oxidation of previously undecomposed particles of contaminants occurs.
- As a result, the water is further purified and becomes suitable for use for technical purposes - watering the garden or washing a car. At the same time, the yield of garden crops increases noticeably.
- Filter fields are used in places where the underlying soil base is clay. In this case, pre-purified water enters the drainage pipe system and is distributed dropwise over a large area.
Preparing the trench and laying pipes
How to install external sewer pipes with your own hands?
- They are placed in specially opened ditches. The depth of the trenches always depended on the depth of freezing of the ground.
- But today's laying technologies can significantly reduce the amount of excavation work by installing heating on pipes and insulating them, as mentioned above.
- The quality of the lining for the pipes at the bottom of the trench is of great importance. Since it is located in the freezing zone, it is important to prevent the presence of water in the pipe support substrate. For this purpose, a drainage layer of gravel and sand is arranged.
- Gravel is poured in a layer of about 30 centimeters and thoroughly compacted. Then you need to pour a layer of river sand 15-20 centimeters thick and spill it with water for better compaction.
- A construction cord is attached to the wall of the trench and stretched along it with a slope of 2-3 millimeters per meter of length.
- Then the pipeline itself is lowered into the trench and installed along the cord with slope control.
- After this, the pipe is carefully sprinkled with sand, which is carefully compacted. And only after this is the final backfilling of the trench with previously removed soil and soil.
The importance of the bath part called “drain”
The Russian bathhouse is a very extreme place. Temperature changes up to 1500, especially in deep winter. High humidity and very serious temperature contrasts - up to 1500. The only source of thermal heating. Fire hazard. Streams of water on the floor in the steam room and washing room. That’s why a well-made floor, and a well-made drain in the floor, is so important. It doesn’t even matter critically whether there is water supply in the bathhouse or not. In extreme cases, the barrel can be trained by hand. But the drain should function perfectly.
Principles of good drainage
- The drain must cope with any flow of water, especially in the washing room, and especially if a bucket with a chain is used.
When using a tub, there is a particularly large load on the drain
- The drain must have a good water seal so that the smell from the sewer does not penetrate into the bathhouse.
- The drainage along with the pipes to the pit or septic tank must be designed in such a way that it never freezes in winter.
- The drain should be easily accessible in case of need for repairs: if the floors are cracked and there is a single drain below, then the boards should be easily removable; if the ladder is visible, then the ladder itself should be easily removable.
- The drain must be durable, so the pipes and the structure itself must be made of durable materials and parts.
How to choose the right material
Modern pipes for organizing a drainage system are made of high-strength plastic. Its service life is 50 years. Pipes are used from:
They are not afraid of water, do not rust or rot. They are easily assembled into a system, attached to each other simply and without much effort. They come in different sizes, among which there is sure to be one that is necessary for specific conditions.
And although cast iron pipes are stronger and more reliable, they are practically not used to create bathhouse drains. They are difficult to transport and install; installation requires special equipment, additional tools and specialists. The result is a costly event that can be avoided.
Asbestos-cement pipes are not recommended for use. They have an uneven surface inside that catches debris. This is especially dangerous if the drainage system is more than 10 meters.
The diameter of the pipes for a steam room with an average degree of use is 11 cm, for small baths 7 cm is enough.
Advantages and disadvantages of sewer drain devices
Today, there are a huge number of devices for arranging a drainage system for a bathhouse. They have both positive and negative sides. These include:
Drainage well. It is a deep pit, the walls of which are filled with filtrate. For this, sand, small crushed stone, and pebbles are used.
Drain well. This is a large container for collecting sewer liquids, in which waste from the bathhouse gradually accumulates. As it is filled, it is cleaned using special equipment or a machine.
The advantages of such a system are: ease of installation and arrangement of the drainage pit, low cost. Negative qualities include: frequent cleaning, inconvenient location of the drain well. As a rule, installation should be carried out at the lowest point of the site.
Pit. It is located under the floor covering of the bathhouse. Drain waste is collected in this pit and undergoes independent cleaning through a filtrate of fine materials.
The positive qualities of the system include: low cost of materials, easy installation. The disadvantages of such a structure are: low throughput; it can be used on sandy and sandy loam soils.
Ground filtration. This is a system that consists of a septic tank and several pipes. Purified water passes through them. The pipeline is laid at a certain angle, due to which all the liquid will drain on its own and be absorbed by the soil.
The advantages of such a system are considered to be: it can be used for the entire sewer network; with its help, the liquid is thoroughly cleaned of harmful impurities. A photo of a bathhouse drain shows the process of filtering sewage waste.