Despite the high temperatures in the steam room, below it rarely exceeds 30 degrees, but there is constantly high humidity on the floor. Therefore, when arranging a floor in such conditions, there are some peculiarities.
In this article we will tell you about how to make a floor in a bathhouse on the ground, the preparation process and laying schemes for a wooden floor.
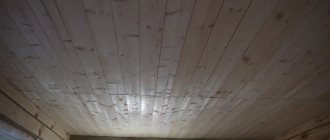
Finishing the floor and walls of the bathhouse with wood
Choosing a floor type
Before starting work on building a floor in a bathhouse, you need to decide what requirements it must meet.
As a rule, you choose from two options:
- concrete floor;
- wood.
Creating a concrete foundation will require a lot of time and money. However, it will serve for quite a long time - about 50 years, and if you update it according to all the rules and use it correctly, then you will not need to change it.
Making a wooden floor is easier and cheaper. It has a beautiful appearance, as you can see by looking at various photos, but it needs to be changed periodically, approximately every 5-10 years.
When making wooden floors in a bathhouse, you should choose one of two types of construction:
- leaky;
- leak-proof.
It is easier to implement a leaking design and its appearance is more interesting. The boards are laid on the logs without fastening. The minimum distance between them is 3 mm. If there is a need to dry them quickly, the boards can be collected and taken outside, where they will dry quickly enough.
It is not necessary to make floors in the dressing room with a gap. In other rooms there should be a gap of approximately 2 mm between all walls and boards. It looks like a frame around the floor.
Physical and technical characteristics
When choosing a floorboard, be sure to pay attention to the physical and technical characteristics, which are divided according to several indicators:
- strength;
- stability;
- appearance.
Floors must be durable and stable in high humidity conditions. But at the same time, do not forget about the decorativeness and appearance of the coating.
Strength
This indicator of wood determines its resistance to wear under the influence of elevated temperatures and humidity. If it is not strong enough, it will quickly lose its original appearance, especially in areas of high stress.
Stability
The stable structure of wood is characterized by a slower rate of shrinkage of floors. If floors are unstable, they will quickly lose their strength.
The ceiling in the bathhouse must be stable
The stability of the material is determined by:
- quality and type of wood;
- cutting method;
- drying method and quality.
Shrinkage under the influence of high temperature and humidity is characterized by:
- longitudinal cracks;
- cracks between the floorboards.
In order for the stability indicators to be at the proper level, it is recommended to use the same material for subfloors and joists as for the final finishing coating. This is explained by the fact that the shrinkage of the floor “pie” occurs at the same speed and will not allow cracks and cracks to appear.
External characteristics
Lamels in appearance are divided into several aspects. One of the criteria for the decorativeness of a floor covering is color:
- light and dark tree species;
- Neutral wood shades are also possible. Valuable and exotic tree species will cost much more, which is why they are not used so often for baths.
The texture of wood is the decorative aspect for which wood is so loved. If it weren’t for the texture, it would hardly have been used so widely for interior decoration. Some arrays have a pronounced structure: oak; and there are homogeneous ones like beech.
The texture of wood material is a decorative technique used by designers
Changes in the appearance of flooring occur due to oxidation, which depends on the chemical composition of the wood, exposure to sunlight and moisture.
Pros and cons of leaking floors
A leaky floor has the following advantages:
- The floor is done very quickly.
- It is the cheapest compared to other types of flooring.
- To drain water from the room to the underground, a drainage pit is installed. There is no need to install any other sewer systems.
- There is no need to perform hydro- and thermal insulation.
There are also some disadvantages, which include:
- Fragility.
- Not suitable for use in winter.
- You can use a bathhouse with a leaking floor all year round only if it is built in a place with a warm climate.
- To ensure a reliable floor, you should choose well-hewn boards, and the installation should be done evenly.
Two main stages: preparatory and main
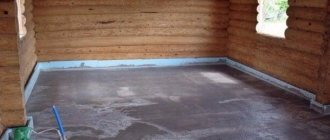
Let's consider the option of a concrete floor, using the example of arrangement on the ground, with a ground water level above 2 meters.
The work is carried out in the warm season. It is assumed that the system for drainage has already been laid and backfilled in an appropriately prepared trench, and the sewer pit is located outside the bathhouse (i.e., not under the floor). At the first stage, you should decide on the type of tilt. The most common options are drainage in two planes or the so-called envelope. So, how to properly fill sloping floors?
Preparatory stage
- We remove the fertile layer of soil and tamp the cleaned surfaces;
Close the hole in the drain pipe with a lid or plug it with a “stopper” made of a thick rag. This will prevent accidental clogging during work.
- We install a fence around the drain pipe in the form of a plank box or folded roofing felt. This will be needed in case of an error in calculating the height of the pipe head, for the purpose of its subsequent replacement, longer or shorter;
- Fill the area with sand and compact it thoroughly again. The thickness of the resulting layer should be 10-12 cm;
The sand must be free of construction debris, clay, silt deposits and other impurities. During the compaction process, it is recommended to moisten it with water.
- We fill the sand with crushed stone or gravel, and tamp it so that it is imprinted into the sand, after which we level the surface. The thickness of this layer is ≈ 15 cm;
If crushed stone and gravel are not available, you can use broken bricks. The surface after compaction should not have pronounced irregularities in the form of protruding debris.
Main stage
- We dismantle the box enclosing the sewer drain pipe. The space around the pipe is filled with cement mortar, in which foam chips are mixed.
- Lay the roofing material with an overlap of 10-15 cm (it will prevent moisture from seeping out of the solution into the sand and gravel cushion) and coat the joints with prepared heated bitumen mastic. We add a layer of roofing felt and glue it to the wall along the entire perimeter of the room to a height of 15-20 cm. A hole is made in the waterproofing to pass the drain pipe. The lower part of the drain ladder is also mounted here.
Article on the topic: What is the body temperature of a person in a bathhouse?
A reinforcing metal mesh is laid on top of the roofing material with a cell pitch of 50-80 mm. It is fastened with knitting wire or polymer clamps (if it is a polymer reinforcement). Instead of roofing felt, you can use “liquid rubber” products or waterproofing films with a thickness of more than 200 microns.
- On top of the mesh we place and attach purchased or homemade beacons, along which the construction concrete mortar will be leveled.
The most practical way to fix beacons is with plaster, making a slide out of it (this mixture hardens quickly). We maintain the distance between the beacons at 1.5-2 m. Pipes or profile guides can be used as beacons.
- We are preparing a solution for pouring a rough concrete base. To improve quality, special additives are added to the solution. It is recommended to use waterproofing additives (Penetron, Crystal, etc.) in bath floors. They improve the structure of concrete in terms of resistance to damage by water and protection of metal reinforcement from corrosion. We are pouring concrete.
The mass is leveled with a trowel and equalized by the rule. Distribution is carried out according to beacon profiles and is constantly monitored by the building level. During the process, it is necessary to compact the solution to prevent the formation of air cavities. Then it is left for the concrete to gain primary strength. This depends on the current temperature and humidity conditions, the thickness of the fill and usually within 7-10 days. Before pouring, we check the functionality of the drain (so as not to drill into hardened concrete later).
- After the concrete has become durable for walking, we begin to create a heat-insulating layer. For this, there are two options:
a) lay waterproofing on the rough screed and lay insulation on it (if it is expanded clay);
b) attach the insulation directly to the concrete base using tile adhesive (this applies to extruded polystyrene foam (penoplex), polystyrene foam, etc.);
- We put another layer of reinforcing mesh on top of the insulation.
Article on the topic: How to make a potbelly stove for a bath
Some craftsmen advise laying plastic film under the mesh.
- Beacons are again installed on the mesh, in the gypsum slides (recommended interval - 1 m), which will be used to control the filling of concrete;
- Next, a leveling screed is poured over the reinforced mesh. It is carefully leveled along the beacons. The layer should be ≈ 50-60 mm. Then the surface is compacted to eliminate voids and create uniform density;
- A deep penetration waterproofing impregnation (for example, Penetron, etc.) should be applied to the surface of the finished dried screed.
- After the concrete has completely “matured”, you can begin laying the decorative coating.
Here is a picture that quite “ideally” fits the description.
Of course, you can simplify this scheme and not make a rough concrete base. Here you can compact the sand and gravel cushion well and use modern technologies - use geotextiles. Here is an article about this material. For this option, you will need geotextiles, penoplex, reinforcing mesh, and concrete itself... On a bath floor with a slope, it is practical to lay small elastic tiles fixed on a soft substrate - a mosaic. It is simply cut and adjusted to fit the drain hole. It’s easy to cut a hole of the required diameter in the middle of its surface and, smear it with tile adhesive, put it on the pipe.
The seams between the tiles are covered with moisture-resistant jointing. It matches the color of the material. Removable wooden flooring can later be laid on top of the tiles or mosaics.
I hope I was able to convey information about how to pour a concrete floor with a slope in a bathhouse. Subscribe to the blog and stay up to date with all the news. Concrete and "dodge properly."
Good luck in your work and peace to your home! Bye.
Wisdom Quote: When a woman is angry, don’t look for common sense in her speeches! (Pierre Beaumarchais).
Standard bath floor
The floor in the steam room must be above the zero level. You can maintain a high temperature in the room by raising the floor not much at all, about 8-10 cm. In the washing room, the floor should be below the finishing level (read: “How to properly make a washing device in a bathhouse - tips with examples”). Thanks to this design, water will not get into other rooms of the bathhouse.
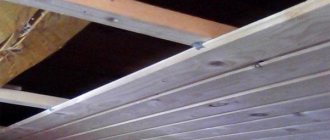
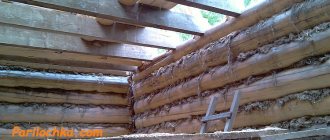
The most popular floor construction consists of the following layers (listed from bottom to top):
- Waterproofing (the material spreads directly to the ground).
- Wooden beams for sheathing.
- Rough floor.
- Layers of insulation (if there are cold winters in the area where the bathhouse is being built, it is necessary to insulate the floor and protect it from moisture).
- Lathing.
- Layers of insulation (hydro- and thermal insulation must be performed; if the bathhouse is located next to any production, club or any other establishment from which a lot of noise comes, then sound-proofing material is laid).
- Lining (small layer).
- Air space.
- Concrete or wood.
- Finish coating.
Wood
There are quite a few types of wood that are suitable for shelf boards (some write “canopies” - this is a mistake) in a bathhouse . It is recommended to use exclusively deciduous trees, and if coniferous trees are used, then only to create a frame.
But, as always, bathhouse owners proceed from a variety of considerations. It happens that shelves are made from coniferous trees. However, it is clear that the release of resin, even without burns, can change the opinion about the suitability of conifers