The bathhouse is an integral part of the Russian tradition of healing the body and spirit, an unchangeable building on a country site that many people want to own.
The issue of decorating the main structural element is discussed at the design stage. The lining of a sauna stove plays not only an aesthetic role, but also a protective one. Often, bathhouse owners don’t bother and use simple plaster, which cracks over time, and the cracks are covered up from time to time.
The modern market is pleased with the abundance of various materials for lining a bathhouse stove, which are endowed with excellent performance characteristics. The most popular among them are: metal, wood, brick, tile, stone.
More about protective screens
They are used to protect the surfaces closest to the heating unit from the harmful effects of emitted infrared radiation, reducing the spread of infrared waves.
They are panels, sheet or built (depending on the material used) around the entire perimeter, in a corner or in some part of the room. There can be two types.
Made of metal
They are made of steel or cast iron, fixed around the heating device, with the required clearances. Small distances are necessary to maintain proper air convection. To ensure the possibility of adjustment, they are not fixed rigidly - with bolts on the floor.
There are 2 types of them:
- frontal - exposed to direct infrared radiation coming from the firebox;
- lateral - perceive already reflected infrared waves.
They become even more effective after painting with a fire-resistant composition.
Made of brick
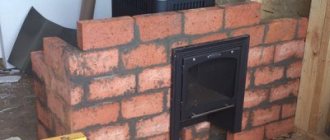
Such protection is laid out after you have equipped the portal for the stove in the bathhouse - in half a brick (fireclay, hollow, fireproof), with technological gaps measuring 6 cm or more and with air ducts in the lower part, located at a distance of over 25 mm from each other.
The erected screen should rise 25-30 cm above the firebox, then it will fully reveal all its advantages, namely:
- stability in conditions of high humidity and temperature;
- low thermal conductivity, and hence the risk of injury - accidental burns are practically excluded;
- transfer of soft heat from the heating unit;
- long-term preservation (accumulation) of heat.
Finishing inside the steam room
Since buildings are made of different materials, owners are interested in whether there is any difference in how to decorate a steam room in a bathhouse, say, from brick or foam concrete. In principle, there are no differences even at the level of constructing an insulating pie, and even more so the finishing does not depend on what the walls of your bathhouse are built from.
However, options do exist.
Interior decoration in a bathhouse made of timber or logs
A beam or log is a material that in itself has excellent decorative qualities, so there is no point in hiding it under the skin, unless your area is in the Arctic cold, that is, if the thickness of the log or beam is enough to keep warm.
In this case, the owner’s main concern will be insulating the joints with inter-crown insulation between logs or beams and sealing them (which we will discuss separately). In addition, finishing works include protecting log walls from various misfortunes (fire, water, insects, fungi and bacteria) and revealing the decorative properties of wood - both are done with the help of impregnations.
BUT! In the steam room, protective measures are limited to antiseptic on the lower rims and impregnation for the walls as a whole, which will protect them from water.
A well-sanded log has a beautiful “moire” pattern, which can be made more visible with the help of varnish or impregnation. On our website parilochka.com there is an article that talks about paints and varnishes that are acceptable for processing steam rooms.
Finishing with clapboard in a bathhouse made of aerated concrete, foam concrete, brick, frame
The finishing of a steam room in a bathhouse built from the materials listed in the title will in the vast majority of cases be reduced to clapboard cladding. This is the easiest way to make the interior “wooden”. In addition, lining is a convenient and affordable material, and the difference in profiles gives the owner the freedom to choose according to his tastes.
Baths not built from wood are usually insulated. In this article we will not describe the thermal insulation pie - you can read about it in this article on our website. However, we will spoil it: methods of thermal insulation finishing of a steam room in a bathhouse made of aerated concrete, foam concrete, etc. are the same. And the lining is the final stage of this finishing.
The lining is attached to the counter-lattice. There are several ways to attach it inconspicuously. Previously, this was most often done with finishing nails through a groove, but this is hard work, especially when compared with the modern method of fastening to staples or nails using a pneumatic gun through clamps. As an option, you can attach it to self-tapping screws.
IMPORTANT! Clippers do not replace fastening with nails or staples, they only simplify it. A nice and convenient addition.. Watch the video, which clearly demonstrates the method of fastening the lining using clamps:
Watch the video, which clearly demonstrates the method of fastening the lining using clamps:
Regarding the finishing of the steam room with clapboard, it is worth saying one more thing: there are two mounting options - vertical and horizontal. Accordingly, the counter-lattice should go in a perpendicular direction.
Since we are talking about a humid and hot room, it is worth noting that vertical fastening of the lining is not optimal. Each individual lamella with this arrangement is moistened unevenly, which leads to stress inside the wood. In the future it may crack.
At the same time, horizontal fastening makes the lamellas moisturized more uniformly. The main thing is not to forget when fastening that the groove should be on top, and the tenon should enter it from below. Then water will not flow into the lock.
In addition to the above, the described types of lining installation also have this feature: vertical fastening visually makes the room taller, and horizontal fastening makes the room appear lower.
How to prepare stones for laying
If you have installed a new stove, before laying the stones you need to heat it well, completely filling the tank with water. The fire in the firebox is maintained for at least 2.5-3 hours, until the smell from burning paint and other materials used in the manufacture of the stove disappears.
Before placing stones in the sauna heater, they must be washed from dust and dirt. This procedure is necessary for any stones – both store-bought and independently collected. You can use a brush or dishwashing sponge with a hard abrasive layer.
Material requirements
Bath tiles must meet certain requirements:
- The surface should not slip after getting wet. It is better to choose rough or corrugated products.
- The material should not absorb moisture. It is necessary to choose products with the lowest porosity.
- Mechanical strength and wear resistance must be high to withstand active use.
- The material must be resistant to chemicals, temperature changes, and cold. The frost resistance indicator is indicated by a snowflake with the sun.
- The facing product must have sufficient heat transfer.
- The thickness must be reinforced.
- The material must be environmentally friendly so as not to emit substances harmful to the body when heated strongly.
- The material must have a good reserve of heat resistance.
Information about the material can be found on the packaging - technical characteristics, areas of application. Basic data is displayed as icons:
- Sun and snowflake - resistance to temperature changes.
- Palm is a wall material.
- The foot is the material for the floor.
- Flask - resistance to chemicals. This coating can be cleaned with detergents without fear of damage.
- Circular saw blade icon - abrasion resistance.
- Flask with a drop - the material is not destroyed when exposed to acids.
- A walking foot is a grooved or rough surface that prevents slipping.
There are three categories of porosity:
- Category 1 - high porosity, more than 10%. Suitable for finishing recreation areas and dressing rooms.
- Category 2 - average porosity from 3 to 6%. It can be used in rest areas and showers.
- Category 3 - low porosity from 0.5 to 3%. Suitable for all sauna rooms, it can be used for lining stoves.
The porosity indicator depends on the temperature at which the material is manufactured and how many firings are carried out.
How often do stones need to be replaced?
The durability and heat resistance of each breed depends on its initial characteristics and on the mode of operation of the bath. Basalt has the longest service life - it can withstand up to a thousand heating and cooling cycles. There are breeds in which this figure is several times lower.
It is impossible to say exactly at what point the stone will become “dead” and lose its ability to retain heat. This becomes clear when changes occur in the operation of the steam room: it takes longer to heat up and cools down faster. In this case, the stones should be sorted and completely or partially replaced.
But it’s better not to wait until the last minute, but to regularly inspect the heater, unload stones, clean them of plaque and soot, remove broken and porous specimens - they are of little use.
The role of technical characteristics of tiles when choosing
When determining a suitable material for a bath, it is necessary to take into account its decorative and operational properties. Dimensions, texture and colors are important when developing interior concepts.
Technical characteristics of the tiles:
- The porosity of the base determines the ability of the tile to absorb water - it should be minimal (preferably up to 10%).
- Frost resistance, which is marked with the image of a snowflake, is important for seasonal use of the structure - temperature changes (resistance to them - the sun icon or “T”) can lead to cracking of the cladding. To be used in a bathhouse, the tiles must have both designations.
- The number of firings is indicated on the marking with numbers - double firing (“2”) products can only be placed in the rest room and dressing room; for other rooms single firing (“1”) is required.
- The surface slip coefficient directly affects safety. This indicator is marked with the letter R with a numerical value of 9-10 for glossy material and 11-13 for matte. The second option is preferable, since leaning on a slippery wall can also cause injury.
Briefly about the main thing
The main rule for laying stones in a bathhouse is that the largest elements should be placed closest to the heat source, leaving free passages between them for the movement of hot air. As it rises, it will heat up the next layers, composed of a smaller fraction. It is also advisable to take into account the thermal conductivity and heat resistance of stones, laying down the strongest rocks that easily give off heat. Ideally, you should choose the filling for the heater taking into account its design, so that one condition for proper installation does not contradict another.
Marking the base
Where to start? And how to ensure even seams? Marking the walls helps with this. It is necessary to determine the starting points of installation. To do this, use a laser or water level. The latter option is preferable if you have a limited budget. It is in no way inferior to the technological version. Plus, in a small area, using a laser does not have any pronounced advantages.
The following recommendations will help you understand where to start and how to work:
- in most cases you need to start from the corners (at least there should be whole elements in the corners);
- with seamless cladding, it is better to lay the stone from the bottom up, and when laying with subsequent jointing (especially when laying porous slabs), it will be more convenient to go from top to bottom - this way the slabs will not become dirty;
- whole slabs - the most visible places; usually these are the top and corners, but you need to look at the situation;
- Usually the bottom row is left for last - it is more convenient to cover the floor with trimming, rather than adjusting the floor covering to the stove stone.
Based on this, the starting points are determined. After this, either lay the first row along the laser mark, or pull the beacon cord (according to the marks).
Materials and tools
When deciding how to properly line an iron stove with bricks, you first need to decide on the materials suitable for this. They must have special characteristics.
Brick
The main material for cladding must be of high quality: without voids, with high heat resistance and fire resistance.
You can choose which brick to line an iron stove in a bathhouse from two options:
Clay brick. It is used for lining the body, masonry of the firebox and chimney of a wood-burning stove. It can be ordinary, front, or with a decorative front surface.
Ordinary solid brick
Facing brick
Facing brick with decorative surface “oak bark”
Using shaped bricks you can create unique shapes
Fireproof fireclay brick. Withstands temperatures up to 1800 degrees. It is recommended to be used for masonry and lining of coal-fired stoves.
Fireclay brick
The approximate quantity is calculated depending on the method of laying (half or quarter brick) and the perimeter of the cladding. In this case, the dimensions of the furnace itself and the distance between it and the lining are taken into account. This also includes the amount required to construct the site, since it is possible to cover a metal stove with bricks only on a solid foundation.
With this type of masonry, the brick is placed on a spoon - a narrow long part
Solution
The ideal masonry mortar is made from clay and sand in certain proportions, which depend on the quality of the clay. Without experience, it is very difficult to do it. Therefore, it is best to buy a ready-made refractory mixture based on red clay.
Before covering the cast-iron firebox with brick, you just need to dilute it with water, as required by the instructions on the package.
Heat-resistant terracotta mixture
In addition to bricks and masonry mixture, masonry mesh and fire-resistant sheet materials may be needed to create a protective screen for wooden surfaces. And also roofing felt as a waterproofing material.
Tools
The following tools will be required to complete this job:
- Container for solution;
- Trowel for typing it;
- Hammer for adjusting bricks;
- Pickaxe for dividing them into parts;
- Jointing for seams;
- Ordering is a strip with divisions applied to it, the distance between which is equal to the height of one or several rows, taking into account the thickness of the seam;
- Construction level and plumb line for level control;
- Cord for controlling the evenness of horizontal rows.
Tools required for masonry A sponge or rag and a bucket of clean water will also help to remove the mortar from the front surface of the masonry.
Quality and safety
Quality depends not only on the skill of the builder. It is important to take care of the preparation of materials and tools, as well as personal safety. All work should be carried out in special protective clothing. Special attention should be paid to protecting the skin of the face and hands from mixtures. For this you will need special glasses and construction gloves. They will avoid not only contamination, but also possible allergic reactions.
Cladding stoves with artificial stone is a modern solution for a private home, affordable. You can do it yourself and not spend a lot of time on it. If you follow the rules of work, the result will please the eye for decades.
Ceramic tile
Ceramic tiles have the same fire resistance as brick.
At the same time, she simply has an incomparably greater variety of appearances.
Now, instead of tiles, almost all manufacturers have mastered the technology of semi-dry pressing, which allows you to create any designs and textures on the surface of the tiles.
This material received the trade name “Porcelain stoneware”, although it does not contain granite. Finishing a stove in a steam room with tiles has its advantages, and the main one is the variety of design solutions. Unlike brick, tiles can be any color.
Information. The finishing of the wall around the stove in the bathhouse with tiles is carried out only along a layer of thermal insulation. You cannot lay tiles on a bare wall. This will be too thin a defense.
The side of the old tile had a size of 10-15 cm. With modern porcelain tiles, the side length can reach 40 cm. The longer the side, the more accurate the coating. It has fewer seams, but the complexity of installation increases significantly. Porcelain tiles should be laid by specialists.
This requires a lot of experience. If the tiles are small, you can do the tiling yourself. There are no particular difficulties here. Laying is carried out using a conventional solution on a sheet of heat insulation. It is better to use a special solution based on a dry construction mixture for the appropriate purpose.
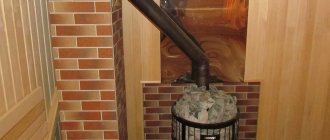
Metal sauna stove
This is the simplest and most traditional option for building a stove in a bathhouse.
The design has a number of advantages that make it popular:
- ease of installation;
- ease of use;
- heating in a short period of time;
- good traction;
- high efficiency;
- a budget option;
- economy in fuel consumption.
You can’t do without lining an iron stove in a bathhouse for several reasons:
- the metal quickly heats up, so being in the room becomes unbearable;
- rapid heating is replaced by rapid cooling. To maintain a certain temperature, you will have to constantly add firewood;
- the cladding will help optimize the heating process and maintain a comfortable temperature in the bathhouse, air humidity will be maintained at an optimal level;
- finishing materials will provide protection against burns that may occur if you accidentally touch the hot surface of a metal stove.
Covering bathhouse walls with non-combustible insulating materials
To prevent the walls from overheating, you can use materials with increased thermal insulation properties and inertness to high temperatures. Two types of materials are used:
- reflective;
- fireproof with lining.
The first type includes materials for wall cladding, consisting of thermal insulation with fire-resistant properties and a metal covering in the form of a sheet.
Insulating walls with reflective sheathing
A protective cake with reflective materials is done this way. First, the thermal insulation is attached using ceramic bushings directly to the wooden walls, then it is sewn up with a stainless steel sheet.
Advice! It is better not to use galvanized metal, since heating may release heavy metals harmful to the human body.
Stainless steel with a polished surface reflects the heat flow inside the steam room, reducing heat loss. In this case, reflected heat is more useful than direct heat. For thermal insulation use:
- basalt cardboard or cotton wool, the only material with increased hygroscopicity, non-flammable, environmentally friendly;
- asbestos cardboard, which reliably protects against flames and has a long service life;
- mineralite, an artificial material made specifically for these purposes.
Protective sheathing requires ventilation gaps of 2 cm from the wall to the insulation, 2 cm from the insulation to the steel sheet. If it is necessary to install the stove as close to the wall as possible, make a double skin of non-combustible insulation, use ceramic bushings to maintain gaps of 2-3 cm and sew them up with a steel sheet.
Insulation with cladding
Measures to protect walls with cladding are necessary in order to preserve the interior decoration of the room. They are more expensive, but no one has canceled the aesthetic advantages of the bathhouse. It is based on tile cladding, which is laid on fire-resistant cladding made of gypsum plasterboard, non-deformable gypsum-based cardboard with fiberglass, mineralite, non-flammable cement-fiber material, moisture-resistant and resistant to biochemical influences, LSU, fiberglass material bound with magnesium additives, resistant to high temperatures, high humidity. Heat-resistant glue is used for installation.
Advice! Use heat-resistant reinforced Terracotta glue, made from fireclay dust bound with kaolin additives, intended for tiling stoves, fireplaces, and all heated surfaces.
The recommended facing materials are quite varied, the best of them are:
- terracotta tiles, they are made from specially fired clay, which gives increased heat resistance and durability;
- clinker, denser clay tiles with a surface of various colors, similar to facing bricks;
- tiles, also made from clay, having an original embossed surface;
- porcelain stoneware made from a mixture of clays, kaolins, quartz sand, feldspars by high-temperature firing under a pressure of 400-500 kg/cm², with imitation of stone, wood, durable artificial material;
- soap chloride, a rock mineral consisting of talc, magnesite and chlorite, an environmentally friendly natural material that does not absorb moisture at all, has an attractive appearance, does not crumble, and is not afraid of high temperatures.
Advice! Use soap chloride to finish the steam room, this mineral has a healing effect on the human body, regulates blood pressure, stimulates cerebral circulation, expels viruses and microbes due to the release of vitamin D when heated.
All of the listed tiles are an element of protection that forms a cake, the basis of which is a fire-resistant material. Just like a screen, sheet material is installed on ceramic bushings with a gap of 2-3 cm from the wall. The minimum distance to the heat source from the tile should be 20cm.
Protection with cladding decorates the room, creates a positive mood, and helps to increase the efficiency of procedures. And most importantly, properly installed insulation prevents wooden walls from overheating and catching fire. Have a nice steam!
Popular types of stone for finishing a bath:
- Serpentinite (coil) The stone has healing properties: eliminates headaches, relieves nervous tension, stabilizes blood pressure, helps get rid of diseases of the digestive organs and colds;
- Soapstone chlorite (talcomagnesite). Helps improve memory, lifts mood, fights stress, improves immunity. In our work we use production facilities from Finland and Russia;
- Jade. Looks beautiful in the form of a panel. It has an expensive look, impressive in different finishes. The mineral is useful for rheumatism and osteochondrosis, and prevents the appearance of cellulite.
Finishing the stove in the bathhouse - choosing cladding and tips
For tiling with ceramic tiles the following are mainly used:
- porcelain stoneware;
- tiled tiles;
- clinker;
- terracotta.
Tile is not entirely suitable for decorating stoves. It is commonly believed that this is just the name of a ceramic slab, but this is not so. Its ability to withstand overheating is much lower than other options.
We can say that such material is a relic of the past, but if the choice still falls on it, additional protection will be required in the form of heat-resistant adhesive for lining stoves. In addition, it will not be possible to use glazed tiles.
Each tile manufacturer has a certificate of conformity, which details the characteristics of the material.
Of the listed options, porcelain stoneware most meets the requirements for finishing tiles; the material itself is extremely durable; many manufacturers use mass dyeing followed by firing, that is, even if chipping occurs, the color inside the slab is exactly the same as on the decorative surface.
Fire protection system in the partition
To achieve maximum heating efficiency in a bathhouse, it is advisable to place the stove in a partition. In this case, it will heat the partition, and not the outer wall or corner, which is much more rational and profitable, since firewood or gas will be well saved.
The partition in the bathhouse near the stove should be well protected. All the same methods are suitable for this as for the usual placement of the furnace. You can use all the techniques described above (brick, tile, metal) both for the outer wall and for the partition.
A brick partition in a bathhouse near the stove will be the most convenient option. It should be noted that brick partitions are often found in wooden bathhouses. Basically, they are made there for design reasons because of the beautiful facing bricks, but the option with a stove is much more functional.
The result is a highly efficient bathhouse for heating; the partition-stove in it is located in the center of the building and does not lose heat. In this case, the portal around the furnace is made lighter. For its construction, it is appropriate to use the same brick as for the rest of the partition. In this case, you will not need to purchase additional materials. If the design requires it, you can use any other option.
Benefits of brick
This solution can be seen in almost any bathhouse. The brick finish protects the wall from overheating. Very often this protection is made even more powerful and extended to the floor. Finishing the stove in a bathhouse with brick performs both a protective and decorative function. For it, the same type of brick is taken as for the rest of the stove, or another facing brick of the required appearance is additionally purchased.
The rules for brickwork for walls, the stove and the protective portal around the stove are general.
Strict adherence to row levels and neat and thin seams are necessary.
On the walls and in the oven, bricks are laid with overlapping seams. If the portal is laid out in one layer, then it is not at all necessary to comply with this requirement. This is why you can often see protective portals where bricks are stacked on top of each other.
The horizontal row is checked by level. Covering the wall with bricks is plumb. For a corner stove, three planes are laid out with bricks, two on the walls and one on the floor.
Attention! A more durable option would be to lay them in one layer with a parquet pattern or according to the usual pattern, as for a half-brick wall. For a stove near the wall - only two, of which one is located on the floor, and the second is on one wall
Brick, even if it is laid in one layer, has good thermal insulation ability. Its masonry is carried out directly on wooden walls and floors without other fire-retardant insulation
For a stove near the wall, there are only two, of which one is located on the floor, and the second is on one wall. Brick, even if it is laid in one layer, has good thermal insulation ability. Its masonry is carried out directly on wooden walls and floors without other fire-retardant insulation.
It is advisable to lay out the horizontal part of the portal in one row between the foundation of the furnace and the subsequent masonry next to it. This advice should only be followed with brick sauna stoves. It is not suitable for metal ones.
Important! When finishing with ceramic tiles, decorative plaster or steel sheets, the use of additional thermal insulation materials is mandatory. In baths, thick fireproof cardboard, mineralite or basalt wool are most often used.
There are also basalt cardboard and other materials that are a variation of the previous ones. Minerite is the most preferred. These are ready-made boards specially designed for thermal protection in areas around stoves
In baths, thick fireproof cardboard, mineralite or basalt wool are most often used. There are also basalt cardboard and other materials that are a variation of the previous ones. Minerite is the most preferred. These are ready-made boards specially designed for thermal protection in areas around stoves.
Decorative plaster
Plaster for stoves began to be used relatively recently. Indeed, a good stove does not need to be plastered. It is made either of high-quality brick, which in itself looks decorative, or of metal, which also does not need plaster.
In this case, we are not talking about plastering the stove itself, but about creating a protective separating layer of plaster between the walls and the stove. Plaster is quite suitable here.
Finishing the walls in the bathhouse around the stove with decorative plaster is especially often done when the stove is not placed in a steam room.
In this case, the requirements for moisture resistance are much lower.
Ceramic tile
Ceramic tiles have the same fire resistance as brick.
At the same time, she simply has an incomparably greater variety of appearances.
Now, instead of tiles, almost all manufacturers have mastered the technology of semi-dry pressing, which allows you to create any designs and textures on the surface of the tiles.
This material received the trade name “Porcelain stoneware”, although it does not contain granite. Finishing a stove in a steam room with tiles has its advantages, and the main one is the variety of design solutions. Unlike brick, tiles can be any color.
The side of the old tile had a size of 10-15 cm. With modern porcelain tiles, the side length can reach 40 cm. The longer the side, the more accurate the coating. It has fewer seams, but the complexity of installation increases significantly. Porcelain tiles should be laid by specialists.
This requires a lot of experience. If the tiles are small, you can do the tiling yourself. There are no particular difficulties here. Laying is carried out using a conventional solution on a sheet of heat insulation. It is better to use a special solution based on a dry construction mixture for the appropriate purpose.
Natural stone is as fire resistant as brick. It is equally suitable for finishing a stove, but its appearance is much more decorative.
The finishing of the stove is carried out not with raw stone, but with finished products made from it. These are tiles or special stone elements for finishing fireplaces.
Classic types of stone are used: marble, granite, but in a bathhouse they may be inappropriate in design and expensive. In this case, they are replaced by cheaper sandstone and slate stone. Slate stone is often cut into flat pieces, so its price is very low.
Finishing the stove in a bathhouse with decorative stone begins with the selection of material. Untreated stone is cheaper, but its surface in a bathhouse can quickly become dirty.
The part of the portal that is laid out on the floor is especially susceptible to contamination.
Despite the fact that untreated stone looks beautiful, it is recommended to use a polished and honed version for a steam room.
Tiles are a classic solution for finishing stoves. They have cheap production technology and very reliable installation. The external surface, finished with tiles, looks like high-quality, thick tiles.
This appearance will be achieved only if you use tiles without a pattern on the front surface. They do not produce a special decorative effect, since they do not differ much from the usual tiles. The only benefit is in the strength of the fastening, which is why other tiles with a three-dimensional pattern on the front side are more popular.
Tiles are laid in the same way as tiles, but require a significant thickness of the finishing layer. If a portal for a sauna stove is made from them, then part of the wall and floor is covered with tiles. They don’t have to be used on the floor if the stove foundation is raised above the floor by one or two brick rows.
If the tiles have holes for wire, then it must be used.
The diameter of the rods is selected according to the instructions. Larger diameter means higher strength, but the complexity of installation increases.
On average, tiles are the same thickness as one brick.
They can just as well be used to create the same protective layer.
Steel case
Steel is also a fire-resistant material. It cannot be left untreated, as it will instantly rust in a bathhouse. When finishing the space around the stove with steel, you need to keep in mind that unlike brick, tiles and stone, steel does not insulate heat at all.
A protective portal around the stove made only of steel will be completely pointless, since it will not be able to fulfill its main task - to protect wooden walls from overheating. In order for this function to be fulfilled, it is necessary to provide a good heat-insulating layer of another material, and then cover it with a facing steel sheet.
This heat-insulating separation layer is created from mineralite. Other fire retardant insulation materials can also be used. Simple mineral wool is not suitable, since after getting wet once it shrinks in volume, and this defect cannot be corrected by anything.
The insulation near the stove should not get wet. You need to take care of its waterproofing. Moreover, this waterproofing should only be on the side of the cold wall, but not on the side of the stove.
Steel has a metallic luster. This effect can be used to greatly increase the efficiency of the portal.
If made from uncoated polished stainless steel, it will act as an infrared reflector.
A similar element can very often be seen in electric fireplaces, heating stoves and any other heating devices.
The main difficulty of this solution is the need to use only stainless steel. Compared to ordinary steel, it costs 10 times more, but the total thickness of the sheets for the reflective screen can be small.
Stainless steel perfectly withstands any humidity. It can even be placed in rooms such as a steam room in a bathhouse; the decoration around the stove will be compact and with a modern design. In a steam room, all interior elements are usually made only from wood. Stainless steel would be appropriate next to a metal stove-stove.
Finishing the stove in the bathhouse - choosing material for decorative cladding
A Russian bathhouse built according to all the rules is always a source of pride for its owner. After visiting the steam room, your health improves and problems fade into the background - this is a place where you can have a wonderful rest
The “heart” of a bathhouse building is considered to be a stove, the lining of which is of no small importance
Stove in the bathhouse
The main room in the bath building is the steam room, where the temperature should be high during the procedures. Steam is no less important. In order for the steam room to function in the desired mode, the stove, the main element of the entire bath, will help to achieve the necessary parameters.
When building or purchasing a heating unit, you must pay attention to the compliance of its functionality with a number of requirements:
- quick heating of the room;
- resistance of the furnace structure to high temperatures;
- the ability to work for a long period;
- beautiful appearance.
Of no small importance for the full functioning of the furnace in the future is the quality of the materials used for its manufacture.
Sauna stove lining
A heating unit installed in a sauna building must not only provide the required temperature conditions, but also have a beautiful appearance. One of the best solutions in this case is deservedly considered to be lining the stove in the bathhouse.
When finishing a stove structure, the following are most often used:
Each of the above materials has its own quality characteristics.
Using tiles for finishing stoves
Tiles are a popular type of material used to decorate a sauna stove due to its affordable price and ease of installation.
When lining a stove structure, the following types can be used:
- Clinker tiles. For its production, clay is used, adding energy melters, fireclay and various dyes.
- Majolica tiles. These ceramic products are made from fired clay and covered with glaze. The finished product has a bright and rich color, which is clearly visible in the photo. If desired, ornaments and designs can be applied to such tiles.
- Terracotta tiles. In terms of the components used in the production process, it has much in common with Majolica. But such a lining for a sauna stove is not covered with glaze. The main advantage of “Terracotta” is its high strength. The product is produced in a round shape.
- Marble tiles. A stove with such a finish looks presentable, creating an atmosphere of coziness and comfort in the room. These marble products are characterized by strength and durability. This type of tile has no disadvantages.
Finishing the stove with bricks
This design option for the heating unit is not only economical, but also easy to implement.
Finishing the stove in a bathhouse with brick has advantages, including:
- rapid heating to the desired temperature and maintaining it for a long time;
- The furnace structure is not destroyed by steam and moisture.
Stone in the design of sauna stoves
When the stove in the bathhouse is decorated with decorative stone (artificial or natural), the interior of the room takes on a noble and aesthetic appearance. If the heating unit in a bath building is lined with such material, it belongs to top-class buildings.
Application of steel case
When using this type of finishing, a metal frame is placed on the surface of the furnace and covered with steel panels. Thanks to the steel case, heat is retained and at the same time the optimal level of heating of the room is ensured. But this type of cladding has a significant drawback - when the furnace heats up, the material also begins to heat up and a person’s touch to it is fraught with serious burns.
Plastering the walls of the furnace structure
If you choose the most inexpensive and simplest option than finishing a stove in a bathhouse, then using plaster will be the optimal solution.
The work is carried out in two stages:
- The walls of the stove are plastered to remove dust and dirt.
- The second time, plaster is used to level surfaces, leveling chips and dents.
After completion of work, it is advisable to whitewash the stove structure with lime.
Tiles for cladding
An ancient method of tiling is laying tiles. This finishing of the sauna stove portal and its surfaces gives the structure an unusual and rather original appearance. As a result of tile cladding, the stove in the room becomes a separate element of the interior.
Only a master can perform this reliable and durable finish. As a result, the stove structure has a higher degree of heat transfer compared to the use of other finishing materials.
Types of stove lining
In addition to the fact that the stove is the main heating equipment, it also performs an aesthetic function.
The cladding of the sauna stove is made using practical and durable decorative materials:
- ceramic tiles;
- refractory bricks;
- artificial and natural stone;
- decorative plaster;
- tiles;
- frame made of metal plates.
All materials are distinguished by high performance characteristics and installation features.
Ceramic tiles - elegance and durability
The best material for lining a sauna stove is ceramic tiles. It is easy to install, affordable and durable.
The following types of tiles are used for facing work:
- Clinker room. It is made from red clay with the addition of fireclay, melting agent and dye.
- Majolica. Material with a pressed base, covered with a protective glaze layer. This type of tile is distinguished by its rich color scheme, decorative patterns and ornaments.
- Terracotta. A facing material whose performance characteristics are similar to majolica. Important differences are the porous structure and the absence of a protective glaze. Terracotta is characterized by durability, increased strength and resistance to mechanical damage. This type of tile is made in a round shape.
- Marble. This material is distinguished by its increased wear resistance, practicality and ease of installation, and is devoid of almost all disadvantages.
When choosing this type of finishing, stove owners ask themselves the important question of which tiles are best for covering heating equipment. Experts believe that the best option is a material that has a minimum coefficient of thermal expansion and a dense structure - clinker tiles.
Firebrick: reliability and safety
Decorating a sauna stove with brick is the simplest and most budget-friendly option for owners who decide to do the cladding themselves.
The material has a number of advantages:
- fast and safe heating;
- accumulation and maintenance of heat for a long time;
- resistance to high moisture;
- low cost and ease of installation.
Work on lining the stove in a bathhouse with bricks consists of arranging a reliable decorative screen around the entire perimeter of the equipment. To increase aesthetics and attractiveness, it is allowed to combine materials of different colors.
To fill the joints, it is recommended to use grout that is resistant to high moisture and temperature changes.
Artificial and natural stone: exquisite nobility
The main advantage of cladding with decorative stone is the creation of a noble and attractive appearance. High strength, durability, environmental friendliness, resistance to high temperatures, a variety of color palettes and textures allow the material to be used for finishing bath rooms.
The following types of stones are used for facing work:
Decorative stones can withstand an unlimited amount of heating; they accumulate thermal energy well and maintain a given temperature for a long time. In addition, this material is resistant to acids and alkalis.
In terms of their performance characteristics, artificial elements are not inferior to natural stones. With their help, you can qualitatively line a stove in a steam room or a fireplace in your home.
The technology for laying stones is simple and therefore does not require additional preparation. Non-standard shapes of elements can cause some difficulties during the fitting process, so before installation it is recommended to lay out the material on a flat base. The stones are numbered and fixed on the surface of the furnace using an adhesive composition.
Decorative plaster: simplicity and accessibility
A simple option for lining a Russian stove is plastering the surfaces. Over time, the decorative and protective properties of the plaster composition decrease, which will require frequent renewal of the cladding.
Important! Decorative plaster is used only for brick stoves and is not suitable for metal devices.
Plastering a stove in a bathhouse is simple; all work is performed in the following order:
- the surface is cleaned of dust, debris and remains of the connecting solution;
- the seams are cleared to a depth of 10 mm;
- Before the cladding begins, the oven warms up;
- a mesh of metal rods is installed on the surface with wire fixation;
- the surface is moistened and a primary layer of plaster mixture is applied;
- After the plaster has hardened, a second layer is applied.
The thickness of each subsequent layer does not exceed 6 mm. The plaster solution is applied using a trowel and leveled over the surface with a spatula. When plastering the surface, it is necessary to avoid the appearance of defects - air bubbles and sagging.
After hardening, the top layer is thoroughly cleaned until a smooth surface is obtained.
Tiles: originality and practicality
The use of tiles is an ancient method of cladding stove equipment for a bath. Tiles are tiles made from pottery plastic clay by firing in a kiln at a temperature of more than 1000 degrees. On the back of the tile there are pumps designed to fix the material on any surface. Tiles are presented in several categories:
- with a smooth surface;
- majolica;
- with glazed surface;
- with a relief surface.
Tiles are distinguished by high performance characteristics - durability, practicality, strength and high heat transfer.
The work of tiling should be entrusted to professionals who will do a good job of installing the material on the surface of the stoves.
Metal frame: accessibility and safety
A sauna stove can be lined with a metal frame, which is installed on top of the device and covered with protective shields. The steel frame provides reliable protection for the furnace portal and an optimal level of heating of the air in the room.
This type of cladding has the following advantages:
- accumulates released thermal energy;
- quickly heats the air and walls in the room;
- It is distinguished by its affordable price and ease of installation.
A serious drawback of such cladding is the likelihood of burns upon direct contact with the surface. Therefore, experts do not recommend installing metal frames for stoves in bathhouses in order to avoid possible injuries.
A competent choice of decorative material for cladding and adherence to the technological process will ensure the correct operation of the sauna stove and the creation of a comfortable microclimate in the premises.
Tiles
A stove with tiles is a rather labor-intensive process. Technology has simplified things a bit. But until now, the construction of such a furnace takes 4-5 months, if you use the classic version. The laying and lining of the furnace occurs simultaneously. Although, in a simplified version, you can line a finished stove.
Expert opinion Nikolay Davydov Stove maker with 15 years of experience
The drawing can be anything. Usually Russian folk motifs are used. The sizes of tiles are regulated by GOST 3742-47. Permissible deviations should not exceed 1 mm in all directions. Thanks to standardization, the cladding process has been significantly simplified. The most important thing is to choose the right material.
Instructions
You should be guided by the following rules:
- Material of manufacture. Impurities in colored clay will not allow the production of high-quality tiles, so it is not used. In contrast, white clay is an ideal raw material.
- The quality of a product is determined by its ability to absorb water. The more pores in a tile and the larger they are, the less quality the product will be.
- Choose tiles made by pressing.
- The surface of the product should not have a dull appearance and there should be no cracks on it. This happens when a product undergoes only one firing.
For cladding, tiles must be sorted by shade. They will need to be laid in such a way that the transition is not noticeable. The size is adjusted using a rasp and an angle grinder on all sides. Defective tiles should not be thrown away immediately. They can be used later.
The next step is to mark. The thickness of the horizontal seam should not exceed 3 mm, vertical - 1 mm. Now let's move on to installation.
Lay out the first row.
The process is very labor-intensive, but the result is worth it. The first thing to do is to properly prepare the tiles for installation. This will ensure the best result.
The installation order is as follows:
- immerse the tiles in water, waiting until the clay absorbs water;
- the clay in the tiller will increase the heat capacity, so you need to fill it halfway;
- steel brackets allow you to correctly connect the tiles to each other;
- We connect a row of tiles to a row of the stove using wire.
Scheme for fastening the tiles: 1 – lump, 2 – pin, 3 – wire, 4 – staples.
Subsequent rows.
- drill holes in the masonry;
- We use screws and wire as a connecting element;
- We fasten the steel pins using wire;
- we place the tile on the pin and bend the last one;
- the dry solution will fill all the voids between the tiles.
Sauna stove in tiles
Nuances when working with the floor
When tiles are laid on the floor of a washing room or shower, the first thing you need to do is maintain the slope.
This is very important, otherwise the water will stagnate in the room and will not leave on its own through the sewer drain.
It is advisable to make markings using a strip or lacing before starting work. This will help you see the required slope more clearly visually.
To maintain the seams, which are a prerequisite for floor tiles, it is necessary to use special crosses 3 mm thick. If you ignore this rule, then over time, due to strong temperature changes and high humidity, the tiles will simply crack and begin to peel off.
Preparing the furnace for work
Before finishing, preparatory work cannot be avoided. They are needed for smooth application of plaster and high-quality wall cladding. The first step is to remove the old plaster if the stove has been used before.
This process is carried out with a spatula and water. If the old plaster contains cement, then you will have to use a chisel or hammer. If the old material is successfully removed, the wall should be cleaned down to the brickwork.
The next step is to run a wire brush or sander over the surface of the oven.
Important! To properly attach the plaster, you will need to spray the walls with water and clean the seams between the bricks. New masonry must be dried and cleaned of dust and other defects.
New masonry must be dried and cleaned of dust and other defects.
After cleaning, the walls need measurements. Using a building level, the correctness of the corners is assessed and, if necessary, they need to be plastered to level them.
Choosing tile adhesive
The stone is laid on tile adhesive. We will not repeat the importance of resistance to high temperatures. But this is not the only criterion for choosing a composition.
Artificial stone is usually not large in size. But if the oven is lined with dimensional materials, you need to take care of adhesion. In such cases, you need to purchase glue designed to work with heavy slabs. And in general, it’s better not to skimp and buy a mixture with excellent grip.
If the base is properly prepared, the glue calculation is carried out according to the diagram specified in the instructions. Otherwise, the quantity must be adjusted taking into account deviations of the furnace surface from the plane and vertical.
Possible problems
The most common mistakes and tips for avoiding them:
The large distance between the stones creates the feeling of a “broken” stone. Such a seam does not look very aesthetically pleasing. Due to poor quality primer, some stones may fall out of the overall composition. Therefore, you should immediately treat your work with respect and do the job well the first time. You need to cut stones with a grinder very carefully, because
If you move carelessly, you can damage them, break them, or chip the surface. It is necessary to select the surface decor with great care to avoid disappointments. A wide variety of colors and textures of stone finishing allows you to choose the appropriate option for every taste. If you disturb the arrangement of the rows at the beginning of the work, you may end up with chaotic masonry, which will have a bad effect on the appearance of the product.
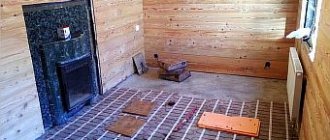
Features of concrete floor
In a steam room or washing room in a bathhouse, a concrete floor looks preferable to a wooden one.
When additives that increase water resistance are introduced into the solution, this design does not rot and resists moisture well
It is important to correctly solve the question of how to fill the floor in a bathhouse under the tiles
To ensure a smooth surface, the top layer should be poured using beacons
First of all, before constructing a concrete floor, a drainage system must be carefully thought out to allow waste liquid under the floor to be drained beyond the boundaries of the structure. The construction itself is carried out in the following order:
- thorough compaction of the soil and backfilling with a cushion of sand and crushed stone 12-18 cm thick with compaction (broken brick can be used);
- pouring the first layer of concrete 5-7 cm thick;
- laying a thermal insulation layer (expanded clay, felt, mineral wool, etc.) and waterproofing from roofing felt or thick polyethylene film;
- installation of a reinforcing element made of metal mesh or steel wire;
- pouring a second layer of concrete 10-15 cm thick, forming a slope in the direction of the drain;
- covering the surface with a primer with an adhesive base for better adhesion to ceramic tiles.
The hole is formed using formwork or a vertically installed pipe with a diameter of at least 5 cm. To ensure a flat surface, the top layer should be poured using beacons.
Ceramic tiles have proven to be a very reliable and effective floor covering in bath rooms such as steam rooms and washrooms, where the highest humidity occurs. The floor in a tiled bathhouse can be either wooden or concrete, and all the work can be done independently
It is important to approach this important event correctly and take into account the features of the floor structure
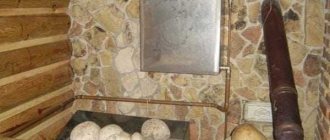
Oven screen options
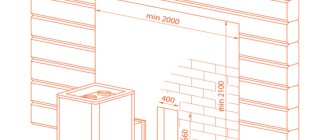
It is recommended to line the sauna stove with half a brick; this is the best option. If the screen is made as thick as a brick, it will take a long time to heat up. In addition, a foundation will have to be built for such masonry. If you resort to a quarter-brick design, the bathhouse room will warm up quickly, but the radiation will be harsh. Regardless of the thickness of the masonry, the distance between the surface of the metal stove and the wall varies in the range of up to 10 cm.
The screens can be a solid structure with ventilation windows, while the chimney is often also made of brick. Another solution is possible: to cover only certain elements of the furnace.
As for decor, there are many different options. The neatly executed masonry itself looks quite beautiful. The color of the red brick contributes to the design of the stove structure. At the owner's request, the bath stove can be faced with porcelain stoneware, decorative brick, natural stone, and tiles. The choice is a matter of taste and the costs planned for these purposes.
When is this required?
There are times when there is no need to protect walls. If the stove is located at a safe distance from the wall from a fire safety point of view, the installation of protective screens and other measures can be neglected. The distance from the walls that is required to reduce the heat from the source varies:
- A stove laid in a quarter of a brick should be located no closer than 35-40 cm from the wall;
- A metal stove without lining should be placed a meter away and no closer;
- A metal one with a lined furnace can be installed 70-75cm from the wall.
However, not every steam room has the opportunity to fulfill these requirements, due to the small area. The layout of steam rooms with an area of 6-8 m² can hardly accommodate the necessary set of items for the steaming procedure. Therefore, the need to insulate walls with special sheathing is relevant.
Do-it-yourself tiles for lining a stove in a bathhouse
An ancient method of tiling is laying tiles. This finishing of the sauna stove portal and its surfaces gives the structure an unusual and rather original appearance. As a result of tile cladding, the stove in the room becomes a separate element of the interior.
Only a master can perform this reliable and durable finish. As a result, the stove structure has a higher degree of heat transfer compared to the use of other finishing materials.
The variety of colors, patterns and textures of tiles is surprising. With such variety, you can choose any material and make your sauna stove unique.
Stone
Finishing the sauna stove with stone would also be appropriate. This material can be natural or artificial. In terms of fire resistance, stone is not inferior to brick. But the appearance of the stove becomes more impressive. The stone is known for its high decorative value.
It is worth considering that the finishing is carried out with stone that has undergone special treatment. Raw material is not suitable for these purposes. Natural stone is used to make elements that resemble tiles or blocks in shape. But on the reverse side they should be flat. There are different types of stone. The most popular finishes are granite and marble. However, they may look out of place in a steam room.
The cost of the presented varieties of stone is quite high. Therefore, many bathhouse owners choose other types of materials. It could be sandstone, shale. The second option is often sold chopped in large pieces. For this reason, the cost of the presented material is low.
Using tiles
The tiles on the stove in the bathhouse are afraid of thermal expansion, therefore, when performing work, it is important to carefully follow the technological process. The lining of the stove in the bathhouse does not tolerate negligence
Kinds
Typically, 7 types of tiles are used for cladding:
- Terracotta is a tile that has not been glazed. It consists of terracotta clay and fireclay, which are mixed in a certain ratio. Such tiles have been known for several centuries. A correctly implemented technological process greatly influences the final quality of the material. This tile can be easily recognized by its characteristic red tint.
- Clinker tiles - clay is the main raw material. The material is obtained by pressing, then it is fired at a temperature of +12000C. The crystal lattice of the clay changes and the tile acquires the properties of ceramics.
- Majolica is very difficult to produce. Previously, only manual labor was used for drawing. Now there are industrial designs. The glaze on the tile is obtained by firing. Properties resemble terracotta tiles.
- Tiles are the most preferred option due to the air gap between the tiles and the oven wall. This layer works as an additional heat insulator, allowing the stove to retain heat near itself even longer.
- Porcelain tiles can also be used for lining a stove. Marble chips added during the production of porcelain stoneware give the material unique decorative properties and high strength. Due to this, porcelain tiles are rapidly gaining popularity.
- Fireclay is able to withstand direct exposure to fire. Fireclay is pressed into blanks and fired at a temperature of +13000C.
- Tile - only a material with a high heat resistance coefficient can withstand temperature loads.
Expert opinion
Nikolay Davydov
Stove maker with 15 years of experience
Based on their properties, the most preferable option for lining a stove is tiles. It is also the most labor-intensive. The most budget option is special tiles with a high heat resistance coefficient, but with its help it will not be possible to finish the hottest areas.
Instructions
Do-it-yourself tiling of a sauna stove is done as follows:
- It is necessary to properly prepare the surface. All traces of old finishes must be removed from the wall. Each seam should be selected at 10-15 mm.
- We dilute a deep penetration primer and add marble chips to it. Carefully prime the surface. Do not forget that the primer must dry (at least 24 hours).
- We stretch and fix the metal mesh using dowels. Such reinforcement will significantly increase the strength of the structure.
- The tiles should not be laid on an uneven surface. We level the wall with plaster. We recommend using stove mortar that is specifically designed for plastering stoves. The plaster must be allowed to dry for 48 hours.
- Apply the facing adhesive evenly to the entire surface of the tile. Carefully cover the surface of the stove and press lightly. The tiles can be leveled in about 10 minutes. Then the glue will set. We check the correctness of the masonry using a level. The glue layer should not exceed 1 cm. To make the seams even, we use special crosses. The thickness of the seam is 2-3 mm.
- When the glue dries, we grout the joints.
Conclusion
The choice of one or another material for lining the stove in the bathhouse is determined by the result that needs to be obtained in the end. The most interesting option in terms of heat preservation is tiling, but it is also the most labor-intensive and expensive. If you want to veneer your stove cheaply, there is such an opportunity.
The most budget option is plastering the stove. It is best to line a metal stove with bricks. This will significantly increase the heat capacity of the oven and it will take longer to cool down.
Another great option is porcelain tiles. When deciding how to line a stove in a bathhouse, pay attention to the quality of the materials used.
To insulate the space around the stove, it is advisable to use mineralite. This is an excellent sauna cover. They are used for lining the sauna - covering wooden walls, although these slabs can also be used to cover a house.
Using the step-by-step instructions in this article, you can not only choose the right material in the best way, but also do the lining of the stove itself and its surfaces with your own hands. This became the main purpose of this material.
Criteria for choosing a full or partial furnace lining
Many bathhouse owners, having decided to line the stove with brick, doubt what type of cladding to choose. If you surround the device with brick walls on all four sides, you will get a complete one, otherwise it will be partial.
Whichever option is chosen, the difference will be in the control of convection. In simpler terms, problems may arise for lovers of Russian baths. If a controlled convention is organized, then it is possible to close it, in this case the hot air heats not the steam room room, but the brick casing, transferring the heat into the steam room softer.
To control the flow of warm air from bottom to top, special openings should be provided. If necessary, they are closed or opened using special doors or pieces of brick.
But open cladding, when the stove is not closed on one or more sides, is most likely an aesthetic aspect and a safety issue, since it is less likely to get burned from a brick than from hot metal.
Methods
There are several solutions on how to beautifully decorate, lay and insulate a stove. Based on the type of lining, two options are considered.
- When lining the furnace on four sides at once, such a scheme will be called a full lining.
- If one of the sides is not involved, then this is a partial layout. The main difference is the controllability of convections.
This question becomes especially relevant for those who want to build a Russian bathhouse. The controllability of convection allows you to regulate the steam; it remains either in the device itself or fills the room. This way the heat is adjusted and controlled.
There are certain options for how to enclose an iron stove with bricks.
- Solid masonry. The efficiency of the device may be low, there are obstacles to convection. Therefore, it is rarely chosen for construction purposes.
- Discharged masonry. The solution is also not often used in the construction industry. The main reason is that the screen efficiency decreases.
- Vents from the top and bottom. This is the most popular solution. Convection becomes more controllable.
Additionally, masonry can be brick, half-brick and quarter-brick. The best option is half-brick masonry, since the thickness and stability of the walls of the structure are freely adjustable.
Features of choosing tiles for a bath
The modern construction industry offers numerous varieties of ceramic tiles
In this variety, it is important to navigate correctly and choose the option that is most suitable for bath conditions. Such tiles must meet the following criteria:
- The surface of the tile should prevent wet bare feet from slipping. This condition is met when it is grooved or rough.
- The tile must have minimal porosity so that it does not absorb moisture either from above or from below. The moisture absorption coefficient should not exceed 10%. The most effective porcelain stoneware has a value of this indicator in the range of 3.2-3.8%.
- The mechanical strength of the tile must be quite high. Tile with a glazed surface, made using double firing technology, is well suited.
- The size of the tile is selected taking into account the need to form a slope to ensure water drainage from the surface. Many people prefer to use ceramic mosaic tiles for their bath floors, i.e. elements measuring about 10 cm.
Bath tiles must have a minimum porosity
Features of finishing of metal stoves
Metal walls have significant elasticity and plasticity, so the process of facing them may seem quite simple at first glance. But the picture is spoiled by the high TCR of steel and the temperature it reaches during furnace operation. Based on this, the most preferable method of lining a metal furnace is painting with heat-resistant enamel - today such compositions are on sale in a wide variety.
Before applying the enamel, the metal walls are degreased. Primer treatment is not used, since this material does not have heat resistance.
A metal stove can be painted with heat-resistant enamel
If you still want to cover the stove with tiles, the latter can be secured with clamps. They will play the role of a movable ligament that will prevent the cladding from peeling off due to temperature changes.
Finishing
The solution may take time to set, so it is better to wait 2-3 days. Finishing involves cleaning the brick from the mortar and giving it a uniform shade.
It is more convenient to remove excess solution using a drill with a brush attachment. The work is dusty, so use a respirator and goggles.
After cleaning, stains of uneven color may remain on the bricks. To even out the shade, use a solution of laundry soap and water and a hard, dense brush. After this, the brick “coat” is washed with water. The result is a beautiful shade without blemishes.
Carry out the first fire after lining slowly, allowing the brick to gradually absorb the heat.
That's probably all. I think that you will feel the comfort of a lined stove right away. The heat will become more balanced, and the heat source will delight you with a pleasant view and pleasure from independent work.
Subscribe to the blog for updates and stay up to date with all articles. Good luck and soft steam to your bathhouse! See you!
Wisdom Quote: The greatest happiness in life is the confidence that you are loved (Hugo Victor Marie).
Creating a tiled floor
In Russian bathhouse traditions, it is not customary to use tiles to cover the floors in bathhouses. Despite this, lovers of steam baths still opt for a ceramic floor. When creating it, craftsmen take into account the type of floor base (concrete or wood) and its slope towards the drain. Let's consider creating varieties of tile floors.
Flat floor
Before laying ceramic tiles, preliminary preparation of the floor base in the bathhouse should be carried out. The next step is marking the floor. It is done if you plan to lay out a tile pattern on the floor.
If the installation is made of single-color tiles, then markings will not be required. In this case, the floor is laid with tiles, starting from the front corner of the room. The adhesive used should be diluted in water according to the instructions for use on the package. To mix and obtain a homogeneous composition without clots, use a construction mixer or drill with a special attachment.
First, the adhesive is applied to the area of the floor required to lay 4-6 tiles. To apply it, use a medium-width spatula or trowel. Then the applied layer is spread with a toothed spatula.
The adhesive is also applied to the back side of the tile using the same spatulas (flat, then serrated).
With drain
Laying tiled floors in a bathhouse requires a slope towards the drain. For guidance, craftsmen use either a building level, a fishing line, or a block with the desired slope. It is placed on the tile, and then measured on top of it with a building level. The tiles are cut with a special tool - a tile cutter; the holes for the drain are cut using a drill with a core drill.
If the drain in the bathhouse is located in the middle of the room, then laying the floor with tiles begins from the central part (from the place of the drain). In this case, the required finishing slope is formed. First, the tiles are laid out without glue to more accurately measure the required slope.
On the concrete floor
First of all, the entire area that is planned to be tiled is cleared of debris and dirt. You can use a vacuum cleaner for this purpose. After cleaning, you should seal the cracks, crevices and flaws in the base of the floor and at the junctions of the walls and floor with sealant. When the sealant has dried, remove any excess. Then a ready-made liquid primer is applied to the base of the floor. The required height of the primer layer is 20 cm (measured along the wall).
After the soil has dried, the floor should be waterproofed. For such purposes, it is practical to use rubber or so-called liquid glass. These waterproofing compounds are applied to the base of the floor using a wide brush in two or three layers. Then you need to let them dry. The tiles are laid on the floor prepared in this way according to the usual pattern.
On a wooden floor
The wooden base boards must be of good quality and condition, not rotten. If there are damaged boards, they should be replaced. The best option is to completely disassemble the base, lay down insulation, remove varnish and paint from old boards, and treat the floorboards with an antiseptic. Gaps of 3–5 mm should be left between the floorboards. Fill these holes with foam.
Then you need to fill all the holes, apply latex impregnation or heated drying oil to the boards. This will be the first layer of waterproofing for the wood floor. The second layer is performed using fluid or bulk components or roofing felt or other rolled materials.
The next stage is the screed. A metal mesh is installed around the perimeter of the bathhouse, which contributes to the stability of the screed. Filling is carried out taking into account the slope towards the drain. Laying tiles on a wooden floor is done in the usual way. Of course, taking into account the slope towards the drain.
Tile is a practical solution for finishing a bath. It is durable, wear-resistant, aesthetically pleasing, easy to clean, and most importantly, it fits perfectly into a “water” room such as a bathhouse or sauna. And it is quite possible to lay tiles with your own hands on any floor: both wooden and concrete. And even the presence of a drain in the bathhouse will not be a hindrance - you will get a perfectly flat plane.
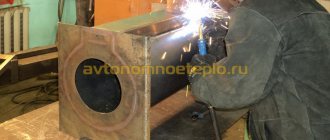
Foundation arrangement
Now on the Internet you can find many drawings, photos, and plans for building a foundation for lining a stove in a bathhouse with bricks. What is this building?
The foundation is made in the form of a quadrangular well, the height of which is equal to the height of the furnace. To cover the metal walls, use solid or masonry with windows, through which not only fuel is thrown in, but also ventilation around the heating surface is enhanced.
According to experts, wooden floor beams can withstand up to 650-700 kg of load. Although practically, it is not recommended to give a load of more than 400 kg per 1 m². Therefore, it is advisable to further strengthen the existing frame with an iron structure from an angle (50 mm), or screw piles, provided that approximately 180-200 bricks weighing 3.5 kg each will be used for the screen.
Foundation construction algorithm
- Cut a square of a certain size in the floor (if it is already installed), dig a pit approximately 35-45 cm deep.
- Fill the bottom with coarse crushed stone, lay waterproofing, and install formwork.
- Place pieces of reinforcement in the foundation frame, apply the required amount of mastic waterproofing, and fill the structure with concrete approximately 15-20 cm above the ground.
- Bring the “pillow” to the floor level with ordinary bricks, on which the stove and lining will be placed.
- Wait about 3 weeks until the concrete shrinks, then lay thermal insulation and steel sheet (3-5 mm thick) under the stove.
Preparation of the solution
In order to properly line an iron stove in a bathhouse, it is best to use a classic clay-sand mortar. You can add a small amount (about a sixth) of grade 400 cement to it. This ingredient can only strengthen the entire structure, since the temperature of the future screen will not be high enough.
Since little clay is required, it is best to buy it at a building materials store. For rural residents, such a problem as purchasing clay should not exist.
To prepare the solution, you need to take sifted sand and mix it with clay in equal proportions. Add water gradually until you get a thick mixture that can easily slide off the trowel.
What other materials are used to line a sauna stove?
It turns out that not only bricks can be used to line sauna stoves. Granite or marble slabs are an excellent substitute. They also tolerate temperature changes well, have a large mass and high thermal conductivity. In addition, such finishing will give the bath room an unusually beautiful and unique look. Not everyone can afford such luxury, from a financial point of view. But if you have some leftovers, you can use them to build a stove partition.
True, the installation of such slabs is a little more difficult in comparison with brickwork. To ensure a beautiful appearance of the lined stove, it is necessary that the work be carried out by a specialist. At the very least, the owner needs to at least consult with such a person.
Minerite slabs are also used to construct a heat shield. With their help, the wall is mounted much easier and faster, even in comparison with masonry, and is able to withstand temperatures of 360-400⁰C. But the heat capacity of this material is low, so it can be used as a good partition that will not be able to accumulate heat.
What will you need for the job?
Tools required for work
The first step is to prepare the tools, which you cannot do without both when performing preliminary activities and when carrying out the main finishing work.
Before starting work, you need to make sure that you have all the necessary tools at hand.
The list does not include complex tools and accessories - almost all of them are available to every household owner:
- A grinding machine with a circle for ceramics, a tile cutter - for different options for cutting finishing materials.
- Spatulas:
- flat, having a width of 100÷120 mm and 250÷300 mm;
- toothed, used to distribute the solution over the surface, with a tooth height of 6÷8 mm;
— corner – for the convenience of removing the corners of the stove;
- rubber - for filling joints with grout.
- A construction syringe, if you plan to use it to fill the joints between the tiles with grout.
- Building level and plumb line - for marking and checking the horizontal and vertical alignment of the masonry during work.
- Metal ruler and tape measure, a simple pencil or marker.
- Rule.
- Trowel (trowel).
- A bucket for mixing glue and a smaller container for preparing the grout.
- Rubber hammer - for tapping tiles against the wall.
- An electric drill and a special mixer attachment with which the solution is mixed.
- Spray bottle for spraying the surface.
- Wire brush for cleaning seams.
- Wide brush for applying primer.
Prices for ceramic tiles
ceramic tile
If installation work will be carried out without the use of glue, then additionally prepare:
- Scissors for cutting metal.
- Wooden beam and steel angle - for making metal brackets and guides for installing ceramic tiles.
Basic and auxiliary materials
To cover the walls of the furnace with ceramic tiles mounted on glue, it is necessary to prepare the following building materials:
- Ceramic tile. Its quantity is calculated in square meters, after measuring each of the furnace walls, taking into account a 5÷10 margin for cutting and for possible defects in work.
- Primer solution for treating walls.
- Plaster for stoves and fireplaces.
- Heat-resistant tile adhesive.
- Grout mixture for sealing joints.
- Fiberglass serpyanka mesh for wall reinforcement.
If you plan to install ceramic tiles without adhesive, frame installation of ceramic tiles will also require certain metal products. This will be discussed in more detail in the corresponding section of the publication.
Styling tips
Installing wall or floor tiles in a wooden, brick, or block bathhouse will be no more difficult than performing the same work in a house or apartment
It is only important to remember that such decor requires a flat base with good adhesion. When laying the tile floor, the slope specified during installation of the rough base structure is observed.
Before installation begins, it is necessary to clean the room, get rid of debris, and remove dust. For work you will need:
- tiles (the quantity is calculated in advance, with a margin of 10%);
- glue;
- notched spatula;
- cuvette for solution;
- construction mixer;
- tile cutter;
- mallet;
- working surface for cutting;
- cross-shaped plastic inserts;
- grout.
The floor is pre-waterproofed and primed. If necessary, it is leveled. Walls in rooms with high humidity are also covered with a layer of waterproofing 1 m from the floor. It is better to start installation from the corner part or the drainage point. Each row is verified using a building level. For installation on the wall, a lower support beam is used, then it is removed.
The glue should not be applied too much. A small layer is enough to secure the product. Use a spatula to scoop the solution onto the tile or the surface to which it is attached. After fixing to the chosen place, each decorative element is tapped with a mallet for a tighter fit and better adhesion. Cross-shaped inserts are laid between the tiles horizontally and vertically. After the glue dries, the resulting seams are rubbed down.
Useful tips for choosing tiles for a bath in the video below.
How to lay it down?
It is quite possible to lay tiles in a bathhouse with your own hands if you treat this process with due attention and carefully study all the nuances. The result and reward for the work done will be a high-quality and beautiful decoration of the room that will last for many years
Since the floor in the room is most susceptible to mechanical stress, the installation process must be approached with great precision. First of all, you should prepare the following tools and materials necessary for installation work:
- rubber mallet;
- spatula with teeth;
- calibration crosses;
- glass cutter or tile cutter;
- mixer and container for mixing the adhesive solution;
- building level;
- pencil, roller, scraper.
Preparing the base
Before facing work, underground preparation and waterproofing work are carried out. It is necessary to make a kind of cake from various layers, which will serve as protection from moisture and temperature changes, namely:
- the surface should be cleaned of debris and dust;
- wooden logs should be checked for strength, leaky areas should be replaced, after which the entire surface should be treated with an antiseptic solution;
- In order to protect the wood from moisture, waterproofing work should be carried out, for example, treated with latex impregnation. For greater waterproofing, you can lay roofing felt or roofing felt on top;
- after this they make a screed. It is made with a slope towards the drain hole;
- Once the floor is dry, it can be primed.
Preparing the tiles
If laying ceramic tiles on a cement mortar, it is recommended to soak the products in water before starting work. After soaking, the tiles do not absorb moisture from the mortar as intensively, which promotes longer mobility and better adhesion to the surface. In cases where a modern adhesive mixture is used for installation, soaking is not necessary, since high-quality glue from leading manufacturers of building materials has high adhesion properties.
Laying
The choice of glue should be taken seriously, taking into account the characteristics of the room. To lay tiles in a bathhouse or sauna, you should choose a moisture-resistant adhesive mixture with good adhesion. There are three options for laying tiles:
- seam to seam;
- diagonally;
- at a run.
You should start laying tiles from the far corner. If you are laying from the center of the wall, then you first need to mark the middle and start laying tiles on both sides of the marked line. If the drain hole is in the center, then it is better to start laying tiles from this place. The adhesive solution should be applied to the underside of the tile and directly to the floor. The tile is lightly pressed and tapped with a rubber hammer to shrink it to the desired level.
To ensure that the gaps between the tiles are equal, special calibration crosses are used, which are removed after the adhesive solution has dried. At the end, you need to cover the remaining areas with tiles, cut to the desired size. Excess fresh cement mortar can be easily wiped off the tiles with a damp cloth before it hardens.
Grouting joints
When the adhesive solution has completely dried, you can begin grouting the joints. In addition to its decorative function, grout also performs a number of protective functions: it prevents the formation of cracks and fungus, provides reliable waterproofing of seams, and protects against temperature changes and other mechanical influences.