Author: Yuriy Fedorovich Kolesnikov, thermal power engineer
Almost exclusively metal stoves are covered with brick. They are relatively inexpensive, compact, light in weight (for a stove), and heat up quickly. Metal furnaces of modern designs are very economical: their thermal efficiency reaches 85% or more. But at the same time, metal stoves quickly cool down, and when fired, they produce a powerful flow of thermal (infrared, IR) radiation, which can cause the fire of flammable objects nearby. The body of a metal stove (if it is not a stove in a steel case, see below) sometimes becomes red hot during combustion, and a burn from it can be very severe.
It may be necessary to line the stove with bricks in the following cases:
- To precisely coordinate the properties and qualities of the oven with the sanitary and hygienic requirements and conditions of a particular room. Its volume recommended in the furnace specifications is a very relative parameter;
- To reduce the fire hazard and injury hazard of the oven, if it cannot be installed exactly according to the requirements. rules;
- To increase the heat transfer time of the furnace after combustion;
- For decorative purposes, brick cladding serves as a kind of aesthetic bridge between the metal of the stove and, for example, wooden walls. Decorative cladding, as a rule, also carries out the functions according to paragraph 2.
Features of installing iron stoves
Installation in a steam iron stove is a common solution. Unlike other options, it has many advantages:
- simple and quick installation;
- the manufacturing technology of metal furnaces is carried out in a semi-automatic mode, with almost no human intervention required, this reduces the cost of finished products;
- the metal has good thermal conductivity, so energy is not wasted, but is spent exclusively on heating the furnace;
- compact dimensions are especially important for small steam rooms, when every meter is taken into account;
- products with an upper blower on one load of fuel can operate for up to 12 hours, which makes them quite economical.
In some cases, it makes sense to cover not only the stove with brick, but also one of the walls; this will favorably emphasize the interior of the steam room. Source strbani.ru
Despite the fact that today iron stoves have a representative and attractive appearance, they look great in the interior of the room against the background of laminated veneer lumber or a log house not entirely organic. And this is not the main reason to line the stove with bricks; there are other reasons:
- if you overdo it with fuel, the heat from the stove will become so intense that it will first begin to smolder, and then the finishing of the steam room may catch fire;
- the surface of the iron becomes so hot that you can get burned on it, plus this contributes to overheating of the steam room;
- the metal warms up quickly, but also cools quickly, so it is difficult to control the temperature;
- you can get burned when touching metal, and in the case of masonry this possibility is eliminated, since it absorbs heat and distributes it over the entire surface;
- brick against a wood background looks much better than iron, which gives an organic feel to the interior;
In some cases, the stove is not completely covered with brick, it depends on the preferences of its owner Source termopaneli59.ru
- iron stoves have few modifications, almost all models of these bathhouse elements are similar to each other, so lining with brick in this case allows you to create any shape;
- Over time, the metal loses its protective coating, and the stove becomes covered with rust, this spoils its appearance and also leads to thinning of the walls.
The disadvantages of iron products are not critical, but they do not allow you to relax comfortably in the steam room with health benefits. This situation can be corrected by laying bricks around the sauna stove.
Fire safety requirements
When installing any sauna stove, it is necessary to strictly comply with fire safety requirements, since the walls of the device heat up to fairly high temperatures during its operation. In order to ensure maximum safety and not have problems with regulatory organizations, it is recommended to install the stove in accordance with the provisions prescribed in SNiP 41-01-2003 (Chapter 6.6).
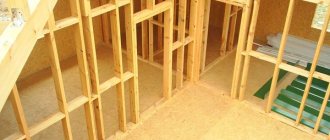
- The first thing that needs to be done is to equip a reliable foundation for the main structure of the stove, which will be adjacent to the wall dividing the room. The foundation should be covered with heat-resistant material and then with metal sheet. Asbestos sheets were previously used as heat-resistant insulation. Today on sale you can find panels of pressed mineral wool, which is less dangerous from an environmental point of view, sheets of foam glass or EZHKAKH (heat-resistant structural mica plastic).
- It is also necessary to provide a metal flooring in front of the combustion door, which will prevent the wooden floor from catching fire and simplify debris removal. The size of the pre-furnace sheet must be at least 400×800 mm.
- If the partition between the steam room and the dressing room is wooden, then the opening through which the fuel channel will pass must be separated from the wood by brick or stone masonry. The distance between the stove and wooden walls should be 400÷450 mm.
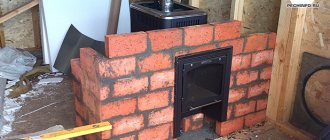
In the version shown, the owner chose to fill the opening with bricks
- Provided that an opening is installed along the end part of the wall through which the combustion channel will pass, a gasket made of heat-insulating material (mineral basalt wool or cement-fiber sheet) with a thickness of 40÷50 mm, the distance between the part of the wall built from combustible material and the outer wall oven can be reduced to 250 mm. If thicker thermal insulation material is installed, the safe distance can be 125 mm.
- The distance between the ceiling of the bathhouse and the surface of the stove should not be less than 1200 mm.
- The distance from the edge of the combustion door to the nearest door must be at least 1250 mm.
- If you purchased a non-factory-made stove, or the device is independently made from sheet metal, then it is best to cover it with brick. Thus, it is possible to protect the structure of the bathhouse from fire, and people taking water procedures from burns. Factory products, as a rule, are made with double walls, between which thermal insulation material is laid or convection channels pass through.
Types of bricks
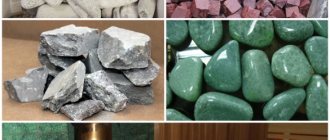
To choose the right material, you need to take into account certain nuances. An iron stove heats up significantly during operation, so it is recommended to choose one of the following types of bricks:
- Refractory. This material is the most optimal in terms of operation, however, it is also the most expensive. This is the most preferred type of brick.
Refractory brick is best suited for cladding, but it is expensive Source selmo.com.ua
- Silicate. It is not recommended to use an iron stove for cladding, since the components included in the composition react poorly to elevated temperatures. Therefore, already laid brick needs additional finishing.
Sand-lime brick is not often used for finishing, but it is the most budget option Source ytimg.com
- Red . Due to its high heat resistance and excellent thermal performance, this brick is often chosen for organizing a screen. Solid products are considered the best option, while hollow bricks are not recommended because they both heat up quickly and cool down quickly. This material has an attractive appearance and, when installed correctly, can decorate the interior of a bath room.
Attention! If wooden elements are located near the brickwork, they must be treated with protective compounds to prevent the surfaces from spontaneous combustion.
Red brick will be an ideal solution for finishing a stove Source t-spectr.ru
See also: Catalog of companies that specialize in the design and installation of fireplaces and stoves
Tip 4: final cleaning of brickwork
After completing the laying of brick rows around the metal stove, you need to wait for the time during which the mortar will set and completely dry. Usually 1-3 days are enough for this.
Then it will be possible to clean the lining from dirty traces of the solution. It will take literally half an hour to use a drill with a brush attachment to get rid of its excess, and to wash the stains left by the brush using a brush with stiff bristles and laundry soap foamed in water.
After this treatment, the stove will acquire an even color, a fresh, attractive appearance and will be ready for lighting.
The first fire should be carried out with great care and precision. Care must be taken to ensure that the metal casing does not overheat.
With uniform progressive heating, the cladding will finally even out its color, and from then on the room will be heated evenly and softly, and the air temperature will remain stable for a long time.
Sheathing options
The brick lining of the furnace is used to organize a heat shield. This means that it bears the main thermal loads. The following cladding options are available:
- a convector with vents is ideal for a steam room, since, regardless of the area of the room, it improves the performance of any iron stove;
- the heat screen is a stone fence that allows you to provide comfort to people near the stove;
- a continuous lining creates rapid heat transfer, this reduces the efficiency of the furnace, so this option is rarely used, it plays more of a decorative role, but does not greatly affect the performance.
Attention! The design of its lining will significantly depend on the main purpose of the stove. If facing the stove in a bathhouse with brick plays a decorative role, then you can lay the screen in a whole brick. If you need to organize a water heater, lay it in half a brick.
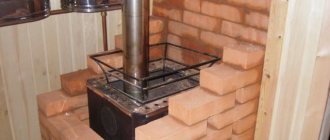
When lining a stove with brick, be sure to leave holes at the bottom and top of the masonry, this will allow air to circulate normally Source pechnoy.guru
Ventilation windows for convection of air leaving and entering the oven
This is an important option that allows you to stabilize the air flows “washing” the furnace and improve the uniformity of heat transfer. If it is round (stove), then the ideology of ventilation ducts is preserved. Try to arrange them symmetrically, on three sides (conditionally), with two windows at the top and bottom, as it would be approximately in a rectangular masonry.
Classic option: two windows in the second row from the top and the second row from the bottom. So, on each side. The lower openings will provide suction of cold air, and the upper ones will provide the release of heated air. In addition, circulation will have a beneficial effect on the metal of the furnace.
Sheathing stages
Before you line an iron stove with bricks in a bathhouse, you need to prepare. To carry out the work, the master will need M150 solid brick, clay, sand, concrete, crushed stone. To create the formwork you will need boards, waterproofing and rods for reinforcement. The tools you need to prepare are a level, a shovel, a tape measure, a pencil, a trowel, and a plumb line.
Attention! If the stove came complete with a convection casing, it must be removed, since its role is now played by the lining.
Today there are many types of iron stoves, the lining of each of them has certain nuances Source wp.com
Foundation construction
The strength of the stove structure and how long it will last will depend on the foundation, therefore, it is better to choose which stove in the bathhouse at the design stage. If the total weight of the stove with laid masonry is no more than 750 kg, a separate foundation will not be required for it. Otherwise, you will need to carry out a number of works to arrange a reliable foundation. In general, they do not differ from the work on arranging any other foundation:
- If the foundation is strip, then a pit is dug for it, in which the formwork is installed and waterproofed.
Heavy metal stoves will require a reinforced foundation Source banya-expert.com
- When the formwork is ready, a 20 cm layer of crushed stone and sand is poured over it, then it is watered and compacted.
- Reinforcement is laid and a mixture of concrete, sand and crushed stone is poured (in a ratio of 1: 4: 3). Everything is leveled up; if necessary, flaws are corrected.
- After the poured foundation is left to harden for approximately 14-20 days.
When the concrete has completely dried, the base is laid: waterproofing is made from roofing felt, and metal sheets 1-2 mm thick are laid on top of it, on which there will be an iron stove.
Covering materials
Solid kiln bricks or refractory bricks are used. The second option is most relevant for burning coal. The brick must be uniformly colored and fired, and have no cracks or chips on the surface.
For the body of the fireplace, a clay-sand mortar is used, mixed in the following proportions:
- 1/1 - for normal clay;
- 1/2 - for oily clay.
Water 1/4, consistency of thick sour cream
For the foundation and in the case of lining the chimney from the roof to the cap - cement-sand, mixed in a ratio of 1/3.
Additional elements - metal corners, arched profile, anchors, and so on. As the design scheme is selected, the issue of choice of materials is decided.
Video description
How to properly make clay mortar for laying bricks for lining a sauna stove, watch the video:
Brick preparation
First, the brick for lining the stove in the bathhouse must be prepared. To do this, it needs to be soaked in water for 10 hours before installation.
Before starting work, you need to do the following with bricks:
- determine compliance with the overall dimensions, the surface must be free of cracks and other mechanical deformations, the rejected material will be used in the future to fill voids at the end of the rows;
- the brick is taken out of the water 30 minutes before laying, so the surface has time to dry, and while laying the rows it will not absorb water from the mixed mortar, without thereby reducing its viscosity.
Correctly selected and prepared brick will greatly facilitate the work of lining the furnace Source ytimg.com
Bricklaying
You can cover the stove in a bathhouse with bricks in one of two ways - a solid well and a lattice one.
The latter method looks more beautiful because it involves the presence of a large number of holes. But it is precisely this specific design that reduces the effect of the heat shield.
Attention! If the stove is round in design, then the masonry is made taking into account its contour.
The brick should retreat approximately 50 mm from the stove body. No spacers need to be installed. Iron expands when heated, which will create pressure on the brick wall.
On an average stove you will need to lay approximately 12-16 rows. It is advisable to carry out the laying in stages. You can lay out 6-8 rows per day, leaving them overnight. In the morning they check how much the structure has sagged, then they begin laying the remaining rows.
How to do it?
If the stove itself is fenced off, then during the construction of the structure an opening is made for the firebox. To connect the main walls of the bathhouse with the partition, pieces of reinforcement are mounted at one end into the wall and at the other into the masonry joints. The diameter of the rod should be 6 mm. If a brick partition in a bathhouse is placed near the stove, then it would be correct to leave a window for the combustion channel. The progress of masonry work is carried out in the following order:
- The first thick layer of mortar is laid, leveled with a trowel, and creates the base of the wall. We need to give it time to catch on.
- Then another layer - thinner - under the first row of bricks. The mortar is applied to the ends of the outer bricks with a trowel, pressed tightly against the wall and excess mortar is removed. Using a stretched string, the evenness of the rows is controlled. And the level shows horizontal and vertical.
- The laying of the second and each even row begins with halves of material. This - dressing - is done to evenly distribute the load.
- Every 3-5 rows, pieces of reinforcement or steel wire are placed on the cement to provide strength.
- In a similar way, the entire wall is driven completely up to the ceiling. The remaining gap is filled with small pieces and fragments soaked in solution. Small cracks are sealed with tow.
- If the bulkhead is planned with a door, then the frame is set up in advance. It is attached to the brickwork using steel strips. The bricks are laid close to it. Do not forget to control the horizontalness and evenness of the masonry by moving the stretched string higher.
- After the solution has hardened, the seams are sanded.
Video description
Watch the video for the most common mistakes when lining a metal stove in a bathhouse:
Attention! Some craftsmen suggest covering the stove in the bathhouse with bricks up to the stove on which the coals are located. This is an interesting solution, it allows you to admire the hot stones. Others, on the contrary, completely cover the chimney with brick rows. Therefore, you need to choose masonry taking into account personal preferences.
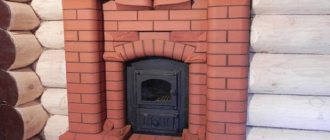
If the chimney has a presentable appearance, it does not need to be covered with bricks Source legkovmeste.ru
How to cover a fireplace
Choosing your own individual interior for a heating stove in a room and deciding what to cover the outside of the fireplace so that it pleases the eye is a very responsible matter. When designing fireplaces, they can be covered with a wide variety of materials. Depending on the material of the fireplace itself, it can be faced with either brick or tile. In addition, today a fireplace designed in a high-tech style using chrome-plated metal elements, silver-plated or even gold-plated, looks very elegant in the house.
Briefly about the commander in chief
Experienced craftsmen say that the lining of the stove in the bath should be half a brick. This is the most suitable option. You can install a damper in a whole brick, but this structure will take much longer to warm up, and the foundation for this wall will require a more massive one.
The entire technological process consists of the following stages:
- preparation of materials;
- choice of location;
- foundation organization;
- laying the base;
- choice of brick and laying method;
- preparing bricks for cladding;
- furnace lining;
- first firebox;
- decorative finishing (if required).
Brick cladding of a sauna stove is needed not only for beauty. This event can significantly improve the atmosphere in the steam room. Moreover, the work is carried out with low material costs and with high quality, if you correctly follow the masonry technology and entrust it to specialists.
Ratings 0
Cast iron for a bath: we understand the advantages, dispel myths, learn to use
Bath traditions have a long history, and cast iron has also been used in stoves for a long time. Its thermal conductivity is 30 times higher than that of stone, and its heat capacity is 20% greater. Because of this, a cast iron foundation warms up a steam room faster than a stone one. But not everyone recommends filling the entire capacity of the heater with it. Why is mixed bookmarking preferable? How to lay cast iron, and what shape? Are there any disadvantages to using it? We will answer these and other questions in this article.
Photo 1. Cast iron is used in heaters of different stoves Photo 1. Cast iron is used in heaters of different stoves
Advantages of using cast iron
Ideal bath stones should intensively accumulate and release heat for a long time, not emit harmful substances when heated, and not crack or crumble under the influence of high temperatures. To find such a stone deposit, you need to try. But cast iron not only meets these requirements, but also surpasses any natural wood in all technical characteristics.
- It is surprisingly resistant to constantly recurring temperature changes, so it is durable and does not require frequent replacement.
- Intensively gaining heat, it warms up a steam room twice as fast as a stone foundation.
- It heats extremely evenly, which makes it possible to achieve the desired air temperature in the steam room without “stress peaks” that negatively affect the human body.
- Having good heat transfer, it simplifies the regulation of humidity and temperature in the steam room, making bath procedures softer.
- Able to heat up to high temperatures, it produces useful fine steam.
- Environmentally, chemically and biologically safe.
- Presented with products of different shapes and sizes, with and without decorative patterns.
Statements from skeptics and responses to them
No one can disagree with the fact that by using cast iron for a bath, steamers can more easily cope with the task of accumulating heat and producing steam for a long time. But some skeptical people do not want to use a cast iron mortgage, because... he supposedly:
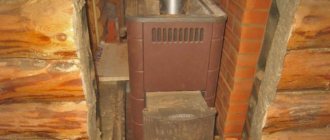
We buy a firebox
A budget version of the firebox was chosen. Subsequent operation showed that secondary afterburning works perfectly, the lower damper and gate actually regulate combustion within the required limits. The “clean glass” system helps to leave glass behind during intense burning of dry hardwood firewood. When burning damp, resinous wood, as well as when laying a whole log and switching to a long burning mode, the glass smokes, but not much. In the morning, the cooled glass is simply wiped with a damp cloth. Operating practice shows that it is impossible to lift the glass to observe an open flame. Regular dry firewood is used for kindling.
Required Tools
To organize your work you need the simplest tools. If there is no electricity on the site, you can do without mixing with a drill and do everything by hand. To work you will need:
- Trowel for laying bricks and cleaning off excess mortar.
- Pickaxe for dividing bricks (if necessary).
- Plumb to maintain even vertical masonry.
- Water level for horizontal leveling.
- Container for solution.
- A shovel or drill with an attachment for mixing the solution.
- Joining, if desired, make neat seams.
- Sieve for sifting sand 1.5*1.5mm. Burlap is used for washing.
- An abrasive attachment for a drill for cleaning finished masonry from excess mortar.