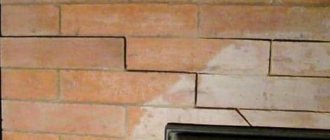
When the sauna is heated, the surface of the stove can heat up to 400 degrees Celsius. It begins to emit infrared radiation, which is why it itself becomes a source of heating. The heat is quickly distributed throughout the entire bathhouse, immediately hitting the walls located near the stove. If the wall surfaces are made of wood, then under the influence of high temperature they begin to char, which can even lead to their fire. To avoid ignition of the walls, it is necessary to create protective screens and cladding in the bathhouse from non-combustible materials.
Heat resistant cables
Choosing a non-flammable cable for steam rooms is a fairly responsible procedure that affects not only the operational reliability of the installed wiring, but also the safety of people in the bathhouse.
Since the temperature inside the steam room can reach plus 170 degrees (with a humidity level of up to 90 percent), the cable products installed in it must have the appropriate characteristics. For these purposes, it is recommended to select special samples of waterproof and heat-resistant cable products in a non-flammable sheath, the quality of which is confirmed by certificates.
Protective materials and devices
When choosing protective screens based on sheet blanks for a bath or sauna, the following range of special products offered on the domestic market is taken into account:
- non-combustible asbestos boards;
- steel sheets;
- calcium silicate and other special protective screens, panels, slabs.
According to the requirements of current standards, the need for such non-combustible materials arises only in cases where the distance from the stove to the walls of the bathhouse does not meet fire safety standards. For different types of ovens they vary from 32 cm to one meter.
https://youtube.com/watch?v=rQTXS0Od3A0
Sometimes stoves in modern baths are finished with non-flammable tiles made of ceramic or stone. As for wooden materials for decoration and accessories, they all have low thermal conductivity, therefore, although they are not non-flammable, they heat up weakly. For the construction of baths, wood with anti-perenum impregnation, brick, aerated concrete and other non-combustible material are used.
Asbestos sheet
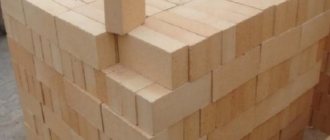
Asbestos belongs to the category of fire-resistant, non-combustible materials that can withstand prolonged heating without loss of strength up to temperatures of about 450-500 degrees. It can have a variety of designs, including sheet format (in the form of blanks of standardized size).
This material is in particular demand in places that are subject to reliable insulation from high-temperature influences (in rooms with thermal and heating stoves installed in them, in particular in baths).
In addition, special fire-resistant partitions for walls and ceilings in bathhouses, as well as insulation of pipelines and thermal connections, are made from asbestos sheets.
Sheet steel and protective screens
Sheet steel is often used as a protective coating for walls in steam rooms, the condition of which is subject to special requirements.
For these purposes, only high-quality metal that is not damaged by rust, purchased in the form of sheet blanks, should be used.
Often, steel sheets are used in bathhouses and to protect floor coverings directly adjacent to the stove, and are used as material for stands.
Protective non-combustible screens are structures that provide insulation from the side walls of the combustion unit in the bathhouse.
They are made of brick or metal sheets and mounted at a distance of no more than 5 centimeters from the surface of the stove walls. From a practical point of view, non-combustible screen structures made from steel blanks or fire-resistant glass are of greatest interest.
Fire-resistant slabs made on the basis of calcium silicate are considered more modern materials for finishing baths. They are used to insulate the walls of the stove in the bathhouse and exhaust ducts.
Internal impregnations
The main reason for using special impregnations in baths and saunas is increased levels of humidity and temperature, which can cause destruction of wooden ceilings, walls and shelves.
When choosing an impregnating material suitable for these purposes, the main attention is paid to the quality of the composition, after application of which the wood should not lose the ability to “breathe” freely.
You should also distinguish between the types of compounds used to protect shelves and benches from similar materials used when treating walls and ceilings in a bathhouse.
Impregnation for shelves
The protective agents used to treat shelves, based on their effect on the color of the wood, are divided into colorless and colored. The first includes impregnations of various compositions, bleaching mixtures, varnishes and waxes. Varnishes for the protective coating of shelves in saunas and baths must be subject to strict selection, during which special brands that release toxic substances when heated are eliminated.
Typically, for benches and shelves in a bathhouse, water-based compounds are used that penetrate well into the wood structure.
Colored coatings are used in cases where darkening of previously treated areas is observed. In this case, only the tarnished parts of the surfaces are subject to coating, but if desired, they can be completely treated.
As for specific samples of protective material, acrylic varnishes from these or “Belinka” are suitable for treating baths and saunas. All of them are made on a natural basis and have a large selection of color shades.
Protective coatings for walls and ceilings
Impregnations intended to protect walls and flows in the bathhouse must have an organic base and have water-repellent properties.
Modern processing agents have universal properties and are able to protect surfaces from moisture and thermal heating, as well as from the destructive effects of fungi and insects.
Depending on their base, all known types of protective impregnations are divided into water-based and oil-based preparations. Complex (combined) compositions, produced in the form of paints and varnishes, are also very popular, providing protection for the finishing materials of the bathhouse from moisture fumes and microorganisms.
Some of them have additional features such as fire resistance and the ability to repel dirt.
Metal pipe: step by step process
In bathhouses with an installed heater, it is better to use brick chimneys, since refractory brick retains heat for quite a long time.
Many people wonder how to decorate the walls in the bathhouse near the stove, because these places also need protection.
Typically, sheets of asbestos or galvanized steel are used where the chimney comes into contact with the roof and ceiling.
Galvanized steel sheets are also used to protect walls near the stove.
Information.
A metal pipe without a heat-insulating layer is the most fire-hazardous option for arranging a chimney. In this case, there should be a distance of 60 cm, no less, between it and the nearest combustible elements.
Important!
The most popular and simplest option for pipe insulation is the use of heat-resistant insulation for its winding. Basalt wool is most often used as such insulation, which is protected on top with plaster or a metal sheet.
Isolation occurs as follows:
- The first step is to stock up on mineral wool slabs, the thickness of which should be more than 5 mm. Next, the insulation material is used to completely wrap the pipe. The insulation is secured with steel wire, which also needs to be wrapped around the pipe;
- On top of a pipe equipped with a heat-insulating layer, it is necessary to construct a reinforced mesh. Next, a cement-limestone mortar is made, with which the mesh is plastered;
- Instead of plaster, you can use a metal sheet.
To do this, you need to roll it around a pipe with insulation and rivet the edges at the fastening point.
SNIP requirements
Protection of the walls of the bathhouse from the heat of the stove is carried out in accordance with the requirements of building codes. It is important for a home master to know the main ones.
SNiP III-G.11-62
“Heating stoves, smoke and ventilation ducts of residential and public buildings. Rules for production and acceptance of work.”
According to these standards, the gaps from the heater to the wall surfaces are:
- the thickness of the covered wall panels of the heater is 24 cm, with an applied layer of plaster from a lime solution, or with the addition of a layer of cement, the thickness of which is 25 mm, as well as when applying a layer of asbestos and clay solution, 4 cm thick - the distance must be at least 13 cm;
- the thickness of the wall of the heater is half a brick and applying a layer of lime plaster and adding asbestos, 25 mm thick or when protected with asbestos-vermuculite slabs 4 cm thick - a distance of 300 mm;
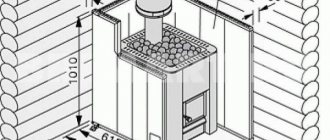
- when installing steel stoves, with the walls of the stove covered with refractory material, the minimum distance to plastered wooden walls is 700 mm, with a layer thickness of gypsum and lime mortar of 25 mm;
- When installing a steel stove in a bathhouse with unplastered walls, the distance to them should be at least 1000 mm.
The fire inspector checks and signs permits for the use of the bathhouse when conducting control measurements. Only after this procedure can you use the bathhouse.
SNiP 2.04.05-91
"Heating. Ventilation and air conditioning."
When purchasing an industrial model of a furnace, the installation requirements can be found in the instructions. Home craftsmen must know and fulfill several requirements:
- the ceiling in the bathhouse is protected by asbestos slabs, plaster and sheet metal, up to 1 cm thick; in this case, the brick-lined stove is made high so that the gap to the ceiling is at least 250 mm;
- when installing a steel stove with a protective heat-insulating layer, maintain a gap to the ceiling of at least 700-800 mm if the ceiling is plastered and protected with non-combustible materials;
- in all other cases, the distance to the ceiling should be 1200 mm.
But the DIYers are faced with the question of how to cover the wall near the stove in the bathhouse?
Sandwich pipe - a godsend for a bathhouse
Modern manufacturers offer to install a safe sandwich pipe in a bathhouse or sauna. By choosing a sandwich chimney you don’t have to worry about insulation. The chimney consists of several sections that are easily inserted into each other. It will be easy to assemble the structure with your own hands. A sandwich pipe is suitable for a bath or sauna with an iron stove.
The sandwich pipe immediately has built-in insulation and insulation.
The sandwich tube design resembles a multi-layer cake. The inside is a layer of stainless steel, then insulation (basalt or mineral wool) is laid, and the outside is galvanized steel. The design is a modern method of built-in ready-made chimney insulation. The design is designed to perform two functions at once: soot does not accumulate inside, and the outside does not overheat.
But the iron stove to which the sandwich pipe is intended is mainly used in the sauna. What to do if you have a traditional Russian bathhouse with a brick stove, how to insulate it? We'll talk about this below.
How to assemble a protective screen yourself
The essence of the assembled protective structure is its multi-layered nature. After everything is installed, you will get a kind of pie, if you count from the surface of the wall: a ventilation gap directly at the partition, non-flammable heat-insulating material, decorative cladding. It is this finishing of the walls in the bathhouse around the stove that allows you to maintain a uniform design style for the entire room and maximally protect the wooden partitions from fire.
The structure is easy to assemble. Pieces of fire-resistant material are mounted on the walls as the foundation of the entire structure. Next, a sheet of thermal insulation material, for example, a glass-magnesium sheet, is attached. After this, the outer surface of the sheet is decorated with decorative material - tiles, porcelain stoneware or soapstone.
The last option is the most beautiful and durable, but it costs more than the others.
If the wall of a sauna or bathhouse near the stove is decorated with a material such as ceramic tiles or porcelain stoneware, one of its properties must be taken into account: the material itself practically does not change its size when heated, but the solution in the seams between the tiles can expand significantly. Therefore, the seams should not be very thin - when expanding, the composition can cause the glued tiles to peel off from the base. In addition, you should use porcelain stoneware with caution - if it gets splashed with water during steaming, it can crack.
Insulation of steam room floors
Wooden floors do not require insulation. Even with a very strong desire, insulation will do much more harm than good. Ceramic tile floors should be insulated. How it's done?
Step 1: Prepare the base. The ground under the steam room needs to be leveled, and a sand cushion about ten centimeters thick should be poured on top.
sand cushion
Step 2. Compact the sand cushion, install plastic pipes to drain water, and lay a layer of waterproofing. For these purposes, you can use roofing felt or ordinary plastic film. Waterproofing will reduce the relative humidity of concrete, which increases its heat-saving properties.
Example of laying communications
Example of waterproofing flooring
Prices for waterproofing
waterproofing
Step 3: Prepare the concrete. We strongly recommend using foam concrete for the base or adding expanded clay or loose foam to the cement-sand mixture. To prepare the solution, add two parts sand and three parts expanded clay to one part cement.
Mixing concrete
Expanded clay concrete
Step 4. Install beacons. Water drainage can be done in the middle or in the corner of the steam room. We do not recommend the first option - it is quite difficult to perform a screed with a slope towards the center. It is enough to have a slope within 2÷3 mm per linear meter of the room. Make a bias towards the location of the shelf or doors. Make a specific decision taking into account the location of the bathhouse and the possibility of discharging water beyond its perimeter.
Floor screed with expanded clay
Step 5. If you have the desire and opportunity, you can concrete the wires for electric floor heating. If you don’t want to, wait a few days until the screed dries and start laying ceramic tiles.
Ceramic tiles in the bath
The cost of an insulated ceramic steam room floor is much higher than a wooden one. As for the comfort of taking water procedures, there is no significant difference. The only advantage is that the service life of floors under ceramic tiles is much longer than that of wood.
Tiled floors are much more durable than wood floors
Regulatory requirements for installation of thermal insulation
Before insulating a chimney pipe, you need to make sure that it is installed correctly.
- The combustion product exhaust pipe should be 5 m high. This figure ensures optimal draft in the heating system.
- A distance of at least 250 mm is required between the roof slab and the outer element of the boiler room.
- If the building is covered with flammable materials, in particular slate, roofing felt, ondulin, then the insulated smoke exhaust structure must be equipped with a spark arrester.
After making sure that the system is installed correctly, you can begin subsequent work on winding with thermal insulation.
Other methods of insulating walls from the furnace
Thermal insulation of a stove from a wooden wall can be carried out using modern materials, with which it is possible to apply a sufficient layer of thermal insulation not only to the walls, but also to apply it to the stove:
- Sheets of environmentally friendly basalt wool with an outer layer of foil. This material can withstand temperatures of at least 7000. This material can be used to insulate fireplaces and chimneys;
- Gypsum fiber sheets. They are produced by pressing natural gypsum material and cellulose. This material does not require additional surface treatment with a layer of waterproofing. Can be used for thermal insulation of the combustion chamber and the body of the potbelly stove from the outside;
- The use of calcium silicate allows you to reliably insulate the firebox and internal surfaces of fireplaces. But the material is expensive, so it is not in high demand.
Calcium silicate panels
Insulation methods
There are several techniques that allow you to reliably insulate wooden structures from the heat of the stove. Some of them involve a fairly large amount of work, while others are much simpler.
- Creating a protective box from brick or stone.
- Installation of a special industrially manufactured screen.
- Creating a protective structure with your own hands from non-combustible materials.
The construction of a box made of brick or stone will require the most time - it will be necessary to lay out several walls that will protect the wood from heat. In addition, this protection option requires a gap between the wood and the brickwork from 5 to 15 centimeters. There should be about 10 centimeters between the casing being built and the walls of the stove. All this eats up useful space and requires some mason skills to work on.
Factory screens are installed quite simply and are not that expensive. They could be an ideal solution if they did not require even larger technological gaps between different surfaces. Therefore, such finishing of the wall near the stove is possible only in a fairly spacious bathhouse. If you need to save space, it is better to look for another solution that allows you to reduce all the gaps from wooden partitions.
We invite you to familiarize yourself with: Finishing a brick bathhouse inside
The third option allows you to reduce the distance to 15 centimeters, which is already more acceptable. At the same time, this method allows you to create the most beautiful design, which is important. However, there will be a lot of work and the costs in this option may be much higher than in the previous ones. In addition, this insulation method requires a more detailed consideration due to the characteristics of the assembled structure.
Safety
When building a chimney in a bathhouse, you first need to think about safety issues. After all, if something is done incorrectly, wooden structures can catch fire very easily. The problem must be approached carefully, then the bathhouse will last a really long time, and there will be no risk to people’s lives.
All the necessary requirements that chimneys must meet are established by the relevant sanitary rules and regulations. They specify the distance that must be maintained between the pipe and flammable parts of the roof slabs. This value depends on the pipe parameters. If you are planning to make a chimney in a bathhouse, you should familiarize yourself with SNiP 41-01-2003, which approves the rules for the installation of ventilation, heating and air conditioning
In this case, pay special attention to paragraph 6.6.22, which contains all the necessary information
To ensure that the chimney is completely safe, you need to use appropriate materials for thermal insulation:
- mineral wool;
- basalt cardboard;
- mineralite
Non-flammable mineral wool with long service life
Fire-resistant plasterboard and glass-magnesium sheet are also suitable for this purpose.
Fire-resistant drywall can withstand exposure to direct fire for about an hour
Glass-magnesium (glass-magnesite) sheet (SML), moisture-resistant, fire-resistant, frost-resistant, environmentally friendly
You need to pay attention to some other points
So, it is important to choose the right materials from which the chimney itself will be made - they must be resistant to high temperatures. For example, if you decide to use a metal pipe to construct a chimney, it must be made of non-galvanized material
The fact is that when heated to high temperatures, zinc begins to evaporate, and its evaporation is extremely harmful to health.
For example, if you decide to use a metal pipe to construct a chimney, it must be made of non-galvanized material. The fact is that when heated to high temperatures, zinc begins to evaporate, and its evaporation is extremely harmful to health.
Protecting the walls of the bathhouse from the heat of the stove: rules for constructing protective screens and casings
During the heating of the bath, the surface of the stove heats up to 300-400°C.
At the same time, it begins to emit infrared rays and itself becomes a source of heating. The coming heat is distributed throughout the steam room, but first of all it hits the walls adjacent to the stove. If the walls are wooden, then under the influence of high temperatures their charring begins. When lighting a sauna stove, it heats up by 300-400 degrees Celsius. At the same time, it is a source of infrared rays, and itself becomes a strong heating element. All this leads to strong heating, and subsequently their charring, which inevitably leads to a fire. To avoid it, it is necessary to protect the walls of the bathhouse from heat, which is achieved by using various types of protective coverings and heat reflectors.
When planning the construction of a bathhouse, it is important to remember to create safety indoors. First of all, this concerns fire safety. By melting the bathhouse, the stove can be heated to 300-400°C, which significantly exceeds the combustion temperature of the wood from which the bathhouse is most often built.
Wooden baths require especially careful compliance with fire safety rules when arranging them. The source of the fire can be anything, an unextinguished cigarette, coals falling from the furnace of the firebox, an uncleaned chimney, but the main source of threat remains the stove itself.
The surface of the stove heats up to 300° - 400°, the heat falls on the wooden walls, which leads to their excessive heating and charring. It is extremely difficult to stop the process of ignition of wooden surfaces; the best way to avoid a fire is to prevent it. There are two truly effective ways to insulate the surface of wooden walls from the heat of sauna stoves - protective equipment in the form of a screen or the construction of special cladding from non-combustible materials.
To prevent the walls from overheating, you can use materials with increased thermal insulation properties and inertness to high temperatures. Two types of materials are used:
- reflective;
- fireproof with lining.
The first type includes materials for wall cladding, consisting of thermal insulation with fire-resistant properties and a metal covering in the form of a sheet.
A protective cake with reflective materials is done this way. First, the thermal insulation is attached using ceramic bushings directly to the wooden walls, then it is sewn up with a stainless steel sheet.
Advice! It is better not to use galvanized metal, since heating may release heavy metals harmful to the human body.
Stainless steel with a polished surface reflects the heat flow inside the steam room, reducing heat loss. In this case, reflected heat is more useful than direct heat. For thermal insulation use:
- basalt cardboard or cotton wool, the only material with increased hygroscopicity, non-flammable, environmentally friendly;
- asbestos cardboard, which reliably protects against flames and has a long service life;
- mineralite, an artificial material made specifically for these purposes.
Protective sheathing requires ventilation gaps of 2 cm from the wall to the insulation, 2 cm from the insulation to the steel sheet. If it is necessary to install the stove as close to the wall as possible, make a double skin of non-combustible insulation, use ceramic bushings to maintain gaps of 2-3 cm and sew them up with a steel sheet.
Measures to protect walls with cladding are necessary in order to preserve the interior decoration of the room. They are more expensive, but no one has canceled the aesthetic advantages of the bathhouse. The basis is tiling. which is laid on fire-resistant cladding made of gypsum plasterboard, non-deformable cardboard on a gypsum base with fiberglass, mineralite, non-flammable cement-fiber material, moisture-resistant and resistant to biochemical influences, SML, fiberglass material bound with magnesium additives, resistant to high temperatures and high humidity. Heat-resistant glue is used for installation.
Advice! Use heat-resistant reinforced Terracotta glue, made from fireclay dust bound with kaolin additives, intended for tiling stoves, fireplaces, and all heated surfaces.
The recommended facing materials are quite varied, the best of them are:
- terracotta tiles, they are made from specially fired clay, which gives increased heat resistance and durability;
- clinker, denser clay tiles with a surface of various colors, similar to facing bricks;
- tiles, also made from clay, having an original embossed surface;
- porcelain stoneware made from a mixture of clays, kaolins, quartz sand, feldspars by high-temperature firing under a pressure of 400-500 kg/cm², with imitation of stone, wood, durable artificial material;
- soap chloride, a rock mineral consisting of talc, magnesite and chlorite, an environmentally friendly natural material that does not absorb moisture at all, has an attractive appearance, does not crumble, and is not afraid of high temperatures.
Advice! Use soap chloride to finish the steam room, this mineral has a healing effect on the human body, regulates blood pressure, stimulates cerebral circulation, expels viruses and microbes due to the release of vitamin D when heated.
All of the listed tiles are an element of protection that forms a cake, the basis of which is a fire-resistant material. Just like a screen, sheet material is installed on ceramic bushings with a gap of 2-3 cm from the wall. The minimum distance to the heat source from the tile should be 20cm.
Protection with cladding decorates the room, creates a positive mood, and helps to increase the efficiency of procedures. And most importantly, properly installed insulation prevents wooden walls from overheating and catching fire. Have a nice steam!
According to fire safety rules, the arrangement around stoves, fireplaces and fuel boilers must be done using fire-resistant special materials, which can simultaneously protect a residential or ancillary building (bathhouse) from possible fire hitting the walls, and at the same time not cause harm to health.
To create a favorable home atmosphere, any stove or fireplace becomes very hot and generates intense heat, which in turn can be a source of ignition or fire. Therefore, it is important to carefully select the right materials when arranging a heat source in a house, bathhouse or basement, if we are talking about a fuel boiler.
Refractory materials can be roughly divided according to the method of heat transfer:
- Heat reflective – aimed at reflecting infrared radiation into the room;
- Preventing loss due to its physical and chemical properties.
But all of them can also differ in the type of raw materials from which they are produced:
- With organic components, for example, polystyrene foam materials, although their fire resistance is very low, they are best suited for walls near stoves with low heat;
- Inorganic is a broad class of non-combustible materials for insulating walls of a wide variety of fire resistance, including very flammable ones, such as wooden floors. These include stone and basalt wool, pressed into large slabs, fiberglass wool, lightweight cellular concrete slabs with fire retardant impregnations, honeycomb plastics, foamed perlite or vermiculite, and polypropylene. However, such a beautiful decorative thing as Leroy Merlin sheet plastic is definitely not suitable.
- Mixed type - these include asbestos-cement refractories, asbestos-lime or silica, foamed from a variety of inorganic substances.
We suggest you familiarize yourself with: Bathhouse on a slab foundation
Many country buildings are built from wood, be it a cylinder or frame house, without a stove or fireplace it is difficult to survive a frosty winter, so they approach their arrangement very carefully, and choose materials laid around the stoves so that they are :
- Effectively and reliably prevented any attempted fires;
- Environmentally friendly, so that when heated they do not release harmful substances into the home air.
But what are the dimensions of a standard oven brick can be seen here.
You may also be interested in learning about what kind of brick is used for laying stoves.
Fire-resistant plasterboards. can act as the basis for covering walls around hot stoves, and for decoration, porcelain tiles of the most unusual colors can be used.
The sheets have the following characteristics:
- Fire resistance – up to 30 minutes of fire resistance;
- Does not ignite for up to 1 hour even after a fire has formed;
- Slab parameters – 120 x 250 x 1.25;
- On the front and back sides there is cardboard treated with gypsum, inside there are fiberglass threads that will resist fire;
- The ends of the sheets are covered with cardboard material, and there is a joining chamfer along them;
- Fastening can be done either using adhesives or self-tapping screws.
Fireproof minirite slabs. The material has excellent heat-resistant properties and is produced exclusively from environmentally friendly substances, including:
- Compositions of white or gray cement make up up to 90% of the total material;
- Included are mineral fibrous materials;
- For strength and durability, fiber reinforcing boards are used.
Asbestos fiber is completely excluded from the composition, which improves the quality of the material for a home stove. It is easy to fix it to the wall with screws close to the wall itself; for reliability, you can mount 2 sheets of minirite. Note! When installing, it is necessary to leave a small distance, since the material may increase in size when heated. For other walls, you can choose a similar decorative brick finish.
Basic rules and regulations
Before insulating a pipe in a bathhouse from the ceiling, you should study the following SNiP requirements:
- To ensure optimal draft force, a chimney pipe with a height of at least 5 m should be erected;
- A minimum distance of 250 mm must be maintained between the chimney pipe and the nearest combustible elements;
- If materials with insufficient fire protection are used for roofing, a spark arrester must be installed;
- A certain distance must be maintained between the upper stove ceiling and the ceiling: for metal pipes - more than 1.5 m, for brick chimneys - 0.5 m.
Insulating a steam room from the inside step-by-step instructions
We discussed above what kind of insulation you can take and now it’s time for instructions:
— wall preparation;
— installation of sheathing;
— use of insulation;
- film.
to use thermal insulation for a bath after preparing the walls.
Materials used in arranging steam rooms
To ensure that the steam room is ready in a short period of time, the following tools are prepared:
- jigsaw;
- Bulgarian;
- hammer;
- chisel.
the wall cannot be processed; only a jigsaw will help. The bathhouse is well insulated, which means it is important to separate the material. Using a grinder, the insulation is cut into strips and then installed.
Insulation of steam room walls from the inside
In a steam room in a bathhouse for insulation from the inside, you should look at the instructions:
- insulation;
- lathing;
- insulation.
The paired material is laid as the first layer. If you use the right tool, you can prepare the sheathing. Next, all that remains is to insulate the wall. As mentioned earlier, it is allowed to use cotton wool or polystyrene foam. The bathhouse is also insulated with polystyrene foam, the main thing is to look at all the advantages and disadvantages.
Thermal protection of the floor and ceiling from the inside
Floors are prepared in a special way.
Options:
- polyethylene;
- polyurethane.
Polyethylene can be used if the floor is wooden. used into small parts for ease of installation. To install the insulating pie, sheathing is required. Lay two layers of cement screed on top.
Variety of insulating materials for baths
The favorite material for bathhouses in Russia is wood. However, it tends to be very flammable. To avoid this, people have long learned to insulate the chimney in the bathhouse, as well as the stove and all surfaces - walls, ceilings. For these purposes, any available means were used - clay, asbestos or any other non-flammable materials with a low degree of thermal conductivity.
Another argument in favor of thermal insulation of the chimney is that in this case the pipe will cool much more slowly and condensation will not accumulate in it.
It is a mistake to think that a good solution regarding how to insulate a pipe in a bathhouse would be to mount sheet iron on the ceiling. The metal can heat up very quickly, which in no way prevents fire, so it is not suitable for thermal insulation.
Among the modern materials that solve the question of how to wrap a metal chimney pipe in a bathhouse, the following are offered on the market:
- folgoizol;
- thermal insulation
Let's look at each of them in more detail.
How to insulate a wooden wall from a steel stove?
Table of contents
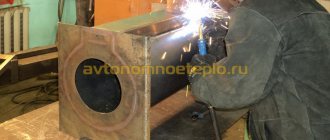
Installing a stove is a complex process and requires a lot of attention to each stage, from preparing the installation site to the nuances of removing the chimney pipe from the roof. In this article we will talk about how to properly insulate a wooden wall from a steel or cast iron stove. Any wood has a predisposition to ignition, so a constantly hot stove design can easily cause a fire. Any builder understands that insulating the wooden wall behind the stove is a mandatory process. Let's look at an example of installing a Bavaria stove-fireplace on a wooden floor next to a wooden wall. The furnace does not have a separate foundation, so a light base for a metal structure is required. The base for the stove will be laid out with bricks in one layer. In this case, wall insulation can be done in two versions: asbestos cement sheets or flame sheets (non-hot composition). There are several opinions about asbestos - sometimes they say that they emit toxic fumes. But flamm has its drawbacks: they have standard sheet sizes of 600x1200 mm, which can be inconvenient when working, and also in terms of price they do not beat asbestos cement at all.
Metal structure
The most favorite material for building a bathhouse for many years has been wood. In addition to all its unique positive properties, wood also has increased flammability, which is why the bathhouse needs fire insulation.
In order to avoid fires, to insulate the pipes in the bathhouse with your own hands, as well as to insulate the walls and ceiling, we used a lot of different materials: asbestos, clay, various insulating boards. The most important thing in insulation is low thermal conductivity.
Information. In addition to fire safety, the thermal insulation of the pipe ensures that it cools more slowly, which avoids the accumulation of condensate and rapid destruction of the structure.
What to wrap: thermal insulation
Teploizol is a relatively new type of insulating material. It consists of foamed polyethylene with a foil surface on both sides.
Teploizol has excellent resistance to elevated temperatures, which is why it is so often used for insulating pipes in bathhouses. The thickness of this material varies from two to ten millimeters. The maximum temperature it can withstand directly depends on the thickness of the insulation layer:
- The material with a thickness of two to five millimeters can withstand from -30 to +100 degrees;
- From five to ten millimeters – from -60 to +150 degrees.
Before wrapping a pipe in a bathhouse with thermal insulation, you need to stock up on metallized tape or wire, since you will need these materials during the insulation process, which is completely simple and does not require outside help.
What to wrap in the attic: foil insulation
Folgoizol is also perfect for thermal insulation of a chimney, due to its resistance to temperature changes. It consists of a double layer of foil and insulation.
For the production of foil-isol, fairly dense food foil is used, due to which it is distinguished by its harmlessness.
Folgoizol is able to withstand temperatures from -60 to +200 degrees, which is why it is used not only for insulating pipes, but also for insulating walls and ceilings. Folgoizol is an excellent heat, hydro and vapor barrier material at a relatively low price.
Attention! Foil is an excellent reflector, thanks to which it retains up to 90% of the heat in the bath.
Which method is better to choose?
The finishing of the wall from the stove for different types and sizes of baths is used in different shapes and materials. The main thing is to ensure the fire safety of your steam room and protect the walls from deformation at high heating temperatures.
Otherwise, everything depends on the capabilities and desires of the steam room owners. You can use heat-resistant tiles or expensive tiles, or you can simply cover the walls and ceiling with mineral wool and a layer of metal foil. By leveling the walls with sheets of plasterboard with surfaces not exposed to open fire, you can paint the steam room with heat-resistant paint using Minerita.
If the bathhouse is large, you may not need to perform this work if the conditions of SNIP and fire safety are met. By making the concrete base larger in size than the stove and maintaining a gap of 1 m to the walls, you can safely use the heater and enjoy the steam. In any case, it is important to take care of safety and then your bathhouse will serve you for a long time.
Maintenance and cleaning
Over time, the walls of any type of chimney become covered with a coating of soot, which reduces the size of the passage, which leads to a decrease in draft in the stove. There is another danger - when heated, soot can ignite, leading to a fire. Therefore, the pipe must be cleaned regularly.
There are several ways to clean a sauna chimney:
- mechanical cleaning. It is performed using a special rod, preferably a collapsible one with brushes. This is a rather labor-intensive, and most importantly, dirty method. Therefore, before starting work, it is necessary to empty the bathhouse of things, and cover the surface of the walls, ceiling and floor with sheets of plastic film;
- using chemicals. A special product called “Chimney Sweeper log” is placed in the stove, which creates good draft and intense heat during combustion. The soot will burn off and come out through the chimney as ash. This method is mainly used for preventive purposes to increase the time interval between mechanical cleanings.
Insulation of the stove in the bathhouse
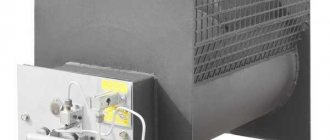
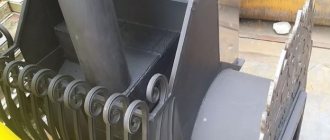
Currently, bathhouses often use simple metal stoves, which are lined with sheet metal on the sides and back, and installed directly on the foundation. To ensure that heat is retained in the bathhouse for a long time and to make it presentable, the stove can be lined with red refractory bricks.
Currently, asbestos sheets are no longer used for stove insulation, since it releases toxic substances when heated.
When installing the stove on a wooden floor, you should first lay felt in two layers, and then lay the brick in three rows. Sheet metal is mounted on the walls and floor around the stove in pieces 50-70 cm high.
We hope that this article was able to answer the most frequently asked questions among novice builders. Let us remind you that high-quality thermal insulation of the chimney, stove, as well as all surfaces of the bathhouse will not only keep you warm longer, but also protect yourself and your loved ones.
Cladding with cladding
This option is practically no different from the previous one, however, if you don’t know how to decorate the wall behind the stove in the steam room in such a way as to preserve the beauty of the room while creating safe conditions, then this option is undoubtedly for you. Protect the walls using heat-resistant decorative materials laid on thermal insulation.
The finishing around the stove in the bathhouse can be done with the following materials:
- Clinker tiles are made from baked clay. It is characterized by high strength, heat resistance and durability. One of the advantages of this option is also the rich color palette, which includes not only black and white tones, but also blue or green colors;
- Terracotta tiles are also made from clay, but they are inferior to the previous option in terms of density and the number of possible colors;
- Soapstone is a good cladding option for a bathhouse, made from rocks of green and grayish shades. Has good heat resistance and strength;
- Tiles are ordinary ceramic tiles, characterized by good heat resistance and a pattern on their surface;
- Porcelain tiles are heat-resistant tiles that imitate natural stone or wood.
The tile will not dissipate heat, protecting the walls from fire, so it cannot be mounted directly on the wall. We recommend using the following design:
- Wall;
- Clearance for ventilation;
- Fireproof material;
- Tiles (the distance from the tile to the stove must be at least 15 cm).
Such a “pie” will create reliable protection for walls from heat, preserving the beauty of the room.
One of the following options can be used as a fireproof material:
- Fireproof drywall - made from the same materials as regular drywall, but using fiberglass;
- Minerite slabs for baths are absolutely not exposed to moisture and heat.
- Glass-magnesium sheet - plates made of fiberglass and magnesium binder. Excellent resistance to heat, moisture and noise.
This option will perfectly protect your bathhouse from the possibility of fire, and will also insulate the room, preserving its aesthetic component.
Insulation of a brick bath: inside or outside?
In the event that you have to choose between which side it would be better to sheathe the bathhouse with insulation, it is worth looking at what will happen in both cases.
It is clear that when sheathing the outside, the entire brick of the building ends up inside a warm “fur coat,” which means that it will have to be warmed again, because in a room that is heated only from time to time, the temperature of the walls drops even with insulation. And again, the lion's share of the heat will go to waste, as if you had not insulated your bathhouse at all.
If you carry out insulation from the inside (including with your own hands), then all the heat will go to heating the air in the room, which, in fact, is what we need.
BUT! If it is possible to sheathe the bathhouse on both sides, then there are no obstacles to this, but this will be a matter of the owner’s taste, because good installation of internal insulation can single-handedly solve all problems.
Now that we understand the mechanism of how insulation works and have decided on the choice of side, it’s worth talking about how brick differs from other materials.
When is this required?
There are times when there is no need to protect walls. If the stove is located at a safe distance from the wall from a fire safety point of view, the installation of protective screens and other measures can be neglected. The distance from the walls that is required to reduce the heat from the source varies:
- A stove laid in a quarter of a brick should be located no closer than 35-40 cm from the wall;
- A metal stove without lining should be placed a meter away and no closer;
- A metal one with a lined furnace can be installed 70-75cm from the wall.
However, not every steam room has the opportunity to fulfill these requirements, due to the small area. The layout of steam rooms with an area of 6-8 m² can hardly accommodate the necessary set of items for the steaming procedure. Therefore, the need to insulate walls with special sheathing is relevant.
Tags: bathhouse, heat, protection, stove, wall
« Previous entry
Choice of insulation
The choice of insulation to insulate a chimney must be approached carefully and seriously. You shouldn’t buy the cheapest one, because it should have good thermal insulation properties, be easy to use, not require additional reinforcement of the load-bearing structures of the roof and ceilings, be non-toxic and non-flammable.
Stone or basalt wool is an excellent thermal insulation made from basalt stones.
This insulation can withstand prolonged exposure to fairly high temperatures and does not burn, even when in contact with an open fire. When heated, it does not emit any toxic or unpleasant odors. Such insulation can be safely called an environmentally friendly material.
Glass wool is a type of mineral wool insulation made from waste from the glass industry. There are a large number of voids between its fibers, so it retains heat well.
Glass wool does not burn and does not absorb moisture, is not susceptible to rotting and rodents. It is not expensive and easy to use. Most often produced in slabs and rolls.
Teploizol or folgoizol are multifunctional types of insulation made of polyethylene foam and covered with a sheet of aluminum foil. It is produced in rolls and has a thickness from 2 to 10 mm. They can perfectly insulate the chimney of a bathhouse, since these insulation materials can withstand heating up to 150C°-170C°.
Protective non-combustible wall coverings
Walls adjacent to the hot furnace walls are susceptible to spontaneous combustion. To prevent their overheating, special casings consisting of heat-insulating and non-combustible materials are used.
Sheathing consisting of a combination of non-combustible insulation and metal sheets is effective. In this case, thermal insulation is attached to the wooden surface, which is covered with a stainless steel sheet on top. Some use galvanizing for these purposes, but, according to some data, when heated, it can release harmful substances. It’s better not to risk it and buy a stainless steel sheet.
We suggest you read: How to make a chimney in a bathhouse through the ceiling with your own hands
For greater efficiency, the metal sheet of the screen must be well polished. The mirror surface helps to reflect heat rays from the wooden surface and, accordingly, prevents its heating. In addition, a stainless steel sheet, directing IR rays back into the steam room, transforms hard radiation into softer radiation, better perceived by humans.
The following can be fixed under stainless steel as thermal insulation:
- Basalt wool - it has high thermal insulation properties and is absolutely safe when used in a bathhouse. It has increased hygroscopicity and does not burn.
- Basalt cardboard is thin sheets of basalt fiber. Used as a fireproof, sound and heat insulating material.
- Asbestos cardboard is a sheet fire-resistant heat insulator. It has high strength and durability, protects flammable surfaces from ignition.
- Minerite is a non-flammable sheet (plate) specially manufactured for shielding stoves, fireplaces, and easily flammable surfaces in baths and saunas.
A popular example of cladding using a metal sheet is this “pie”: wall – ventilation gap (2-3 cm) – insulation (1-2 cm) – stainless steel sheet. The distance from the wooden wall to the stove is at least 38 cm (SNiP 41-01-2003).
Ceramic bushings are used to attach the sheathing to the wall. They do not heat up and allow the formation of ventilation gaps between the thermal insulation and the wall.
If the distance between the wooden wall and the stove is minimal, then the cladding is made of two layers of fire-resistant insulation, for example, mineralite. In this case, the sheets are fixed through ceramic bushings, maintaining a gap of 2-3 cm. The top sheet is covered with stainless steel.
Of course, protective cladding with stainless steel perfectly protects wooden walls from heat and fire. But it can spoil the impression of the most expensive finish. Therefore, if the steam room is designed in a decorative style, the fire-resistant lining is masked with heat-resistant tiles. The tiles are laid on heat-resistant adhesive, for example, produced by Terracotta.
The best materials for cladding walls near the stove:
- Terracotta tiles are made from baked clay. It is characterized by strength, heat resistance, durability. Terracotta tiles can be matte or glazed (majolica), and the color varies from pastel yellow to brick red.
- Clinker tiles are also made of clay and look similar to facing bricks. Unlike terracotta, clinker tiles are denser. The color range covers almost all colors, ranging from white to black, including green and blue tones, unusual for clay.
- Tiles are a type of ceramic tile. It usually has embossing on the front surface in the form of a design or ornament.
- Porcelain tiles are heat-resistant, durable tiles. Depending on the method of processing the front surface, tiles can imitate natural stone, brick, or wood. The color range includes all natural shades, from white to black.
- Soapstone is a rock of grayish or greenish color. It is fireproof, waterproof and durable.
Attaching fire-resistant tiles directly to walls will not have any thermal insulation effect. The wall will still heat up, which can lead to spontaneous combustion. Therefore, tiles are used only as an element of a protective “pie” of the following design: wall – ventilation gap (2-3 cm) – fire-resistant sheet material – tiles. It is recommended to maintain a minimum distance of 15-20 cm from the tiles to the walls of the oven.
Any material from this list can be used as a fire-resistant element in the cladding:
- Fire-resistant drywall (GKLO) is drywall supplemented with fiberglass fibers. Resists thermal effects without structural deformation.
- Minerite is a cement-fiber board, absolutely non-flammable. Minerite slabs are moisture resistant, do not rot, and do not decompose.
- Glass-magnesium sheet (FMS) is a material in the form of plates made on the basis of magnesium binder and fiberglass. It has heat and sound insulating properties and is not destroyed by water and temperature changes.
The protective cladding, which must comply with the ventilation gap, has a very low heat absorption coefficient, so the wall underneath it practically does not heat up. In addition, the use of cladding allows you to disguise the protective “pie” and maintain the finishing of the steam room in the same style.
The second option for protecting walls from fire is special sheathing, which is made from non-combustible materials. The working element of this protection, which reflects IR rays that are dangerous for flammable surfaces, is a reflective material, for example, stainless steel.
How to install a sandwich chimney
Insulated chimneys (sandwich)
Scheme for installing a sandwich chimney
New designs look great, are quickly installed, and have a long service life. All performance characteristics are at the highest level. The only drawback is that the price of these structures is at the same high level.
Manufacturers complete their products with a full set of additional elements: elbows, tees, clamps, plugs, ceiling-passage units, heads, protective screens. The specific choice of additional materials should be made taking into account the design features of the chimney.
How to make the right chimney
Correct joining of sandwich pipes
One of the advantages of a sandwich chimney is the presence of a layer of insulation that protects the outer pipe from overheating. In addition, this layer allows the inner tube to heat up quickly, which minimizes the amount of condensation, which prevents soot from sticking to its walls.
Sandwich chimney installation algorithm
Step, No. Illustration Description Step 1
Insulated hole for chimney passage
Using a plumb line, mark where the pipe exits through the ceiling and roof, and make holes. Do not forget to leave a distance between the sandwich pipe and the wooden ceiling structures of approximately ten centimeters around the perimeter of the hole. For thermal insulation, use mineral wool or glass wool, carefully cover the entry point of the pipe into the ceiling. Do not be afraid that the mineral wool will become damp; the high temperature of the pipe will quickly dry it out. Step 2
Unloading unit in the attic
Take all dimensions and determine the installation location of the unloading unit. It is made in the attic of the bathhouse; it takes on the load of the pipe coming out from the ceiling. In addition, the unloading unit does not allow lateral vibrations to occur. If you have a large distance between the attic floor and the roof, then you need to install an unloading unit; if the distance does not exceed 1.5 meters, then no additional stops are needed. The unloading unit consists of metal corners and installation elements
Metal corners are fixed to the legs of the rafter system; make the fastening as reliable as possible. Step 3
Starting chimney pipe
Install a starter sandwich on the outlet pipe of the stove; it should fit tightly into the pipe; select the dimensions at the time of purchase or change the diameter of the smoke outlet pipe from the stove. Step 4
Clamp for sandwich pipes
Pipe fastening
Please note: the inner pipe must fit into the outlet of the oven, and not cover it. All individual pipe sections are inserted into one another; transitions and bends must be additionally secured with clamp clamps. Step 5
Cutting the bath ceiling
Preparation and installation of ceiling penetrations
Where the pipe passes through the ceiling, a ceiling groove should be installed to close the outlet hole in the ceiling and provide stability to the structure
A pipe with a slightly larger diameter (pass-through) than the diameter of the outer pipe of the sandwich is welded to the ceiling groove, due to this the abutment area is increased and deformation is eliminated during the occurrence of strong lateral loads. The passage allows the sandwich chimney to move up/down and prevents lateral vibrations. In order to minimize heat loss through leaks, it is recommended to use mineral wool. Place it under the ceiling groove and tighten it tightly to the ceiling with screws or nails. Step 6
Chimney passage through the roof
Diagram of the chimney pipe outlet through the roof of the bathhouse
Make holes in the sheathing and roofing. Next, proceed to sealing the chimney outlet, use a roof penetration for this. All joints must be coated with sealant. If you wish and have free time, you can put an additional sheet on the cover. The waves must match; secure it with self-tapping screws and sealing rubber washers. Treat all accessible and “suspicious” cracks with sealant. The chimney outlet should be 50 cm above the level of the roof covering. Step 7
Mushroom for pipes with thermal insulation (Thermofungus)
Install a fungus at the top of the chimney.
As an experienced master can notice, the installation algorithm has been significantly simplified. We did this specifically to speed up and reduce the cost of work. At the same time, the functionality and safety of the chimney has not deteriorated. You can, of course, install spark arresters and deflectors, thermal fungi and weather vanes, and other parts. If you have the desire and money, install it.
Protective ceiling coatings
For thermal protection of the ceiling, mineral wool sheets with aluminum foil are usually used. The thermal load on the ceiling is small, so the choice of material is determined by fire characteristics.
At the point where the chimney pipe passes through the ceiling, it is sealed with a refractory backfill; expanded clay or granulated vermiculite can be used. For steam rooms and bathhouse buildings, in which heating is provided by electric heating elements, the ceiling is lined with heat-resistant plasterboard or mineralite.
Impregnation for shelves
Most decorative and impregnating materials for benches are made on an organic varnish or oil base. With the exception of organosilicon, they are flammable and flammable, so shelves and benches, floor boards are impregnated with protective salts and dried thoroughly before being impregnated with oil or heat-resistant polyurethane or acrylic varnish.
After treatment, the surface must be thoroughly dried to maintain its fire-resistant qualities.
Often, to improve the fire-resistant characteristics of shelves, complex preparations from Tikkuril or Belinka are used, which contain special inhibitors that reduce the flammability of wood. In this case, the part of the shelves that is not used for sitting can be impregnated with fire-resistant silicone oils.
Features of ceiling and floor insulation
Useful tips for insulating floors
Ceramic tiles are ideal for the waiting room and washing area of a bathhouse - but there must also be thermal insulation underneath it. Here is the most common scheme for insulating the floor in a bathhouse: a cranial block is sewn to the beams, on which a subfloor made of boards is laid. After this comes a layer of vapor barrier, and then the space between the beams must be filled with the selected heat-insulating material - expanded polystyrene or expanded clay, for example.
A reinforced metal mesh is placed on top of this and a concrete screed is poured. After the latter has dried, the floor is waterproofed with waterproofing. Again the screed is 3-5 cm thick and a heated floor system can be built in if desired. And finally, ceramic tiles are laid on the screed.
But in the steam room and relaxation room, the floor must be made of wood - so that the so-called “heat stroke” does not occur.
Making a “pie” when insulating the ceiling
Insulating a bathhouse from the inside always starts from the ceiling - after all, the highest temperature is always at its level, and therefore this part of the steam room needs to be given special attention. The ceiling should be arranged as follows: vapor barrier - insulation - sheathing - beams - ceiling boards
If the attic or the second floor in the bathhouse is residential, then the insulation cake will look a little different: the ceiling boards need to be smeared with clay in a two-centimeter layer and covered with wood chips up to 20 cm, or expanded clay, or use some kind of insulation. The main thing is that it is the right thickness.
This is how a bathhouse is insulated from foam blocks, logs and bricks. Each type of structure has its own technology, and knowing at least its basics will help you always keep your steam room warm.
Protective thermal screens
As the main protection of the walls of the bathhouse, heat-resistant screens are used - special insulation shields to cover the side surfaces of the stove and reduce the intensity of the spread of IR radiation in the room.
Screens are divided into two categories: metal and brick.
Metal
Protective screen made of sheets of steel or cast iron. It is mounted around the perimeter of the sauna stove, while maintaining small technological gaps (3-5 cm) between the screen and the outer walls of the heating structure to ensure additional air convection.
Depending on the characteristics of the walls of the bathhouse and the type of stove, metal screens can be front and side. Some models of metal stoves are produced with an additional protective casing, which is installed when installing the firebox.
Installation of metal screens is carried out using adjustable legs and secured to the floor with bolts. In addition, the legs allow for clearance at the bottom of the structure for additional ventilation. To increase service life, the screens are coated with a fire-resistant paint layer.
- reduction in the intensity of IR rays;
- improvement of air convection between the oven walls and the screen;
- reduction of the overall heating temperature of the external walls of the heating structure.
Brick
A protective screen made of brick is intended for enclosing the walls of a sauna stove.
The masonry is done in ½ brick around the perimeter, maintaining technological gaps of 6 cm. The lower part of the structure is equipped with additional air ducts at a distance of 2.5 cm from each other.
To construct a brick screen for furnaces, heat-resistant fireclay bricks without voids are used. As a connecting mixture - a thick solution of cement or clay.
The finished screen walls should be 22–25 cm higher than the wall of the heating structure.
- low thermal conductivity of the material from which the screen is made;
- resistance to high humidity and high temperatures;
- long-term accumulation of heat in the room;
- receiving soft heat from the stove.
Brick screens
The furnace fence in the steam room can also be made of brick. A brick screen can be installed on all sides of a metal furnace, forming a protective lining. Also, such a screen can only be installed between the flammable surface and the stove, representing a protective wall.
This finishing of an iron stove in a bathhouse is also carried out in compliance with certain rules:
- In the lower part of the shield it is necessary to provide special openings that will ensure air convection between the furnace wall and the brick;
- The height of the brick wall should exceed the height of the stove by 20 cm, but it is often built right up to the ceiling;
- Maintain a distance of 5-15 cm between the stove and brick screens;
- There should also be a distance of 5-15 cm between the flammable surface, for example, a wall and a brick protection.
When is protection needed at all?
The need to install protective casings and screens does not always arise. If a fire-safe distance is maintained between the stove and the nearest flammable surface, additional protection is not needed. At this distance, the IR rays are scattered, weakened, and the amount of them that the wooden wall receives can no longer lead to damage.
It is believed that the safe distance from the wall to the brick stove (quarter-brick laying) is at least 0.32 m, from the wall to the metal stove (not lined) - at least 1 m. For a metal stove lined from the inside with brick or fireclay, the distance decreases to 0.7 m.
Thus, maintaining fire safety distances is more possible in large baths, where the issue of saving space is not relevant. In family steam rooms, where every centimeter of space counts, installing a stove 0.3-1 m from the nearest walls is impractical. In this case, the safety distances established by the standards must be reduced using screens and casings.