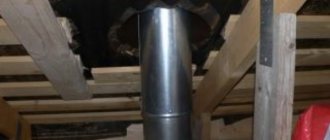
The roof trim of the chimney is a prerequisite for its safe operation and a guarantee of warmth and dryness in the house.
Ideal chimney roof trim
Errors when venting a chimney through the roof usually lead to leaks, rotting and destruction of wooden roof structures, and improper fastening of the chimney itself can cause a fire. By following the technology described in our article, you will be able to figure out this issue and, if necessary, install the chimney roof trim yourself.
The procedure for installing a chimney through the roof
When installing a chimney, you need to do the following:
- You need to choose the best location for the passage on the roof.
- It is necessary to install a box - a structure that ensures the safe passage of the pipe through the roof.
- A hole is cut in the slope.
- During work, the roofing material is folded upward and the thermal insulation layer downward.
- The pipe is fixed.
- The box needs to be filled with thermal insulation and secured.
Next, you need to use sealants to ensure complete insulation of the structure.
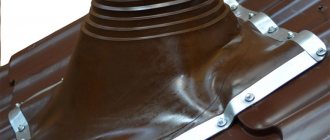
Elastic penetration
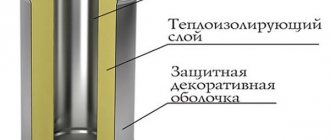
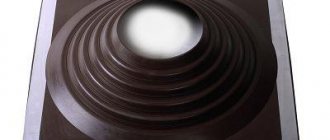
Most often in private construction they are faced with the installation of round metal pipes. To ensure the tightness of the passage, a special device is used - an elastic penetration. This is a product made of high-strength silicone or rubber, shaped like a funnel with a wide flange in the form of a square or circle, called an apron. Thanks to its properties, the elastic penetration takes any shape, adapting to the angle of inclination of the slope. It can withstand extremely high or low temperatures, exposure to aggressive chemicals and comes in a wide range.
Installation diagram of elastic penetration
Elastic penetration on metal tiles
When purchasing an elastic penetration, they are guided by the diameter of the pipe and the color of the roofing material. Universal models, in the form of a stepped pyramid, are suitable for any size; adjustment is carried out by trimming the penetration to the desired level. Installing an elastic apron on the roof is very simple, you need to place it on the chimney passage, apply a metal circle with holes for fasteners, treat the joint with fire-resistant sealant and secure it with a screwdriver. For roofs with steep slopes, a special type of plastic penetrations with a specified flange mounting angle is used.
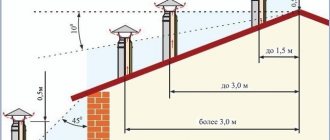
Determining the location and height of the pipe
Depending on which location is chosen, the pipe on the roof of the house is installed according to the following rules:
- If it is closer than 1.5 m from the ridge, then the upper edge of the pipe should be located 0.5 m above it.
- When the distance is in the range from 1.5 to 3 m, the height of the pipe on the roof is such that it is level with the ridge.
- At a further distance, to determine the height, use the following construction. It is necessary to lay a corner, the side of which is horizontal and located flush with the ridge of the roof. 10 degrees are laid down from this line. The resulting straight line determines the height that the pipe should have.
If the roof is flat, the pipe should extend 0.5 m out of it.
Standards for the distance from the pipe to the walls
According to SNiP (Appendix 16), there are certain standards for the distance from the surface of the pipe to materials prone to fire, described in the table below.
Table 1
| Sandwich pipe thickness, mm | Indentation for the partition, which is protected from fire, mm | Indentation for partition not protected from fire, mm |
| 120 | 200–260 | 260–320 |
| 65 | 380 | 320–500 |
This appendix describes the norms for the distance between pipes and walls. The wall material may not be fire resistant, so they, like ceilings, need insulation. For this, mineral wool and a sheet of galvanized steel are used, mounted on top of the insulation.
How to seal a chimney on a roof
Combustion products are removed through the pipe. Their temperature can reach 200 degrees. Sealing is designed to achieve the following purposes:
- Smoke must not be allowed to enter the room.
- The fire hazard of using the pipe must be ensured.
- Sealing must be done aesthetically.
This stage of work is carried out after the pipe and box have been installed.
Selection of thermal insulation material
Today, the building materials market is distinguished by a variety of thermal insulators, which have different technical characteristics and may differ in price. Let's consider the main materials that are used for thermal insulation purposes when laying sandwich pipes through the ceiling and roof:
Basalt or mineral wool. Such materials are used quite often when constructing sandwich pipes. The temperature that these insulation materials can withstand reaches up to 600 °C. Let's consider the main disadvantages of basalt and mineral wool:
- Such materials are not environmentally friendly and may cause harm to human health. When heated, such cotton wool releases harmful substances - formaldehyde;
- mineral and basalt wool have a rather poor coefficient of water resistance. When wet, they lose their protective qualities.
- Over time, wool can cake and lose its thermal insulation characteristics.
Expanded clay. It has high insulating characteristics. When condensation forms, followed by wetting, expanded clay, unlike mineral wool, quickly restores its protective properties. The disadvantage of this material is that when installing pass-through units, special containers are required for it.
You can insulate cuttings with different materials, but it is better to choose those that will not harm human health
Minerite. The composition of such insulating material includes: cement, cellulose and various mineral additives. Minerite is resistant to temperatures up to 600 °C. When wet, it does not lose its insulating properties, and when heated, it does not emit carcinogens harmful to human health.
Asbestos. Asbestos itself has fairly good thermal insulation properties, but when heated it releases carcinogens. The use of asbestos as insulation is recommended by experts only as a last resort.
Sand or clay . Such materials were used long before modern thermal insulators appeared. The thermal insulation properties of these natural products are inferior to specially developed modern insulation materials, however, some owners prefer to use natural ones as thermal insulation.
What are the consequences of violating the installation rules?
If the chimney box on the roof was installed improperly, this can lead to the following problems:
- Gradual destruction of the chimney.
- High level of heat loss.
- Formation and deepening of cracks in the structure.
- Disruption of the gas circulation process.
- Ingress of moisture, which leads to destruction of the pipe and duct.
- The presence of moisture can lead to rotting of wooden parts and the formation of fungus.
Therefore, it is important to install the pipe and the duct for it in accordance with the technological requirements.
Corrugated roofing
Corrugated roofing has earned the trust of consumers due to its reliability and attractive appearance. A metal sandwich pipe can be installed on a corrugated roofing roof as follows:
- the installation location is marked on the surface of the corrugated sheet;
- Using a grinder, cut through the corrugated sheet, stepping back a couple of centimeters inward. You need to cut corrugated sheets very carefully so that notches do not form;
- Having made cuts in the corners of the holes, bend the corrugated sheet upwards;
- now we cut through the ceiling, making a similar hole;
- install a metal box through which the sandwich pipe needs to be routed;
- Having installed the sandwich pipe onto the roof made of corrugated sheets, put mineral wool into the box or pour expanded clay;
- A silicone seal is put on the sandwich pipe and glued to the corrugated sheet, forming a sealed chimney pipe outlet unit.
Ensuring fire safety
The smoke that passes through the chimney has a high temperature. Because of this, wooden parts, layers of vapor barrier and waterproofing can ignite. To prevent this from happening, it is necessary to install a special box where the pipe passes through the roof.
Next we will tell you how to seal a pipe on the roof. The box is made from wooden parts. It is placed on the sheathing from the outer part.
Layers of vapor barrier and waterproofing from the outside are fixed along the perimeter. Since they are located at a considerable distance from the hot pipe, they are safe. The first of them is located on the inside, and the second on the outside of the roof.
For this purpose, you can use cross-cut material. If there is a vapor barrier and waterproofing in the inner layers of the roof, the resulting corners are folded down. A photo of a pipe on the roof will help you figure out how to do this correctly.
When the pipe passes through the roof, it is covered with insulating material. For this purpose, you can, for example, use mineral wool. The insulation layer cannot be placed close to the chimney. To prevent the heat from damaging the mineral wool, there must be a gap of 5-7 cm thick.
Cutting
To seal metal pipes made of sandwich-type stainless steel or round ceramic pipes, special penetrations for the roof with a steel or polymer cap are used. In order to protect wooden roof elements in the chimney passage area from heating, a thermally insulating box made of non-flammable material should be used, and the resulting gap between the box body and the chimney should be sealed with non-flammable fire-resistant material, basalt or stone fiber with a high melting point compared to the chimney material at operation.
Installation of square or rectangular pipe
Such pipes are most widespread. This is due to the fact that their installation is the simplest. In most cases, the chimney is located strictly vertically.
However, sometimes it may be necessary to adjust the location of the roof exit. In this case, an additional horizontal section is used. In the place chosen for access to the roof, a roofing pie is cut. The structure described above is installed here.
A steel sheet is placed on the attic side. It must have a hole corresponding to the cross-section of the pipe. After the box has been installed, it is necessary to protect the structure from precipitation.
The inside of the box is lined with basalt wool or asbestos sheets. The protective and decorative joint is attached to the pipe using self-tapping screws. The joint around the perimeter of the pipe is filled with a special fire-retardant sealant.
Next, install the inner apron. For this purpose, strips of galvanized steel are used. For them, grooves are made on the brick pipe. They should go along the brick and not get into the joints. The side slats at the bottom should have sides along which atmospheric moisture will flow.
To make the pipe look nice, you can use a metal apron for the entire part of the pipe located above the roof.
What thermal insulator to use
After the device is fixed to the ceiling, they go up to the attic or second floor and fill the gap between the outer wall of the pipe and the beams with heat insulator.
Basalt wool can be used as thermal insulation. But be sure to check that the operating temperature range should be greater than 600°C.
You can use mineral wool or clay to insulate the pipe.
Some people think this option is not the best. Firstly, during production, resins are used as a binder, which release formaldehyde when heated. Secondly, condensation sometimes runs through the pipe. And mineral wool (and basalt wool too) lose their heat-shielding properties when wet. And when they dry, they are only partially restored. So this option is really not the best.
The penetration is also covered with expanded clay of medium and fine fractions. This is a natural material that is relatively light in weight. Even if it gets wet, it then dries and restores its properties. When wet, the thermal conductivity increases slightly, but it is already worse for expanded clay than for mineral wool.
In the past, sand was often used. The option is not bad in all respects, except for one detail: it gradually wakes up through the cracks. Refilling the sandbox is not difficult, but constant sand on the stove is annoying.
If we talk about natural heat insulators, then you can use clay. It is diluted to a paste-like state and the entire gap is covered. Sometimes expanded clay is used as a filler.
One of the heat insulators is expanded clay
Here is a review of the use of clay when passing a bath pipe:
“Clay rules in cutting! I dismantled the chimney in my bathhouse. Or rather, I took apart what was left: there was a lot of snow, and when it melted, it blew off the entire top. Once you change the top, you need to look at the bottom: the pipe has been standing for 7 years. So here it is. There is zero burning inside, and there is no burnout of the pipe either. Condition: as soon as installed. My penetration is lined around the perimeter with basalt wool, and then everything is covered with clay. This is definitely the best option."
Not everyone recommends using insulation in the passage unit. There is an opinion that it is better to leave the gap unfilled: this way it will be possible to avoid overheating and burning out of this section of the pipe - it will cool better due to air blowing. This may be true, but the radiation from the heated pipe will dry out the nearby wood, and in this case the temperature of spontaneous combustion is significantly reduced - to +50°C.
As you can see, the pipe burned out
There are several ways to avoid overheating. The first, and most rational, is to use the heat that flies out into the pipe and heats it to extreme temperatures for your own needs. There are three options:
One way to avoid overheating is to place stones on the pipe
- Make a water jacket on the metal chimney and use hot water for showering or heating. The system is not so simple; it also requires a remote tank, as well as pipe connections, cold water supply, etc. But temperatures above the water jacket will not be nearly as high, and the pipe will not burn out.
- You can also heat water, but it’s easier: install a samovar-type tank. Hot water is also provided, the chimney does not overheat and is protected. But there are some nuances here: do not let it boil, drain the heated one in time, add the cold one. And doing this is not entirely convenient, since the tank is located quite high: above the stove on a pipe.
- Adapt a net for stones. The water will have to be heated in a different way, but the advantage here is this: after the procedure is completed, the stones dry the bath. Here, too, difficulties may arise: the weight of the stones is considerable, it is unlikely that you can do without support, unless you use the factory version (on the right in the figure). In a homemade version, a structure will be needed to redistribute the mass.
When using any of these methods, the pipe temperatures in the ceiling passage are significantly reduced. The likelihood of burning becomes very small. That's not all. There is a way - simply cool with air. To do this, another one of larger diameter is put on the heat-insulated pipe. A grate is made at the bottom and top through which air enters/exits. For a steam room this is not an option - it will draw out all the steam, but for a washing room it can be used. The method is especially good in the attic and when passing through the roof.
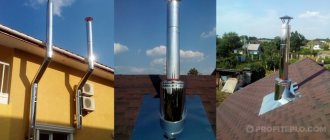
How to install a round chimney pipe
In practice, the following types of such chimney pipes on the roof are used:
- Made from asbestos. They are gradually falling out of use due to poor resistance to overheating and insufficient environmental friendliness of the material used.
- Steel coaxial pipes consist of two pipes - one inside the other. Smoke comes out through the inside, and the space between the pipes is used for air intake. This is used to operate a closed firebox.
- In sandwich products, a layer of heat insulation is laid between two pipes.
- Single-layer metal pipes are used.
If the last of the listed options is used in the house, then it is recommended that in places where it goes through the ceiling or roof, you yourself make sections in the form of a sandwich from two pipes of different diameters.
When running a round pipe through the roof, you need to make a steel sheet with a round hole. The design of the roof box must ensure the correct installation of vapor barrier and waterproofing layers. Manufacturers offer ready-made solutions for such pipes. When choosing, it is necessary to take into account the structural features of the roof and the topography of its surface.
Strengthening the rafter system
Often when installing a chimney, the question arises about strengthening and strengthening the rafter system, because it is necessary to form a hole in the roof pie for the pipe. That is, you will need to install a couple of spacers. When creating a roof made of metal tiles, the pitch between the rafters is rare, and the formed opening or the distance between the rafters may be too large. Therefore, it is necessary to install vertical spacers.
Sometimes you have to break the integrity of the rafter leg, that is, cut it. Then, in certain situations, purlins or crossbars are also sawn. In this case, at the place where the rafter leg was cut, it must be fastened to adjacent, undamaged ones. For this, additional spacers are also used, between which bars are inserted vertically. Their function is to replace the rafter leg at the chimney passage.
Photo of installing a chimney (pipe) through the roof
Basic Rules
When wiring a chimney through the ceiling and roof structure, it is necessary to take into account fire safety rules and regulations, in accordance with SNiP 2.04.05–91. The pipe in a private house and bathhouse must be equipped with a special passage unit.
The rules have the following main provisions:
- The distance between rafters made of flammable material and a pipe made of brick or concrete is set at a level of 13 centimeters or more.
- The distance between an uninsulated ceramic pipe and combustible rafters must be at least 25 cm. If there is thermal insulation, this figure is reduced to 13 cm.
These rules are mandatory when installing beams, the pitch of which is usually 60 cm. To obtain the required distance between the chimney structure and the ceiling with such a pitch, the use of exclusively insulated pipes will be required. An excellent option in this case is a special sandwich pipe, the design of which includes several layers, including insulation. Typically, furnace outlet pipes have a cross-section of 115-120 cm. If the thickness of the insulating layer of the sandwich pipe is 10 cm, the total diameter reaches 315-320 mm, and the distance reaches 130 mm.
In bathhouses, pipes are usually used, where the thickness of the insulating layer usually reaches 10 cm. In some cases, this figure can be reduced to 5 cm, although experts do not recommend this. The most common type of sandwich pipes are products with a thickness of insulation layer of 35-50 mm: options with 100 mm thermal insulation are usually available at specialized points of sale focused on bathhouse equipment. For chimney pipes without insulation, the minimum distance to combustible material is set at 250 mm.