Chimney installation rules
If the house has a stove, then a chimney is also needed. Although instead of a stove there may be a special tank running on gas. In any case, the house is heated somehow, and combustion products need to be removed. There are several options for removing the pipe through the roof, related to determining the location. It is planned when a house project is being developed. The location is considered relative to the ridge of the roof - a horizontal edge that is located where two slopes meet. The pipe can be installed:
- directly in the ridge;
- at a distance from the ridge.
The first and second options have their pros and cons. On the one hand, it is easier to install a chimney in a ridge. But this is for someone who deals with this particular issue. But for arranging a rafter system, this is more difficult, because you will have to make a gap in the horizontal beam. On the other hand, when the pipe is in the ridge, this guarantees good traction. And the possibility of leakage under it is reduced to a minimum here. But still, most often the chimney is moved relative to the ridge.
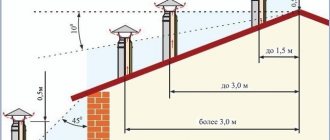
Chimney offset relative to the roof ridge Source katlavan.ru
In this case, the following building regulations must be observed:
- If the chimney on the roof is installed at a distance of no more than 1.5 m from the ridge, then the pipe should be 0.5 m higher than it.
- When installed at a distance of 1.5 m to 3 m from the ridge, it is made on the same level with it.
- When the pipe is more than 3 m from the ridge, it can be lower than it, but no more than 10°.
The best option for locating the pipe relative to the ridge is not far from it. If you make the chimney much lower, the risk of damage from falling snow increases.
To ensure good traction, you must adhere to certain standards for placing the chimney relative to the roof ridge Source rekvartira.ru
There is a place where it is generally not recommended to install a pipe - the valley. This is the internal angle that two slopes of a complex roof form when connected. There is always an increased load on it, since precipitation flows there and snow is retained. With such an installation, the possibility of waterproofing damage is very high. This means that there will be leaks.
Materials for laying stoves and chimneys.
When laying stoves
the following
materials
:
- for the main masonry of the walls of furnaces, hearths, chimneys
and
channels in the walls
-
fired solid red brick
of the first grade (
GOST 530-71
); - for lining (internal lining) - use refractory refractory brick
; - for portal cladding (external) - tiles, roofing and rolled steel, asbestos plywood
; - for cutting smoke circulation, fire-retardant insulation and cladding - solid bricks, asbestos cardboard, asbestos-cement insulating boards, inorganic mineral wool products on a synthetic basis
(mats, semi-rigid boards),
construction felt
soaked in a clay solution should be used.
NOTE: Use of mineral products with a bitumen binder
NOT ALLOWED for fireproof insulation.
Brick
They are selected of
the correct shape, the same size, without cracks, inclusions of stones and dummies, and normal firing
.
NOTE: Bricks from dismantling buildings or old furnaces
, subject to careful selection and cleaning of the solution, it can be used for laying
pipes, cutting
and the lower parts
of furnaces and hearths
.
ATTENTION! Brick from dismantling stoves, impregnated with flue gas condensate, is PROHIBITED for re-laying fireplaces. The following solutions are used in furnace work: The following solutions are used in furnace work:
During furnace work
The following
solutions
:
- for laying stoves and kitchen stoves
from ordinary bricks -
clay-sand
; - for masonry made of refractory bricks - refractory clay with sand
; - for masonry made of refractory bricks - refractory clay with fireclay powder
; - for laying chimneys, ventilation and smoke ducts
in the walls of buildings -
lime-sand or lime-cement
; - for laying chimneys above the attic floor
-
lime-cement
, and on top of the roof -
cement
.
Quantitative ratio of clay-sand mortar
, depends on the fat content of the clay, and should ensure drying of the solution
without a noticeable change in its volume and without cracking
.
ATTENTION! The solution is prepared at least DAYS before the start of work. When laying ordinary bricks, plastic clay is used, mostly red, not contaminated with random impurities. Before use, the clay is soaked in solution and rubbed through a mesh with 3-4 mm holes.
Before use, the clay is soaked in solution and rubbed through a mesh with 3-4 mm holes.
When laying ordinary bricks, plastic clay
, predominantly red, not contaminated with random impurities.
Before use, the clay is soaked in solution and rubbed through a mesh with 3-4 mm
.
To prepare the solution
As a rule,
mountain sand
, without foreign impurities and plant residues,
fine-grained, sifted
through a sieve with holes of
1.0-1.5 mm
.
Water
must be clean to prepare the solution.
When using sea water,
the cement rate must be increased
by 10-15%
.
Table 5: Clay mortar compositions.
| Brand of solution | Type of solution | Type of additive | Composition of the solution, (clay dough + additive + sand), in volume parts | |
| in dry climates | in moderately humid climates | |||
| Clay solution: | ||||
| 10 | 2 | 1- on oily clay | without additive | 1+0+4 |
| 10 | 2 | 2- on clay of medium fat content | without additive | 1+0+3 |
| 10 | 2 | 3- on lean clay or loam | without additive | 1+0+2,5 |
| 4 | 4 | Clay with black binders | black binders (tar, bitumen, pitch) | 1+(0,05…0,1)+(2,5…4) |
Note:
- Clay mortars
are used in summer conditions for finishing work, mainly in dry climates with normal indoor air humidity. - The amount of sand in clay solutions with black binders
depends on the fat content of the clay. - When using hard black binders,
an emulsion of clay
with black binders is pre-prepared in a heated state
.
NOTE: Masonry mortars
must be used before setting begins. “Rejuvenating” (diluting with water) “set” solutions is PROHIBITED.
For insulation
materials with low thermal conductivity are used:
ordinary clay brick, felt, as well as asbestos in the form of sheets and cord
.
Felt
, usually made
5 mm
, conducts heat poorly and serves as a good heat-insulating material.
It smolders and with its pungent, suffocating odor
signals the outbreak of a fire.
To make the felt more resistant to fire, it is impregnated with a liquid clay solution before laying it in place
.
Protecting the roof from heat coming from the pipe
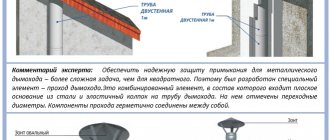
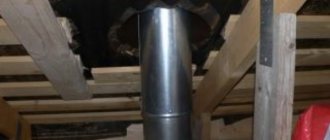
When organizing a pipe passage through the roof, it is important to insulate the roof from it. After all, the pipe gets very hot, which increases the fire hazard. The roof is protected using a separate box, the beams and rafters of which are located taking into account the requirements of SNiP. The minimum distance standard from the chimney to the load-bearing beams and rafters is from 130 to 250 mm. The inside of the box is filled with some material that does not burn. For example, it could be basalt or stone wool.
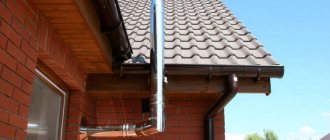
The chimney in no case directly touches the roofing Source barmanlive.ru
Further organization of the pipe outlet depends on what shape it is and what it is made of. The shape of the chimney can be made either as a regular square or round, or in the form of a rectangle or oval. And pipes can be brick, metal, asbestos-cement or ceramic. The material from which the roof is made is also taken into account. This can be slate, metal tiles, corrugated sheets, ondulin, roofing felt or bitumen shingles. Each case has its own characteristics.
Workflow - step-by-step technology
Surely you are wondering whether it is possible to install high-quality and reliable ventilation (chimney) yourself and at the same time save not only money, but also time - our answer is positive. The sections below will describe detailed instructions to confirm that this process is possible for independent mastery.
Stage one - preparatory
Initially, you should prepare everything necessary for subsequent work:
- Purchase a pipe, if not available, and fire retardant material.
- Fastening materials.
- Tool: Building level.
- Welding machine - in case the pipe has to be joined.
- Screwdriver.
- Hammer.
- Jigsaw and grinder.
- Wooden beam.
- Finishing material.
Stage two - roof preparation
Now let's move on to the process where you already need to work with your own hands:
- To begin with, on the roof we measure the distance from any rafter beam, which is half a meter plus the diameter of the ventilation pipe.
- We build another beam in the indicated place to increase the stability of the roof.
- Using a regular plumb line from the center of the measured distance, we measure a point on the floor of the attic or attic.
- Around this point we attach a vertical and horizontal beam so that there is an equal distance from each edge to the pipe (its center is the measured point).
Instead of timber, you can use a metal profile
We drill a hole through in the indicated place so that a hole is formed on the ceiling of the first floor. According to the plan, this should be exactly above the stove or half a meter from this place.
As a result, we should get a reinforced box inside which a chimney will be laid. At the same time, it should be installed only in the attic or attic space; in the living room, it is enough to decorate the pipe with finishing materials.
You can avoid the box if you purchase a galvanized pipe casing
The box is necessary for the safe operation of the ventilation system, which often heats up to critical temperatures - protection for both those living in the house and for flammable materials.
Stage three - through hole
Now let's move on to preparing a specific place for the passage of the ventilation pipe in the ceiling of the first floor/floor of the attic:
- If the ceiling is made of wood, you can cut a circle of the required diameter using a chainsaw. We remind you that you need to add 15-20 sms on each side to the diameter of the pipe itself.
- If you have to work with a concrete slab, then a long drill and a hammer drill will help you with this - the tool drills many holes in a circle. A very weakened piece of the slab is knocked out with a sledgehammer.
It is wooden floors that need to be given more attention, for example, the chimney in a bathhouse is the most dangerous area
Let's move on to opening the roof. The best option is when the roofing material has not yet been laid, but this is only possible if the house is at the construction stage.
We will deal with the process of installing a chimney after the facility is put into operation:
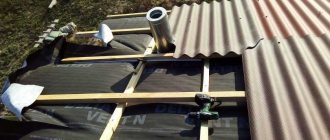
- Before removing the pipe through the roof from the corrugated sheet, we cut the material so that it can be bent and left in this position for a while.
- If you are faced with tiles, then all that remains is to carry out only partial dismantling in the place where, according to the plan, the pipe will come out (with a small margin).
- Now that we have a through hole, we can insert the ventilation pipe into the “hole” on the roof.
- Fixation of the chimney itself is carried out by installing collapsible clamps, which in turn are attached to the protective box we built.
- We close the hole in the roof, from the attic side, with an asbestos sheet that will not heat up.
- Now, using the steam film, we attach it to the walls of the pipe box using furniture staples.
The place where the stove stands and connects to the chimney must also be secured using fire-retardant materials
We connect the free end of the pipe to the furnace; it is better to use a welding machine for this; this method ensures the tightness of the connection. You can also use a connecting clamp, but here everything depends on the ideal shape of the products - if there are no defects, then the tightness will be decent. (See also the article Metal pipe clamps: features.)
Installation of a round pipe
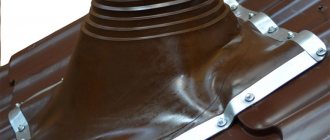
Often in construction a circular chimney section is used. To pass a round pipe through the roof and seal it tightly, special flexible adapters are used. They are made from heat-resistant polymer with elastic properties. In appearance, such an adapter looks like a funnel, at the base of which there can be a circle or a square. The base is called an apron, it is made in the form of wide fields. Since the material is elastic, it easily takes on different configurations. Therefore it has a wide range of applications. Such adapters can be used on roofs with any covering and slope angle.
Exit of a round pipe through an ondulin roof Source nashaotdelka.ru
The main thing is to choose an adapter that will match the diameter of the pipe. Although there are universal options for such products. They are made in the form of a stepped pyramid. To adjust their size to the pipe, the excess is simply cut off with scissors. Elastic adapters are attached to the roof using bolts or metal studs. They are installed in holes on the flange, which presses the adapter to the roof. The space between the flange and the roof surface is lubricated with a sealant that can withstand temperature changes.
Universal adapter for passing a round pipe through the roof Source pinterest.it
Passing through floors
In order to correctly install a chimney system through the ceiling, it is necessary to take the following nuances as a basis:
- A simple metal pipe, not insulated, is attached to the outlet pipe of the furnace, the length of which is about one meter. Next, you can connect this section with an already insulated system;
- Where the chimney passes through the ceiling, the pipe is insulated on all sides with your own hands or initially purchased in this condition;
- It is prohibited for pipes to be joined to each other where they pass through the ceiling;
- The total length of one horizontal section is no more than 1 meter;
- You should not use more than 3 bends for one system;
- To connect pipes, use only flexible fastening elements, since when heated, the chimney is capable of sudden expansion, and after cooling, contraction.
Due to correctly carried out cutting, installation of a chimney pipe system is possible even in a wooden house
Features of a sandwich chimney
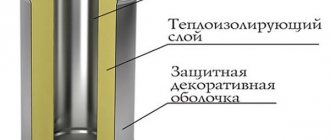
A type of round pipe is a sandwich chimney. It consists of two pipes of different diameters, between which there is a heat-resistant thermal insulation material. They are made of stainless steel. The sandwich chimney is in great demand because it provides stable draft, does not heat up, is easy to install and looks beautiful in appearance.
The passage through the roof of a sandwich chimney can also be done using an elastic adapter. However, it may not be in harmony with its mirror surface. In this case, a metal adapter is used, the material of which is also stainless steel. It is not flexible, so you must take into account the diameter of the pipe and the angle of the roof slope.
Carrying out cutting
If desired, the purchased structure can be replaced with a home-made one according to the following instructions:
- The hole is covered with a pre-cut element from a stainless steel sheet;
- We cut out a round passage in the center, the diameter of which is 12 millimeters larger than the pipe itself;
- we cut out an opening similar in shape and size in the ceiling;
- The passage is sealed at each edge with basalt fiber;
- For additional protection of the thermal insulation layer, it is covered with steel strips;
- During the assembly process, we attach the first elbow to the stove and complement the structure with a stainless steel sheet;
- This section of the system must be vertical. We secure the element to the attic;
- We fix a special plate and lay a layer of heat-insulating material in the space formed between it and the ceiling;
- We fix the plate with self-tapping screws;
- We insulate the passage.
High-quality insulation of the ceiling, with the installation and fastening of several steel sheets at once
It is important that the chimney is well insulated - this will not allow condensation to accumulate and form on its inner surface
Insulation is carried out over the entire thickness of the ceiling
Passage through metal tiles
Metal tiles are sheets of steel, copper or aluminum, which are coated with a polymer layer. In appearance they resemble natural tiles, which are folded in even rows. This roofing material is very popular. If a round pipe is to be passed through the metal tile, flexible adapters are used, which we have already described. When using a square or rectangular brick pipe, a different method of installation is used. It is as follows:
- The connecting unit is being manufactured. It consists of two aprons - internal (main) and external (decorative). The material of manufacture is thin aluminum sheet or tin.
- Before the metal tiles are laid, an internal apron is installed on the sheathing. These are 4 strips located on 4 sides of the pipe. They simultaneously extend under the metal tile (no less than 250 mm) and onto the pipe (no less than 150 mm).
- The apron elements are installed in a groove - a groove that is cut along the perimeter of the pipe to a depth of 10 to 15 mm. The groove is cleaned and filled with fire-resistant sealant.
To install an apron, you need to make a special groove in the pipe Source experttrub.ru
- The apron is attached to the pipe using heat-resistant dowels. The joints between the four planks are soldered. On the slats that are located on the sides, sides are made, the purpose of which is to drain water down.
- The lower part of the apron is installed on the so-called tie - a sheet of metal with sides. This ensures water drainage from the chimney to the bottom of the roof. The width of the tie should be greater than that of the pipe by at least 0.5 m on both sides. Its length depends on the distance from the pipe to the edge of the roof.
- After installing the tie and interior apron, the metal tiles are laid.
- An external apron is installed on top. It is usually a corrugated sheet of lead or aluminum. There is a decorative strip in its upper part. It is attached to the pipe using self-tapping screws. The attachment point is slightly higher than parts of the inner apron. Before fixing the decorative strips, the fastening points are coated with sealant. To attach the corrugated sheet, its back side is provided with a self-adhesive coating.
Finished chimney pipe passed through a metal tile Source tproekt.com
Roof cutting of rectangular pipes
For roof cutting of pipes made of bricks or blocks, special elements are used - metal aprons, ties, wall profiles. Self-adhesive film and sealants are also used to seal joints.
Cutting rectangular pipes from bricks or blocks
A pipe made of bricks or blocks is usually placed on a foundation, so it is quite stable. Its additional fastening is possible with the help of special brackets, but they should not provide a rigid connection with the roof, otherwise if the roof is damaged, deformation and destruction of the pipe may occur, which can lead to a fire.
Technology of roof cutting of brick pipes
The cutting is carried out after installing the sheathing and waterproofing, on top of the counter-lattice made of planed boards. Connection strips are applied to the pipe walls and a contour is drawn along the upper protruding edge.
Marking the contour for the junction bar
A groove is cut along the resulting contour using a grinder and a diamond disk.
Grooving a groove for the abutment strip
Sweep away the dust with a broom and wash it off with a stream of water, possibly from a plastic bottle.
Removing dust with a broom and water
Place the junction strip at the bottom edge of the pipe, mark its dimensions with a marker and, using metal scissors, cut out the vertical part of the junction strip on both sides. Apply the junction strip to the pipe and carefully hammer its edge into the groove in the brickwork.
Installing an abutment strip on a pipe
The plank itself is attached to the sheathing with self-tapping screws using a screwdriver.
Fastening the bottom abutment strip
The side strips are marked in the same way and the protruding vertical part is cut off. Fasten both side strips with self-tapping screws so that they are on top of the bottom one. The upper junction bar is secured in the same way.
Fastening the side abutment strips
All joints between the slats and the pipe are sealed.
Sealing joints
Install a tie and bend the gutter on it so that any moisture that accidentally gets on it drains from the roof without getting onto the sheathing.
Tie fastening and gutter hem
The roof covering is laid using a special technology. The aprons are installed in the same sequence as the abutment strips: the lower apron, the side ones, and then the top apron - it is placed so that it is under the overlying sheet of roofing. If the pipe is close to the ridge, then the upper apron is placed under it.
Attaching aprons over roofing
Installing a chimney through corrugated sheeting
Corrugated sheeting is a sheet of metal produced by cold rolling and then profiled. Mainly made of steel, but can be made of copper and aluminum. The sheet has ribs of oval, square, trapezoidal or polygonal shape. A special coating is made on top, which gives it anti-corrosion properties. Corrugated sheeting is often used as a roofing material.
To pass the chimney through the roof, in the case of a square or rectangular pipe, a device in the form of two aprons and a tie is used. The method is the same as for a metal roof. Installing round pipes in corrugated sheeting is not recommended, because it is difficult to cut the correct circular section into it. But if you still make a round chimney, the pipe is insulated using a universal elastic adapter.
Accessories for running round pipes Source metalsteel.com.pl
Laying tile sheets
correct laying of sheets
Before starting to lay the material, assemble the logs that are necessary to lift the sheets onto the roof. Metal tiles are allowed to be laid on both sides of the first sheet. If the next sheet is placed on the left side, then the last wave is covered on top. When this is done on the right side, the subsequent material is overlapped under the previous sheet. Regardless of whether a hip roof is created from metal tiles or it will have a different shape, it is customary to align the sheets of material horizontally along the eaves. There are several ways to install this roofing material. The operating procedure is as follows:
- the first sheet is placed on the slope and the material is leveled along the cornice and end;
- this sheet is attached to the ridge with one self-tapping screw - it is screwed into the center of the strip of material;
- the next sheet is laid next to an overlap of 15 centimeters, it is aligned with the cornice and connected with a self-tapping screw to the first;
- Similarly, several sheets are mounted and fastened together;
- the block formed from fastened sheets is once again aligned along the eaves and attached to the sheathing, except for the last of them, which is used to create the next blocks of metal tiles.
The technology for creating a roof covering looks like this:
- the first sheet is placed on the slope and aligned along the cornice and end;
- the second sheet is placed above the first and secured with one screw at the ridge - the screw is placed in the center;
- both of these sheets are connected to each other using screws;
- the third sheet is placed next to the first, and the fourth is placed above the third;
- the prepared block, consisting of four sheets, is leveled and mounted to the sheathing.
To implement it:
- on a triangular slope, find the center and draw a line along it;
- a similar line is marked on the first sheet in the center;
- the first sheet is placed on the slope, aligning the axes, and secured with one screw at the ridge;
- further installation is carried out on the right and left sides of the first sheet;
- On a triangular slope, when installing metal tiles, the sheets will have to be cut, which will require a special tool called a “devil” - a standard tool for a tin roofer. You can make it yourself from 10-centimeter boards. They are assembled into a rectangle, the elements of which are held in place using hinged fasteners. This tool will help you mark sheets of material directly on the roof (see also the article: “Installing a metal tile roof - features and rules”).
Installation and operation of a metal tile roof, detailed in the video:
Passage through ondulin
Ondulin looks like regular slate, but its material is completely different. This is compressed cellulose, which is treated with bitumen impregnation. It comes in a variety of colors, is water resistant, but burns quite well. Therefore, when a passage through the roof is organized, maximum attention is paid to filling it with fire-resistant materials. The hole for the pipe in the ondulin is made large. To insulate the junction of the roof and the chimney, an apron is used, which is placed under the roof. In this case, elastic self-adhesive tape “Onduflesh” is used, made of bitumen with an aluminum insert.
Brick pipe passed through ondulin Source seaside-home.ru
Steel apron
To finish the chimney, aprons made of galvanized steel are used. They can later be painted in the desired shade. The configuration of this element may vary. There are ready-made aprons of different sizes on sale.
How is the apron installed?
- The edges of the waterproofing membrane and thermal insulation that were damaged when the pipe was brought to the roof must be secured to the chimney with construction tape.
- To install the wall profile, the pipe is grooved along the entire perimeter (before this, markings should be applied). The upper part of the strip is inserted into the recess and fixed with a high-temperature resistant sealant.
- The first layer of the apron is placed under the profiled covering and fixed with roofing screws.
- The second layer of the protective device is mounted on a profiled sheet with an overlap of 10...15 cm.
Installation diagram of a steel apron All joints are treated with sealant.
The protective apron should be fixed using special self-tapping screws with a rubber seal. If such hardware is not available, you can use homemade rubber gaskets that fit under the fastener heads.
Handmade metal apron
For those who have skills in working with tools and metal, the best option for an apron may be a self-made design.
Table. Tools necessary for the manufacture and installation of an apron.
| № | Tool | Illustration |
| 1 | Screwdriver | |
| 2 | Metal scissors | |
| 3 | Envelope forming pliers (heron) | |
| 4 | Tongs (45 degrees) | |
| 5 | Manual bender (sheet bender) | |
| 6 | Kiyanka |
In addition, you should prepare sheets of metal (smooth) of suitable size and roofing screws.
The task is to make an apron from sheet metal for this chimney.
We will make an apron for this chimney
Step 1. Measurements are taken. This point must be taken with great responsibility, since the functionality of the design depends on it. The height of the apron must be at least 15...20 cm.
Step 2. The four components of the apron are prepared. To bend the sheet, you need a bender. This handheld device replaces a bending machine.
To bend a sheet you need a bender
Metal cutting is done with scissors.
Metal trimming
You will need four blanks:
rear end;
The back part of the edge must be slightly bent so that snow does not fall between the apron and the roofing.
two sidewalls with stiffening ribs;
Sidewalls with stiffening ribs The sidewalls should also have bends.
Fold on the side
front end.
Front It has a more open angle.
Step 3. The rear element is mounted first.
Rear element installation
The part is pressed tightly against the chimney and fixed.
Step 4. The sides are folded into an envelope. This ensures that there are no cuts on the apron. All folds of the envelope are tightly tapped with a mallet.
The sides are folded into an envelope
After the envelope is formed, a semicircle is cut out on the sides (on the side that will be in contact with the back panel).
A semicircle is cut out
A smoothly smoothed transition will also avoid cuts. After processing, the sidewalls look like this.
Sidewalls after processing
Step 5. The sides are pressed tightly against the pipe and screwed to the roof. Self-tapping screws should be fixed on the protrusion of the corrugated sheet.
Step 6. The protruding part of the back part is cut to the size of the side panel, taking into account a small margin. It is necessary for the subsequent bending of the rear element onto the side.
The protruding part of the rear part must be trimmed with a margin
Step 7. The back wall is folded over the protrusion of the side panel. This ensures a tight connection between the two parts. The seam is tapped carefully.
The seam is tapped
The same procedure is carried out with the second sidewall.
Step 8. The front element is installed in place and fixed with self-tapping screws to the chimney and corrugated sheet. This apron piece also has envelope folded side edges. They are also cut in a semicircle.
Fixing the front element
The sides (protruding beyond the chimney) are cut in a semicircle 1...2 cm higher than the front part, after which they are folded onto the walls of the front part, creating a lock. The result was a completely sealed chimney lining.
Sealed chimney liner
The only weak point of this design is the connection of the top of the slats to the pipe. Moisture penetration may occur in these areas. To eliminate this problem, the joints must be treated with sealant.
Installation of a chimney in a soft roof
Soft roofing is a flammable material, so it is important here that there is a gap of 13 to 25 mm between the pipe and the covering. The passage of the chimney through the roof is organized depending on its shape - flat or pitched. The material from which the pipe is made also plays a role. If the roof is flat, consisting of a concrete slab and the pipe is not made of brick, the passage is made as follows:
- Around the pipe at a distance of about 15 cm along the perimeter, everything is removed, right down to the concrete.
- The formwork is being installed.
- Concrete is poured so that a side is formed, the height of which is 15 cm.
- The roofing covering is applied to the walls.
- Where the roofing material connects to the side, a metal strip is installed. Fastening is done using dowels.
- An ebb tide is installed on the side.
If the pipe is brick, there is no concrete side. In this case, roofing material is placed on it and a metal apron is installed on top. A groove is made in the wall of the pipe (depth 1.5 cm), into which the edge of the apron is inserted.
When passing a pipe through a soft roof, many nuances must be taken into account Source teplospec.com
The junction is filled with sealant. In the case of a pitched roof, waterproofing is carried out as on other coverings, that is, using aprons (for square and rectangular pipes), as well as flexible or metal adapters (for round ones).
Pass-through unit: structure and dimensions of the box
There are several names for a box that is installed in the gap of a hole cut in the ceiling: these are “pass-through unit”, and “cutting box” and “ceiling cutting”, and PPU (ceiling pass-through unit).
What is he? Quite simply, it is a box with insulating material that should fit into the hole you cut, and also keep the chimney pipe exactly in the center.
Box for the passage of the chimney through the ceiling for installing a stove in a steam room
In addition to this, there is also the finishing of the hole itself, which is very desirable to be reinforced with a material that can withstand high temperatures, is non-flammable and has low heat transfer. Below we will talk about specific materials, but the problems that should be solved by them are exactly the same.
The pass-through unit is made of metal. In particular, it can be stainless steel. In any case, the part that is visible from the steam room is usually made of stainless steel. On sale you can find boxes made entirely of stainless steel, and entirely of galvanized steel, and combinations thereof.
The boxes vary in size. And not only the box itself, but also the internal hole through which the chimney must pass. Diameter varies from 115 to 300 mm.
As for external dimensions, everyone interprets GOST in their own way. We already understand why this happens - some believe that a box with a side of 1 meter corresponds to GOST, others that 26 cm + pipe diameter is quite enough. And all this is based on technical standards.
IMPORTANT! If there is any discrepancy, one has to rely on common sense.
What is the main limitation when passing through the ceiling? Ceiling beams if the ceiling is false. If the dimensions of the box are greater than the distance between the beams, you will have to cut the beam and insert the cross member in another place. This will affect the load-bearing capacity of this beam. That is why they try to fit the box between the existing beams without additional waste of effort and time.
The ceiling in the bathhouse and the chimney. Photo StroyDom
Of course, if the position of the furnace had been thought out at the design stage, then the beams could have been positioned so that the foam would pass between them. Consequently, the size of the PPU would need to be thought out in advance.
On the other hand, there are now materials with low heat transfer that can withstand heating up to 1000-1100 degrees. If you use them, there is no need to cut out a large piece of the ceiling. For example, watch a video showing a test test of a calcium silicate slab. We then looked at the technical characteristics of this refractory - they are simply excellent! Find out for yourself (we do not advertise or sell).
For now, let’s summarize the data. It turned out that, according to SNiP and other standards, there are the following options:
- radius of ceramic pipe + insulation + 13 cm;
- ceramic pipe radius + 25 cm;
- pipe radius + 38 cm;
- pipe radius + 50 cm.
ATTENTION! There are no data for steel pipes in the first two cases.
As for the device, everything is simple: the metal box has the height of the ceiling, and is closed at the top and bottom with lids with holes for the diameter of the pipe. The lids are larger than the size of the box.
The box itself is lined on all external surfaces with a heat insulator - mineralite or basalt cardboard. Expanded clay is poured inside the box or basalt wool is laid. This is the standard option and is done most often. But in the video you saw that you can get by with a calcium silicate slab and use it to insulate the pipe in the bathhouse from the ceiling.
Installing a chimney in a finished roof
If the chimney is not installed at the construction stage of the house, but in a finished roof, the following is done:
- There is a place for output taking into account the requirements of SNiP. This should be the space between the cross beam and the rafters.
- A box is made of beams, the cross-section of which is equal to the cross-section of the rafters. The box is made such that the width of its sides is 0.5 m greater than the diameter of the pipe.
- A hole is cut in the roof equal to the perimeter of the box. To comply with it, through holes are drilled from the inside in the corners of the box.
- The roofing material is bent outward, a pipe is inserted into the hole and secured.
- The box is sealed with fire-resistant material for thermal insulation.
- The junction of the pipe and the roof is sealed. The flange (adapter) is being installed.
The pipe must be routed only through an adapter Source rinnipool.ru
What are the consequences of violating the installation rules?
If the chimney box on the roof was installed improperly, this can lead to the following problems:
- Gradual destruction of the chimney.
- High level of heat loss.
- Formation and deepening of cracks in the structure.
- Disruption of the gas circulation process.
- Ingress of moisture, which leads to destruction of the pipe and duct.
- The presence of moisture can lead to rotting of wooden parts and the formation of fungus.
Therefore, it is important to install the pipe and the duct for it in accordance with the technological requirements.
Methods for processing edges for welding
There are several ways to process the edge of a part:
- Manual - for this, tools such as a chisel, sandpaper or file are used;
- Mechanical - they differ in the type of equipment used: 1) using a lathe or boring machine, the part is turned on an axis that rotates; 2) other workpieces are processed on milling, grinding, planing and other machines; 3) milling or universal machines are used to process curved edges.
- Thermal – 1) using a gas cutter, which turns into manual welding; 2) plasmatron - one of the most accurate processing.
How to prepare a product before cutting an edge for welding
Preparatory work can be divided into several types:
- Manual > - this method of straightening is used to attach slabs using a hammer.
- Mechanical - this type of preparation is used to eliminate folds, unevenness and warping (distortion of shape) by rolling on the right rollers.
- Marking - used during repairs, to correct curved seams when it is necessary to drill holes.
- Thermal – used to increase elasticity and regulate the internal structure of the metal, for which metal products are heated in advance.
It is also important to prepare the edge itself. Preparation varies:
- With cutting: one side is chamfered, and, if necessary, the other, often from both products. Or they do an angular bevel.
- There is no cutting: to do this, you need to thoroughly clean the surface and lay it at the required distance.
- Beading: Pointed sides are smoothed out.
When the entire range of preparation work has been completed, they proceed directly to cutting the edges of the pipes before welding. It is possible to distinguish one-sided cutting of pipes for welding and double-sided (since bevels of more complex shapes must be welded on both the front and back sides of the part).
Cutting edges for GOST welding
The preparation of elements for welding can vary and depend on the type of connection and the thickness of the metal, ordered by the GOST system.
Cutting pipe edges for welding - GOST 16037-80, and is also suitable for connections made of materials such as steel. It is worth considering the specifics of the elements being connected and the type of connections:
- Properties of pipe structures;
- Dimensions, i.e. pipe thickness and diameter;
- Compound.
All conditions specified in the interstate standard for cutting pipes for welding 16037-80 must be observed to perform high-quality welding.
It is important to properly clean and degrease the surface of the edges of the pipes that will be welded.
Before electric arc welding using gases, the edge of the part is processed manually, thermally or mechanically. For laser, it is necessary to thoroughly clean the metal, etching the edges of further seams, washing and drying them.
Sharp edges on the bevels of the workpiece must be rounded, otherwise this may lead to burning or poor welding of the seam.
What it is
During combustion, strong heating occurs on the outer surfaces of not only the walls of the furnace body, boiler, but also the structures of the flue that discharge hot flue gases into the atmosphere.
Fire-resistant cutting is an increase in the width of the walls of the housings of heating units - stoves, fireplaces, boilers or chimneys, ducts in places/areas of direct contact with building structures of objects made of flammable, low-combustible materials.
Fire-resistant retreat is the space, the distance between the outer surfaces of the walls of the housings of furnace units, heating equipment or smoke ducts and unprotected or protected from constant heating, ignition walls, partitions made of combustible, low-combustible building materials.
