Many people believe that in order to take a steam bath in camp conditions, you need special equipment and special skills and knowledge. In fact, a camp bathhouse with a stove is very simple to build, and does not require practically any tools other than those that you already take on a hike: an ax, a shovel and, in some cases, a hammer.
The easiest way to arrange a bathhouse
DIY camp sauna
A mobile bathhouse tent is constructed from a frame covered with film, awning or tarpaulin. A stove is installed inside. There are 2 options for organizing a bathhouse: assemble a structure from available materials or install a factory-made tent.
In the first case, the frame of the camping bathhouse is optimally folded from thin metal tubes, but it will have to be transported to the resting place. In nature, a similar skeleton of a structure is assembled from long, strong poles. Cobblestones are used to lay the stove.
The second option for a camp bath is a ready-made, factory-made tent. She will have to be transported to her vacation spot by car. Plus, a metal stove is included with the tent. It is small, but it has weight, and it is difficult to carry such a load manually.
Advice! When using a tent, it is optimal to give preference to a Soviet-style product.
The choice is explained by the fact that in such models a tarpaulin serves as cover for the frame. The material retains heat and moisture and does not emit harmful fumes when heated.
Features of the design of a camp bath
The main requirement for such structures is that the camp sauna tent must be light, safe, and quickly disassembled and assembled.
The best frame for a bathhouse is considered to be a frame made of aluminum tubes. When disassembled, it is easy to carry even by hand. The assembled frame is durable and fireproof. If the skeleton of the tent is made from wooden poles, then the best material is considered to be long, thin trunks of young trees. The poles should not be taken dry, as they are fragile and more susceptible to ignition from the stove.
The best covering material for a bathhouse is Soviet-style tarpaulin, but it is heavy, expensive and cannot be purchased everywhere. An ordinary film will serve as a primitive shelter. For a tent designed for 5 people, you will need a piece measuring 6x6 m. The disadvantage of the film is that it quickly burns out when hit by a spark from the stove, but it is easy to carry with you on a hike.
Any sauna tent must be equipped with a stove. There are 2 options to choose from:
- The stove-heater is built on a resting place from large cobblestones. The design resembles a well with a closed top. A window is left on the side for placing firewood in the firebox.
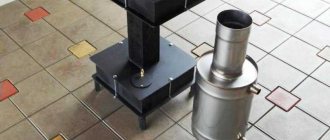
- The portable sauna stove is welded from metal. The design resembles a potbelly stove. There is a platform on top of the stove where you can heat water and heat stones to create a steam room.
The camping stove can be folded inside or outside the tent. The first option is called “black”, since there is smoke inside the bath along with the steam. The second option is called “in white”. Smoke from the stove does not penetrate into the tent. The stones are heated outside the bathhouse and brought inside while hot.
Important Terms
A portable sauna tent cannot be installed anywhere. It is optimal to choose a site with suitable conditions:
- Availability of water. In camping conditions, a suitable option for a bathhouse is the bank of any pond or river.
- Stones. If there is no metal portable stove, it will have to be stacked with cobblestones. There should be stones nearby, but not layered, but solid. Otherwise, the cobblestones will crack due to heating. Flying fragments can injure a person. The optimal dimensions of a cobblestone are from 10 to 12 cm. Small stones cool quickly, while large stones take a long time to warm up over a fire. The optimal shape of the cobblestones is slightly flattened and elongated. It is difficult to build a stove out of round stones, as they will roll off.
- Young trees. If you don’t have the frame with you, it is collected from long poles 3-4 cm thick. The material is looked for in the nearest forest or planting.
- Firewood. The stove in the camp sauna is heated for about 3 hours. Firewood requires dead wood. Trees are selected with a trunk thickness of 10-15 cm.
On a hike, it’s not always possible to find a place for a bathhouse with all the conditions, but you need to try to find something in between. First of all, a reservoir is in demand. Stones, firewood, and poles can be searched for and brought by hand.
Bathhouse tents from manufacturers
Specialized travel stores offer outdoor enthusiasts portable bathhouses in the form of kits consisting of the following elements:
- tent;
- bake;
- bench;
- ladles.
Some manufacturers sell benches and buckets separately, believing that they may not always be in demand. The stoves offered in kits often resemble ordinary potbelly stoves, so if tourists have something similar, it is not profitable to purchase a kit.
Tents from different manufacturers differ in the quality of the material that can be presented:
- polyethylene;
- PVC film;
- tarpaulin
A camping mobile sauna should always have a particularly strong frame. In some kits it is made of aluminum profile, in others only metal pegs are offered, and for load-bearing supports it is recommended to use trunks of dried trees or shrubs, which are abundant in the forest.
The mobile sauna tent has a fire-resistant coating in the place intended for installing the stove, this is a fundamental difference from conventional tent products.
Hiking models, which are expensive, are equipped with forced ventilation and have a special windproof belt, which creates comfortable conditions in the interior that are most reminiscent of the environment in stationary baths.
True, such a bathhouse is not a completely portable model; it is good for motorists, lovers of hunting or spending time in the country; not very convenient for conquerors of mountain trails and river cascades.
DIY manufacturing steps
A tent bathhouse is set up according to almost the same principle, regardless of the available material. The difference is the location of the stove.
Making a camp sauna “white-style”
“The white way” is to set up a sauna in a tent with your own hands without a stove. It is built outside the steam room. Only hot stones are brought inside the tent. The advantage of this method is the absence of smoke. The downside is that the camp bath takes a long time to warm up and cools down quickly. It is optimal to build a small tent so that there is enough space only for the necessary procedures. A large camping steam room will take a long time to warm up, you will need a lot of stones, and in cold weather this is almost impossible to achieve.
Due to the absence of a stove inside the tent, film can be used as a covering material. The frame in the traveling version is most often made of poles. You will need 8 poles more than 1 m long. The poles are tied together with wire or tape. You should get a cube or parallelepiped.
Advice! For a group holiday, it is better to build a bathhouse for 4 people and take turns to steam.
For 1-2 people, you can get by with a wigwam-shaped frame. 3 poles are placed at an angle, forming a cone. Before stretching the film, tape all sharp knots on the sticks. The polyethylene sleeve is opened with a knife. The resulting single-layer fabric covers the frame. The film is taped to the poles and secured with clothespins.
2 large sheets of film are left on the entrance side. The doors should overlap so that steam does not escape from the camp bath. Inside they set up a place for hot stones. It is fenced off with sticks 30-50 cm long driven into the ground. The floor of the camp bathhouse is covered with spruce branches. For sitting, you can lay a rug or find a stump.
The stove is installed at a safe distance from the tent. The spark should not reach the film cover. You also can’t move the stove too far away, because you’ll still have to carry hot stones into the tent. After the construction of the stove, the remaining stones are not thrown away. They press the bottom of the tent's film cover to the ground. It is important to place the stones tightly together, otherwise steam will escape from under the unpressed areas.
Making a sauna tent “the black way”
Using the “black” method, a do-it-yourself sauna on a camping trip is installed in the same way. The difference in the design is the location of the stove inside the tent. The frame of a camp bath is tied with willow twigs or vines. The easiest option is to fasten 4 poles about 1.5 m long with tape. If you can find long poles about 3 m, then 2 of them will be enough. The poles are simply bent, tying them with a cross in the center to form a hut shape.
Film can serve as a shelter for a camp bath, but polyethylene is afraid of fire. The stove will have to be folded efficiently in order to protect the film tent as much as possible from sparks.
For a “black-style” camping sauna, it is better to install a collapsible frame made of thin aluminum tubes. It is guaranteed not to ignite in the oven. Instead of film, the tent is covered with a tarpaulin. Durable posts will withstand the shelter even if it is covered with snow or rain accompanied by strong winds.
A quick camp sauna with a stove is organized in a factory-made tent, only with a tarpaulin cover. The frame is assembled from folding arches in a few minutes. For convenience, first a stone stove is laid out in the tent, and then a tarpaulin cover is pulled up.
How is it arranged?
First of all, you need to understand the principle of operation of a conventional bath. There is a room that is thoroughly heated by lighting the stove. Then, in the steam room, a ladle or two of water is poured onto the heater, creating a specific microclimate - high temperature and humidity.
If there are no walls that require long-term heating, all that remains is to heat the heater efficiently. It consists of ordinary stones stacked into a dome. A fire is made inside it and burned for several hours, heating the stones. This point is the most important - the more you can heat them, the longer and better the bath will be.
All the time you need to monitor the combustion mode, add firewood, check the uniform heating of all areas of the heater.
When the stones are sufficiently hot, you need to remove the remains of the fire from the dome. To do this, take a shovel and carefully remove the burnt coals and ash through the firewood supply hole. It is necessary to remove all remnants of the fire - this will make the bathhouse better and the air in it cleaner.
The next step is to install a tent or awning over the dome of hot stones. It should be a tent with a tightly closing canopy to prevent heat loss. All that remains is to go inside, close the curtain and splash water on the heater. Steam will come out, and a typical steam room microclimate will appear in the room.
If the stones are heated well enough, you can repeat entering the camping steam room several times - experienced people say that you can do this up to 10 times if the stones are massive and well heated.
Most often, the heater’s energy is enough for 3-4 passes, which is quite enough to thoroughly steam and wash.
Do-it-yourself camping sauna stove
The stove-stove for a camp bath is built with your own hands on the spot from large cobblestones. In fact, the design resembles a potbelly stove. First, lay out the firebox in the shape of an unfinished ring, leaving a window for loading firewood. The vault is made as shown in the figure: solid, vaulted or with a lintel. The first scheme is worse due to poor heating of the upper cobblestones, since there is not enough flame to reach them.
Conclusion
How to make a camp sauna and what to use for it depends on your desires and capabilities. Naturally, if you travel on foot, carrying a ready-made stove and a tent with a frame is quite expensive. In this case, the easiest way is to carry only a ready-made awning, and build the frame and stove on site (see also the article “Do-it-yourself camping sauna - in nature with comfort”).
If you are a fan of car travel, then you can carry a complete set and build a mobile steam room in a matter of minutes. Moreover, its size can be very impressive, which is important when vacationing with a large group.
In order to understand all the intricacies even better, we recommend watching the video in this article, which clearly shows the beauty of using a bathhouse on a camping trip.
Did you like the article? Subscribe to our Yandex.Zen channel
The main stages of constructing a bath using improvised means
Experienced travelers quickly erect a sauna tent with a stove. A beginner should follow the steps step by step, following the recommendations. After several training sessions, installing a camp sauna will take no more than an hour.
Selection of location
A suitable site for a camp bath is selected taking into account important conditions. Any source of water, firewood and stones is required. Carrying cobblestones from afar is difficult. The same goes for water. You can bring a couple of buckets, but the pleasure from bathing will be limited. It’s good to stop on the shore of a pond, where you can take a dip after the steam room.
When choosing a site, it is worth examining the soil. The ground must be solid. In soft and loose soil it is impossible to reliably strengthen the tent poles.
Construction of the stove
The most important step is to install a stove for a camp bath using cobblestones found in the vicinity. The simplest heater is built according to the following rules even before covering the tent with a tarpaulin:
- Under the stove, cut off the upper part of the soil with a sharp spatula. The base is laid out in the recess with cobblestones. If there is dry grass nearby, remove it with a spatula to prevent fire.
- Using flattened cobblestones with a size of 200 mm or more, lay out the fireplace. Its height and diameter are approximately 700 mm. A small opening is left for storing firewood in the fireplace. The hearth is covered from above with a large flat stone. You'll be lucky to find a slab-shaped savage. It is convenient to place a bucket of water on a flat stone.
- A fire is lit in the stove of the camp sauna tent 4 hours before swimming. The readiness of the stones will be indicated by their red or white color, which depends on their breed.
The first watering on the stove is done with caution. If the stones do not crack and no fragments fly off from them, the cobblestones are selected correctly.
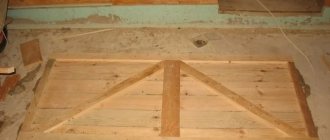
Frame structure
A collapsible tent has a frame made of tubes. When using a homemade structure, the felled poles are cleared of knots. The most convenient and safest is a two-compartment camping sauna. The frame of the tent is made in such a way that the steam room is slightly removed from the stove.
First, 4 racks are dug in the corners. From above they are connected along the perimeter and crosswise by crossbars. The poles form a strong outline of the tent and prevent the tarpaulin from sagging on the ceiling. Two long poles are placed at an angle to one side of any wall. They are attached to the tent frame from above, and pressed into the ground from below. This creates a second compartment for the stove.
Canopy for camping steam room
For a tent, it is advisable to use a single piece of film or tarpaulin. It should be larger in size than the frame so that the bottom edges can be strengthened well. The canopy is pressed to the ground with cobblestones or earth. The best option is to dig a trench around the frame, lay a canopy, and cover it with soil.
The warm floor inside the tent is made of spruce branches. Lay a rug on top or lay out thin branches with foliage. Birch is ideal.
Tips for using a camp sauna
Using a sauna tent is easy. A few tips will not hurt novice travelers:
- when burning wood in the tent, leave a small open window to ventilate the smoke;
- a bucket of water is placed on the stove to water the heater;
- after heating the stones, the burnt-out heat is removed from the heater, and the tent is tightly closed to avoid heat loss;
- The stones are watered as needed to create a comfortable amount of steam.
Cooling of the stove stones takes about 2 hours. During this time you can comfortably steam. To protect the walls of the tent from fire and people from accidental burns, the stove is fenced with shields made of branches.
How to choose a place for a mobile sauna
The frame is placed on the shore of a suitable body of water - a lake or river. An area with dense, non-flowing soil is suitable; The tent must be secured, otherwise burns and bruises are possible.
See if the parking lot has everything you need: suitable stones, poles for the frame, dead wood for kindling. Sometimes it is not possible to find a site that suits all parameters - you need to act according to the situation. In any case, the tent is set up close to the water, and you can bring stones and firewood.