Used oil is a proven fuel that can be used to heat small spaces. Recently it has become less profitable, but it is suitable for small warehouses, garages or utility blocks where fuel consumption is low.
An oil stove is an inexpensive way to heat the average garage. The material for the firebox is not difficult to find, and you can assemble it yourself in a matter of hours. It is not difficult to assemble the unit; it is made from scrap materials.
For refueling, regular motor oil is used, which can be drained from the car. Compared to expensive diesel heating devices, there is no need to buy diesel separately.
Furnace in production: options for making the device yourself
With the approach of cold weather, many craftsmen are coming up with various designs for heating the room and heating water. First of all, the question is about the type of fuel. In search of the most rational and cheapest option, many choose to work off, the average consumption of which is about 2 liters per hour. A waste oil furnace has a number of advantages. Knowing all the intricacies of its manufacture, you can create a budget-friendly and efficient source of heat in the house. Garage stove: photo examples, varieties, how to make it yourself (read more)
Creating a homemade stove for mining is not a labor-intensive process.
Arrangement of doors
The stove is almost ready. The finishing touches remain. I cut an opening in the door of the lower chamber through which air can freely flow to the pan and the stove burner.
Gap
The opening in the upper door was equipped with thrust plates for additional sealing.
Riveted the thrust plates
I assembled a simple lock for the top door. During the heating process, the stove body “leads”. To ensure that the combustion chamber remains airtight, the top door must close as securely as possible. That's why I made the castle.
Simple castle
I screwed several pieces of metal corner to the wall.
I installed the stove on the screwed corner. This is both convenient (if necessary, it will be much easier to carry out an inspection) and functional (heat loss into the ground is reduced).
Installed the stove
Advantages and disadvantages of a waste oil stove
A factory or homemade waste oil furnace is characterized by a number of advantages:
- ensuring fast and efficient heating of enclosed spaces in the form of greenhouses, domestic buildings, warehouses and technical rooms;
- independence of the device from electricity and gas;
When ensuring normal operation, the stove does not create a lot of soot and burning.
- unique design features of the device that allow you to carry out the cooking process;
- ease of operation;
- no open flame;
- reliability of the structure, which is made of metal products connected by welding;
- when ensuring normal operation, the stove does not create a lot of soot and burning;
- due to its light weight and dimensions, the device can be transported;
- the stove can be made from scrap metal;
- during operation of the device, combustion of oil and its vapor is ensured;
- The stove can be combined with a water heating system by installing a tank on top.
A closed type furnace is not without its drawbacks, among which are the following:
- the possibility of clogging the supply tube with waste oil;
- the need to install a chimney with a length of at least 4 m;
- presence of hot open surfaces;
The exhaust furnace provides fast and efficient heating of various types of enclosed spaces.
- weekly cleaning of the chimney and oil container from accumulated waste;
- high probability of contamination of clothing and premises during contact with fuel;
- the container with fuel should be located in a warm room;
- unpleasant smell of used oil;
- the flame in the apparatus can be extinguished only after the fuel has completely burned out;
- if used incorrectly, the fire hazard increases;
- characteristic humming noise during operation of the furnace;
- The fuel ignites only when it is heated to its flash point.
Note! Before pouring oil into the system, it should be filtered.
Furnace with afterburner
Furnace with afterburner
To prevent precious heat from quickly escaping into the chimney, you can organize its additional collection. To do this, the second chamber is bent at an angle of 90° or a little more (but it should not be sharp).
The principle of assembling such a device is usual. The only difference is that you will need two pipes. To connect them at an angle of 90° when cutting workpieces, they should be sawn at an angle of 45°.
If black smoke comes out of the chimney when the stove is ignited, this means that there is not enough oxygen to burn the fuel. This problem can be eliminated by making 3-5 additional holes in the afterburner.
Operating principle of a waste oil furnace
The prototype for oil furnaces operating on waste oil is kerogas, which was previously used in villages and dachas. It used kerosene as fuel, the vapors of which were burned in a separate chamber. To save on fuel, a waste oil burning option was developed. It can be purchased for free or at a reasonable cost at any service station.
Components of a waste oil stove.
Creating a homemade stove during mining is not a difficult process. The main task is to properly organize the system for a productive oil combustion process. To ensure complete combustion of vapors, heavy components must first be split into light ones, which is carried out as a result of pyrolysis. The oil must be properly heated for efficient evaporation.
The operating principle of an oil furnace during mining is as follows. First of all, the mining is ignited in the lower chamber of the apparatus. The combustion intensity is regulated using a throttle valve in the device body, through which air enters the chamber. Oil vapor mixed with oxygen rises upward through a vertical pipe. The pipe is connected to the upper tank, which is the afterburner chamber.
The mixture is mixed under the influence of the Coriolis force (force of inertia). The intensity of the process is achieved by choosing the correct diameter and length of the combustion chamber. To ensure complete combustion, air must flow through the damper in sufficient quantity. To do this, it is additionally sucked through holes made in a vertical perforated pipe connecting the tanks.
The combustion intensity is regulated using a throttle valve in the device body.
The gas flow is directed to the final combustion chamber, in which the upper part is expanded. During its manufacture, a horizontal separation is made between the chimney inlet and the combustion chamber outlet, which is necessary to ensure a temperature jump between the nitrogen oxide and oxygen afterburning zones. At temperatures below 600 °C, nitrogen oxides are more active than oxygen. As they decompose, they oxidize fuel particles. With increasing temperature, oxygen acts as the main oxidizing agent. Harmful substances are released into the atmosphere through the chimney.
Note! To ensure efficient oil combustion in the upper tank, the temperature must be low.
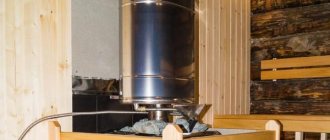
Oil tank
Oil tank
To make the tank, I took a freon cylinder. You can buy it for pennies at any service station or metal collection point. The main thing is that the needle valve of this cylinder is in good condition. With its help, in the future you will be able to accurately control the amount of fuel supplied.
Oil tank
The tank was connected to the stove using a hose. The hose was connected to the valve. The tank itself was secured in an inverted position.
To fill the waste, I cut a hole in the tank.
Waste oil furnace: types of designs
There are several types of oil furnaces that operate on waste oil. The classic model is the pyrolysis apparatus. It is made from ready-made containers in the form of barrels, pipes, cylinders or from alloy sheets. Oil is poured into the lower vessel, which splits when there is insufficient air. In the upper tank, intensive combustion of its vapor occurs, due to which a lot of heat is released.
Temperature regulation is carried out by air supply. Such a furnace requires constant cleaning of the chambers from accumulated fractions. It does not have mechanical temperature control.
Oil is poured into the lower vessel of the stove, which breaks down when there is insufficient air.
At the oil recovery stove, a guaranteed air supply to the second chamber is realized with the help of a fan. The combustion process is more efficient, so warm air evenly enters the room.
The operating principle of a stove with a drip supply of fuel is similar to the operating mechanism of diesel engines. It is economical. However, the independent process of manufacturing the device is very labor-intensive, so it is better to purchase a factory device of this type. In addition, it should be taken into account that homemade drip stoves are picky about the quality of the oil, which must be preheated before feeding into the stove.
The most efficient model is a supercharged waste oil furnace. It, in comparison with a potbelly stove, has a higher cost. Additional heat comes from blowing fans. Supercharging can be done using a car cooler motor, and the heater is blown by a 220 V home propeller.
Standard layout of a waste oil furnace.
Climate
0 votes
+
Vote for!
—
Vote against!
Very often, in household buildings or houses where people live periodically, it is necessary to install an economical stove. An affordable and budget option is a potbelly stove using waste fuel. The real owners quickly figured out how to put oil to work and came up with a heating system that runs on energy-intensive fuel. This raw material burns, releasing a lot of heat and releasing a minimum of soot or soot into the room. The stove and heating method are the most convenient option for heating many outbuildings, such as garages, sheds, greenhouses or animal pens.
Table of contents:
- Do-it-yourself furnace
- Pros and cons of using spent fuel
- Do-it-yourself furnace, drawings
- Do-it-yourself stove made from a gas cylinder
- Do-it-yourself garage oven
- Do-it-yourself drip furnace
- Do-it-yourself wood-burning stove
Do-it-yourself furnace
The design of this stove is simple and, if you have the tools and materials, you can make it in a few hours. As for raw materials, recycling waste diesel fuel, recycled oil and other flammable materials is a big problem for motorists. The decision to use recycling waste from a car to heat the same garage or other buildings is an excellent solution that will bring double benefits. Free material, which is also practically safe for the environment, is an ideal solution. All that remains is to make a stove and use the fuel twice, for its intended purpose and as recycled material. You can get used raw materials in large quantities at service stations and car factories. Sometimes they even pay for the disposal of recycled materials.
Pros and cons of using spent fuel
The most important advantage of using a do-it-yourself stove is its high efficiency. Mining is practically free fuel, which can be purchased for a purely symbolic amount. The efficiency of the boiler installation is at least seventy-five percent. These are not the highest figures, but not small ones either. Among the advantages of heating using economical waste furnaces, the following parameters can be highlighted:
- The heat output of this type of heating is comparable to an electric heater with a power of fifteen kilowatts. Average fuel consumption is one liter per hour;
- in fifteen minutes the high temperature rises and warms up a medium-sized room;
- Any oil will be used, it can be transmission, shock-absorbing or motor oil;
- the design can be used at any temperature conditions, low temperature will not affect the quality of the stove;
- to make such a heating system you do not need special skills, it is enough to have welding and plumbing skills;
- the flat top of the oven allows you to cook food on it;
- the structure is quite mobile and can be moved to any convenient place;
- burning waste fuel can be called conditionally environmentally friendly, but the harm to the environment is minimal;
- The stove can be integrated into the heating system.
As for the disadvantages of this option, we can highlight the following:
- to prevent carbon monoxide and smoke from entering the room, it is necessary to make a sufficiently long chimney and insulate it well;
- you should clean the boiler installation and chimney at least every ten days;
- the issue of storing oil in winter requires advance decision, so that the waste does not freeze, it must be stored in a warm place or buried in the ground below the freezing line;
- heat does not accumulate, the room temperature is comfortable while the stove is burning;
- To comply with safety precautions, you must purchase a fire extinguisher and store it close to the stove you built yourself.
Do-it-yourself furnace, drawings
When deciding to build a heating device for testing yourself, you need to think about what type of structure it will be. There are three known options for a heating system using used oil:
- Pyrolysis burner - made from sheets of metal or ready-made tubes, cylinders; such a system consists of two closed reservoirs connected to each other using a pipe. Used oil is poured into the lower reservoir, which releases vapors, which in turn burn, spreading heat. The temperature can be adjusted by increasing or decreasing the oxygen supply.
- Design with built-in ventilation - a specially adapted fan supplies air to the second compartment, this allows the combustion process to be carried out more efficiently, and heat is distributed throughout the room.
- Design with drip feed of waste - this model is identical to the principle of operation of a diesel engine and is the most economical, but at the same time the most difficult to manufacture. Factory-made devices are available for sale and it is better to purchase a ready-made design. This type of stove is quite demanding on the quality of the fuel and its temperature.
There are many options for making a stove, but with any variation, the necessary parts of the heating system are as follows:
- fuel tank or combustion chamber;
- afterburner;
- air damper;
- chimney pipe;
- primary air supply;
- secondary air hole;
- legs.
The stove has its positive and negative sides. The advantages include the following:
- efficiency - low fuel consumption;
- ease of manufacture - such a design can be made in a day;
- energy independence - you can heat the stove at any time as needed, without being tied to gas or electricity;
- multifunctionality - the stove heats the room, using the stove you can heat water or cook food.
The disadvantages of such structures are that:
- chimney pipes must be installed only strictly horizontally with a pipe height of at least four meters;
- The chimney must be cleaned regularly.
But we should not forget about precautions when using homemade heating structures:
- No water should get into the boiling oil;
- During operation of the heating system, it is necessary to carefully refuel;
- do not use this heating option in rooms with difficult access to fresh air;
- Do not leave the device unsupervised for a long period of time.
Do-it-yourself stove made from a gas cylinder
If the farm has a gas cylinder, it can be used to make a homemade furnace for mining. Thanks to the thick walls of the cylinder, the stove can function for a long time without burning out. The shape of the cylinder is ideal for the design of the boiler installation. To make a stove, you will need:
- To do this, you need to take any cylinder with a volume of fifty liters. The thickness of the material should not exceed one and a half centimeters, otherwise the walls cannot fully warm up and the oven will not work properly.
- You will need a sheet of metal of the same thickness - up to one and a half centimeters.
- The chimney pipe must be no shorter than four meters, with a diameter of ten centimeters.
- The best pipe for the burner is ten centimeters in diameter and up to thirty-five centimeters long.
- For the legs you will need a metal corner or tube.
- The tools you will need are a tape measure, a drill, a grinder, a welding machine, and electrodes.
Before starting work, the cylinder must be emptied of gas residues and thoroughly rinsed outside. Even if the cylinder appears empty and has not been used for a long time, safety precautions should be observed.
The cylinder is fixed for convenience and work on making the stove begins.
The bottom of the cylinder is the lower combustion chamber, the height of this part of the structure is about twenty centimeters, the upper chamber will be about the same size. Legs made from available materials are welded to the bottom part: corners, tubes.
A partition is welded to the opening of the upper chamber hatch; it is welded as close as possible to the location of the chimney; its task is to trap heated smoke in the tank.
After this, you need to cut out two circles; for this, metal sheets are used. Circles will be used for the lid of the lower chamber and for the bottom of the upper chamber. Holes ten centimeters in diameter are made in each of the lids. For the lower chamber, the hole is located in the center, for the upper chamber - closer to the edge along the diameter of the combustion tube. A hole about six centimeters in diameter must be made in the bottom cover; it is necessary for refueling. The hole should have a flap like a peephole, with the ability to move back and be installed in place.
Forty-eight holes are drilled in the connecting tube - this is an afterburning chamber in which exhaust vapors are mixed with oxygen. To prevent soot and soot from accumulating inside the structure at a very rapid pace, you need to sand the internal parts of the unit.
A connecting tube is welded into the hole prepared in advance.
A hole is made in the top of the chamber for the chimney pipe; it is important that it must be positioned strictly vertically, otherwise good draft will not be ensured.
Do-it-yourself garage oven
Additional fragments can be added to the classic design and the stove can be improved. Experts advise trying these additions:
- One of the disadvantages of such a furnace is considered to be rapid cooling after the combustion process stops. In order for air heating to be more efficient, experts advise making a heat exchanger. Such an engineering solution will increase the efficiency of the furnace and will be able to heat the room more efficiently.
- If you build a reflector and make a pipe outlet to supply warm air to the adjacent room, you can heat additional rooms.
- In order for the stove to function as a boiler, it is necessary to weld a water tank, which will be heated by the stove.
- An additional reservoir with automatic oil supply will help extend the operating life of the furnace.
The structure can be painted using a mixture of liquid glass and aluminum powder.
In a garage, such a heating system will be a real godsend; it will help solve the issue of recycling used oil and heating the room without high material costs.
You can see how to make a furnace for testing with your own hands in the video. It describes in detail how to make a working furnace with your own hands.
Do-it-yourself drip furnace
The drip-type furnace is manufactured in the same way as those described above. A distinctive feature of this design is the drip supply of fuel. Oil is supplied from the external tank using a dropper. Most often, this type of furnace is made from a freon cylinder, provided that the needle valve is intact. A hole is cut at the bottom of the cylinder for pouring used oil; it must be made so large that pouring waste from the canister is convenient. If a fine mesh is placed over the hole, it will be able to filter out the poured materials. Since the oil tank is located above the level of the heating system, devices for hanging the tank should be welded.
A gas cylinder is ideal for a drip-type stove. This type of furnace is manufactured similarly to others previously described.
To properly manufacture a furnace for testing with your own hands, you must carefully consider all the drawings. They describe in detail the algorithm of actions and the stages of work.
But making a drip-type furnace with your own hands is quite difficult, and if you don’t have the skills to do this kind of work, you need to carefully study the videos and drawings of this version of the heating system. If you are not sure that everything will work out or there is not a sufficient supply of tool material, you can purchase a factory-made unit. Calculating everything correctly and making the equipment safe is not easy.
Do-it-yourself wood-burning stove
A do-it-yourself wood-burning stove or, as it is called, a combined stove, is a simple and highly efficient device for heating rooms. Combination stoves combine two important principles - high thermal efficiency and a simple internal structure. Such stoves are an ideal option for heating non-residential premises without high economic costs.
There are three ways to make the device:
- the easiest way is from steel sheets or cylinders;
- devices with forced air injection;
- drip type device.
As already noted, making the latter option is available only to those who have certain skills.
In a combi stove, oil is supplied from above and wood is burned from below.
This version of the stove - combined - requires reasonable use. Competent operation should be manifested in the ability to refuel and ignite the workings. Provided that the stove is homemade, you must especially carefully follow the rules for using the structure.
Refueling is carried out through a hole adapted for this purpose; it is allowed to refuel up to two-thirds of the norm. The furnace is ignited using sawdust mixed with waste. To facilitate ignition, use paper.
The combination stove is becoming increasingly popular for heating small outbuildings. This is due to the low cost of the material and high heat transfer. But if we talk about comparing a working furnace and a combined heating option, then the first option is cheaper and more accessible.
Any craftsman can make a furnace during testing, and if it is possible to buy raw materials, then this type of heating of non-residential premises is economically profitable and convenient.
Requirements for installation and operation of an oil furnace
It is required that the stove be located in an empty room, near which there should be no flammable surfaces. Particular attention is paid to self-made devices. They should not be placed on a shelf or other support that could catch fire.
A homemade furnace for mining should be located on a flat base, which can be concrete or brick. It is necessary that the distance between the apparatus and the wall be at least 1 m. To create good draft, the chimney must have a length of more than 4 m. Insulation should be provided on its external side to prevent the formation of acid condensation.
The used oil should not contain any solvent or other flammable element, so such components should be kept away from the furnace. It is also unacceptable for moisture to get into the container with oil. This will cause a fire in the oven. In the event of an emergency, a fire extinguisher should be used to extinguish the fire.
Note! In the room where the stove is located, there must be a good system of natural supply and exhaust ventilation.
The operating principle of a stove with a drip supply of fuel is similar to the operating mechanism of diesel engines.
Before starting work, oil is poured into a container in an amount equal to half the volume of the tank, which will provide the necessary space for the formation of vapor. For the vapors to become enriched with oxygen, you need to wait some time. Then the fuel is ignited using long matches. As soon as the process of ignition of vapors begins, the damper is closed halfway.
To increase the performance of the mini-furnace during mining, you can install a sealed tank with liquid above its upper chamber. To supply and drain water, fittings are attached to it, which are located at different levels. Another option for increasing productivity is the necessary air convection, which is carried out using a fan located near the upper chamber. By taking warm air from the stove, it helps to cool it, which has a positive effect on the life of the device.
Fire precautions
Whatever type of furnace you choose to use, you should adhere to the following safety rules:
- do not leave the stove in a draft;
- do not place the oven near objects that can easily ignite;
- keep a distance of half a meter around the stove so that nothing is on it;
- Water should not get into the oil;
- regularly check the chimney for leaks;
- use only technical purified oil;
- Do not leave the unit running unattended.
If you follow these rules, your stove will last as long as possible and will allow you to save significant money on heating.
DIY options for increasing the efficiency of a mini-oven
Waste oil furnaces are often used to heat a garage or small workshop. It is not recommended to use such a device in a building where people are constantly present. This is due to the fact that the stove absorbs oxygen, which has a negative effect on the human respiratory organs. If the device is intended to heat a living space, it should be located in a separate room.
It is not recommended to use such a stove in a room where people are constantly present.
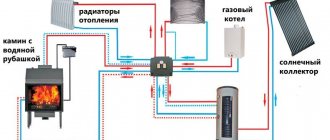
To improve the efficiency of the device, additional devices can be used. A waste oil furnace with a water circuit is organized by tying the coil body or installing a water jacket on the chimney. In the first case, the coil is made of copper pipe. It is built into the heating system of the house.
The water jacket is made of sheet metal in the form of a container, which is located in the upper part of the housing. It circulates a liquid coolant. For the stove to operate efficiently, the tank must contain up to 30 liters of water. Such a device will allow you to heat a large area.
An exhaust furnace with a water circuit must be equipped with an expansion tank with an emergency drain, necessary in case of boiling of the liquid. It is not recommended to install a membrane container here.
Another option for increasing the efficient operation of the furnace is to use an air heat exchanger, which is represented by a fan. No design changes are made to the device, and the heating of the room is improved. The fan is located near the upper chamber. When it cools, the heated air spreads across the area of the room. You can also pass air through a box located on top of the stove, or through a pipe that is installed in the afterburner chamber.
An exhaust furnace with a water circuit must be equipped with an expansion tank with an emergency drain.
Heat exchanger assembly
I made the stove to heat the garage. I don’t have hot water heaters in my garage, so I decided it would be better to have it immediately heated and circulate the air. If you have water batteries, then you can abandon the air heat exchanger and simply run 4-5 water coils through the upper chamber, connecting them in parallel. In this case, the design must be supplemented with a circulation pump and fan. Such equipment will allow you to heat the entire house with a stove; you just need to allocate a room for installing the stove.
Heat exchanger assembly
Let's go back to my heat exchanger. I installed it between the smoke exhaust pipe and the stove burner - this is where the heat is greatest. I welded an iron plate to the heat exchanger. Thanks to it, the flame will be held better. It will also help distribute the fire inside the stove body.
An air swirler was installed inside the heat exchanger. There are no engineering delights in such a swirler, but it copes with its task one hundred percent. When operating at maximum power, the metal of the case heats up to a scarlet color, and the heated outgoing air even penetrates the glove. You can see the swirler itself in the photo.
I'm making a swirl
I'm making a swirl
I'm making a swirl
Installed a swirler
Next, I took a duct fan and placed it on one side of the heat exchanger. By the way, you can connect a thermal relay to the fan for automation. This will allow you to set the temperature yourself and save resources. For example, I decided to use a thermal relay from Autonics - I just had it lying around idle. But you can also take some budget model, for example, Vemer KLIMA. I tried it too, it works great.
Supercharged
This is what happens
Heat is concentrated in the firebox compartment.
Popular options for pre-fabricated furnaces, their characteristics
The Teplamos NT-612 stove is often chosen as a device used for heating a garage. The power of such a drip fanless heater can vary between 5-15 kW. Fuel consumption is 0.5-1.5 l/hour.
This furnace for use in a garage is a closed type device. It is equipped with a chimney, an air supply pipe and a built-in tank designed for 8 liters of fuel. Fuel combustion occurs in the inner chamber. The operation of the device begins with electrical heating of the plasma bowl. When the required temperature is reached, fuel is supplied and air is forced into the combustion chamber. The average cost of the device is 30 thousand rubles.
Note! For normal operation of the stove, it must be preheated with a small amount of diesel fuel, which is poured into a special bowl.
Another popular model is the Zhar-25 (MS-25) stove. This device can operate not only on waste oil, but also on diesel fuel. The device operates from the electrical network, which powers the internal fan. The thermal power of the furnace varies from 25 to 50 kW. It is designed to heat a room up to 500 square meters. m. Maximum fuel consumption is 4.5 l/hour. The device has large dimensions. Its weight reaches 130 kg. This stove needs to be equipped with a good chimney. You can buy it for 45 thousand rubles.
The exhaust furnace is equipped with a chimney, an air supply pipe and a built-in tank.
Example of calculating furnace dimensions
As mentioned above, fuel consumption is about 1...2 liters per hour. At the same time, the radiated heat is about 11 kW/hour per liter. Thus, the furnace can produce 11...22 kW per hour. To calculate the required volume of the firebox taking into account the burning time, we accept:
- volume of the room (garage) – 7x4x2.5=70 cubic meters, area 28 sq.m.;
- We believe that for every square meter of a garage-type room, at least 500 W are required (basic 100 W, we enter coefficients for all external walls, non-insulated roof and foundation, large entrance opening, metal structure);
- Accordingly, an area of 28 squares requires 14 kW of energy per hour.
By slightly increasing the minimum power of the stove (increasing the draft), we will obtain the required temperature in the room. But fuel consumption will increase to approximately 1.5...1.6 liters per hour. Therefore, for a burning time of at least 6 hours, the volume of the firebox should be 10 liters. This corresponds to 0.001 cubic meters, that is, the container should have a size, for example, 10x10x10 cm. In reality, the volume of the firebox exceeds the required volume of fuel by 1.5...2 times, that is, the dimensions should be 20x10x10 cm or more, this is suitable for a mini stove. Usually they take it with a substantial reserve, that is, 50x30x15 cm. This allows you not to add fuel every time you ignite.
Important: with large firebox sizes, it becomes necessary to extinguish the fire in the furnace during exhaust before the fuel burns out completely. The extinguishing process is shown in the video.
The length of the pipe is 40 cm, respectively, its diameter is 10 cm. The area of the lateral surface of the cylinder is equal to its height multiplied by the circumference of the base (diameter multiplied by the number π), in our case 40x3.14x10 = 1256 cm2. Accordingly, the area of all holes is one tenth of the total - 125.6 cm2. Considering that the area of one hole with a diameter of 10 mm is equal to πx0.52=3.14x0.25=0.78 sq.cm, such a pipe will require 125.6/0.78=160 holes.
Note! The accepted value is the area of the holes 10% of the total area of the side surface of the pipe - conditionally! The number of holes during manufacturing is taken, among other things, from the strength of the product and is usually noticeably less!
Considering that the unfolded cylinder is a 31x40 cm rectangle, and the holes should be placed in a checkerboard pattern, we will have to make 12 vertical rows of 13 or 14 holes each. Marking vertical rows is simple - divide the upper or lower circumference of the base of the pipe into 12 parts in any geometric way and draw vertical drilling lines.
The distance between the rows will be 3.3 cm. Marking the vertical rows is a little more difficult, since in every second row it is necessary to shift the upper (or lower) marking point by half the distance between the holes. Considering that we need to make holes not on the edge of the pipe, we add 1 to the planned number of holes and calculate the step: for 13 holes it will be 40/(13+1)=2.85 cm, for 14 – 40/(14+1) =2.6 cm.
Important: when drilling, the axis of the drill must be directed towards the axis of the pipe!
Do-it-yourself stove made of sheet metal and pipes
Depending on the type of device, the structure can be created from pipes of different diameters or from iron sheets. To work you will need the following tools:
- grinder with cutting and grinding wheel;
- sheet metal and pipes;
- welding machine and electrodes;
- metal corners;
- metal paint that can withstand high temperatures.
Before making a furnace for testing, a detailed drawing of the apparatus is made. You can create it yourself or use ready-made options that are easy to find on websites on the Internet.
The first step is to make the lower part of the chamber connecting to the fuel tank. It looks like a rounded or straight tank with a lid where two pipes are located. The first is used to supply oil, and the second is used to strengthen the pipe that goes into the middle part of the device. Elements for the tank are cut out with a grinder and connected according to the drawing.
Depending on the type of device, the structure can be created from pipes of different diameters or from iron sheets.
The bottom and metal corners are welded to the walls of the tank, which act as the legs of the structure. To create a lid, a sheet of metal is taken and holes are made in it. The first, with a diameter of 100 mm, is located in the center; the second, 60 mm in size, is located closer to the edge. The lid should be removable, which will make cleaning the stove easier.
A pipe about 37 cm long and 100 mm in diameter is used to supply oxygen. It has holes along the entire length of the element necessary for the supply of oxygen. The pipe is welded perpendicular to the cover at the bottom of the apparatus. An air damper is fixed on it, which will be secured with a rivet or bolts. The hole under the damper should be 6 cm in size. It is intended for supplying oil and igniting fuel.
The design of the upper tank is carried out by analogy with the design of the lower tank according to the drawing of a furnace using waste oil with your own hands. The walls of the product must have a thickness of at least 350 mm. A bottom with a diameter of 10 cm is cut out of the bottom of the tank, which should be placed closer to the edge. A small piece of pipe with a diameter of 11 cm is welded to the bottom of the hole. This is necessary to connect the element to the gas combustion tank.
Before making a furnace for testing, a detailed drawing of the apparatus is made.
Since the top cover of the supercharged exhaust furnace is exposed to high temperatures, a metal sheet with a thickness of at least 6 mm should be used for its manufacture. There is an opening in the lid for the chimney pipe, which should coincide with the opening at the bottom of the container. Between these elements, a partition made of dense metal sheet is mounted, located near the smoke hole. A pipe is attached to the top of the lid, connecting to the chimney part. The self-production process can be seen in detail in the video of the furnace being tested.
Note! To give the structure rigidity and stability, a metal spacer in the form of a piece of pipe with a diameter of 200-300 mm is welded between the chambers.
Making a drip heater
Most often, craftsmen use old oxygen and propane cylinders with a diameter of 220 and 300 mm, respectively, to assemble droppers. The former are preferable because of their powerful thick walls that can last a long time and not burn out. A pipe made of low-carbon steel (St 3-10) with a wall thickness of 5 mm or more is also suitable.
Advice. The ideal option for a durable housing is a pipe made of heat-resistant stainless steel alloyed with chromium, molybdenum or nickel (for example, 15X1MF or 12X18H12T) with a wall no more than 3 mm. Perhaps you or a neighbor has one in your garage. There is no need to buy it specially - it will be too expensive.
Select rolled metal for other parts according to the drawing of the furnace with top feed of waste into the combustion zone. The blower fan is a “snail” from a VAZ 2108 cabin heater or its Chinese equivalent, the fuel line is a stainless tube with a diameter of 8-10 mm.
The manufacturing technology is as follows:
- Make a fire bowl from a piece of pipe or take a ready-made steel container. It must be removed through the inspection hatch, so do not make the tray too large.
- Cut openings in the body for the chimney pipe and cleanout hatch. In the latter, make a frame and install the door (possibly bolted).
- Make an afterburner. Take your time to drill all the holes indicated on the drawing; do the bottom 2 rows first. You will complete the rest while setting up the oven.
- Weld a cover and an air duct with a flange for mounting the fan to the afterburner. Attach the fuel supply device as shown in the photo.
- Assemble the heating unit and connect it to the chimney.
Advice. For greater stability to the body, it would not hurt to weld a frame from a steel profile or angle according to the example shown in the photo.
The afterburner in the photo is a close-up - side and end views
. To regulate the heating power, you need to provide a fan speed control and a device for dosing the fuel supply (as a rule, an auto-drinker with a jet break is used). According to reviews from craftsmen on a popular forum where heat extraction issues are discussed, fuel consumption in the furnace can be monitored visually. The trend is this: if the oil flows in drops at the break in the stream, then less than 1 liter per hour burns, and when a thin stream flows, more than 1 liter per hour.
Recommendation. Control the fan performance using a cheap Chinese PWM controller (price is about 8 USD).
Different designs of drip bowls
After igniting and warming up the heater, it is necessary to set the optimal operating mode. The procedure is carried out according to the same scheme as with the miracle stove: you need to achieve the most transparent smoke from the chimney by drilling additional holes in the afterburner. The ideal flame color is blue, normal is yellow, and reddish is unsatisfactory. In the latter case, low heat transfer, high consumption and soot formation are observed. For details about the design and assembly of the furnace, see the video:
Step-by-step instructions for making a waste oil stove with your own hands from a cylinder
The device can be made from old items using the presented drawings of a waste oil furnace. For this process you will need a gas cylinder with a capacity of 50 liters. You should also prepare:
- pipe with a diameter of 80-100 mm and a length of 4 m;
- steel corner for making a stand and internal elements of the heat exchanger;
- sheet steel for making the bottom of the upper chamber and the plug;
For the manufacturing process of a waste oil furnace, you will need a gas cylinder with a capacity of 50 liters.
- brake disk;
- fuel supply hose;
- clamps;
- half-inch valve;
- loops;
- half-inch oil supply pipe.
An empty gas cylinder is used to make the body. You need to unscrew the valve on it, after which you should leave it outside overnight to ventilate the remaining gas. A hole is drilled in the bottom of the product. To prevent the formation of a spark, the drill must be moistened with oil. Through the hole, the cylinder is filled with water, which is then drained, washing away the remaining gas.
Two openings are cut in the cylinder. The top one will be used for the combustion chamber, where the heat exchanger will be installed. The lower one acts as a burner with a tray. The upper part of the chamber is specially made large. If necessary, it can be filled with other fuel options in the form of firewood or pressed briquettes.
A stove made from a gas cylinder will be more economical and efficient than one made from other materials.
Next, the bottom for the upper compartment of the device is made from sheet metal 4 mm thick. A burner is made from a piece of pipe 200 mm long, as shown in the drawing of a waste oil stove. There are many holes made around the circumference of the product, which are necessary for air to enter the fuel. Next, sand the inside of the burner. This will eliminate the possibility of soot accumulating on the ends and uneven surfaces.
Burner for testing: varieties, device, how to make it yourself (read more)
The furnace burner is exhausted from a gas cylinder and welded to the bottom of the upper chamber. If there are no mining reserves, wood can be laid on the formed shelf.
How to weld a simple stove
There is no point in explaining how to make the standard and most common design, shown below in the assembly drawing. Firstly, the diagram is very clear, and secondly, there is no shortage of information of this kind.
Let's move on to a more complex version of the heater with an afterburner bent at 90° (the angle of rotation can be made larger, but not sharper). The purpose of the event is simple - to organize the extraction of heat from hot flue gases, and not immediately throw them out into the street. The second difference is a drawer with oil instead of a traditional closed container, which is inconvenient to clean. The design of the furnace with dimensions is shown in the drawing.
The dimensions of the unit are arbitrary and may change when selecting pipes of a different section
Advice. Select the sizes of pipes for the firebox and body depending on the volume of the heated room. For a regular garage 6 x 3 m, a profile pipe of 80 x 80 x 4 mm is suitable; for a fuel box, take a size of 60 x 60 x 4 mm. Round rolled metal will also work, but it is more difficult to work with.
Step-by-step instructions for assembling a furnace for burning waste look like this:
- Cut blanks for the body, drawer and afterburner. For the latter, the pipes must be cut at an angle of 45°.
- In a profile with a smaller cross-section, cut out one wall with a grinder, and weld plugs on the sides to create an open container. Attach a handle to the front part protruding over the sides of the box.
- Weld the structure as shown in the drawing, drill an air hole on top of the fuel chamber and perforate your bent pipe. The heater is ready.
Here the master attached convection fins from a 40 mm steel strip for better heat transfer.
A few words about how to select the number and diameter of the afterburner holes. In our example, its cross-section is 80 x 80 = 6400 mm²; for the calculation you need to take half - 3200 mm². If you use an 8 mm drill, the area of each hole will be 50 mm². Divide 3200 by 50 and we get 64 pieces that need to be drilled during the assembly process; when setting up, their number will increase.
Important point. Before starting the heating unit, make sure that the total height of the chimney (calculated from the oil chamber to the pipe cut on the street) is at least 5 m, otherwise increase it to the required level.
One of the simplest ways to extract heat is to connect the stove to a horizontal pipe 3-4 m long, running at a slope along the wall of the room. Make sure that there are no wooden shelves or fuel cans placed above it and the heater. It is better to fence the walls near the stove with sheet iron.
Now all that remains is to ignite, warm up and configure the oven. Your task is to achieve minimal emissions of black smoke into the street, indicating a lack of air for combustion. It is necessary to drill 3-5 additional holes in the afterburner and check the operation of the unit again until the emission becomes as transparent as possible.
Advice. Do not overdo it and do not do a lot of drilling, which will cause the potbelly stove to smoke into the room. The video describes production, setup and maintenance in great detail:
Making a tray for working off and installing a chimney for an oil stove with your own hands
According to the drawing of the stove, a cast iron automobile brake disc, which has good heat-resistant characteristics, is used to make a waste oil pan. A steel circle is welded in its lower part, which forms the bottom. At the top there is a lid through which air enters the oven.
A cast iron automobile brake disc is used to make the pan.
On a note! It is better to make the opening wide. This will provide sufficient air draft so that the oil will flow into the pan.
The next stage in the manufacture of a stove using waste oil from a gas cylinder is to make a coupling from a 10 cm long pipe that connects the burner and the pan. Thanks to this element, servicing the stove will be much easier. You can remove the tray and clean the bottom of the burner. To ensure the supply of oil, a metal tube is inserted into the hole in the housing and secured by welding. An emergency valve is installed on the pipe.
The chimney structure is made of a pipe with a diameter of 100 mm. One end of it is welded to the hole in the central upper part of the body, and the other is brought out to the street.
On a note! The chimney pipe through the wall must pass through a special fireproof glass.
By watching the video “Furnace using a gas cylinder”, you can familiarize yourself with the sequence of actions in the manufacture of the device.
Ensuring oil supply
I'll insert a tube into the hole
Waste will drip through the tube
The tube was caught by welding
I cut the pipe
Next I worked on the oil supply system. To do this, I took a piece of pipe and welded it to the pallet through a previously prepared hole. I cut the pipe in advance so that the waste stream could pass normally through the opening in the pan.
This is an emergency valve and a tube that leads to the tank
I ran the tube to the tank and installed the valve.
How to make a pyrolysis type stove
A potbelly stove during mining consists of three main elements:
- oil containers with lid and valve;
- closed combustion chamber;
- afterburning chambers.
The stove must have a chimney, the length of which is at least 4 m. The oil container, according to the do-it-yourself potbelly stove drawing, is made from a piece of pipe with a diameter of 345 mm and a length of 100 mm. A sheet metal cover is welded to its lower part. The removable top cover is made of a pipe with a diameter of 352 mm, to which sides with a height of 600 mm must be attached by welding. The lid has a central hole of 100 mm in size, intended for the combustion chamber, as well as a side hole (60 mm in diameter) for air injection, which is closed by a rotating lid.
Note! By adjusting the clearance of the blower, you select the combustion intensity of the stove, which affects the air temperature in the room.
According to the drawing of the stove during testing, a pipe with a diameter of 352 mm and a height of 100 mm is used to make the afterburner. Holes measuring 100 mm are made in its lower and upper parts. The first is for the combustion chamber pipe, and the second is for the chimney. Closer to the chimney opening, it is necessary to weld a partition 70 mm high and 330 mm wide.
Diagram of a pyrolysis-type furnace.
Using a drill, holes are made in the combustion chamber pipe along its entire height, leaving the lower zone 20 mm high and the upper zone (50 mm) unused. After completing all welding work, the tightness and reliability of the seams should be checked. Next, a furnace test is organized. The waste is poured into the oil container. Kerosene is added on top. Careful ignition is carried out with the ash pan open, with the help of which, after heating the oven, the heat intensity is adjusted.
Note! Testing the furnace during testing should be carried out outdoors, which will avoid a fire indoors or other accident.
To heat a garage, small workshop or living space, you can use a waste stove, which has a number of advantages. The device can be purchased ready-made or made independently using drawings from the Internet. Before making a stove, you should study the sequence of actions in order to subsequently obtain a practical and effective device.
What is mining
Waste oil is technical oil that is used inside automobile engines and is drained from them after the end of its service life. That is, it is a 100% petroleum product to which various additives are added to increase the service life of car engine parts that rub together.
Under the influence of high temperatures and air, technical oil loses its technical properties. Therefore, it is replaced with a new one at certain intervals. It is the drained oil that is called used or waste oil. All oils used in car engines of any brand are flammable. That is why they are often used as fuel.
But when burned in a flame, the waste leaves behind a fairly large amount of waste, some of which is toxic. To reduce the concentration of such substances, craftsmen came up with waste oil stoves, which operate on the principle of heating waste oil. It is during the process of heating to high temperatures that the oil begins to break down into components, some of which are flammable mixtures. They burn in fire, releasing enormous thermal energy. Of course, the presence of oxygen in this process is mandatory.
Used oil drained from a car engine crankcase
Required materials and tools
To manufacture the device you will need sheet steel from 4 mm. The thickness of the metal is important: the thicker it is, the more durable the finished stove design will be. Experts recommend using a sheet of five to ensure the reliability and resistance of the structure to temperature deformations.
To work you will need tools:
- cutting torch;
- Bulgarian;
- welding machine, electrodes;
- drilling machine, electric drill, set of drills (in particular, a drill with a diameter of 10 mm for making holes on the surface of the combustion chamber);
- measuring tools: tape measure, ruler, caliper.
Safety precautions
Improper handling of the stove can cause a fire. To avoid such trouble, it is recommended:
- do not allow the use of other types of oils, except for used engine fuel;
- do not start up faulty equipment;
- do not allow the unit to be installed in a garage that does not have a ventilation system;
- do not leave the room if the stove is working;
- do not allow fires to start if there is no smoke exhaust duct;
- the hole to the burner must not be blocked;
- Oil should not splash onto a hot surface.
Important! The stove can only be used by adults. Children and animals should not come close to the unit.
Ignoring safety precautions may cause a fire.
The video of making a stove during testing for a garage provides additional information on the construction of a heating unit:
Drawing option
For a more clear idea of the design of the furnace, let’s look at its assembly diagram.
The lower tank is composite, which is important for servicing the device, filling fuel and igniting the stove.
The given drawing is not the only possible design. There are various options, but the most common and successful is this. The general appearance of the product will look like this.
The design does not necessarily have to consist of round tanks; rectangular tanks are often assembled. This greatly facilitates production, less waste remains, and the density of the lids when produced independently is much higher. The indicated dimensions are also not a dogma; changes are possible.