Category: For the bath, For the cottage, Firewood Published 11/13/2019 · Comments: · Reading time: 8 min
In private properties with stove heating or a bathhouse, firewood is indispensable. To keep them in order and dry, special storage facilities are installed. The logs are securely stacked in them and protected from precipitation. There are different ways to make a firewood rack at your dacha with your own hands.
Types of woodsheds
To figure out how to make a firewood log, you need to get acquainted with its different types:
- Canopy. These outdoor firewood boxes are chosen for summer cottages; assembling them is not difficult. The process consists of preparing a floor raised above the ground, organizing at least 4 supports and a roof. To store large volumes, several sections are made, separating them with supports or partitions.
- Extension. It is stable and simple, with a building as the back wall. The important elements are a lower frame with an upper ceiling; it is not necessary to make walls. Such extensions are not recommended for wooden buildings, as they increase the fire hazard.
- Free-standing firewood rack for a summer house or home. It is stable and used for large volumes of fuel. There are different manufacturing methods.
- Mobile firewood for a dacha (at home). It is designed for small volumes of fuel and can be moved.
Simple country firewood
For a summer cottage on the street, you can build a simple structure with your own hands; it will cost little.
It is important to calculate the dimensions; you can use ready-made drawings or create them yourself.
You need to prepare:
- on the lower frame a pair of one and a half meter boards and 4 0.34 m each;
- on the side posts 4 bars of 1.5 m each and a pair of 0.34 m each;
- for the rear crossbars 2 strips of 1.45 m each;
- drill with drills;
- hacksaw;
- level;
- pencil with tape measure.
If properly prepared, the process will take several hours. The algorithm is as follows:
- Cut out the parts to the required sizes.
- Make a frame. Assemble a rectangular frame from two long and two short boards. Use the remaining short strips as crossbars to keep the frame secure.
- Attach long pole bars perpendicular to the frame. Install them in the inner corners of the base. From below, the bars should protrude beyond the frame, forming legs.
- Using short bars, fasten the side racks at the top in pairs.
- Secure the rear crossbars. Without them, the structure will be unstable.
- For reliability, you can make a top floor or replace it with 1-2 boards.
Expert opinion
Igor Lebedev
Expert of our site. More than 10 years in the furnace business. Implemented dozens of different projects. Helps make the content of our site interesting and useful!
Ask a Question
Advice! In order for even the simplest wooden firewood logs for the dacha to last longer, you need to paint them. To ensure reliable connection, it can be treated with waterproof glue.
Making a metal country firewood
For the woodshed, you can take a profile pipe. It will turn out strong. For a metal woodshed you will need:
- aluminum profile 2.5 m;
- a pair of L-shaped metal corners of the same size;
- self-tapping screws;
- hacksaw or grinder;
- angle grinder;
- roulette.
Don't miss: Features of the design and operation of the Buleryan stove
To get everything smooth, you need to use a level. The work will take several hours, the algorithm is as follows:
- Saw the metal profile in the middle.
- Cut one corner into 0.6 m sections.
- From the second corner, prepare 4 sections of 0.3 m each, the same number of brackets of 0.15 m each and legs of 5 cm each.
- Assemble the side posts. The vertical supports will be sections of 0.6 m each; connect them at the bottom and top with sections of 0.3 m each.
- At the bottom of the rack, connect parts of a metal profile - they will serve as the long sides of the frame.
- Attach the support legs.
- Fasten the profile to the side posts with brackets, placing them at an angle of 45°.
A metal building for the street will suffer from precipitation, so it needs to be painted. It is better to use matte black paint.
The metal firewood rack must be installed evenly. A platform is being prepared for this. You need to remove the sod and add gravel. It is better to install bricks under the legs.
To make the metal woodshed more stable, you need to strengthen the supporting frame with a crossbar. It is also placed on legs.
Selecting a location
Place the woodshed away from barbecues and other sources of ignition. You should not build a woodshed near a garden or vegetable garden, as this is usually a rather large structure and shades the area. This should be an elevation (in the lowlands the firewood will become damp) where the wind blows. In this case, it is worth considering the possibility of travel to the building. For fire safety, a distance of at least 4 meters is maintained from the house to the woodshed.
How to make a woodshed
It is not difficult to build such a structure; in many ways it resembles a free-standing firewood shed.
You will need the following materials:
- boards;
- plywood 20 mm – sheets 2.45x0.68 m and 1.2x2.5 m;
- roofing felt;
- tiles;
- screws.
You need to act step by step:
- Assemble the floor frame. This is a rectangular frame and several cross members.
- Secure the vertical support posts. The height on different sides should be different so that the roof is sloped. Attach the posts below the frame. To make legs.
- Cover the walls, attaching the planks horizontally.
- Prepare the boardwalk. Depending on the length, the material can be laid lengthwise or crosswise. Use galvanized screws to secure.
- Equip the frame for the roof.
- Prepare the rafters, maintaining an angle of at least 15°.
- Lay a plywood sheet on the rafters, securing it lengthwise with screws at intervals of 15 cm.
- Lay down roofing felt.
- Secure the shingles. The beginning of styling is the lower left edge. The tiles should protrude approximately 5 cm from each edge.
The final stage is processing and painting wooden surfaces.
If you need a closed structure, then you need to form a fourth wall. You can install a door or leave a wide opening. Its width should be such that a person with an armful of logs can easily get out.
Design
The standard design of a woodshed is similar to a gazebo; it consists of pillars, lintels and a roof with large plumbs to protect it from precipitation and direct sunlight. Sometimes they put a door.
Experience shows that it is good when there are at least two compartments. One is consumable for this year, and the other is for aging for next year. Between them, about a meter (at least 80 cm) of space is kept for free air circulation. There are also shelves (not solid, lattice) on which stacked firewood is stored.
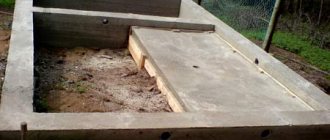
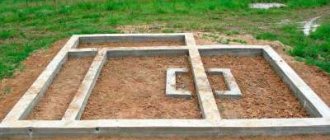
Foundation. The woodshed is built on a foundation. You can opt for a columnar, non-buried foundation with ready-made concrete columns 100x200x400 mm installed upright. This is safer during (seasonal) ground movements. If the area is windy, then parts for attaching the frame frame (anchors) can be walled into the posts. Instead of concrete, you can choose ridges (wood) of the same height, but thicker - from 150 mm. But such elements are treated in advance with hot bitumen, and then rolled in sand and wrapped in roofing felt. Screw piles are also suitable.
Golostan
“I drew a small “project” of the foundation. The plan is as follows - 6 screw piles 89 mm (3000 mm high), screw them in, leaving 250-300 mm of height above the ground, weld a 100-120 mm channel between them, attach a firewood structure made of 100 mm timber to it. only without a utility unit. I plan to use screw piles for installation.”
Floor. There should be a gap of 10 cm from the ground to the floor of the woodshed. If you place the structure directly on the ground, there is a risk that the material will become damp. It is better not to make the floor itself cracky. For flooring there is a tongue and groove board from 40 mm along joists from 150x75 mm in increments of up to 450 mm. Otherwise, the debris from the logs will fall into the underground and rot. In addition, such a floor is more durable, because a considerable load is placed on it - sometimes exceeding 1000 kgf/m2.
Walls. There are usually no blank walls, so that the forest is well ventilated and dried enough for good combustion. The width of the cracks is from 5 to 10 cm (it’s better not to make them too big - it will sweep up the snow). Otherwise, the firewood may rot. Ventilation is extremely important!
Kor173
“I have my own sad experience. I once installed a 10x3 m woodshed, with the long side along the north-south line (prevailing winds). It has virtually no walls and large gaps in the floor, with high-quality corrugated flooring on top. I laid it well - 5 pokes 1 spoon. But the wood in the middle rotted. Infrequent side winds did not blow 3 meters. And the climate is not tropical at all, and there were still winters. Now I have to leave half a meter empty in the middle - it helps. So it’s useful to think about ventilation in advance.”
There are a couple of points. Wall cladding is often chosen according to the type of blinds. This way the firewood gets less wet during rains, but is less ventilated. They are chosen based on the climate of the area and weather conditions. The horizontal lathing strengthens the structure, but in a rainstorm the drops bounce off onto the firewood.
Roof. The overhangs are large - 350 mm and more. Canadians, for example, make a minimum of 380 mm. As with most small outbuildings, a shed roof with a slope of 15-250 is optimal for a woodshed. Flat - collects snow and rainwater, requires careful and expensive waterproofing. Gable - too complex for a shed. And when installing a pitched roof, you do not need to equip the ridge, and you will need 2 times less rafters.
The valleys (along the facade) are placed on top to improve ventilation - which is also suitable if precipitation in your area is moderate. The cross members on top are more suitable for harsh climates - heavy snow, frequent downpours. To drain water flowing from the roof, it is recommended to make a drainage ditch.
Making a shed for logs
It’s easy to make a shed for firewood at your dacha with your own hands. There are many possible execution options. This can be a barn-like configuration without a front wall or a pole-supported shed top with or without sides.
The basic elements are a floor with supports and a roof on them. If there is an adjoining building, then it is enough to add only the side walls.
A shed for firewood at the dacha is made from wood with your own hands. The roof can be wooden or made of roofing felt. The service life depends on the selected material.
To make a shed for firewood with your own hands, it is worth studying photos of such structures. The process does not require special skills and will take several hours.
Firewood boxes can be of different sizes and configurations, metal and wooden. You can build a simple shed or shed, or an original building that decorates the site.
Woodpile material
The firewood rack should serve for a number of years, so its choice must be approached thoroughly. First of all, you need to decide what material to build it from: wicker, wood, or metal.
Woodpiles are:
- wooden. They can be made both portable and outdoor. The main thing: do not forget about treating wooden structures with special protective agents. The disadvantage of such a firewood rack is that it lasts a relatively short period of time;
- metal. It happens that metal firewood racks are placed as decorative stands for firewood in the dressing room, where they serve for beauty and to create coziness. If they are made for external use, the metal must be treated with an anti-corrosion solution. Such forged firewood boxes last much longer than wooden ones;
- wicker. They are easy to carry firewood in and can be used as a stand. They can serve to decorate the interior, but require more careful treatment;
- combined. There are firewood stands made of wood, metal, and woven material. There are various options available here.
Photos of firewood for cottages and baths:
Tags: woodshed for a bath, woodshed at the dacha design photo
About terminology
Drovyanik is often called drovyanik in certain regions of the Russian Federation and in other Slavic languages. The term “woodshed” is also often used. We will do both, and the third, but first let’s decide what is what:
- A woodshed is usually a woodshed with a door, standing on a foundation separate from the house.
- The woodshed is a simplified woodshed in the form of a canopy attached to the house, resting on a blind area around the house. (Outdated meaning - small firewood dealer peddling from house to house).
- A firewood rack is a stand for a consumable load of firewood for heating a fireplace or a basket for carrying firewood. Often both are combined in one product, see at the end.
DIY woodshed: decoration
Creating the decor of the firewood shed is as important as the construction itself. You can design a firewood storage facility in different ways. For example, create a flowerbed on its roof, nail a birdhouse, decorate it with climbing plants: such a structure will resemble a fairy-tale gnome’s house.
The original shape of the woodshed, which fits into the exterior of a country house
The woodshed will acquire originality and sophistication if the wooden surface is treated with a special dark stain.
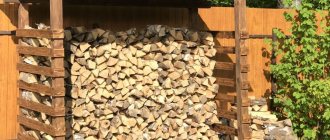
It is worth remembering that the appearance of the solid fuel storage depends on the quality of the stacking of logs. If the firewood is placed chaotically, you will not be able to create harmony, no matter how hard you try. Therefore, logs should be laid carefully. The method of display is determined by everyone according to their personal requirements and desires.
Laying logs in the woodshed - a decorative element
Decorating a firewood shed is limited only by your imagination. Forged parts are perfect for decoration. They fit perfectly with any materials. If you have a fireplace in your house, then you can complement the interior with a small forged wood burner, which is placed directly next to the firebox. Such a mini-woodshed will also decorate the place near the grill.
Woodburner in the shape of squares near the fire
A woodshed is a simple structure that significantly helps to preserve firewood. Experts advise harvesting logs immediately for several years. Such a supply will not be excessive, but will allow you to feel confident, because every person uses a barbecue, heats a stove or fireplace. Well, a place to store firewood will always help keep natural fuel dry.
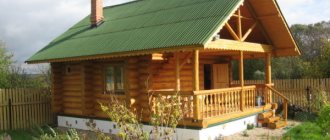
A sauna requires a lot of firewood, so those who like to take a steam bath stock it up for future use in order to use dried logs.
The volume of solid fuel storage is determined by the frequency of use of the sauna and the number of people wishing to improve their health - the duration of burning wood in the stove.
Shelter structures for woodpiles are designed in a stationary design when fuel consumption is high, and portable - when the bathhouse is used occasionally.
Making doors
Not all woodsheds have doors. If you install this structural element, then your structure will be called a woodshed. Note that sometimes woodsheds do not even have a front wall. This ensures more active ventilation. The front wall and doors are necessary if the area is turbulent, but in general the owners can do without them.
Before you make the doors to the woodshed with your own hands, you must take into account that they load the racks. Therefore, additional support will be required. If you have chosen this particular solution, you will need to make a door frame. For this, pine wood (50 mm thick) is used. The box is made flush with the wall. If suitable boards are not available, you can connect two together.
For the threshold, a product thinner than 20 mm is used. The box parts are cut out with the following dimensions: 155 x 90 cm. All manufactured parts are processed with an electric plane and connected to each other with furniture dowels. You should drill holes in the end parts of the board and add wood glue to them. Next, dowels are inserted there. Holes are drilled in other parts, where glue should also be dropped, connecting the workpieces together. At this stage, it is important to pay special attention to the markings so that the walls are in the same plane after joining.
Before making a woodshed with your own hands, it is recommended to look at photos of such structures. After familiarizing yourself with them, you can understand what the frame and door look like. At the next stage, the details of the box are set aside to begin making the door itself. 40mm boards are used for the canvas. Their length should be 152.5 cm. On one side, the wood is processed with an electric planer. To prevent the boards from spreading, they should be connected to each other with furniture dowels and glue.
The internal width of the box is 80 cm. This distance must be measured by subtracting 0.5 cm, which will go towards the gap. The excess is cut off with a circular saw. The dimensions of the door should be 152.5 x 79.5 cm. Before making a woodshed with your own hands, examples of such buildings should be studied. As mentioned above, usually such structures do not even have a front wall. If you decide to add a door to the storage space for solid fuel, then it is important to eliminate problems associated with its impressive weight.
To prevent the canvas from falling apart during finishing work, it should be strengthened. For this, three planks are prepared. These elements are attached with self-tapping screws in the place where the cuts were not processed with a plane. The first and third strips can be attached straight, and the second one can be made diagonally.
Woodshed location
First of all, you need to choose a place to build a structure; the only criterion is rationality. The structure for storing wood should not be visible, but at the same time it should be located closer to the house, because firewood needs to be carried. Also, in the optimal case, there should be an entrance to the woodshed so that transportation of natural fuel is as simple and convenient as possible.
If the house or the fireplace inside it does not need wood, then it is better to locate the building closer to the bathhouse. Before choosing the right place to build a structure, you need to take a sheet of paper and a pencil, schematically depicting the site plan. Thanks to this, you can compare several options, choosing the optimal location for the woodshed. It is best to place it on a hill, since moisture constantly accumulates in the lowlands, which negatively affects the tree. The woodshed can serve as an extension to a bathhouse, barn or private house, and can also be erected as a separate structure.
Suggested Options
You can choose the dimensions of the woodcutter yourself. The recommended parameters are 1.8 x 3.7 m. The front racks can have a height of 2.45 m, and the rear ones can be 2.2 m. The final volume of the woodshed is 13 cubic meters. Two cars of firewood will fit here (no more than 10 cubic meters). There should be paths inside to make it more convenient to take firewood. The woodshed is not loaded all the way to the top, because not everyone in the family is tall.
Creative and original ideas for placing firewood in the form of columns
If you want to not only place firewood for the fireplace in a niche in the wall, but want to do it in an original and unusual way, then turn the woodshed into a column! Rectangular niches in the wall can be filled with firewood up to the ceiling or hidden in the corner of the room, it all depends on your taste preferences and the overall style of the room.
So, in the photo below there is a small living room from the designers of Capoferro Design Build Group, who placed a small rectangular woodshed in the corner of the room. Now the niche in the wall is only half filled with firewood, but if desired, the firewood can be stacked up to the ceiling of the room.
Rectangular woodshed in the corner of the living room.
The designers of Designdock Lakberendezés built a real column of firewood for kindling next to the built-in fireplace. The unusual firewood rack has become an excellent decoration for a cozy reading corner.
Woodshed-column in a wall niche.
To create the right balance and harmony in the room, follow the basic rules of symmetry when decorating the interior. So, the designers of the D'apostrophe Design company placed two small column firewood burners in niches on both sides of a small built-in fireplace.
Symmetrical wood burners in niches near the fireplace.
A small rectangular woodshed in a wall niche.
Stylish woodshed in a white living room.
The photo below shows a simple and stylish option for storing firewood from the designers of InHouse Design Studio, who placed a small firewood rack in a cabinet niche.
A small woodshed in the niche of the closet.
Woodshed-column in a stone wall.