Installing heated floors in a bathhouse under tiles is a popular solution, since this type of heating improves the microclimate in the bathhouse and has a number of other advantages. Despite the fact that such a heating system is not cheap, it pays for itself in the future. The ability to quickly dry all surfaces can also be considered a plus, resulting in an increase in the service life of finishes and floors.
Currently, there is a wide variety of options for types of heated floors. They all have their positive and negative sides and installation features.
. In this article, we will examine in detail the question of what type of heated floors are best suited for a bathhouse under tiles. And to understand this, you should familiarize yourself in detail with all their types.
Types of heated floors for baths
Previously, the only way to heat the floors in a bathhouse was stove heating - instructions on how to connect a water floor in a bathhouse to a sauna stove. Modern heating devices are more efficient, and, despite the prevailing opinion about the possibility of fire, they are fireproof. There are three main options for heated floors for baths:
- Water is a closed system filled with water and having a heating electric or gas boiler.
| pros | Minuses |
| Uniform heating of the area | Labor-intensive installation |
| The cost of service is not high | Requires expensive temperature control equipment |
| Possible depressurization of the structure | |
| Conditions for carrying out repair work are difficult |
- Electric - a heating element is used for heating, in the form of a cable or mat. The principle of operation is that the supplied electricity is converted into thermal energy and distributed over the entire surface.
| pros | Minuses |
| Temperature adjustment is automatic | Expensive consumables |
| Any covering available | High cost of electricity |
| Quick installation |
- Infrared heated floors are warm electromagnetic radiation. All elements are wrapped in plastic film, which protects against electric shock.
| pros | Minuses |
| Durable and practical design | Hidden compounds are present in large quantities |
| Can be installed under any base |
Selecting a heating system
Of the two existing systems, water and electric, it is most profitable to make a warm floor for a bath using the second option. The reasons for this choice can be described point by point:
- The water floor heating system has extremely high thermal inertia.
- The cost of equipment and complexity of work for the formation of water heating of floors is much higher than for electrical systems.
- Occasional inclusion neutralizes the economic effect on the operation of water heated floors.
An electric heated floor in a bathhouse can be installed based on the following technologies:
- Infrared film;
- Amorphous tape;
- Heating cable.
Important: Each heating element has its own unique advantages, and the same fundamental flaws.
Therefore, each of them deserves a separate description, so that the reader does not think about the tendentious orientation of the facts presented.
But first of all, you need to justify the choice of flooring.
Requirements for flooring for heated floors in a bathhouse
There is no point in laying heating elements if there are thick floorboards on top of them.
In addition, destructive factors of different etiologies will simultaneously act on the tree:
- It will heat up from below, which will cause drying out;
- It will become moisturized from above, which will lead to warping.
This means that you will have to abandon the usual wooden floors in favor of a mineral-based coating. This can be either ceramic tiles or porcelain stoneware. But porcelain stoneware has an advantage - its water absorption coefficient is an order of magnitude lower than that of tiles.
When choosing, you should pay attention not to wear resistance, but to anti-slip properties. They are defined by the DIN 51097-C standard. Material from this group is used on sloping floors in wet rooms intended for walking on barefoot.
Tip: on sale you can find porcelain stoneware slabs with a thickness of 3 mm and dimensions up to 1×3 m. If you cover an electric heated floor for a bathhouse with a material of this size, then not only the amount of work will be reduced, but also the number of seams. Consequently, the tightness of the coating will increase. A small thickness (3–5 mm) will contribute to faster heating.
Types of electric heating elements for bath floors
Comparative characteristics will be given only in relation to the use of certain heating elements in the bath. To avoid bias, the performance characteristics are not based on personal experience, but are taken from the manufacturer.
Important: The safety of electric heated floors in a bathhouse is placed above economic feasibility.
Infrared film
A feature of the heating film is the method of heat transfer. Unlike other technologies, about 95% of heat transfer from film is carried out by radiation. To check, try holding your palm over the turned on film, and then put your hand on the material itself.
With direct contact, the heating is practically not noticeable. And given that the film will be in the screed, its efficiency will be extremely low.
Another disadvantage is the poor resistance of the lavsan base to the alkaline effects of cement.
These two qualities are enough to exclude infrared heating film from candidates for use in a bathhouse. But under certain conditions, it can be used to heat the floor in the bathroom.
How to make a heated floor in a bathroom using heating film
Infrared film can be used in the bathroom, but only if it is covered with a laminate.
There are two types of laminate that are recommended for rooms with high humidity: moisture-resistant and water-resistant.
Moisture-resistant laminate, designed for short-term contact with water. And the lamellas are waterproof and made of plastic. They are not afraid of contact with water. But in order to make heated floors in the bathroom based on infrared film, you will need to meet the following conditions:
- Mandatory waterproofing made of thick polyethylene with glued joints;
- Sealing of laminate joints with silicone composition;
- Sealing the joint between the lamellas and the wall;
- Mandatory grounding!
Provided that there are no puddles on such a floor, an electric heated floor in a bathroom will be safe and will last at least 10 years.
Amorphous tape
This is a relatively new product in this market segment, which should be classified as metamaterials. The unique properties of the composite alloy are achieved by extremely fast cooling (about 1 million degrees per second). As a result, a material with unique properties is formed:
- The thickness of the amorphous tape is 250 microns, and in the finished product, on mats, less than 2 mm;
- There is no heat accumulation, and due to rapid heating, energy savings reach 50%;
- Efficiency of converting electricity into thermal energy ≈ 99%;
- High corrosion resistance;
- Electromagnetic radiation does not exceed background values.
Amorphous tape is produced in rolls and mats. The manufacturer recommends using only mats with amorphous heating tape to install an electric heated floor in a bathroom or bathhouse. In this case, you don’t have to fill the screed!
The only drawback is the relatively high cost. The minimum price for 1 m² of amorphous tape on mats, power 150 W, starts from 1500 rubles.
Heating cable
The material is time-tested, and most electric heated floors made in Russia are made on the basis of a heating cable. Produced in coils (moldings) and in mats. Can be single or double wire.
The negative characteristics of the heating cable include:
- Higher electromagnetic radiation compared to other types of heating elements;
- The point heating area (when viewed in a section) and powerful wire insulation increase the inertia of the system, increase power consumption, and contribute to the appearance of the “zebra effect”.
- Mandatory filling of the screed to prevent uneven heating.
Installing the cable on mats is preferable, because it allows you to strictly adhere to the recommended laying step and fixation to the base is more reliable.
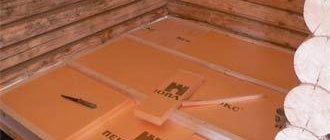
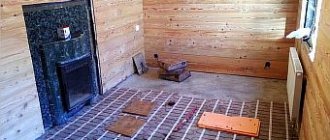
Preparation before installing heated floors
Wood is often used for flooring in bathhouses, but today tiles are popular. In this case, a concrete screed serves as the base; it does not retain heat well.
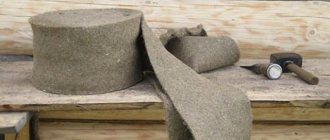
Therefore, additional insulation of the floor with a heat-protective layer is required. You can insulate with heat-insulating material: felt, expanded clay, glass wool, polystyrene foam.
The floor in the bathhouse is warmer if insulation is placed between two layers of concrete. The last layer can be made thinner than the base layer, this will save space in the room.
It is important to know ! Since the humidity level in the bathhouse is high, all parts of the subfloor should be treated with a water-repellent and antiseptic solution and waterproofed.
Device options
First of all, you should pay attention to the fact that we are talking about arranging a room with a high level of humidity. Therefore, special attention should be paid to waterproofing material
At the same time, it would not be superfluous to treat all wooden elements, such as parquet, joists and subfloors, with antiseptic impregnations. There are only two main structures: electric underfloor heating (cable) and infrared (film).
Film
Infrared flooring is a thermal film that is sold in rolls. It consists of flexible strips made of carbon, the thickness of which does not exceed 0.3 mm. Each strip is in its own polymer shell, which plays a protective role.
Benefits of use:
- High level of strength, which allows installation under clinker and porcelain stoneware.
- The available electromagnetic radiation is minimal and cannot harm human health.
- All elements are connected in parallel. Moreover, if one element fails, the rest do not lose their functionality.
- For installation, you can eliminate the need to install a screed, but for greater confidence it is still better to use it.
The disadvantages include the relatively low water resistance compared to cable structures. It is recommended to use in rooms with an optimal level of humidity, such as rest rooms and dressing rooms.
Cable
In a bathhouse, the electric floor should have a power of 250 watts per square meter of area. It is possible to use both two-core and single-core cables. It is preferable to use a two-wire one, as it is easier to install. In this case, the radiation will increase slightly, which does not suit everyone. The most convenient way is to use mats, which are heat insulating slabs that already have a cable in their structure. You can install such a warm floor in a bathhouse yourself, without involving third parties.
Disadvantages of the device:
- if one of the heating elements is damaged, the entire structure will fail;
- the level of electrical energy consumption, compared to film structures, is significantly higher;
- You will need to install a screed, which complicates the entire installation process.
The advantages include the ability to use any type of floor covering, independent adjustment and setting of the temperature regime, and the reliability of the device.
Electric heated floor in the bathhouse
The electrical system for a bath is not dangerous, since there is no direct interaction with water. The basis of the design is the cable: single-core or two-core.
Installing a warm electric floor under tiles, you need to start by choosing a laying pattern; the most common is the snake, it is easier to install.
The principle of operation itself is not complicated, the main thing is to follow the following rules and retreat:
- 5 cm from all walls;
- 10 cm from heat sources;
- take a step between turns, each manufacturer has its own, according to the instructions indicated on the package.
Brief installation instructions
Otherwise, the procedure for installing electric heated floors under tiles in a bathhouse is simple:
- At the first stage, the base should be formed; it should have the correct slope along which water will flow. Its minimum level is 2 cm/m; it should not be directed towards the center of the room, but rather towards any of the walls.
A groove is made along it with a slope to collect water. The easiest way to make a gutter is to take PVC sewer pipes with a diameter of 100 mm, which are cut lengthwise.
Using waterproof silicone sealant, you can connect the pipe walls. The groove is covered with a grid.
The base includes a clay layer and a bed of sand and gravel. Each layer should be compacted well.
- The next step is to install the beacons; this should be done before pouring the screed. The distance between the beacons is 1 - 1.5 meters. If the surface to be concreted is 3 meters, then it is enough to install 1 beacon in the center, and 2 on each side, in increments of 1 meter. When finally determining the level of inclination of the base, the beacon plays an important role. It is necessary to stick damper tape along the walls; its thickness should be 10 mm and its height 200 mm.
- The surface is filled with semi-dry screed, that is, the consistency is similar to wet sand; water does not flow when compressed. This mixture perfectly retains its shape and quickly becomes durable. However, according to the laying technology, time is required for complete drying - if the cement layer is 5 cm, then the cycle duration will be 4 weeks.
Material consumption depends on the area of the room and the thickness of the screed itself. For example: if the bathhouse is 3 by 4, and the thickness of the screed is half a meter, then you will need 0.6 m³ of concrete (3 x 4 x 0.05). The ratio of water to cement is 0.45.
To secure the base, you can use reinforced mesh; it significantly increases the strength of the surface.
- The next step is to lay a heat-insulating layer of hard foam polymer having a compressive strength of 2 kg/cm². According to the technical characteristics, an extruded type with a thickness of 3 cm is ideal. It is laid in two layers, the joints are glued with tape.
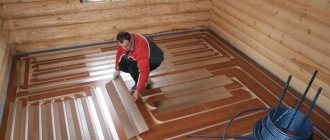
- The final stage before laying ceramic tiles is the installation of an electric heating system (mats). The cable must be laid over the entire surface of the floor. It is not recommended to place it in places where furniture is planned to be installed.
The power of all heating mats is the same - 150 W/m². Therefore, before purchasing it is necessary to draw a layout diagram. If in a bathhouse an electric heated floor under tiles is divided by a partition into a washing compartment and a steam room, then each compartment needs a separate circuit.
The electrical device must be covered with reinforced mesh. Sensors should be placed, grounded and connected according to the instructions.
Then, the design needs to be checked in action by turning it on for 10 minutes. If all elements heat up equally, then you can begin installing the tiles.
The thickness of the electric heated floor in the bathhouse under the tiles is 23 cm, from the ground to the coating.
When installing mats, it is important to be guided by the following requirements:
- do not cut or bend them;
- do not overlap one another;
- do not place heavy objects;
- do not walk on unmarked mats;
- do not lay mats at temperatures below 5 degrees;
- do not install them under walls;
- Do not place under wooden floors.
Mounting options
A heated floor in a bathhouse on the ground is made using two screeds, a rough screed and a covering screed.
In the case of a film floor, you can do without a top screed. When installing a heated floor, insulation is laid along the joists between the joists themselves. And on top of the logs - reinforcing mesh. It should isolate the wood from contact with the cable. A cable is placed on top of the mesh.
When laying the cable over a subfloor (for example, in a frame bath), the pie may look like this:
- base - OSB sheets, on top of which logs are nailed;
- waterproofing and windproof membrane;
- insulation between joists;
- second layer of OSB;
- polystyrene foam mats;
- vapor barrier membrane;
- reinforced screed;
- mesh and cable;
- finishing screed;
- tile.
Planning and laying heating mats
Heating mats with amorphous tape are available in widths of 0.5 m and 1 m. And the length varies from 0.5 m to 6 m, in increments of 50 cm.
The power of heating elements per unit area is always the same - 150 W/m².
Before purchasing, you should draw a diagram of the placement of heating mats on the floor of the bathhouse. If the steam room is separated from the washing compartment, then to prevent the effect of “heat blocking” from the installed partition, a separate circuit should be laid inside the steam room.
To comply with all requirements, the following restrictions must be adhered to:
The heating strips should be located at the bottom, and the mesh at the top.
Scotch tape is used for fixation.
After all the work at this stage, it is necessary to check the functionality of the structure. To do this, turn it on for 5–10 minutes. If all strips are heated evenly, then you can begin gluing the decorative coating.
Gluing the decorative covering
Regardless of the material of the decorative coating, ceramic tiles or porcelain stoneware, gluing begins from the gutter.
Although the slope is very small, such a sequence will prevent the possibility of freshly glued tiles slipping.
It is recommended to maintain the thickness of the adhesive layer equal to the thickness of the tile. This will help to completely fill the sub-tile space and prevent the appearance of voids.
Large tiles are preferable when gluing onto amorphous heated floor mats in a bathhouse, as they more evenly distribute the load on the heating elements.
It is recommended to cover electric heated floors in a bathhouse with tiles using seamless technology.
Porcelain stoneware is best suited for this. It has smooth edges, exceptionally low water absorption and a virtually zero coefficient of thermal expansion, in the temperature range from 0 to 50˚C.
Recommendations for pouring screed
To increase the rigidity of the screed, fibrin can be added to the working mixture. When making the working solution, plasticizers are used: they extend the time of use of the mixture to eight hours, reduce the viscosity, and give the composition plasticity.
The solution is mixed in this order: first dilute the cement with water, then add sand. Stir until smooth (preferably with a drill).
The surface can be completely leveled using a self-leveling mixture.
We continue to lay the electric heated floor in the bathhouse with our own hands under the tiles. A day after pouring the rough screed (when the mixture has hardened and you can stand on the floor), we begin laying the floor itself.
- Lay down a reflective foil layer.
- Lay another reinforcing mesh and fix the cable to the cells. You can lay the cable without a mesh and secure it with mounting tape.
- Place the temperature sensor in the corrugation between the turns of the cable. Connect the wires from it to the thermostat. Install the regulator itself on the wall.
- Pour a finishing screed on top with a thickness of more than three centimeters (thinner - it will crack). When installing the finishing screed, set a slight slope to allow water to flow towards the funnel.
- Lay floor tiles.
To prevent water from leaking to the lower rims, a flange is made along the perimeter of the wall. It is necessary to install several wooden blocks along the walls for a ventilation gap, and lay waterproof plasterboard or other similar material on the bars. Glue the tile.
Seal the joint between the floor tiles and the flange with sealant. Cover the top of the plinth with tiles laid horizontally.
You can use heated floors after the concrete has completely set, no less than 10 days.
Finishing work
After the tile adhesive has hardened, cut the damper tape just below the tile level. The resulting hollow is filled with silicone sealant.
It is recommended to additionally treat the gaps between floor tiles with a silicone composition. Even if they are of minimal thickness, thorough rubbing of silicone will eliminate the possibility of future leaks.
Film infrared floor
Infrared film heated floor under tiles in a bathhouse is the most economical option. This type of floor is also very easy to install. An infrared mat is a transparent material with an infrared film inside.
Installation of this type of underfloor heating begins with the installation of thermal insulation. Although, it can be laid on any type of surface.
Step-by-step instructions for laying warm film flooring in a bathhouse
- The amount of material is calculated and its preparation is carried out; all sections of the heating elements must be insulated;
- the film is spread according to the developed scheme, and the places where the cable will be installed are marked;
- the area is cleared of debris;
- heat-insulating material is laid and fixed with tape;
- the infrared film is laid and fixed in the same way;
- the film channels are connected to the power cable and secured with connecting clamps;
- joints are insulated with special impregnation;
- the operating resistance is measured;
- The final stage, before installing the tiles, is to cover the film with tile adhesive.
You can make such a warm floor under tiles in a day. After all, the peculiarity of this model is that there is no need to fill the screed.
How to lay cable flooring in wet areas
When drawing up a diagram of underfloor heating with cable, an important task is to ensure safety during operation of the heating system. Do-it-yourself installation is allowed only if you have a special specialized education.
Only a qualified electrician who is well acquainted with the rules of electrical installation regulations can make a competent installation plan and provide protection against electric shock. At the same time, careful adherence to the step-by-step plan for laying the heated floor pie will be required.
The work is carried out as follows:
The floors withstand the winter well and remain functional at sub-zero temperatures. After switching on, they quickly warm up the surface and air in the room.
Water heated floor
Before starting work on installing a warm water floor in a bathhouse, you need to make sure that the surface is flat, decide on the material of the pipes and plan their placement (snail, snake). The snail is the most suitable model for a bath; it heats the surface evenly.
Water is most often used as a heat source, but it is possible to replace it with antifreeze. It is not susceptible to freezing at low temperatures, which can result in pipe rupture.
Note! To ensure heating of a water floor , it must be connected to a heating boiler, but in a bathhouse it can be replaced with a stove. To do this, a boiler is installed above the stove, and water is heated in it.
This will be especially appropriate if the steam room is a separate building. A pump is required regardless of the selected heating option; it ensures water circulation in the pipes.
Comparison
For comparison, only the heating cable and amorphous tape remained.
This will look more clearly in the table, provided that the comparison is made not in absolute criteria, but in relative ones. That is, relative to each other.
| Heating cable | Amorphous tape | |
| Working temperature | 50–80˚C | 38˚C |
| Increasing floor height | Minimum 4 cm (1 cm cable + 3 cm tie) | 0.2 cm (thickness of mat with amorphous tape) |
| Actual heating area, relative to the floor | 1–3% | 20–30% |
| Zebra effect | Present | Absent |
| Heating rate/thermal inertia | Medium/high. To reach the operating mode, you need to heat the screed layer. | High/absent. |
| Energy consumption (all other conditions being equal for power and operation) | High | Low. Compared to the energy consumption of the cable system, it is 40–50% lower. |
Regarding uneven heating, it should be explained separately.
In the cross-sectional image of an electric heated floor, it is clearly visible that the amorphous tape heats up at a lower temperature of the working element, but at the same time the area is much larger than that of the cable.
In this picture
The principle of formation of the “Zebra” effect is schematically shown. The fact is that the minimum distance between the turns of the cable is 8 cm. And to the floor surface is at least 4.5 cm (3 cm minimum thickness of the screed + 1 cm thickness of the tile + 0.5 cm thickness of the adhesive composition).
The temperature sensor is located between the turns of the cable, at an equal distance, that is, approximately 4 cm.
At a superficial glance, the heating rate should be the same. But according to the Debye model (1912), during heat transfer, the phonon energy is weakened when moving from one medium to another. And in this case, there is a transition of thermal phonons from the screed to the glue, then to the floor covering.
If you increase the thickness of the screed so that the heating is uniform, this will increase the energy consumption and inertia of the structure.
A thinner screed will not be able to perform protective functions and at the same time the likelihood of cracking is much higher.
From all the above factors, it follows that the use of amorphous heating tape when organizing an electric heated floor in a bathhouse is the only investment option to achieve the optimal balance between price, efficiency and reliability.
Installation of a warm water floor
A water floor in a bathhouse under tiles can be laid in two ways:
- concrete - implies the presence of a concrete screed, it is poured over the pipes;
- laid - the heating circuit is laid on polystyrene foam boards or wood flooring, used when the foundation is not strong enough to withstand cement pouring.
However, more often a concrete option is used for the floor in the washroom and steam room. The procedure for installing floors using this method is as follows:
- The surface is leveled; for convenience, you can apply a special rule. In the case of wooden floors, it is necessary to make openings for pipes.
- To increase the efficiency of heat transfer, mineral wool is laid under the circuit.
- The mounting surface is installed using heat-insulating material with bosses, and pipes are laid between them. However, the pipeline can also be secured using clamps.
- The pipe is being laid; it should not have sharp turns. The step can be anything, but don’t stand too close, it will be expensive, but the effect will not change.
5. The system is connected and the presence of leaks is checked.
6. The final stage is pouring the screed.
An important point is that there is no tilt. Although the pump will be able to supply water in this position, the increased pressure will quickly damage the system.
Installation technology
Depending on the base material, it is practiced to install a wooden, polystyrene, or concrete heated water floor.
Concrete
It is widely used in Russian latitudes, it is based on a concrete screed with a flexible pipe; it also uses insulation in tandem with polyethylene film. Mineral wool and penoplex are optimal as thermal insulation materials. Concrete is mixed with special additives (they are also used in the construction of swimming pools), which prevent cracking of the dry mass under conditions of frequent temperature changes.
Preparing the base:
- the screed is made with an inclination corresponding to the direction of drainage of water, the maximum angle is 10°;
- the completely dried layer is covered with a polyethylene vapor barrier;
- insulation is laid on top - mineral wool, penoplex;
- holes are formed in the material into which beacons for future screed are placed;
- The top of the “pie” is covered with a metal reinforcing mesh with a cell size of 10x10 cm.
Polyurethane foam tape is fixed along the perimeter along the walls: a soft membrane compensates for the potential expansion of concrete and prevents it from cracking when heated.
The pipe is laid in a spiral taking into account the following recommendations:
between the turns you need to leave gaps no wider than 40 cm, a distance of 25 cm should be maintained from the outer pipe to the walls; When laying a pipeline, the permissible radius of its bend should be taken into account - this is five times the diameter. The product is sold in the form of reels, they are unwound as they are used, fixed with clamps so that there is space for pipe expansion; the pipes are combined into a circuit in a manifold cabinet.
After trial testing, the concrete screed is poured again. It is important that the ambient temperature is kept in the positive range; a vibrator is used to compact the mass
After trial testing, the concrete screed is poured again
It is important that the ambient temperature is kept in the positive range; a vibrator is used to compact the mass
The optimal layer thickness allows you to leave 2 cm of concrete above the pipes; usually it ranges from 7-8 cm. If a tiled floor covering is planned, 5 cm is enough.
Wood
The flexible pipe is placed in the grooves left between the slats; this space should be wider than 2 cm. Chipboard panels are considered the most budget-friendly base material. Operating procedure:
- The base is leveled and debris is removed.
- A sheathing is formed from timber with a cell side of at least 60 cm, and fiberboard or plywood is stuffed onto it.
- The finished raised floor is covered with a vapor barrier and insulation on top.
- Lay out the boards, in the gaps between which the pipe will be placed. Their height should exceed 2 cm.
- The grooves are insulated with foil to prevent heat leakage downwards, and pipes are placed on it.
- All ends are connected to the manifold cabinet.
- A finishing layer of cladding is formed.
To fix the foil in the gaps, you can use small nails or a stapler. If the raised floor is assembled from fiberboard, foil is glued to the smooth surface of the slabs using double-sided tape.
From polystyrene plates
The base is assembled from segments with ready-made grooves; pipes are inserted into them. Plates are inserted into the gaps to promote more uniform heat distribution. A low and light structure is formed that does not “eat up” the usable space in the room. No labor-intensive concrete screeds are needed here. Polystyrene does not allow moisture to pass through and retains its heat-insulating properties throughout its entire service life.
Installation features:
- the first layer is laid insulation in the form of mineral wool;
- polystyrene foam is installed starting from the far corner, the plates should be placed so that their grooves coincide;
- distribution plates are placed in the holes;
- A flexible pipe is fixed on top.
Polystyrene boards
After checking the functionality of the system, a final floor covering is formed.
Installation errors
It is not difficult to carry out independent work on laying a heated floor in a bathhouse, despite this, mistakes are often made that lead to defects in the entire system.
To avoid them, you must adhere to the following recommendations.
- When choosing a cable or mat, you need to take into account not the entire area, but only the space where furniture will not be located.
- It is not recommended to shorten the cable placed in the system. This increases the load on it, causing it to fail. That's right, reduce the pitch and increase the heated area.
- It is forbidden to turn on the system until the concrete is completely dry.
- The heating cable element can only be laid on a clean surface that has been treated with a primer.
- The distance between parallel lines in the structure must be at least 5 cm.
- When laying the cable with your own hands, the degree of bending should be in the range: 5 - 9 of its diameters.
- The heating device sensor must be installed in an accessible place, and it must be protected by a corrugated box.
- It is imperative that the floor surface comes into contact with the sensitive probe of the sensor.
- When laying the system, do not walk on it with shoes to avoid damage.
- Before installing a water floor, you must first prepare a diagram.
- You need to carefully check the water floor for leaks.
Taking these points into account, you can independently install a heating system in the bathhouse.
Which bath floor is better to choose?
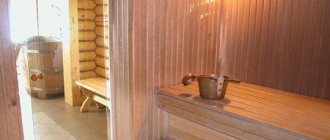
No one doubts the need for heated floors in a bathhouse under tiles, because they have a number of advantages:
- The service life is extended, because the steam room is a place with high humidity. In this regard, the likelihood that a wooden surface will begin to rot or become moldy is enormous. Dry air distributed from the bottom of the heating surface to the top promotes better drying of the room.
- Minimizes the presence of drafts, thereby reducing the likelihood of colds among bathhouse visitors. Ideally, infrared flooring solves this problem.
- Creates a more comfortable washing process - it’s more pleasant to step on a warm tiled floor.
- Maintains the bathhouse in good condition - regular heating of the room will protect it from destruction.
Despite all the positive aspects of such floors, they also have disadvantages: high cost, labor-intensive installation and difficulty in repair, because basically it requires removing the flooring.
Taking into account the design and layout of the room, you can install heated floors under tiles in the washroom, dressing room, sauna.
It is most advisable to install a film infrared heated floor in the bathhouse, since for its operation it is enough to connect to the power supply and it is quite simple to install. For a water floor, it is necessary to install a boiler, which is expensive and requires pouring screed, which takes up to one month to dry completely.
Therefore, even with the high price of electricity, the infrared system option still looks more practical and economical, since the system does not work all the time.
Which design to choose is up to the owner. It is worth starting from your preferences, financial capabilities, and, of course, the strength of the foundation and the layout of the room.
Benefits for the bath
Warm floors ensure a comfortable and safe stay in the bathhouse. Underfloor heating is a functional element of the main heating system. It ensures uniform heating of the air - when heated masses rise to the ceiling and cold masses fall down.
Taking into account the design features and layout of the bathhouse premises, heated floors are provided in the washing room, dressing room, bathroom and rest room.
Moreover, any modern underfloor heating system requires preliminary thermal insulation of the base. In this case, a screed is made based on sand-cement mortar or a self-leveling mixture.
In most cases, in addition to thermal insulation of the base, waterproofing is installed. This can prevent the accumulation of excess moisture in the floor pie during operation of the heating system. Polyethylene or polypropylene film is used as a waterproofing material, and polystyrene foam, mineral wool, expanded clay or penofol are used for thermal insulation.
In the car wash
The washing room is one of the important rooms in the bathhouse. To arrange it correctly, you need to take into account many nuances, since any mistake can spoil the final result.
It is important to correctly solve the question of how to make a heated floor in a sink or washing bath
In order for the floor covering to serve for a long time, the following requirements should be taken into account:
- quick drainage of water (for this purpose tilting and draining is done);
- high-quality ventilation for quick drying;
- resistance of the coating to humidity and elevated temperatures;
- eliminate drafts.
It is worth considering all the flooring options that can be used in a washing room and choosing the most optimal one. Typically, wooden buildings are made of wood or concrete. Wood provides comfort and good thermal insulation. Concrete lasts for a long time.
Warm floors in a wooden bathhouse are used:
- electric;
- infrared;
- water.
Water heated floors are higher than other options due to the height of the pipes used. They can be powered with hot water from a common heating device. It is worth remembering the need for constant heating during cold periods to avoid freezing of the system.
The use of an electric floor has certain requirements, since it is necessary to eliminate the risk of electric shock.
In a bathhouse sink, an infrared heated floor ideally copes with the task of heating the room; it has excellent waterproofing, which eliminates the danger of high-quality insulation of all current-carrying connections.
Wooden boards or ceramic tiles are used to cover the floor in the washing area of the bathhouse.
When laying boards in a sauna washing room, two options can be used:
- non-leaking - the boards are laid tightly next to each other at a slight angle to drain water into a special hole, from where the water is removed from the room through a pipeline;
- leaking - water drainage is provided by small gaps between the boards.
Only the first option is suitable for installing a heated floor.
The ceramic tile floor is also laid without gaps with a slight slope towards the drain.
It is easy to install a heated floor under such a surface, which will make staying in the room more comfortable, and will also help eliminate stagnation of water and ensure high-quality drying of the floor. Warm floors radically solve the problem of heating a room. This heating option is economical and improves the comfort of the bath room.
How to mount
The process of installing a heated floor in a bathhouse is practically no different from its equipment in other rooms.
The only thing worth paying special attention to is high-quality heat and waterproofing
Installation of a water floor can be carried out in several ways:
- heated floor located on a wooden base;
- placement of pipes under a concrete screed.
In large rooms, preference is given to concrete floors, in small rooms - wooden floors.
Water pipes are arranged similarly to a paired “snail” or “snake”.
It is important that the temperature of the water circulating inside the pipes does not exceed 55°C. Since the temperature of the water in the heating tank is much higher, the use of a collector is required to bring it to the required temperature.
In the collector, waste water is mixed with hot water. In this case, floor heating will be ideal.
The water pipe is laid from the outer walls, taking into account that the optimal step is 30 cm.
To install infrared heated floors:
- perform thermal insulation;
- lay and fix the infrared film;
- carefully isolate all joints;
- check the resistance level;
- lay the floor covering on top.
Operation: pros and cons
When using water heated floors in the sink, the following advantages are observed:
reduced electricity consumption compared to an electric floor over the same period of time.
The disadvantages are the following:
- installation complexity;
- the heated floor is heated only if the water heating boiler or furnace is operating, which ensures the operation of the steam room;
- in cold weather, in the absence of constant heating, the liquid in the circuit freezes. To prevent this, it is recommended to use corrugated stainless steel or polypropylene pipe.
Infrared film flooring does not have these disadvantages. Its advantages are:
- quick heating of the room;
- no need for constant operation of the system;
- Quite economical energy consumption due to irregular operation.
Common mistakes that accompany self-installation
To ensure stable operation of the system, it is important to eliminate the conditions for the occurrence of the following defects at the preparation stage:
Assembly of the heated floor can only begin after 2 weeks have passed from the moment the rough screed is formed
Otherwise, the concrete will crack; before installing the finished floor covering, you should test the heated floor scheme so as not to brick up any errors; when creating a “pie” it is important to use high-quality insulation materials; you need to remember about the limitation regarding the length of one pipe - 100 m; a mandatory measure is to fix the compensation tape around the perimeter. If the installation of the system was carried out taking into account the indicated vulnerable points, you can expect long and uninterrupted operation of the heated floors
If the installation of the system was carried out taking into account the indicated vulnerable points, you can expect long and uninterrupted functioning of the heated floors.
Device specifics and functionality
The bathhouse is built mainly separately from the main housing, so it is equipped with its own boiler and heating circuit. If you install a double-circuit model with a boiler, hot water will always be available. The downside of the solution is that in winter you will have to make sure that no water remains in the system; every time you use the steam room, it needs to be filled and drained.
If you are planning a sauna with a stove-heater, a single-circuit boiler will be sufficient; in this case, the water for hygiene procedures will be heated separately. When arranging a sauna, you should ensure that the equipment has two circuits - for servicing the water in the pool and for heating the bath rooms. When the complex has a swimming pool, the heating system can be organized using several methods:
- autonomous heating, powered by solar panels or a heat pump;
- heat exchanger and pump combined in a heating circuit;
- pumping antifreeze into pipes;
- installation of a flow heater with a heating element.
The priority is given to electric sauna boilers, which are supplied with a complete set of piping:
- circulation pump;
- filter designed for fine cleaning;
- thermostat;
- expansion tank;
- safety valve.
An example of an electric boiler for a bath
A useful option will be auto-shutdown elements that are triggered in an emergency situation: when a pressure drop or overheating occurs. The possibility of switching from summer to winter mode is welcome; in this case, energy savings are realized.
Safety precautions
A bathhouse is a room with a high level of humidity. Therefore, installing an electrical system for floor heating requires strict compliance with all safety standards:
When laying heated floors, you should ensure that all electrical elements are completely protected from moisture. Before using the heating system, the equipment must be checked. If screeding is performed, there should be no accumulation of air - plugs. Electrical heating equipment can only be put into operation when the concrete pour has completely hardened.
Installation of a warm electric floor must be carried out under the supervision of a specialist. The system is installed in accordance with the manufacturer's instructions.