Material calculation
To calculate the number of tiles, you need to know the size of the roof, but not only that. The tiles are laid with an overlap, the amount of overlap is determined depending on the slope of the slope:
- Up to 16 degrees – from 10 cm;
- Up to 30 – from 8;
- Over 30 – from 7.
Ceramic tiles are laid on the roof using counter-lattice and sheathing. The second serves as a solid base for the coating, the first provides the necessary ventilation gap.
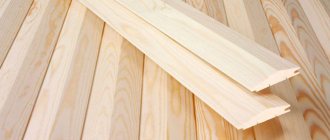
For the sheathing, sawn coniferous timber with a maximum moisture content of 25%, without knots, is used (SNiP, paragraph II-25-80).
- The pitch of the sheathing (and therefore the number of boards) depends on the slope of the roof and on the model of the tile (order - from 30 centimeters);
- The minimum cross-section of beams for sheathing and counter-lattice is 3 by 5 centimeters;
- For complex roofs or long slopes, use a square beam with a side of 5 cm.
To calculate the amount of material and its final cost, you can use the services of our company.
Or calculate it yourself: ceramic tiles in drawings (for example, Braas) can be presented in the form of a diagram indicating all sizes of the tiles.
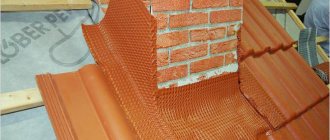
Ridge formation
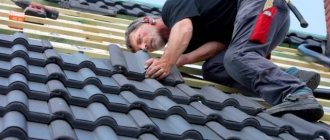
Ridge elements of cement-sand tiles are installed after completion of all other types of work.
Special holders are mounted on top of the connection of the slopes, and in them there is a ridge block, which is covered with insulating sealing tape with ventilation holes. Then the ridge tiles are sequentially “fitted” onto the beam.
The individual ridge elements cling to one another using special clamps, which are attached to the beam with self-tapping screws. The end caps are fixed with stainless steel self-tapping screws.
Compliance with the installation technology of cement-sand tiles will ensure the durability of the roof and save it from leaks.
Ventilation and thermal insulation
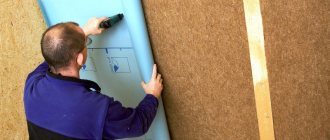
The technology for laying ceramic tiles involves installing a ventilation system in the under-roof space. This is necessary to ensure that condensation does not accumulate inside the roofing pie, which leads to the destruction of the insulation and rafter system.
There are two options for constructing a roofing pie. In both cases, the main layers are the same:
- Vapor barrier (bottom layer);
- Insulation;
- Waterproofing.
The difference between single-layer and double-layer ventilation is that in the single-layer version there is only one air layer, directly between the waterproofing and the roof. Two-layer means the presence of two layers, the second - between the waterproofing and insulation.
The choice of technology depends on the waterproofing material. Only membranes with a vapor permeability of at least 750 grams per square can be placed directly on the insulation, which will protect the insulation from moisture and drain condensation to the outside.
note
The total height of the ventilation gap must be at least 20 centimeters.
With a two-layer scheme, about two centimeters are left from the insulation to the film. In addition to creating air gaps for roof ventilation, when laying ceramic tiles, special elements are used:
- Skates;
- Cornice.
The types of elements are different:
- Hard aerators;
- Rolled ventilation films;
- Ventilation grates;
- Ventilation tiles.
Elements are selected depending on the type and slope of the roof.
The brand of insulation and layer thickness depend on the region. Examples (for roofs in the Moscow region):
- Mineral wool P175 (thermal conductivity coefficient 0.072) – 40 centimeters;
- Fiberglass (coefficient 0.044) with a windproof membrane - 24 centimeters;
- Expanded polystyrene (0.032) - 15 centimeters.
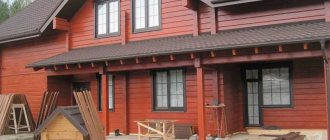
Installation of the roof base
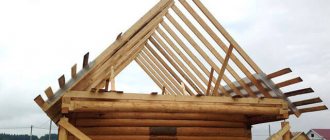
The base for the roof is a supporting frame made of wooden beams and boards, designed in a special way. It is formed in several successive stages:
- Mauerlat - a wooden beam made of timber, which will serve as the basis for the subsequent installation of floors and arrangement of the rafter system;
- logs are roof coverings that will support the attic or attic. Installed on top of the maurlat;
- ridge run. It can be mounted in different ways, the simplest is by fixing horizontal beams mounted on vertical supports;
- rafters and sheathings. They are the skeleton - the main part of the roof. They carry the entire load, starting with insulation and ending with roofing materials;
- fillies, soffits. Eaves overhangs play a significant role in protecting walls from precipitation. To strengthen the structure, soffits are installed - supporting supports, and sheathing is mounted on top;
- waterproofing. Special membrane materials are used for it, protecting the internal elements of the roof from the penetration of rain moisture;
- ventilation. It is important to provide a small space between the membrane and the roof to prevent the accumulation of condensation and ensure good air exchange between the internal and external spaces.
Insulation and waterproofing
- The vapor barrier layer is attached to the rafters from the inside (from the ceiling) with vertical and horizontal overlaps of at least twenty centimeters.
- Fixed with wooden slats. In the future, when arranging the ceiling, the panels (boards) should not come into contact with the vapor barrier.
- The insulation is cut into blanks according to the width of the step between the rafters and placed between the rafters in a spacer.
Installation options for the top waterproofing layer
- Installation of the film directly onto the insulation is carried out with the steam-removing side facing outwards, i.e. towards the roof covering.
- The film should be rolled out along the cornice along the rafters, starting from the bottom row.
- The recommended overlap when installing the next row is approximately 10 cm for steep roofs. If the slope is less than 22 degrees, it is increased to 20 cm or the joints are taped with double-sided tape.
note
The film is secured with a stapler or roofing nails and finally fixed with counter-lattice boards.
Other methods:
- When using polyethylene-based membranes, the film is pulled over the rafters with a sag of one or two centimeters. At the same time, at least two centimeters should remain from it to the insulation. In cold weather, the film is stretched without sagging.
- With a small roof slope (within 16 centimeters), a welded roof can be used as a waterproofing layer. To do this, it is necessary to make a continuous flooring and fill it with trapezoidal counter-lattice slats up to 5 centimeters thick.
Technology for installing a tile roof if the slopes are flat
If the slope of the slope is less than the minimum for the selected type of tile, this does not mean that you will have to abandon the tiled roof. Of course, tiles are not suitable for almost flat roofs with a slope of less than 10°. But if the slope is intermediate - from 10° to 16-22° - then this is a solvable problem. In this case, instead of the usual waterproofing, a lower roof is made under the tiles.
A continuous sheathing of moisture-resistant plywood or OSB boards is placed on top of the rafters. In this case, there should be a gap of 30 mm between it and the insulation. Counter battens are placed on a solid base above the rafters, after which roll bitumen-polymer waterproofing is fused onto it, rolling it out from the ridge to the eaves.
The result should be a completely sealed roof that can withstand heavy rain, even if there are no shingles above it at all. The tiled covering in this design plays the role of a decorative roof.
Lathing and counter-lattice
- Along the rafters, on top of the waterproofing film, we lay counter-lattice bars approximately 1.3 meters long.
- We fix it with galvanized nails every 0.3 meters not higher than the marker line on the film.
- At the joints of opposite beams on the ridge, we saw the boards at an angle so that the joint is even. The angle of the cut will depend on the slope of your roof.
- Between the beams of the valley or hip ridge and the main counter-lattice we leave a ventilation gap of about 10 centimeters.
- We place the sheathing beams parallel to the earth's surface, starting from the overhangs.
- The step between the first two bars (on the overhang) is from 32 to 39 cm (measured along the outer edges of the bars).
- We place the third block under the ridge, at a distance of three centimeters from the joint of the counter-lattice bars. If the roof is steeper than 30 degrees - at a distance of two centimeters.
- We measure the distance between the second and third beams along their upper edges.
- We divide the resulting figure by the number of intermediate bars so that the step between them does not exceed the recommended parameters:
- Roof slope up to 22 degrees – 31-32 cm.
- Up to 30 – up to 33.5;
- Over 30 – up to 34.5.
We install the sheathing on other slopes in the same way.
Fixing shingles
First you need to calculate the required number of shingles:
- measure the sheet of ordinary tiles and the area of work;
- divide the last value by the first.
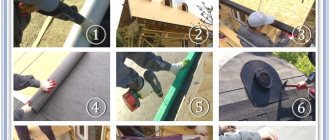
Next, apply shingle marking lines to serve as guides to easily align the shingles in any direction. Believe me, without them you will have to return to the work done more than once, tear off and reapply the sheets, especially when you are doing this work for the first time.
To form landmarks, the roof is first marked with coated construction thread. Parallel stripes are marked at a distance of five rows of flexible tiles. A distance equal to one row is struck vertically. After this, you should begin the process of installing flexible tiles. The formation of shingles is carried out in accordance with a simple algorithm of actions:
- the starting row is laid out the eaves parallel to the flexible tiles, fastening them to roofing nails;
- for ease of horizontal alignment, the first row of soft row tiles begins to be glued from the center of the slope. 1-2 cm are retreated from this parallel and fixed using the already proven method - each sheet is nailed with four nails at a distance of 2-3 cm from the grooves between the petals;
- Installation of the next shingle also begins from the middle. However, it is placed in such a way that the petals are above the groove of the first row and the fixation points are completely closed;
- the outer corner of each tile, located near the pediment, is cut along the contour of a triangle with identical opposite sides equal to 1.5 or 2 cm. Trimming is necessary for water drainage.
Further laying can be done according to the same principle - in successive rows, as well as using the pyramid method, increasing from the center of the slopes to the edges, or diagonally. It is not necessary for the nails to penetrate deeply inside; it is enough that they hold firmly in the sheathing.
In the vast majority of cases, the starting tiles are laid along the eaves, 1.5–2 cm away from the edge of the overhang. Moreover, its edges should be covered by gable strips. The first strip is the same ordinary shingle with the petals removed. However, many manufacturers produce special elements designed specifically for this purpose. When ordinary tiles are used for the starting strip, the back side of which is not equipped with an adhesive base, the lining carpet at the place of fixation is treated with bitumen mastic.
To arrange the valley, an open valley method is provided. Row tiles are laid to the axis of the valley on both sides of the slopes. However, nails are no longer driven into shingles at a distance of 30 cm from the axis. After the rows are formed, the boundaries of the valley are marked with coated cord, along which the layer is cut off. The width of the groove is from 5 to 15 cm. To ensure more accurate work, a board is placed under the layers before cutting. The corners of the tiles located near the valley are trimmed to remove water, after which the underside of the coating is treated with mastic and glued;
How to lay ceramic tiles
Attention: in this article I will only tell you how to lay ordinary ceramic tiles, i.e. on the slopes. In addition to slopes, the roof has other nodes:
- Endovy;
- Ridge (except hipped roofs);
- Cornices;
- Connections (to pipes, roof windows, etc.);
- Gables have pediments;
- The hip and tent ones have ridges.
Another article is devoted to the installation of all these elements.
Tile laying technology:
- Check the roof prepared for laying ceramic tiles for deviations from the plane. For two meters of roof, deviations for sheathing beams should not exceed half a centimeter.
- Lay out the tiles on opposite slopes in columns of five to six tiles.
- Lay out two rows, top and bottom, without fastening. If the length of the roof and the width of the tiles are non-multiple numbers, use half tiles.
- Mark the outer rows of tiles on the sheathing. Additional marking - after 3-5 intermediate rows.
- The bottom row of shingles should extend beyond the roof by one-third the diameter of the gutter running under the eaves.
- Lay tiles from bottom to top. Secure the first row with 4.5 mm by 5 centimeter screws or anti-wind clamps.
- On gable roofs, tiles are laid in the direction from one end to the other.
- On the hips - from the middle of the slope, which needs to be beaten off with a marking cord from the top to the middle of the cornice.
note
You need to lay tiles on triangular slopes in the following order:
- Middle vertical row;
- Bottom horizontal row:
- Second row from the bottom, from the middle to the ridges;
- Third, etc. to the top.
Which tiles should be fastened with hardware?
- Bottom row (cornice);
- Upper (at the ridge);
- Lateral (at the ends and ridges);
- Any trimmed tiles;
- At the junctions.
If the area is characterized by high wind loads, all tiles must be secured.
For different models of tiles, 4.5 by 50 galvanized screws (self-tapping screws) or universal stainless steel clamps can be used.
Laying ceramic tiles with your own hands is a long and energy-intensive process that requires highly qualified installers. Moreover, we are talking about expensive material.
Our company has extensive experience in laying roofing coverings, ceramic tiles are no exception. Entrust this matter to us, and you will receive a beautiful, high-quality roof quickly and inexpensively.
“Roofing pie” design
Very often we hear from builders or designers the combination “roofing pie”. When laying flexible tiles yourself, it is important to understand that the durability and practicality of the roof will depend on the correctly installed “roofing pie”. The cake is made in layers and includes: rafter system, films, insulation, lining carpets, and so on. Each layer is laid sequentially and performs its important function.
The “roofing pie” for a cold (without insulation) and warm (with insulation) roof will be different. It is not difficult to guess that a cold roof is much easier to deal with. An approximate diagram of a cold roof is below:
1. Flexible tiles 2. Underlayment carpet 3. Base (OSB board) 4. Wooden sheathing 5. Rafter leg
The “roofing pie” for an insulated roof has many more layers. The diagram of the entire structure looks like this:
1. Flexible tiles 2. Underlayment 3. Film (Windproof membrane) 4. Insulation (mineral wool) 5. Vapor barrier film 6. Base (OSB board) 7. Sparse sheathing 8. Counter beam for creating a ventilation duct 9. Rafter leg 10. Sheathing under insulation 11. Attic filing
Additional materials on the topic
Reviews about ceramic tiles
More details
Roofing units made of ceramic tiles
More details
Ceramic tiles koramic
More details
Your feedback, comments, questions
Dear visitors! We will periodically answer your questions in the comments as we are busy. In order for us to respond to you promptly (within an hour), you can: call, write a personal message or leave a request for a free consultation by phone.
Required tools:
Before starting work, you need to ensure that you acquire the necessary tools. You may need:
Roofing knife - for cutting single-layer tiles.
A special mechanical or pneumatic cutter for cutting multi-layer bitumen shingles.
Metal scissors - for cutting metal strips or reinforcing profiles.
Stapler - for fixing roofing films.
Guide bar - for even cutting of shingles in valleys, on ridges or junctions.
Hammer, saw, drill, screwdriver - for installing the rafter system and fastening various elements.
Construction hair dryer - for heating bitumen shingles or components (valleys, ridges) in the cold season.
Common fastening errors
- The most common mistake is incorrectly joining the sheets together, creating cracks or gaps into which the wind rushes in . Frequent exposure to gusts of wind over a fairly large area of the sheet will sooner or later tear it off the sheathing. In addition, one often encounters an incorrectly cut edge of a sheet, covered with a corner in such a way that water flows freely under it.
- All places where water can accumulate or penetrate require special attention and local additional waterproofing.
- When installing metal tiles, various situations may arise that require a non-standard solution. It must be taken into account that in any case the general requirements must be met - no cracks, no possibility of water penetration, parts of the sheets must be located in the direction of water flow.
- Common mistakes include the absence of a counter batten when installing the sheathing, which eliminates the possibility of air circulation.
- It is not recommended to use roofing felt or similar materials using bitumen, as in the summer it melts, sag and emits a suffocating odor.
- Under no circumstances should you use self-tapping screws without a sealing washer and gasket.
Stage IX. Trimming tiles for valley joints
To correctly lay the tiles in the valley, use a string on the groove to mark the hanging line so that the overlap of the tiles on the groove is 8-10 cm. After this, cut the tiles at an angle along the marked line. Just don't use small, triangular pieces of shingles that are difficult to secure.
To move the column and ensure quality fastening, you will need half shingles. Approximate consumption – 1 piece for 2 rows:
For convenience, first number the cut tiles and remove them from the sheathing. To cut tiles, we advise you to take a miter saw with a power of 2 kW and a diamond blade with a diameter of 22.23 cm, which is specially designed for dry cutting of heavy concrete. Protect your eyes with goggles or your face with a respirator.
By the way, accuracy will be achieved on a water-cooled machine. Wash the cut tiles with water to remove dust and let them dry. Since you will not cover the cut edges with anything, cover them with cold engobe to match the color of the roof - this is sold immediately with the tiles.
To properly secure the cut tiles to the ridges, use special stainless steel clamps. These clamps come in two types:
- anti-wind, which attract the tiles to the sheathing;
- universal, which support the tiles in weight.
The wire fastener is screwed to a nail, which is driven into the nearest lath. And sometimes the wire is used so thick that it itself is driven directly into the sheathing instead of a nail.
Advice from an experienced specialist:
- Always follow the metal tile fastening diagram. Installation begins from the left edge of the roof. Subsequent sheets of material are placed under the previous layer.
- After fixing the first sheet of the ridge, the second sheet is laid in a straight line. When joining with an overlap, at the top point the sheets are connected with one screw.
- If the top row of the ridge is not level, the sheets are raised and the slope sides are usually shifted slightly. This way they can be carefully placed in the required position. Then secure firmly.
- If during installation through holes and numerous overlaps are formed, these places must be sealed urgently. For this purpose, special silicone-based compounds are used.
Did you manage to solve your problem using the recommendations from the article?
Yes!
46.81%
No. More answers required. I'll ask in the comments now.
37.33%
Partially. There are still questions. I'll write in the comments now.
15.86%
Voted: 643
General information about metal tiles
The composition of the most common roofing material is quite simple.
Decorative tiles are based on steel sheets. During manufacturing, they are coated with a special polymer coating. The characteristic shape is achieved through a stamping process. Visually, this material is practically no different from ordinary tiles. Transverse rows appear as waves in metal tiles. Experts call longitudinal profiles rows. The material pitch is measured by the distance between rows.
The most popular sample has the following parameters:
- Sheet width – 1.18 m;
- Working width – 1.1 m;
- Step – 0.35 m.
The fastening of metal tiles depends on many factors. The length of the profile cut, the individual needs of the client and the wooden roof sheathing are taken into account.
As a rule, the distance between the bottom cut and the edge of the stamping is 5 cm. The distance between the upper edge of the stamping and the cut is determined both by the length of the sheet itself and by the individual features of installation on a particular object.
Advantages of the material:
- Metal tiles are considered the best option for roofing, since they fully meet the criteria of quality and reasonable cost.
- With proper calculation and provision of accurate information about the project to the manufacturer, large volumes of waste during installation can be avoided.
- The material does not make noise in the rain. If unpleasant sounds are observed, it means that the installation work was not performed efficiently.
- The polymer coating of metal tiles can reliably adhere to the metal surface for 10 years. The majority of brands provide a guarantee for this period.
- No water seeps between the sheets. The fastening points are hermetically sealed with gaskets mounted on self-tapping screws.