Today, soft roofs not only occupy a leading position in the market, but have become a real discovery for designers and architects. Many styles, individual solutions and the possibility of easy implementation on complex roof structures - what more could you ask for? The main thing is to achieve absolute tightness between the shingles, on which the durability of the entire coating depends. And the installation of flexible tiles itself will be within your power, believe me, even if this is your first time encountering this type of work!
Therefore, if you carefully read our tips, you will be able to cover even a large roof with the help of one more person. The fact is that even in the factory, shingles are prepared for gluing by applying a special solution to the bottom layer, and they even make four holes so that you know exactly where to drive in the roofing nails. And now we will tell you about all the intricacies of working with soft roofing.
Step 1. Installation of the roofing pie
If the attic is cold, then all the moisture will come out of it on its own, using natural ventilation. But in the case of a residential attic, a vapor barrier is necessary. It is laid on the inside, protecting the insulation from moisture. The vapor barrier film is installed with an overlap and taped with special tape (regular tape is not suitable).
Next, lay the selected insulation on the outside of the vapor barrier film, preferably staggered. Cover the top with a windproof membrane and secure with bars, which will also later serve to create ventilation channels.
As a result, you should end up with a “layer cake” like this, as roofers like to call it:
We have prepared for you a detailed master class on how and in what order everything should happen:
Technical description of the material
The prototype of modern flexible tiles is considered to be an analogue of slate roofing made from paper impregnated with bitumen resin. This was invented by poor settlers in North America. They began to cover the blanks with stone chips. Modernized versions were imported into the domestic market in the 90s from Finland.
Today, shingles come in small segments, otherwise called shingles. Here, dense fiberglass acts as a base. Bitumen mass is used as a binder and functional impregnation. On the front side there is basalt (retains color longer) or slate chips, which serve as a decorative and protective coating. An adhesive substance is applied to the reverse side, which simplifies the installation process. The composition can occupy 50% of the area on ordinary samples and up to 100% on products for finishing the ridge and eaves of the roof.
An example of one ordinary shingle Source atdomnsk.ru
There are so-called laminated samples. In essence, this is a multi-layer roof made of 2-3 layers of treated fiberglass. Here, the main advantage of the latter is a longer service life: around 50 years versus 20 for single-layer tiles. But many craftsmen insist on choosing simple collections due to the fewer number of seams.
Advantages and disadvantages
Installation of bituminous shingles is carried out without lifting equipment, since the weight of sq. m. meter of coverage is only 5-8 kg. This is one of the main advantages of waterproof material compared to alternative solutions. There is also an effective ability to absorb impact noise from natural precipitation and resistance to atmospheric phenomena in general. As for fire safety, ignition does not occur from the sun. Among the advantages, many craftsmen note flexibility, which allows you to decorate structures of any complexity with minimal waste. The volume does not reach 5%, which is not typical for every roofing material.
Shingles bend easily and do not crack Source derevo.by
Soft tiles have relatively fewer disadvantages. There is a limitation on the inclination of the working base - at least 12 degrees. That is, for a flat roof such a coating is unacceptable for use. The rationale here is simple - water can get into the joints between individual shingles.
Disadvantages also include the relatively high cost of high-quality materials. For example, tiles that meet the European standard EN 544 are guaranteed to have good performance. Here, the minimum amount of bitumen is considered to be 1.3 kg/sq.m. But in America and in our country less maintenance is allowed, which affects the reduction in prices and service life within 20-30 years. Another pricing factor is the reinforcement of finished products. Shingles that are made of fiberglass rather than fiberglass are stronger and more expensive. According to European standards, the optimal base density is 110-125 g/sq.m. Polyester has even higher quality.
Example of fiberglass structure Source depozituldefose.ro
Step 2. Installation of continuous flooring
To install flexible tiles, a rigid solid base is required. Therefore, mount a solid carpet of plywood or OSB boards on the prepared sheathing, with a gap of 3-5 mm, which is necessary for thermal expansion, and secure it to the rafters with self-tapping screws.
The main requirement for a base for flexible tiles is a flat area and the ability to fix the shingles with nails. For this purpose, sheets of glued wood shavings similar to plywood or tongue-and-groove boards laid end to end are suitable. Only the board should be as dry as possible so that waves do not form during drying. But it’s a big mistake to use only the sheathing itself, albeit more frequently, for a soft roof, because already in the first season the entire roof will simply go in waves. And photos with such problems become a real asset for manufacturers who scare their customers with such errors.
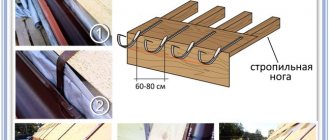
Once the base is ready, reinforce the eaves overhang with metal strips. These are laid edgewise on the edge of the base and secured with roofing nails, in increments of 150 mm, in a checkerboard pattern:
Step 3. Selecting and installing the substrate
Now is the time to take care of waterproofing. It is necessary in such difficult places as abutments, joints and valleys. Here the canvases are laid from bottom to top with an overlap of 10 cm in the longitudinal and 15 cm in the transverse direction:
We recommend that you use a specially designed underlay rather than roofing felt or similar material, as is sometimes done. The fact is that they and the finishing roofing coating have different service life, and even conditions of use!
And such an attempt to save money will soon lead to swelling of the entire roofing carpet. In addition, no manufacturer will provide a guarantee for a roof that contains materials from third-party manufacturers.
By the way, until recently, lining carpets were practically not used in Russia, and even today many people try to cheat. This is logical, because by the time the roof is built, it often turns out that the planned budget for the entire house is not enough, and concessions have to be made. But, if you want to lay roofing tiles and forget about it for many decades, then do not give up such an important element.
There is always a risk that water will penetrate into the under-roof space, especially in such difficult places as bypassing chimneys or contact with an installed antenna. There are also emergency situations when strong winds lift shingles during a rainstorm.
Moreover, choosing a roofing carpet is not difficult, because... it is subject to the same requirements as tiles: to be resistant to temperature changes, provide reliable waterproofing and last a long time. And the modern market provides many options, both imported and domestic. Moreover, many factories in Russia today operate on European equipment and the quality of their products is not inferior to their foreign counterparts.
In general, underlay carpets come in two types: self-adhesive and with mechanical fixation. Self-adhesive ones are laid mainly in valleys, and mechanical ones are rolled out over the remaining roof area and fixed with galvanized nails:
Here is the process of installing a regular roofing carpet, which will need to be fixed with bitumen mastic:
Here is an example of working with a more modern self-adhesive roofing carpet:
So, a self-adhesive waterproofing carpet is ideal for a valley. And, if the slopes have a slope of more than 18 degrees, then consider laying the carpet in all places of probable leaks, and these are: ribs, ridges, gable overhang and all exits of roofing elements.
But on a roof with a slope of 12 to 18 degrees, you will need a continuous waterproofing carpet. Before this, we recommend placing a self-adhesive bitumen-polymer material, for example, “Barrier”, on the eaves overhangs, and at the same time strive to ensure that the carpet itself is without overlap - continuous along the entire length:
Also insulate ventilation passages, areas around roof windows and chimneys in advance. Before installing the flexible tiles, coat all the passage elements with bitumen mastic yourself - it’s not difficult.
Before you begin laying shingles, you will also need to strengthen the eaves overhangs. They need to be fixed with roofing nails in increments of 10-15 cm. Here is an educational video lesson on this topic from the Technonikol company:
Specifics of soft roofing
Materials from the group of soft roofing coverings are modified versions of the good old roofing felt. The new developments borrow from their predecessor flexibility and lightness, which rightfully top the list of advantages. They retain excellent water-repellent properties, thanks to which the wooden base and rafter system last longer. The composition has been improved, due to which the period of flawless operation of the materials has increased threefold.
According to the installation method, the class of soft roofing coverings is divided into three types:
- Roll materials supplied in the appropriate format. These include bituminous descendants of roofing felt and new representatives, such as polymer membranes. Roll coverings are laid in strips. Bituminous materials are attached by fusing, polymer materials by partial or complete gluing. With their help, they are mainly used to equip flat and gently sloping roofs with slopes up to 3º, permissible up to 9º. Rolls are in demand mostly in industrial construction;
- Roofing mastics supplied ready-made or cold to be heated. Sprayed or applied in a thick layer on flat roofs, resulting in a monolithic coating without seams. Reinforcing mesh is used for strengthening. The scope of application is limited to flat roofs.
- Bituminous shingles supplied in flexible shingle tiles. Essentially, it is an improved roofing felt material, cut into relatively small sheets. The edge of the shingles is decorated with figured petals to imitate the ceramic prototype. The back side is equipped with an adhesive strip designed for attachment to a wooden base. Glued individually. Additionally, roofing nails or self-tapping screws are driven into each shingle. When a bitumen roof is heated by the sun's rays, the tiles are sintered and transformed into a continuous roofing shell.
In private low-rise construction, the piece variety is actively in demand, because Flat and low-pitched roofs over one- or two-story residential buildings are constructed extremely rarely. Domestic buildings have a “flat” fate, but not every owner will decide to buy membranes and mastics for the roof of a barn. This means that we will pay attention to the installation of the most popular bitumen shingles.
Step 4. Selecting fasteners
To secure shingles, you will need special nails with wide heads. It will be extremely important to nail them so that the head is in the same plane with the surface of each shingle, and at the same time does not “cram” into it. In addition, nails for soft tiles must be galvanized.
Nails for installing soft tiles are divided into the following types:
- Tar paper nails . Their tip is so sharp that when buried in the bitumen layer, they do not violate its integrity. Such nails are produced galvanized or without a protective layer at all. Of course, unprotected ones are the cheapest, but at the same time they are not at all practical and quickly begin to rust. These are only suitable for assembling furniture or constructing temporary sheds.
- Rough nails . They have special teeth on the working rod that are directed towards the cap. These are not easily driven into wood, although it is quite difficult to pull them out even with a nail puller. And most often, during the dismantling process, the heads of rough nails are simply cut off - and that’s it. They fix the roofing so tightly that they are more often used for slate than for soft roofing.
- Club nails have longitudinal grooves and webs on the working rod, and are less suitable for soft roofing.
We recommend that you use galvanized rough nails with a head diameter of 8-9 millimeters as roofing nails specifically for flexible tiles. They also produce special nails for bitumen shingles, and they differ from their standard counterparts.
These are made from strong steel wire, which is automatically cut into equal pieces, then the workpiece is sharpened on one side, and riveted into the shape of a hat on the other. If you find these on sale, you can buy them.
But it is important that the nails themselves comply with GOST 4030-63: the diameter of the rod is 3.5 mm, and the diameter of the head is at least 8 mm. The thing is that when working with concrete shingles, the most unpleasant moment is when the nails, with the next blow, simply sink into the bitumen layer and thereby violate the integrity of the coating. But the expanded cap will not be able to “sink” so easily. And the larger it is, the better it will hold the shingles, which is why high-quality nails for flexible tiles resemble a pushpin. Moreover, for single-layer and two-layer tiles you will need nails with parameters of 30x3.5 mm, and for three-layer tiles - 45x3.5 mm.
By the way, some would-be builders don’t understand why they can’t just heat up sheets of soft tiles and glue them to the flooring, why exactly nails and all the fuss associated with them? In fact, the use of open fire on such a roof is prohibited due to basic fire safety considerations. So, forget about this risky idea and rent an automatic appliance.
Famous manufacturers
Below is a list of asphalt shingle manufacturing companies that are in greatest demand.
IKO
Production is located in Belgium, Slovakia, Canada. The main raw material for tiles is soft bitumen.
The molds for casting the material were developed in our own laboratory.
The choice of colors is very large. Product prices are at an average level.
DOCKE
It is a group of companies that have two factories in Russia. Start of activity - 2005. There are official representative offices in every region of the country.
To create soft roof elements, SBS-modified, oxidized bitumen is used.
Low-cost product options have a 20-year warranty, and expensive ones have a 50-year warranty.
TechnoNIKOL (Shinglas)
The association of enterprises produces bitumen shingles under the trademarks TechnoNIKOL Shinglas (Shinglas), Tilercat.
There are both single-layer and multi-layer roofing elements on sale. Several model ranges of tiles are produced. The quality is high.
The warranty period for certain types of tiles reaches 50 years.
Icopal
Large Finnish manufacturing company. The basis of the material is SBS-modified bitumen. Own molds for low tide. Assortment of flowers. Prices are average.
Tegola
Production - Italy. The company started its activities in 1973. Constantly holds a leading position in terms of sales in Europe. There are official representative offices and production in 73 countries, in Russia – in the Ryazan region.
Particular attention is paid to the decoration of shingles. There are shingles with different types of coating, which allows you to decorate buildings in different styles (country, chalet, Provence). The price is affordable.
Kerabit
Finnish manufacturer. Product prices are average market prices. Good quality.
CertainTeed
American manufacturing company. Finished products are also available for sale on the Russian market. The range of tiles in shape and color has no analogues among competitors. Prices are high.
Katepal
Katepal is a large Finnish company producing soft roofing. It goes on sale under the Ruflex brand. Start of work - 1949.
When creating shingles, bitumen with increased frost resistance is used. Multilayer tiles are also produced, but the assortment is several times inferior to the Italian plant.
Step 5: Place the starting strip
Now let’s move on directly to laying flexible tiles. It starts from the starting line. As such you can take:
- a pattern from ordinary tiles, for example, shingles with cut petals, if you are working with the “ Tango ” or “ Trio ” collections;
- universal ridge-eaves tiles, especially if you are working with “ Accord ”, “ Sonata ” or “ Jazz ”.
If it's more convenient for you to start with the eaves tiles, lay them on top of the metal strip, stepping back a little from the bend. Next, nail it down, but keep in mind that the longer and steeper the slope, the greater the indentation from the inflection point should be:
Here's what laying the starting strip looks like in practice:
Required tools:
Before starting work, you need to ensure that you acquire the necessary tools. You may need:
Roofing knife - for cutting single-layer tiles.
A special mechanical or pneumatic cutter for cutting multi-layer bitumen shingles.
Metal scissors - for cutting metal strips or reinforcing profiles.
Stapler - for fixing roofing films.
Guide bar - for even cutting of shingles in valleys, on ridges or junctions.
Hammer, saw, drill, screwdriver - for installing the rafter system and fastening various elements.
Construction hair dryer - for heating bitumen shingles or components (valleys, ridges) in the cold season.
Step 6. Installation of different types of shingles
Now let's unpack the shingles. The main requirement for their installation is dry, warm weather, because it is undesirable to install bitumen shingles at temperatures less than +5°C, because in areas where it will need to be bent, it will be difficult to avoid cracks.
If you still have to attach shingles in such conditions, you will need preventive maintenance: the sheets are heated with a construction hairdryer and bent onto a metal pipe about 10 cm in diameter. But it's better not to do that.
Calculating the required number of shingles is not difficult: take one sheet, measure the area that will be visible, find out the area of the slope and divide the second by the first. Here is valuable advice on how to calculate and prepare flexible tiles for installation:
Of course, if you have a diamond eye, you can get by with detailed calculations, but the marking lines serve as excellent guides along which you can align the tiles both vertically and horizontally. Especially if you are laying soft roofing for the first time.
Believe me, tearing off several sheets and reattaching them to fix a jamb is not the most fun. And absolutely without markings, if some element is embedded in the roof or the overall geometry of the slope is broken. Tools such as a hammer, a plumb line and a level will help you in this matter.
As we have already said, usually, for convenience, ready-made shingles are marked with small holes in the factory so that you know exactly where to hammer the nails. If there are none (for example, in the cheapest collections), then simply step back 2-3 cm from the edge and be guided by this illustration:
In each case, the place where the nail is driven will directly depend on the shape of the cut of the tile itself. It is only important that each nail simultaneously pierces both the lower and upper edges of all sheets, and if you are laying flexible tiles on slopes with an angle of 45°, then the upper corners of the shingles also need to be additionally fixed.
The entire procedure for laying flexible tiles is not complicated, here are the instructions for the process itself:
- Before installation, mix shingles from several sticks to minimize variations in shade. The fact is that even in one mail the color can differ so much that you will be surprised, and such incidents will be very noticeable on the roof.
- If the slope is long enough, start laying the tiles from its center and level it horizontally. And the second row is already shifting the shingles to the left or right by half a sheet. Shift the third and all subsequent rows relative to the previous one, also half the petal, left or right, depending on which direction you initially chose.
- You need to start laying tiles on a slope with a lesser slope, and you should approach a steeper slope by at least 30 cm. On a steeper slope, it is recommended to knock off the chalk lines so as not to get lost. Now cut the tiles on a more slope along this new line, and after fixing, coat them with bitumen mastic where there is no self-adhesive layer on the back side.
- Lay the tiles from bottom to top, moving away from the edge of the drip edges. Here you will need to lay special ridge-eaves tiles. By the way, you can replace it with a regular one if you cut the petals.
Now secure the shingles. An automatic tool is good for this, especially if it runs on electricity. The main thing is that when choosing a model, take care of your own safety: the trigger mechanism should be comfortable, with protection against an accidental shot and the ability to remove a stuck nail without any risk. After all, usually a hammer is more intended for small household work, and professional roofers rarely use it.
The only point: if the special roofing nails do not fit the gun, take a ready-made clip of nails with a wide flat head. They differ in that they are connected to each other by a thin wire. This kind of tape is inserted into the chamber and the nail is fed one after another. This is much more convenient when working at heights: you don’t need to look for bunches, you don’t need to expose your fingers to the blow, and the fastening itself will be of better quality than when you are already too tired on the 501st nail. The main thing is to follow the basic technology: the nail must be driven in strictly perpendicular to the plane of the shingle.
Remember, if some shingle was not securely fixed, then over time it will loosen its fastening and fly off with a gust of wind. And the nail itself, lifted by the wind, will tear the sheet, shaking the neighboring one. And all this will lead to leakage and necessary repairs. Of course, it will not be possible to completely avoid problem areas, which is why periodic inspection of such a roof is necessary.
Now let's look at the features of installing different types of shingles. So, before installation, you need to remove the protective film from single-layer shingles, which is always located on both sides of the shingles. Why is she? The fact is that this roofing covering is transported by ordinary trucks both in the heat and in the heat, but we are still talking about bitumen.
But in collections with such cutting as “ Dragon Tooth ”, there is no film, it is only important to choose a beautiful pattern or lay it chaotically, simply mixing shingles.
And how exactly to work with each type of shingle cutting, the following illustrations will help you:
Next, if you have to work with a complex roof, you have two ways to lay shingles: segmented and seamless. In the first method, divide the corner or cone into equal segments, and lay each of them separately. And in this way, cover the entire roof. The seamless method is more complicated: here it is important to make the correct marking of the ramp and navigate according to it. Think and choose the one that seems more convenient to you.
Leaders of sells
Flexible tiles
Many homeowners are perplexed by the question of which manufacturer to purchase this bitumen material from. And for good reason, since today you can find several dozen famous brands on construction sites. Such foreign brands as Katepal, Icopal, Finnmaster are popular.
TechnoNIKOL
TechnoNIKOL
TechnoNIKOL However, due to economic reasons, the Russian representative of TechnoNIKOL . TECHNONICOL SHINGLAS tiles are confidently capturing the domestic market - the main advantage is the ratio of price and quality of tiles.
The cost of the proposed line starts from 220 rubles per m².
Tegola
Tegola
Tegola A well-known manufacturer of roofing materials, this company has been operating since 1973 and deservedly enjoys authority in the European space. A large number of shapes, colors and high quality are the hallmark of Tegola.
Budget offers start from 280 rubles for Jazzy, Katrilli, KL, Rocky, Foxy
Katepal
Katepal
Katepal Representative from the Finnish side. One of the oldest specialized organizations, it has been working on roofing sites since 1949. Finland is a northern country, and it’s not the place to know about all the nuances of a cold winter.
Improved bitumen with increased frost resistance is the specialty of Katepal. Wide range of products: Jazzy, Katrilli, KL, Rocky, Foxy.
The average price starts from 280 rubles.
Döke
Döke
Doeke Those who are interested in more expensive tiles of higher quality should take a closer look at the Doeke company.
Roofing products that comply with GOST standards begin their price range from 340 rubles.
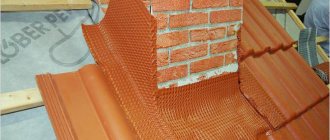
Step 7. Fastening the tiles in the valleys
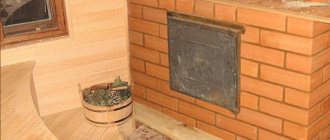
And now – about the most problematic areas of the roof. You can organize the valleys, namely the internal curves of the roof, in two ways: open and closed, which is also called the undercut method. The main thing is then to make a triangular strip at the junction of the roof and the wall and place tiles under it.
In addition, if the wall is brick, it must be plastered and treated with a bitumen primer. The upper part of the junction must then be covered with a metal apron, which must be secured and inserted into the grooves, and then sealed:
The process of preparing bitumen mastic
Mastic can be purchased at the store, ready for use, or you can make it yourself. This will require bitumen, which makes up approximately 80% of the composition, and filler. Take 2 parts bitumen and 1 part filler, resulting in a cold mixture. The bitumen is heated to 180 degrees and diesel fuel and filler are simultaneously prepared. The contents of the two boilers are mixed after the water in the bitumen has evaporated.
To prepare hot mastic, bitumen is first heated in a boiler to 200 degrees, and then filler is slowly added to it. During the process, the temperature of the mixture should not be less than 160 degrees.
Step 8. Laying ridge and spine tiles
Next, we will understand the concepts of ridge tiles. As you might guess, these are the shingles that cover the ridge of the roof. All other tiles are called ordinary tiles. By the way, spine tiles are obtained when the ridge-cornice tile is divided into three parts, or they are cut out from ordinary ordinary tiles using the perforation method.
To correctly lay the spine tiles, use a cord to mark off the dimensions of the future ridge - these are two stripes along it, and lay the spine tiles from the bottom up. Then secure the shingles with nails on each side and make sure that the overlap of the overlying shingles overlaps the nails by 5 cm.
The ridge tiles are laid on the side opposite to the so-called wind rose (you can find out about this from your neighbors or from the wind map). Then everything is the same as during the laying of the ridge. If there is no self-adhesive layer in the right places, coat it with mastic.
Now let's move on to the ribs. Here the ordinary tiles should be cut so that there is a distance of 3 to 5 mm between adjacent slopes:
Here's another great tutorial that walks you through the details of the process:
And another example of neat work:
Key quality criteria when choosing flexible tiles
Reduced to the following list:
- Flexibility test. You need to try to bend the element. High-quality shingles will return to their original position without any problems, without loss of appearance.
- No noticeable odor. If it is present, then this indicates the low quality of the raw materials. The material will quickly lose the necessary elasticity.
- The outer coating of stone chips should be applied evenly and not crumble.
- The minimum thickness of shingles in one layer is 4 mm. Products with a lower indicator are not worth taking.
- If the tiles have a self-adhesive surface, it is important to pay attention to the production date. If more than six months have passed, you will have to glue the elements with a hair dryer. These tiles are considered old.
According to the standard, a pack should contain 22 units of material. In terms of finished coating, this is 3 square meters. The weight of a pack of single-layer shingles reaches 8 kg, multilayer - 20 kg.
To ensure a high-quality and durable roof, it is important to take a responsible approach to the preparation of the base, ensure the tightness of the coating and not skimp on fasteners.
Step 9. Finishing work with additional elements
And finally, finishing work. The installation of flexible tiles is always completed by installing a ridge aerator. To do this, a special groove is cut along all the slopes, and an aerator is inserted into it. It is fixed with nails and covered with special ridge tiles.
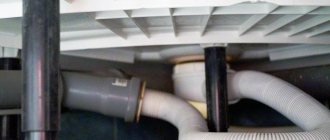
Also, special additional elements are made for soft roofing - these are the lower parts of the roof passages, which are popularly called “skirts”. And to prevent snow from accumulating behind ventilation and chimney pipes, especially when their cross-section exceeds 50x50 cm, you need to organize a groove. In short, you will need the following elements:
So, your roof is ready, and all that remains is to properly care for it. To do this, once every six months, use a soft brush to sweep away all small debris, leaves and branches, from the roof. The main thing is not to use sharp tools, because it is important not to scratch the basalt chips. And clean your gutters and funnels from time to time.
Fortunately, a roof made of flexible tiles is highly repairable: it is enough to heat the damaged area, remove it and lay new tiles. It's just a matter of one day!
Arrangement of the valley
The valley is a part that is laid parallel to the inner corner of the roof, located between the joints of the slopes. Designed to protect the entire “pie” from moisture penetration inside and unhindered removal of precipitation from the roof. The number of valleys depends on the following factors:
- roof shapes and configurations;
- the presence of auxiliary elements: attic, dormer windows, etc.
Depending on the type of roof, the top piece of the strip may or may not be installed. Proper execution of the entire process ensures the strength and waterproofing of the roofing.