For an experienced roofer, installing a modern drainage system is not particularly difficult, but an inexperienced person may not be aware of some of the nuances that lead to serious problems in the future. Of which, the most common are deformation, bending of the gutter, leakage and destruction of the facade from constant moisture.
Moreover, just one small installation error can cause all this. Therefore, we will now tell you in great detail how to fix the drain so that it serves faithfully for many years.
How to choose the right mount?
In total, to secure the drain you will need the following fasteners:
- Brackets on which you will attach the gutters. It will not be difficult for you to choose a suitable mount, based on the shape and dimensions of the purchased gutters.
- Clamps are special devices that allow you to attach drain pipes to the wall. This type of fastening is also selected depending on the type and size of the drain pipes. Also decide on the material for making the clamps: if it is plastic, then it has two attachment points, while metal ones have one, long hardware.
On sale you will find two types of hooks:
- The long ones are attached to the sheathing, to the rafter legs.
- Short ones - to the front board, according to the original plan or due to the fact that the roof is already installed.
The distance between the hooks should ideally be about 50 cm, maximum 60 cm. If you use long hook holders, it is better to screw them through the sheathing directly to the rafters, then the fastening of the drainage system itself will be more durable.
Upon completion of installation, both long and short hooks from above must be covered with a curtain rod.
Of course, according to all instructions, long hooks must be attached under the roofing directly to the sheathing. But there are often situations where it is not so easy to remove the old roofing covering, just as it is not possible to lift it up.
For example, it is old, so such hooks are often screwed even onto the hem of the cornice. Despite the illogicality of this method, in practice it often turns out to be rational and sometimes the only possible one.
Basically, according to the rules, metal hooks are used for metal drains, and plastic hooks for plastic ones. Today, copper hooks are rarely, but still used:
We perform calculations correctly
When calculating the required amount of materials, we take into account the following points:
- The standard length of gutters is 3 m. Their footage corresponds to the length of the cornices.
- One funnel is needed for each gutter.
- The number of brackets is calculated by dividing the length of the cornice into segments of 50–60 cm (this is the step with which the fastening will be carried out). Before calculating, it is recommended to leave a margin of 5 cm from the edges of the cornice.
- If the funnel is placed near the corner of the house, then one holder (bracket) is enough; when installed in the middle of the wall, two are needed.
- Each pipe branch requires two plugs.
- You will need two upper and lower elbows to assemble the riser outlet.
- If the overhang of the roof eaves is more than 25 cm, you will have to buy two pieces of pipe to connect the elbows. When suspended up to 25 cm, the knees are simply connected to each other.
- Number of pipes for the riser. To calculate it, take the distance from the ground to the cornice minus the length of the outlet and a distance from the ground of 40 cm.
- To fasten the risers you will need two main brackets and additional ones every 1.5 m.
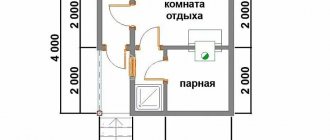
Calculations for houses with an attic and veranda are carried out in a similar way.
How to position the brackets correctly?
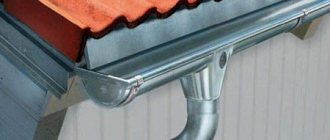
At this stage, you will have a completely expected question: how are gutters attached to the roof itself? Hooks for them are mounted to the front board, windshield, to the eaves overhang or directly to the rafters.
Fastenings are installed on rafter legs when there is no front board as such or it is important to leave it untouched for a certain aesthetic effect. But, if the roof is already ready, then the only rational option is to attach the fasteners to the front board:
Sometimes fasteners for the drainage system have to be installed directly to the roof sheathing. For this purpose, special elongated clamps are used, which are fixed at two points. The brackets are attached to the rafters (through the sheathing) only after being pre-bent.
Often home craftsmen try to save money and place the brackets too far from each other, although the distance between the fasteners should not exceed 60 meters. If this rule is not followed, over time the gutters will become deformed and gradually damaged under the pressure of the weight of water, ice and snow.
It is also important to guess the location of the brackets so that they are not too low or too high relative to the edge of the roof. If the hooks are located lower than necessary, rainwater from them will not flow well into the gutter, it will splash and streaks will appear on the facade.
Sometimes such an installation error even leads to breakage and breakage of the fastener itself. It is correct if the gutter protrudes slightly beyond the edge, at least half its width. If the drain is installed too high, then the mechanical pressure on it and its fastenings will be many times greater than normal, and the drainage system itself will have to bear the load of melting snow.
After completing the installation of the fastener, it is important to correctly install and align each hook:
Please also keep in mind that when installing metal tiles, an anti-condensation film with an allowance is also used:
Attention: slope
No water drainage system will work if the installation of a roof drain does not provide for the correct slope of the gutter. It is done in the direction from the highest point of the drain to the water intake funnel.
There are practical limits here:
- If the slope is insufficient, rain and melt water will stagnate in the gutters, and it may even overflow over the edges.
- If you install gutters with an excessive slope, there may be too much water flow that the funnel cannot handle.
- The optimal slope of the gutter per 1 meter of horizontal drainage should be maintained within the range of 0.2 - 0.7 mm.
How to fix the gutter yourself?
When installing any drainage system, it is extremely important to take into account the thermal movement of the gutter and its structural elements, which, depending on the material of manufacture, work differently in tension and contraction.
According to the rules, the only movable such element should be a hinged complaint, which is mounted without additional gluing - only on a latch. Moreover, modern manufacturers take care of this by making a special, so-called expansion mark inside the gutter, which helps to assemble in accordance with the air temperature at the time of installation.
Here's how to properly attach a gutter directly to an eaves overhang:
Basic mistakes in installing roof gutters
When you build a drain with your own hands, you need to pay great attention to the rules. Otherwise, there is a high probability of not only low efficiency of the system, but also a reduction in the service life of such a design
If assembly and work planning are not performed correctly, over time, due to heavy load, the metal begins to deform, and the plastic begins to crack, which makes it completely unsuitable for further use.
If you are planning to install roof drains, you can familiarize yourself with the common mistakes that beginners make in this matter.
- Incorrect bracket count. Horizontal gutter parts will experience bending pressure once installed, causing them to require significant support. It is recommended to fix plastic gutters every 0.5 meters, and metal gutters every 0.6 meters. There is no need to save on such parts, because if the gutters are damaged, the losses will be greater.
- The gutters are not installed at the correct angle. The recommended tilt angle for each meter is 3-5 mm. If this indicator is increased, then near the end of the slope the gutter will be located too low. Because of this, water from the roof will not get into it. If, on the contrary, this part is fixed at too small an angle or even on a straight line, then precipitation will stagnate in it. Over time, this causes dirt and dust to form, fur begins to grow, and water simply stops passing through. To fix this problem, cleaning will need to be done. Such work will take a lot of effort and time, and it may not even help. Therefore, it is better to immediately install the system at the desired angle.
- Fixing the gutter in the wrong place. To ensure that snow and water flow from the roof directly into the drainage system, it is necessary to place the horizontal pipe in the proper place. To do this, it is necessary to continue the roof line and install the gutter so that its rear edge and the resulting line are 20-25 mm apart. In addition to this indicator, you should adhere to one more size. Having drawn a vertical projection of the edge of the roof, the line should fall in the middle of the gutter or 1/3 closer to the wall.
- Leaky connection of parts. For connections, seals made of glue or rubber are used. At this stage of work, you need to apply maximum attention and your skills to tightly establish all connections. A bracket must be added on both sides of the coupling for additional reliability.
How to attach modern plastic gutters?
In total, you will need the following tools to install a plastic drain: a cord, a hacksaw or grinder, a screwdriver or screwdriver, a hammer drill, a pencil, a tape measure, a ladder, a hook bender or a vice.
Let's look at an example of how to properly install a plastic drainage system. In total, you will only need to spend about a day on this activity. The main thing is to correctly calculate the slope of the gutter towards the funnel so that the water drains easily and the melted ice quickly falls down. According to building codes, it is advisable to make 1 cm of slope for each linear meter. Next follow these instructions:
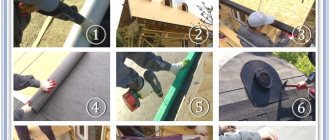
- Step 1. So, we mark the hooks: place them on a flat surface close to each other.
- Step 2. Now on the hook where the gutter will be mounted, make notches as many centimeters as necessary to create a slope, and mark this place with a pencil.
- Step 3. Apply a ruler and draw a line from the first mark to the last. The line will not be horizontal, as you understand, and it is along this line that you will attach the brackets.
- Step 4. Next, if you have metal hooks, then you will need a special hook bender, but if not, then a small vice. They should be pinched along the line and bent towards themselves.
At this stage, we install all the hooks, checking the bend angle. Please note that the bend angle of all hooks should be the same, and only the bend location along the line should be different.
So, step by step:
- Step 1. Take the hook with the smallest bend and screw it to the cornice. You should end up with the highest side of the mount and the lowest side.
- Step 2. Make sure that the edge of the roof falls exactly in the middle of the hook. This is important so that the snow that slides down in winter does not damage the complaints and that rainwater falls exactly into the funnel.
- Step 3. Now stretch lacing or strong thread between the first and last hook, and attach all the remaining hooks clearly along this line. The distance between the hooks should be from 50 cm to 65 cm.
- Step 4. Now we take the gutters and install them. Please note that modern drainage systems have special strips along the edges of the drains that simply snap into place, and a clever rubber gasket protects them from leaks. It is usually black and hard to miss.
- Step 5: Now install the gutter cap. It should be placed first on the inside of the hook and pressed on its outside.
It is important that the mounted gutter is perpendicular to the ground:
We continue installing the drain:
- Step 1. The next step is to measure the distance from the funnel to the gutter connector, and keep in mind that during the installation process it will go into the funnel and connector up to 7 centimeters.
- Step 2. Install the funnel so that it is 20-30 cm from the edge of the roof.
- Step 3. Cut another piece of the complaint. It is most convenient to cut a plastic gutter with a regular hacksaw with a fine tooth, or with a grinder with a thin metal circle.
- Step 4. Now we take the funnel in our hands. Please note that it has special sides - these are limiters up to which you need to insert the gutter.
- Step 5. Install the funnel and gutters.
- Step 6. Now we move on to installing the knees. The elbows need to be installed on the drain hole of the funnel and turned towards the wall.
- Step 7. After this, take the second knee and measure the distance between them. The second elbow must be secured with a clamp.
- Step 8. The next step is to measure the distance to the drain elbow. It will be convenient to secure the clamp to the wall using self-tapping screws with a 30 mm press washer or a dowel if you have a brick house.
The following step-by-step photo illustration will help you consider the process in more detail:
Features of installing a PVC drainage system
So, installation of gutters requires compliance with the rules. I would like to focus on:
- The slope of the cornice is up to five mm per meter of cornice, otherwise the device will become clogged;
- The correct position of the gutters is 2 cm below the roof (you need to mentally draw a line, as if continuing the roof);
- The bracket spacing should be no more than 50 cm;
- Connection of couplings - unreliable fastened parts will lead to leakage.
The drainage system is intended only to collect moisture. Ice coming off the roof must not fall into the gutters! The structure will one day not withstand the load if it is made incorrectly.
How to fix metal gutters?
Modern metal gutters do not always have mechanical latches, and therefore their parts must be joined by cold welding or using special glue:
Let's look at the technology of fastening metal drains in more detail. So, all the parts necessary to assemble such a system are produced in the factory with high precision, thanks to which you can assemble the elements into a single system yourself and without much effort:
- Step 1. The first thing you need to do is take exact dimensions and make a diagram of the fastening of the future drain to accurately calculate the number of pipes with fastening parts, gutters and brackets, gutter plugs, funnels and their connectors. And purchase all this from a quality manufacturer.
- Step 2. To set the correct slope of the gutter (5.0-10.0 mm is enough), secure the first and last brackets, and then stretch the cord between them. Step 3. Now let's move on to the installation itself. First, we install gutters with the obligatory maintenance of the required slope along the roof slope. Install the mounting brackets around the perimeter of the roof at a distance of 0.50 m.
- Step 4. It will be easier for you to connect several parts of a metal gutter of the same length on the ground using rivets and a special sealant. Close the ends of the gutters that will not drain water tightly with plugs.
- Step 5. Next, install drainpipes, which should be fixed in the required places on the walls. Connect the pipe sections themselves using clamps.
- Step 6. Check the vertical placement of the pipes with a plumb line. metal roof gutters.
- Step 7. Now connect the gutters with pipes and funnels.
- Step 8: Finally, install the bottom drain elbows in the desired direction.
Fashionable copper gutters are attached according to the same principle as conventional steel ones:
But the most difficult thing is installing a drain of complex shape:
Be sure to check the installed drain for reliability and leaks by simply pouring water into it from a garden hose:
Protection of the foundation from groundwater
Groundwater has a constant impact on the foundation, so it is important to create reliable protection for the foundation from this negative factor.
Very often, for greater efficiency, complex protection is used: trench drainage and foundation waterproofing. The drainage system is designed to drain water from the foundation, and waterproofing provides protection against moisture penetration into concrete structures.
Trench drainage
The drainage system can be open or closed.
Open drainage consists of ditches 50 cm wide and up to 1 m deep. The walls of the ditch are made with a slope of 30 degrees to ensure maximum accumulation of water. The length of the ditch must also have a slope for arbitrary water flow.
You can make closed trench drainage with your own hands according to the following scheme:
- A trench about 30 cm wide is dug along the perimeter of the base of the house; the depth should be slightly below the base of the foundation.
- Sand is poured onto the bottom in a layer of up to 10 cm, providing a slope.
- The sand is covered with geological textiles, fixed to the walls of the trench.
- Gravel is poured on top in a layer of 10 cm.
- Next, drainage pipes are laid. Many holes are drilled in them, thanks to which water will seep into the pipe and be directed to specially prepared places. The pipes must have a slope of 1 cm per linear meter.
- The pipes are covered with gravel, the layer of which above the pipe can reach 10 cm.
- The gravel is covered with geotextiles, the ends of which are sewn together.
- The end of the drainage pipe should be taken away from the base of the house at a distance of at least 5 m.
- The drainage system ends with a water intake, which can be an artificial or natural reservoir.
Foundation waterproofing
Waterproofing work protects the foundation of the house not only from groundwater, but also from soil moisture. Waterproofing can be horizontal and vertical. In the first case, the upper part of the base receives protection at the points of contact with the walls. In the second - the side surfaces of the foundation.
https://youtube.com/watch?v=a-26-EskN90
For vertical waterproofing, you can use several options:
- Protect the foundation with a layer of cement-sand mortar.
- Create insulation using bitumen mastic.
- Lay several layers of roofing felt or roofing felt.
How to install a heating cable in a drain?
In order to protect the newly installed drain from being broken by ice during the first cold weather, today a cable heating system is being installed. It is an electrical cable that is stretched along the entire perimeter of the roof. It operates in temperatures from 0 to minus 15 degrees, and even in the presence of ice and water on the roof.
Such cables are equipped with a temperature main sensor. They are installed along the edges of the roof on the south side, and such sensors regulate the on/off switching of the cable system.
So, any gutter is always subjected to constant loads during its service. Especially if in your area it rains, snows and there are strong winds quite often. In addition, ultraviolet radiation and wind-blown debris have a destructive effect on the drain. And therefore, even a well-installed drainage system always needs to be looked after!
In what cases is drain pipe heating used?
Often during a long winter, a lot of snow gets inside the drain and ice freezes. A plug is formed, due to which the thawed water cannot flow down the pipe by gravity, so it overflows over the edges and, upon freezing, turns into icicles. There is not only a risk of damage and deformation of drainage elements, but also a danger to the lives of people nearby.
In order to prevent icing and prevent such a situation, a cable is laid inside the drain that will heat the system.
When powered by electricity, the cable generates heat. Fastening is carried out after the installation of the drain. Placed inside gutters and risers in a longitudinal position. Fixation - special clips made of plastic or metal.
A thermostat with built-in humidity temperature sensors and a power supply are supplied along with the cable. Using a thermostat, you can control the heating temperature of the cable taking into account weather conditions: reduce it when it’s warm outside and increase it when it’s very cold.
To improve the effect, the cable is also laid on the roof overhang. They do this with a snake, fixing it with clamps to the flooring material.
Installation of funnels
The plastic funnel is a ready-to-install unit. It is mounted on two support brackets and then attached to the adjacent gutter.
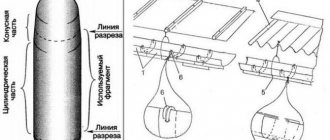
The metal funnel must be embedded into a standard gutter:
- Mark the point of connection to the drainpipe on the outer surface of the gutter.
- Make two cross cuts. The length of each is equal to the diameter of the pipe.
- Bend the “petals” outward so that a circle is formed - this will drain into the drainpipe.
- Place a funnel over the flared hole. Its carved flange should extend beyond the edge of the gutter facing the facade.
- Bend the flange onto the edge of the gutter.
depositphotos