How to make a drain from plastic bottles with your own hands.
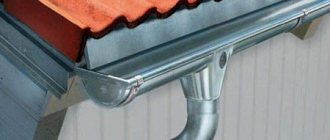
Often, summer residents are faced with the fact that they do not have enough funds to equip certain systems, since a lot of money is spent on finishing/constructing the house. For this reason, it would be an excellent solution to the problem to arrange some structures from waste, improvised material. Naturally, it will not be able to serve for a long time, but it will be able to help out for a short period of time. Let's look at how to assemble a drain from plastic bottles yourself. A roof drain is an important drainage element. In its absence, melt water and rain will flood the foundation and walls. A drain system can be made from a variety of materials, and metal is usually used for this purpose. But sometimes such costs cannot be called rational or they are simply beyond our means when it comes to arranging a country house. Is it possible to reduce the cost of such work and if so, how? It turns out that everything is quite possible, it’s enough to make a drain from plastic bottles; making it yourself won’t cause any difficulties. In this article we will talk about how to implement such a solution.
Using plastic bottles to install drains
Materials and accessories
To make a plastic water drainage system you will need a minimum of materials and tools:
- Carefully selected plastic bottles in the right quantity, and even a little more;
- A furniture or large stationery stapler for connecting parts together with a sufficient number of staples;
- Scissors and a sharp knife to separate the necessary parts from the bottle;
- Thin wire for attaching the structure to the roof;
- An awl or burner for making holes in plastic parts;
- Drill (may be needed to drill holes in the roof material).
As you can see, the tools are simple and can be found in almost everyone’s home. You can, of course, also use a sealant for greater reliability when fastening drainage parts, but, as practice shows, this is not necessary, since this will not extend the service life, and investing in temporary amenities is not rational.
Installation of drainage from plastic bottles: step-by-step diagram
So, let's start assembling our drain:
- We took measurements at the very beginning, now it is necessary to draw an approximate diagram of the drain, determine the angle of inclination of the gutter;
- When the drawing is ready, we begin to prepare the material for installation: we wash the bottles in warm (not hot!) water, carefully scrape off all labels and glue residues so that our design looks neat. To quickly remove stickers, it is recommended to soak the bottles in warm water with a little water beforehand. amount of soap, then the cleaning process will go faster;
- We cut off the neck and bottom of the bottles, leaving a flat middle part, similar to a cylinder;
- Next, we cut the cylinder exactly in half, in the end you should end up with two “troughs”. These are ready-made parts that serve as elements of the drainage system;
- The resulting parts are overlapped with each other using a stapler. You can build a fastening with wire, and cover the holes with plasticine or cover it with another viscous mass;
- Once the required length of the gutter is ready, you can attach it to the roof. To do this, use a drill to make holes in its surface at equal distances. Next, you need to make holes in the gutter, calculating so that they coincide with the holes drilled in the roof. The holder is a wire, and we use it to hold everything together.
- Now it's time for drainage. We cut off the neck of the bottle, and cut out a hole in the side so that the end of the structure lying on the roof can fit into it. Thus, we get the angle of inclination of the drainage system, which we mentioned at the very beginning and drew in the drawing;
- Next, cut off both the neck and bottom of the required number of bottles, and insert the resulting cylinders into one another. It is worth noting that they are fixed quite reliably, but we will still go through the overlaps with a stapler.
So, the installation is ready.
Advantages of a plastic drainage system
The advantages of the system manufactured by us are:
- Low cost. This is one of the obvious advantages, because the materials required for drainage do not need to be bought in a store, except perhaps a stapler, and even that has long been in the arsenal of any business owner;
- Despite its unreliable appearance, the drain may well serve you for a whole year, having experienced all natural disasters, such as temperature changes, for example;
- In addition, the ice in plastic gutters begins to melt at the slightest thaw, which is not typical for metal drainage systems;
- The lightness, almost weightlessness of the drain should also be considered an advantage, because a metal pipe falling on your head will cause significant damage to your health, which will not happen in the case of a plastic structure;
- In the summer, it is possible to lead the drain pipe into some container to collect rainwater, which is so useful for watering plants and crops in the garden. Both useful and economical!
- A drain made of plastic bottles can easily be made into an entire architectural composition that will fit perfectly into the design of a personal plot.
Disadvantages of plastic products
A drain made from plastic bottles is, of course, not ideal:
- The appearance of such a product will not suit a permanent structure: a house, a mansion or a country cottage;
- Another significant drawback is fragility, since the service life is no more than one year;
- The lightness of the design, which we considered an advantage, is also a disadvantage, since during a hurricane or simply a strong wind, the gutter can be torn off the roof and carried away in an unknown direction, which is still more difficult to do with its metal counterpart.
What else will you need?
To make a roof drainage system, plastic bottles alone are not enough. It is necessary to prepare additional materials and tools in advance. To complete this task you will need:
- to connect the individual components of the drain, prepare a furniture stapler and staples for it;
- prepare steel wire. It will be needed to attach gutters and pipes to the roof;
- take care of the tool. To cut plastic bottles you need a knife or large scissors. A drill and an awl will also be useful for completing the work.
To make the drain more airtight and not let water through, it is advisable to use a sealant. But there is one caveat. Of course, the drainage will be reliable, but its cost will increase significantly. Plus, the work itself will slow down significantly. If such a system is used as a temporary measure, then there is no point in buying a rather expensive sealant.
How to make a drain from plastic bottles? At the first stage, you need to draw up a plan for the future drainage system. Determine the location of the gutters and the location of the pipes. Next, all the necessary material is prepared. After this, we begin the work itself.
First of all, the horizontal part of the drain is assembled with your own hands; it will be located along the roof eaves. This work is performed in the following sequence:
- First of all, we prepare the plastic bottles themselves. The neck and bottom are cut off from them so that an even cylinder is obtained. After this, the bottles are cut in half. The result is two gutter sections.
- Next, we assemble the horizontal part of the drain. To do this, the resulting scraps are overlapped with each other, each part must overlap at least 2 centimeters. In this case, you should take into account where the slope of the gutter will be. It is necessary that the drains do not encounter obstacles on their way.
- The halves of the plastic blanks are fastened together with a furniture stapler. You can use thin wire instead. Also, to improve the sealing of the drain, the joints are coated with sealant.
After the gutter of the required length has been assembled, it is attached to the roof. For this, it is best to use steel wire. Using a drill, drill holes in the roofing material and attach the drainage to them. You can nail nails to the cornice strip and carry out installation to them.
It is very important to maintain the angle of inclination of the drain during installation. It should direct the drainage to the drainpipe, which is located at the corner of the house. As a rule, the slope is made based on a difference of two millimeters for every meter of the gutter. If this rule is not followed, the wastewater will accumulate at a certain point. In addition, debris coming with the water will definitely cause a blockage.
Installation of plastic gutters
If you have chosen plastic gutters for your roof, you can install them yourself in two ways.
- For small one-story houses, the drainage system can be assembled on the ground and only then lifted for installation in pre-mounted brackets. The technique is not suitable for houses above 1 floor and with a large building area, since the assembled large structure may be damaged during lifting.
- Gutter elements can be raised individually at roof level and assembled into a single system on site.
Plastic or metal fasteners are used for installation. The choice of material depends on the home owner's preferences and durability considerations. The installation location also matters.
- Gutters are attached to the roof rafters only using metal fasteners.
- On the frontal board, elements can be fixed with both plastic and metal.
Options for mounting brackets for roof drains
Do-it-yourself drains from plastic pipes and gutters are installed according to certain rules.
- The installation process is carried out from top to bottom.
- Before installation, the building elements on which the drains are planned to be fixed should be checked with a level.
- Marking of fastening points is carried out in the following way: the extreme positions are marked (the places of the first and last in the fastening line), after which the distances are measured and the places for intermediate fastenings are marked. It is advisable that the distances between nearby fasteners should not be greater than 600 mm. When attaching the brackets using twine, the angle of inclination is set - for each meter of the gutter, about 3-5 mm towards the funnels.
- The distance from the edge to the side brackets is 150 mm.
- The gutters in the brackets are fixed with light pressure until they click.
- Funnels are installed in the designated places, for which holes are pre-cut in the gutters.
- Next, under the funnels on the walls, clamps are installed to secure vertical pipes in 2-meter increments.
- Using elbows, vertical drainpipes are connected to water inlet funnels and then secured to the wall with clamps.
- Bends are placed on the pipes from below, directing water away from the house.
We select containers
A drain made from plastic bottles can be quite effective. The most important thing is to do everything right. First of all, you need to prepare the main material, or rather plastic bottles for the drain. Which container is best to choose? Plastic bottles with a capacity of one and a half or two liters are suitable for the roof drainage system.
To prevent drainage from causing a lot of trouble during further operation, all containers must meet the following requirements:
- All plastic bottles must be the same size. This will make it much easier to create a drain with your own hands. In addition, this will help make the entire system more airtight.
- The container must be chosen to be flat, without relief, protrusions or depressions. If this rule is not followed, the drain made of plastic bottles will quickly become clogged.
- Labels must be removed from all containers. To do this, just place plastic bottles in a container of water for a day or two. If this is not done in advance, then over time the drain will turn into a “monster” hung with paper rags.
What color should I choose? There are no special recommendations here. Everything will depend on your taste. The only thing I can recommend is to choose a darker container. In this case, debris, of which there will be quite a lot in the drain, will not be visible.
How many plastic bottles do you need? To answer this question, you need to do some calculations. It is necessary to measure the entire perimeter of the roof. This will be the length of all the gutters. The height from the eaves to the ground is also taken into account. This parameter indicates the length of the drainpipe.
After this, simple calculations are carried out. The length of the plastic bottle is measured and it is calculated how many are needed to do the work with your own hands. Only two important factors should be taken into account. Firstly, you don’t need to take the entire length of the bottle, but only 80 percent. The rest will go to waste. Secondly, the number of containers must be prepared in reserve.
Using plastic bottles to install drains
Materials and accessories
To make a plastic water drainage system you will need a minimum of materials and tools:
- Carefully selected plastic bottles in the right quantity, and even a little more;
- A furniture or large stationery stapler for connecting parts together with a sufficient number of staples;
- Scissors and a sharp knife to separate the necessary parts from the bottle;
- Thin wire for attaching the structure to the roof;
- An awl or burner for making holes in plastic parts;
- Drill (may be needed to drill holes in the roof material).
As you can see, the tools are simple and can be found in almost everyone’s home. You can, of course, also use a sealant for greater reliability when fastening drainage parts, but, as practice shows, this is not necessary, since this will not extend the service life, and investing in temporary amenities is not rational.
Installation of drainage from plastic bottles: step-by-step diagram
So, let's start assembling our drain:
- We took measurements at the very beginning, now it is necessary to draw an approximate diagram of the drain, determine the angle of inclination of the gutter;
- When the drawing is ready, we begin to prepare the material for installation: we wash the bottles in warm (not hot!) water, carefully scrape off all labels and glue residues so that our design looks neat. To quickly remove stickers, it is recommended to soak the bottles in warm water with a little water beforehand. amount of soap, then the cleaning process will go faster;
- We cut off the neck and bottom of the bottles, leaving a flat middle part, similar to a cylinder;
- Next, we cut the cylinder exactly in half, in the end you should end up with two “troughs”. These are ready-made parts that serve as elements of the drainage system;
- The resulting parts are overlapped with each other using a stapler. You can build a fastening with wire, and cover the holes with plasticine or cover it with another viscous mass;
- Once the required length of the gutter is ready, you can attach it to the roof. To do this, use a drill to make holes in its surface at equal distances. Next, you need to make holes in the gutter, calculating so that they coincide with the holes drilled in the roof. The holder is a wire, and we use it to hold everything together.
- Now it's time for drainage. We cut off the neck of the bottle, and cut out a hole in the side so that the end of the structure lying on the roof can fit into it. Thus, we get the angle of inclination of the drainage system, which we mentioned at the very beginning and drew in the drawing;
- Next, cut off both the neck and bottom of the required number of bottles, and insert the resulting cylinders into one another. It is worth noting that they are fixed quite reliably, but we will still go through the overlaps with a stapler.
So, the installation is ready.
Advantages of a plastic drainage system
The advantages of the system manufactured by us are:
- Low cost. This is one of the obvious advantages, because the materials required for drainage do not need to be bought in a store, except perhaps a stapler, and even that has long been in the arsenal of any business owner;
- Despite its unreliable appearance, the drain may well serve you for a whole year, having experienced all natural disasters, such as temperature changes, for example;
- In addition, the ice in plastic gutters begins to melt at the slightest thaw, which is not typical for metal drainage systems;
- The lightness, almost weightlessness of the drain should also be considered an advantage, because a metal pipe falling on your head will cause significant damage to your health, which will not happen in the case of a plastic structure;
- In the summer, it is possible to lead the drain pipe into some container to collect rainwater, which is so useful for watering plants and crops in the garden. Both useful and economical!
- A drain made of plastic bottles can easily be made into an entire architectural composition that will fit perfectly into the design of a personal plot.
Disadvantages of plastic products
A drain made from plastic bottles is, of course, not ideal:
- The appearance of such a product will not suit a permanent structure: a house, a mansion or a country cottage;
- Another significant drawback is fragility, since the service life is no more than one year;
- The lightness of the design, which we considered an advantage, is also a disadvantage, since during a hurricane or simply a strong wind, the gutter can be torn off the roof and carried away in an unknown direction, which is still more difficult to do with its metal counterpart.
General information
Advantages and disadvantages
Do-it-yourself drainage from plastic bottles is an excellent alternative to creating a permanent drain. But what are the positive and negative characteristics of such a system? Why is it often used by home craftsmen?
Roof drains made from plastic bottles have a number of advantages:
- Low cost. All necessary materials, namely plastic bottles, can be found anywhere and completely free.
- Construction speed. All installation work can be completed within one day.
- No specialists required. Such a drain, which will be made from plastic bottles, can be easily assembled with your own hands. You don't even need an assistant for construction.
These advantages and the sufficiently high efficiency of the system as a whole attract many craftsmen - both home and professional - to this method of arranging the system. But such a drain also has certain disadvantages. First of all, we are talking about service life. It is unlikely that such a drain will last you longer than 1 year. Moreover, such a drain for water from the roof is not able to withstand heavy loads, and if there is heavy rain, the device simply will not cope with the task.
Using used plastic containers to create a drainage system is only justified if it is a temporary measure. Also, a similar drainage system can be used for small country houses, but using the system for a permanent residential building would not be a reasonable solution.
DIY drain made from plastic bottles
When planning to assemble a spillway from a plastic container with your own hands, you need to prepare the “material” with a reserve, since in the process of work you can accidentally damage the prepared elements.
What else is needed for the job?
To collect water drainage from the roof with your own hands, in addition to the required number of bottles, you will need to prepare:
- sharp knife or scissors for cutting material;
- furniture stapler with staples for connecting individual elements into a gutter;
- wire on which the plastic gutter will be attached to the roof covering;
- a drill to make a hole in the roof covering;
- soldering iron or awl for making holes in plastic;
- for greater reliability, it is also worth using a sealant, however, sealing will greatly increase the time spent on construction, and since the structure is being assembled temporarily, you need to decide whether it is worth bothering with it for a long time.
The work is carried out in two stages:
- assemble and secure the gutter to the roof;
- construct a vertical drain for water.
Gutter assembly
To assemble the gutter, you need to cut off the bottom and neck of the bottle so that you get an even cylinder. Then the resulting workpiece must be cut in half to obtain two semicircular elements. Having prepared a sufficient number of blanks, you can begin to assemble the gutter:
- two parts are folded with an overlap of 1.5 cm wide;
- fasten with staples using a furniture stapler or make holes in the parts with an awl and fasten them with a piece of wire;
- You can additionally use sealant.
Repeating the operations described above, it is necessary to assemble a gutter of the required length. Then you will need to secure it to the roof. The most convenient way is to hang the plastic gutter on a wire by making holes in the slate and in the gutter itself. In this case, you need to ensure that the gutter is suspended with an inclination to the place where the funnel is installed.
Vertical part of the system
The drainage funnel and drainpipe are also made from bottles. To make a funnel, cut off the neck of the container and, after cutting out a hole, connect the funnel to the gutter.
We assemble the drainpipe from the same bottles, cutting off the bottom and neck from them so that we get a part with a narrowed edge. We insert the blanks one into the other, forming a pipe.
Results
At this point, the production of the roof drain, which is made from plastic bottles, can be considered complete. There is an additional recommendation - it is advisable that the drain be tested, and it is better to do this at both the first and second stages. First, you should spill a little water after attaching the gutters to the roof, and this way you can understand whether the slope is made correctly and whether you have a leak. After the structure is completely assembled, you can conduct an additional test, and then you will see the entire operation of the system. If everything is normal, then the new system can begin to be used to drain wastewater from the roof.
How to collect drainage from bottles?
Prepare the bottles for work. They need to be soaked for a while in water with a little soap so that the paper labels get wet and fall off. You should not neglect this part of the work: there is nothing good in the fact that they will gradually peel off and hang from the finished drain like rags. For a plastic bottle, you need to cut out a cylindrical part in the middle, then cut it lengthwise on one side. You should end up with a rolled piece of plastic. Do this several times until you have the required number of pieces.
Connect the resulting parts with an overlap and secure with a stapler. For reliability, you can make holes along the edges of the parts and pass wire through them. These holes can be made along the very edge, and to be sure, they can also be covered with something.
Once the gutter part is assembled, you can fasten it in place. Drill through holes in the roofing material at equal intervals, and make the same ones in the gutter using a soldering iron or burner. Calculate the distances between the holes so that when fastening they are opposite each other. Attach the gutter to the bottom of the roof and thread wire through the holes to tighten them together. Each time you will also have to wrap the plastic with wire so that it does not lose its shape under the weight of water.
For several other bottles, cut off both the neck and bottom to create a cylinder. Insert the parts formed in this way into one another and fasten them together. Then insert the upper end of the resulting structure into the plastic cylinder that ends the gutter. You can only cut off the bottom and not touch the neck. Place the parts with the neck down to create a drainpipe.
When all the parts are assembled and fastened together, the drainage device can be considered complete. Even a person who is not particularly versed in construction can make such a structure. But it should be noted that the installation of a plastic drain can only be considered temporary, and at the first opportunity it is necessary to replace it with a more reliable material.
Step-by-step algorithm for building a drain
To install a drain, you need to do all the work in stages:
- Measure the length of the future drain and draw up a design drawing. Based on the drawing, you can calculate the approximate number of bottles. You also need to calculate the angle of inclination of the gutter. If the distance is too long, then due to the large difference between the upper and lower points, a horizontal gutter may not work, or the design of the weir may need to be changed.
- Once all the details have been thought out, you can start cutting the container - remove the bottom and neck and cut the middle part in half.
- Rectangular parts need to be overlapped together. The distance of the connection strip is 1-1.5 cm. The elements are fastened together with a stapler.
In the absence of a stapler, both connections can be pierced with an awl and fastened with thin wire.
- If the master thinks that water will seep through the connecting strips, then you can cover the holes with plasticine, and subsequently they will be fixed with dirt and become airtight.
- The assembled gutter is attached to a thin wooden strip using a stapler, which will prevent it from deforming (or sheets of thin iron can be inserted inside).
- The bottle gutter takes 2-3 hours to assemble, and after that the structure can be mounted to the roof.
10 options for using plastic bottles in a modern dacha. Do-it-yourself crafts are made from plastic bottles in the dacha; they are quick to make and easy to use in…
Materials for drainage installation
The drainage system is an important and very useful part of the building, but in conditions of a limited budget it is not always possible to equip it properly. For the same reason, gutter installation is carried out independently, without the involvement of professionals.
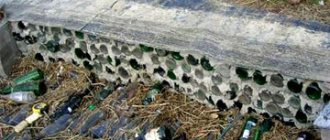
To install a simple drainage system, galvanized steel elements or plastic products are most often used, but both options have one common drawback - these materials are quite expensive. To reduce costs, you can use available materials, some scraps of wood or drywall.
However, the most common budget material for assembling drains is plastic bottles, which can be collected in sufficient quantities without any problems. Even a small house will need a lot of bottles, and it is advisable to select ones that do not have various damages. As a rule, the drainage system is assembled from brown bottles - they look better and partially hide the debris that gets into them.
The connection of individual drainage elements is best done using wire (preferably with a protective coating that prevents the material from being exposed to moisture). It will be easier to simply buy brackets for attaching gutters and pipes - they have a very reasonable price.
- https://kryshagid.ru/vodostochnaya-sistema/iz-plastikovyx-butylok-svoimi-rukami.html
- https://domsdelat.ru/poleznie-soveti/kak-sdelat-vodostok-iz-plastikovyx-butylok-svoimi-rukami.html
- https://otomatah.ru/vodostok-dlya-dachi-bez-vlozhenij.html
- https://moya-banya.ru/vodostoki-iz-plastikovyh-butylok-svoimi-rukami.html
- https://krovlya777.ru/stroika/vodostok-iz-plastikovyx-butylok.html
- https://roof-tops.ru/vidy/kak-sdelat-kryshu-iz-plastikovyx-butylok-svoimi-rukami/
Drainage systems
The design of the drain requires the presence of special gutters for removing precipitation, which are installed along the perimeter of the roof using brackets. Due to the fact that the storm drain repeats the configuration of the upper element of the building along its base, there are both external and internal corners. In this case, all elements of the system are connected to each other with sufficient tightness, which is ensured by rubber seals.
Many consider such elements to be superfluous, since the option of laying gutters overlapping is available, when one part overlaps the other by at least 30 cm, and their connection is carried out using self-tapping screws.
To ensure the removal of sediment, holes are made in certain places in the gutter necessary for the installation of funnels. After that, sewer pipes are connected to the installed cone-shaped devices, that is, they are integrated into the overall system.
When the roof has a large overhang, a curved cylindrical product is used, which is possible with the help of additional elements in the form of elbows and special rings. The drainpipe is mounted on the wall of the house using clamps.
The result of such an assembly is the creation of a system of the required configuration. To arrange a storm drain yourself, you will need a house plan with its exact dimensions. This will allow you to understand what elements will need to be purchased for the future design, as well as determine their quantity.
The concept of sand-plastic tiles
Due to the improved technological process for manufacturing the material and the optimal composition, we produced individual products that have exceptional properties. I would like to immediately note that the price of plastic tiles is 4 times lower than ceramic tiles and 1.5 times lower than cement-sand tiles. At the same time, the result was a decent roofing material, which many have already tried. Here is the composition of the material:
- based on quartz sand;
- the second most important component is the polymer;
- various additives that protect the material from fire and UV stabilizers;
- There were also dyes.
In fact, the composition is almost the same as that of cement-sand tiles, only the binding component is not cement, but a polymer, also known as polyethylene. Thanks to him, the products received their amazing characteristics.
During manufacturing, plastic tiles are equipped with special locks, which allows the elements to be firmly connected. The roof is much more reliable than from natural materials. Oddly enough, this does not affect the appearance in any way. And laying the material is much faster.
What are the advantages of such plastic roofing materials?
Preparatory work
Before you start, you need to be sure that you have a sufficient number of plastic bottles at your disposal. You can calculate: the part of the bottle used will be its middle part, about 20 centimeters long, measure the length of the future drain and divide it by 20. As a result, we get the required amount of container.
Carefully inspect the prepared bottles: it is desirable that their surface is smooth, without patterns or indentations, as this can become an obstacle to water drainage, especially in winter, when due to frost in these indentations water will accumulate and freeze, thereby spoiling product. In addition, all bottles must be the same size.
It is advisable to choose a dark color for the bottles, as water leaves streaks and deposits of mineral salts. On a light surface they will be clearly visible and give the product an untidy look.
What function should the drain perform?
Regardless of what material the drain is made of, it must protect the foundation and base of the house from rain and melt water.
Waterlogged soil can cause premature deterioration of building masonry materials or subsidence of the foundation. Reducing the load-bearing characteristics of the foundation is a very big problem. It can only be noticed when cracks appear on the facade walls of the house. Restoring the strength of the foundation is very difficult and expensive; such work can only be performed by professionals.
But they are not able to give a 100% guarantee that the measures taken will achieve the goal. All other functions of drainage (collection of rainwater into a container, decorative decoration of the facade of a building) are considered secondary and do not have any impact on the duration and safety of operation of the building.
Option for organizing drainage
Which pipe to choose
In order for the drainage system to last a long time and solve the problem effectively, it is necessary to find out which soil predominates on the site: sandy, clayey, crushed stone, loamy (mixed). Having decided on the soil, you can choose pipes.
For sandy soil, you need to make drainage with pipes equipped with a filter made of non-woven fabric. For crushed stone, a filter is not needed. If the soil is clayey, you can do without a filter, but you need to sprinkle crushed stone around the pipe. Pipes equipped with geofabric filters are suitable for loam.
When laying drainage, structures made of various materials are used. These are plastic, asbestos cement, ceramics and pottery analogues. But now preference is given to plastic analogues from various derivatives:
- low-density polyethylene (HDPE);
- polypropylene (PP);
- polyvinyl chloride (PVC);
- high density polyethylene (HDPE).
Depending on the amount of groundwater, the diameter of the pipes is determined.
Made of wood
Having a dacha or country house, it is easy to find this material. For temporary use for a short period, a couple of hours is enough.
Temporary drainage is made from 150x10mm boards. The length of the boards is equal to double the perimeter. For example, the perimeter of the roof overhang is 100 m, which means the sum of the lengths of the boards should be 200 m.
The boards are nailed together at right angles. The resulting corners are overlapped, resulting in long gutters. For temporary construction, temporary hooks are made from boards and iron. Gutters are attached to the resulting brackets.
The bracket can be made of wood. A triangle with a landing for gutters is cut out of a wooden beam. The brackets are nailed or wired to the roof. When installing, the edges of the perpendicular gutters must overlap.
Having adjusted the slope of the gutter, we proceed to the drain. It can be made from pieces of tin or by making another trench that reaches to the ground.
The main task of such a drain is to drain water from the foundation of the house. Next, you can dig a groove to drain the water or take it under a tree. The water should move away from the house by about 1.5 - 2 m.
A temporary gutter looks a little silly, but it can last for over a year.
Until the owners save money or come up with another option. To protect wood from moisture, you can use plastic film secured with tape, a furniture stapler or small nails.
There is another option for making a gutter. Dissolving a small log into 2 parts. Using a chisel, cutting out an oval, you get an excellent gutter. The method of attaching to the roof remains the same.
- Protective nets are installed to get rid of fallen leaves and debris. It's easy to make yourself. To do this, you need a fine mesh, which is cut into strips 6 cm wider than the width of the gutter (3 cm more on each side). You can attach it using clamps or wire.
- Cleaning the drainage system from dirt and debris will prolong its life and protect it from blockages. Clean with a brush or by hand, removing sticks. A clogged drain allows water to leak onto the walls and foundation of your home.
From metal profiles for plasterboard
The lightweight and durable metal profile is perfect for draining water. We find the required amount of material based on the perimeter of the roof of the house.
Profiles around the entire perimeter of the house can be attached to:
- brackets;
- wire;
- bars.
To protect against water pouring out of the gutters, it is cut into 2 parts, the end is left above the funnel and bent to make a semicircle barrier at the corner. The drain pipes and funnel will have to be made from other materials.
Do-it-yourself drain from various materials
Below are several examples of how to make a roof drainage system yourself. This task is not difficult, the main thing is to have the desire to do such work, understand the process of creating a system and know some options for executing the plan. For example, a drain can be made from a sewer pipe, tin, sheet metal, wood, polyethylene, etc.
Sewage pipe
- plastic pipe with a diameter of 50 mm for arranging water drainage;
- a cylindrical product with a thickness of 100 to 110 mm, necessary for the manufacture of gutters;
- adapters that make it possible to connect the above-mentioned elements with each other when the inlet diameter reaches 110 mm, and the outlet diameter reaches 50 mm.
Since a plastic sewer pipe was used to make gutters, it will need to be split into two halves of equal size. To do this, you can use a grinder, an electric jigsaw or a hand saw. The first option is preferable, but there are some nuances of the process.
If you cut a pipe using a grinder, plastic will inevitably stick to the special casing, so it is advisable to dismantle this safety element. As a result, it is recommended to use other protection, part of which is a mandatory face mask. Although there is a more optimal solution to the problem - buy a special disk designed for working with plastic.
To ensure a high-quality connection of gutters and tees, do not unravel the pipe all the way: leave about 150 mm at the edges.
Metal
A sheet of metal is taken and cut into strips so that their width is 25 cm. Then these parts are given the shape of a gutter, that is, they are curved accordingly. The use of galvanized sheet or tin requires the manufacture of durable steel brackets. For this you can use wire rod (6 mm), but then you will have to double the number of hooks.
Making your own brackets shouldn't be difficult. To do this, it is enough to take a cut of a log with a diameter of 20 cm and wind a wire around it, making about three turns. After this, you need to remove the resulting workpiece and compress it. Then you need to bend the edge of the structure by 4 cm to fix it on the roof, and shape the remaining part in accordance with the required profile.
Using the same screws, the brackets are installed on the roof. Then the gutters are suspended and the catch basins are leveled to form the desired slope.
Wood and polyethylene
The starting material for constructing a drain of this type should be a thin board, the total length of which would be equal to double the perimeter in relation to the roof overhang. After which you can begin the actual production of the drain:
- Connect the boards in pairs using nails at 90 degree angles.
- Assemble gutters that match the length of the walls of the house, which must be overlapped.
- Make fasteners for installing gutters in the form of hooks using boards or wire rod. The best solution would be to use not wire, but scraps of lumber, the use of which involves cutting triangular grooves that serve to secure the gutter.
- Secure the brackets to the corners of the wall, for example, with nails.
- Install narrow channels to direct rainwater from the top of the building, ensuring that their edges overlap.
- Adjust the slope of the gutters and place plastic film in them, securing it with shoe nails, buttons or tape.
For the manufacture of a drainpipe, a wooden gutter is quite suitable if its length is at least 2.5 m. The purpose of arranging a drainage is to divert atmospheric precipitation into a special ditch, which should have a depth of about 30 cm, and it must also be filled with crushed stone. When digging a ditch, you should create a slope that helps remove sediment from the wall of the house to a distance of at least 1.5 m.
A wooden roof drain will last longer if, to ensure tightness, you use silicone sealant rather than plastic film, after pre-treating the wood with a preservative compound.
Steps for making a drain
Selecting the right material
A DIY plastic bottle drain can be very effective. The main thing is that everything is done correctly. First you need to prepare the basic materials, namely plastic bottles for draining rainwater. But which container will be better? Bottles with a capacity of 1.5-2 liters are ideal for a roof drainage system.
To prevent drainage from causing a lot of trouble in the future during operation, all containers must meet the following list of requirements:
- All plastic bottles must be the same size. This will greatly help make it easier to create a drain yourself. Moreover, it will help make your entire system airtight.
- The container should be chosen without any relief, even, so that there are no protrusions or depressions on it. This rule must be observed, since otherwise the drain will quickly become clogged and will not be able to perform its main functions.
- Labels should be removed from all containers. To do this, simply place all plastic containers in a cup of water. If you do not do this in advance, then after some time the drain will become a “monster”, which will be hung with paper rags.
Which color should I choose? There are no specific recommendations here. Everything will depend on your preferences and tastes, but the only thing that can really be recommended is the use of dark-colored containers, since in this case the stuck garbage in the drain will not be so visible, but believe me, there will be enough of it in the drain. Now a little about how many plastic bottles you need. In order to answer such a question, certain calculations must be performed. You will need to measure the perimeter of the roof and this will be the length of all the gutters. You should also consider the height from the ground to the eaves. This parameter will indicate the length of the drain “pipe”.
After this, we will perform the calculation for our drain made of plastic bottles. You need to measure the length of the plastic bottle and calculate how many pieces you will need to do the work yourself. But here you will need to take into account two extremely important factors - the length of the bottle should not be calculated all, but only 80%, since the remaining 20% will be used for the joint. In addition, the number of containers must be prepared in excess.
Additional tools and materials
To create a drainage system, plastic bottles alone will not be enough. You will need to prepare other materials and certain tools in advance.
In order to cope with this task, you will need:
- To connect the individual components of the gutter, you should prepare a furniture stapler and a lot of staples for it.
- Prepare steel wire. It will be needed to attach gutters and pipes to the roof.
- Don't forget about the tool. To cut plastic bottles you will need large scissors or a sharp utility knife. Also, to complete the work you will need an awl/soldering iron (to create holes) and a drill.
To ensure that the drain is sealed and does not let water through in any way, you will need to use a sealant. But there is a certain nuance here. Naturally, in this case the drainage system will be reliable, but its cost will increase. In addition, the work will also last more than one day. If you plan to use such a system as a temporary solution to the problem, then there is simply no point in buying expensive sealants.
Installation work
So, how to make a drain from previously used plastic bottles? First, you will need to create a plan for the future drainage system. Determine the location of the gutters and the location of all pipes. Next, you should prepare all the materials, and only after that you can proceed directly to the installation. First, you should assemble with your own hands the horizontal part of the drain, which will be located along the roof eaves,
and such work should be carried out in a certain sequence:
- First you need to prepare all the plastic elements for work. You will need to cut off the neck and bottom from them so that you get an even cylinder. After this, cut the bottle in half. As a result, you will have two gutters in your hands.
- After this, you can begin assembling the horizontal part of the drain. To do this, all the trimmings should be overlapped with each other, and each part should overlap the other by at least a couple of cm. At the same time, take into account where the slope of the gutter will go. It is necessary to ensure that the drains do not encounter any obstacles on their path.
- The halves of the plastic blanks should be fastened together using a furniture stapler. You can instead use a thin wire and coat everything with sealant to improve the sealing quality.
Once you have the required length of gutter assembled, it can be attached directly to the roof. For this, it is better to use steel wire. Here you should use a drill to drill holes in the roof and attach a drain to them. You can nail nails to the eaves strip and carry out installation on them. It is also very important that during installation work the angle of inclination of the drain is maintained.
It should be directed to the drainpipe, which will be located at the corner of the house. As a rule, the slope should be based on differences of 0.2 cm for every 1 meter of the gutter. If you do not follow this rule, then the drains will begin to accumulate at a certain point, and moreover, the debris that will flow along with rain and melt water will certainly form a blockage somewhere.
Construction of the vertical part
The last stage of creating a roof drain from plastic bottles will be the assembly and installation of drainpipes, and such work should be carried out as follows:
- Cut off the bottom of a plastic bottle.
- You need to cut off the neck, but not completely - you need to leave such a segment so that a pointed end is formed.
- After this, insert the bottles into each other and get a drainpipe.
- To improve the strength properties, the resulting structure can be attached to a wooden stick. In this case, the risk of pipe breakage due to wind or mechanical stress will be reduced. Moreover, such structures will be easier to attach to the wall.
It is also important to create the correct funnel for the drain. It should be made from the top of a cut plastic bottle. It is enough to make slits on the sides so that the gutter can fit tightly into them. After this, the funnel should be inserted into the drainpipe. As a rule, the transition point of the drain from the horizontal part (i.e., gutter) to the vertical (i.e., standing pipe) is made at the corner of the building.
But there are certain nuances here too. If your walls are too long, then the gutter will be long, and because of this, it will not be able to cope with even the flow of water from a light rain. To avoid this, pipes and funnels should be installed every 4 meters of the gutter. This rule is extremely relevant if the drain was made of plastic pipes, since this material is not very durable, like ceramics or metal.
Features of drainpipes made of plastic containers
The task of such a system is to collect and remove moisture from the roof of buildings to a prepared place. The drain protects the foundation of the house from flooding during heavy rains or melting snow, and moisture flowing into the basement.
If the owner of the dacha does not have the time or funds to build a capital drainage system, then they use a temporary solution - plastic bottles.
This practical material has a number of positive aspects:
- Low cost. The availability of plastic bottles allows you to install an effective drain at your dacha for pennies. Materials are collected independently or with the help of pickers.
- Quick assembly and installation. You can assemble parts and install finished structures in one day.
- Simplicity. Plastic is easy to prepare and process with your own hands. There is no need to involve specialists to carry out the work.
This type of drain has disadvantages. The main disadvantages are service life and inability to withstand long-term loads. After a year, the structure will no longer fully perform its tasks.
Advice! The use of plastic bottles for the drainage system is justified as a temporary measure.
Advantages and disadvantages
Do-it-yourself drainage from plastic bottles is an alternative to permanent drainage. What are the positive and negative characteristics of this system? Why is it often done by home craftsmen?
A gutter or drain from a roof made of plastic bottles has the following advantages:
All this, plus fairly high efficiency, is what attracts home craftsmen to this system for draining drains from the roof. But such a drain also has its drawbacks. First of all, this is service life. The system is unlikely to last more than one year. In addition, such a drain will not be able to withstand heavy loads. If it rains heavily, it will not cope with its task.
The use of plastic bottles to create a drainage system is justified only in one case, if it is a temporary measure. In addition, such a drain can be used in small country houses. It is unwise to use it constantly for residential buildings.
Advantages of a bottle drain
Simple spillway at the dacha
I hope everything worked out for you, but did the design seem frivolous to you? This is a deceptive impression, believe me! Have you ever put a plastic bottle in the freezer to cool, and then forgotten it for a long time? The walls of the bottle were never torn by ice. And your drain has undoubtedly retained all these qualities. He is not afraid of ice. And when the ice begins to melt during the first warming, the water will instantly flow down, thanks to the plastic surface, which is unusual for metal pipes.
If you made a mistake or did not have the strength and dexterity to secure your unique project well, and it suddenly fell down, then you are unlikely to get injured from such a weightless object. Imagine now if a steel pipe (which was made before in Soviet times) fell on you...
Of course, everything described above is the simplest and most affordable option. But, having accumulated bottles, creative thoughts and experience over the winter, you can build a more advanced drainage system. By the way, here are a few photos that show very original solutions in using a plastic bottle...
I hope you liked the idea, stay in touch! See you on the next blog pages!
Wisdom Quote: The world is boring for boring people.
Installation nuances
After all the preparations have been made, let’s take a closer look at how to equip a drainage system with your own hands. Installation of brackets is carried out with the obligatory creation of a slope towards the funnels, when, taking into account the linear meter, a vertical displacement of 5 mm is assumed. If there is a need to accelerate the flow of water, this slope can be increased to 10 mm.
If the length of the pediment does not exceed 10 m, a slope is made to one side. A larger value involves the installation of an additional funnel installed in the middle with a drain pipe connected to it to form a drain. But you can also make two slopes of the gutter going from the middle of the gable.
To install gutters you need:
- fix the first bracket at the point of maximum height of the sewerage system;
- fix the second one, taking into account the fact that it will be lower than the first one, thereby creating the required slope;
- Stretch twine between the installed brackets, which serves as a guide for marking the attachment points for other supporting parts of this type.
The described process of installing storm sewers looks quite simple from the point of view of its implementation, but there are certain nuances. To create a slope, they mainly focus on the horizontal, which is the front board, known as the wind board.
But is it always installed with strict horizontality? It is advisable to verify this, for example, using a hydraulic level or level. You can also use a simple option in the form of a bubble device, but only if its length is 1 m or more.
Maintenance and repair
No matter what the drainage system is made of, timely maintenance is necessary to extend its service life.
For example, after rain, you need to check whether the drain is clogged with branches, dry leaves and other debris. Failure to clean the drain in a timely manner can lead to its destruction. The place where the water flows also needs to be cleaned periodically, otherwise a whole swamp will form.
It is very easy to repair a drain made from a plastic container with your own hands, since it is all made of component parts, and you can easily replace only the part that has failed. Repairs, as well as the actual manufacturing of the structure, will not require additional costs from you.