Almost every owner of a summer house or private house dreams of building a bathhouse. At the same time, rarely does anyone order construction from specialized companies, since the price of such buildings amounts to a tidy sum. That’s why most people build bathhouses with their own hands.
However, building materials these days are also not cheap. So you have to get creative when coming up with ways to save money. But the main thing is that such savings do not affect the characteristics of the steam room itself.
The photo shows a bath wall made of bottles.
One of the most interesting options is a bathhouse made of glass bottles, which we will talk about in this article.
Using bottles
It's no secret that bath procedures are good for well-being and have a beneficial effect on it. Therefore, building the right steam room with the ability to maintain the desired temperature is not so difficult if you rely on the experience of professionals and craftsmen.
Cold air from the floor definitely causes discomfort and interferes with enjoying your time in the bathhouse. To avoid this, you need to ensure maximum thermal insulation, and ordinary bottles can help with this. Why is this method so good for floor insulation? This is because the secret to using this common method for constructing floors is based on the following principles:
The properties of an empty bottle allow it to retain heat inside it due to its emptiness and, thus, the floor will not be cold, even in severe winter;
The properties of the material from which the bottles are made help the floor to be strong, since the container can withstand any shocks and impacts.
General information
How advisable is it to use bottles for floor insulation
? Of course, the question may arise about how to accumulate such a large amount of containers. In fact, there should be no difficulties in performing such a task. It is not at all necessary to resort to the method of accumulating building material on your own, since the bottles you need are available in large quantities in garbage containers. If this option is not suitable for you, then you can make a large supply of bottles in a relatively short period with the help of family members, friends, relatives and neighbors. There is no need to speed up the process by buying drinks a little more often or in larger quantities, since all the beauty of the method, which is its cheapness, will be lost. All that remains is to allocate space for storing plastic or glass containers.
Empty bottles that are placed under the floor covering can provide an air gap between the base and it.
How to insulate the floor in a bathhouse with bottles Advantages and stages of work
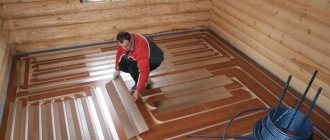
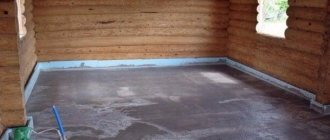
Bath procedures always bring benefits and health. Especially if the steam room is designed and built correctly. In this case, the temperature in the steam room is constant and comfortable. But what to do if there is a cold feeling from the floor in the steam room and there is little pleasure from being in such a bathhouse? You will have to insulate the underground using improvised means. In our case, this will be the floor in a bottle bath.
Are you surprised? But in vain. The principle of insulating a room with simple glass or plastic bottles lies in the air gap that fills the cavity of the bottle. As a result, a kind of thermal barrier is formed, which does not let the cold into the room. In addition, glass in the form of a bottle is highly durable. It will be very difficult to damage such a floor even with the mechanical impact of a large impact force.
Advantages of insulating floors with bottles
The use of such readily available material as bottles is unusual, but very profitable. Since heated floors made from empty glass or plastic containers have the following advantages:
- Relatively good financial benefit. After all, the material can simply be collected from friends and acquaintances, without spending the family budget on it.
- Excellent thermal insulation. Since air sealed in a container has low thermal conductivity.
- High speed of work with minimal labor costs. Agree, laying the floor with bottles in even rows does not require high skill.
Important: you can use both glass and plastic bottles for warm pilaf in the bathhouse. But in both cases, the container needs to be properly sealed on a dry sunny day.
This way, each bottle will be filled with warm air. In addition, you can pour sawdust or expanded clay into a plastic container. But this is at your discretion.
Stages of work on floor insulation in a bathhouse
In order to make a heated floor in a bathhouse with your own hands, you will need:
- Bottles (glass or plastic, but always sealed).
- Crushed stone, sand or screenings.
- Reinforcing mesh.
- Concrete mortar, which is mixed either from a special construction mixture or from cement, sand and crushed stone in a ratio of 1: 3: 5. All bulk ingredients are mixed and diluted with water to the consistency of thick sour cream. In addition, plasticizers can be added to concrete.
- The finishing layer is made of tiles or wood grating.
- So, making an insulated floor from bottles in a bathhouse is not at all difficult. To do this, first use a bayonet shovel to remove the top layer of soil along the entire perimeter of the future steam room. The depth of the pit for laying a heated floor should be at least 20-25 cm. We compact the soil well.
- After this, we fill in a layer of crushed stone, screenings or sand. We also compact it well.
- The loose layer is covered with a reinforcing mesh. This will strengthen the crawlspace and prevent it from collapsing over time.
- Now you need to make the layer itself from the bottles. We stack empty containers in rows close to each other. Parallel rows of bottles need to be joined neck to neck and bottom to bottom. This way you will leave less free space between the containers, which means you will create a good air cushion.
Important: if the depth of the soil, the space and the number of free bottles allows, then they can be installed vertically close to each other, as shown in the photo. This will make the warm floor even denser.
- Another reinforcing mesh can be laid on top of the container layer.
- And now the floor, assembled from glass or plastic containers, needs to be filled with a cement screed 5-7 cm high. In this case, the concrete pouring needs to be pierced well in many places so that air can escape from the poured solution. This will prevent porosity and brittleness of the poured concrete.
- And to make your concrete base even stronger, you can iron the solution. That is, simply sprinkle the still wet screed with a thin layer of dry cement.
- Finally, cover the dried screed with a wooden lattice on top of which the logs and wooden flooring will lie.
For those who prefer a tiled floor in the steam room, all that remains is to simply lay the tiles on top of the concrete layer.
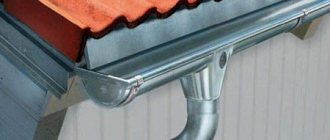
Bathhouse roof insulation
An important area of thermal insulation work, because Quite a lot of heat escapes through the roof. If the roof is well insulated, you can eliminate the insulation of the ceiling
However, it is possible to insulate the roof only if the bathhouse is a separate building with a pitched roof. For insulation, you can use any thermal insulation material that is laid on the attic floor
If the roof is well insulated, insulation of the ceiling can be eliminated. However, it is possible to insulate the roof only if the bathhouse is a separate building with a pitched roof. For insulation, you can use any heat-insulating material that is laid on the attic floor.
The procedure for using synthetic insulation, wool or polystyrene foam is no different from laying it on the wall.
Insulating the roof of a bathhouse with sawdust
Execution scheme:
arrangement of the frame;
preparation of sawdust. If sawdust is poured in the form of a dry mixture, then it must be dried, deresined, and impregnated with an antiseptic. Dry sawdust can be poured in the form of a mixture between the cells of the frame and covered with a membrane or covered with ash. But more often they are placed in plastic bags and stacked in bags;
Note. In its pure form, sawdust is used only in wooden houses.
Insulation of the roof in a bathhouse with sawdust poured into bags
preparation of the mixture. Sawdust insulation is an effective thermal insulation option if the floor is a concrete slab. Composition of the mixture for insulation (proportions of components): – sawdust – 8 parts; – lime – 1 part; – gypsum – 1 part.
First, mix the dry materials and then add water to the desired consistency.
There is a second recipe:
– sawdust – 5 parts; – clay – 5 parts.
Insulating a bathhouse with a mixture of sawdust, clay and straw
Recommendation. Boric acid can be used as an antiseptic - 10 ml. for 1 l. water.
In this case, the clay is soaked in water, diluted to the consistency of sour cream and mixed with sawdust.
Advice. Instead of sawdust, you can use straw (densely packed).
An effective insulation will be a 100 mm layer of sawdust mixture.
Insulating the roof of a bathhouse with sawdust
Backfilling ash around the exit of the sauna stove pipe from the attic floor
Pie of concrete floor in the steam room
The construction of a permanent floor involves the formation of a kind of “pie”, which includes six main “layers”, namely:
- properly prepared for further concreting, high-quality compacted and strengthened earthen base;
- first concrete pour. Usually a layer 50 mm thick is made;
- thermal insulation material. Expanded clay backfill is most often used;
- reinforcing layer of concrete with mesh;
- leveling layer;
- finishing coating.
The soil, thermal insulation and each concrete layer must all have a slope in the direction of the drain pit, i.e. the floor structure must be equipped with a normal bath drain. The slope is standard - about 10 degrees.
Choose a suitable floor scheme. Think in advance about what kind of stove you will install in your steam room and whether you need a separate foundation to place it. The base for the stove unit is best created at the stage of arranging the bath floor.
Furnace foundation
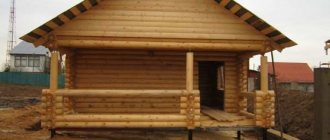
We build the building with our own hands
Any building consists of several elements that are completed one after another. First comes the foundation, followed by the walls and floor. Let's start in order.
Foundation
Garages and summer kitchens, showers and baths can be “placed” on a foundation made of glass bottles without compromising the strength of the resulting foundation.
Despite the fragility of glass, the foundation will have excellent strength characteristics comparable to the properties of a stone foundation .
Advantages of a foundation made of glass containers:
- moisture resistance;
- excellent thermal insulation;
- no shrinkage of components;
- corrosion resistance;
- long service life.
Glass also has a drawback that will have to be mitigated during the construction process. Binding materials do not adhere well to bottles , so the requirements for the brand of concrete used here are high.
Main stages of construction:
- Preparation, including clearing the area and marking it for excavation work.
- Construction of a trench to a depth below the freezing point of the soil.
- Formwork installation.
- Laying a cushion under a foundation made of sand and crushed stone mixture.
- Pouring the bottom layer of cement.
- Laying the first row of glass bottles close to each other.
- Filling with cement mixture followed by laying a layer of bottles.
- Reinforcement with iron rods.
Rows of bottles, cement and reinforcement alternate with each other until the desired height of the structure is achieved. The last layer is made of a dense concrete mixture.
Self-construction of a glass base requires taking into account some subtleties:
- Difficult hydrogeological conditions are the reason for abandoning the intention to build a “glass” foundation. High groundwater levels and movement of heaving soil will lead to cracking of the foundation.
- Severe freezing of the soil in winter is a factor influencing the appearance of cracks in the thickness of the foundation. For construction in northern latitudes, foundations of a different type are suitable.
- Bottles may float in cement solution . Place them after the mixture becomes viscous enough to hold the glass container securely.
Walls
Bottles, an exotic, at first glance, material for building walls, are increasingly being used for the construction of gazebos and summer verandas.
There are cases where entire houses were built from bottles. The walls of such structures look very original, reminiscent of lace stained glass windows.
The construction of walls from bottles requires careful selection of material. Bottles must be the same volume and diameter , and the color scheme can be very diverse.
To prepare the binder composition, it is recommended to use cement and sand in a ratio of 5 to 1 . Clay is not added to the solution.
To build 1 m2 of wall you will need about 420 bottles.
Searching for material, as a rule, does not cause difficulties:
- self-collection on the streets;
- gathering from neighbors, acquaintances, relatives;
- organizing a bottle collection point.
The technology for laying walls involves installing support pillars , the thickness of which is equal to the height of the bottles used. The distance between supports should be no more than 2 meters.
You can choose any material for the pillars:
Too much distance between the pillars and each other will affect the stability of the structure.
The bottles are laid on the foundation in a horizontal position with each layer of glass coated with a binding solution. The bottom layer is laid bottoms out , subsequent layers can change direction or remain unidirectional. Each subsequent layer is laid after the previous one has completely dried.
When stacking bottles, you must leave a small gap between them. This measure will allow the solution to more fully adhere to the glass.
In addition to its durability, the concrete floor in a garage or livestock barn is distinguished by its low temperature.
To insulate a concrete surface, you can use polystyrene foam and other expensive insulating materials, or you can use a supply of glass bottles.
It has been experimentally determined that 1 m 2 of floor will require about 145 half-liter bottles, into which vodka is usually poured.
Glass containers can be placed either horizontally or vertically , depending on the overall thickness of the future floor. It is enough to fill the bottle layer with concrete mortar to a level of 1 cm and a light heated floor will be ready.
Concrete floor
Concrete floors have many important advantages over their wooden counterparts, among which the following points must be highlighted:
- resistance to temperature changes and high humidity;
- long service life;
- unpretentiousness in care and handling;
- resistance to rotting, corrosion, mechanical and other damage.
Arrangement
Scheme of a concrete bathhouse floor made directly on the ground
Thoroughly compact the soil and form on it an approximately 15-centimeter cushion of crushed stone impregnated with bitumen. Crushed stone will help distribute the load evenly.
Consider insulation. You can make a two-layer base with a layer of heat-insulating base, form a heat-insulating layer on top of the concrete and lay the finishing coating on top, or install a floor heating system.
The most commonly chosen option is double concrete placement. Pour the bottom layer from a solution using large crushed stone (30-35 mm). This layer will be 15 cm thick.
If the steam room has a small area, you can pour the screed over the entire base at once. Otherwise, it will be more convenient to divide the space into meter strips using guides.
Pouring concrete screed onto reinforcement
Let the concrete dry and lay or pour the selected thermal insulation material on top of it.
It is recommended to prepare concrete for the top layer using fine crushed stone. When arranging this layer of the structure, be as careful and careful as possible.
Insulation
Regardless of what kind of insulation you decide to use for thermal insulation of the floor, the insulating material is laid on a pre-equipped moisture-proof layer. For waterproofing, roofing felt or polyethylene is usually used. If you wish, you can buy some modern coating solution.
Waterproofing the concrete floor of a bathhouse
Insulation, as already noted, is carried out after the first layer of concrete floor has dried. Expanded clay, boiler slag, mineral wool in slabs (mats), polystyrene foam and other similar materials are perfect for thermal insulation.
Insulation
Each listed material has a number of important advantages and some disadvantages. For example, expanded clay gravel has a fairly high cost, but to create a layer with the necessary thermal insulation properties of expanded clay it will take much less than the same slag.
Polystyrene foam is characterized by remarkable thermal insulation properties, but the service life of such insulation in bathhouse conditions leaves much to be desired.
Mineral wool insulation also has excellent performance, but is not environmentally friendly.
Thus, each insulation has its own disadvantages. Therefore, the final choice always remains with the user.
Finishing
Concrete floor in the bathhouse
Bath floor
To finish a concrete floor, tiles or mosaics are traditionally used. When laying tiles, in most cases you can avoid pouring the second layer of concrete, replacing it with a self-leveling mixture.
Finishing
Cover the thermal insulation layer with a waterproofing material of your choice. Pour a 1.5-2 cm layer of a special self-leveling mixture over the insulation. This fill will be an excellent base for finishing tiles.
Use specially formulated adhesive to attach the tiles. Cover the entire planned surface, let the glue dry and grout the tile joints.
Ceramic tiles in the bath
Before pouring the self-leveling mixture, you can lay the elements of the floor heating system. However, in traditional Russian steam rooms and Finnish saunas this is usually not necessary, but, for example, in a Turkish hammam, a heated floor would be more than appropriate.
Now you can independently arrange the floor in your steam room. At the same time, you have the opportunity to choose - you can make either a beautiful wooden floor or a solid and durable concrete floor. It all depends solely on your personal preferences and the characteristics of the bathhouse. Choose the appropriate option and get started.
Good luck!
Types of insulation
You can insulate a concrete floor using different materials, each of which has its own strengths and weaknesses.
Mineral wool
Cotton wool is made in slabs, which must be laid between the joists. Kinds:
- glass;
- slag;
- stone.
The type depends on the number of main components. When working with mineral wool, it is recommended to use a respirator, protective gloves, and long sleeves.
Advantages:
- high resistance to heat;
- vapor permeability;
- resistance to mold and mildew.
When moisture enters, mineral wool begins to deform and its basic properties deteriorate.
Mineral wool (Photo: Instagram / stroymarket_vld)
Perlite
It is made from glass-like hard rock that is of volcanic origin. The finished material can expand many times when heated. Often used in the manufacture of noise and heat insulating layers.
Advantages:
- Environmental friendliness. The material does not harm people and pets, does not emit harmful substances during operation.
- Immunity to the formation of mold and mildew.
- Resistant to sudden temperature changes. The material can withstand changes within the range of -220–+900°.
- Low specific gravity. Suitable for insulating floors, ceilings, walls without additional reinforcement.
- High level of sound insulation.
- Resistance to alkalis and acids.
Since the material has low resistance to prolonged exposure to moisture, it is not suitable for steam rooms and showers.
Perlite (Photo: Instagram / orxidejka)
Expanded clay
Porous round granules consisting of shale, low-melting clay. The finished material is obtained by firing two components at a temperature of +1050°C. Firing duration is 30 minutes.
Advantages:
- low price;
- low specific gravity;
- environmental friendliness;
- high strength;
- durability;
- immunity to temperature changes;
- fire resistance;
- high thermal insulation rate.
The material has high hygroscopicity. To make high-quality insulation in a cold climate zone, you need to spend a large amount of expanded clay.
Expanded clay (Photo: Instagram / kirpichnyy_dvor_56)
Extruded polystyrene foam
Advantages:
- immunity to the formation of mold and mildew;
- low moisture absorption;
- resistance to temperature changes;
- low thermal conductivity;
- high compression resistance;
- environmental friendliness.
Basic preparatory work
Having made the final decision to make a floor from bottles for a bathhouse with your own hands, you can begin the preparatory work:
- Calculate the required amount of material, taking into account the total area of the room and the size of the container - length, diameter of the bottom and neck.
- Pre-prepare the container, warm it up and, if desired, fill it with heat-insulating bulk mixtures, carefully close with stoppers and lids.
For work you will need the following tools and materials:
- bottles;
- quarry or river sand;
- crushed stone of medium fraction;
- cement grade M400 or M500;
- metal frame made of wire with a diameter of 7 mm (cell size – 5 × 5 cm);
- bayonet shovel;
- metal carcass;
- roofing felt;
- bitumen mastic or adhesive tape;
- finishing coating.
Recommendations
Some are afraid to insulate the floor with plastic containers, considering them not strong enough for this. In addition, everyone knows that plastic dishes are subject to rapid deformation. However, PET bottles are used for floor insulation no less often than glass bottles.
Below are recommendations that you can follow to create a strong and reliable foundation:
- To prevent bottles from deforming and add strength to the future floor, it is enough to fill them with sawdust, sand, dry clay or other bulk materials.
- Work on preparing the base and laying plastic bottles is carried out similarly to installing a floor made from glass containers.
- Installation of an insulating structure made from PET bottles is best done at an air temperature of 20-25 degrees.
- When preparing a concrete solution, the cement-sand mixture must be diluted with heated water, which helps to slowly cool the air inside the plastic container. As a result, optimal pressure is created on the walls of the dish, which helps to strengthen them until the solution begins to harden.
- The screed must be reinforced, and the size of the mesh cells should be no more than 150x150 mm.
It is necessary to warm up the bottles outside on a sunny day, thus preparing them for stacking;
It needs to be filled with concrete, the thickness of which should be 5 cm
Expanded clay or dry sawdust must be poured into bottles to maintain warmth and tightness for a comfortable temperature regime;
Use tight stoppers to securely close the containers you use.
Wooden floor. Features of installation of leaking and non-leaking floors
The construction of a floor from logs and boards is carried out in several stages. Perform each of them sequentially, and you will receive a reliable coating with excellent performance properties.
Layout of a leaky type floor
The first stage - supports
There is practically nothing complicated about installing a wooden floor yourself. First prepare a high-quality wooden beam with a cross-section of 150x150 mm. Boards will be attached to it.
Support pillars for joists
The logs will experience a fairly high load, so they can only be placed on supports. For the manufacture of such supports, it is allowed to use brick or reinforced concrete. The racks must have a thickness of at least 150 mm. The racks themselves also rest on additional platforms. The width of such a platform should be approximately 70 mm greater than the width of the support post.
Select the height of the racks in accordance with the height of the foundation. In the case of a strip foundation, the posts should be placed flush with the edge of the base; in the case of a columnar foundation, make the posts so that their upper ends are flush with the upper ends of the pillars.
All supports are subject to mandatory waterproofing. To protect against moisture, bitumen or roofing felt is usually used. Wooden structural elements are necessarily impregnated with an antiseptic.
Second stage - underground
Start filling the underground space. If the bathhouse floor is leaking, pour approximately a 25-centimeter cushion of crushed stone onto the bottom of the subfloor. If the soil at the construction site does not absorb liquid well, be sure to install a separate container of suitable volume to collect wastewater.
When constructing a leak-proof floor, expanded clay should be used instead of crushed stone. Make the height of the backfill such that its upper edge does not reach the joist by about 150 mm - this is the necessary ventilation gap. Compact the backfill thoroughly.
The third stage - logs and boards
Leaking bath floor
Proceed to laying the joists. If you are making a leaky floor, you can start laying them from any wall convenient for you. If the floor is not leaky, install the joists with a slope towards the drain.
Non-leakage floor in the bathhouse
Place the logs on the supporting elements prepared for them. For additional reliability, you can fasten the logs to the supports using any suitable fasteners.
The principle of laying flooring for a leaking floor
Rules for laying non-leaking floors
Start laying the boards. If the floor will not leak, first install a base (rough) base with moisture insulation and insulation, and then lay tongue and groove boards on top of it. Direct the groove of the boards inside the steam room. To attach the boards to the joists, use nails, screws or other suitable fasteners.
The plank floor does not require finishing.
Important: wood in the steam room cannot be treated with any paints and varnishes.
Mineral wool
Mineral wool is considered a common material for thermal insulation: affordable, but quite effective. It is mainly used for insulation of attic spaces or floors of the 1st floor.
Mineral wool consists of thin fibers and can be corrugated, spatial, horizontally or vertically layered and have the following substances in its main composition:
- slag from blast furnaces;
- volcanic rocks (basalt, stone, etc.);
- glass.
Advantages and disadvantages
The main advantages of the material are: wrinkle resistance, good vapor permeability, frost resistance, cost-effectiveness, resistance to temperature changes, low biological activity (immunity to the spread of mold and fungi). In addition, mineral wool is easy to install and screed, and can also last for many years.
However, when choosing this material, one should take into account its disadvantages in the form of a large layer height and low resistance to moisture penetration. Therefore, when installing mineral fiber, it is imperative to lay a layer of waterproofing. In terms of moisture permeability, glass wool has proven itself well, but it consists of loose sharp elements, which can cause some inconvenience when installing it as insulation.
Mineral wool is produced in the form of rolls, layers such as flexible mats or hard slabs.
The stages of installing mineral wool are carried out in approximately the same algorithm, the nuances consist only in the form of the surface. First, the base is carefully prepared, then a waterproofing layer is laid, and insulation and a vapor barrier are laid on top of it. The final stage before screeding is the finishing coating.
Basic floor parameters
Before starting work, select the appropriate material for the flooring, and also decide on the preferred type of construction.
Material of manufacture
As already noted, in bath buildings the floors are made of wooden elements or concrete.
It will take more time, effort and money to install a concrete floor, but such a structure will last much longer compared to its wooden counterpart.
Installation of a concrete floor in a bathhouse
The construction of a floor from lumber requires minimal time, labor and money, but after 5-10 years of operation, the elements of such a structure will have to be replaced.
Wooden floors
Wooden floors are divided into leaky and non-leaky varieties.
Leaking floor
The most cost-effective and easy-to-build design. This type of floor looks like a plank flooring, the elements of which are laid at intervals to drain water from the bathhouse into the ground.
Exhaust device from under a leaking floor (diagram)
Any additional devices, with the exception of perhaps a basic drainage system in the underground, are not provided. Thermal insulation of such a floor is also not carried out. In view of this, it is only recommended for owners of bathhouses in the southern regions to give preference to leaky structures. Also, such a floor would be appropriate in a country bathhouse used occasionally.
A leaky bath floor is extremely easy to install yourself. Repair and independent replacement of worn-out components will also not cause any difficulties. In this design, the boards are not fixed to the joists, so in the future the owner will be able to remove them without any problems and take them out of the room to the street for better drying.
If desired, instead of the traditional underground backfill, you can use a pan, the liquid from which will be discharged to some suitable object of the sewer system.
Non-leakage floor
Non-leakage floor
It is somewhat more difficult to install such a floor compared to a leaky analogue. This system is laid out from two rows of high-quality wooden boards. To lay the first row, use larch or pine boards. The finishing row is laid on logs previously placed on reliable supports. The boards of this series must be of the highest possible quality, without the slightest knots or gaps.
A subfloor is installed under the top flooring. You can use insulation. The floorboards of the rough part should be placed with a slight slope in the direction of collecting wastewater and further discharging waste into a septic tank or sewer ditch.
To ensure the drainage of wastewater at the lowest point of the flooring, you need to make a hole of suitable size for connecting a siphon.
Insulation of premises
A lot of water pours onto the floor in just one compartment – the washing area. There is much less moisture in the waiting room or rooms intended for relaxation, so it is not at all necessary to waterproof the floor surface in them. As for a steam room in a building that is already finished and in use, it is not necessary to dismantle the floor.
It is possible to lay another floor on joists on an existing surface, having first laid an effective insulation. This solution fits well with the recommendations of experts: the floor of the steam room should be 10-20 cm higher than the floor level in other centimeters - thanks to this, the volume of the steam room is reduced and it warms up faster.
About the use of bottles as building materials
The experience of folk craftsmen has shown that the bottle is an excellent product that allows you to create not only strong, but also warm walls and floors in a building. The principle of such insulation consists of an air layer that is formed from bottles, and accordingly, heat is retained in the room.
On the other hand, glass containers are highly durable - try crushing a bottle by stepping on it. This is simply impossible.
Thus, the following components of a bathhouse can be made from glassware:
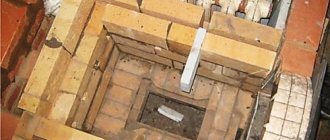
- Foundation. And this is not just a budget option for those who want to save on pouring the solution. In fact, such foundations are very strong and completely eliminate the possibility of building subsidence.
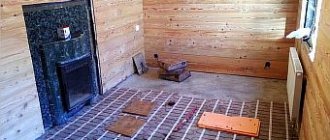
- Bottle bath floors are often used in such buildings. In this way, home craftsmen manage to create a truly warm base, which allows paired procedures to be carried out even in severe frosts.
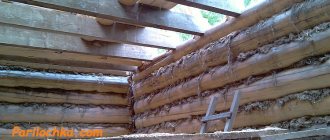
- Bath walls can also be lined with bottles. Such walls are durable and warm. Most often they are arranged in two ways:
- Using frame technology. A frame is built from wooden slats into which the bottles are placed. A special sand-clay solution is used to fasten glass containers.
- Pillars are erected from bricks, between which walls are laid out from bottles.
Along with a glass one, a bathhouse can be built from plastic bottles, the price of which will be an order of magnitude lower, because plastic containers are much easier to obtain.
Using plastic bottles to build a bathhouse.
Where to get building materials
If you are planning to build a bathhouse floor from bottles, then the first thing you should think about is where to get that amount of building material.
Here, home craftsmen recommend using one of the following methods:
- The most effective way to prepare the required amount of material is to contact a garage cooperative. There are enough bottles here for one foundation.
- If you have a lot of friends, you can ask them not to throw away the empty containers, but to bring them to you. Naturally, such a collection of building materials may take several years, but every visitor to your bathhouse will be proud to have contributed to the construction.
We are building a bottle foundation
To carry out the work, there are the following instructions:
- We dig a trench about 50 cm deep and about 40 cm wide.
- We fill it with crushed stone, a layer of about 10 cm.
- Next, you can fill the trench with about 10 cm of concrete fragments of slabs and bricks.
- We lay a reinforcement cage of several rods.
- Pour a thin layer of concrete (5-10 cm).
- We lay about 4 layers of empty bottles up to the top level.
The structure of the floor created using the described technology.
- We lay 3 layers of brickwork and the columnar foundation is ready.
We create a strong and warm floor
If the floor in your bathhouse is already poured, then one of the most inexpensive ways to insulate it is to use glass bottles.
Let's look at how to insulate the floor in a bottle bath:
- First we make the base, that is, we lay crushed stone, preferably sieving, and then compact it.
- We lay reinforced mesh on top of the crushed stone.
- Fill it with concrete, about 5 cm thick.
- We lay the bottles horizontally, as tightly as possible, with their necks facing each other.
- Pour a layer of concrete on top, a layer of about 40 mm.
- It would be best to lay ceramic tiles on a layer of concrete. In this case, it can be laid on wet concrete. This way you get a warm and durable floor.
As you know, tile is considered a rather cold material. However, durability and ease of maintenance are often decisive factors when choosing it. As a result, tiled floors require high-quality heating.
Very often, a system of water heated floors is used for this. However, installing it in a bathhouse is quite problematic, and such floors are not cheap. Insulating the bathhouse floor with glass containers allows you to achieve a similar effect while spending a minimum of money.
Bottom line
Construction from glass bottles is a real way to create exclusive elements from seemingly useless raw materials. The use of glass containers in construction work reduces financial and labor costs.
Laying rows of bottles does not require much skill or effort, and the raw materials themselves will not cost you anything .
Collecting bottles is not only a chance to get free building materials, but also a way to take care of the environment.
Give unwanted glass a second life!
Materials
You will need the following materials:
Medium-sized crushed stone mixture or screenings;
Mesh frame with steel wire 7-8 mm and cells 50-80 mm;
Concrete mortar to which we add cement, sand, crushed stone in a ratio of 1:3:5. Mix all the ingredients and dilute with water to obtain a creamy consistency;
Tile or wood flooring.
Follow this sequence of actions when performing work:
It is necessary to remove the layer of soil around the perimeter of the planned bathhouse using a bayonet shovel;
It is necessary to ensure a deepening evenly throughout the entire area by 25-30 cm if the container is laid horizontally and by 35-40 cm if vertically;
Using a tamper, compact the layer;
Pour the crushed stone-sand mixture or screenings into the base of the recess and compact it;
With the help of reinforcing mesh it is necessary to strengthen the surface and prevent discrepancy during use, so we lay it in the next layer;
Next, you need to lay out the filled bottles horizontally and parallelly in rows on the resulting surface, so that there is no empty space left. The material should be laid as tightly as possible. In turn, placing the bottles vertically will ensure greater filling and thermal insulation;
It is necessary to install a mesh reinforcing frame along the edges to ensure greater strength and reliability of the building;
Next step: pour the solution prepared in advance over the entire area and 7-8 cm thick;
It is necessary to get rid of air cavities using steel reinforcement. This will prevent pores from forming or cracking;
Thanks to the cement screed poured on top of all layers in a wet form, it is also possible to increase strength and prevent the formation of cracks;
The resulting base must be completely dry before further work is carried out.
The finish can be different depending on preference: tile or wood.
Subtleties of technology
This method of building a foundation has proven itself to be excellent among developers who prefer to carry out most of the work on their own. Note that there are still certain features, and it is not recommended to ignore them:
- the foundation base made of bottles does not withstand extreme situations in hydrogeological terms - close flow of groundwater, seasonal heaving of the soil composition, etc.;
- Due to the weak adhesion of the solution to a smooth glass surface, during the season of strong freezing of the soil composition, there is a possibility of cracks forming in the foundation. When deciding to make a foundation from bottles, you should take into account the weather conditions in your region;
- When laying the bottle foundation, it is necessary to compact the mortar mixture at least to a minimum extent. This work is carried out carefully so as not to break the bottles. It is best to use special vibrator installations for such an event.
The use of glass bottles for pouring the foundation is an alternative solution that makes it possible to recycle glass containers with maximum benefit.
Advantages
When insulating the floor, you can use any container in construction
It is important to be aware of the positive aspects of using the selected raw material when deciding to use it. Main positive points:
Minimal, almost imperceptible expenditure on material. You can look for this type of insulation from friends and relatives, buy it from restaurants or catering establishments, and also contact commercial enterprises;
This material is publicly available and everyone can gradually accumulate it for the winter on their own, turning to housing cooperatives or neighbors for help;
It doesn't take much time to build these floors. Since no standards set the speed of laying bottles in the base of the floor, everyone who gets to work decides for themselves how much time to devote to this activity. Building a heated floor in this way can take just one day, even without professional skills;
Designing a floor from bottles for a small country bathhouse is not difficult. We’ll talk further about how to lay the material in a fairly simple way;
In addition to the fact that such a floor looks original, it is very warm and heat-insulating; thanks to its properties, the container retains heat inside and does not allow cold air to pass through. This will allow you to comfortably spend time in the bathhouse even in the coldest winter;
This floor is very strong and can withstand any load placed on it: be it people who come to relax in the bathhouse, or bulky equipment that provides this relaxation.
Pros and cons of the alternative method
Before you get acquainted with how a floor is made from plastic bottles, or how glass containers are used for this, it is necessary to evaluate the advantages of this, already relative, “innovation”. And then consider its shortcomings. The advantages of this method include:
- material benefit, since containers are relatively easy to find for free: if your “savings” are not enough, then relatives and friends will help, who will only be happy to give away what they don’t need;
- speed and simplicity: arranging such a floor will take a minimum of time, and anyone, even those far from construction, can cope with the “bottle” work quite quickly;
- a minimum of calculations that owners have to make: after measuring the diameter of the container, you can easily calculate the amount of material needed (about 55 glass bottles are needed per 1 m2);
- reduction of heat loss due to air securely locked inside plastic or glass containers;
- reliability of glass containers, which in large quantities can withstand maximum loads;
- an opportunity to help nature by ridding the planet of a small portion of garbage.
The biggest advantages of using plastic or glass containers as insulation are that the material is free, the opportunity to save on the solution, and the effectiveness of thermal insulation. These are the three main attractive features of the method.
Often those who used to laugh at their “innovative” neighbors soon begin to imbue themselves with this idea of “drinking.” Does flooring made from plastic bottles or glass containers have any serious disadvantages? This is not yet known. Skeptics laugh at “bottle concrete”, but do not provide any compelling arguments against it.
The disadvantages include the room that will need to be allocated for storing gradually accumulating containers. Since the advantages in this case win an unconditional victory over the non-existent disadvantages, the technology has the right to be implemented. Therefore, you absolutely need to get acquainted with this lean method.
Building a fence
A bottle fence is an original, easy-to-make fence option.
Advantages of bottle fencing:
- simple installation;
- strength and durability of the structure;
- excellent light conductivity;
- the ability to implement any architectural forms;
- exclusivity;
- savings on materials.
To make a screen fence you will need:
- empty bottles of any color and size;
- material for making racks - brick, blocks, metal, wood, plastic;
- components for preparing concrete mortar;
- frame corners and metal rods with a diameter smaller than the neck of bottles;
- decorative elements.
You will need to drill holes in the bottles. To drill glass, use diamond-tipped drill bits . Work at minimum speed.
The work is performed in the following order:
- preparation of bottles - washing, drying, drilling holes in the bottom of containers;
- digging holes to a depth of 120 cm for installing support pillars;
- installation of supports with concreting of their base;
- forming the frame of a bottle fence using steel corners and rods;
- assembling the canvas by stringing glass onto rods with the addition of decorative elements.
The resulting structure is not particularly durable and is not suitable for use as a street fence . A screen is an option for decorating a site, and not protecting it from the penetration of uninvited guests.
A permanent glass fence is created using a different technology.
- bottles, preferably identical;
- components for preparing concrete mortar;
- spatula for spreading the mixture;
- level.
Draw a sketch of the desired hedge , carefully consider the placement of the bottles to create a specific ornament.
- Preparing glass - washing, drying, closing.
- Construction of a foundation made of vertically placed bottles filled with cement mixture. The depth of the base is 35 cm.
- Formation of the fence fabric.
To ensure the fence is stable, continue work only after the concrete has completely hardened.
The bottles are stacked in 2 rows, with the narrow end inside the future structure . Each layer is coated with a binding solution and dried - failure to comply with this requirement will lead to cracking of the bottom row of bottles.
Transparent bottles can be painted in any color using a special tinting paste, which will allow you to put into practice any design idea, having only colorless glass available.