A drain is a structure designed to drain melt and storm water from the roof, which is necessary to protect the building from rotting, corrosion, and any mechanical damage. Today, hardware stores are simply overflowing with various materials for constructing a drain for every taste, but some owners do not want to overpay for a structure that they can make with their own hands.
Option for a mounted galvanized roof drain
It turns out that making a drainage system with your own hands is not so difficult; besides, it looks quite original when constructed correctly.
The drain performs several functions at once:
- Protective. The gutter ensures the removal of wastewater from the foundation and walls of the building, which is the main task of roof drainage. If it is absent, the base of the building will collapse within ten or even five years, depending on the amount of precipitation and the depth of the foundation. In addition to the base of the building, its foundation will also suffer, as it will erode, causing cracks to appear on the walls of the building.
- Decoration. The decorative function can only be performed by a gutter that was made by hand, and not purchased at a hardware store.
Several options for decorating roof gutters - Collection of storm water from the roof of a building. Since rainwater is very suitable for watering various plants in the country, many summer residents drain stormwater using a pipe into a specially adapted barrel.
Do-it-yourself drain from various materials
Below are several examples of how to make a roof drainage system yourself. This task is not difficult, the main thing is to have the desire to do such work, understand the process of creating a system and know some options for executing the plan. For example, a drain can be made from a sewer pipe, tin, sheet metal, wood, polyethylene, etc.
Sewage pipe
- plastic pipe with a diameter of 50 mm for arranging water drainage;
- a cylindrical product with a thickness of 100 to 110 mm, necessary for the manufacture of gutters;
- adapters that make it possible to connect the above-mentioned elements with each other when the inlet diameter reaches 110 mm, and the outlet diameter reaches 50 mm.
Since a plastic sewer pipe was used to make gutters, it will need to be split into two halves of equal size. To do this, you can use a grinder, an electric jigsaw or a hand saw. The first option is preferable, but there are some nuances of the process.
If you cut a pipe using a grinder, plastic will inevitably stick to the special casing, so it is advisable to dismantle this safety element. As a result, it is recommended to use other protection, part of which is a mandatory face mask. Although there is a more optimal solution to the problem - buy a special disk designed for working with plastic.
To ensure a high-quality connection of gutters and tees, do not unravel the pipe all the way: leave about 150 mm at the edges.
https://youtube.com/watch?v=-fGEZnHlI0U
Metal
A sheet of metal is taken and cut into strips so that their width is 25 cm. Then these parts are given the shape of a gutter, that is, they are curved accordingly. The use of galvanized sheet or tin requires the manufacture of durable steel brackets. For this you can use wire rod (6 mm), but then you will have to double the number of hooks.
Making your own brackets shouldn't be difficult. To do this, it is enough to take a cut of a log with a diameter of 20 cm and wind a wire around it, making about three turns. After this, you need to remove the resulting workpiece and compress it. Then you need to bend the edge of the structure by 4 cm to fix it on the roof, and shape the remaining part in accordance with the required profile.
Using the same screws, the brackets are installed on the roof. Then the gutters are suspended and the catch basins are leveled to form the desired slope.
Wood and polyethylene
The starting material for constructing a drain of this type should be a thin board, the total length of which would be equal to double the perimeter in relation to the roof overhang. After which you can begin the actual production of the drain:
- Connect the boards in pairs using nails at 90 degree angles.
- Assemble gutters that match the length of the walls of the house, which must be overlapped.
- Make fasteners for installing gutters in the form of hooks using boards or wire rod. The best solution would be to use not wire, but scraps of lumber, the use of which involves cutting triangular grooves that serve to secure the gutter.
- Secure the brackets to the corners of the wall, for example, with nails.
- Install narrow channels to direct rainwater from the top of the building, ensuring that their edges overlap.
- Adjust the slope of the gutters and place plastic film in them, securing it with shoe nails, buttons or tape.
For the manufacture of a drainpipe, a wooden gutter is quite suitable if its length is at least 2.5 m. The purpose of arranging a drainage is to divert atmospheric precipitation into a special ditch, which should have a depth of about 30 cm, and it must also be filled with crushed stone. When digging a ditch, you should create a slope that helps remove sediment from the wall of the house to a distance of at least 1.5 m.
A wooden roof drain will last longer if, to ensure tightness, you use silicone sealant rather than plastic film, after pre-treating the wood with a preservative compound.
How many brackets are needed and how to attach them
Calculating the required number of brackets for attaching the drainage system is easy. As a rule, when installing them, a step of 50-60 cm is used. Therefore, first the total length of the wall is divided by this indicator. A unit is added to the result obtained to indicate the outermost bracket.
In this way, the required number of brackets per wall is calculated. The remaining sections are calculated in a similar manner. If the walls have a non-linear configuration, the count is carried out piece by piece, with the obligatory support of corner elements on both sides.
As for attaching brackets, three methods are usually used for this:
- Nailing to roof rafters. It is most convenient to do this before laying the roofing material: in this case, fastening occurs without any problems.
- Installation on wind board. For plastic castings, this option is the only one possible. Other systems can be mounted differently.
- Fastening to the edge board of sheathing or decking under continuous roofing material. This type of installation can also be implemented only before laying the roofing material.
Once again, it is worth recalling that when attaching the brackets, it is important not to forget about the slope angle. Metal products can be bent in any convenient way
There is also a special device for this - a hook bender: it is sold in the same departments as gutters.
The gutter should be positioned in such a way that the roofing deck ends no further than halfway. The best location is checked in the range from half to a third of the size of the product. This will allow most of the gutter to participate in water capture, which is especially important during heavy rains.
Using plastic bottles to install drains
Materials and accessories
To make a plastic water drainage system you will need a minimum of materials and tools:
- Carefully selected plastic bottles in the right quantity, and even a little more;
- A furniture or large stationery stapler for connecting parts together with a sufficient number of staples;
- Scissors and a sharp knife to separate the necessary parts from the bottle;
- Thin wire for attaching the structure to the roof;
- An awl or burner for making holes in plastic parts;
- Drill (may be needed to drill holes in the roof material).
As you can see, the tools are simple and can be found in almost everyone’s home. You can, of course, also use a sealant for greater reliability when fastening drainage parts, but, as practice shows, this is not necessary, since this will not extend the service life, and investing in temporary amenities is not rational.
Installation of drainage from plastic bottles: step-by-step diagram
So, let's start assembling our drain:
- We took measurements at the very beginning, now it is necessary to draw an approximate diagram of the drain, determine the angle of inclination of the gutter;
- When the drawing is ready, we begin to prepare the material for installation: we wash the bottles in warm (not hot!) water, carefully scrape off all labels and glue residues so that our design looks neat. To quickly remove stickers, it is recommended to soak the bottles in warm water with a little water beforehand. amount of soap, then the cleaning process will go faster;
- We cut off the neck and bottom of the bottles, leaving a flat middle part, similar to a cylinder;
- Next, we cut the cylinder exactly in half, in the end you should end up with two “troughs”. These are ready-made parts that serve as elements of the drainage system;
- The resulting parts are overlapped with each other using a stapler. You can build a fastening with wire, and cover the holes with plasticine or cover it with another viscous mass;
- Once the required length of the gutter is ready, you can attach it to the roof. To do this, use a drill to make holes in its surface at equal distances. Next, you need to make holes in the gutter, calculating so that they coincide with the holes drilled in the roof. The holder is a wire, and we use it to hold everything together.
- Now it's time for drainage. We cut off the neck of the bottle, and cut out a hole in the side so that the end of the structure lying on the roof can fit into it. Thus, we get the angle of inclination of the drainage system, which we mentioned at the very beginning and drew in the drawing;
- Next, cut off both the neck and bottom of the required number of bottles, and insert the resulting cylinders into one another. It is worth noting that they are fixed quite reliably, but we will still go through the overlaps with a stapler.
So, the installation is ready.
Advantages of a plastic drainage system
The advantages of the system manufactured by us are:
- Low cost. This is one of the obvious advantages, because the materials required for drainage do not need to be bought in a store, except perhaps a stapler, and even that has long been in the arsenal of any business owner;
- Despite its unreliable appearance, the drain may well serve you for a whole year, having experienced all natural disasters, such as temperature changes, for example;
- In addition, the ice in plastic gutters begins to melt at the slightest thaw, which is not typical for metal drainage systems;
- The lightness, almost weightlessness of the drain should also be considered an advantage, because a metal pipe falling on your head will cause significant damage to your health, which will not happen in the case of a plastic structure;
- In the summer, it is possible to lead the drain pipe into some container to collect rainwater, which is so useful for watering plants and crops in the garden. Both useful and economical!
- A drain made of plastic bottles can easily be made into an entire architectural composition that will fit perfectly into the design of a personal plot.
Disadvantages of plastic products
A drain made from plastic bottles is, of course, not ideal:
- The appearance of such a product will not suit a permanent structure: a house, a mansion or a country cottage;
- Another significant drawback is fragility, since the service life is no more than one year;
- The lightness of the design, which we considered an advantage, is also a disadvantage, since during a hurricane or simply a strong wind, the gutter can be torn off the roof and carried away in an unknown direction, which is still more difficult to do with its metal counterpart.
Several simple ways to organize watering
Several options for drip irrigation through bottles have been developed, which are successfully used in practice. All of them work quite effectively and allow you to forget about the problem of plant moisture for 2-3 days.
Underground root irrigation
To organize watering using this method, you will need a plastic container with a volume of 1.5–2 liters. You need to make several holes in it with an awl or a gypsy needle at a distance of 3–4 cm from the bottom. The number of holes depends on the type of soil, for example, for sandy soil two will be enough, but for loamy soil you will have to make at least four holes. To water moisture-loving plants, small holes are pierced across the entire surface of the bottle.
Dig the container between the plants upside down to a depth of approximately 10–12 cm, with the neck remaining above the ground. Pour water through it using a watering can and screw on the lid, in which you have previously made a hole for air to escape.
This is how plants are watered
Another option is to bury the bottle in the ground, neck down, after making several holes in it and screwing the cap tightly. The bottom of the container is cut off in such a way as to form a kind of lid that will prevent water evaporation. This method of irrigation is more convenient, since the tank is filled with water through a fairly wide hole.
If necessary, the drip irrigation time can be extended. To do this, use larger containers - five-liter plastic bottles. In this case, holes are pierced on one side of the container, and the lid is cut on the other. The bottle is placed in the ground horizontally with the holes down.
Surface irrigation scheme
Surface watering of plants
The containers do not need to be buried; they can simply be hung above the plants. To organize drip irrigation from plastic bottles using a surface method, you need to build strong supports above the bushes and attach containers to them. The bottle is hung with the lid down, having first pierced one or two holes in it, or vice versa, they make holes in the bottom and secure it with the neck up.
This method of irrigation is more convenient and of high quality, since the plants receive warm water heated by the sun.
In addition, the direction of the drops can be accurately determined; it is important that they fall only into the soil, without affecting the leaves of the plants. If you notice that the fertile layer of soil is being washed away, move the container to another location. You can see how to make drip irrigation from plastic bottles in the video
You can see how to make drip irrigation from plastic bottles in the video.
An improved way to moisten the soil
To organize more effective drip irrigation, in addition to the bottle, you will need an empty ballpoint pen. You need to cut off the writing part from it and rinse it well. In the resulting tube, one end must be closed with a toothpick or a sharpened match, then, stepping back about 2 cm from the closed edge, pierce a small hole with a needle.
Now you need to make a hole for the rod in the bottle. If you install the container with the neck down, then pierce a hole at the level of the bottle hanger. If there is a bottom at the bottom, then make a hole, 10–15 cm away from it. Insert the rod with the closed end outward and compact it well with plasticine. Pour water into the container and place it near the plant as shown in the photo.
1 – water bottle, 2 – rod, 3 – closed end of the tube
With this method of drip irrigation, moisture goes directly to the roots of the plants. The watering speed is controlled by the width of the hole in the rod. Practice shows that when using two-liter containers, the soil will remain moist for five days, but provided that no more than 10 drops of water are poured out within five minutes.
Drip irrigation using plastic bottles is a realistic and inexpensive way to organize an effective irrigation system for garden plants. This is an ideal option for areas that do not have a constant water supply, and for summer residents who, when leaving for several days, can be sure that the planted crops will not die from lack of moisture.
Flat roof drainage system
A flat roof is characterized by the absence of slopes; accordingly, the drainage system in this case is installed differently. However, as with pitched roofs, it can be made from plastic sewer pipes. Flat roofs are equipped with internal drainage. Most often, the slope of such roofs is directed towards the center of the house, where the funnels of the drainage system are located. Depending on the roof area, there may be several or only one. The funnel is rigidly attached to the screed under the waterproofing and connected to the internal drainage pipe.
A waterproofing carpet glued to the side of the funnel ensures complete tightness of the connection. The outlet pipes are installed in the thermal insulation layer. Usually they go into the technical room and connect there with a sewer riser, from where the water is discharged into the storm drain.
If polypropylene pipes are chosen for internal drainage, they should be installed with a small technological gap, which is necessary for temperature compensation of the pipe material. For the same purpose, the pipe can be equipped with a layer of insulation.
The downpipe pipe can be connected to the storm sewer inlet. An example of competent execution of a node
If the roof is equipped with several funnels connecting to the drainage system, you must remember that the diameter of the horizontal parts should be smaller than the diameter of the funnel. This will make it easier to install the funnel into the roofing pie. Adapters are installed in the areas connecting horizontal and vertical elements. The parts are mounted end-to-end with the obligatory use of sealant. The elements of the drain riser are connected to each other and to the funnel using special glue.
Another design option for the lower part of the drain riser. It ends above the entrance to the storm drain
Some tips from the professionals:
- Gutters should be placed evenly on the lowest areas of the flat roof.
- The funnel bowl should not rest on thermal insulation. A wooden beam, pre-treated with an antiseptic, is placed under it. The part is fixed to the base of the roof. The funnel is attached directly to the beam.
- The outlet of the funnel should be located above the freezing point. This is necessary to prevent ice plugs from freezing in it. If this is not possible, it is worth installing an electrically heated funnel. In addition, if the distance from the roof to the heated room is more than a meter, it is worth warming up the horizontal drain. Otherwise, when an ice plug forms, the insulation will play the role of a thermos and retain the ice for a long time, which in turn will prevent the normal removal of moisture from the roof.
A properly organized drainage system reliably protects the walls and foundation of a building from moisture. The easiest way is to purchase a kit of parts to assemble the drain. Such products are sold in specialized stores and are quite expensive. But you can also save a lot by assembling a drainage system from plastic sewer pipes. This will require patience, accuracy and strict adherence to instructions. The finished system can be painted in the color of the roof, and it will not differ at all from an expensive purchased structure.
What function should the drain perform?
Regardless of what material the drain is made of, it must protect the foundation and base of the house from rain and melt water.
Waterlogged soil can cause premature deterioration of building masonry materials or subsidence of the foundation. Reducing the load-bearing characteristics of the foundation is a very big problem. It can only be noticed when cracks appear on the facade walls of the house. Restoring the strength of the foundation is very difficult and expensive; such work can only be performed by professionals. But they are not able to give a 100% guarantee that the measures taken will achieve the goal. All other functions of drainage (collection of rainwater into a container, decorative decoration of the facade of a building) are considered secondary and do not have any impact on the duration and safety of operation of the building.
Features of installing a water drainage system
The gutter is secured to the building and roof using special brackets. As a norm, the rule is accepted according to which the gutter is fastened every meter
When calculating drainpipes, take into account that every 10 meters of gutter must be equipped with one drainpipe with a diameter of 100 mm. It is very useful to know the area of the roof, and even better, its projection. This is due to the fact that a roof with an area of 100 m2 with a slope of 30° will absorb more precipitation than the same roof with a slope of 45°
Experts in the construction industry have long established that every 100 m2 of roof projection must be equipped with one drainpipe with a diameter of 100 mm
This is due to the fact that a roof with an area of 100 m2 with a slope of 30° will absorb more precipitation than the same roof with a slope of 45°. Experts in the construction industry have long established that every 100 m2 of roof projection must be equipped with one drainpipe with a diameter of 100 mm.
Drainpipes are also secured with clamps, only of a slightly different type than for gutters. Very often, buildings and structures have a complex roof structure, requiring additional installation of drainpipes. In this regard, when calculating the drainage system, specialists take into account the presence of gables, projections, bay windows and other architectural features.
The question especially often arises of how to secure a galvanized drain to a building. This can be done very simply with the help of special galvanized clamps and brackets, which are commercially available. One of the design features of galvanized systems is the presence of a protective polymer layer under the paint. When this polymer coating is deformed, corrosion will spread very quickly throughout the damaged area. In this regard, during the operation and installation of galvanized elements, the use of sharp objects and tools, as well as excessive bending and other operations dangerous to the polymer coating, is prohibited.
When choosing the color and texture of the drain, special attention should be paid to the color of the roof and facade of the building. The drainage system must fit harmoniously into the design of the structure and not spoil the facade with its appearance. Otherwise, the drain should be hidden from the back of the house, which will be the best solution if it is impossible to choose a suitable color
When using soft tiles, experts recommend installing a plastic drainage system. This is due to the presence of a layer of mineral chips with abrasive properties. With large flows of water, it is washed into the drain, scratching the surface of the gutter, funnel and pipes, and this, accordingly, can lead to damage to the polymer coating and the development of corrosion
Otherwise, the drain should be hidden from the back of the house, which will be the best solution if it is impossible to choose a suitable color. When using soft tiles, experts recommend installing a plastic drainage system. This is due to the presence of a layer of mineral chips with abrasive properties. With large flows of water, it is washed into the drain, scratching the surface of the gutter, funnel and pipes, and this, accordingly, can lead to damage to the polymer coating and the development of corrosion.
How to make it yourself from improvised materials
You can make a drain yourself from various available materials. This allows you to save significant money. When installing a drainage system with your own hands, a material such as galvanized steel is very popular. It will last about 10 years - it is quite economical and also affordable material. Let's take a closer look at this option.
To work on creating a drain made of galvanized steel, you will need the following tools and materials:
- metal cutting scissors;
- hammer;
- marker for making marks;
- sheets of galvanized steel about 0.5 mm thick;
- pliers.
- we mark the starting point for installation, located at the maximum height;
- fasten the gutter bracket;
- we install a funnel, which is placed at the lowest point between the brackets;
- combine the funnel with the pipe;
- We fix the drain pipe using clamps;
- We attach and secure the drain to the pipe from below;
- We are installing a system for heating the drain.
Video: DIY roof gutters
Do-it-yourself drainage system
Of course, most often people purchase and install ready-made structures. Today there are many options for making gutters with your own hands from various available materials. This decision is most often based not on the desire to save money, but for the purpose of decorating a private home.
An excellent idea is to make a drain from wood, but subject to the correct choice and processing. This storm water drainage system will serve you for more than ten years. Suitable wood species include pine, fir and larch.
It is very rare, due to the negative impact on human health, but storm water drainage systems made of lead are common.
Design drawing with roof drain dimensions
Although it is quite practical, its significant drawback reduces its prevalence.
The winner among all is a drain made of galvanized steel, as it is characterized by its low cost and harmlessness. But it is quite difficult to process and its service life does not exceed ten years. As for durability, there is no equal to a drain made from ceramic parts, since its service life reaches centuries.
In order to make a drain from galvanized steel sheets with your own hands, you will need:
- metal scissors (if you will be making a metal stormwater drainage system);
- hammer;
- marker for marking on a sheet of metal;
- galvanized steel sheets (approximately 0.5 millimeters thick);
- pliers.
Layout of drains around the building
Please note that the width of the workpiece must exceed the diameter of the pipe by one and a half centimeters, because this difference is necessary to connect the edges of the sheet. First of all, you need to make a pattern on a metal sheet
Draw a straight line on the workpiece, on one side it will be half a centimeter, and on the other - a centimeter.
After this, you need to bend the sheet of metal using pliers, with the smaller side at a slight angle, and the remaining side at a ninety-degree angle. After this, we wrap the higher edge and connect the edges of our workpiece, the smaller side should fit into the larger one.
The process of installing brackets for drainage
Next, you need to slightly crush the pipe with a hammer so that it can be connected to another pipe.
Now you need to make a gutter for the drainage system, and for this you will need special equipment, but you can try to do it manually, although the effect will not be the same. So, first you will need to cut a blank from a pipe or wood, and then put a metal sheet on it and, using a mallet, try to give it the required shape.
Next we move on to the process of installing the drain:
- We determine the starting point, which is located at the maximum height.
- Install the gutter bracket.
- We secure the gutter.
- We install the funnel, which should be located at the lowest point between the brackets.
- We connect the funnel to the pipe (if necessary, we do this using a corner gutter).
- We fix the drain pipe using clamps.
- We fix the drain at the bottom of the pipe.
- We install a gutter anti-icing system.
Options for crafts for the cottage and garden
The worst kind of garbage is plastic bottles, because getting rid of them is quite problematic. If you place a bottle in a trash can, it will take up all the space, and it will not be very convenient to use it further. Many people in their dachas have absolutely no designated places for garbage, so there are only two options left - either take all the garbage home, or make various decorations out of it.
You can diversify your territory at the dacha with various crafts made from this material. You can use them to make various flowers and plants, bird and animal feeders, curtains, flower pots, vases, garden furniture, hanging gardens, garlands and much more. Such elements will help make the garden and home a little brighter and add some zest.
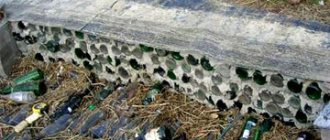
Fence and flower beds
Using bottles, you can separate some beds and flower beds from each other, and it will look very stylish, and due to the divided space it will become much more convenient to water and care for plants. And most importantly: rain will never wash away such a flowerbed or bed.
Various plants and flowers
On the site you can build a tree or just flowers, which will be the same color in winter and summer. Such crafts will delight the human eye, and such trees can also be made musical. For example, you can make a palm tree or a willow, the main thing is that the tree can have branches hanging down, on which you should attach bells, shells, various pieces of glass, and when the wind develops the branches of the tree, various beautiful sounds will come out, it’s like “wind music.”
Heroes of children's fairy tales
Such crafts will be useful for those who have children, because children can set up a small clearing with fairy-tale characters where they can play and frolic. You can plant small birds on trees, and also make them musical. It is worth remembering that such crafts will help drive away birds that spoil vegetables and fruits, and serve as a garden scarecrow.
Lamps and floor lamps
This is a very good way to waste plastic containers. At the dacha you always need outdoor lighting so that you can go out into the garden late in the evening and not feel like a mole. Not everyone has lanterns, so a good way is to make lamps, but in order not to damage the wires, and to prevent short circuits due to rain, it is better to make a floor lamp from plastic, because it will not allow moisture to pass through. The most important? Do not attach it too close to the light bulb.
Flower pots
Making them is very simple: cut off the bottom of the container and place soil in it, in which the plant will be planted. Pots can be in the shape of animal faces, ships and much more. If the pot will be used outdoors, then it is worth using waterproof paint for painting; estates and country houses are often painted with it.
Materials for drainage installation
The drainage system is an important and very useful part of the building, but in conditions of a limited budget it is not always possible to equip it properly. For the same reason, gutter installation is carried out independently, without the involvement of professionals.
To install a simple drainage system, galvanized steel elements or plastic products are most often used, but both options have one common drawback - these materials are quite expensive. To reduce costs, you can use available materials, some scraps of wood or drywall.
However, the most common budget material for assembling drains is plastic bottles, which can be collected in sufficient quantities without any problems. Even a small house will need a lot of bottles, and it is advisable to select ones that do not have various damages. As a rule, the drainage system is assembled from brown bottles - they look better and partially hide the debris that gets into them.
The connection of individual drainage elements is best done using wire (preferably with a protective coating that prevents the material from being exposed to moisture). It will be easier to simply buy brackets for attaching gutters and pipes - they have a very reasonable price.
- https://kryshagid.ru/vodostochnaya-sistema/iz-plastikovyx-butylok-svoimi-rukami.html
- https://domsdelat.ru/poleznie-soveti/kak-sdelat-vodostok-iz-plastikovyx-butylok-svoimi-rukami.html
- https://otomatah.ru/vodostok-dlya-dachi-bez-vlozhenij.html
- https://moya-banya.ru/vodostoki-iz-plastikovyh-butylok-svoimi-rukami.html
- https://krovlya777.ru/stroika/vodostok-iz-plastikovyx-butylok.html
- https://roof-tops.ru/vidy/kak-sdelat-kryshu-iz-plastikovyx-butylok-svoimi-rukami/
Craft options for home
There are many types of things that will decorate your apartment. Some will bring a certain brightness and style to the house, because such things cannot be bought in a store, and, therefore, no one you know has them.
Boxes and caskets
This item is always irreplaceable, because everyone has small parts that can be easily lost. Such boxes are perfect for handicrafts, for storing medicines, for storing important papers, jar lids and much more.
Vases
The most common bottle craft. After all, you can do nothing with the container and get a vase right away. But if you use your imagination and spend a little time, you will get an unrealistically beautiful masterpiece. You can cut out various contours on it or prepare some elements in advance with which to decorate the vase. These elements are also made from plastic containers, for example, flowers, animal faces, leaves, etc.
Flower pots
In stores, flower pots are not cheap at all, so it is better to make them yourself from bottles that would be thrown away anyway. You can decorate it to suit your taste and any style. Flowerpots in the shape of faces of various animals or flowerpots decorated with paintings in the shape of flowers or trees look very stylish.
Drainage system
Gutters for installing roof gutters with your own hands are most often elements of various shapes open at the top:
- Elliptical.
- Square.
- Trapezoidal.
- Semicircular or crescent shaped.
Sewer pipes will be used to create semicircular gutters.
The structure is mounted along the entire perimeter of the roof with a slight slope. At the top point, a plug is needed to protect against overflowing water, which should be directed through gutters into the storm drain funnel leading into the drainage ditch. In addition to pipes, to make gutters you will need:
- plugs;
- funnels;
- turning angles;
- couplings and fittings.
To form complex enveloping sections of the façade, corner elements at 90°, 120° and 135° are used. In the corners, water from the gutters flows into pipes through funnels; below, the water drains into a drainage ditch. Gutters and other structural elements are attached to the roof and facade with special brackets in the shape of a semicircle. But they can be made of metal in the form of hooks. You will also need:
- drippers (preventing the accumulation of water under the roof);
- storm water inlets (connection of gutters and pipes with storm sewers);
- baskets and nets (protection against clogging of pipes with plant debris).
Required tools for cutting and installation:
- rolling tool;
- hammers;
- scissors for cutting metal;
- marking devices;
- Bulgarian.
For installation you will need additional elements - bends, corners, plugs, fasteners
Types of structures
In multi-storey buildings and structures with flat roofs, internal drainage is installed. The liquid is collected in a funnel from the roof surface and enters a riser located in non-residential premises, staircases or corridors. At the lowest point, the system is connected to the city storm sewer through a closed outlet running underground. Water flows from utility networks to nearby reservoirs.
In private low-rise construction, an external drain is used, where the system is located outside the building. Pipes, gutters and funnels are attached to external walls. Such structures are easy to maintain and repair. From the pipes of external drains, liquid is discharged through open outlets, which are above-ground concrete gutters or grooves along the perimeter of the blind area. They are closed on top with protective grilles. Read more in the article storm drainage for a private house, where we examined all the options in detail.
Calculation of the drainage system
Since the main task of such a system is to drain water from the roof, it is necessary to correctly calculate such a system in order to create the necessary equipment that will not damage the roof and will do its job efficiently.
The calculation of such a system is carried out directly according to facade measurements or according to the roof plan (drawings).
The first step is to measure the height of the house. You need to find out the height from the ground to the eaves overhang; you can use a tape measure; The second thing to do is measure the length of the cornice itself on each slope. You will need this figure for the future general calculation of the gutter footage;
You need to know the future length of the pipes; to do this, take measurements from the eaves overhang (distance from the ground to the drain);
Next we determine the roof area
This is important in order to choose the correct pipe section. It is logical that the larger the roof area itself, the more runoff water there will be.
There is a formula by which you can calculate the required figure:
S = B * L, where
L - Direct length of the slope, along the cornice (measured in meters);
B - width of the ramp (in meters);
S – Roof area (measured in square meters).
If the roof of your house has a non-standard shape, then calculating its area is carried out similarly to calculating geometric shapes.
The calculation of the number of pipes looks like this - 1 drainpipe per 100 square meters.
Design of a drainage system
From theory to practice
Having completed the theoretical part, we will analyze in detail how to make a drain. The longest and shortest brackets are attached to the front board of the cornice. Then they are connected from one to the other with a rope (the slope should be 3 mm for every 0.5 m). Please note that the roof overhang will fall on the first 2/3 of the gutters. Then the water will flow to the very center.
Using self-tapping screws, tighten the rope in the same way and secure other brackets. The minimum distance between the wall and the gutter itself is at least 10 cm. Sewerage pipes are separated lengthwise. From 1 pipe you will get two identical gutters. To make it perfect, the pipe is placed on the boards. Its wall is attached from below with a self-tapping screw. After this, self-tapping screws are screwed in from the top at both ends. They are connected with a rope and a marker is used to mark the place where the pipe will be cut. After which the thread is removed and the pipe is cut with a grinder.
The same is done on the other side. Only now, the pipe is secured from below using two self-tapping screws, 1 in each half of the sawn pipe. Next, cut off pieces of pipe, 5 cm each, which will replace the connectors. The gutters are connected to one another. Two gutters must be installed in the connector and secured with self-tapping screws. Additionally, the fastening is lubricated with silicone-based sealant.
The gutters with connectors are secured to the brackets using self-tapping screws. To prevent the pipes from twisting under the influence of the sun, they are secured with tendrils on the brackets. If there are none, you need to install spacers and secure them with self-tapping screws.
After installing the gutters in a horizontal position, they proceed to installing water drainage pipes. Since the pipes are attached to the wall, a gap of 20–80 cm is created between the pipe and the gutter. The tee and elbow will ensure a smooth transition from the gutter to the pipe. When the bevel is very wide, pipe sections of suitable length are attached.
Vertical pipes are attached to the wall using brackets with clamps. For 1 m of pipe you need 2 fastenings. An outlet elbow is mounted at the end of the pipe. It will direct the water where it is needed. The elbow should protrude 30 cm from the wall. At the end, the end of the gutter is covered with plugs. They also need to be cut in half.
This completes the installation of the water outflow system. In addition, in regions with snowy winters, a heating cable is installed in the gutter.
DIY drain made from plastic bottles
Another option for drainage is from plastic bottles. This sounds interesting and intriguing, because in this way you can save a lot. It’s worth figuring out which containers will be relevant in your work:
- bottles should be the same size and shape (it’s also better to take the same color);
- Be sure to select only straight bottles.
Next, gather the following tools:
- in order to cut bottles - a knife or scissors;
- stapler to connect the necessary elements;
- wire acting as a gutter fastening;
- awl/soldering iron for making holes.
In fact, creating such a system yourself is not difficult, the main thing is to correctly calculate the dimensions and draw up the correct diagram.
The work itself is carried out in two stages:
- assemble and secure the gutter on the roof itself;
- pipes are assembled.
Start assembling the gutter. To do this, you cut off the bottom of the bottle and its neck, you will get a cylinder, then cut it into two even parts (lengthwise). When you have collected the required number of bottles, you need to start collecting. It is worth understanding that the parts need to be connected only with an overlap of 1.5 cm wide.
The system, which has a vertical position, is also made from pipes - cut off the bottom and neck so that the bottle is slightly narrowed. Just insert one bottle into another. It is logical that the funnel is also made from a plastic bottle, or rather from its neck.
The advantage of such a drain is that it is cheap, but the disadvantage is that such a system will not last you more than one year. Many summer residents prefer such systems, as they cope with their tasks quite reliably.
Drainage systems are a necessary element of any private home; you can choose the best option for yourself, which will not only help you get rid of unnecessary water, but will also look harmonious on your home. Do not forget to clean the drain on time and take care of installing an anti-icing system.
Collecting rainwater using plastic bottles
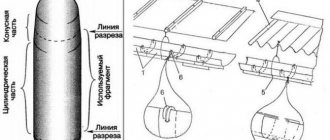
An acute shortage of water for watering plants on the site forced me to collect rainwater from the roofs of even such small buildings as a utility shed and a temporary shed over the summer kitchen. It seemed to me irrational to make drainage gutters and drainpipes from galvanized steel sheets for such buildings. Therefore, I made both from plastic one-and-a-half and two-liter bottles of various drinks.
I made the gutters (Fig. 1) from two-liter bottles. I cut off the bottom and the top part with a threaded plug from each, and cut the remaining cylinder along the generatrix into two equal parts. Then I laid the resulting “grooves” along the board with an overlap of about 2 cm and nailed them to the board with small nails. The length of the board should be equal to the width of the roof. The rigidity of such a gutter is quite sufficient for a small building.
I also made drainpipes from bottles, but with a capacity of 1.5 liters. They are more convenient for this purpose, since they have a small, smoothly tapering cone at the top. Due to this, if they are cut as shown in Fig. 2, the resulting “tubes” can be connected into a pipe of almost any required length. This is done as follows. To the lower end of the carrier board, the width
about 10 cm, you need to nail the first “tube” with two nails with the narrow end down. Insert the narrow part of the next “tube” tightly into the upper, wider part of the nailed “tube” and secure its upper free end with one nail. And so on until the required length. The result is a lightweight and durable drainpipe.
To prevent plastic gutters and pipes from being damaged by snow and ice, I remove them during the winter and store them away until next spring.
A.CHERNOV
Preparation
First of all, you need to take measurements from the roof to find out how many bottles will have to be used.
Advice! To carry out calculations, it is worth assuming that the “working part” of the bottle, taking into account the required overlap, is approximately 20 cm. Therefore, to calculate the required number of elements, you need to divide the length of the curtain rods by 20.
Which container is suitable?
To make a roof drainage system, you can use containers with a capacity of 1.5 and 2 liters. Basic requirements for the “material”:
- the container must be the same size and shape;
- these should be smooth, cylindrical bottles without recesses or relief patterns (the presence of relief creates hydraulic resistance and contributes to rapid clogging of the drainage system);
- the color of the container is not an important point, however, drainage systems made from dark bottles look more beautiful, since all the dirt that flows from the roof is visible in the transparent drainage. You can, of course, use multi-colored containers; this will not affect the quality of drainage, but such a drainage system will not decorate the house;
- Labels from bottles must first be removed, since if this is not done in advance, then soon the paper will begin to lag behind and hang in ugly rags.