Water is the main enemy of building structures. Flowing down from the roof during rain or melting snow, it moistens the walls of the building, breaks up blind areas or paths, and erodes the soil under the foundation. This can cause the house to settle unevenly and cause cracks to appear. At low temperatures, the liquid in the pores and capillaries of structures freezes, and the destruction process accelerates. To protect against aggressive moisture, a drainage system is installed. Making a gutter with your own hands is a completely doable task for those who do not want to put up with dampness in the basement, sagging foundations and streams of rain pouring from the roof.
Three ways to drain water from the roof of a house
The roof of the house collects rain and melt water from a fairly large surface. The larger the roof area, the greater the amount of water discharged from the roof per unit time. It is necessary to organize the drainage of water from the roof so that it does not flood the walls of the house, does not soak the soil on which the foundation of the house rests, and does not create “rivers and lakes” on the site.
The method of draining water from the roof is chosen depending on the roof design, aesthetic preferences and construction budget.
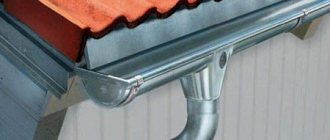
Drainage systems made of gutters and pipes
The most popular solution for draining water from the roof is drainage systems, the main elements of which are hanging gutters and downpipes.
.
Each manufacturer also usually includes corner elements, protective nets, audits, fastening parts - brackets, holders, clamps, etc. in the drainage system.
The maximum cross-sectional size of a gutter is usually within the range of 100 - 150 mm, and that of a drainpipe is 70 - 100 mm . Gutters are available in different shapes: semicircular, semioval, trapezoidal, rectangular or more complex shapes. The shape of the downspouts must match the shape of the gutter. The gutter shape is usually chosen for aesthetic reasons.
All elements of the system are easily connected to each other and, if installed correctly, drain water properly.
Gutter parts can be made of PVC plastic, galvanized steel, aluminum, copper or titanium and zinc alloy. For economy-class houses, drains made of plastic or steel are usually used
. Systems made from other materials are much more expensive.
Pros and cons of a PVC plastic drainage system
The drainage system made of PVC plastic has the following advantages:
- Has a minimal cost compared to metal systems.
- The unusually smooth surface of gutters and pipes prevents the accumulation of dirt.
- High resistance to corrosion.
- Simple installation that does not require high qualifications and special expensive devices. You can assemble a plastic drain with your own hands. You just need to follow the manufacturer's recommendations.
- The parts are painted in bulk, so scratches on its surface are hardly noticeable.
When choosing a plastic drainage system, you should also take into account the following features:
- Not very high resistance to low and high temperatures. Operating temperature of parts is from -30°C to +60°C. At low temperatures, plastic elements become more fragile.
- When the temperature changes, the coefficient of linear expansion of plastic parts is 7 times greater than that of steel parts. When manufacturing and installing plastic gutters, special measures are taken to allow parts to change sizes without destroying them.
- When significant mechanical loads are applied to the drainage system, plastic parts crack and collapse, and metal parts become crushed.
Elements of gutters made of galvanized steel
often have a polymer coating in a wide range of colors, which makes it easy to match the color of the gutters to the color of the facade or roof. System parts made of steel with a polymer coating are connected to each other with locks or brackets with latches through rubber gaskets.
In Russian snowy winters, ice often forms on roof overhangs, gutters and downpipes.
. Ice prevents water from draining from the roof and clogs gutters and pipes. Under the weight of ice, gutters and pipes are deformed and destroyed.
To protect against ice, increase the durability and trouble-free operation of gutters, heating electric cables are installed on the roof overhang, in gutters and pipes.
The heating system adds a significant amount to the cost of constructing gutters. Plus, there are the annual costs of paying for electricity.
Calculation of the required number of elements
For each building it is necessary to calculate the number of elements individually. Most modern houses are built according to unique designs - roof designs are very different. However, you can use a calculation template that will help you do the calculations yourself.
As an example, let’s calculate a drain for a roof with two slopes equal to twelve meters. You can set your own parameters to this value.
Calculation of gutters
Trays are sold by the meter - you need as much as the length of the cornices. It is often recommended to take into account thermal expansion compensation, but this is not necessary.
Calculation of corner gutters
Corner gutter elements are required if the drainage pipe runs along the facade of the building. The number of parts depends on the number of external and internal corners of the house. However, they must be taken into account, otherwise fastening the gutter will be difficult. With a cornice length of twelve meters, three elements are used to connect the structure.
Calculation of funnels, plugs and connectors
You need to buy two funnels and four plugs for one drainage tray. To calculate the number of brackets, divide the length of the cornice into segments of fifty cm. Don’t forget to retreat five cm on each side! The funnels are secured with holders.
The riser branches are constructed from two upper and lower bends. Pipe sections for connection will be required if the width of the cornice is more than 25 cm. Calculation and cutting are carried out when installing the storm drain on the roof, so it is impossible to calculate in advance. If the specified parameter is less, then it is permissible to simply join the knees.
In addition, pipes are used to remove moisture from the gutters. It is important to retreat from the surface of the earth up to forty centimeters. The risers are secured with two mandatory brackets. The first of them is mounted next to the lower elbow, and the second - with the drain riser. If necessary, do more, retreating one and a half meters.
For a house with a mansard roof, the drainage elements are calculated in a similar way. A similar principle also works with multi-tiered structures - you just need to carry out calculations separately for all slopes.
It is much more difficult to make calculations for a half-hip and hip roof. To create a drainage system, use at least 4 corners and 2 compensating connectors.
Even at the time of design and calculation of components, it is necessary to select the diameter of the cornice. It is important that the water does not accumulate, otherwise it will overflow. Precise selection of pipe diameter will avoid a bulky design. This is not only a matter of appearance, but also the cost of materials and installation.
Following technical recommendations, drainage from one square meter should take up about 1.5 cm2 of the cross-section of the drainage pipe. The figure was taken for a reason - this is an indicator for most Russian cities. You can calculate the required standard size yourself:
- Calculate the roof area treated with 1 funnel;
- Divide by one and a half - this will be the calculated value of the pipe cross-section;
- Round up to select the size of the gutters.
The area of slopes in typical buildings rarely reaches 70-80 m2. Many people don’t even do calculations, but use ready-made diagrams.
Calculation of the dimensions of gutters and pipes
To select the dimensions of the roof drainage system elements, determine the effective area of the slope from which water is drained using the formula:
Se=(b+h/2)*c,
where: b is the horizontal distance from the eaves overhang to the ridge of the roof; h - roof height; c is the length of the roof slope along the center line. All dimensions are in meters.
If the area of the slope Se from which water is drained is less than 57 m2, then a gutter with a diameter of 100 mm is sufficient. and a drain pipe with a diameter of 70 mm.
With the slope area Se up to 97 m2, the gutter diameter is increased to 125 mm. Gutters with a diameter of 150 mm. will ensure the drainage of water from a slope with an area Se of no more than 170 m2. In the last two cases, it is enough to choose drainpipes with a diameter of 100 mm.
conclusions
If we compare the technologies for installing gutters (round and rectangular), the design of rectangular systems looks more complicated. Some parts differ in size and configuration. For example, the thickness of the strips of brackets for a rectangular gutter is usually taken to be at least 3-4 mm.
However, from an operational point of view, rectangular systems are more preferable. With savings of 10-15% relative to the installation of round gutters, they provide greater throughput.
Sources used: vsadu.ru, xn--86-dlcaicfy2bts.xn--p1ai, kanalizaciya.online, infotruby.ru, nicespb.ru, bobrhouse.ru, expert-dacha.pro, stoki.guru, a1-exp.ru , housechief.ru, pvsservice.ru, kryshagid.ru, klub-masterov.ru, homius.ru, okanalizacii.ru, prostroymaterialy.com, vesnadompenza.ru, 1-proect.ru
Installation of roof gutters – gutters and pipes
The developer is quite capable of installing overhead drainage gutters and drainpipes on the roof on his own.
Three ways to install hanger gutter brackets.
For high-quality installation of gutters you need:
- Carefully study the manufacturer's instructions for installing the drainage system and carefully follow the recommendations contained in the manual.
- Install brackets for gutters and pipe holders at a distance no greater than that specified in the installation manual. Typically, the pitch of brackets for gutters is 0.35-0.5 m.
- It is imperative to ensure that the slope of the gutters in the direction of the drainpipe is 0.5 - 2% (5 - 20 mm per 1 m of gutter length). With such a tilt gutters will clean themselves
flow of rainwater. The minimum slope of the gutter is not less than 0.2% (20 mm per 10 meters of length).
- The edge of the gutter must be located at least 3 cm below the roof plane, otherwise it will slide off the roof snow will damage the gutter
.
- The outer edge of the gutter must be placed from the roof overhang at a distance of 1/2 - 2/3 of the gutter width, then water will always flow into the gutter
.
- On steep roof slopes, it may be impossible to fulfill the last two conditions. In this case To protect against snow, barriers must be installed on the roof
for his arrest.
- The outer edge of the gutter is located slightly lower than the inner one, then water overflowing over the edge of the gutter during heavy rain will not fall on the facade.
- When installing gutters at joints, maintain the thermal clearances recommended by the manufacturer of the drainage system. Gutters and pipes with temperature changes must be able to move freely
- do not clamp them too tightly at the fastening points.
To prevent snow sliding from the roof from damaging the gutter, its edge should be located 3 cm below the roof.
The parts of the drainage system made of PVC plastic are connected to each other through rubber sealing gaskets or glued together.
When assembling the system, it is necessary to take into account the outside air temperature at the time of installation. At temperatures below - 10°C, plastic becomes brittle. In addition, when cutting gutters, their length should be adjusted to take into account subsequent changes in linear dimensions with temperature fluctuations.
The gutter changes its length during temperature fluctuations, moving along the rubber seals at the joints.
How to secure a gutter
After the fastenings are installed, the installation of roof ebbs with your own hands proceeds to the stage of attaching water gutters. First you need to adjust them to length. The pieces of the part must be placed in the fasteners, not forgetting to leave space for the connecting inserts. Their size can be measured in advance, usually about 10 centimeters are left.
If the gutter is too long, it can be shortened; you will need to use a hacksaw. The cut area is cleaned with a file. To make your work easier, place the cap on the end of the pipe while you are standing on the ground. It is quite difficult to do this by weight. The individual parts of the gutter can be connected using inserts. For convenience, they have special marks.
After assembling the gutter, it must be secured to the holders, then check whether there is the required slope. To do this, it is not necessary to take measurements, just pour a little water into the gutter and see whether it flows out or remains in place. If the liquid does not flow out, the inclination needs to be increased.
After you have managed to correctly install the ebbs on the roof , you can proceed to the installation of the drainpipe. Work starts from the funnel. If the length allows, the pipe can be immediately connected to it, otherwise, you will have to install an elbow: it will help avoid splashes and force water to flow into the pipe.
Typically the pipes are 2 meters long. You will have to calculate how much material and connecting elements will be required. Do this in advance.
Attaching the holders
Where should the water from the drainpipes be directed next?
The best solution is to connect drainpipes to some kind of closed water collection and drainage system . It could be:
- Underground drainage system to drain the site. The drainpipe is connected to the outlet of the drainage system through a collector well with a check valve that prevents rainwater from entering the drainage pipes;
- Storm drainage system for collecting and draining water from the surface of the site;
- A special system for collecting and storing rain and melt water for the purpose of its further use for irrigation and other household needs.
- Sewage system for household wastewater. With a centralized sewerage system, it is necessary to obtain permission to receive additional volumes of wastewater from the owner of the network (as a rule, permission is granted for an additional fee).
The rainwater inlet of the roof drainage system of a private house is equipped with a debris catcher, which must be regularly cleaned through the hatch.
Drainpipes are connected to the water intake pipes of closed storm sewer systems through special devices - storm water inlets.
These devices collect large debris (leaves, etc.), and they may also have a valve that prevents air (odors) from escaping from the sewer system. The rainwater inlet has a hatch through which you will periodically have to remove the debris that has accumulated there.
Draining rainwater through closed sewer systems significantly increases the cost of building a house.
Products for construction and repair
⇆
Most often, in economy class houses, near-surface drainage trays are used to receive and drain water flowing from a drainpipe .
From the drainpipe, water enters the drainage tray of the blind area of a private house
Such trays are usually installed not only to drain water from the roof, but also to collect and drain surface runoff from blind areas and other hard-surfaced areas. Water can be discharged from the trays onto the terrain of the site in a convenient place away from buildings or into a drainage well.
Drainage trays are usually made locally from concrete or using ready-made drainage systems made of concrete, plastic or metal. Ready-made near-surface drainage systems from different manufacturers are available for sale. The main elements of such systems are trays and removable grids that cover the tray from above.
A drainage device is installed on the drainpipes, which directs rainwater into a container installed nearby, a barrel. The device stops the flow of water into the container if it is completely filled.
A decorative container for collecting and storing water from drainpipes can become a home decoration.
Purpose of storm drainage
Sediment drainage systems are gutters and pipes connected in a certain way. They encircle the building along the perimeter of the roof and go down in several places. Next, the water is sent either to the central sewer system, city storm drains, or to storage tanks to collect precipitation.
Main purpose of the drain:
- protection of walls, foundations and basements from getting wet and flooding;
- protecting the site from erosion, and the local area from dirt and puddles.
An additional purpose, important for gardeners, is the accumulation of free rainwater for irrigation and other household needs. A bonus includes clean walls, windows and the basement of the house, which is also important.
Rain chain - original drain
In one-story houses, instead of traditional drainpipes, a chain can be attached to the gutters, along which water will flow.
Rain chains are extremely popular in Japan, where they are decorated with a variety of decorative elements. Chains are made from various materials; the links can have a complex spatial shape and alternate with decorative bowls and other elements. The lower and upper ends of the chain must be secured so that the chain remains taut.
When using rain chains to drain water, the roof overhang should be increased - the distance from the wall of the house to the chain should be at least 0.5 m, or the wall should be additionally protected from wetting by splashes of water.
Overhead drainage gutters on the eaves of the roof
In the drainage system described above, drainage trays-gutters are suspended from the roof eaves. Such gutters, when exposed to ice and snow, are easily deformed, displaced, damaged or clogged.
The relatively small slope of the gutter and the narrow and deep opening of the tray make self-cleaning of debris difficult.
In operation, the option of a drainage system with an overhead gutter on the eaves of the roof causes less trouble.
Unfortunately, elements of such a factory-made drainage system are not often found on sale.
| Roof installation with an overhead gutter: 1 – T-shaped crutch; 2 – wall gutter; 3 – fastening the gutter hook with a rivet; 4 – water intake funnel; 5 – cornice overhang; 6 – top layer of roofing carpet; 7 – bottom layer of roofing carpet; 8 – gutter hook; 9 – base for roofing carpet; 10 – additional layer of roofing carpet |
Usually, locally, on the edge of the roof, an apron for the eaves overhang (pos. 5) is made of galvanized iron and a wall-mounted gutter (pos. 2) is fixed on top. Water from the gutter flows into the receiving funnel of the drainpipe (pos. 4). It is clear that the manufacture of parts from ordinary gray galvanized iron, without a colored polymer coating, reduces the decorative effect of the roof.
Overhead gutters on slopes with a slight slope or low snow accumulation can serve as snow retention.
Due to the increased metal consumption, a drainage system with overhead gutters is usually more expensive.
than with hanging ones.
However, the greater durability and reliability of overhead gutters, the ability, in some cases, to refuse the installation of snow retainers and electric heating devices, make such gutters quite competitive.
How to solve a freezing drain problem
Unlike rainwater, snow poses a greater problem for gutters. To prevent it from accumulating, the gutters must be lowered below the roof slope line. Then the melting snow will slide over the gutter. To ensure this, it is recommended to reinforce a protective mesh over the gutters. If the roof slope is very flat and the snow slides slowly, you will need to install snow guards on the roof.
It is necessary to install frost protection on the roof gutter
There is also a more progressive method. A heating cable is laid under the gutter, melting snow and ice into melt water. The cable can also be laid under the roof, in close proximity to the gutter.
Laying the heating cable and installing a drainage system
Free roof drainage is not the cheapest solution
Among some developers, there is an opinion that the cheapest thing to do is to do nothing - let the water flow freely from the roof directly onto the blind area and then onto the ground.
There is no need to make a special device for collecting and draining water from the roof of the house, provided:
- Increase the overhang of the roof edge from the wall to 0.6 m.
- Carry out enhanced waterproofing of the foundation and basement walls to a height of at least 0.5 m above the surface of the blind area;
- Cover the base to the specified height with a non-moisture-resistant material with high frost resistance (for example, clinker bricks or tiles, natural stone, base siding).
- Ensure that the blind area around the house and the surface of the site have a slope of several percent away from the house.
Calculate the costs of this additional work and you will see that installing a drainage system to collect and drain water from the roof will be cheaper.
By arranging a free drain without the above measures, you risk significantly reducing the durability of the finishing of the walls of the house and the basement, and reducing the bearing capacity of the soil under the foundation due to their soaking.
In addition, unorganized water flows around the site reduce the comfort of using the territory. The blind area is often used as a pedestrian path. If there is a free drainage from the roof, such a path will become impassable during rain.
Free drainage is usually used in certain areas of the perimeter of the roof of a house and outbuildings. To collect water along the edge of the blind area, it is recommended to install a tray. The system for collecting water in a tray at the edge of the blind area is less sensitive to the effects of ice and snow, to clogging with debris, and is easier to clean than a drainage system with gutters on the roof.
Next article:
How to make a roof from corrugated sheets
Previous article:
Bituminous shingles. Installation and laying of soft roofing.
More articles on this topic
- DIY sewerage in a private country house
- Ground ventilation heat exchanger in a private house
- Frame house with communications - features and advantages
- Dry heated floor without screed in a wooden house
- Installation of internal sewerage in a private house
- DIY monolithic concrete staircase in a private house
- Norms and rules for planning a private house, cottage
- Groundwater in the basement - what to do?