Many tourists who are fond of frequent forays into nature would benefit from such an indispensable attribute as a camp sauna.
Depending on what abilities and capabilities tourists have, they have two options: buy a ready-made device or make a camp stove with their own hands. Many specialized stores sell entire sets of tourist baths. They mainly consist of the following elements: stove, tent, benches and ladles. Those who like to use home-made devices will be happy to try their hand at creating a unique and useful design.
Using a potbelly stove and a piece of old pipe, you can make a good device. However, this kind of design is suitable only for those who have a vehicle at their disposal. After all, such a load as a stove and a fairly spacious tent for providing bath procedures has a considerable weight. Therefore, hikers must have certain skills in order to build a camp bathhouse from objects that are located near the chosen camp site.
Decoration
To create a unique, attractive appearance that will decorate the site, decor is used. The most common methods of decoration:
- Plants are planted at the bottom of the pond. They are usually sold in ready-to-use containers;
- Plants in tubs and pots that are installed on the shore. The advantage of this option is the ability to change the location of elements and thereby create a unique design;
- Placing fish with bright colors;
- Creating compositions from natural materials, such as stones.
To prepare a more beautiful composition, it is better to alternate the sizes of stones and their shapes.
Camping sauna: choice of design, subtleties of use and how to make it yourself
Using a sauna tent is easy. A few tips will not hurt novice travelers:
- when burning wood in the tent, leave a small open window to ventilate the smoke;
- a bucket of water is placed on the stove to water the heater;
- after heating the stones, the burnt-out heat is removed from the heater, and the tent is tightly closed to avoid heat loss;
- The stones are watered as needed to create a comfortable amount of steam.
Cooling of the stove stones takes about 2 hours. During this time you can comfortably steam. To protect the walls of the tent from fire and people from accidental burns, the stove is fenced with shields made of branches.
Possible difficulties
Difficulties may arise in connection with the selection of the necessary building material . For better stability, stones for laying the stove are chosen to be flat and without cracks. It is advisable to fill the heater with smooth, heavy stones from the river - pebbles, basalt.
Attention! An improvised stove is placed at some distance from the walls of the bathhouse so as not to burn through the thin canopy.
In order not to spread ashes and ash throughout the tent and not to pour on hot stones, it is necessary to dig around the perimeter of the stove to a shallow depth. In winter, the bottom of the bathhouse is covered with spruce branches or special heat-insulating mats.
Features of the design of a camp bath
Design features of a camping sauna Description Frame It is better to make it from aluminum posts (for example, from a sales tent), since this material is safer than wood. In the absence of such, you can make supports from young trees, but in this case you will have to carefully ensure that the wood does not ignite. To fix the frame elements, you can use both rope and soft wire. Covering material The simplest option is thick polyethylene film, but due to its disadvantages - low thermal insulation qualities and density - it is preferable to use tarpaulin
It is important that it is a large and solid piece of material. The dimensions of the covering material depend on how many people will be steaming at the same time, but if there are no more than four or five people, then a piece of 6x6 m will be enough. Travel heater Portable metal heater
Here the choice is also quite wide: you can install a factory-made stove-heater, you can make it yourself in the form of a mesh metal box made of metal rods or thick wire, or you can simply build a well of rounded stones and line it with firewood.
Important Terms
A camp sauna can be made only under certain conditions. The resting place must meet the requirements below.
| Photo | Conditions | Description |
| The presence of a body of water is an important factor | First of all, there must be water there. | The ideal option is to choose a place on the bank of a river or other body of water. |
| Stones for the stove | There should also be stones there. | Layered cobblestones should not be used, as when heated, they can fly apart into pieces, causing serious injuries to steamers. The stones should not be too small or too large, the optimal size is 100-120 mm, the shape is somewhat elongated. If the stones are smaller, they will not be able to accumulate the required amount of heat and will cool down very quickly; Large specimens will take a very long time to heat up. Although, if you have time, you can build a kind of foundation from large stones for a future fire. If there are no boulders, then it is quite possible to use pebbles. As for the quantity, for each person who will steam, you will need 1 bucket of stones. Therefore, each participant is required to collect a bucket of boulders for themselves. |
| Frame material | Near the resting place there should be thin young trees (or better yet, dead wood), which will be used to construct the frame (if the aluminum posts were not prepared in advance). | From these trees you need to make poles with a diameter of about 30-40 mm, and you should also think about the method of attaching them in advance. |
Firewood | A fire will require firewood, and in large quantities, because it will burn for at least 3-4 hours. | Excessively thick logs are not suitable for this, as they do not burn well. The maximum diameter of the firewood should be 100-150 mm - this way they will quickly burn out and transfer all the heat to the stones. |
Preparatory work
Selecting a gas cylinder
For work, it is better to use a propane tank. It is most suitable for this design due to its dimensions. You can buy a cylinder at any scrap metal collection point, the main thing is that it is intact, without holes or large dents.
It doesn’t matter when the cylinder was produced or when it was tested. Do not pay attention to the uniformity of the paint coating on the walls of the container; it will still burn out immediately during the first tests of the oven
The main thing is that rust does not eat through the walls; it is better if they remove the tap before you and release the gas from the cylinder.
Gas cylinder
Expert opinion Pavel Kruglov Stove maker with 25 years of experience
You should not purchase a new vessel; it is better to use these funds to purchase sheet metal and other materials. Ask your neighbors and friends if they have an unnecessary cylinder collecting dust, which they will gladly give you as a gift or sell it for a small fee.
Materials and their quantity
It is difficult to indicate the exact quantity of materials. Much depends on the size of the water container or the size of the compartment for stones. Here is a list of the necessary materials, and how many you will need is up to you:
- gas cylinder;
- sheet of metal, 2-3 mm thick;
- if after construction there are pieces of reinforcement or rods left over, you can use them to make a grate and handles for doors;
- for the legs you can use a corner or a profile pipe. If the farm has a piece of large diameter pipe, you can cut a piece 60-70 mm wide, cut it in half and weld it to the cylinder;
- pipe, cross-section 120 mm, length 400 mm for the chimney outlet;
- rod or reinforcement for making a mesh in which we place stones;
- bricks for the foundation of the bathhouse stove.
Do not use mica stones or granite. In the first option, carbon monoxide will be released when heated, and granite will quickly collapse when exposed to high temperatures. It is better to lay the heater with diabase.
Tools
You will need:
- welding machine with hand and eye protection;
- workbench with a vice;
- clothing with long sleeves made of thick material;
- electrodes for welding structural steels. An inexpensive option is ANO-21 or MP-3, with a diameter of 3-4 mm;
- Bulgarian;
- cutting and cleaning discs;
- metalworking tools;
- sandpaper, metal brush.
Gas infrared
In this method we will tell you how to assemble such an installation yourself, because... building an infrared burner is very difficult.
Materials and tools
For production you will need:
- Infrared ceramic burner.
- Gas cylinder.
- Oxygen hose 2 m with a diameter of 0.4-0.6 cm.
- Clamp 2pcs
- Screwdriver
- Nozzle for liquefied gas or natural gas (depending on the fuel used).
- Retaining ring
When choosing a ceramic heating pad, it is better to give preference to small models - gas is consumed more economically. The peculiarity of infrared heating is that it heats objects, not air, so if possible, it is good to have a stand under the heating pad, which will allow you to direct the energy.
Manufacturing instructions
The diagram clearly describes the principle of operation of the stove. The gas-air mixture allows you to achieve high temperatures with the least risk of fire.
Principle of operation
Essential elements
- Place the nozzle into the connection hole of the infrared burner.
- Attach the retaining ring on the reverse side.
- Place a clamp on the oxygen hose to prevent gas leakage.
- Connect to the nozzle, tighten the clamp with a screwdriver.
- Connect the gas cylinder to the hose, also using a clamp.
- To light the heater, you need to hold a match to the ceramic heating pad. It is forbidden to ignite gas near the nozzle. Fuel can be propane, argon and natural gas. When replacing fuel, you need to change the type of injector. The gas camp stove is ready.
Type of infrared gas stove for a tent
Operating rules
A camp stove for a tent should not only heat the space, but also serve as an assistant in cooking.
Infrared heaters are not intended for this, but craftsmen have learned to cook on the following tiles:
- You need to place the heating pad with the radiating side up, and place two stones or bricks on the sides.
- Place metal rods or skewers on the bricks.
- Place dishes on top for cooking and heating canned goods.
A 200g can will last for 2 hours, after which you need to replace it with a new one. The gas cylinder must stand upright. It is prohibited to leave the stove unattended. Ventilate the tent from time to time. The surface temperature of the ceramic heater is 800-900 degrees.
The procedure for constructing a camp bath
The arrangement of one of the options for a mobile bath structure looks like this:
- First, a fire is made, then, using 2 spears and a crossbar placed above it, a bucket of stones is placed. The larger its volume, the better. Heat the stones until they begin to turn red. Water is also heated here for washing.
- Not far from the fire, a frame is built from pre-prepared racks. The corners in it are tied together with rope or tape and the result should be a cube without a bottom or a hut. During the construction of the frame, the ends of the poles are wrapped with a piece of any unnecessary fabric so that they do not damage the film.
- A thick film is stretched over the assembled frame, and the overlapping areas are taped with tape. At the bottom, the material is pressed to the ground and sprinkled.
- A bucket filled with stones is brought inside the created bathhouse, a container of water is also brought there, and then you can start washing.
There is another option for constructing a mobile bath structure, called the “black sauna”:
- Inside the frame, they make a stove for a camp bath with their own hands in the shape of the letter “P”. Above it, a box or pyramid is made from twigs or thick wire; stones are placed in them. It must be remembered that a unit of this design is unsafe to use and must be constantly monitored.
- When the stones have reached a high temperature, you should wait until the firewood completely burns out and then ventilate the room, pack it and begin the procedures.
Some useful tips:
We build the frame
So, if the stove-heater is located inside the steam room, then the frame is installed around it. Then the four corner posts are driven into the soil and connected at the top along the perimeter with poles. In this way you can make a bathhouse in the shape of a cube or parallelepiped. The choice should be based on the number of people who want to be in the steam room at the same time.
To make the tent in which the steam room will be more stable, you can add supports on the sides, leaving space for the entrance. And to avoid the roof sagging, place several crossbars on top.
Fasten all the poles together with wire, rope or tape. The latter is useful for wrapping sharp corners of the frame, which can damage the film if you use it as a covering material.
Photo from the site pp.vk.me
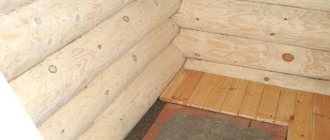
When you have installed the frame and flooded the sauna, take care of the floor of the steam room. To avoid sitting on the cold ground, lay down travel rugs or place folding chairs. If the size of the bathhouse does not allow it or such props are not available, cover the ground with spruce branches and sprinkle leaves on top.
Next, cover the frame with thermal insulation material.
Option #1. Miniature stove made from a tin can
The most primitive single-wall option is a DIY camp stove made from a tin can. In the process of creating it, you will need an ordinary tin can or an iron mug, but always of a minimum size (about the size of a tall glass). In the future, you will have to perform such actions.
Step 1. First, make a couple of holes in the bottom of the mug or jar to create draft (they will serve as sources for supplying air to the body)
It is important that these holes coincide with the internal air flow channel. There is another option - to make one large hole in the bottom, but in this case the coals may fall out
Step 2. Then fill the jar with small (about the thickness of a finger) wooden blocks so that they do not extend beyond the edges of the jar. The stacking of firewood should be strictly vertical (something like an “Indian candle”).
Step 3. After this, remove the block from the body, which is located in the center - this will provide a channel for the passage of air.
Step 4. Place paper or dry grass into the formed channel and set it on fire.
Step 5. This design, the volume of which will be approximately 500 ml, will burn for about 25 minutes, which is more than enough to whip up something. The area will not be filled with smoke!
Step 6. Of course, if many people take part in the hike, then the jar should be larger - at least by one or two liters. But in this case, to obtain stable combustion, thicker firewood must be used, and in larger quantities.
The flame “produced” using this design will burn for about 60 minutes. This is enough to properly boil potatoes and fry shish kebab on smoldering coals. This is just one of the manufacturing options. Now let's move on to the next one.
Projects
A transportable bathhouse made of timber can be selected in accordance with the finished project, which differs in size and layout, or ordered according to your own project.
In addition, ordering a finished bath involves delivering the goods to the client with full installation and assembly on site.
We invite you to read: Installation of beacons for plastering walls
An important point is the fact that the cost of the project is affected only by the number of partitions, doors and other components, and not by their location. If you want to move this or that element, the cost should not change.
Among standard projects, the most popular are baths with dimensions:
- 3 by 4 m;
- 4 by 4 m;
- 5 by 3 m;
- 6 by 4 m;
- 6 by 5 m;
- 6 by 6 m;
- 6 by 8 m;
- 8 by 9 m;
Popular models and prices
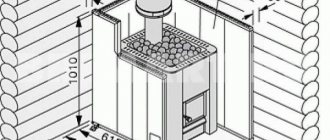
In specialized stores for tourists you can find various models of camping stove equipment. Several models stand out among them:
- "Bannaya Shore". It is equipped with five pipes for chimney assembly, 50 cm long. Additionally, protective screens 0.5 mm thick are supplied. Without stones, the entire oven weighs 13 kg.
- Camping stove "Yarillo". A small but powerful stove with which you can heat a homemade steam room with a volume of up to 20 m3. The total weight of the structure is 9.5 kg.
- "Therma Sonita". A large camp stove with a heater located on top of the body. The kit includes a chimney. The total weight of the structure without stones is 19 kg. The peculiarity of this model is that it has a gate. It is needed to make the wood burn longer.
The average price of camping stoves is 14,000 rubles.
Tips for using a camp sauna
Tips for using a camp sauna
- Despite the fact that making such a bathhouse requires a lot of time, you still won’t be able to steam in it for a long time, since the stones will quickly cool down, especially if you water them.
- Stones with visible defects at high temperatures can shoot off small pieces, so you need to stay as far away from the stove as possible. It is worth knowing that after watering the stones with water, the risk of cracking is minimized.
- The stove should be installed in the part of the tent opposite from the entrance - this will make it safer to enter/exit.
- The main disadvantage of a sauna tent is the low temperature near the ground. Therefore, you need to put something under your feet, otherwise you can catch a cold.
Rules for using the device
Compliance with safety precautions is a basic requirement for the safe use of any oven. To prevent a fire hazard, you need to provide reliable fencing for the stove installed under the awning. To do this, you can use wooden or metal racks.
Before installing the stove, you should take care of the condition of the soil. The soil must be hard and dense, which will ensure reliable fixation of the poles holding the awning. This is the only way to prevent the tent from collapsing on the tourists in it and the well-heated device.
The ash that is removed from the oven after taking bath procedures must be buried or filled with a sufficient amount of liquid.
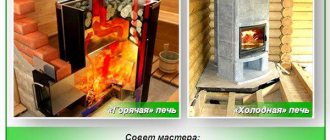
To set up a camping steam room, different types of heater stoves are used. Their main difference lies in the method of covering the stove vault. There are stoves with solid, vaulted and lintel-lined masonry. Inexperienced tourists who choose the first type of device risk that they will receive little heat and will not experience complete satisfaction from the bath procedures. Solid masonry becomes an obstacle to the penetration of heat from the fire to those stones located on top. Thus, the sauna heats up weakly, which affects the quality of the steam.
Preparatory work
Since a homemade iron sauna stove is made from a material that is prone to incandescence, it must be hardened before assembling the device. After all the necessary parts have been cut out, they must be heated in any way until the metal turns red. When this moment comes, you can begin to slowly cool the material. It often happens that after the raw material release procedure, it warps. It's not a problem. You can return the shape using a hammer. It is also worth measuring all the sheets again. If some are too far out of bounds, then you need to trim them again to the required dimensions. This is a very important point, as it will eliminate the possibility of metal warping during operation of the furnace.
What to look for when buying
To ensure that a bathhouse does not “let you down” on a camping trip, you should choose it carefully. Proceed according to the recommendations below.
Bake
Do not confuse it with a regular tourist one, you need to take a special one. A steam room stove produces maximum heat in a short period of time, while conventional appliances, on the contrary, must maintain a comfortable temperature for as long as possible.
There are two types of sauna stoves:
- With built-in steam generator. This one works like a samovar - water constantly boils in the container, saturating the space with steam. The humidity rises very high.
- Kamenka. Stone masonry is laid in it; it becomes heated from the heat, water or a flavored infusion is poured on top. The good thing about this method is that you can regulate the humidity level yourself; but in the end the steam will be much less than from a steam generator.
Which option to choose is a matter of taste; both have their supporters.
What else should you pay attention to? On the quality of the material. Almost all mobile ovens are made of stainless steel
But steel comes in different grades: AISI 430, 321, 304.
All brands are considered heat-resistant and corrosion-resistant, but they differ in composition.
Also, when purchasing, do not forget to find out:
- Chimney diameter. Check that it fits your awning.
- Weight. For a hiking trip, you will need a model no heavier than 10-15 kg.
- Availability of a spark arrester. This is a mandatory element to ensure your safety.
- Ease of assembly. Do I need to screw the legs, doors, how long will it take?
Tent canopy material
The main difference between a bathhouse and a regular tourist one (except for the hole for the chimney) is the mandatory fire-resistant fabric. In addition, in order for the temperature inside to rise to the desired level, the awning must have waterproof and windproof properties. Oxford is considered the best material. Some combine it with nylon or polyester.
Nylon Oxford is stronger and resistant to chemicals.
Polyester has higher heat resistance.
Overall, both options are good.
Frame
There are two main options:
- Collapsible aluminum tubes are lightweight and fireproof. An oxide film forms on the surface of aluminum, which prevents corrosion; You should not choose painted, shiny, attractive-looking tubes - these break quickly. A good tent skeleton is made from unpainted, stain-resistant aluminum; To assemble the frame, you will need gloves. The exception is anodized tubes. They look beautiful, do not get dirty, but are expensive, and have no advantages over unpainted aluminum.
- Frameless designs. To install the canopy, the tourist will need to collect suitable poles in a wooded area. Do not use too dry ones: they are fragile and flammable.
Frameless sauna tent
Frames vary in volume. The diameter determines how difficult it will be for you to set up a tent: straightening a wide awning and pulling it over a skeleton alone is quite difficult.
The weight of the structure depends on the diameter of the aluminum tubes:
- 10 mm - the lightest, used in backpack-type baths. Optimal for hiking. The weight of such a tent does not exceed 8 kg.
- 13 mm - lightweight design. The weight of a tent for 3-4 people will be around 10-15 kg. Can be used on hikes.
- 16 mm - reinforced design with increased strength. Such a frame will not lose its shape even if it is knocked over by the wind. But it is heavy: a tent for 3-4 people weighs 30 kg or more. Suitable for a summer residence, for a beach holiday, for winter tourism on wheels.
It’s good if the frame design includes several arcs and the model has detachable internal partitions. The presence of a vestibule eliminates the need for tourists to change clothes in the car.
Safety
The safety rules are so simple that it would seem that even children should know them. But as practice shows, the overconfidence of most people leads to inattention and an increased risk of accidents
Remember some of the rules indicated in the paragraph above that are important to follow
It is also worth paying attention to the following
The organization of the process involves working with fire
It is important that it does not go beyond the stove, as this can lead to a fire in the environment and further serious consequences. In this regard, you should not leave the fire unattended.
When constructing a frame and tent, if you use flammable materials, install them at a safe distance from fire
In this case, the trapezoidal structure is the most advantageous, since it allows you to cover the stove at the very last stage, when the main frame is ready, the fire in the hearth has gone out and the stove has heated up.
An old metal bucket can be used to create a fire
Mobile baths - tents with a stove
The following types of tourist steam rooms can be found on sale:
Camping bathhouse.
- An awning made of specialized material without a stove or frame. Has a hole for the chimney. Folds into a backpack, weighs little (2-3 kg). Designed for any temperature fluctuations, heat-resistant, non-toxic;
- Bathhouse tent with frame, door, windows, chimney. There is only no stove. The size varies, can accommodate from 3 to 6 people in different configurations;
- Complete set with frame, stove, everything you need. They weigh a lot and need to be transported by car. For motorists, fishermen, hunters - just the thing;
- The most comfortable, but expensive option is a tent with a sauna, dressing room and rest room. Here you can take a steam bath, relax, and eat. And settle down for the night in another room.
Kinds
Varieties:
- Steam room in a tent. Takes up minimal space. It consists of three parts - an awning, a frame, and a stove. All elements are prefabricated.
- Industrial sauna for travel. Resistant to different weather conditions. The structure is assembled quickly, but to place it you need a sufficient amount of free space with a flat base.
- Mobile steam rooms with stove. They consist of a metal frame, which is covered with dense polyethylene film. A stove is installed inside and a chimney is installed.
The choice of a hiking steam room depends on the method of travel, conditions, and number of visitors.
Steam room in a tent (Photo: Instagram / mobilnaya.banya.samara)
Replacing glass-ceramic inserts in fireplace stoves
In case of damage to the glass-ceramic screens, metal plates are supplied with the Fireplace stove to replace them.
The replacement process consists of the following steps:
1. Place the oven in working position;
2. Unscrew the fasteners, remove the plate securing the transparent screen;
3. Carefully remove the glass ceramic insert. Do not remove the heat resistant seal;
4. Insert the metal plate in place of the transparent glass-ceramic screen;
5. Install the fasteners to fix the insert in its original position.
Detailed video instructions for replacing the glass-ceramic insert with a metal plate.
Material for making a camp bath
To mount the frame, you can use wooden, aluminum or carbon fiber racks. It is better, of course, to use pre-prepared poles made of fire-resistant material. But if we are talking about camping conditions, then thick branches are suitable for constructing a disposable frame.
If you do not plan to install a camp bathhouse in advance, then you can use ordinary plastic film to cover the frame. In order for the steam room to be a great success, you need to guess its size or make small calculations before the trip, starting from an area of 6 square meters. This is exactly how much will be enough to create a good steam room in nature.
It is also worth preparing firewood and stones in advance. Dry wood of medium thickness is suitable for a camp bath. It is better to take different stones - round and with sharp edges. To create a heater you need a lot of them to ensure good heating and sufficient steam. But layered and flat stones should be immediately discarded.
Ready-made mobile sauna tents
A camping sauna tent is an excellent option for relaxing in the country, fishing or hunting
We invite you to familiarize yourself with the electric heater with a water tank
There are many options for making a sauna-paltaki. You can buy a ready-made tent with or without a stove, or you can build everything entirely from scrap materials. It is not recommended to use regular camping tents. Firstly, such fabrics are not intended for high temperatures and you will soon have to buy a new tent, and secondly, when heated they can emit harmful substances.
Sauna tent made of polyethylene film
If you lead an active lifestyle and long hikes are not uncommon for you, it makes sense to purchase a ready-made sauna tent. There are many models, manufacturers, and configuration options. There are simply awnings without a frame and a stove. They are made of material that retains heat well and can withstand high temperatures.
There are many types and models of ready-made sauna tents
Bathhouse tents with a ready-made frame and a prefabricated stove weigh quite a lot, so it is more convenient to transport them in a car. The only thing that needs to be found on site is stones for the heater, but they are required much less than when installing a fireplace and it will take a little time, although You can take them with you if you have somewhere to put them...
Bathhouse tents with stove
When choosing a ready-made sauna tent, you need to pay attention not only to the size and cost. One of the important characteristics is the installation/assembly speed
For both large and small companies, you can choose suitable products from the Mobiba model range.
Mobile sauna "Mobiba" for a small company
Tents are made from Oxford - a durable fabric made from chemical fibers (nylon or polyester) of a certain structure, usually with a coating that ensures the fabric is completely waterproof. The fabric also has water-repellent properties.
The frame is made of aluminum aviation alloy D16T, which combines two important qualities: lightness and reliability.
A fairly popular model is Mobiba MB-104. It turns out that our compatriots even bring such baths to America.
Bani Mobiba is designed for the use of stoves. There is already a hole in the ceiling for the chimney. For fire safety purposes, the passage under the pipe is lined with heat-resistant materials.
Furnace "Mediana"
Bath-tents from Nova Tour are popular among tourists. The tents are very light, which makes it possible to carry them even in a backpack when hiking. For example, a sauna tent designed for 4 people weighs only 2.5 kg.
Camping sauna tent Nova Tour
Tent material: Poly Taffeta fabric. The fabric is made of polyester (polyester fabric), which, unlike nylon, is more resistant to ultraviolet rays and stretches less when wet.
The bathhouse is closed with a zipper. The Nova Tur tent for 4 people can be bought for 4 thousand rubles.
Manufacturing instructions with orders
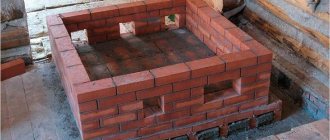
It is not difficult to make a brick stove for a bathhouse with a closed or open heater. You need to choose the material and learn the whole work process.
Masonry of open-type stove-heater
When the concrete base is completely ready, you can begin further work. Below are the basic construction work on laying a do-it-yourself sauna heater stove made of brick and a diagram of the action.
The arrangement of a brick stove for a bathhouse with your own hands with an open heater can be seen in the photo below:
Photo instructions for laying an open sauna stove:
Ordering a closed stove-heater for a bath
Description of the masonry of a closed sauna stove:
- The first row should be perfectly level. Next, the verticality of the walls is checked along its bricks using a plumb line.
- An ash pan is being made. It is needed for waste that remains during fuel combustion.
- At the level of the third row, the blower is attached using a steel strip. Usually it regulates the combustion process: if you open the valve, the flame begins to burn more intensely.
- Steel corners for the grate are laid on top of the fifth row.
- After this, they begin laying the firebox.
- In the sixth row, the firebox is lined with fireclay bricks. The height of the firebox is usually 25 cm, and the width is slightly larger - 30. A grate is placed on top.
- Further, the firebox area gradually expands. The external firebrick lining is tapered.
- It is necessary to create holes for secondary air supply. To do this, the side bricks are cut with teeth.
- Laying of the exterior brick continues.
- The firebox doors overlap.
- A partition for the chimney is installed.
- A water tank is installed.
- At the level of the fifteenth row, the firebox is covered from above with a slab of durable material on which the stones will be laid.
- The compartment where the stones will be laid is being laid; it should be quite large.
- The chimney is laid out from fireclay bricks and gradually narrowed towards the top. The damper is installed. The chimney can be installed through the roof or wall. To do this, you need to put a layer of thermal insulation in the places where it passes. During operation, the chimney may become dusty with fuel residues. To prevent this, you can make a tin protection in the form of a cap.
After installation, it is necessary to dry the device thoroughly. All doors need to be opened and the product should be left in this state to ventilate for several days, or better yet, a week.
You cannot use the heating device to its full potential right away. All moisture must be removed. To do this, heat the stove for several days with small logs for a few minutes at a time. If no wet drops remain on the damper, the device is ready for use.
Basic formats
Devices of two schemes are very popular - “Beg” and “Poshekhonka”. All stoves for tourist baths, one way or another, belong to one of these two versions.
“Poshekhonka” is a particularly compact stove. Its dimensions are 0.3x0.3x0.5 m, weight is 8-9 kg, depending on the nuances of the design. To make Poshekhonok, stainless steel sheets 0.08 cm thick are used.
This design is completely disassembled. You can shoot:
- legs;
- insulating screens;
- fire door.
After dismantling, all these elements are placed inside the stove. The product is equipped with a pipe with two elbows with a total length of 1.5 m. Such a device ensures ease of installation of the pipe in any convenient place in the bathhouse. Although there is no heater here, there is a flat surface on top, on which stones also rest well. A special feature of the design is the air intake, thanks to which firewood can burn for a long time - up to 6 hours in a row. Side screens not only prevent accidental touching, but also help improve heat transfer.
The design of “Bereg” is noticeably different from “Poshekhonka”. In this version, the combustion chamber is thicker, and there is a characteristic bevel at the bottom. And also thanks to the monolithic casing, effective containment of entrained heat is guaranteed. From 20 to 25 kg of stone are placed in the “Bereg”.
The removable door has an opening that allows you to vary the air flow rate. This solution, coupled with the absence of hinges, made the oven more convenient. Some modifications may have a removable water tank with a capacity of 12 liters. Both the legs and the pipe can be detached. They can be put away in a case without any problems.
The top of the "Berega" firebox is equipped with a spark absorber. This device ensures safe operation of the stove. The total weight of all components reaches 11 kg, which is very light compared to other models.
Folding camp fires can heat a sauna to 80 or 100 degrees in a maximum of 40 minutes, achieving good steam. But not all people prefer to buy ready-made devices - many people prefer what they do with their own hands.
This is interesting: What are the best possible façade styles for country houses? Architectural buildings and decor