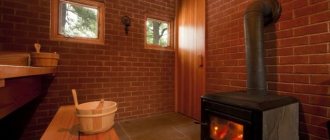
A potbelly stove is often used to heat a steam room. Cast iron or metal stoves are easy to maintain, easier to make than brick stoves, and quickly heat the room. Despite their advantages, such stoves also have a drawback - they cool down quickly. Of course, while the fuel is burning, the stove heats up the steam room, but as soon as the wood runs out, it stops heating the room, and it quickly becomes cool. What to do in this case? A simple option is to line the potbelly stove with bricks.
Why cover with bricks?
Potbelly stoves come in cast iron and metal.
The first ones are, of course, more economical. The problem with all metal stoves is rapid heat transfer. As soon as all the fuel has burned out, the potbelly stove instantly cools down, and with it the heated room. Fast heat transfer helps when you need to quickly warm up a room, but requires constant loading of fuel. The potbelly stove got its name for such “gluttony” - no matter how much fuel you put in, it’s not enough. To increase the efficiency of a potbelly stove, during the October Revolution the chimney pipe was lengthened. Burning gases passing through a long pipe heated it, so the length of the chimney could be equal to the perimeter of the room. Collapse Contents:
- Which brick to choose?
- Additional materials
- Required Tools
- Preparation of the solution
- Preliminary preparation
- Step-by-step instructions for lining
- Conclusion
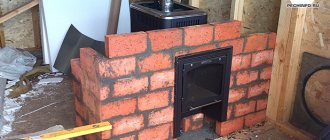
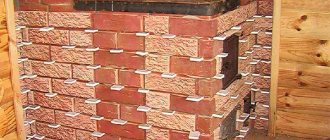
An easier way to retain some of the heat is to line the stove with bricks. The heat emanating from the stove heats the brick, and as it cools, it releases the accumulated heat. The brickwork will allow the stove to remain warm for a couple of hours after it has cooled down. Covering a potbelly stove with bricks in this way not only increases efficiency, but also externally transforms a cheap stove. For greater beauty, you can use special heat-resistant tiles. So a potbelly stove can become visually very attractive and resemble a Dutch or Swedish stove.
Cover example
Features of potbelly stoves
The design of the potbelly stove is extremely simple. It is a rectangular or cylindrical combustion chamber to which the chimney is connected. At the bottom there is an ash pan with a grate. There are two doors in the front part - firewood is loaded through one, ash is unloaded through the second. The second door also serves as a blower. Sometimes, instead of two doors, only one is installed - if the combustion chamber is small.
To increase the efficiency of the potbelly stove, partitions are attached inside. They prevent combustion products from directly escaping into the chimney. First they will have to go through a curved channel formed by two sheets of iron. Here they will give up the accumulated heat to the maximum, after which they will leave the confines of the stove. Brick lining gives equally good results, increasing efficiency and retaining heat.
Which brick to choose?
In order to cover a potbelly stove, ordinary brick will not work . You need to choose between special stove and solid ceramic. Kiln brick will withstand temperatures up to 1000 degrees, while solid ceramic bricks can withstand temperatures up to 800 degrees. Every stove maker will say that laying bricks on edge is strictly prohibited, although you can hear similar advice in order to save material. Heat-resistant bricks are placed in water before laying so that they do not draw moisture out of the mortar and provide maximum adhesion.
Use only heat-resistant bricks
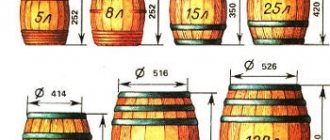
To calculate the consumption of bricks, you need to measure the stove and take into account the 10-15 centimeters of gap between the metal wall and the brick. The potbelly stove is placed on one or two brick rows, and the top is laid as desired. The area of the proposed masonry must be divided by the area of the narrow side of the brick. This is a rough calculation without taking into account seams and air circulation holes in the masonry, but it gives an idea of the maximum amount of material required.
For example: to cover a metal stove “Gnome” you need 83 bricks if you lay it according to the technology and 45 bricks if you lay the brick on its side. This amount will be needed provided there is a foundation in two rows and a lining on top.
There are craftsmen who fill the space between the brick and the stove with sand. But a potbelly stove with sand rarely lives up to expectations - the sand becomes a heat insulator without increasing the useful time of the firebox. The same can be said about gravel, which is used along with sand.
Step-by-step instructions for brickwork
- On the first row, mortar is placed at the end parts of all bricks. No bonding is required with sand backfill. The first row is laid on dry ground and leveled. In order to avoid sand slipping, you can use a plinth.
- The blower door is mounted in the second row. It is placed on a layer of solution and secured with wire. As a result, a blower chamber appears.
- The ash grate closes on the third row.
- The combustion chamber and channels for removing combustion products begin on the fourth row. The bricks are laid end to end. We make supports for the bricks of subsequent rows in channels, since the hole for removing smoke must be preserved. The back wall is laid dry. After completing the fourth row, the combustion chamber door is installed.
- The brick lies flat on the fifth row, with the exception of those forming channels for smoke.
- On the next row, the brick is placed with the end part. In this way, the bricks no longer fall. The basis of the rear wall is made up of two rows of bricks, which are placed at the end.
- The seventh and eighth rows cover the firebox door with 2 bricks. For the back wall we use hewn brick, which acts as a fire guide to the burner.
- To begin the ninth row, it is necessary to lay an asbestos sheet at the location of the cooking plate.
- We use the tenth row to install the hob and begin work on the chimney.
- A chimney valve is installed in the eleventh row. To do this you will need a solution of clay and asbestos.
We make a potbelly stove using waste oil with our own hands.
At the end of the last row, the laying of the chimney begins (2-4 rows) and a metal pipe is attached. It is possible for the chimney to exit to the street. To insulate outdoor pipes we use mineral wool and burnt wire. It will take time for the oven to dry completely.
You cannot rush to finish the stove, as cracks may appear in the first year of operation. It is worth watching a number of videos on the Internet. But on the second one you can finish the potbelly stove with clay mortar. Now the structure is ready for whitewashing or tiling.
HomeDo-it-yourself houseDo-it-yourself brick stove - instructions for creating
The historical events of 1917 caused a sharp increase in demand for stoves that were small in size and mobile. Therefore, this year is the year of birth of the potbelly stove. At that time, there was a critical shortage of fuel, people were forced to lead a nomadic lifestyle, there was a housing problem - all this served as an impetus for the invention and mass distribution of compact metal stoves, the transportation of which is not difficult.
There are several versions of why the simplest in design heating device got its name:
- the bourgeois revolution and its consequences led to an increase in the popularity of these stoves;
- The high heat transfer of this heating device makes it possible to obtain a sufficient amount of heat in the shortest possible time, and at the same time requires constant maintenance of the combustion process. To do this, it is necessary to have some reserves of fuel, and at that time a person with such wealth could only be called a bourgeois.
Potbelly stove in the museum
Additional materials
In addition to the brick you will need:
- metal sheet 0.5mm;
- asbestos cardboard, 1 sheet 10mm;
- sand;
- clay;
- pure water.
Sand and clay can be replaced with a ready-made refractory mixture. The amount of mortar depends on the area of the masonry. The water must be purified - it is impossible to get rid of water stains, and mineral impurities weaken the solution. Clay can be either white or red - only its fat content is important. The sand is sifted and washed on stretched burlap.
Types of chimneys
There are not so many materials from which a smoke exhaust duct can be built. This could be a stainless steel chimney - or rather, an entire system created in a factory, which can be mounted not only vertically, but also horizontally. The main pipe of such a chimney is placed in a sleeve, and between their walls there is a heat-insulating non-combustible material.
- Original systems of this type have a lot of undeniable advantages: they are not afraid of condensation and high temperatures, they are durable and resistant to wear. It is clear that all these characteristics depend on the quality of the steel, and the consumer cannot evaluate it visually. The only annoying thing is that the high price of a product is not a guarantee of its quality, and you can easily run into a fake.
- Similar systems are also produced on the basis of ceramic pipes. Their cost is even higher, but counterfeiting is almost impossible. In addition, ceramics combines all the advantages of high-alloy stainless steel. If we talk about their resistance to heat, then everyone knows that metal heats up faster and stronger than ceramics.
- It turns out that it is ahead of steel in many respects. In addition to the high price of ceramic systems, they have one significant drawback - their heavy weight, which requires the installation of a foundation. But this minus is more than compensated by their other advantages.
- We won’t even talk about polymer pipes as a smoke exhaust, since they can only be used at a certain temperature - mainly for boilers running on gas or liquid fuel. Buyers are attracted by the lower cost of plastic, but believe me, such pipes are not suitable even for removing smoke from a conventional stove.
Required Tools
To organize your work you need the simplest tools. If there is no electricity on the site, you can do without mixing with a drill and do everything by hand. To work you will need:
- Trowel for laying bricks and cleaning off excess mortar.
- Pickaxe for dividing bricks (if necessary).
- Plumb to maintain even vertical masonry.
- Water level for horizontal leveling.
- Container for solution.
- A shovel or drill with an attachment for mixing the solution.
- Joining, if desired, make neat seams.
- Sieve for sifting sand 1.5*1.5mm. Burlap is used for washing.
- An abrasive attachment for a drill for cleaning finished masonry from excess mortar.
Installation and connection
When installing the stove, you must strictly follow the fire safety rules:
- The distance to walls and surrounding objects must be at least 800 mm. The walls can also be covered with ceramic tiles.
- All parts of the chimney must be tightly connected.
- The room must be equipped with a supply and exhaust ventilation system.
The chimney is installed like this:
- We fix the first piece of pipe above the chimney opening.
- We increase the pipe bends to the ceiling level.
- We make holes in the ceiling with a diameter of 170 mm. We remove a layer of thermal insulation around the hole to prevent fire.
- First, we mount the pass-through glass, then insert the pipe into it.
- Next, we connect the pipes to the external chimney.
- We apply bitumen to the pipe and insulate it.
If you need to heat a large area, you can connect the stove to a heating panel. This will increase the heat flow and allow it to be retained longer.
A DIY brick potbelly stove is a good alternative to a metal stove. Potbelly stoves made of metal are small in size, but have a serious drawback - the high thermal conductivity of the material. The metal heats up quickly, but soon cools down, resulting in the need to regularly maintain the fire, which means high fuel costs. A brick stove or a metal stove lined with brick is a more rational choice - it can retain heat for a long time.
Preparation of the solution
It is not difficult to cover a potbelly stove with bricks, but the design requires a special mortar - heat-resistant. There are already proven dry mixes on the market for laying stoves. It is enough to add water to such mixtures and mix the solution in the proportions indicated on the package. The advantage of the ready-made solution is that you do not need to adjust the fat content of the clay and risk the quality of the masonry.
If the goal is to make a solution from scratch yourself, you need to take into account the subtleties of the technology. Different sources give different proportions of clay to sand. This is due to its quality - the fatter the clay, the more sand is required.
For 1 part of fatty clay, take 2 parts of sand; for lean clay, 1 part of sand is enough. To test the clay for fat content, it is mixed with water to form a dough, rolled into a ball and allowed to dry. The dried ball is squeezed with planks; if it crumbles, the clay is skinny; if cracks appear, the clay is greasy.
Before mixing, the clay is filled with water for a day, and the sand is thoroughly sifted and washed. Dry clay is poured with water 1:2, and oily clay 1:1. Next, the clay is filtered and sand is added to the consistency of thick sour cream. To strengthen the solution, it is recommended to add salt and cement. Salt 150g, and cement 1kg per 10 kg of clay. After mixing, the solution must be checked for the ratio of components.
Clay mortar for masonry
There are several ways to do this:
- Take a couple of bricks and fasten them with the resulting mixture. Wait 5-7 minutes. If after the specified time you can hold the structure by the upper brick, and the lower one will not fall, then the solution has been selected correctly.
- Roll the solution into a 20cm sausage, twist it into a ring and leave until dry. The presence of small cracks indicates that the solution is greasy; breaks and an excessive number of cracks indicate an excess of sand.
Installation of a metal stove with a remote firebox in a log house
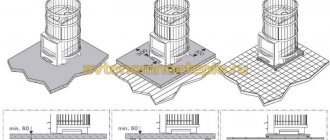
Let's consider the option of installing a fireproof anti-shrink wall made of LV mineralite. A special fastening method will allow installation in the log house before it shrinks, and the floating design of the fastening elements will prevent the rigid wall from deforming.
Minerit LV
Minerite
Step 1. Prepare the opening in the wall. We cut it out with a chainsaw according to the markings.
Hole in the wall
Step 2. Cover the inner surface of the opening with mineralite. We saw the mineralite sheet into three pieces. We cut out two vertical pieces based on the height of the opening minus 10 cm. We cut out the horizontal part with a length equal to the width of the opening minus 2 cm. The width of the mineralite section should be equal to the thickness of the timber or log from which the wall of the bathhouse was built.
Step 3. We nail foil to the inside perimeter, and then mineralite. First, we fix the vertical sections with nails, then the horizontal ones.
Step 4. It is necessary to make an opening in the mineralite sheets, which will protect the wall from the heat of the stove. The remote furnace firebox will pass through this opening. We take measurements of the remote firebox, then make markings with a pencil and cut the sheet so that there is 3 cm on each side between the remote channel and the sheet.
Installation of foil and mineralite. Finishing of the opening can be done both before and after installation of the main slabs of refractory material
You can do it differently - first we fix the sheet on the wall, and then we cut the opening for the remote firebox.
Mounting mineralite to the wall
The sheet is fixed, you can cut out the opening
Step 5. Drill oval holes in the sheet for self-tapping screws. When shrinkage occurs, the screws will move downward inside these holes, while the sheet will remain motionless. We fix the foil insulation on the wall (with a stapler), and then use self-tapping screws and a washer to fix the mineralite sheet (we mount the sheet on the steam room side).
Step 6. We attach the second layer of mineralite with an air gap of 3 cm. To do this, you need to purchase a mounting kit with ceramic or steel bushings.
Mounting kit
Once again, you need to drill oval holes, but be sure to make sure that the fasteners of the first and second sheets do not end up at the same point.
The photo shows a diagram of the installation of a protective screen made of mineralite. Double-layer sheathing. If the stove has an external firebox, make an opening according to the instructions
When joining two sheets at 90 degrees, we make cuts at the ends at 45 degrees for a more aesthetic appearance.
After installing the sheets, we install the stove on the base. We adjust the legs, making sure that the external channel is located exactly in the center of the opening cut in the mineralite. We take foil-coated basalt wool and place it tightly between the walls of the outlet channel and the mineralite. In this case, the foil should “look” towards the steel walls of the channel.
Adviсe
Craftsmen use different methods of installing stoves and protecting walls. So, for example, in a log bath it will be more convenient to install mineralite on a wooden sheathing. Antisepticize the 50x50 mm bars, drill holes for self-tapping screws and fix the sheathing posts exactly vertically. The mineralite will already be fixed to this sheathing with self-tapping screws.
Lathing
If you plan to cover the wall from the inside (from the steam room side) with mineralite for further finishing, for example, with a coil, and finish the portal with brick from the outside, then it is worth carrying out the work in the following sequence:
- From the side of the steam room, fix a sheet of mineralite;
- cut a hole for the outlet channel;
- secure the horizontal guides from the plasterboard profile. Fasten the strips with self-tapping screws at the top of the opening, along the bottom and exactly above the opening for the fuel channel;
- install the vertical posts of the sheathing from the profile, fix them with self-tapping screws through the shelves;
- take basalt wool and lay it between the sheathing posts;
- sew up the opening with mineralite (from the dressing room side);
- install the stove in its place;
- Now, on the side of the dressing room, fill the opening with brick (don’t forget to put insulation in the cracks), and on the side of the steam room, apply decorative finishing with stone.
Lathing and insulation
View from the steam room and dressing room
Fixed furnace portal
Walls and chimney after finishing with a coil
The process of finishing the oven itself
The work on installing the furnace does not end there. Be sure to install a water tank and a heat exchanger, if they are provided for in the design, install the chimney in accordance with fire safety rules, prepare and lay the stones in the mesh.
Preliminary preparation
Before laying bricks, you need to make sure the floor is in good condition. Thus, a reinforced concrete floor can withstand no more than 800 kg of weight per m2; the load on any other floor is usually calculated as 150 kg per m2. Before you cover the potbelly stove with brick, it needs to be installed on a kind of foundation made of a sheet of metal, asbestos cardboard and brick in this order: cardboard is placed on the floor, a steel sheet on top, then the brick is laid in two rows, as close to each other as possible.
If the potbelly stove has already been installed, it must be disconnected from the chimney pipe and moved away from the site of future masonry. When the floor is old and the weight of the structure cannot withstand, the logs are cut out and a cement foundation is poured, provided that the stove is installed on the first floor of the house. The stove should not stand only on the finished floor. To reduce the load on the joists, it is allowed to lay only 1 row of bricks on a sheet of metal and asbestos cardboard. The steel sheet should protrude 30 cm in front of the firebox door.
Variations of designs
There are many options depending on the scale of the planned furnace. Simple structures for lining are already equipped with special shelves on which bricks are laid.
Craftsmen also sew a potbelly stove into a brick in a more fundamental way. This can be done more or less efficiently depending on the qualifications of the master.
Below is a diagram of a potbelly stove stove, a brick in which serves to expand its functionality.
Conclusion
A potbelly stove lined with brick retains heat longer and allows you to consume less fuel. Masonry significantly increases the aesthetic qualities of a simple stove. If desired, the efficiency of the potbelly stove can be increased by installing a sandwich mesh. It protects the chimney from burning out and accumulates heat. Often the front side and top are left open. This way the stove warms up the room faster, but due to the reduction in brick area, it releases the heat faster. Clay mortar is ideal for stoves, but is demanding on room humidity. If the logs are old, it is better to remove some of them and pour a cement foundation.
People have been wondering how to line a potbelly stove to preserve heat since the time of the revolution. The brick absorbs some of the heat, which is safer to use and reduces the risk of getting burned. You can dry things, fruits and berries on the masonry. A potbelly stove has been helping out in the cold for more than one generation; it never ceases to be in demand and loved by all summer residents. Covering a stove with brick is an affordable and quick way to improve it and keep the house warm. A budget method that does not require special skills.
Facing
Before you line a metal stove in a bathhouse with bricks, you need to prepare for work.
Preparatory activities
You can start laying only after the concrete and brick base has dried. A metal stove is installed on it, and future cladding is marked around it.
But first you need to install a fireproof shield made of any fire-resistant materials on the wooden walls around the fireplace.
Insulation of wooden walls and floors with mineralite
If you decide to prepare masonry mortar from clay, then you need to fill it with water for several days and carefully sift the sand. Since it is difficult to cover an iron stove with bricks and not stain its body with mortar, before starting laying it should be protected with paper, cardboard or film, securing them to the walls with tape.
To prevent water from the solution from being absorbed into the brick, it is soaked in water about half an hour before starting work.
Soaking the brick
Masonry
When deciding how to brick a cast-iron stove, it is better to choose half-brick masonry. A thicker screen will take longer to heat up, and a thinner screen will cool down faster.
The laying of the first row begins from the far corner, laying a whole brick
It is very important to lay it out evenly and neatly, since all subsequent rows will be aligned with it. They are laid out alternately, with an offset of half a brick. Don't jump over the row, first raising the corners and then filling the space between them.
Laying is done offset
- The permissible thickness of the horizontal seam is 8-10 mm, vertical 3-5 mm.
- The seams are filled completely with the solution, its excess is immediately removed from the surface with a trowel.
Bricks that go beyond the plane are knocked down with a hammer or mallet
During the laying process, you need to constantly monitor the verticality of the walls and corners using a plumb line or building level.
A cord stretched along the upper edge of the row will help to keep the row strictly horizontal.
Auxiliary vertical stands will make work easier
To strengthen the masonry, reinforcing mesh can be placed in the seams every two or three rows.
The photo shows the reinforcement of the masonry with metal mesh
Also, every two or three rows you should unstitch the seams until the mortar loses its elasticity, and wipe the surface from any remaining mortar with a wet rag.
Joining seams
When laying out the walls, it is necessary to leave ventilation holes in them: at least two at the top and two at the bottom. Cold air will flow into the lower ones, protecting the oven from overheating, and heated air will come out through the upper ones.
Furnace ventilation diagram
- As an option, you can line the stove with bricks laid in a checkerboard pattern with holes between all adjacent elements.
- Around the doors of the firebox and ash pit, masonry should be carried out taking into account their full opening.
The brick will have to be cut if it prevents the doors from opening
Where to finish the masonry is up to you. If you have a stove with a stove or heater, it is only brought to the top of the body. You can raise it to the ceiling. Or you can make figured masonry with a vault and chimney lining, turning an ordinary potbelly stove into something like a fireplace.
Metal stove for a bath, lined with bricks up to the pipe
Option with full height masonry and pipe lining
The brick portal turned an ordinary stove into a real fireplace. Now you need to let the solution dry for at least a day. It is desirable for this to happen in natural conditions, so it is better not to heat the stove for now.