What kind of bathhouse it should be depends mainly on the stove in it. According to tradition, a Russian bathhouse should have a brick stove, which replaced the more ancient stone one. And many owners of baths under construction or built a long time ago are trying to install one of these - after all, this is a thing that has been tested for centuries. But how to assess the scale of the effort, time and finances associated with the construction of a brick stove for a bathhouse? We want to help you - read and decide whether you can handle it yourself or still look for a professional, or is it easier to abandon this idea in favor of a brick-lined metal stove, which, if handled skillfully, can produce the same conditions as a brick one ?
Brick sauna stoves: history
The historical moment is also important: understanding how the Russian bathhouse develops can point to the most significant things in it.
The first stoves were simply made of stone, they didn’t even put it on the mortar - a pile of stones over a fire , roughly speaking. And there was no chimney - smoke spread throughout the entire hut (yes, the bathhouse was made right in the hut, there were no yard buildings, it was also heated) and flowed out of the windows and doors. Until the 15th century, such baths were the most common in Rus'.
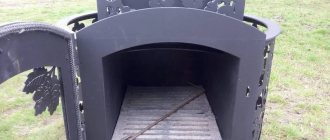
Brick sauna stove
The first innovation was, after all, a pipe, but made of wood , it often became the cause of a fire (the reason is simple - wood ignites at a temperature lower than that of the furnace gases at the outlet of the furnace).
Next, they invented something between a “white-style” and “black-style” stove - for this purpose, they placed something like a hood (a cap with a chimney pipe on top). But this is not a brick stove yet.
The revolution, as one would expect, was carried out by Peter I - firstly, he took a dozen stoves from Holland along with the craftsmen , and secondly, he banned the construction of stoves in the capitals that were heated “black”. But in the end it turned out the same way as with the potatoes - the brick oven took root and became like home.
We hope you noticed the main thing - the Russian bathhouse was originally heated by intermittent stoves with flow-through heaters , which only lacked stone insulation of the hearth and a chimney pipe. And when the brick one arrived, it solved all these problems at once. Features of choosing sauna stoves are presented in a separate article.
Laying a rubble concrete foundation
A heater stove for a bathhouse with your own hands can be built on a different type of foundation, which is created as follows:
- They dig a pit taking into account the amount of soil freezing. It needs to be made wider relative to the perimeter and depth by 10-15 centimeters. A rubble concrete foundation is laid provided that the walls of the pit do not crumble and groundwater does not seep through.
- Crushed stone 15 centimeters high is poured onto the bottom and compacted, making a horizontal platform.
- Next, they build a formwork that looks like a box without a bottom. The inside is covered with a waterproofing layer of roofing felt or hot bitumen is used, after which it is immersed in a pit.
- A layer of stones with a diameter of no more than 15 centimeters is placed at the bottom, and crushed stone is poured into the spaces between them.
- A solution of Portland cement and sand (in a ratio of 1:3) is poured on top, reminiscent of thick sour cream in composition.
Further actions depend on the selected option:
- The first row of stones is filled with solution and left for 24 hours. Do the same with the second layer of stones and wait a day. Continue in the same way until the desired level is reached.
- If the volume of the base is small, the filling is done at one time.
The level of the rubble concrete foundation is made 6-7 centimeters below the finished floor. The surface of the screed is checked with a level and covered with film. After about one week they begin laying.
Advantages and disadvantages
Being progress for their time, brick stoves for baths, of course, had significant advantages, but this does not mean that they were completely devoid of disadvantages.
Among the latter is chipping of the solution . This is an inevitability that can only be cured by jointing and filling the seams with new mortar . The owner needs to constantly monitor the condition of his stove.
Skillful , unhurried ignition will eliminate cracks on the chimney , which are the result of sudden temperature changes in winter.
Another concern for the owner will be monitoring the amount of soot in the chimney. But similar responsibilities cannot be avoided by the owner of an iron stove. There is one “but”: iron ones have practically no smoke circulation, and if there is, it is purely nominal. And brick ones are often made with one form or another of smoke circulation . And it also needs to be cleaned. For this purpose, special cleaning doors are provided.
However, the majority still considers the main disadvantage After all, 4-5 hours is the average time required to prepare a bath . So for day visitors this may not be an option.
Firewood consumption should also be taken into account. In winter, you will have to spend about four dozen firewood for one heating, in summer - three. Some customers prefer to choose electric furnaces so as not to have to worry about calculating and purchasing fuel.
By the way! Just in case, we remind you that a newly built stove must first be dried - this is done by repeated fires with a small amount of firewood. That is, they don’t immediately heat a new stove at full capacity - it will deteriorate and crack. First, moisture is removed from the entire massif.
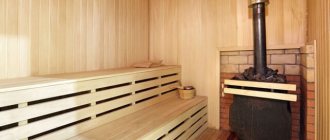
As for the advantages , they are obvious: the comfortable atmosphere of a Russian bath is a low temperature (60 degrees) and high humidity created by steam obtained from the overheated stones of a closed heater. Brick sauna stoves do the best job of maintaining the desired temperature inside and outside the stove.
Water container
Before making a stove with your own hands, we advise you to decide on the size of the container for heating water. To do this, you should have an approximate idea of how many residents will live at home and whether you plan to invite guests to the bathhouse. The calculation is based on 8-10 liters of hot water per person.
Water heating container
It is better to use an open water container. Evaporation during operation will be small, but you will receive a number of advantages:
- Free access when filling Water heating tank
- Possibility of servicing the interior.
- When the oven operates, scale will form on the walls of the container. Open access will allow you to freely clean and dry the inner surface.
- In winter, this will completely remove remaining water, protecting it from freezing. Water heating container
A boiler of the appropriate size, sold in specialized stores, is perfect for the container. If desired, the container can be welded individually.
Water heating container
Our advice: when making the bottom, use thickened steel.
Types of brick stoves for baths
Interesting topic, extensive. There are a lot of structures that form different types of brick stoves for baths. Some are simpler, others are more complex. Some provide registers for heating water , others provide space for a tank . There are bell-type stoves and channel stoves , and there are more familiar types of heaters - solid and flow-through . In addition, there are different smoke circulation systems for channel stoves - vertical and horizontal.
So, it is clear that registers and tanks are additional devices, but first we need to understand the necessary elements. These include:
- blower;
- grate;
- firebox;
- heater;
- smoke circulation.
The first major division can be carried out using heaters . In some furnaces, the stones are separated from the fire only by a grate , which does not in any way prevent their contact; in others, a sealed box , the bottom of which separates the stones and the flame, acting as an intermediary in the transfer of heat.
The first heater is called “ flow-through ”. This is the heiress of “black-style” stoves. Today they are called "batch ovens". In fact, how can you pour water into such a heater without filling the fire? Impossible. Therefore , you have to wait until the wood burns out completely. Then you can open the door and add water to get steam.
The advantage of a flow-through heater is that the stones heat up faster and to a higher temperature. The downside is that this has a bad effect on their lifespan in the heater.
A closed or blind heater allows you to pour water directly while firing the stove , which makes such units popular. Because these are independent processes. For such convenience, you have to pay in that the stones heat up more slowly, not as hot as in a flow-through, but still their temperature is enough to produce good steam.
Another way of dividing furnaces is this: they are channel and bell-type. the Kuznetsov stove became widely known . The difference between them is what exactly is the “engine” of the combustion products inside the furnace: a channel furnace operates exclusively on draft . And in the bell chamber, combustion products move freely, but at the same time, new arrivals crowd out their predecessors along the passages prepared for them by the engineer.
On a note! There are a lot of varieties of both channel and bell-type furnaces. The final choice of the appropriate option for your case usually depends on the stove maker, or more precisely, on how many different stoves he has built during his life.
The point of different designs is to increase the heat transfer of furnace gases. The more they give, the higher the efficiency of the stove. Kuznetsov has an efficiency of 94% - simply an excellent indicator. This is achieved by installing several caps.
By the way! The second cap is often used to integrate additional devices - a heat exchanger or a tank for heating water; separate articles are devoted to stoves of these types.
Let's return to channel furnaces. The set of channels represents a smoke circulation. Brick sauna stoves can also be classified according to how the channels are located:
- vertical;
- horizontally.
The specifics of each of these options are fully understood when it comes time to cleanse.
Advice! Therefore, here too (at least at first) it is worth using the services of a professional.
A little about tanks . Brick stoves for a wood-fired sauna with a water tank can be located both at the top and at the bottom of the stove structure. A fairly common option is when the tank is located behind the firebox, that is, the water heats up as quickly as possible. But we must take into account that the removed heat increases the heating time of the stones and the steam room .
Yes and more. The location of the firebox is variable, but it will not have an external fuel channel - the stove itself will be positioned so that its wall with the firebox will be located in the dressing room, for example. In this case, two birds with one stone are killed: heating goes to the rooms adjacent to the steam room, and the steam room itself is clean and tidy.
There is one interesting point about the types of stoves. Without going into details, people often formulate their desires as follows: “I want the simplest stove for a brick sauna” or “I need a small stove for a brick sauna.” Well, why not, let’s consider them as possible varieties.
Small brick stove for a bath
In general, such a division should also be considered legitimate. The power depends on the size. The minimum and at the same time cost-effective values that we were able to find are 89x102 cm at the base. In other words, the stove is 4 bricks long and 3.5 bricks wide. As for the height of a brick stove for a Russian bath, the recommended value is 168 cm. The cost of the unit also depends on the technical characteristics; most buyers prefer to choose inexpensive models.
If you want even less, line a small metal sarcophagus with brick or stone.
Simple brick stove for a bath
But simplicity is a relative concept. If you have no experience, any will be difficult, but if you have it, any will be within your power.
A simple brick stove for a bath with a closed heater
Based on the number of parts and stages, including preparatory ones, then in our opinion the simplest would be the same metal stove with a brick lining - it’s not a fact that it will need a strong foundation, the casing is easy to build yourself, masonry errors will not be so critical, but the result will please you with both the quality of heat and steam. So think carefully about what you are willing to do.
Conclusion
Heater in the steam room - both spirit and temperature
Currently, a large number of methods for heating a bath are offered, but only a stone stove lasts longer and brings more benefits. Our portal offers you additional information on this topic, and the video in this article will examine in detail all the nuances that we discussed in this material.
Did you like the article? Subscribe to our Yandex.Zen channel
How to stay safe
Standard fire safety rules require that a pre-furnace sheet at least half a meter long , and the distance from the firebox to the nearest wall should be at least one and a half meters.
Brick stove for a Russian bath. There should be a pre-furnace sheet in front of the firebox (marked with an arrow)
Left in the photo: pre-furnace sheets in the store
A brick sauna stove should not be connected to the wall . A gap should be left between them. It is needed primarily due to the thermal expansion of the furnace - with a rigid connection, cracks may appear. And so its surface does not heat up to the combustion temperature of wood.
However, a brick sauna stove is still a fire hazard. It's all about cracks that appear over time both in the stove itself and in the chimney, and can cause sparks to be released. The only way to fight is prevention. The crumbling seams are cleaned and sealed with new mortar.
Work on insulating flammable materials
A modern bathhouse is most often built of wood, and sometimes even a brick bathhouse has wooden partitions. Therefore, the partition opening where the heating device is located must be insulated.
This opening, as well as the section of the wall near the opening, is sheathed on both sides with asbestos cardboard and a sheet of metal 4 mm thick is placed on top of it. In this case, the distances from the stove body to the walls and partitions must be maintained: 32 cm to unprotected ones and 26 cm to protected ones.
Places where insulation is required
Brick sauna stoves: sequence of work
As we promised, you can estimate your capabilities by getting acquainted with the stages of constructing a stove in a brick bathhouse.
Foundation
A brick stove in a bathhouse must have a foundation. There are no options: the stove in a brick bathhouse will have to be placed on a separate foundation. Many people believe that the matter can be done with a shallow foundation, but this is not always the case. You need to focus on what you did for the bathhouse as a whole. After all, everything greatly depends on the bearing capacity of the soil. Weighing several tons, the brick mass will exert significant pressure on the ground, and it usually sags unevenly, which causes distortion and fracture of the structure - a wall or a stove.
Advice! Read our materials about foundations in the corresponding section of the site. There you will find not only theory, but also numerous practical recommendations for building a suitable foundation.
The main thing is not to forget that you cannot combine the foundations of a bathhouse and a stove into a single structure. It is customary to leave a gap of at least 5 cm between them.
Brick stove for a bath: solution
IMPORTANT! No cement is placed in the mortar for stove masonry, this must be remembered.
Two ingredients remain: clay and sand. And both can be different in composition or particle size. The sand is sifted through a 1.5 mm sieve. As for clay, there are two options: either dig it up on your own site, or buy a bag in a store. In the first case , you need to dig deeper than half a meter, because it is from this mark that what may be useful to you begins.
Rule! It is recommended to use the same type of clay for the mortar as in the brick, that is, red or fireclay. The reason is that homogeneous materials have the same thermal expansion, and this is good under conditions of strong heating - they expanded equally, contracted equally, no stress or deformation.
For masonry, the most important parameter of clay will be whether fatty or lean . These are quite conventional names. You can only understand what you are dealing with by drying a lump of clay and looking at the result. Skinny clay tends to crumble when it dries. Oily skin behaves differently: visually the lump becomes smaller in size and cracks appear on it.
Note! When mixed with sand, the fat content of the clay changes, and sand reduces it. That is why there is no exact proportion; it is the result of selecting specific ingredients. The selection is carried out in the form of the following experiment: make several samples of mixtures of clay and sand, mark the shares and let them dry. If a dried cake crumbles, there is too much sand; if it cracks, there is too much clay. Optima is a homogeneous sample that is not cracked or crumbled.
Before mixing, the sand is not only sifted through a fine sieve, but also washed.
By the way! Some solution recipes contain... table salt in small quantities.
The brick itself - brands, types
When planning a stove for a steam room or a brick bathhouse, the choice of the most basic building material plays an important role. We recommend watching a video in which a stove maker tells you what you can find on sale and what he thinks is better.
Video
Let us add on our own that a good selection criterion is the sound when hitting a brick . There are no defects if the sound is ringing and metallic. Any deafness is a sign of cracks.
We have already mentioned red refractory and fireclay bricks . , clinker and alumina heat-resistant ones are suitable for furnaces . Fireclay is the most expensive. It is used only for laying out the furnace core of the furnace. Others listed are used for laying its walls.
The mark (number) indicates density . Stove makers use from 150 to 250 . The higher the density, the higher the heat capacity, the longer it takes for the steam room to heat up.
The frost resistance of the material does not matter indoors, but it is worth paying attention to when making a chimney.
Uniform color is a good sign. Heterogeneous indicates uneven firing and, as a result, different strength of brick sections.
Geometry is also not the last criterion when choosing. It’s easier to work with the right one.
Masonry mortar
In past times, sand-clay mortar was used for mortar, but since the preparation of this miracle takes a long time, “kiln masonry mixtures” are now used. This is a topic for a separate conversation, I will write about it in one of the following articles...
Mixing a solution from the mixture is quite simple - take a container, fill it with water, lay out the dry mixture and mix the whole thing using a hammer drill with a special attachment (if there is no hammer drill, use a drill).
The finished mixture should be of medium thickness (neither runny nor thick).
Checking the readiness of the solution - take a clean, dry stick, lower it into the solution, take it out, if there is solution left on the stick within two millimeters - the solution is ready for use, if not, it means you went too far with something.
Brick sauna stove: are there any alternatives?
Finally, let's look at what can replace a brick stove in a bathhouse.
Stone stove for a bath
We will not advise you to build the walls of the stove from real stone, but covering an iron stove with slabs of some nice stone is not a bad idea. Such a stove will cost less than a brick stove, but not that much cheaper. The advantage is that it will take up less space and will be easier to maintain . In essence, this is an alternative to a brick casing, which, by the way, is also quite good for creating a suitable stove for a Russian bath.
Stone stove for a bath
Stone casings are sold for a variety of stove models, and if we are talking about homemade products, you can always make a casing to order.
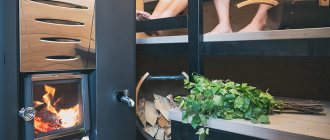
Metal stove + brick pipe
We somehow avoided in this article the question of what kind of chimney should be. It is clear that most people will not put an ordinary sandwich over a brick oven (although there are some). Such a stove requires a brick chimney, with fluff and proper cutting of the ceilings.
However, a heavy and durable brick chimney can also be installed on a regular metal stove , in particular cast iron, which is also not bad. More precisely, connect a metal stove to a brick pipe. In other words, the chimney is a different story. Look at the photo to see what its implementation could be like in the above-mentioned combination:
*** So, the decision is yours - there are no ideal stoves in nature, but there are those that suit us. We wish you to find exactly the one that is best for solving certain problems.
Necessary tool
To lay a stove, you will need the following set of tools:
- small trowel;
- hammer-pick;
- square 60×40 cm;
- plumb line;
- steel level 60–90 cm;
- grinder with cutting disc for stone;
- protective glasses.
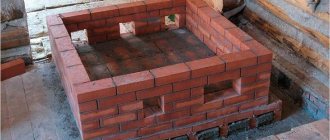
Row by row we build walls
First row
After laying the foundation, it is time to build the walls. The first row is placed on a bitumen waterproofing pad that covers the foundation. First, a protection wall is erected, the main function of which is fire protection. It is laid from cut bricks, and each brick must be moistened with water before laying. Check the correct angles and "order".
Be careful when measuring the edges of the order. If you leave even small gaps, smoke will enter the bathhouse. The ideal seam width for brick row spacing is 3-5 mm. The tighter the material fits together, the better.
Second row
The 2nd row and subsequent rows are laid out so that the middle of the brick falls at the junction of the two lower ones.
Third row
When laying the 3rd row, a blower door is installed. This element is reinforced with strips of steel sheet or galvanized wire. To determine the exact location of the blower, you need drawings of the bathhouse. To insert the door mount into the oven wall, a recess is made in the brick.
Fourth row
The 4th row is the location for installing the well, where ash will accumulate, and the grate (grids on the air duct to clean the firewood compartment from ash).
Fifth row
Before starting this row, carry out strict control of the evenness of the walls, check that all the corners are right. To install the grate, recesses are created in the bricks with a margin of 1 cm on each side for the expansion of the grate due to exposure to high temperatures.
The recess on the back wall should be rounded to create minimal resistance to the air flow when directed into the firebox.
Sixth row
The 6th row completes the installation of the blower.
Seventh row
On the 7th row, the combustion door and grate are installed. The installation diagram for the combustion door is the same as for installing the blower door.
Eighth row
At the level of the 8th row, a partition is made, and the chimney begins here.
Calculations, diagrams, drawings
Some craftsmen prefer to build a sauna stove “by eye,” arguing for the simplicity and undemanding nature of the structure. But the thermal regime and quality of the steam depend on how correctly it is designed (if desired, you can always install a steam generator in the bathhouse). For example, with excess power, the air in the steam room will heat up very quickly, but the stones will remain cold for a long time. If the performance of the heating device is not enough, then it will constantly overheat, which will quickly disable it.
The parameters of a sauna stove are calculated based on the actual cubic capacity of the room. To determine the volume of a steam room, three quantities are multiplied - its length, height and width. After this, adjustments are made related to the characteristics of a particular structure. So, for bathhouses with a bare frame, the obtained value must be increased by 1.5 times, and for each uninsulated square meter of surface (windows, doors, etc.) 1.2 m3 is added to the volume of the room. For example, the actual volume of an unclad building measuring 2x2x3 m with a window (1x1 m9 and a glass door (1x2 m) is taken equal to V= 2x2x3x1.5+1.2+2.4=21.6 m3.
Experienced stove makers calculate the power of the stove based on the fact that for each cubic meter of the actual volume of the steam room, 1 kW of energy will be required. So, in our case, a 20 kW heating device is suitable. To calculate the size of its firebox, the resulting power is multiplied by 2. For example, in the example discussed above, a firebox with a volume of 40 liters will be required. As for the linear dimensions, the height of the combustion chamber should be no more than 2/3, and the depth should be no less than 2.5 of its width.
Brick by brick
The stove-heater is folded according to an algorithm, but there are quite a lot of algorithms themselves. Each row has certain dimensions. Strictly follow the chosen project, the durability and performance of the stove structure depends on it.
We offer several orders of popular sauna stove designs.
Also, for example, look at the order of the Dutch oven
The number of rows may be more or less, since the height of the steam room may vary.
Whatever scheme you choose, laying bricks begins with a solid bottom row. Moreover, this series, despite its apparent simplicity, is the most complex. The correctly measured diagonal of the base is of fundamental importance. The maximum permissible error is 0.5 mm. To do this, the edges of the base square are laid out with bricks with perfectly smooth edges.
After each row, check yourself using a plumb line. This will help avoid distortions.
IMPORTANT! When laying a firebox, you cannot use both refractory and ordinary bricks at the same time. They have different heat transfer and different heating temperatures, which can lead to the appearance of cracks and cracks.