The main reason why it is most often necessary to insulate the walls of a wooden house is the insufficient thickness of the walls and the wear and tear of the structure itself. For example, according to SNiP 23–02–2003 “Thermal protection of buildings”, the thickness of the massive walls of a house must be at least 30 centimeters. That is, both the timber and the logs must be quite thick.
In addition, there will always be gaps in a house made of timber! If you use high-quality laminated veneer lumber, the total area of the cracks will be comparable to a slightly open window, which is not critical. But if the house is built from ordinary profiled timber, then the area of all the cracks will already be comparable to an open window. Will it be possible to warm up such a house? Yes, but not for long. Heating costs will rise.
In a wooden house made of logs, the main problem will be the joints between the logs.
In the first years, the house will shrink and cracks may open. Yes, you did the caulking, we believe. But you will have to repeat this process again. And, most likely, again in a year. In order not to constantly have to deal with caulking, owners sometimes decide to thoroughly insulate the walls. Important! In general, according to experts, annual caulking of a wooden house at the joints between logs and sealing the cracks of a timber house can replace the use of a continuous layer of insulation.
But this is if your walls are thick enough. And the wood has not worn out yet. We strongly recommend using a thermal imager to identify problem areas and avoid repairing the entire façade. So, we found out the reasons for the need to insulate a wooden house. Now let's talk about what mistakes are most often made during this work.
Defining the essence of the term
In simple terms, the dew point is the moment when the internal temperature of the room and humidity significantly exceed the surface temperature of the ceiling. In this case, moisture from the air inevitably condenses on the surface of the wall. This moment is influenced by:
- indoor air humidity;
- temperature of walls or ceilings;
- temperature inside the building.
If the room is humid and hot, then dew drops will immediately form on a cold glass.
Why is this term used in construction? Any fence: a wall or a window is a border with the outside world, which means the temperature of their surface differs from the average temperature in the room.
This means that moisture will regularly accumulate in the place where the dew point is located on the wall. Finding the dew point is influenced by:
- characteristics of materials used in construction and their thickness;
- installation location, number of layers and quality of insulation.
It is important that the dew point is on the outside of the building wall. Otherwise, we get a constantly wet surface and, as a result, the formation of mold, mildew, destruction of the decorative layer and the load-bearing characteristics of the structure.
Nuances of wooden construction
The construction of any object made of wood requires compliance with several stages in relation to the material itself:
- Correct choice of timber. For any facility, the moisture content of construction raw materials should not exceed 8–12%. Otherwise, the raw crowns will begin to twist in the finished box, causing gaps and cracks to appear in the array and reducing the safety of the assembly.
- Maintaining the shrinkage period. You cannot carry out finishing manipulations or insert doors and windows if the period of primary shrinkage is not met - in the first year after construction it is especially intense.
- Wood protection. A bathhouse is a “wet” object, therefore, protecting the crowns from the outside and inside from the formation of mold and rot is the main task. No less important will be the procedures for impregnating surfaces with fire retardants (fire-retardant compounds) and liquids that repel parasites and rodents.
- Creation of ventilation. For long-term operation of the bathhouse, it is necessary to keep the crowns dry. It is especially important to carry out high-quality installation of air ducts if it is decided to arrange a thermal insulation cake with subsequent cladding.
At all points, the determining factor in the quality of construction is the humidity of the timber and the air - it should not cause damage to the material. Determining the dew point is an important parameter that adjusts the construction of a bathhouse.
Dew point calculation
Many owners of square meters are interested in the question of how to independently calculate the dew point in the wall. Purely theoretically, there is nothing difficult about this, especially if you are a mathematician, physicist, or simply remember the school curriculum well.
To do this you need to use the formula:
TP = (b * λ(T,RH)) / (a * λ(T,RH)), where:
- TP – desired point;
- a is a constant equal to the value 17.27;
- b – constant equal to the value 237.7;
- λ(Т,RH) – coefficient, which is calculated as follows:
λ(T,RH) = (a*T) / (b*T+ lnRH), where:
- T – internal room temperature;
- RH – indoor humidity, the value is taken in fractions, not percentages: from 0.01 to 1;
- ln – natural logarithm.
If in school you were more interested in playing basketball or reading Dostoevsky than logarithms, don't worry. Everything has already been calculated in the thermal protection data table under the number SP 23-101-2004, compiled on the basis of measurements and calculations by research and design organizations.
The most likely values under average Russian conditions are shown in the table below:
If you decide to calculate the value, you will get data similar to what is shown in the table. Among other things, you can use an online calculator to calculate.
Factors influencing dew point
Its location is influenced by the following factors:
- Climatic conditions of the region.
- Temporary or permanent mode of operation of premises.
- Materials for the construction and insulation of walls.
- Floor thickness, thermal insulation layer.
- Air temperature and humidity level indoors and outdoors.
- What is located behind the insulated ceiling (room, street).
- Functionality of the ventilation system.
- Efficiency of the heating system.
- Thermal insulation of other structural elements of the building.
An important role is played by ventilation and heating systems, which are designed to maintain an optimal indoor microclimate. Thus, an increase in air humidity inevitably leads to an increase in the dew point value.
Practical use
In practice, the meaning of the term dew point is important when insulating the walls of a building. To ensure optimal thermal insulation characteristics of the building envelope, it is necessary to know not only the value of the dew point, but also its position on the surface or in the body of the wall.
Modern construction methods allow 3 options for carrying out work, and in each case the point of condensation may be different:
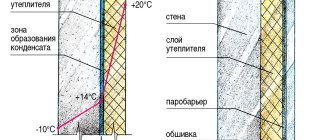
- A building constructed from a single material without additional thermal insulation. If the body of the wall consists of brick, stone or monolithic concrete, then if the construction technology in such buildings is followed, the dew point is located inside the wall. Its location gravitates towards the outer edge of the surface. As external temperatures decrease, the dew point will shift inside the wall. If the temperature difference turns out to be significant, there may come a time when the dew point is inside the room and moisture appears on the wall. We are all familiar with the situation: windows fogging up in winter.
With proper insulation from the outside, the dew point will be located inside the insulation
- The building was constructed with a layer of external thermal insulation. If calculated correctly, this thermal insulation is optimal. Correctly selected material thicknesses will allow you to insulate the structure, while the dew point will be located inside the insulation layer.
- A structure with an internal insulating layer. In this case, the dew point will be close to the inner surface of the wall, and in case of cold weather it will move directly to the surface.
An exception in the case of a wall of the same type would probably be wooden log houses. Wood is a natural material with excellent quality characteristics of low thermal conductivity and high vapor permeability. In such buildings, the dew point will always be located closer to the external surface. Wooden log houses almost never require additional thermal insulation.
The latter option is extremely undesirable and is done only when there is no other option. To learn how to properly insulate the walls of a house, watch this video:
Features of moisture accumulation in walls with facade insulation with foam plastic, expanded polystyrene
Insulation materials made from foamed polymers - polystyrene foam, polystyrene foam, polyurethane foam - have very low vapor permeability. A layer of insulation boards made of these materials on the facade serves as a barrier to steam. Steam condensation can only occur at the boundary of the insulation and the wall. A layer of insulation prevents condensation from drying out in the wall.
To prevent the accumulation of moisture in a wall with polymer insulation, it is necessary to prevent steam condensation at the boundary of the wall and the insulation . How to do it? To do this, it is necessary to ensure that the temperature at the boundary of the wall and the insulation is always, in any frost, above the dew point temperature.
The above condition for temperature distribution in a wall is usually easily met if the heat transfer resistance of the insulation layer is noticeably greater than that of the insulated wall. For example, insulating a “cold” brick wall of a house with foam plastic 100 mm thick. in the climatic conditions of central Russia it usually does not lead to the accumulation of moisture in the wall.
It’s a completely different matter if a wall made of “warm” timber, logs, aerated concrete or porous ceramics is insulated with polystyrene foam. And also, if you choose a very thin polymer insulation for a brick wall. In these cases, the temperature at the boundary of the layers can easily be below the dew point and, to ensure that there is no moisture accumulation, it is better to perform the appropriate calculation.
The figure above shows a graph of the temperature distribution in an insulated wall for the case when the heat transfer resistance of the wall is greater than that of the insulation layer. For example, if the wall is made of aerated concrete with a masonry thickness of 400 mm. insulated with foam plastic 50 mm thick, then the temperature at the border with the insulation in winter will be negative. As a result, steam condensation will occur and moisture will accumulate in the wall.
The thickness of the polymer insulation is selected in two stages:
- They are chosen based on the need to provide the required resistance to heat transfer of the outer wall.
- Then they check for the absence of steam condensation in the thickness of the wall.
If the check according to clause 2. shows the opposite, then it is necessary to increase the thickness of the insulation.
The thicker the polymer insulation, the lower the risk of steam condensation and moisture accumulation in the wall material. But this leads to increased construction costs.
A particularly large difference in the thickness of the insulation, selected according to the two above conditions, occurs when insulating walls with high vapor permeability and low thermal conductivity. The thickness of the insulation to ensure energy saving is relatively small for such walls, and to avoid condensation, the thickness of the slabs must be unreasonably large.
Therefore, to insulate walls made of materials with high vapor permeability and low thermal conductivity, it is more profitable to use mineral wool insulation . This applies primarily to walls made of wood, aerated concrete, gas silicate, and large-porous expanded clay concrete.
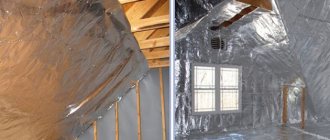
The installation of a vapor barrier from the inside is mandatory for walls made of materials with high vapor permeability for any type of insulation and facade cladding.
To install a vapor barrier, the interior decoration is made of materials with high resistance to vapor permeation - a deep penetration primer in several layers, cement plaster, vinyl wallpaper is applied to the wall, or a vapor-proof film is used.
Everything described above applies not only to walls, but also to other structures enclosing the thermal contour of the building - attic and basement floors, mansard roofs.
Watch the video, which clearly shows the thermophysical processes in insulated roof slopes. Similar processes occur in the outer walls of buildings.
After reading this article, you learned how to make a wall dry.
The wall should also be warm. Read about this in the next article.
Next article:
Heating costs and heat transfer resistance.
Previous article:
Load-bearing, self-supporting and non-load-bearing walls - what's the difference?
More articles on this topic
- We are building a wood-burning house with walls made of firewood - logs
- Installation of plastic windows at the dacha
- We make paths and platforms from tiles and paving stones on the site
- Heating scheme with solid fuel boiler and heat storage tank
- Checking the effectiveness of ventilation in a house or apartment according to GOST
- Calculation of a wooden attic beam
- Materials for the construction of a single-layer external wall of a house
- Choosing façade plaster for finishing the exterior walls of a house
What to do to bring the dew point out of the house?
What is the right thing to do when the house has already been built and is in use, but the walls have begun to become damp? All of the above tells us that it is necessary to change the factors influencing the dew point. This means that you can either increase the heating to reduce the humidity level, or reduce the difference in the temperature of the coatings, namely, lay a layer of external thermal insulation.
Wall insulation options
Why do we insulate the walls from the outside? First of all, it's convenient. Secondly, in this case, the temperature of the external environment will be not the wall of the house, but the thermal insulation layer. The temperature decrease curve will become flatter, and the dew point will actually move towards the edge of the insulating layer. For important tips on this issue, watch this video:
The thicker the coating, the more likely it is that the dew point in the thermal insulation body will shift beyond the walls of the house. As a result, houses that are well insulated on the outside last longer and do not require high heating costs.
A short excursion into the physics of the phenomenon
The dew point is the temperature of the air at which excess moisture contained in it falls out in the form of condensation. Why is there too much of it? The fact is that warm air holds a large amount of water vapor, cold air holds much less. It is this temperature difference that forms condensation . An example of the phenomenon are drops of water on cold water pipes or windows, or fog.
What else you need to know about dew point:
- The higher the humidity, the closer it is to the air temperature, and vice versa.
- Its value cannot be higher than the air temperature.
- Condensation always appears on cold surfaces . This is explained by the fact that the warm air next to them cools and its humidity decreases.
The unit of measurement for the condensation point is degrees Celsius.
Thermal insulation material
As we have already figured out, it is better to use thermal insulation material that can be mounted on the outside of the building. As a rule, we are talking about penoplex, polystyrene foam or mineral wool.
The material based on mineral wool has good vapor permeability. In this case, part of the moisture is retained in the insulation and flows down under the influence of gravity. This circumstance does not threaten the insulation in any way, since basalt or glass fiber is resistant to moisture.
It would be a good idea to install a layer of waterproofing at the bottom of the building to prevent the foundation from collapsing.
Materials such as penoplex are vapor-tight, so when installing them you should leave an air pocket to remove moisture from the inner surface of the material.
If these conditions are met, we can talk about the safety of the walls and the effectiveness of insulation.
The dew point in a frame house corresponds to the place where liquid droplets form when cold and warm air currents come into contact. Heating the internal area of a building involves heating the air, which is vented outside through the walls. Upon contact with a cold surface, the air temperature drops with the simultaneous formation of droplets. If condensation forms inside the insulation, its getting wet leads to premature loss of performance characteristics and the duration of operation of the building.
Articles on the topic
Switching from brick to sandwich - installation, pros and cons, instructions, advice from masons
Beating plaster from brick surfaces using machines and manually, instructions, advice from masons
Foundation for a brick house - strip, monolithic, slab, instructions, advice from masons
Cladding a house with bricks - how to calculate how much material is needed, instructions, advice from masons
How to brick a window opening - options, instructions, advice from masons
Ventilated brick facade - how to install, instructions, advice from masons
Brick plinth on a strip foundation - masonry technology, instructions, advice from masons
Insulation of a brick house from the outside - mineral wool, polystyrene foam, expanded polystyrene, instructions, advice from masons
Reviews ()
Location of areas with high levels of condensation
The location of the dew point is determined by several parameters. The main factors are the humidity of air flows in the interior and heating temperature. Depending on the proximity of the point to the outer or inner cladding, the wall can be either dry or wet. The conditions under which the conversion of vapor to liquid occurs may vary. If +20°C is fixed in the rooms, the appearance of drops at a humidity of 60% will occur when the surface cools down to 12°C. At 100 percent humidity, drops will appear on walls heated to 20° above zero.
The location of condensation points is influenced by the following factors:
- An increase in wall thickness leads to an increase in thermal resistance. Access of cold air masses inside the building becomes difficult. In this case, the dew point moves deeper into the wall and can lead to premature wear of the insulation and expensive repairs.
- Insulation from the inside allows you to cut off the walls from the heat coming from the inside. In this case, drops of liquid appear in the immediate vicinity of the inner lining and also leads to premature destruction of the coating.
- External insulation is considered the best way to keep the walls of a frame house in perfect condition. The dew point remains near the outer wall, and moisture is gradually removed from the insulation without destroying it or causing rotting.
The farther the place where steam is converted into liquid is located from the inner wall, the more reliable and better quality the cottage or private house becomes. An external wall, if well insulated, shifts the place of condensation formation to the outside of the building and has a positive effect on the service life.
How to calculate dew point?
Of course, every person strives to provide comfortable living conditions, which is impossible with high levels of humidity, because then the room becomes damp. The accumulation of condensate not only negatively affects the standing of floors and insulation, but also causes health-threatening diseases. In addition, growing mold will be difficult to combat.
Therefore, in order to avoid the above troubles, it is necessary to carry out calculations in advance. This will allow you to find out whether it would be advisable to insulate the walls of this room or whether it would be better to build a new house. It is worth remembering that for each structure there will be an individual value, so it will not be possible to make insulation according to general calculations.
Calculation of the dew point is the most important point in construction
It should be borne in mind that, to one degree or another, moisture is present in any material, so it is important to provide conditions so that this level does not increase. Therefore, even if you contact a specialist because of the problem of damp walls, he will most likely find incorrect thermal insulation, where the thickness of the material does not correspond to the norm. After all, it is the exterior decoration that largely influences the location of the place where moisture accumulates.
To determine the temperature threshold at which condensation forms, the following methods are used:
- settlement;
- using a special program;
- tabular.
Calculated
In this case, the calculation will require a cumbersome formula that takes into account some coefficients and climate features. The calculation method involves a method for determining the logarithm of humidity. This option is not popular due to its complexity, because you have to spend a lot of time on calculations.
This is the formula used by professional builders to make calculations:
Using a special program
If you wish, you can find a huge number of sites where there is a special calculator, thanks to which you can quickly get the desired value. Here it will be enough to select a building material from the list provided, and also indicate the thickness. Next, all you have to do is click the “Calculate” button.
Note! When choosing the option of determining the dew point using a calculator, you should choose only reliable sites that have appropriate recommendations.
You must select certain values in the calculator
Tabular
This is a convenient way when you need to quickly get a value. For such purposes, a special table is used, which already indicates the values of room temperature in relation to humidity. In order to understand how to do this, we will look at an example of a calculation using a table.
Calculating dew point: step-by-step instructions
Before starting the process, you need to prepare the following equipment:
- thermometer;
- laser pyrometer;
- hygroscope.
Step 1: in the room where you want to determine the value, you need to measure a distance of about 55 centimeters from the floor. Now in this position you should take temperature measurements.
It is better to place the thermometer on a table surface of the same height
Step 2: now you need to measure the humidity at the same height with a hygroscope.
Hygroscope
Step 3: Next you need to find the value from the table, which will allow you to determine the point.
Table for determining values
Step 4: after which it is necessary to check the possibility of carrying out repairs in the building with the obtained humidity level. To do this, measure the ceiling temperature at the same distance.
For such purposes, a laser pyrometer is used
Prices for laser pyrometer
Laser pyrometer
Upon completion, all that remains is to compare these indicators with each other. So, if the floor surface has a temperature four degrees higher, then there is a possibility of a dew point, so the choice of insulating materials plays a key role here. It is recommended to entrust this important task to a specialist.
Dew point calculation
In addition to additional insulation of walls on the outside of the building, it is necessary to calculate the dew point. Having reliable information about the location of condensate formation makes it possible to carry out its displacement efficiently and at minimal cost. As a result, comfortable conditions are provided for the materials used and their premature destruction is eliminated.
The simplest calculation method is based on the tabular method. Depending on the temperature and current humidity, as well as the thickness of the wall, you can determine the location of the dew point in relation to specific conditions. This method is considered approximate, but for carrying out additional measures to insulate the building it is quite sufficient.
What is dew point
The dew point is a certain limit of air temperature, below which the vapor contained in the air becomes saturated and turns into liquid.
The dew point is the place where cold air meets warm air, and the place where their interaction forms liquid in the form of condensation. Using the example of building structures, the dew point appears in the form of condensation on the windows. Always, when it gets cold outside, we see fogging and water droplets forming on previously dry window panes. This is the closest and most harmless manifestation of the dew point.
condensation on the window
In nature, the dew point appears in the form of drops of morning dew on plant leaves and other objects. It is formed as a result of the interaction of cold night air and warm morning air heated by the sun's rays.
manifestation of dew point condensation in nature
In the case of heated premises, the dew point is created artificially at any time of the day, under conditions of temperature below zero outside.
It is a completely different matter if the formation of such dew point condensation is detected on the inside of the wall of the house. Even a not very experienced builder will be concerned about the formation of excess liquid in a previously dry room. Since the consequences of such accumulations of moisture can be the most unfavorable. But the interior wall of a house is not the only destructive place where incorrect calculation of the dew point or its absence can manifest itself.
Incorrect calculation and location of the dew point for a home is the number one destructive enemy in construction. Which, from the inside, slowly but surely destroys any strong structure.
Definition of “dew point”
In order to understand the processes occurring in the wall, I will first dwell on such a concept as the dew point in construction.
Depending on the location of the dew point (further or closer in the thickness of the wall to the interior), the wall is either dry or wet inside.
The dew point (condensation temperature) depends on:
- indoor humidity;
- indoor air temperature.
1. If the indoor temperature is +20 degrees and the indoor humidity is 60%, then condensation will form on any surface with a temperature below +12 degrees.
The lower the humidity in the room, the lower the dew point is than the actual indoor air temperature.
2. If the indoor temperature is +20 degrees, and the indoor humidity is 40%, then condensation will form on any surface with a temperature below +6 degrees.
The higher the humidity in the room, the higher the dew point and the closer to the actual indoor air temperature.
3. If the indoor temperature is +20 degrees, and the indoor humidity is 80%, then condensation will form on any surface with a temperature below +16, 44 degrees.
If the relative humidity is 100%, then the dew point is the same as the actual indoor temperature.
4. If the indoor temperature is +20 degrees, and the indoor humidity is 100%, then condensation will form on any surface with a temperature below +20 degrees.
Dew point temperature table
If you don’t have special equipment and don’t want to calculate using formulas, then there is a table. You can easily determine the dew point from the table.
Dew point determination table
| Humidity percentage Temperature | 40,00% | 45,00% | 50,00% | 55,00% | 60,00% | 65,00% | 70,00% | 75,00% | 80,00% | 85,00% | 90,00% | 95,00% |
| -5°C | -15,3 | -14,04 | -12,9 | -11,84 | -10,83 | -9,96 | -9,11 | -8,31 | -7,62 | -6,89 | -6,24 | -5,6 |
| -4°C | -14,4 | -13,1 | -11,93 | -10,84 | -9,89 | -8,99 | -8,11 | -7,34 | -6,62 | -5,89 | -5,24 | -4,6 |
| -3°C | -13,42 | -12,16 | -10,98 | -9,91 | -8,95 | -7,99 | -7,16 | -6,37 | -5,62 | -4,9 | -4,24 | -3,6 |
| -2°C | -12,58 | -11,22 | -10,04 | -8,98 | -7,95 | -7,04 | -6,21 | -5,4 | -4,62 | -3,9 | -3,34 | -2,6 |
| -1°C | -11,61 | -10,28 | -9,1 | -7,98 | -7 | -6,09 | -5,21 | -4,43 | -3,66 | -2,94 | -2,34 | -1,6 |
| 0°C | -10,65 | -9,34 | -8,16 | -7,05 | -6,06 | -5,14 | -4,26 | -3,46 | -2,7 | -1,96 | -1,34 | -0,62 |
| 1°C | -9,85 | -8,52 | -7,32 | -6,22 | -5,21 | -4,26 | -3,4 | -2,58 | -1,82 | -1,08 | -0,41 | 0,31 |
| 2°C | -9,07 | -7,72 | -6,52 | -5,39 | -4,38 | -3,44 | -2,56 | -1,74 | -0,97 | -0,24 | 0,52 | 1,29 |
| 3°C | -8,22 | -6,88 | -5,66 | -4,53 | -3,52 | -2,57 | -1,69 | -0,88 | -0,08 | 0,74 | 1,52 | 2,29 |
| 4°C | -7,45 | -6,07 | -4,84 | -3,74 | -2,7 | -1,75 | -0,87 | -0,01 | 0,87 | 1,72 | 2,5 | 3,26 |
| 5°C | -6,66 | -5,26 | -4,03 | -2,91 | -1,87 | -0,92 | -0,01 | 0,94 | 1,83 | 2,68 | 3,49 | 4,26 |
| 6°C | -5,81 | -4,45 | -3,22 | -2,08 | -1,04 | -0,08 | 0,94 | 1,89 | 2,8 | 3,68 | 4,48 | 5,25 |
| 7°C | -5,01 | -3,64 | -2,39 | -1,25 | -0,21 | 0,87 | 1,9 | 2,85 | 3,77 | 4,66 | 5,47 | 6,25 |
| 8°C | -4,21 | -2,83 | -1,56 | -0,42 | -0,72 | 1,82 | 2,86 | 3,85 | 4,77 | 5,64 | 6,46 | 7,24 |
| 9°C | -3,41 | -2,02 | -0,78 | 0,46 | 1,66 | 2,77 | 3,82 | 4,81 | 5,74 | 6,62 | 7,45 | 8,24 |
| 10°C | -2,62 | -1,22 | 0,08 | 1,39 | 2,6 | 3,72 | 4,78 | 5,77 | 7,71 | 7,6 | 8,44 | 9,23 |
| 11°C | -1,83 | -0,42 | 0,98 | 1,32 | 3,54 | 4,68 | 5,74 | 6,74 | 7,68 | 8,58 | 9,43 | 10,23 |
| 12°C | -1,04 | 0,44 | 1,9 | 3,25 | 4,48 | 5,63 | 6,7 | 7,71 | 8,65 | 9,56 | 10,42 | 11,22 |
| 13°C | -0,25 | 1,35 | 2,82 | 4,18 | 5,42 | 6,58 | 7,66 | 8,68 | 9,62 | 10,54 | 11,41 | 12,21 |
| 14°C | 0,63 | 2,26 | 3,76 | 5,11 | 6,36 | 7,53 | 8,62 | 9,64 | 10,59 | 11,52 | 12,4 | 13,21 |
| 15°C | 1,51 | 3,17 | 4,68 | 6,04 | 7,3 | 8,48 | 9,58 | 10,6 | 11,59 | 12,5 | 13,38 | 14,21 |
| 16°C | 2,41 | 4,08 | 5,6 | 6,97 | 8,24 | 9,43 | 10,54 | 11,57 | 12,56 | 13,48 | 14,36 | 15,2 |
| 17°C | 3,31 | 4,99 | 6,52 | 7,9 | 9,18 | 10,37 | 11,5 | 12,54 | 13,53 | 14,46 | 15,36 | 16,19 |
| 18°C | 4,2 | 5,9 | 7,44 | 8,83 | 10,12 | 11,32 | 12,46 | 13,51 | 14,5 | 15,44 | 16,34 | 17,19 |
| 19°C | 5,09 | 6,81 | 8,36 | 9,76 | 11,06 | 12,27 | 13,42 | 14,48 | 15,47 | 16,42 | 17,32 | 18,19 |
| 20°C | 6 | 7,72 | 9,28 | 10,69 | 12 | 13,22 | 14,38 | 15,44 | 16,44 | 17,4 | 18,32 | 19,18 |
| 21°C | 6,9 | 8,62 | 10,2 | 11,62 | 12,94 | 14,17 | 15,33 | 16,4 | 17,41 | 18,38 | 19,3 | 20,18 |
| 22°C | 7,69 | 9,52 | 11,12 | 12,56 | 13,88 | 15,12 | 16,28 | 17,37 | 18,38 | 19,36 | 20,3 | 21,6 |
| 23°C | 8,68 | 10,43 | 12,03 | 13,48 | 14,82 | 16,07 | 17,23 | 18,34 | 19,38 | 20,34 | 21,28 | 22,15 |
| 24°C | 9,57 | 11,34 | 12,94 | 14,41 | 15,76 | 17,02 | 18,19 | 19,3 | 20,35 | 21,32 | 22,26 | 23,15 |
| 25°C | 10,46 | 12,75 | 13,86 | 15,34 | 16,7 | 17,97 | 19,15 | 20,26 | 21,32 | 22,3 | 23,24 | 24,14 |
| 26°C | 11,35 | 13,15 | 14,78 | 16,27 | 17,64 | 18,95 | 20,11 | 21,22 | 22,29 | 23,28 | 24,22 | 25,14 |
| 27°C | 12,24 | 14,05 | 15,7 | 17,19 | 18,57 | 19,87 | 21,06 | 22,18 | 23,26 | 24,26 | 25,22 | 26,13 |
| 28°C | 13,13 | 14,95 | 16,61 | 18,11 | 19,5 | 20,81 | 22,01 | 23,14 | 24,23 | 25,24 | 26,2 | 27,12 |
| 29°C | 14,02 | 15,86 | 17,52 | 19,04 | 20,44 | 21,75 | 22,96 | 24,11 | 25,2 | 26,22 | 27,2 | 28,12 |
| 30°C | 14,92 | 16,77 | 18,44 | 19,97 | 21,38 | 22,69 | 23,92 | 25,08 | 26,17 | 27,2 | 28,18 | 29,11 |
| 31°C | 15,82 | 17,68 | 19,36 | 20,9 | 22,32 | 23,64 | 24,88 | 26,04 | 27,14 | 28,08 | 29,16 | 30,1 |
| 32°C | 16,71 | 18,58 | 20,27 | 21,83 | 23,26 | 24,59 | 25,83 | 27 | 28,11 | 29,16 | 30,16 | 31,19 |
| 33°C | 17,6 | 19,48 | 21,18 | 22,76 | 24,2 | 25,54 | 26,78 | 27,97 | 29,08 | 30,14 | 31,14 | 32,19 |
| 34°C | 18,49 | 20,38 | 22,1 | 23,68 | 25,14 | 26,49 | 27,74 | 28,94 | 30,05 | 31,12 | 32,12 | 33,08 |
| 35°C | 19,38 | 21,28 | 23,02 | 24,6 | 26,08 | 27,64 | 28,7 | 29,91 | 31,02 | 32,1 | 33,12 | 34,08 |
If you have any questions, leave them in the comments.
Dew point location
And the position of the dew point in the wall depends on:
- thickness and material of all layers of the wall,
- indoor temperature,
- outside temperature,
- indoor humidity,
- humidity outside the room.
Further we will rely on these two concepts: the dew point and the position of the dew point in the wall.
Let's look at what happens to the position of the dew point:
- in a wall that is not insulated at all;
- in a wall insulated from the outside;
- in a wall insulated from the inside.
Immediately, for each option, we will consider the consequences of such a location of the dew point.
What happens if you don't take the dew point into account?
In case of neglect of structural design standards during construction work, undesirable consequences arise for wood, metal, concrete and other materials. The formation of water droplets on dense polymer materials that were used as insulation is undesirable. Otherwise it will lead to the following consequences:
- the surface will begin to swell quickly;
- finishing material will begin to peel off in different parts of the room;
- drops of water will certainly appear on surfaces below the point;
- mold will appear on the floors, which is dangerous to human life;
- load-bearing floors will begin to rapidly deteriorate, which will shorten the life of the building.
Mold begins to form on the walls
Removing mold from a wall
Why do windows “cry”?
Thanks to new technologies, it was possible to achieve comfortable living conditions in the apartment. For example, plastic windows best protect the room from cold and extraneous sounds coming from the street. In addition, housewives no longer need to insulate their windows every fall.
Condensation accumulation
Location of the dew point in an uninsulated wall
Based on the location of the dew point, there may be the following options for a non-insulated wall:
1. The location of the dew point between the middle of the wall and the outer surface of the wall.
In this case, the wall is dry.
2. The location of the dew point between the middle of the wall and the inner surface.
In this case, the wall is dry and can become damp when the outside temperature drops sharply (lower than the calculated temperature according to DBN/SNiP in the region for several days). During these few days, the dew point position may shift to the inner surface of the wall.
3. Location of the dew point on the inner surface.
The wall is wet inside almost the entire winter period.
As has already been discussed, the position of the dew point depends on 5 factors described in the part above.
In a dry wall there is a vapor barrier and a ventilated gap
| Fig.2. An example of temperature distribution in the thickness of an external wall. a - when large, b - when low thermal resistance of the wall material; |
The dew point in a properly designed wall without insulation will be in the thickness of the wall, closer to the outer surface, where steam will condense and moisten the wall.
In winter, as a result of the transformation of steam into water at the condensation boundary, the outer surface of the wall will accumulate moisture.
During the warm season, this accumulated moisture should be able to evaporate.
It is necessary to ensure a shift in the balance between the amount of vapor entering the wall from inside the room and the evaporation of accumulated moisture from the wall towards evaporation.
The balance of moisture accumulation in the wall can be shifted towards moisture removal in two ways:
- Reduce the vapor permeability of the inner layers of the wall, thereby reducing the amount of vapor in the wall.
- And (or) increase the evaporation capacity of the outer surface at the condensation boundary.
Single-layer walls
have the same resistance to vapor permeation throughout the entire thickness, as well as a uniform temperature change across the thickness of the wall. The boundary of water vapor condensation in a properly designed wall without insulation is located in the thickness of the wall, closer to the outer surface. This provides such walls with a positive balance of moisture removal from the wall thickness in all cases, except for rooms with high humidity.
In multi-layer walls
materials with different vapor permeability resistance are used with insulation. In addition, the temperature distribution throughout the multilayer wall is not uniform. At the boundary of layers in the thickness of the wall we have sharp temperature changes.
To ensure the required balance of moisture movement in a multilayer wall, it is necessary that the resistance to vapor permeation of the material in the wall decreases in the direction from the inner surface to the outer.
Otherwise, if the outer layer has greater resistance to vapor permeation, the balance of moisture movement will shift towards the accumulation of moisture in the wall.
For example.
The resistance to vapor permeation of aerated concrete is significantly less than that of ceramics. When finishing the façade of a house made of aerated concrete with ceramic bricks, a ventilated gap between the layers is required. If there is no gap, the blocks will accumulate moisture .
A ventilated gap between the facing masonry made of ceramic bricks and the load-bearing wall made of expanded clay concrete blocks is not needed, because The vapor permeability resistance of brick cladding is less than that of a wall made of expanded clay concrete blocks.
If the wall is constructed incorrectly, moisture will gradually accumulate in the insulation.
Already in the second, or maximum third-fifth heating period, it will be possible to feel a significant increase in heating costs. This is naturally due to the fact that the humidity of the thermal insulation layer and the entire structure as a whole has increased, and accordingly the thermal resistance of the wall has significantly decreased.
Moisture from the insulation will be transferred to adjacent layers of the wall. Fungus and mold can form on the inner surface of external walls.
In addition to the accumulation of moisture, another process occurs in the wall insulation - freezing of condensed moisture.
It is known that periodic freezing and thawing of a large amount of water in the thickness of the material destroys it.
Moistening insulation, such as ecowool, with condensate also leads to the leaching of antiseptics and fire retardants. Most often, it is boric acid. The concentration of which will decrease over time.
Any insulation gradually, over the years, loses its heat-saving properties. When to change insulation, read here.
Wall materials vary in their ability to resist condensation freezing. Therefore, depending on the vapor permeability and frost resistance of the insulation, it is necessary to limit the total amount of condensate accumulating in the insulation during the winter period.
For example, mineral wool insulation has high vapor permeability and very low frost resistance. In structures with mineral wool insulation (walls, attic and basement floors, attic roofs), to reduce the entry of steam into the structure from the room side, a vapor-proof film is always laid.
Household products
⇆
Without the film, the wall would have too little resistance to vapor permeation and, as a result, a large amount of water would be released and frozen in the thickness of the insulation. The insulation in such a wall would turn into dust and crumble after 5-7 years of operation of the building.
The thickness of the thermal insulation must be sufficient to maintain the dew point in the thickness of the insulation, Fig. 2a.
If the insulation thickness is small, the dew point temperature will be on the inner surface of the wall and vapors will condense on the inner surface of the outer wall,
Fig.2b.
It is clear that the amount of moisture condensed in the insulation will increase with increasing air humidity in the room and with increasing severity of the winter climate at the construction site.
The amount of moisture evaporated from the wall in the summer also depends on climatic factors - temperature and humidity in the construction area.
| Fig.3. The result of calculating the humidity regime of a three-layer wall: expanded clay concrete - 250 mm, mineral wool insulation - 100 mm, ceramic brick - 120 mm. residential building in St. Petersburg. There is no accumulation of moisture in the annual cycle. |
As you can see, the process of moisture movement in the thickness of the wall depends on many factors. The humidity regime of walls and other fences of the house can be calculated, Fig. 3.
Based on the calculation results, the need to reduce the vapor permeability of the inner layers of the wall or the need for a ventilated gap at the condensation boundary is determined.
The results of calculations of the humidity regime of various options for insulated walls (brick, cellular concrete, expanded clay concrete, wood) show that in structures with a ventilated gap at the condensation boundary, moisture accumulation in the fences of residential buildings does not occur in all climatic zones of Russia.
Multilayer walls without ventilated gap
must be applied based on the calculation of moisture accumulation. To make a decision, you should seek advice from local specialists professionally involved in the design and construction of residential buildings. The results of calculating the moisture accumulation of typical wall structures at the construction site have long been known to local builders.
“Three-layer stone wall with brick lining” is an article about the features of moisture accumulation and insulation of walls made of brick or stone blocks.
Location of the dew point in an externally insulated wall
Depending on the location of the dew point in a wall insulated from the outside, there may be the following options:
1. If the insulation is taken at the thickness required according to the thermal engineering calculation, then the position of the dew point is inside the insulation.
This is the correct dew point position. The wall in this version is dry.
2. If the insulation is taken with a thickness smaller than required according to the thermal engineering calculation, then all three options described above for an uninsulated wall are possible. The consequences are described there.
Location of the dew point in an internally insulated wall
According to the location of the dew point in a wall insulated from the inside. When we insulate a wall from the inside, we, as it were, “fence it off” from room heat.
There may be the following options:
1. Location of the dew point in the thickness of the wall.
In this case, the wall is dry and can become damp when the outside temperature drops sharply (lower than the calculated temperature according to DBNSNiP in the region for several days). During these few days, the dew point position may shift to the inner surface of the wall.
Where should the dew point be?
The ideal place for the dew point to occur in a wall is the insulation located on the outside of the wall. The thickness of the insulation on the wall should be such that in the coldest time condensation does not move into the wall itself, or if it does, it will not be for a long time.
dew point in insulation
For the destructive consequences of the dew point being in the body of a load-bearing wall, see the article below.
Walls based on porous materials, such as foam and gas blocks, shell rock and similar materials, require a larger layer of insulation, since they absorb and retain moisture well. That is, even a short-term (several days) presence of dew point in a porous wall can have a destructive effect on the internal integrity. Therefore, so-called warm materials for masonry walls can only be effective in certain regions, with not the most frosty winters.
If, according to calculations, the dew point will periodically move into the wall of the house itself or there is a high probability of such a shift, then this fact should be taken into account when choosing material for laying walls. For such cases, wall materials with high density are well suited and can withstand a large number of freezing and thawing cycles without damage. With a high frost resistance coefficient. Such frost-resistant materials include brick and expanded clay concrete.
frost resistance indicators of the most common wall materials
When is it possible or not to insulate walls from the inside?
Now let's look at when it is possible to insulate a wall from the inside, when it is not, what it depends on and how it depends. What is this “no”, what are the consequences?
The main “is it possible or not” is what will happen to the wall after insulating it from the inside. If the wall is dry, it’s possible.
If the wall is dry, and only with a sharp, unexpected (which happens once every ten years) cold snap can it get wet, you can try to insulate it from the inside (at the discretion of the customer).
If the wall is consistently wet throughout the winter design period (with normal winter temperatures in the region), it cannot be insulated from the inside.
As we have already found out above, these consequences depend on the position of the dew point. And the position of the dew point in the wall can be calculated, and then it will be clear (BEFORE insulation) whether it is possible or not to insulate a particular wall from the inside.
Now a little discussion on the topic of what affects the possibility of insulation from the inside, and how it affects it.
This part of the article was prompted by questions from readers of the following nature: “Why can one person insulate from the inside, but I can’t, because he and I (further options) have the same apartment layout, or the houses are built from the same material, or the same city of residence, or the same wall thickness etc.
As we have already found out above, the consequences of internal insulation depend on:
- dew point (condensation temperature);
- the position of the dew point in the wall before and after insulation.
In turn, the dew point (temperature) depends on: room humidity and room temperature.
And the humidity in the room depends on:
- Mode of residence (permanently or temporarily).
- Ventilation (both supply and exhaust, are they sufficient according to calculations).
And the room temperature depends on:
- Heating quality.
- The degree of insulation of the remaining structures of the apartment building, except for the walls (ceiling, roof, windows, floor).
The position of the dew point depends on:
- thickness and material of all layers of the wall;
- indoor temperature. What it depends on was clarified above;
- temperature outside the room. It depends on whether it is outside or another room, as well as on the climate zone;
- indoor humidity. What it depends on was found out above;
- humidity outside the room. It depends on whether it is outside or another room (and on the mode of operation of this room), as well as on the climate zone.
Here is a list of these factors:
- mode of residence in the premises (permanently or temporarily);
- ventilation (both supply and exhaust, are they sufficient according to calculation);
- quality of indoor heating;
- the degree of insulation of the remaining structures of the apartment building, except for the walls (ceiling, roof, windows, floor);
- thickness and material of all layers of the wall;
- indoor temperature;
- indoor humidity;
- outside temperature;
- humidity outside the room;
- what is behind the wall, a street or another room (its mode of operation).
It becomes clear that there may not be two identical situations regarding insulation from the inside.
Let's see what (approximately, without specifics) the situation looks like when insulation from the inside is possible:
- permanent residence premises,
- ventilation is carried out according to the norm (for this room),
- The heating works well and is done according to standard,
- the remaining structures are insulated according to the standard,
- the wall that is planned to be insulated is thick and quite warm. According to the calculation of additional insulation for it, it should not be more than 50mm (foam plastic, cotton wool, EPS). In terms of heat transfer resistance, the wall “falls short” of the norm by 30% or less.
I think it is clear that in each specific case you need to consider your “input data” and then make a decision.
Everything that is written above gives the impression that there are very few cases when internal insulation is possible and not harmful. This is true.
In our experience, out of 100 who came up with the idea of internal insulation, only 10 can do it without consequences. In other cases, it is necessary to insulate from the outside.
Mistake #2. Inattention to caulking
Traditional caulking is done, strictly speaking, not to insulate the log house, but to prevent it from blowing out, which ultimately affects the preservation of heat in the house.
When deciding to insulate log facades, pay attention to the condition of the caulking along all the crowns. You should not dismiss this operation. Perhaps it is thanks to 2-3 defects of this natural insulator that your house is cold in winter.
A loosely twisted rope, with protruding fibers, or a loosely packed bundle will be pulled apart by birds
. It seems that after finding out this fact, our dear reader’s craving for total insulation has weakened somewhat.