The laying of electrical wires in cable channels, the installation of sockets and switches must be carried out in compliance with all fire safety requirements and compliance with technical standards. These requirements increase significantly if the walls are made of sandwich panels, timber or logs. Laying a cable in a cable channel can be done by any owner who has basic electrical installation skills.
What are cable channels?
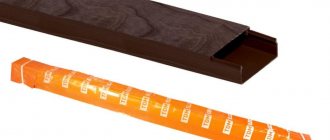
A cable channel is an electrical installation element with a rectangular profile, similar to a pencil case. Intended for installation on an open surface of a wall, floor or ceiling for the subsequent laying of electrical and communication wires and cables in it.
Communications means telephone wires, Internet, television, antenna cables and security system cables. Cable channels consist of a base (box and cover). They increase fire safety, give electrical wiring an attractive appearance, and improve the aesthetics of walls.
Cable channels are made from:
- Thin sheet cold-rolled or galvanized steel. Boxes can be solid or perforated (lightweight version);
- Aluminum;
- Fireproof plastic.
Aluminum boxes are considered the most expensive. They are lined with colored polymer film, or film that imitates various types of wood and stones.
Plastic pencil cases do not support combustion, but restrictions have been introduced on their installation. The power consumption of the current passing through the wires should not exceed 1000 W. Therefore, it is not recommended to lay such cable channels where energy-intensive heating devices are expected to be used. Plastic electrical boxes are:
- White;
- Painted in a different color, which allows you to match the cable channels to the tone of the wall and make them less noticeable;
- Imitating natural wood. Such boxes are matched to the tone of the house's carpentry (windows, doors) or to the color of the furniture.
Cable channels differ in the degree of protection:
- The lowest degree of protection is for perforated boxes (IT20). Such boxes can only be used in rooms protected from moisture; wires with low conductivity can be laid in them;
- Solid closed boxes have protection (IT40). This is the standard level of protection for residential premises;
- Boxes with increased protection against moisture - IT44. Such boxes are installed in bathhouses and bathrooms, attics, and verandas. In a word, these boxes are designed for rooms with high air humidity.
Some rules for laying open wiring
- Do not pinch, twist or break the cable, all turns are only at an angle of 90 degrees or with double fastening at 45 degrees;
- Laying power lines vertically or horizontally along walls and structures, without circles, turns, turns;
- Laying strictly according to the scheme and design;
- Elimination of intersection of adjacent lines. If this condition cannot be met, additional insulation is installed between the cables;
- Wiring distances from the floor and ceiling at a distance of 150 mm;
- The distance of the wiring line from windows, doors and furniture is 100 mm;
- Compliance with fire safety standards and PUE is required, as well as special attention when laying the line next to other communications!
What are extras
The cable boxes are supplied with so-called accessories:
- Couplings, or connecting connectors, are installed at the junction of two boxes if the wiring length exceeds the standard 2 meters for a box. If, for example, the length of the wiring in a visible place is 3 or 5 meters, the craftsmen trim the cable channels so that the couplings are located symmetrically. In the first case, they make not 2 and 1 meter, but 1.5 and 1.5;
- A T-shaped coupling (corner) connects 3 boxes having a T-shaped joint;
- Triangles (external and internal) are used to connect two boxes in the corner. These elements are able to change the angle from 70 to 130, providing close contact with walls that have non-standard architecture. External triangles are used to connect boxes on wall ledges, internal triangles are used to connect the channel cable from the wall to the ceiling or when turning along the internal perimeter of the room;
- Plugs are used to close the box at the end of the pencil case;
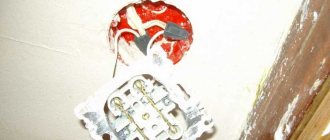
- The installation box is intended for installing switches and sockets.
The extensions are matched to the tone of the main boxes, which can be cut together with the covers:
- Plastic - with a carpenter's hacksaw with fine teeth;
- Aluminum and steel profiles - with a grinder or a hacksaw.
To maintain the correct angle during the cutting process, you can use a carpentry tool - a miter box.
Preparing for work
Before laying a cable in a cable channel, it is necessary to think over the layout and installation technology. First of all, a working drawing is created, indicating the types and number of conductors that are planned to be laid. Based on the sketch, you need to purchase the required number of boxes, accessories, switches and sockets.
Before attaching the cable duct to the walls, you need to mark the electrical wiring route. Where cable lines are laid, there should be no risk of mechanical or thermal damage. The location of switches and sockets should ensure convenient and safe use.
When purchasing electrical accessories, it is necessary to check the serviceability of the locks securing the product cover, which should close with a characteristic click and hold securely on the profile. Spontaneous opening is excluded.
How to calculate components for electrical wiring
Boxes vary in width and height; each box can contain from one to several wires at a time. In order to correctly calculate the footage of electrical boxes and the required number of additions, you need to create an electrical wiring project. It can be drawn first on paper. This will help calculate the number of components: sockets, switches, boxes and fittings. Then, with a marker or pencil, draw the installation locations for sockets and switches, installation of lamps and other devices, and connect them with lines. These lines will serve as a guide for installing cable channels. Measure all resulting lines with a tape measure. Indicate these dimensions on a paper drawing. Make such projects for all rooms. Sum up the result.
Hiding wires with threads and ropes
Another simple way to hide TV wires is to wrap them with colored threads, ribbons or jute rope.
You can choose one of several design methods. For example, simply twist the wire or braid it with a pigtail. The color of the material should be in harmony with the surrounding environment.
Suspended ceilings: 100 design ideas (photos)
What and how to buy for electrical wiring installation
Now that you know exactly what electrical devices and accessories you will need, how many corners and turns you plan, how many meters of electrical wires and cable channels will be required for installation, you can go to the store. When buying, take extra of everything.
- Take 4-5 meters more cable boxes and electrical wires;
- Accessories - 2-3 pieces each;
- Sockets and switches - 1-2.
Surely, when creating the project, you missed something or miscalculated. It is possible that errors may occur during operation, which will lead to damage to the device. Having extra parts will save you from unnecessary trips to the store. In the store, check each part for integrity, so that all elements are free of cracks and dents, and the lids on the boxes should stay on. It is important. If you feel that the cover does not snap well or does not adhere well to the profile, request replacement. Important: when choosing electrical devices and wires, do not skimp. Choose only certified quality products. The fire safety of the apartment and the safety of family members depend on this. Experienced electricians prefer copper wires. Important: It is prohibited to connect aluminum and copper wires together in one twist. Firstly, such a connection is fraught with electrolysis, and secondly, the wires have different linear expansion when heated, which is possible when a current of more than 800 volts passes. As a result, the contacts will weaken, which leads to even greater heating. And this is fraught with burnout of insulation, short circuit and fire. When calculating sockets, take into account the number of constantly operating electrical household appliances. For devices that consume electricity more than 1000 W, it is recommended to install a separate outlet with a separate wire. For low-current electrical appliances, you can choose a unit connected by one pair of wires and consisting of 3-5 sockets. Along with the fittings, you also need to buy fastening elements:
- Liquid nails, screws with or without plastic dowels;
- Wire connectors – terminal blocks, caps, sleeves;
- Insulating tape.
Installation of cable boxes begins from the distribution board (box), which is usually located at the entrance to the house. The counter is also installed here. From here the wires branch out and run throughout the house. Therefore, it is advisable to connect larger boxes to the distribution board than those that will be installed in the rooms. And a residual current device (RCD) must be installed in the switchboard.
Security measures
Making mistakes when installing open wiring creates the preconditions for emergency situations to occur during the operation of the home electrical network.
Layout of elements
Main causes of fires:
- weakening, oxidation of contacts;
- insulation damage;
- use of cable with copper and aluminum conductors;
- laying on a flammable base;
- the wire cross-section does not correspond to the load;
- the panel contains automatic circuit breakers with a higher permissible limit (current) than that of the cable;
- faulty sockets.
RCD connection diagram
To avoid fire, use a cable with a reserve cross-section. On combustible bases, conductors are laid on a gasket made of non-combustible materials. An RCD is installed in the panel for each group of loads.
Thus, open wiring has a number of advantages: it is inexpensive, quick to install, and lasts a long time. However, it is not suitable for everyone, because wires on the walls do not fit into many interior styles.
How and with what cable channels are attached to the wall
It was already mentioned above that the cable channel consists of a box and a cover. The box is attached to the wall
- Self-tapping screws, if the walls are wooden, or covered with plasterboard, plywood;
- Liquid nails are used to glue plastic channels if the finish is compatible with them.
- Plastic dowels and screws.
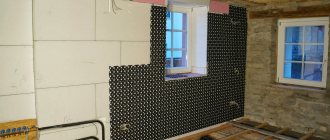
In reinforced concrete walls, the wiring is usually installed inside the wall. Factory panels made in Soviet times have special grooves for laying electrical wires, holes for switches and sockets. Now in a number of regions, gating of panel walls is prohibited. Therefore, a change in the location of electrical wires, or an increase in the number of electrical devices, forces apartment owners to lay wires over the wall in cable channels.
First you need to mark the lines on the wall where the cable channels will pass. Lines must be drawn using levels.
Next, on a line drawn on the wall, which should coincide with the middle (the center line of the cable channel), drill holes with a Pobedit drill with a diameter of 6 mm at a distance of 50-60 cm from each other, and insert plastic dowels into these holes.
Align the box with the line on the wall and mark the points on the box where you want the holes for the screws to be. You can easily pierce a plastic pencil case with an awl, but for a metal or aluminum box you will need to use a 4-5 mm drill. Then, through these holes, the cable channel is screwed to the installed plastic dowels.
The cable channel can be attached to the wall using a dowel-nail.
In the same way, cable boxes are attached to a brick wall or a wall made of aerated concrete blocks, but not sheathed on the outside with thermal insulation and plasterboard. Now that the cable channels and fittings have been secured, you can begin installing electrical wiring and telecommunications, installing sockets and switches in installation boxes.
Under furniture
Mostly we hide the wires behind the TV. It is clear that if you look closely, all the cords will be visible. However, today you can buy special furniture that allows you to hide all communications.
To a greater extent we are talking about TV stands. They are equipped with special holes in which wires can be placed. It is very comfortable. Not to mention the fact that the cables will not be visible and therefore will not disrupt the interior design. Special headsets, which have an area intended for installing a TV, also allow you to hide the wires.
How wires are laid in cable channels
Laying wires in electrical boxes has one important advantage - the availability of wires for repair in the event of a break or short circuit. If you need to add any electrical unit, the wire is easily added to the box. It is also easy to add an additional box after completion of installation work, without causing damage to the final finish of the walls. When laying cables inside the box, it is important that they do not twist and are laid straight.
After this, the cable channel can be closed.
It is not allowed to connect two short wires in the middle of the cable channel. Wires must only be solid. Wires can only be connected at branch points or in junction boxes. For connecting wires there are
- Terminal blocks are plastic devices, inside of which there is a brass sleeve with screws that clamp the wires;
- Connecting insulating clamps that simultaneously perform both connecting and insulating functions. The connection is made using a spring built into the plastic cap;
- Crimping sleeves are the most optimal option for connecting power wires through which more than 1000 W of electricity is consumed at a time. Crimping sleeves are short tubes into which wires are inserted. The tubes are clamped with a special tool - a compactor;
- Good old twisting also withstands energy-intensive appliances and lasts for decades.
Crimping with sleeves and twisting must be carefully insulated with special heat-resistant tubes or electrical tape.
Masking with vinyl stickers
Interior vinyl stickers are an excellent decorative material. Its main advantage is that it allows you to quickly transform the interior and emphasize style. At the same time, such decor can be removed or replaced with a new one at any time without any problems.
Use vinyl stickers to create decorations where the TV cable is located. It could be a branchy tree, with the crown of which the cable will blend into the color palette.
Stages of work
How to create a project
How well this step will be implemented will affect the composition of the required purchases and quantity, as well as labor costs when performing installation work, which will affect the completion time of the work and the final cost. For such reasons, drafting a project is a fairly responsible and important point, although many people neglect it and make many mistakes.
The project for installing a cable channel at home can also be completed in draft form on a simple sheet of paper. The main thing is that the plan is accurate and that measurements are provided that can be done using a regular tape measure. A plan should be drawn up both during the initial construction and during the next reconstruction/revision of the electrical circuit. The sequence in drafting the project is as follows:
- Determine the places in the room where switching elements will be located (sockets, switches, distribution box), as well as consumers of electrical energy, which include lamps, stationary and portable electrical appliances.
- Plan the main lines of power electrical wiring, low-current and computer networks, determine the bypass of possible critical routes around the gas and water supply lines, as well as sewerage and heating systems.
- Draw up sketches of the rooms on paper and mark the planned installation locations, indicating the exact dimensions, which make it possible to calculate the need for materials.
Slitting process
Why bother with “disguising” the electrical wiring if you can first attach it to the main wall, and then simply plaster it on top. The technique is called “hidden” and the sequence of actions is not always exactly the same. Most often, a team of plasterers does their job valiantly, and then they are replaced by electricians who begin to reformat the world in their own way, in accordance with the tasks assigned to them. This is strongly reminiscent of the joke about two soldiers from a construction battalion, one of whom was digging holes, and the other was burying them after him (there was no third one, who was supposed to plant trees, but an order is an order). To carry out wiring, electricians are forced to make channels for wires and holes in the plaster with a hammer drill - to punch the surface.
Not everyone and not always want this burdensome procedure:
- Scoring damages existing plaster. It is extremely rare to be able to break through neat channels. And even if this can be done, the final layer of plaster in the areas of gating will still have to be restored after laying the cable. It is worth recognizing that the technique is very multi-iterative.
- Grooving is associated with increased generation of dust, which will be everywhere in the apartment. If we are not talking about the initial arrangement, but about repairs, then you will definitely have to re-glue the wallpaper and update the ceiling.
- Long-term unpleasant sound impact of a hammer drill. Even if you carry out repair work at strictly prescribed hours by law, your neighbors will still not thank you.
- The wiring turns out to be completely hidden. There will never be access to it now.
The purpose of the thesis of this section is not at all to discredit one of the most universal construction technologies that provides great opportunities (slating)
In relation to electrical wiring, I would like to emphasize that the design and aesthetic appeal of the method comes at the price of safety. Electricity is not something to be trifled with, and communications tend to fall into disrepair
It would be good to replace them. But if the wires in the apartment are laid in channels drilled into the wall, then you can simply forget about it. Replacing the wiring is only possible by laying a new cable and disconnecting the old one (at both ends).
In this regard, it would be nice, of course, to get an alternative. There is such a way - it is laying electrical cables in an open way. The features and capabilities of this path are described below.