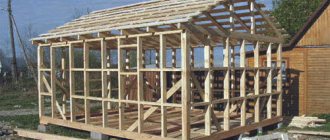
Covering the roof with corrugated sheets is one of the most popular finishing methods today. This coating is reliable, durable and attractive in appearance. Often, owners of buildings with stove heating are faced with the need to finish the joints between the chimney and the roofing material. The operational life of the structure largely depends on the quality of these works. This review will help you understand how to seal a chimney on a corrugated roof.
Sealing a chimney on a corrugated roof
How to ensure sealing of a chimney on a corrugated roof
Corrugated roofing is a good solution for protecting a building from weather conditions for many decades to come. This economical and reliable material is used for roofing in individual and multi-apartment housing construction, in the construction and repair of production areas or other facilities.
Correct sealing of the chimney on a corrugated roof is a guarantee of the safety of the entire structure. Work on waterproofing the joint between the pipe and the roof is carried out both at the stage of roof installation and during the repair (replacement) of the roofing or chimney.
Important points
The waterproofing of chimneys, if it is damaged, can be restored in several ways: the choice of the most suitable one depends on several factors:
- A pipe installed on a slate roof must be freed from the cement apron, and then the slate sheets adjacent to the pipe must be removed. After checking the condition of the pipe for mechanical damage, an apron should be made from sheet metal. The joints are treated with oven clay with the addition of Portland cement or fire-resistant mastic. Now you can lay slate sheets on the apron, and then coat them with cement mortar.
- Fused insulation can be used to insulate leaky areas, but damaged slate sheets should also be replaced.
- If the pipe is made of brick and the first two above points are completed, it is enough to coat it with clay-cement mortar.
- For a metal roof, you need an apron made of the same material: it can be made using special scissors. The outlets of round pipes can be sealed using special corrugated rubber elements.
- If the distance between the pipe and the ridge is large, special bitumen tapes with metal inserts are used.
The exit points of round pipes are sealed using rubber corrugated inserts
Why do you need chimney sealing?
Installation of a pipe of any configuration requires a fire-prevention gap between the roofing pie and the chimney. The result is an opening around the outer perimeter of the chimney into which atmospheric moisture freely penetrates. If this gap is not sealed tightly, then the water will quickly begin to destroy the roof elements with which it comes into direct contact.
The following negative consequences of depressurization of a corrugated roof in the area of the chimney are possible:
- Rotting of wooden structural elements of the roof.
- Structural destruction of synthetic roofing pie thermal insulation materials. As a result, thermal insulation loses its effectiveness, and the processes of destruction of the structure increase.
- Corrosion of corrugated sheeting from the joining edge. In the place where the corrugated sheeting was cut, its protective layers become vulnerable to external influences. The destruction of the protection will provoke the process of rusting of the iron base.
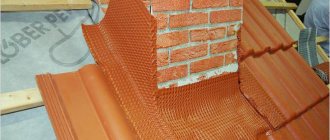
Note! Sealing a chimney on a corrugated roof is not difficult and can be done using ready-made devices. Special aprons from the manufacturer of corrugated roofing sheets are reliable in operation and do not spoil the aesthetics of the building.
Expert advice
Before purchasing the necessary materials for arranging an external chimney, the power of the equipment is determined. It affects the diameter of the pipes. You can also use these expert tips:
- if the heating equipment is equipped with forced draft, then it is not necessary to increase the vertical section of the structure; it is enough to remove the horizontal pipe;
- a horizontal section that is too long helps slow down the smoke flow (the value should not exceed 1-1.5 m);
Rules for installing chimney pipes Source krovgid.com
Inspection holes are installed not only on the outer part of the structure, but also on the internal horizontal element.
Methods for sealing pipes of various configurations
The method of sealing the gap between the chimney and the roof depends not only on the capabilities and preferences of the craftsman, but also on the size of the hole, the shape of the pipe, and the roofing material.
You can seal a corrugated roof at the junction with a pipe:
- Special adhesive tape. The industry offers ready-made insulation material made of butyl rubber with aluminum coating. Insulating tape is available in different colors, which, when sealed, allows you to maintain the aesthetics of the roof. Has exceptional adhesiveness to any materials. It is the best option for sealing a stove chimney with small gaps on flat roofs.
- Polyurethane, bitumen, silicone, or acrylic sealant. The sealant is used as an independent material for sealing or during the installation of a waterproofing apron.
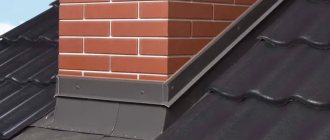
- Galvanized (or specially coated) steel apron. The apron has different configurations for round and square chimneys. You can make it yourself from sheet iron or buy it ready-made.
- Elastic penetration. A special elastic nozzle for a round or oval chimney. Suitable for use on different diameters. It is the most convenient and reliable device for sealing a stove chimney on a corrugated roof.
Note! All insulating materials used to seal the chimney must be non-flammable!
Since the corrugated sheeting itself is a non-flammable material, the gap between it and the chimney during installation can be made minimal (5 mm). This will make sealing easier, allowing you to use a heat-resistant sealant. If the gap is left more than 1 cm, then technologies and materials are used to seal it, depending on the shape of the chimney.
To cover large openings between the chimney and the roof, use the following non-combustible insulating materials:
- mineral wool;
- roll filters;
- asbestos boards.
The selected material is used to fill the voids between the roofing pie and the walls of the stove chimney.
Oval or round pipe insulation
A round or oval-shaped chimney is sealed using either an elastic penetration or a metal apron, which is a truncated cone.
It is more convenient to work with a factory-made elastic penetration than to install a metal seal for a round stove chimney. Its top should be cut to a diameter smaller than the diameter of the chimney.
The corrugation in the body of the penetration for a pitched roof allows you to compensate for the slope. The flexible base easily flows around the shape of the roofing sheeting. The penetration is attached to the iron with self-tapping screws. The upper joint is filled with sealant.
An important nuance of sealing a round chimney pipe with an elastic penetration is that you need to choose the correct diameter, this is of decisive importance . If the diameter of the penetration hole is too small, it may tear when put on the chimney.
If the hole diameter is too large, then you cannot do without an additional crimp clamp. Installing a rigid clamp may cause depressurization of the joint when the pipe moves when heated.
A decorative apron is installed on top. Its purpose is to improve the aesthetics of the building and protect the insulator itself from destructive atmospheric and ultraviolet influences. Elastic penetrations are available for sealing pitched and flat roofs.
Sealing a round chimney with an iron protective cone consists of the following operations:
- a metal sheet is put on the chimney and screwed to the roof sheathing;
- a truncated cone is installed on top, which is a protective apron;
- The upper connection of the chimney and the cap is tightened with a metal clamp with a fire-resistant elastic gasket.
Note! On a corrugated roof, it is preferable to seal a round chimney using an elastic nozzle.
Insulation of square and rectangular pipe
Sealing a square or rectangular chimney using the classic method involves installing a special steel apron. It has an internal, external (decorative) and moisture-wicking tie, which ensures complete tightness of the roof. The apron parts are cut (or purchased) according to the dimensions of the sides of the chimney.
Schematically, sealing a square stove pipe can be described as follows:
- At a height equal to the vertical wall of the internal insulating strip, the chimney is grooved with a grinder.
- An internal wall profile is laid along the perimeter of the chimney for waterproofing.
- The upper part of the profile strips is inserted into grooves and treated with sealant.
- The lower part of the wall strips is placed under the roofing material.
- A drainage tie with guide gutters is secured under the roofing material. It is brought out between the underlying profile sheets.
- The structure is covered from above with a decorative apron in the color of the roof. The slats of the upper apron are mounted flush against the walls of the chimney, but are not inserted into the grooves.
Note! The insulating apron is attached to the corrugated sheet with special screws with rubber seals. If there are none, then the rubber bands for the screw heads should be cut out manually.
When tightened, rubber gaskets are deformed, filling all the voids between the metal parts. This ensures reliable sealing of the entire structure.
For greater reliability of waterproofing, special skirts are mounted on a square or rectangular chimney, which act as a mini roof for the upper part of the apron.
This function is partially performed by the mounted top cap to protect the inside of the pipe from precipitation. High-quality sealing of the chimney can not only preserve the roof, but also give it a special charm.
Adjacent rules
Construction norms SNiP do not have strict regulations on the location of the chimney, but contain instructions on the height of this element:
- The height of the chimney must exceed the height of the ridge by at least 0.5 meters, if it is located at a distance of 150 cm or less from the ridge itself;
- When located 1.5 - 3 m from the ridge, the chimney pipe can be equal in height to the level of the ridge or exceed it;
- If the distance from the ridge to the pipe exceeds 300 cm, then its height should be at the same level as the ridge, or not lower than a line drawn from the ridge at an angle of 10 degrees to the horizon line.
All other implementation features required by the device connecting the roof to the pipe remain without regulatory recommendations, and therefore can be carried out at your own discretion.
But taking into account the experience of professionals, it is better to install the pipe on the roof closer to the ridge, for the following reasons:
- This arrangement facilitates the process of high-quality sealing and provides coverage without leaks;
- The closer the pipe is to the ridge, the less space is left for snow and water to accumulate behind it, reducing the risk of leaks.
Attention! Condensation can form both inside and on the surface of the pipe, which leads to the formation of ice during the cold season. It damages the walls of the chimney, significantly impairing draft and reducing service life.
Round pipe
A roof equipped with a round chimney is one of the most common options for private construction.
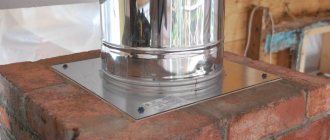
To ensure a high-quality connection to the roof of such a pipe, standard three-layer structures are produced. The central part of such a multilayer system is made of heat-insulating material. The kit is complemented by a flat steel sheet and an apron-cap into which the chimney pipe is inserted.
It is worth choosing a suitable kit depending on the angle of inclination of the slope. Standard systems are produced for the most common angles. With the help of such structures, making your own high-quality connection is quite simple.
The abutment plate is tightly and rigidly secured to the roof plane. The top of the cap is cut off; the size of the cut should allow the pipe to fit tightly into the hole, with no gaps. The upper edge of the apron is pressed against the pipe with a steel clamp with a gasket made of heat-resistant elastic material.
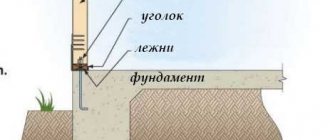
Attention! All materials must be reasonably clean, as well as the roof surface. This will ensure maximum quality of sealing work. The plate is secured with self-tapping screws, using rubber or neoprene gaskets.
The plate is secured with self-tapping screws, using rubber or neoprene gaskets.
If the angle of the slope does not allow the use of a standard type chimney installation system, then this can be done without the involvement of specialists. To do this, to create a sealed apron, it is necessary to cover the perimeter of the pipe with lead or aluminum tape.
It is also possible to use a finished oval-shaped lead part, which can be easily profiled onto the covering of a soft roof or a roof made of hard material using a rubber hammer or a wooden tool.
This lead self-adhesive is a material with high performance properties. It is resistant to temperature fluctuations, corrosion and ultraviolet radiation.
One of the ways to independently seal a round pipe on a metal roof is shown in the video:
Square pipe
For the installation of square and rectangular pipes, it is very rarely possible to select ideally suitable ready-made elements offered for sale. Depending on the type of roofing material, methods for arranging the connection of the pipe to the roof are also selected.
Roof passage unit
When carrying out construction work, partial dismantling of the roof sheathing is often required. At the same time, to ensure the rigidity of the structure, a frame made of wooden beams is mounted around the pipe, to which layers of waterproofing and vapor barrier are attached. The waterproofing is attached to the sheathing and counter-lattice. The vapor barrier is installed between the roof frame and the interior finishing materials. The space between the frame and the pipe must be filled, according to SNiP standards, with thermal insulating non-combustible material - stone wool.
Important! Particular attention should be paid to the quality of sealing of the joint between the vertical element and the roofing material. There should be no leaks at their connection points.
Chimney installation rules
On sloped roofs, there are rules for installing a chimney.
- On a roof with a slope, it is permissible to place the chimney at a distance of up to 1.5 meters from the ridge, and at least 0.5 meters above its height.
- The location of the exit is at a distance of 1.5 to 3.0 meters from the ridge.
- The angle cannot be more than 10%, formed by lines from the ridge and the top of the chimney at a distance of no more than 3 m.
A pipe at a distance of 50-70 cm from the ridge is considered the most rational option. Such location parameters significantly reduce the risk of roof leaks and the appearance of snow pockets.
The process of arranging waterproofing
Let's consider the sequence of the technological process of arranging waterproofing.
For a round chimney made of galvanized steel, the space between the pipe and the roof covering is much easier to seal. In this option, factory-made elastic penetrations are used, which are as close as possible to the profiled sheet.
The gaskets are an aluminum flange with a connecting part made of silicone or EPDM rubber. They can be of different sizes from 3 to 600 mm and designed at different angles, solid and split. Their service life is long. Such devices can be used for flat roofs and at an angle.
Sealing with such penetrations is the simplest method of insulation at the junction of the roof and the outlet.
So how does the process work?
- First, determine the size of the hole on the roof and cut the rubber corrugation according to these parameters. When organizing a chimney outlet on pitched roofs, a hole of 2-5 centimeters in diameter is required.
- Then they put on a pad.
- For the flange, select the desired shape.
- The grooves on the underside of the flange are filled with sealant and pressed tightly against the roof deck, and additionally secured with self-tapping screws with rubber heads, which are flattened during the tightening process. They are used for roofing work to prevent water from getting inside. When working with conventional self-tapping screws, rubber gaskets are used.
Important: the surface of the penetration and roof must be dry and clean.
Causes of leaks
The roof, covered with a profiled sheet, must be equipped with several openings through which the chimney pipe and ventilation channels will be routed. As a result, the integrity of the waterproofing may be disrupted, which will increase the risk of leaks. It is quite difficult to solve this problem if the chimney had to be routed through an already constructed roof.
To ensure high-quality sealing of the areas where the pipe meets the corrugated sheet, you need to put in quite a lot of effort.
If the work is done poorly, many problems arise:
- Water begins to flow. This happens if the sealing of the joint between the chimney and the corrugated sheet is poorly equipped.
- The rafter system began to rot. After water gets inside the roofing pie, the wood from which most of the roof elements are made gets wet. As a result, the structure is deformed.
- The roofing material itself begins to rust. Corrugated sheeting is not very well protected from corrosion from below.
- Aging of thermal insulation. When insulation gets wet, its effectiveness is significantly reduced.
To increase the reliability of the roof, you need to correctly select the location of the chimney and ventilation ducts. This will make sealing the pipes much easier.
Sealing
Sealing the joints of a roof with a brick chimney is a responsible and complex process.
As a result of the temperature difference between the working pipe and the air temperature during combustion, condensation forms in it, which causes destruction. Therefore, it is very important to insulate the protruding part of the pipe with finishing materials, taking into account their stability and appearance when choosing.
First, insulation is carried out using clinker bricks. You can cover the pipe with plaster or cover it with cement-fiber boards. Finishing with corrugated sheets the same as the roof is covered will look aesthetically pleasing.
To seal the gaps between the pipe and the roof deck, a cement collar with an increased moisture resistance coefficient is used, followed by the organization of the collar. To cement the crack, a metal profile frame is installed. A decorative collar made of sheet steel is put on and then fastened.
You can put a rubber seal on the round pipe with glue. Cement mortar is poured into the gap and allowed to dry for a day. A metal canopy is arranged to drain water, followed by fastening with self-tapping screws.
There are important nuances here:
- Gaps less than 5 mm wide can be sealed with heat-resistant silicone-based sealant.
- A gap whose width is more than 1 cm is cemented with mortar and covered with an apron.
Finishing work
Finishing the chimney is the beginning of roofing finishing work, since otherwise the finished roofing covering can be damaged or stained. Visually, both the chimney itself and the roof covering should form a harmonious tandem, so it is best to select identical materials for their cladding.
Depending on the materials used for finishing work, several cladding options are provided. Each of them has a number of positive characteristics, however, each has some disadvantages.
Clinker bricks and tiles
A fairly common method is when clinker tiles or bricks are used for finishing. A sufficient degree of strength, resistance to weather conditions and temperature changes are its main advantages. In addition, this facing coating is not afraid of dirt, which is important from an aesthetic point of view. There is one downside: the need to use solid clinker bricks set on a special clinker mortar leads to the high cost of the work. Therefore, this method in most cases is not available to a wide range of consumers.
Ready-made factory-made structures
You can line chimneys with pre-prepared material. As a rule, this is a factory-made version of a pipe that has a steel channel. Using bricks, reinforced mesh, and plaster, the chimneys are finally brought to perfect condition.
Plaster
Speaking about a chimney that involves a budget version of the cladding, it is worth remembering the old proven method of plastering a smoker. Despite the fact that this method is considered the most budgetary, it is no less durable and reliable.
Alternative methods can be considered using cement-fiber boards, slate, etc.
Sheet of profiled flooring - priority in choosing a facing material
The market for finishing and facing materials is quite diverse. The main criteria justifying the choice of one or another option are reliability, strength, and durability. However, the price of the material and the ease of its installation are no less important.
Corrugated sheeting best meets all of the above requirements due to its high technical characteristics:
- Resistance to temperature changes,
- Length of service life,
- Ease and efficiency of installation,
- Ease of maintenance,
- Low specific gravity,
- Low cost.
Corrugated sheeting is equally good for organizing roof cladding and chimney lining. In addition, it looks quite impressive, adding respectability and solidity to the structure, emphasizing style.
Corrugated sheeting has a fairly wide color palette, which allows you to implement any design solution.
Types of corrugated sheeting suitable for lining a chimney
The wide range of profiled sheets significantly expands the boundaries of available cladding solutions. Among the produced types there are:
- Combined type sheets used in organizing a variety of fencing and finishing structures,
- Support-type corrugated sheeting, characterized by increased strength,
- Aluminum profiled sheets, characterized by a long service life and increased resistance to moisture,
- Painted sheets of profiled flooring,
- Galvanized,
- Roofing,
- Facing.
Each type can be used as a finishing material, and therefore the priority of choice is determined by the price of the issue.
Sealing by arranging a box
There is a method of sealing by arranging a box.
- Leave a distance between the edge of the cut roof and the pipe in accordance with fire safety standards.
- Treat the adjacent edge of the roof to the chimney and the chimney itself with heat-protective material.
- A box made of galvanized steel or corrugated sheeting is installed in this area. Cut strips up to 40 cm must be sheathed around the perimeter and the angle of inclination of the slope.
- The elements of the box (collar) are overlapped and soldered.
- When the roof slopes at an angle of more than 30 degrees, a metal outlet is installed to drain rainwater around the chimney.
- Fill the space between the pipe and the box with thermal insulation material. You can use basalt wool.
The principle of arranging a passage with thermal insulation materials is applicable to a chimney on a slope and a ridge with minor differences. The installation of a chimney along the ridge involves changes to the design of the rafter system.
The roofing deck is covered with roofing felt, overlapping the pipe walls, and the apron is installed, followed by filling the gaps between the apron and the wall with polymer sealants.
Arrangement of an apron made of aluminum tape
The second method of sealing a pipe is done by installing an apron made of aluminum tape. You should go around two layers of aluminum tape around the perimeter of the pipe, so that part of the tape is buried in the gap between the pipe wall and the roofing. What can I cover it with? It should be covered with bitumen mastic followed by gluing the tape. The lines connecting the apron to the pipe are fixed with a metal profile and covered with a waterproofing film.
Bypassing the pipe on the roof with corrugated sheeting can be done by arranging an apron using adjacent lower sheet strips. The installation principle boils down to organizing the first plank to the side wall of the chimney and fixing the upper level mark. A fine is made at the mark, followed by filling with sealant. The next work process is the organization of a metal tie with the arrangement of sides along the edge to drain water. Then the tie is attached to the top edge.
To ensure high-quality corrugated sheeting around the pipe, it is necessary to make a sheathing. It will ensure reliable fastening of the lower junction strip and the edge of the corrugated sheet along the walls of the chimney.
Tape sealant
Tape sealant is a solid material. Many builders consider it the most cost-effective option for roof sealing. Material Features:
- it is based on butyl rubber;
- The sealant tape is highly resistant to ultraviolet radiation and high temperatures;
- it has high adhesiveness, making it easy to install;
- Ideal for sealing joints between chimneys and roofing.
The tape has an aluminum coating, which increases the service life of the sealant for outdoor use. The tape is easy to install and operate. The average service life of the product is 10 years. Thanks to a wide range of colors, the tape can be used to seal various roofing coverings. The sealant has exceptional adhesion to various surfaces. The tape is used when it is necessary to seal wooden, plastic, and metal surfaces. The tape is also successfully used for sealing translucent roofs.
How to use
The surface of the pipe and roof on which the tape is applied must be cleaned and dried
It is important that the area being treated is level. To apply the tape, you need to cut a piece of a certain length, then remove the protective film and press the product tightly against the joint (slot)
At temperatures below +5, the tape is first kept indoors at a temperature of 15 degrees for 12 hours.
Using the tape in sub-zero temperatures involves heating the surface to be treated. The tape is not used for surfaces with an operating temperature above 80 degrees or when the roof slope is more than 55 degrees.
How and with what to seal the gap between the pipe and the roof - different options for different materials
Installing a chimney is usually not a difficult process, however, in some places, such as floor crossings, some difficulties may arise. An important point is to ensure proper waterproofing. We will talk about this and other nuances related to how to seal a chimney pipe in this article.
Even if the pipe is placed as tightly as possible on the roof, minor gaps will still remain. When it rains, moisture will constantly enter the attic through them, which over time will lead to damage to the roofing structures. This is why roof pipe sealing is so important.
Results
Despite all the difficulties that I faced while sealing a brick chimney, following all the installations and rules, I reliably isolated the junction of the roof and the brick chimney. Using the “apron” system and related materials for corrugated roofing, you can independently insulate all joints and protect them from rain and snow accumulation.
A fireplace or stove heating are indispensable attributes of a country house or country house, which gives them additional comfort, warmth, and coziness. Even with the spread of heating devices powered by natural gas or electricity, they have not become less popular, especially when it comes to the construction of traditional Russian baths. When constructing a fireplace, the most critical and difficult moments are the removal of the chimney through the roof and the waterproofing of the joints between it and the roofing material. In this article we will tell you how high-quality sealing of the chimney outlet affects the durability and reliability of the roof.
The place where the chimney of a stove or fireplace goes outside is called the chimney pipe passage or simply the penetration. It can be located in the wall or on the roof of the structure, and the second output option is considered more popular, but also more dangerous from the point of view of leaks. If the waterproofing of the seams between the stove chimney and the roofing material is not carried out efficiently, then during the operation of the roof the homeowner may encounter the following problems:
- Leaks. According to statistics cited by experienced roofers, most roof leaks occur due to gaps or cracks between the chimney and the roofing material that are not properly sealed.
- Rotting of the rafter frame. The penetration of atmospheric moisture through the seams between the chimney and the roof leads to gradual rotting and deformation of the roof frame made of wood.
- Reduced draft in the chimney. Insufficient sealing of the junction between the pipe on the roof and the roofing material leads to condensation and cooling of the chimney, which negatively affects the draft force in the system.
Source
How can you eliminate gaps?
The easiest way to solve the problem of how to seal the gap between the pipe and the roof is to install an apron on top. You can do it yourself, in which case you will need to provide strips for connection to the pipe in advance. There is an easier way - to buy a ready-made stainless steel roof passage. Often, round passages are made for the chimney, and they are made of stainless steel. The passage is placed on the pipe, and the joint is fixed with a steel clamp.
If you need to seal minor gaps formed between the pipe and the roof, then for these purposes you can use silicone sealant (read: “Which sealants for chimneys are best to use - types, characteristics”). You can find a huge variety of them on sale, but we need a heat-resistant type.
The process of how to seal a roof around a round pipe will differ slightly depending on the type of roofing, that is, in addition to the basic recommendations, there are also algorithms that will vary somewhat.
Design of junctions between the roofing covering and the pipe
When a reliable foundation for arranging the connection of the roofing material to the chimney is ready, you can proceed to the installation of coating sealing elements.
The design of the system for connecting the coating to the pipe can be different, depending on the selected roofing material. The functions that are assigned to the elements included in the junction structure are sealing and waterproofing the joints of the roof covering and ventilation or chimney pipes, as well as draining and redirecting water flows flowing from the roof ridge to the pipe above.
Ideally, the layout of such a junction should be determined when drawing up the design of the rafter system and roofing “pie”. The fact is that some options involve the installation of individual structural parts before laying the roofing.
In addition to the type of roof chosen for covering the roof, when drawing up the project, you should also take into account the location of the chimney pipe, its shape, as well as the material from which it is made.
Professional builders usually recommend using only ready-made structures that are produced by roofing manufacturers for arranging junctions. However, many craftsmen prefer to make these parts themselves.
One of the options for a home-made design of a junction of a roof to a brick pipe of rectangular cross-section. It’s easy to make such a “kit” yourself from galvanized sheets
It should be noted that a chimney pipe passing through the roof directly at the ridge line of the roof is the easiest to seal. With this arrangement, water during rain, as well as snow drifts in winter, do not have the opportunity to accumulate above the rear wall of the pipe, which minimizes the risk of roof leakage in this, perhaps, the most vulnerable junction.
It will not be difficult to arrange a reliable connection of the roofing material to the chimney, which is also located in close proximity to the ridge line, that is, almost immediately behind the ridge element. There is also a very small space above the pipe, which prevents the accumulation of snow and water.
An additional fracture of the roof above the pipe - a groove - will prevent rain or melt water from accumulating in this space - it will redirect its flows to the sides
But performing high-quality sealing of a chimney located in the middle or lower part of the roof slope is much more difficult. In this case, waterproofing must be especially reliable. Therefore, quite often, and especially, for example, when the roof is covered with a soft bitumen roof, it is necessary to equip an additional pitched structure - as shown in the illustration above. Such a special break in the roof will divert water flows, directing them along the side walls of the pipe. Such protective extensions to the pipe are usually called grooves.
Perhaps the most unfortunate location of the pipe is on the valley line. It is advisable, even at the stage of designing chimney and ventilation ducts and roof structure, not to allow a detailed passage of the pipe through the roof
And, of course, the most difficult thing is to properly arrange the junction around the chimney, which is located in the middle or lower part of the valley. In this case, the pipe will be in the path of clearly directed flows of water, which during rain or melting snow will flow into the gutter at the junction of the slopes
In this case, it is extremely important to reliably seal not only the back side of the pipe, but also its side lines. Therefore, even at the design stage, it is necessary to try very hard to avoid such a pipe location
Now, in order to answer the most popular questions that arise in the process of arranging this roof assembly, it is necessary to consider several options for sealing pipe passages through the roof.
Seal gaps between chimney and slate roof
Sometimes the question arises of how to seal the gap between the pipe and the slate.
The technology provides the following sequence:
- First, a round hole is cut in the steel sheet that will be needed to finish the ridge.
- Next, a ring of sheet asbestos cement is placed on the pipe.
- For absolute sealing, so that in the future there will be no problems with the leaking pipe on the roof, the joint between the pipe and the roof is sealed with an asbestos cement solution (proportion 1:2).
- In addition, the same solution is used to fill the gap between the chimney pipe and the slate sheet. To do this, you can temporarily make a limiter out of cardboard.
Getting rid of cracks on a tiled roof
On a tile roof, it is best to seal the cracks with a solution of sand and cement, which will best protect the inside of the building from moisture and precipitation.
To achieve the best moisture insulation, you will need:
- Install a galvanized collar on the roof, thus creating a place for pouring the solution.
- Pour a solution of cement and sand, making sure that it clearly fills the entire space between the roof and the chimney.
- In addition, you will need to make a surface and place it at an angle so that excess liquid flows down it.