A good-quality wooden bathhouse has long become an integral part of many people’s leisure time. But, in addition to a feeling of satisfaction, it also brings headaches to its owners. Wood and water are not the best of friends. When exposed to moisture, floorboards become unusable over time. And wood wears out quite quickly from mechanical stress. There is a need to repair the floor: from replacing several floorboards to reconstructing the entire flooring as a whole.
Is it possible to avoid this? Certainly! Today there are a number of different solutions, but I would like to focus on one. This is laying tiles on a wooden floor in a bathhouse. And we’ll talk about how to properly lay tiles on the floor in a bathhouse in this article. How to combine seemingly incompatible things, which tiles and adhesive mixtures to choose for this, how to organize the work correctly? Discuss all the subtleties and nuances of the technology, hear the opinions and advice of experts.
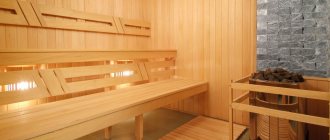
The only thing is that we will decide right away in which rooms you need to lay tiles on the floor in the bathhouse, and in which there is no need for this. We will talk about those rooms in which water is intensively used. The floor in the steam room should be wooden, so we will not take it into account in the future.
How wood and tiles combine
The very first question that comes to mind is: is it possible to lay ceramic tiles on a wooden base? There are a number of factors that can become an obstacle to completing this task:
- One of the main requirements for tiles used in rooms with high humidity is moisture resistance. Consequently, the boards under the ceramics will be deprived of air access. And in the absence of ventilation, they will quickly rot.
- Depending on the state of the environment, the tree “plays” - it can change its shape and volume. Tiles are hard and cannot deform to the same extent as wood. A hard and static surface is another condition for installing tiles.
- Changing the size of the gaps between the floorboards can cause cracking or even destruction of the adhesive layer and the tile itself.
In contrast, we note that the floor in a bathhouse made of tiles will be much more durable and practical, and with the right choice of ceramics, it will be resistant to mechanical damage and shocks. The moisture-impermeability of the material will stop the access of moisture to wooden structures, thereby increasing their service life.
As for the aesthetic side of the issue, then, probably, in some cases, natural wood looks preferable. But the level of modern technology has made it possible to create simply a huge number of decorative coatings that will not leave you indifferent. The floor in a bathhouse made of tiles will look very stylish and beautiful. Having weighed all the pros and cons, we can summarize: if you wish, tiles can be laid on a wooden floor in a bathhouse without any problems.
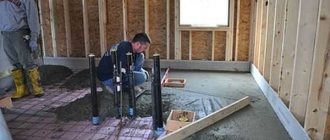
Installation of a sand cushion on the ground
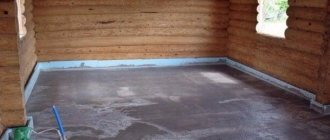
I would like to make a reservation right away that I made the floors directly on top of the ground - inside the strip foundation. In principle, for baths most often they make strip or columnar foundations, where the floor is initially a ground covering.
So, first we remove the fertile layer of soil, preferably down to the clay, that is, 15-20 cm. Pour sand into the resulting hole and lay a drain pipe. Make sure that the drain pipe has a water seal, otherwise there will still be odors in the sink! Also, be sure to provide a plug with which you could close the pipe outlet in winter.
The sand cushion should be spilled with water and compacted thoroughly.
The drain pipe is laid in a sand bed
Required Tools
Before starting any work, you must prepare all the necessary tools in advance. You need to work concentratedly and measuredly, and not rush around headlong in search of missing equipment. What you will need for this job:
- Crowbar, nail puller, heavy hammer, hacksaw for dismantling the old floor or its fragments for subsequent replacement.
- Rule, level and tape measure for arranging a new coating and marking it.
- Glass cutter, tile cutter and grinder with discs for cutting ceramics.
- A drill with a mixer attachment and a container of sufficient volume for stirring assembly mixtures.
- Roller or brushes for priming.
- Convenient spatulas, trowel and comb for applying adhesive.
- Rubber hammer for shrinking and leveling tiles during installation.
- A set of rubber spatulas and rags for working with grout.
When selecting a comb, remember that for tile sizes from 5x5 to 15x15 cm, the tooth width should be 3-6 mm. For squares with a side of 25 centimeters, the tooth will be 8, and for 30 - 10 millimeters. If you need anything else, think about it in advance and put the tool so that it is always at hand.
Step-by-step installation technology
Now let's look at the step-by-step procedure for laying tiles on the floor in the bathroom.
Preparing the base
Preparing a rough base for laying ceramics includes the following steps:
- Waterproofing the base. This stage is carried out before pouring wet screed or self-leveling mixtures so that moisture from the solution does not go down under the influence of gravity. Waterproofing is needed only to prevent moisture from the concrete from spoiling the repairs for neighbors below, so there are no special requirements for it.
- Alignment. It is recommended to lay the tiles on a flat base with a maximum height difference of no more than 1 cm per 1 linear meter. Laying tiles on a thick layer of adhesive is considered a violation of technology. On each bag there is written the maximum thickness of the layer on which tiles can be laid, specifically with this adhesive.
- Surface priming. A mandatory step, which, in addition to reducing the absorbent characteristics of the base, increases the adhesion of the tile adhesive and allows you to remove dust from the surface.
More details about leveling technology, the methods used and other nuances of floor preparation can be found in this material.
Required Tools
For installation work you will need the following tools:
- Comb spatula with teeth depth 8 or 10 mm.
- Building level.
- Tile cutter or grinder.
- Plastic spacer crosses for uniform seams. The optimal seam width is 2–2.5 mm.
- Mixer, drill or hammer drill with an attachment for preparing tile adhesive.
- Rubber hammer for knocking out tiles.
Preparation of glue
When preparing tile adhesive, it is important to follow the manufacturer’s instructions, especially regarding the amount of water added, since not only the consistency, but also the physical and mechanical characteristics of the finished adhesive directly depend on this. The general technology and sequence of mixing dry mixtures is as follows:
- A measured amount of water is poured into a clean, deep container.
- The dry mixture is poured into the water. If you have an assistant, it will be better if the mixture is added while mixing the water.
- The composition is mixed until a homogeneous mass is obtained, in which there are no lumps.
- After a technological break of 5–10 minutes, the solution is mixed again.
With the correct consistency, the glue has good mobility and ductility, but it does not float on the surface, and when applied to a spatula, it remains on it.
Choosing ceramic tiles
“Whatever you call the boat, that’s how it will float,” sound the words of one famous song. Which tile you choose - this is the result of all the work. Let's consider the main criteria that you need to pay attention to when making a choice. Remember, floor and wall tiles are two very different things!
- Moisture resistance. The porosity of the material should be minimal. Only in this case will the floor tiles in the bathhouse absorb a minimum of moisture.
- Rough surface. The surface structure should provide reliable grip on the foot, especially in conditions of abundant water.
- Strength and wear resistance. Ceramics must be resistant to load, mechanical stress and possible impacts. Let's not pretend - when both your hands and most furnishings are wet, something often falls on the floor.
- The consignment. It is very important! Make sure every single box of tiles is from the same batch. Products from different batches may differ in color and size.
- Geometric characteristics. The edges must be smooth and regular. If you take several different specimens at a glance, their sizes should perfectly match each other.
To be fair, it should be noted that cladding made from natural materials looks more natural, but glazed plates have increased strength. The markings and special symbols printed on the packaging will tell you about certain properties and qualities of the floor tiles. If you yourself find it difficult to understand the meaning of the designations, do not hesitate to contact your sales consultant.
Log repair
If, after opening the wooden floor, it turns out that the joists have reliable support, but are not aligned in the same plane, or some have dried out and bent, then the matter can be corrected with even overhead boards. They can be attached to joists with nails, self-tapping screws, and for those who find this not enough, then with bolts and large washers.
Everything can be leveled at the highest point by pulling the cords in a horizontal plane. If there is a large gap between the lags, then you will have to install additional lags.
The end result is a great timber floor which can be enhanced by adding 15-20mm moisture resistant plywood over the floor. In this case, it needs to be cut crosswise into 4 parts and screwed with self-tapping screws at intervals with a gap of 3–5 mm. We lay the tiles in the usual manner using elastic adhesive on primed plywood.
Complete reconstruction
Finally, the bad thing about a wooden floor is that the joists are no good for support. In this case, you will have to completely or partially replace them and do everything in accordance with the standards for a wooden floor. Then there are no problems with laying tiles. New logs for a wooden floor can be set at the desired height and the tiles can be laid at a given level.
Preparing the base for tiling
Let's figure out how to make the floor in the bathhouse ready for tiling. The most important and important step at this stage of work will be to check the condition of the existing floor. We carefully check the condition of the flooring. Ceramic coating is durable, so it will be incredibly disappointing if the old base cannot withstand the load and collapses, thereby rendering the entire structure unusable.
How to make a floor in a bathhouse from tiles?
Leaky boards need to be replaced. It is advisable to dismantle the board cover and check the logs. Rotten fragments are replaced with new ones. The distance between the logs, taking into account the increase in load, should not exceed 50 cm. If this size is exceeded, we install additional logs. The ends of the joists should not rest against the wall; the gap should be around 1 centimeter. All wooden elements are carefully treated with an antiseptic composition. From this point on, there are several options for preparing the base to lay tiles on a wooden floor in a bathhouse:
- Filling the screed;
- Leveling the surface using chipboards or plywood sheets;
- Reinforcement of the base with sheets of moisture-resistant plasterboard.
Before starting any of the chosen methods, you should take care of organizing wastewater disposal. Most often, the drain hole is located in the center of the wash room or shower, but it can be shifted to any location you specify. The drain hole is located at the lowest point, so the floor in this room will not be level, but will have a slight slope towards the drain. Otherwise, water will not flow into the sewer system. The slope should be 1 cm of difference in floor level for every meter of distance from the drain hole to the wall.
Filling the screed
After checking the condition of the logs, we return the old boards (if their use is possible) to their places. Their thickness cannot be less than 40 mm. In order for the floor to breathe, the boards are not laid solid, but with gaps of about 10 millimeters. If you decide to make the flooring continuous, be sure to drill a sufficient number of ventilation holes in it.
Standard sheets of multi-ply plywood or any other particle board with a minimum thickness of 12 mm are divided into 4 parts and the resulting tiles are laid on top of the plank flooring perpendicular to the boards. We leave a gap of approximately 3 millimeters between the fragments. The slabs are installed according to the principle of laying bricks - there should be no cross-shaped joints. In these places the structure will “play” and will not provide the required strength. The plywood is glued to a special compound and fixed with self-tapping screws at least every 20 cm. Given the presence of an aggressive environment, the screws must be made of non-corrosion metal or galvanized.
The next layer is waterproofing. Whether it is specialized paper, bitumen tape or just plastic film depends on your capabilities and preferences. Strips of material are spread, overlapping by 7-10 cm. The joints are taped. The waterproofing is also applied to the walls by 10 cm and is also fixed with tape. Along the perimeter, a damper tape with a thickness of 10 and a width of approximately 100 millimeters is attached to the walls.
We lay the reinforcing mesh and fill the screed. What it will be like: a sand-cement mortar with the addition of liquid glass or a specialized mixture is again up to you to decide. We protect the edges of the drain hole with formwork. To get the desired slope without unnecessary problems, we recommend installing beacons and leveling the solution along them. To avoid excessive load on the base, the maximum thickness of the screed should not exceed 30 mm.
Leveling the surface using chipboards or plywood sheets
The floor is leveled with sheets of wood or pressed particle boards. To raise the floor level to the required level, logs are installed on the existing flooring on special stands that are adjustable in height. On the logs, as in the previous version, quarter sheets of plywood are mounted using the “masonry” method. A second layer is laid on top of it so that the seams do not overlap each other. We maintain a gap of about 3 mm between all tiles.
The positive aspect of this option is that insulation can be placed between the joists, thereby simultaneously solving the issue of thermal insulation.
Another very similar option comes down to the fact that instead of point supports on the existing floor, a dry leveling mixture, fine expanded clay or sand is poured over a layer of waterproofing and a damper strip. It is compacted and then covered with plywood sheets or OSB boards.
In both cases, the top layer of plywood is sanded and the seams are puttied. Glue can be used as putty on which the tiles will be laid. The finished surface is covered with a layer of primer, in other words, primed. The adhesive mixture for tiles is selected taking into account the properties of the base material. For example, for OSB, polyurethane compounds can be used.
Laying ceramic tiles on a wooden floor
Reinforcement of the base with sheets of moisture-resistant plasterboard
Absolutely nothing new. Sheets of moisture-resistant plasterboard are laid on the existing floor. The plane is controlled using a building level. To level the flooring, we put pads made of any material at hand that will not shrink: slats, fiberboard, strips of roofing felt. We leave a gap along the edge, which we subsequently seal with sealant. We prime the fixed sheets with a primer.
So, we have prepared the foundation and approached the final stage of work. We only note that for a shower room the best option would be a wet screed. But other methods also have a place with a careful, balanced approach to organizing work. How to properly lay tiles in a bathhouse on a prepared floor? We'll talk about this in the next chapter.
Wall edging
The edging is necessary so that during the washing process water does not flow under the lower crown of the frame and does not lead to rotting of the wooden walls of the bathhouse. However, edging must be done in any case, even if the bathhouse is brick, so that water does not fall directly on the walls.
I made the edging the height of the tile - this is the most optimal. You can make the base higher, but there is no particular point in this.
First, we attach several 2-3 cm thick bars to the wooden walls of the bathhouse to provide a ventilation gap. It is necessary so that the space between the wall of the bathhouse and the inner surface of the flange can dry out during the washing period. We fix the bars vertically according to the height of the future base. We attach pieces of DSP or moisture-resistant plasterboard to the bars, and then glue the tiles onto them. We seal the joint between the flange and the floor with sealant so that water does not flow out beyond the resulting “trough”. We also coat all tile seams with sealant to retain moisture. The top of the plinth is covered with tiles to prevent water from getting behind the wall of the plinth.
Now you can splash around in the sink and pour water onto the floor to the height of an entire tile! And the water will not leak out!
The edging along the walls will allow you to pour water onto the floor to the height of the tiles
The floor design I proposed, firstly, does not absorb moisture and does not cause an unpleasant odor in the sink, secondly, it is as hygienic as possible, thanks to porcelain tiles, and, thirdly, it additionally warms the room with the energy of the electric cable.
I hope my tips will be useful.
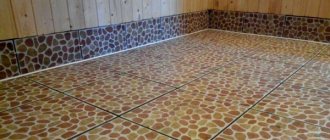
Floor tiling
We mark the floor. If the drain is in the center, we will start dancing from there. You can lay out the tiles in an “envelope” by laying out a central square of triangles. The markings will be made from the center with rays to each corner of the room. The imagination now pictures a pile of tiles cut at different angles... Indeed, the best option would be simple, standard masonry.
The center of the first square will be the drain hole. We make a block from 4 tiles, measure it, and according to the resulting size, divide the entire area into blocks. Why is this necessary? Firstly, it is easier to lay out even rows and adjust seams. And secondly, the glue dries out quite quickly and loses its properties. Therefore, marking will help to apply the mixture to such an area that you can cover with tiles without compromising the properties of the adhesive solution.
Spread the adhesive mixture evenly over the floor and tile surface with a comb. Let us remind you that the tiles are first soaked in water for 5-10 minutes so that the moisture from the adhesive is not absorbed by the porous structure of the material.
Having covered the first fragment of the surface, we repeat the procedure until the floor is completely covered with a decorative layer. To make it easier to align the ceramic plates, we install special mounting crosses in the corners of the seams. One of the nuances of this stage will be the choice of the adhesive mixture: it must be completely compatible with the base material. How to properly prepare the solution for use is written in the manual that is supplied with the glue by the manufacturer.
Work order
Determining the reference point
Once you have decided on the design, it is very important to designate the location of the first tile from which you will “dance.” Since cut tiles do not look aesthetically pleasing, it is advisable to start the first row from the wall, which is in plain sight in the room. If the floor is completely open and it is not possible to hide the scraps behind the furniture, you will have to do it differently: beat off the center of the room using a coated cord and lay out the tiles starting from the center
This way, the outermost tiles on both sides of the floor will be cut equally and the installation will be symmetrical.
If the floor is completely open and it is not possible to hide the scraps behind the furniture, you will have to do it differently: beat off the center of the room using a coated cord and lay out the tiles starting from the center. This way, the outermost tiles on both sides of the floor will be cut equally and the installation will be symmetrical.
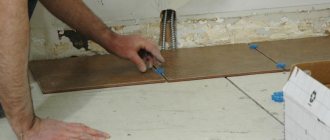
Laying a layer of adhesive
It's time to lay the tiles. Prepare the adhesive and apply a thin layer to the floor. Use a notched trowel to smooth out the glue, leaving grooves of equal height on the surface. According to the rules, glue is applied to 1 m2 of surface at a time. For inexperienced tilers, this is too large an area - you simply won’t have time to lay out all the necessary tiles, and the glue will already dry. Therefore, it is better to apply glue to the surface corresponding to one tile - the one that you are going to lay right now.
The adhesive is evenly applied to the floor surface and leveled with a notched trowel.
There is one important detail: if instead of modern tile adhesive you use cement mortar (or, alternatively, a mixture of cement mortar and glue), then the tiles should be soaked in water before laying. This is necessary for good adhesion of the tiles to the mortar.
Laying tiles with glue
Lay the tile on the applied adhesive, pressing it to the surface on all sides and leveling it with your hands.
The tiles are laid on the adhesive solution, pressing on it with your hands for better adhesion.
Be sure to check the straightness of the row and the horizontal surface of the tiles using a building level. It is unlikely that you will be able to determine by eye the correct position of the tile; most likely, some corner will have to be lowered, and some will have to be raised. To lower a part of the tile lower, just press it with your palm or tap it with a rubber hammer. When the tiles sag, an additional portion of mortar is placed under it.
To level the tiles, tap them with a rubber hammer.
Plastic crosses are inserted between the laid tiles, the thickness of which will determine the thickness of the seam. If for some reason you were unable to purchase crosses (for example, you forgot about them), then ordinary matches can successfully replace them.
Need for pruning
When laying tiles, a situation often arises when a whole tile does not fit in a row and has to be cut. Then a tile cutter or grinder comes to the rescue. It happens that these useful tools are not available on the household, how to lay tiles in this case? There is a way out: at home, you can cut the tiles with a glass cutter or a hacksaw. Of course, this is not so convenient, but it will not require you to buy expensive tools.
It will take 2-3 days for the adhesive to completely harden and acquire the necessary strength. After this, you can start grouting the joints.
Grouting joints
The final stage will be grouting the joints. Choose a composition in a contrasting color or to match the general background of the surface - your taste and desire will tell you. Main quality. If, as an example, we consider the range of grouts from the Ceresit company, then there are silicone grouts, elastic water-repellent grouts, and two-component grouts. Antifungal impregnation is offered to protect the grout.
Therefore, your experience, information that you can find in sufficient quantities on our website or consultation with a specialist will help you make the right choice. After the tiles have completely dried, we begin grouting. Mix the solution with a mixer, and use a rubber spatula or small grater to fill the seams. We hold the tool at an angle of approximately 45 degrees - this is how the grout most effectively fills the seam. You need to prepare as much mixture as you can produce in 20-30 minutes. After this time, it will begin to dry out and lose elasticity.
After letting the grout dry a little, use a dry, clean rag to carefully remove excess gypsum from the surface of the tile. After this, wipe clean with a damp cloth and leave until completely dry. As you can see, there is nothing complicated or supernatural about laying tiles on a wooden floor in a bathroom. Please note an important point: the floor level in the washroom should be lower than the floor level of the remaining rooms of the bathhouse, so that in case of problems with the drainage, the water does not flood the neighboring rooms.
Proper processing of lining
Having decided how to cover the lining in the steam room of the bathhouse, you can proceed to the processing itself. To perform high-quality impregnation that will last a long time, we recommend that you read the following instructions:
Processing lining in a steam room begins with preparing the wood itself. Clean it from various contaminants with sandpaper or other suitable method. It is also recommended to wash the boards with an aqueous solution of soda (300 g of soda per 10 liters of water); Next, you need to degrease the surfaces. Remember that not only the lining itself is impregnated, but also the frame to which it is attached; Sand surfaces with pumice to obtain a smooth finish; Next, you need to apply an antiseptic that will protect the wood from fungus and mold; Now you can saturate the lining
When choosing impregnation for the dressing room, pay attention to the humidity of the air in it, as well as the temperature of the steam. If the indicators are approximately equal to the indicators inside the steam room, then it is necessary to use the same impregnation.
By doing all the work correctly, you can achieve an excellent result, as in the photo.
Horizontal drain
It is better to place a horizontal drain close to the wall, since the trim does not look aesthetically pleasing.
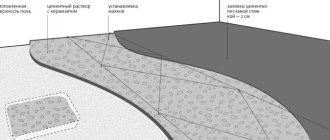
- This option for laying tiles is as easy as shelling pears to do with your own hands, even if the screed was initially poured without a slope. First, we calculate the distance from the drain to the opposite wall. The level of floor slope in centimeters towards the drain will be equal to the number of meters. For example, if there is 3 m from the ladder to the wall, then the slope level should be 3 cm.
- Now we measure 3 cm up from the floor on the wall opposite the gutter and attach the beacons. We pull the cords from them towards the drain and fix them in this way. As a result, we have a template according to which we will lay the tiles.
Important: mark the wall in the washing bath, from which we will begin laying the lining towards the drain, in half. The first tile should be placed to the right of the applied markings. Now you should put the required amount of material to the right and left of it. This will be the first row of masonry.
The process for laying each tile is as follows:
- Apply the required amount of glue to the back side of the tile using a notched trowel and lay the tile. We adjust the height of the masonry with a rubber mallet if the screed was poured without a slope.
- Between each tile we install plastic or wooden crosses that regulate the width and uniformity of the seams.
- First, lay all the whole tiles towards the drain and only then lay the outer cut ones. While working, use a damp cloth to remove excess adhesive on the tiles. Otherwise, once it dries, it will be difficult to remove.
- Leave the laid floor for 12-24 hours until the glue dries completely.
- Once the glue has completely dried, you can rub the seams. The grout is applied with a special rubber spatula. Remove excess with a cloth. We treat the joints of the facing material with the wall with silicone.
Solving ventilation issues
The simplest option for organizing ventilation of the space between the “subfloor” and the finished flooring was mentioned earlier - holes are prepared in the floor and pipes leading out of the room are fixed in them. A diagram of such a system is shown in the following image.
The simplest option for organizing ventilation of the space between the subfloor and the finishing flooring
Another option for ensuring ventilation is the arrangement of multi-level floors. In this case, the height of the floors in different rooms will differ. So, in the wash room the floor is made on average 3 cm lower than in the dressing room.
Another option for providing ventilation
The first option has gained the most popularity among developers. The procedure is extremely simple: during the process of arranging the floor in the corners of the washing room, special holes are left in the base for further installation of ventilation pipes. Pipes with a diameter of 5-10 cm are mainly used. The material used may vary.
Ventilation pipes
The ventilation pipes are installed directly after finishing the walls of the room. Ventilation pipes with a diameter of 5 cm or less can be disguised under the casing if desired. More impressive pipes are usually mounted in corners and attached to the surface of the walls with special clamps. It is advisable to install pipes with a diameter of more than 5 cm in baths that are visited more than twice a week.
Central drain
In this case, laying tiles indoors with your own hands will be a little more difficult, but it can still be done.
Here the floor with a slope will be laid using the envelope type. That is, stretch the cords towards the drain from the corners of the room. In all three corners, raise them by the required number of centimeters (see above for how to calculate the height of the clone). You will end up with three or four triangles of possibly different sizes (depending on the location of the drain in the washroom). In order for the laying to be correct, you can start from the base of a larger triangle. That is, from the wall of the washing bath that is wider.
- We take the first tile, apply glue to it and lay it in the center of the largest base. To the sides of this we place the required number of whole tiles. We adjust each one with a mallet in accordance with the established levels.
- We will lay the next row of whole tiles like brickwork, that is, tied together. Thus, you need to lay the entire triangle with whole tiles.
- Using the same principle, you can cover the floor in the area of the remaining triangles.
- The remaining untiled areas of the floor will need to be finished with cut tiles. And each piece will have to be adjusted in accordance with the necessary parameters.
- Now let the cladding dry for 24 hours.
- Finally, apply grout and treat the joints of the tiles and walls with silicone. We rub the seams.
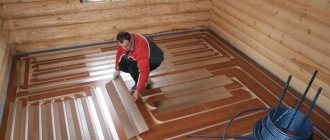
Insulation of the coating
If you plan to install a heated floor, then place a foil-coated heat insulator or mats with guides for pipes on the screed. After laying the heating line, installing the drainage system and reinforcement, a screed is poured with a slope towards the drain. The perimeter walls of the bathhouse must be insulated from it with damper tape. It should be added that their lining is done after finishing the floor, which will provide additional protection of the structure from water.
Covered with concrete, insulating and finishing material, it does not pose any threat to health. A bedding made of expanded clay, sand or clay can be used as a heat insulator. The insulation is placed on a membrane laid on top of the compacted cushion.
If you plan to install a heated floor, then place a foil-coated heat insulator or mats with guides for pipes on the screed
The insulation is equipped with a water drainage system. The gaps between the polystyrene foam boards are filled with polystyrene foam, pieces of polystyrene foam, etc. It is better to seal the gaps with tape. A waterproofing material is placed on the thermal insulation made from bulk materials. It is placed on the walls (to a height corresponding to the thickness of the future screed and floor covering). To improve the water-repellent properties of the ceiling, its surface is reinforced with cement before the solution begins to harden.
Pit
A pit is nothing more than a container for wastewater, installed directly under the washing room. It is worth considering that the use of this system is rational only for small baths that are rarely used.
The construction of the pit must be carried out in the following sequence:
Alternatively, the floor board does not need to be nailed to the joists, so that they can be removed at any time and taken outside the bathhouse for faster drying.
The pit can be arranged in another way, in which the wastewater, having reached a certain height, would be discharged into the sewer or septic tank. This system is usually installed under “leaking” floors.
To install such a system, you will need to perform a number of works:
Water drainage methods
Diagram of a filtration system for draining a bath. The design features of the base and methods of arranging the hydraulic apparatus directly depend on what types of materials the floor will be constructed from.
As a rule, wood, cement screed or combinations of materials are used to finish the base. For any type of construction, a system for draining water masses from the bathhouse is prepared in advance. The design of the drain mechanism can be different and depends on many factors:
Drainage well
This system can only be installed in an area where groundwater flows at great depths. Otherwise, due to its design, such a well will always be filled with groundwater, which will make it impossible to collect wastewater in it.
First you need to decide on the location of the well; it’s good if the gap between it and the bathhouse is about 2 meters. At large distances, problems may arise when creating the desired slope of the drain pipe. At the same time, placing the well too close will lead to the foundation getting wet and subsiding in the future.
Now you can decide on the material for installation. This will usually be affected by the type of soil, because if the soil is crumbling, the walls will need to be reinforced, and this is a fairly common occurrence.
You can strengthen walls using the following methods:
Sequence of construction work:
The drainage well is now ready.