Tile on the wall in the bathhouse (sink)
Good day, dear readers!
You built a bathhouse and you wanted to line the walls in the sink with beautiful tiles. Indeed, tiles in a bathhouse are a good and practical solution, but how to do it correctly?
There is no point in properly plastering the internal surfaces of newly erected stone, brick or cinder block walls of a bathhouse, which are planned to be lined with ceramic tiles. They just need to be aligned. It is possible that the walls of the building are already smooth, then just prime them.
What are the benefits of ceramic tiles in a bathhouse?
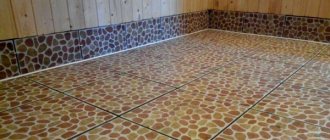
Ceramic tiles in the bath
Moisture-resistant wooden tiles that have undergone special treatment have appeared on sale: “thermo-birch”, “thermo-aspen” and other types for laying floors in bathhouses. Treated wood has unique properties: it is not subject to deformation, cracking, drying out, does not absorb water and is lightweight.
Such products are quite expensive. Nowadays, ceramic tiles are increasingly used for bathhouse floors and baseboards, under which a heated floor system is installed.
This tile has a number of useful qualities that make it indispensable in conditions of high humidity and can please connoisseurs of beauty and aesthetics:
Tile structure
- high resistance to moisture;
- resistance to any detergents;
- heat resistance;
- environmental friendliness and safety - contains only natural materials and does not emit harmful substances when heated;
- distinguished by a variety of colors, textures and patterns;
- durable and inexpensive;
- makes it possible to make a heated floor using modern systems.
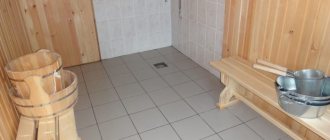
Features of finishing of bath rooms
A classic Russian bathhouse necessarily contains such rooms as:
- steam room;
- washing;
- vestibule (locker room).
If the area allows, modern buildings will be equipped with a separate recreation room, a billiard room, a swimming pool, a veranda, a barbecue area and even a full kitchen.
Despite fashion trends, the basic requirements for a bath remain unchanged:
- the steam room requires persistent hot steam,
- in the washing room there are non-slip floors and the possibility of convenient bathing procedures,
- In general, the premises have a comfortable microclimate and an aesthetically pleasing environment.
The functionality of bath rooms largely depends on the correct finishing. Even if your structure is built from rounded logs, and the walls from the inside look beautiful and aesthetically pleasing, it is recommended to carry out interior finishing of the bathhouse, as this will significantly extend its service life.
Finishing a steam room as a necessity
Each room has a number of features that must be taken into account when choosing materials and cladding methods.
Choosing tiles for a bath
Table of the types of ceramics from which the tiles are made
Tiles can be glazed or unglazed. The glazed one undergoes double firing, so it is more durable and resistant to temperature changes.
The front side should be rough so that the coating does not become slippery. This will help prevent injuries from falling.
The back side of the tile should be embossed for better adhesion to the surface using glue. In addition, this side should not be porous so that the cladding does not absorb moisture and lasts as long as possible. The best option for the floor in the bathhouse is porcelain stoneware or clinker. When choosing regular glazed tiles, you should pay attention to the brands: A1 and B1 have low moisture absorption.
The dimensions of the tiles for the bath should be selected taking into account the complexity of the configuration of the floor slope towards the drain. The more complex it is, the smaller the tile dimensions should be. The ideal option for a bath floor is ceramic mosaic, but it is not cheap.
Floor tiles must be thicker than those for walls and be at least 9 mm. Its quality can be determined visually. You need to choose tiles without defects, with smooth corners and edges. If you stack two tiles from the same batch with their backs facing each other, their corners and sides should line up perfectly. Floor tiles must be taken with a margin of 10% of the area. The stock is needed in case of need for pruning and possible defects. For DIY installation, rectangular tiles are suitable; octagons are best left to professionals.
Tile shapes
Application of protective screens
Screens are shields made of brick or metal that protect walls from intense thermal radiation. Similar protection is used when installing metal stoves.
- Metal screens are made from steel or cast iron sheets, these
casings surround the heat source with a distance of 3-5cm.
Advice! When purchasing a metal sauna stove, you should give preference to a model equipped with a metal casing. Its cost is not much higher, but the issues of wall insulation are eliminated.
Additional frontal or front shielding, which is located on the walls depending on the location of the stove, will not hurt. The protection guarantees the wood from overheating, reducing the temperature by 100 degrees or more, and provides the opportunity to save space in the steam room. A stove protected by a casing can be installed at a distance of 50-55cm from the wall.
Installation of screens is simple. The casing, equipped with legs, is secured to the floor by side or front screens - with galvanized nails or self-tapping screws.
- Brick screens are masonry used to cover the stove with
on all sides, the same casing, only made of brick. Another method is to lay half a brick between the firebox and a wall made of solid fireclay bricks laid on a solution of clay and cement. The width of the wall should be 120mm, although there is an opinion that it is permissible to put 60mm in a quarter of a brick, but it should be remembered that in this case the thermal insulation value is reduced by exactly half. It is recommended to raise the height of the masonry 20-30 cm above the surface of the firebox, but if you raise it to the ceiling, it will not be worse.
The screen should be placed at a distance of 10-15cm from the wall, 5-15cm from the stove, that is, the space saving is 30-40cm
Important! Functional openings for heat exchange should be made at the bottom of the masonry. Protective screens are effective; they reduce the temperature to a level acceptable when using high-temperature fuel units. The same function is performed by wall cladding made of non-combustible materials.
The same function is performed by wall cladding made of non-combustible materials.
Protective screens are effective; they reduce the temperature to a level acceptable when using high-temperature fuel units. The same function is performed by wall cladding made of non-combustible materials.
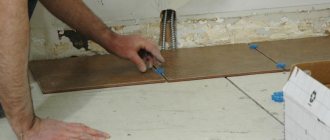
Preparing the base for laying tile material
Before laying the tiles, it is necessary to level the floor surface and make a slope towards the drain. To ensure the required slope when pouring a concrete screed, guide rails are used.
Preparation of the base is an important stage of cladding. You cannot skimp on materials - the base must be strong. It is necessary to waterproof the floor and slope to the drain.
Stages of work:
One of the options for preparing the floor for laying tiles
- the slope towards the drain hole is made at the rate of 1 cm of height difference per 1 meter of laying area;
- the drain hole must be made when constructing the foundation;
- to prevent air from the sewer from entering the steam room, water seals are installed in the sewer pipe;
- the concrete base is poured with a cement-sand screed, and the wood requires more complex preparation;
- when preparing a wooden base, you need to make sure the strength of the floorboards and replace them if necessary;
- there should be a gap of 1 cm along the perimeter between the boards and the walls. If there is no gap, the movement of the boards during temperature changes will destroy the cladding;
- All existing holes must be filled with putty and the wood treated with heated drying oil. This will be the first layer of waterproofing;
- the second layer is made using roofing felt;
- a reinforcing mesh is laid on top of the roofing felt and the screed is poured;
- When laying floor tiles on a mortar, the slope can be created during the tiling process.
How to prepare walls
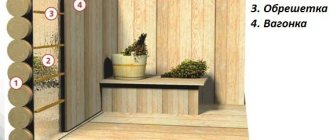
Before starting work, the surface of the brick (cinder block) masonry must be prepared, namely: clean it of layers of fat (if any), dirt and dust. After this, after wetting the surface of the wall with a simple household sprayer, it is necessary to level out all roughness, sharp changes and depressions larger than 10-15 mm with the solution. In a word - do rough plaster. Next, you need to make small notches on the plaster to better attach the tiles. For work, use a simple spatula or trowel.
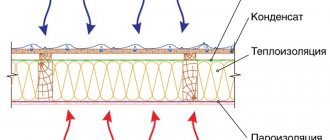
If the walls of the bathhouse are made of timber, then it is necessary to waterproof these walls. For such work, a simple roofing material is suitable, although you can use other rolled material. After this, it is good to secure a reinforced mesh onto the roofing material (you can use a chain-link mesh with a fine mesh). The plaster must be applied over a metal reinforced mesh using cement mortar 15-20mm thick.
Laying technology
To lay tiles you need the following tools:
- notched trowel with teeth height 8–9 mm;
- manual or electric tile cutter;
- plastic crosses for aligning seams;
- level;
- attachment with a drill for mixing glue.
Before laying tiles in a bathhouse, it is recommended to soak them in water for 5–10 minutes. This will reduce the absorption of moisture from the construction adhesive into the finishing material.
Floor tile laying technology
We ensure the strength of the future coating
Since it is unlikely to be possible to glue tiles onto tiles in the bathroom over an old glossy coating, it should be pre-treated. How? There are three ways to solve the problem.
It is necessary to remove the gloss from the old tiles. It's long, hard, and there's a lot of dirt left behind. Then you need to make notches on it (the same disadvantages) or treat it with a special compound. The third method involves purchasing a primer, which is quite expensive. But since even the most frugal owner will not be able to glue tiles onto tiles in the bathroom without any financial outlay, it is wiser to stick with this option. But the process will not take either time or effort. This miracle remedy is called “Concrete Contact”. The primer will make the old tiles rough and provide excellent adhesive properties to the base. The composition is applied with a brush or roller. The main thing is to maintain the exposure time, that is, let the primer set well and dry. Which will take about six hours, no more.
Glue selection
Ceresit CM 17 for laying floor tiles
The adhesive for the floor in the bathhouse must have high elasticity. Porcelain tiles also require a high degree of adhesion (adhesion) - at least 28 kg/cm², since this material is heavy and does not absorb moisture.
Ceresit CM 17 and Ceresit CM 11 adhesives are popular for attaching ceramic tiles and porcelain stoneware. You can use dry mixtures for bath floors.
The dry mixture is diluted with water according to the manufacturer's instructions. For mixing, use a drill with an attachment or a construction mixer. After the formation of a homogeneous mass, the solution is kept for several minutes to swell.
Builders often use a homemade adhesive composition for installing tiles, consisting of cement and sand (1:3) and PVA glue.
Notes on condensation.
As I already described, condensation can be observed on porcelain tiles even when warm – at 40 degrees or more.
This time an interesting phenomenon was noted. There were 2 slabs on the top and bottom shelves. The temperature on the top tiles is 45 – add 1 liter. We get condensation on the upper ones and complete absence on the lower ones. I throw another 1+1 l=2 - there is no condensation on the lower tiles. WHY?
I'll have to buy another pack of tiles for the walls.
- A sharp limitation of convection - the holes in the oven are closed, the holes in the screen are significantly reduced, which has led to the fact that it is practically impossible to heat the steam room above 80-85 degrees.
- The floor doesn't heat up very well now.
- Opening the ventilation hole leads to a decrease in the temperature in the steam room.
- Pros. Now, even if you forget about the steam room when warming up, it will not become a sauna.
- Minus: The floor doesn't heat up well.
The solution to this problem is to make additional supply windows in a brick screen - right at floor level.
Laying tiles when the drain is located horizontally near the wall
In this case, installation should begin from the center of the opposite wall.
Sequencing:
Laying tiles at the location of the drain
- The first tile must be placed to the right of the center, and the rest from it to the right and left. The first row is ready;
- the tiles are laid using glue, which is applied to the back side with a notched trowel;
- special crosses are installed between the tiles, which ensure the required width and uniformity of the seams;
- First, whole tiles should be laid out, the outer ones are cut off;
- Excess glue is constantly removed with a damp cloth. Once it dries, it is very difficult to remove.
The floor with the laid tiles should be left for a day for the glue to dry completely.
Laying with the center located along the drain or in the corner of the bath
With this arrangement, the following should be laid away from the drain:
Drainage drain diagram
- place 4 tiles with their corners towards the center of the drain, marking a cut line for the drain hole along the edge of each corner;
- first, the first row must be made with the necessary slope towards the drain so that the seams are even;
- then a row is laid out to the opposite wall with the same slope;
- if the base has not been prepared, the slope can be adjusted using glue using a level and beacons.
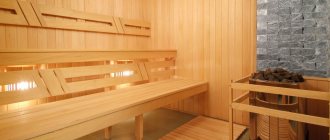
Interior Design
As a rule, two tiers are built inside the sauna for sitting and lying areas. Right angles between the walls and benches allow you to fully utilize the steam room area. All benches are made exclusively from wood. Spaces of 1.5-2 cm are left between the boards to ensure ventilation of hot and cold air in the sauna.
The width of the top shelf should be at least 50 cm so that a person can lie on it comfortably. Additionally, the front of the bench is equipped with a stand on which you can rest your feet. A distance of 70 cm should be left between tiers.
100-105 cm are left from the top bench to the ceiling so that a person can feel the maximum effect of the sauna. If the size of the room allows you to place shelves in only one tier, it should be taken into account that a very tall person, when sitting on a bench, should not reach the ceiling.
There is no plunge pool or buckets of water placed inside the sauna, since the shower and relaxation room are located separately. There are enough showers in small rooms. But equipping a swimming pool will be very useful if you have a large area. This way out is not only healthy, but also pleasant.
Grouting tile joints
It is carried out no earlier than one day after cladding. The spaces between the tiles and their surface are pre-cleaned of glue.
Grouting tools
The grout must have water-repellent properties. After its application, the entire surface becomes waterproof. It is good to use two-component epoxy grout. To give the desired shade, pigment is added to the grout mixture. It is better to make the tone of the grout a little darker than the tile. Light-colored grout quickly gets dirty and becomes unattractive. Remains of the grout mixture must be immediately removed from the surface with a damp sponge.
For high-quality work, you need to choose the right material - durable and moisture-resistant tiles, porcelain stoneware, other moisture-resistant and heat-resistant materials, heat-resistant glue and moisture-resistant grout. And follow the installation recommendations.
Floor requirements
The washing room is adjacent to the steam room
This part of the bathhouse always has special conditions. Firstly, there is constantly high humidity here. Secondly, there are sudden temperature changes in the washing room. The user can enter and exit adjacent rooms and visit the steam room. At this time, cold or hot air penetrates into the washing room.
All these factors can ruin even a solid floor in a short time. To prevent this from happening or to happen as late as possible, the following characteristics should be taken into account during construction:
- the floor covering and its components must dry quickly;
- the floor should easily withstand temperature changes;
- have the ability to pass air;
- the underground space should be ventilated, but not create drafts.