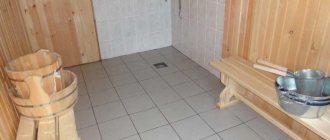
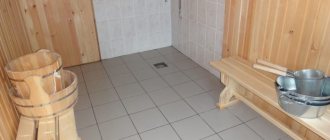
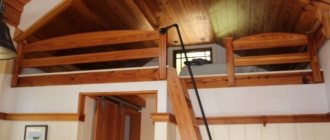
The use of tiles in room decoration is no less important than natural wood. Even in a steam room, where fragrant wood is an indispensable attribute, tiles can be found in the design of the floor and plinth under wooden through flooring. Tile flooring in the shower, rest room, locker room and vestibule will allow you to keep them clean. This material is not afraid of temperature changes and high humidity, it is easy to care for and is highly decorative. In this article we will tell you how to make a floor in a bathhouse from tiles.
Bathroom floor made of tiles
Features of the floor in the bath
In the bathhouse, special operating conditions are created for finishing materials, more extreme than in a regular bathroom. This is especially true for the steam room, where the floor and wall coverings are exposed to the following aggressive influences:
- pouring water;
- superheated steam condensate;
- high temperature (up to 70 degrees) and its changes;
- mechanical influences.
Indoors, washing tiles are appropriate not only on the floor, but also on the walls
Floor coverings for use in such conditions must meet increased requirements regarding resistance to water, steam, high temperatures, wear and possible mechanical stress. Therefore, ceramic floor tiles will be an excellent choice, as they can withstand this type of impact for a long time.
Important! When choosing tiles as a floor covering in a bathhouse, you must carefully prepare the rough base for its installation. Read about how to fill the floor in a bathhouse in a special article.
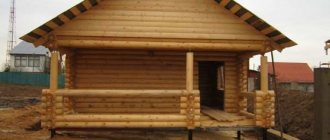
A traditional bathhouse is built from a log house, so the subfloor is wooden, but with proper preparation, it will become a reliable base for tiles. Concrete screed is best suited for tiles, as it allows you to create a perfectly level base. How to correctly lay tiles on a wooden floor, read here.
The shower room in the bathhouse can be completely decorated with tiles, choosing a pattern that imitates natural stone
How to organize a slope for drainage
It is not very convenient to wash in a room where there are always puddles. The sewer drain allows you to remove waste and prevent the appearance of puddles. But in order for it to work effectively, you need to make a slight slope in its direction on the floor. If the drain is placed along the wall opposite the front door, making a drain will be as easy as shelling pears. To do this, you just need to lift the edge of the floor located on the opposite side of the tray.
When the drain is located in the middle or in the corner of the room, it will be quite difficult to make a screed with a slope yourself. It's difficult, but it's possible. To do this, you need to correctly calculate the height of the drain. To do this, appropriate height marks are made in the corners of the room. From them, bundles of threads are pulled to the center of the drain hole. Beacons or metal profiles are laid on them. The floor screed is performed on them.
Advantages of ceramic tiles in a bath
The special qualities of this material speak in favor of choosing ceramic tiles for flooring in a bathhouse:
- Environmentally friendly - the tiles are made on the basis of natural clay and mineral fillers.
- High moisture resistance.
- Hygiene and easy care.
- Resistant to very high temperatures, steam and condensation.
- Resistant to chemicals and detergents.
- Biological passivity – fungus and mold do not form on the surface of the cladding.
- Wide selection of shades, textures, imitations of other finishing materials.
- The material can be used in a “warm floor” system.
- The material allows you to perform the necessary slope to organize water flow.
- Organic combination with natural wood.
Tiles matched to the color of natural wood are almost invisible and do not disturb the atmosphere of the traditional bathhouse interior
What should ceramic tiles for a bath be like?
Floor ceramics differ in many criteria, so for a bath it is important to choose a material that meets the special operating requirements. The markings indicated on the information sheet in each package will help you make the right choice. You will need to pay attention to the following criteria:
1. Moisture absorption . Since the flooring in the bathhouse has constant, intense contact with water, the moisture absorption rate of the ceramics should be minimal. This value depends on the method of baking the products, as a result of which their structure has a certain number of pores. A more porous surface absorbs more moisture.
Material marked AI and BI has a minimum level of absorption - its density is higher, and therefore more difficult to cut. These products differ in quality, as they are produced in different ways. To produce tiles marked AI, the extrusion method is used, when the dough-like mass is squeezed through nozzles (forming heads) on a special line, cut to the desired size and fired. Cladding marked BI is made using high pressure pressing.
The tiles are 100% moisture resistant
2. Wear resistance. According to this parameter, floor tiles are divided into 5 groups. Group 1 has the lowest level of wear resistance, and 5 has the highest. In a bathhouse that will be used daily, choose products of categories 4 and 5. If the operation is gentle - a couple of times a week, then you can use a coating of category 2 wear resistance. The higher the indicator, the more expensive the material.
The process of laying floor tiles
3. The quality of the tile will have to be assessed visually - first of all, attention must be paid to the geometric parameters of the product, plane and angles. To do this, you need to attach two tiles with their backs to each other. High-quality cladding will fit tightly, and the corners of the two products will coincide.
It is necessary to evaluate the evenness of the edges - this will also allow the formation of beautiful seams. The surface of the products must be smooth, without defects or deformations.
Important! A smooth floor surface can be laid out only if high-quality floor finishing is used.
Floor cladding can imitate the surface of various natural materials, even wood
4. Design. The texture, shape, pattern and color of the flooring will need to be selected individually, guided by personal preferences and the intended interior of the bathhouse premises. A modern manufacturer is ready to offer a wide selection of tiles with and without a pattern, with a smooth and textured surface that can imitate many natural materials, including stone and wood.
5. Purpose. Taking into account the operating conditions and the constant presence of water on the floor surface, the floor lining in the bathhouse must have an anti-slip rough surface. Floor tiles are distinguished from wall tiles by their thickness, which should be at least 9 mm.
The textured surface of the tile provides its anti-slip properties
Central drain
In this case, laying tiles indoors with your own hands will be a little more difficult, but it can still be done.
Here the floor with a slope will be laid using the envelope type. That is, stretch the cords towards the drain from the corners of the room. In all three corners, raise them by the required number of centimeters (see above for how to calculate the height of the clone). You will end up with three or four triangles of possibly different sizes (depending on the location of the drain in the washroom). In order for the laying to be correct, you can start from the base of a larger triangle. That is, from the wall of the washing bath that is wider.
- We take the first tile, apply glue to it and lay it in the center of the largest base. To the sides of this we place the required number of whole tiles. We adjust each one with a mallet in accordance with the established levels.
- We will lay the next row of whole tiles like brickwork, that is, tied together. Thus, you need to lay the entire triangle with whole tiles.
- Using the same principle, you can cover the floor in the area of the remaining triangles.
- The remaining untiled areas of the floor will need to be finished with cut tiles. And each piece will have to be adjusted in accordance with the necessary parameters.
- Now let the cladding dry for 24 hours.
- Finally, apply grout and treat the joints of the tiles and walls with silicone. We rub the seams.
Glue
An important criterion for the adhesive composition used in the bath is high elasticity, since the material is subject to heating and expansion, cooling and sometimes freezing. If porcelain stoneware is used, the adhesive must also have high adhesion (not less than 28 kg/cm2), ensuring reliable fixation of heavy cladding.
For these purposes, Ceresit CM 17 and Ceresit CM 11 adhesives have proven themselves well. Cement-based adhesives are sold as a dry mixture. It is easy to prepare a working solution - just follow the instructions on the packaging, which indicate the proportion of water and dry component. Mix the glue using a construction mixer and then leave it alone for 10 minutes. After this, the glue is mixed for two minutes and work begins.
Table 1. Comparative characteristics of Ceresit CM 17 and Ceresit CM 11
| Glue | Characteristic |
Ceresit CM 17 |
|
Ceresit CM 11 | layer thickness: 2-10 mm;
|
If a “warm floor” , then the adhesive composition must be marked that it can be used for these purposes. In a special article you will find instructions for insulating the floor in a bathhouse in a washroom.
Glue for tiles in a bathhouse must be moisture-resistant, well tolerate temperature changes and aggressive influences, and also be frost-resistant if the temperature in the bathhouse is periodically negative. Two-component epoxy adhesive meets these conditions. However, it is worth remembering that after an hour it loses its elasticity. Therefore, you should not knead a large volume at once.
In one of the articles we will look at how to choose adhesive for floor tiles in order to obtain a high-quality and durable coating and how to calculate material consumption.
Width of joint between tiles and grout
When choosing grout, you need to choose a composition that is compatible with the adhesive. This is very important for normal and long-term operation. The grout must meet the same requirements as the glue: moisture resistance, ductility, wide operating temperature range. This material also has a specific parameter: the permissible width of tile joints - it is indicated on the packaging. Typically, 2-4 mm are left between the tiles (maximum gap 20 mm), which are maintained using crosses of the appropriate size.
For a bath, you can use Ceresit CE 33 Super grout, provided that the width of the joints does not exceed 5 mm. For joint widths from 4 to 15 mm, Ceresit CE 35 Super grout is suitable. You can also recommend grout with an antifungal effect Ceresit CE 40 Aquastatic (instructions) for joints up to 10 mm wide. Dry mix CE 40 Aquastatic is supplied in 2 kg polymer buckets.
Elastic water-repellent grout Ceresit CE 40 for joints up to 10 mm wide
As for the color scheme, it is more practical to take a grout that is darker than the tiles - over time, the grout becomes lighter due to fading/washing out of the coloring pigment, and on light-colored joints the plaque that is sure to form during the operation of the bath is clearly visible.
It’s better to use dark grout – it’s more practical.
If you initially use light-colored grout, it almost immediately acquires a yellowish-cloudy coating, which no household chemical can handle. It turns out completely unaesthetic.
Ceresit grout color system by number
It is recommended to fill corner seams (these will appear if you glue a row of tiles to the wall under the lining) with silicone grout, for example Ceresit CS 25.
Silicone grout-sealant for joints Ceresit CS 25
Ceresit CS 25 is suitable for use in baths, as it can be used at temperatures from –40 to +120°C (instructions for using Ceresit CS 25 silicone sealant).
When working with sealant, you will need a blower gun (“caulk gun”).
The sealant is squeezed out of the tube using a pump gun
Preparing the base
The most important stage of the cladding process is preparing the base. To do this, the following conditions must be met:
- The use of high-quality materials guarantees a strong rough foundation. Saving here is not recommended.
- At the preparation stage, it is imperative to carry out waterproofing work.
- The base must have a slope for natural water drainage.
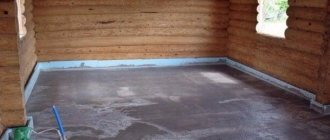
The choice of method for preparing the base is influenced by its structure and condition. The concrete base is leveled using a cement-sand screed, a slope and waterproofing are arranged.
Concrete screed on the floor in the bathhouse
Wood is an unstable material; it is susceptible to temperature, humidity and other aggressive influences. Regardless of the base material, there are a number of conditions that must be met when preparing the base for ceramic tiles on the floor in a bathhouse:
1. You will need to make a drain hole to drain water from the surface of the ceramic floor covering. It is advisable to equip drain holes with special drains when installing a drain, the location of which can be arranged in the center of the room or near the wall. A common option is to install a longitudinal ladder on one or both sides along the wall.
2. It is necessary to form a slope of at least 10 degrees on the floor, which will ensure the removal of water that flows independently towards the drain. To do this, the floor level must have a difference of at least 2 cm for every 1 m of floor.
3. An essential condition is the installation of a drainage system. The simplest option is to organize the drainage of water into a drainage hole located under the bathhouse. To do this, the following conditions must be met:
- the presence of loose soil;
- deep occurrence of groundwater;
- lack of special environmental requirements;
- installation of a sand-crushed stone filter layer.
It is important that discharged water does not accumulate under the bathhouse - this will ensure the safety of the foundation. With a more complex system, trays and drainage pipes are installed, with the help of which wastewater is collected and discharged into special wells.
4. must be installed under the tiles in the bathhouse . Considering that moisture comes from both above and below, from the soil. A vapor barrier layer is installed in the steam room.
Organization of drainage in a bathhouse on stilts
Preparing the wooden base
To install a wooden base under the tiles in the bathhouse, boards are used. Plywood or chipboard does not have the required degree of reliability. The preparation process is as follows:
- Boards must be in working order. If defects and damage are detected, the boards are replaced.
- It is recommended to disassemble the old wooden one, insulate it, remove the paint layer from the boards and treat them with an antiseptic composition.
- There should be a gap of at least 1 cm around the perimeter of the room between the walls and the plank floor. This will ensure the integrity of the plank floor when the material expands due to temperature changes. If you neglect to create a gap, the adhesive layer will not hold up, and the cladding will collapse. For the same purposes, gaps of 3-5 mm are left between the boards, filling them with sealant or polyurethane foam.
- Defects existing on the surface of the boards in the form of holes from fasteners or knots must be puttied.
- To create the first waterproofing layer, the wood is treated with heated drying oil or latex impregnation.
- To create a second layer of waterproofing, a coating or laying method is used. In the first case, bulk or flowing materials are used, in the second - roofing felt and other roll insulation.
- With the coating method, a layer of painting mesh is laid on a not completely dry layer of waterproofing.
- After this, the screed is poured, having previously installed a metal reinforcing mesh around the perimeter of the base, which will compensate for the moving layers of the structure. Filling should be carried out taking into account the slope towards the drain hole. The slope can be formed during the laying of the tiles.
Leveling the floor
Important! The problem lies in the relative mobility of the wood, as a result of which walking on the floor can have a negative impact on the reliability of fixation of the cladding. Therefore, it is necessary to eliminate the mobility of the subfloor, strengthen it and level it.
To prepare a wooden base, one of three methods can be used:
Method 1. A common method is the “dry method”, when sheet material in the form of flooring - OSB, gypsum board, plywood - is laid on top of a flat, insulated wooden floor with waterproofing. The joints between sheet materials are sealed and sanded. Expanded clay or mineral wool is used as insulation material.
Floor insulation with mineral wool
Method 2. With the “wet” method, a concrete screed from a special solution 3-5 cm thick is placed on top of a wood base, not forgetting to leave a damping gap 1-2 cm wide along the perimeter along the walls. Bitumen, roofing felt, paraffin paper or thickened polyethylene film laid on a rough base. The insulation must be placed 10-12 cm on the wall and fixed using a furniture stapler. Then a ten-centimeter damper tape is laid along the perimeter along the walls. Pouring is carried out over a metal reinforcing mesh.
Construction of a concrete base
Method 3. A simple and quick method is to glue several layers of gypsum board using polyurethane glue onto a plank base.
Features of concrete floor
In a steam room and washing room, a concrete floor is a more preferable solution than a wooden one. Special additives in the solution make it possible to obtain a waterproof structure that is not subject to rotting. Before pouring a concrete floor, carefully prepare a drainage system to remove waste liquid. To do this, compact the soil and fill it with a sand-crushed stone cushion with a compaction of broken brick 12-18 cm thick.
The first layer of concrete is 5-7 cm. The thermal insulation layer is formed from expanded clay, felt or mineral wool. Roofing felt or dense polyethylene is used as a waterproofing material. The reinforcing element is a metal mesh or steel wire. The second layer of concrete is 10-15 cm and is poured with a slope towards the drain hole. Before laying the tiles, the surface is coated with a primer with an adhesive composition for better adhesion.
Important! The location of the drain hole in the concrete floor is planned in advance, taking into account the location of the drainage system.
To form the hole, use formwork or a vertically installed pipe with a diameter of at least 5 cm.
Reinforcing metal mesh for screed
Floor tiling
We mark the floor. If the drain is in the center, we will start dancing from there. You can lay out the tiles in an “envelope” by laying out a central square of triangles. The markings will be made from the center with rays to each corner of the room. The imagination now pictures a pile of tiles cut at different angles... Indeed, the best option would be simple, standard masonry.
The center of the first square will be the drain hole. We make a block from 4 tiles, measure it, and according to the resulting size, divide the entire area into blocks. Why is this necessary? Firstly, it is easier to lay out even rows and adjust seams. And secondly, the glue dries out quite quickly and loses its properties. Therefore, marking will help to apply the mixture to such an area that you can cover with tiles without compromising the properties of the adhesive solution.
Spread the adhesive mixture evenly over the floor and tile surface with a comb. Let us remind you that the tiles are first soaked in water for 5-10 minutes so that the moisture from the adhesive is not absorbed by the porous structure of the material.
Having covered the first fragment of the surface, we repeat the procedure until the floor is completely covered with a decorative layer. To make it easier to align the ceramic plates, we install special mounting crosses in the corners of the seams. One of the nuances of this stage will be the choice of the adhesive mixture: it must be completely compatible with the base material. How to properly prepare the solution for use is written in the manual that is supplied with the glue by the manufacturer.
Drain system device
The drainage system from the washing room and steam room is similar in principle to a street rain drain, when water naturally flows along the floor towards a built-in drain connected to the sewer system.
With the help of this simple system, the foundation of the bathhouse will be reliably protected from moisture, musty odors, mildew and mold. For the drainage device, if possible, choose the lowest area of the room. The drain in the form of a gutter or pipe must have an anti-corrosion coating. The upper part of the drain is made of a material that does not overheat when exposed to high temperatures. It is advisable to place the drain funnel in a poorly accessible area of the room.
Drain ladder
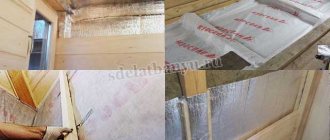
More about waterproofing
The service life of a bathhouse, the safety and comfort of staying in it largely depends on high-quality waterproofing.
Traditional methods of floor waterproofing include coating and laying. We are talking about bitumen mastic, which is applied in several layers to the cleaned floor. A waterproofing coating and finishing are laid on top. This simple method provides excellent protection from moisture, but has its drawbacks. The height of the room decreases, as the floor level rises by an average of 5 cm. It is likely that the wooden cladding of the ceiling and floor will become saturated with a specific pungent bitumen odor.
Another traditional method of waterproofing is the use of glass roofing material, various polymer films, hydroglass insulation and other materials that are not afraid of moisture.
Waterproofing with polyethylene film
Often in baths they use penetrating waterproofing, which does not have the disadvantages of the above methods. We are talking about special waterproofing compounds that are applied over a cleaned and primed floor. As a result, a layer is formed that, after drying, reliably protects the surface from moisture.
Penetrating waterproofing is:
- concreting;
- polymer cement;
- cement inorganic;
- seamless.
Of all the varieties, the polymer-cement composition is suitable for use in a bath - environmentally friendly, durable, with excellent adhesion and seamless coating.
In a bathhouse with a wooden floor, the work of waterproofing the floor is firmly connected with the process of its thermal insulation. A floor without insulation will freeze, become covered with ice and release heat from the room. Therefore, heat-insulating material with fire-fighting properties is laid on the waterproofing layer (2-3 layers of roofing felt, for example or polyethylene film). Mineral wool is excellent for these purposes. A waterproofing layer is placed on top of the thermal insulation.
How to choose good mineral wool?
Laying tiles
Laying floor tiles in a bathhouse is technically no different from laying them in other rooms. The instructions below will briefly describe the main nuances of the process.
Tools for working with floor tiles
Table 5. Instructions for laying tiles
| Illustration | Description |
| The surface to be covered must be leveled, cleaned and degreased. | |
| Markings are applied to the floor surface in order to obtain a symmetrical pattern on the floor and avoid a large number of undercuts. First, draw a line running perpendicular from the center of the threshold to the opposite wall | |
| The first trial row is laid along the line, taking into account the distance seams. | |
| Aligning with the outer edge of the last tile, draw a second orientation line perpendicular to the first. The first tile will be laid at the intersection of the lines. | |
| The adhesive solution prepared in accordance with the instructions is applied to an area slightly larger than the one that will be occupied by the element of the first row. | |
| Using a notched trowel, grooves are formed on the surface of the adhesive layer. | |
| If one side of the tile is larger than 30 cm, then glue must be applied to its reverse side. | |
| The tile is laid at the intersection of the lines, taking into account the exact coincidence of its edges with the markings on the floor. The accuracy of the entire styling pattern depends on this. | |
| Use a rubber hammer to level the tiles | |
| Spacer crosses are placed in the corners, marking the width of the seam. The first row is laid, leveling its height using the rule and the building level | |
| Laying subsequent rows is carried out with mandatory control of the overall horizontal plane. | |
| In order to facilitate wet cleaning in the room, a plinth is laid at the junction of the floor tiles with a wall made of another material - stone or wood. | |
| After the glue has dried for 24 hours, begin grouting the joints. | |
| The seams are filled with the compound using a trowel, making movements diagonally to the direction of the seam, trying not to press the grout too much into the seam. After 15 minutes, remove excess grout using a damp sponge. Frequent washing is required. | |
| After at least an hour, wipe the tiles and the area around them with a cloth. | |
| If after 15-20 minutes a white coating appears on its surface, use a tile detergent to clean it. |
Trimming of tiles may be required during the process. The following instructions tell you how to do this correctly.
Table 6. How to trim tiles?
| Illustration | Description |
| To trim the last tile adjacent to the wall, it is laid on the element of the last row | |
| Place another one on top, 1 cm away from the wall, and draw a line along which the cut will be made. | |
| The product is placed on the tile cutter so that the cut mark is located exactly on the cutting line of the tool. | |
| The knife is placed on the top edge and controlled by gently pressing on the other end of the tile. | |
| The same operation can be performed using an electric tile cutter. | |
| If a shaped incision is necessary, first mark the boundaries of the incision using a pencil. | |
| The part that needs to be removed is divided into squares using a special sawing scriber. | |
| If the part is large, use a grinder or tile cutter. | |
| You can adjust the shape using parrot pliers. |
How to make a slope
There are two ways to create a slope: pouring the floor initially or laying the tiles in a special way. The instructions below will tell you about the sequence of laying tiles to form a slope towards the drain hole.
Table 7. Instructions for creating a slope towards the drain hole
| Illustration | Description |
| The location for the drain ladder is chosen in advance, before tiling the floor. | |
| The ladder should protrude above the floor surface. | |
| This is due to the fact that the tiles must be located in the same plane as the plane of the ladder. | |
| At the stage of pouring the floor, the ladder is located at sharp angles relative to the walls (in the form of a diamond) to reduce the number of undercuts from 8 to 4. | |
| Before you start marking the floor, cover the front surface of the ladder with a protective layer of masking tape - this will protect it from dirt and scratches. | |
| The plane of the drain ladder must be strictly horizontal so that water does not accumulate in other places, but flows directly into it. | |
| Lines are drawn on the floor along which the tiles will be oriented. When installing a ladder in a diamond shape, the lines passing through its tops should be parallel to the walls. Having installed a staff or level along the vertices of the diamond, draw pencil lines on the floor | |
| Perform a check and draw a line passing through the vertices of the diamond. | |
| Marking of cuts on the surface of the tile should take into account the slope under which it will be located. To simulate a slope, pads made of hard material are used. The slope of all 4 tiles should be directed towards the middle of the ladder. | |
| To correctly mark for trimming, you need to install spacer crosses. | |
| Using a square and a special pencil, mark the cutting line. When marking, take into account the gap at the seam between the ladder and the tiles. | |
| Spaced crosses should be installed between all tiles, and the slope should be directed towards the center. | |
| According to the markings, the tiles are trimmed. | |
| Then it is laid in place, simulating a slope using solid pads. This is required in order to accurately determine the angle of inclination. | |
| It is at this stage that, having laid the first tile, it is necessary to accurately determine the angle of inclination so that when installing the remaining three tiles, we can focus on it. | |
| Install the second and subsequent tiles taking into account the selected slope, which should not be too large. So, for 44 cm tiles it is about 5 mm. Using a level, it is necessary to control the displacement of the air bubble - it should be the same on all sides of the ladder | |
| The gap between the tiles and the drain corresponds to the thickness of the adopted seam. | |
| The edges of the tiles are outlined along the wall - it is these lines that should be oriented towards during the installation process. | |
| All tiles must be located in the same plane with a given slope. | |
| When applying glue, it is carefully rubbed into the primed base, avoiding the formation of air cavities in the glue and under the tile. Due to the slope, the adhesive layer will be large. Using a putty knife and a notched trowel, smooth out the glue so that it matches the lines on the wall. | |
| If laying on a thick layer of adhesive is required, then it would be advisable to apply part of it directly to the tile. | |
| To prevent the formation of air pockets, furrows are formed using a notched trowel. | |
| Pressing the tiles, they are guided by the lines on the wall. | |
| Excess glue is removed with a spatula. | |
| Check the slope using a level and make sure that the tiles do not fall below the plane of the ladder. It is better that it is located a few millimeters higher, since the glue will shrink during the drying process. | |
| Crosses are installed starting from laying the second tile, including near the ladder. | |
| A day after installation, the seams are cleaned of glue using a special scraper. You must work carefully, trying not to damage the edges of the cladding. | |
| If there are any adhesive stains left on the surface of the tile, they can be removed using a special alkaline product. It can also be used to clean the end parts of seams. | |
| After cleaning the seams, they begin to joint them. Before this, the seams are moistened with a sponge. The fugue is applied with a small rubber spatula, first along the seam and then across it. It is necessary to ensure that the fugue reaches the very bottom of the seam. You can check this by pressing the tip of a spatula onto the already applied fugue. | |
| After 10-15 minutes, the seams are cleaned of excess fugue, smoothed and left in this state for a day. |
Tile in a bathhouse may look cold, but in tandem with natural wood it will maintain a warm, cozy atmosphere and increase the practicality of the flooring.
Prices for grout for Ceresit tiles
ceresit tile grout
Horizontal drain
It is better to place a horizontal drain close to the wall, since the trim does not look aesthetically pleasing.
- This option for laying tiles is as easy as shelling pears to do with your own hands, even if the screed was initially poured without a slope. First, we calculate the distance from the drain to the opposite wall. The level of floor slope in centimeters towards the drain will be equal to the number of meters. For example, if there is 3 m from the ladder to the wall, then the slope level should be 3 cm.
- Now we measure 3 cm up from the floor on the wall opposite the gutter and attach the beacons. We pull the cords from them towards the drain and fix them in this way. As a result, we have a template according to which we will lay the tiles.
Important: mark the wall in the washing bath, from which we will begin laying the lining towards the drain, in half. The first tile should be placed to the right of the applied markings. Now you should put the required amount of material to the right and left of it. This will be the first row of masonry.
The process for laying each tile is as follows:
- Apply the required amount of glue to the back side of the tile using a notched trowel and lay the tile. We adjust the height of the masonry with a rubber mallet if the screed was poured without a slope.
- Between each tile we install plastic or wooden crosses that regulate the width and uniformity of the seams.
- First, lay all the whole tiles towards the drain and only then lay the outer cut ones. While working, use a damp cloth to remove excess adhesive on the tiles. Otherwise, once it dries, it will be difficult to remove.
- Leave the laid floor for 12-24 hours until the glue dries completely.
- Once the glue has completely dried, you can rub the seams. The grout is applied with a special rubber spatula. Remove excess with a cloth. We treat the joints of the facing material with the wall with silicone.