High temperature, high humidity and other unfavorable factors impose quite stringent requirements on the finishing materials used in the bathhouse, and the culture of installation work must be at its best. Finishing a sauna is a serious stage that requires a sober mind, skillful hands and a clear, pragmatic view of, in general, difficult things. Dedicated to all finishers and sympathizers.
Features of the choice of finishing materials
The best option for finishing a steam room is natural wood. It must be resistant to rotting, attractive in appearance and of sufficient density. It is undesirable to decorate a bathhouse with pine, since when heated, this material releases resin into the surrounding space .
If your financial situation allows, then it is better to buy fir, Canadian cedar, rosewood or African oak. These wood species are characterized by a delicate and pleasant aroma, interesting patterns and attractive colors.
Alder, ash, aspen, birch and linden are considered more economical solutions. Linden croaker with a paint coating is especially popular among owners of private houses. This material has a pleasant-to-touch surface, does not heat up very much and allows you to regulate the level of humidity in the steam room. Alder and birch have medicinal qualities, and ash is very durable.
To decorate the washing room, it is not necessary to use the same wood as for the steam room . Such a room can be equipped with the help of pine lining, which is not afraid of moisture and is not susceptible to rotting. Spruce lining has similar qualities, which is why it is often used to decorate washing areas.
Not only the type of wood species is very important, but also its quality. Boards must be selected with a minimum of pods and defects. They must also be thoroughly dried.
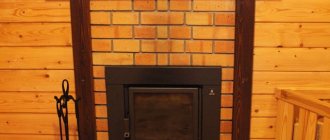
Some other materials are also used for finishing baths and saunas. Areas near the stove are usually exposed to high temperatures, so they require finishing with heat-resistant tiles or stone.
It is advisable to cover the floor in the washing room and the walls of the shower with tiles. For convenience and safety, square or rectangular wooden pallets can be installed on the floor surface. To give the interior of the bathhouse originality, you need to correctly combine tiles and stone with wood.
Types of home sauna
The question of how to make a sauna in the house has several answers. The choice of the optimal option depends on:
- The number of people willing to take a steam bath;
- Financial opportunities;
- Owners' preferences.
Nice factory options were:
- Barrel sauna. This method of arranging a steam room helps strengthen the cardiovascular system, get rid of cellulite, increase immunity and skin elasticity. The special charm of such a barrel is created by the cedar finish, which fills the room with the delicate color of the wood and a light, healthy aroma. The control process is displayed on a separate remote control, and if desired, additional functions can be installed in the sauna.
- Sauna cabin. A small cabin, designed for one maximum of two people, takes up very little space. The only condition for placing such a structure is the presence of free space between the floor of the room and the cabin, as well as between the ceiling and the upper part of the steam room. This work of bath art will be decorated with doors made of wood with glass inserts or made of tempered glass. Although they are installed more for the beauty and psychological comfort of the person inside.
- Salt sauna. To create this option, unique Himalayan salt is used. It normalizes the circulatory system, has a beneficial effect on the heart and blood vessels, rids the body of harmful bacteria and the effects of stress, and improves the condition of the skin and respiratory system.
Additional comfort will be provided by a small swimming pool or bar located nearby.
In a private house, they try to allocate a separate room for a bathhouse, in which it will be possible to equip a sauna, a washing room, a dressing room and a relaxation room, possibly even with a terrace or veranda.
Surface preparation
Before covering the wall, the ceiling and floor must be carefully prepared: insulated, protected from moisture, and made sure of their strength . Walls and ceilings made of wood must be covered with a soil mixture with an antiseptic effect; block and brick walls must be leveled with cement-based plaster.
Particular attention should be paid to leveling the floor: both plank flooring and tile cladding need a flat plane with a slight slope. At this stage of preparation, you need to think about the location of the chimney and drain and install everything necessary.
Content
The interior, made in the Russian style, is a classic.
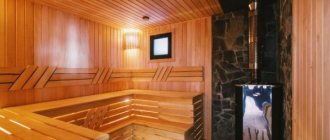
Beautiful interior inside the bathhouse
In fact, everyone is provided with such familiar attributes as brooms, hats, buckets, gangs. Only by adhering to the integrity of the overall style and competently choosing the necessary accessories can you make your sauna unique and its interior special.
Design depends on the choice of material
DIY finishing stages
After preparation, you can proceed directly to finishing. For work, it is recommended to acquire the following tools and devices :
- screwdriver;
- building level;
- rubber and ordinary hammer;
- screws and nails;
- notched spatula;
- tile adhesive;
- clinker tiles;
- electric jigsaw;
- lining;
- thermal insulation material;
- slats and beams for making sheathing;
- film for vapor barrier.
All work consists of several stages. It is worth dwelling on each of them :
- Floor finishing. For this, clinker tiles are used, since its surface will not slip even after getting wet. Builders advise soaking the product in water before finishing to reduce glue consumption. The tiles are laid gradually; plastic crosses are placed between its edges and the wall to ensure even seams. Excess adhesive mixture is removed with a dry and clean cloth. Then the seams are rubbed with a special compound, which must be applied with a spatula. The protrusions are adjusted with a rubber hammer.
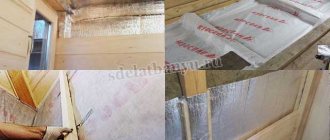
- Installation of sheathing. It is necessary for vapor barrier and insulation of wall structures. To make it, you need to nail a flat beam to the base of the wall. It is secured to brick structures using anchors.
- Thermal insulation device. The waterproofing material is fixed to the sheathing using a construction stapler. Sheets of heat-insulating material are placed between the beams in one or several layers. The final layer is a vapor barrier film. It can also be fixed using a construction stapler. The seams are sealed with tape.
- Covering wall surfaces. At this stage, you can turn on your imagination and decorate the interior in an original way. The walls, for example, should be entirely finished with boards or clapboards, or combine wood with ceramic tiles. In the steam room, it is recommended to lay heat-resistant tiles only near the stove, but in the locker room and washing room, you can use it to finish any surface. All existing gaps should be sealed with sealant.
- Ceiling finishing. The beams on the ceiling must be covered with a waterproofing film using staples from a construction stapler. The voids between the individual beams should be filled with insulation material. After this, the thermal insulation layer is covered with foil or vapor barrier film. The seams are sealed with special tape. The lining is fixed to the slats nailed to the protruding beams.
What you should pay attention to
When choosing a material, when you have to decorate a sauna with your own hands, you should be guided by some rules:
- Commercial timber must have a nominal moisture content established by the regulatory framework.
- Finished joinery products, in the form of lining, tongue-and-groove boards, block houses, must be protected either with packaging films or special storage conditions in closed dry warehouses.
- Reject products with through knots, cracks, or breaks. You need to be especially meticulous in inspecting the elements for signs of warping or twisting. Products of the same batch must be calibrated in terms of geometric dimensions, lock shape and main color of the product.
- The presence of signs of changes in natural color, darkening or graying of the ends, or whitening of the surface indicates problems with pathogenic microflora and control measures taken.
- Signs of damage by grinding insects indicate a dramatic decrease in the strength of the elements and the possibility of infection of healthy wood in case of contact.
Covering a bathhouse with bamboo panels
Bamboo panels are considered an excellent replacement for wood paneling . This material still continues to gain popularity, which is why it is not very common in private baths. Panels made from bamboo have many advantages: they are not afraid of high temperatures, mold, moisture, they are very durable and very aesthetic. In addition, these products are very flexible, so even rounded elements can be finished with them.
The surface for such cladding is prepared in the same way as for wooden lining. After fixing the heat and vapor barrier, strong slats are attached to the racks. Bamboo panels are fixed to them using liquid nails or a construction stapler.
Installation of shelves
The finishing of the steam room is completed with the installation of special furniture - shelves. They are made from the same material as the walls, although there are exceptions. The best materials: linden, aspen, alder, cedar, ash.
It is important to place the shelves correctly to ensure maximum comfort for steamers. The recommendations are as follows.
- If the height of the room allows, it is better to install shelves in 2 or 3 tiers. In this case, you can choose not only a comfortable position, but also the temperature: those who like it hot, steam on the top shelf.
- The distance from the top tier to the ceiling should be at least 120 cm so that it is convenient to climb onto the shelf.
- The distance from the bottom bench to the floor is 25–45 cm.
- The width of the shelf for sitting is 40 cm, for lying - 60 cm, but a width of up to 80 cm is preferable, if the area allows.
- The length of the lying shelf is selected taking into account the height of the tallest family member. Usually it is no less than 180 cm.
Valera
The voice of the construction guru
Ask a Question
Depending on the configuration of the steam room, the relative arrangement of the shelves is chosen. If the sauna is small, it is convenient to dock the sun loungers in the corner. Then their total area will be larger. In a spacious steam room, it is best to install shelves on opposite walls and place the stove between them. In this case, the room is heated more evenly.
Manufacturing and installation
Frame for shelves
First of all, create a drawing of the steam room and examine different options for the arrangement of shelves in the sketch. After choosing the layout, production begins,
- Using the diagram, the volume of materials needed is calculated . For racks and crossbars, take thick bars with a cross-section of 50*50 or 50*80 mm. For the bench itself and the backrest, boards with a thickness of at least 25 mm are needed. The width should be no more than 4 times the thickness, and the length depends on the length of the bench. When making calculations, take into account that the slats are laid with a gap of 1–2 cm.
- Lumber is treated with antiseptics.
- Assembling the frame. They start from the top tier: where the shelf is installed, strapping bars are attached to the wall. Support bars are installed under the harness - at the extreme points and intermediate ones.
- On the contrary, at the width of the shelf, a second row of supports is installed and secured to the wall beam with horizontal jumpers. Then they are tied together with horizontal crossbars, forming an external harness.
- If there is a 3rd tier , repeat the operations: place vertical supports at the required distance and attach 2 tiers to the harness. If necessary, the structure is fastened with diagonal jumpers.
- The flooring boards are placed with a gap of 1–2 cm and secured to the strapping bars with self-tapping screws. The fasteners are recessed so that the metal caps do not burn the skin.
- Install the backrest in the same way : fix it to the wall with self-tapping screws. If a backrest is needed on the lower tier, slats fill the space between the loungers. There should be a larger gap between the bottom rail and the bench - 5-6 cm.
Like the walls in a steam room, the shelves can be painted, varnished with appropriate compounds or treated with oil and wax.
Manufacturing and installation of shelves
Environmental items are also important for finishing . In the case of a bathhouse, this role is assigned to the shelves. They usually have a rectangular shape and consist of several levels. They need to be sheathed solid with minor gaps. This is best done with linden boards.
You can use standard installation methods, or you can use your imagination and do something original, for example, sheath the structure with light wood and use darker material for the boards along the edges. The corners of the shelves can be decorated with decorative elements or rounded. All unusual shapes and solutions attract attention and arouse interest.
Bake
But the most important element for creating a sauna remains the stove. She may be:
- Conventional wood-burning, independent of external energy sources. This design ensures fairly cheap operation of the sauna, the creation of soft steam, and a high heating rate. But when installing a wood-burning stove, additional costs will be required to install a chimney, and the risk of fire increases several times.
- New-fashioned electric, capable of heating to a fixed temperature and providing maximum fire safety.
A sauna with an infrared stove still causes quite a lot of controversy. It is believed that such heating does not provide a therapeutic effect other than intense sweating.
Room interior
There is no more suitable place where you can simultaneously relax after a busy work week, imbue yourself with harmony, and cleanse your body than a sauna or bathhouse, which is closer in spirit to the Russian spirit.
For many, visiting it is a tradition that is supported by every generation, and is often instilled in families from early childhood, so it is not surprising that our compatriots want to have their own bathhouse in the backyard.
Great place to relax
The environment inside should give harmony and tranquility. This atmosphere is achieved by the combination of all parts of the interior. You should not think that the type of Russian baths is a standard steam room with a stove and the same type of shelves. A designer interior is always distinguished by original details and decor; only by implementing an individual project can you get a stylish room for couples and relaxation.
Stylish room in oriental style with your own hands
Quality, thoughtful finishing and accompanying accessories are three pillars of internal content that will never cause you any inconvenience. For information on how to equip the interior, I will tell you today. These ideas can be used both at home, for your own needs, and for business.
Thoughtful finishing is the key to success
Shower room
The shower room is an innovation inherent in the modern bathhouse; it demonstrates how you can isolate yourself from prying eyes. It is preferable to tile a room, adding colorful elements to the design, such as mosaics and stained glass. There is a special requirement for the floor covering; it must have a rough texture. The range of equipment for washing is quite large. Installation of a shower, jacuzzi, swimming pool is allowed.
Installation of a shower stall
If you build according to the model of your ancestors, then huge tubs filled with water installed on top will look more harmonious. Naturally, the height of such a homegrown soul should exceed the height of an adult. To get a “shower”, you need to pull the string, after which you are guaranteed an invigorating waterfall.
Huge tubs filled with water
It’s good if the shower room is equipped with shelves and cabinets for storing clean towels, felt hats, sheets, brooms and other paraphernalia, without which a steam room is not a steam room.
The walls inside the shower can be painted or made of wood, but in this case the tile will be functional. Ceramics on the wall will prevent the appearance of fungus and mold, and in addition, it is easy to keep clean and disinfect.