A bathhouse is a functional building that combines special sections for health procedures, relaxation and rest. A separate room that requires close attention when arranging is the washing room in the bathhouse.
How a bath sink is designed and what available materials should be used to decorate the interior in order to create optimal conditions for procedures are questions that are of interest to many.
Advantages of the washing compartment
The washing compartment in the bathhouse is arranged in a separate area, fenced off from the steam room, dressing room and relaxation room. In small baths, all rooms are combined, and the washing area is separated from other functional areas by a decorative partition.
The combined option of a washing compartment with a steam room provides significant space savings, but makes the room less convenient to use.
The advantages of a separate sink include:
- the ability to create a unique and practical interior;
- possibility of accommodating a large number of people;
- the possibility of using wear-resistant and durable materials for internal lining;
- simplicity and accessibility of washing machine maintenance.
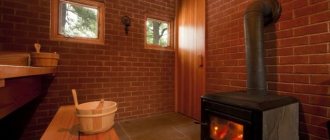
In a small-sized private bathhouse there can be two rooms: in one there is a dressing room with a relaxation area, in the other there is a steam room with a sink. A stove for a bath and an area for storing bath accessories are located in the steam room, a shower and benches for relaxation are located in the washing bath.
This design has some advantages, including:
- Economical consumption of fuel material for heating combined rooms.
- A laconic and practical interior, when a heater with an extended firebox can be installed in a steam room and washing room. This will provide simultaneous heating of the premises and hot water supply.
Country holiday
To install a new structure for a steam room, you must select a free area. The specific criteria for allocating a plot of land are determined solely by the owner himself.
For example, those who are predisposed to colds prefer to place a bathhouse closer to a residential building.
With all this, you don’t want the bathhouse to be located next to a place of discharge of natural needs (unless, of course, you have a septic tank) or a garbage pit.
Often, users prefer to place the bathhouse adjacent to the main building, ensuring the proper level of heat and vapor barrier.
Bathhouse at the dacha: photo
Another direction in planning the site for installing a building for a bathhouse comes from geological research data. Of course, if the layout of a 4x6 bathhouse involves the creation of drainage for water disposal, then the requirements for soil quality may not be so high.
Bathhouse design: photo of the location of the sink, steam room, relaxation room, bathroom and terrace
Often, a traditional project does not involve the creation of a special sewer system; in this case, a reinforced foundation is planned and a place with a low groundwater level is selected.
Areas of high moisture accumulation are usually excluded from the 5x6 project. In this case, it is necessary to maintain distance from the following objects:
- from the well - at least 5 meters;
- from the toilet and garbage pit - at least 8 meters;
- from a residential building - at least 8 meters.
If you are really lucky and your site is located close to water, it makes sense to install a bathhouse with access to a body of water. In this case, the issue of planning and installing the pool is removed; immediately after the steam room you can plunge into the cool water of the lake.
When the issue with the location is resolved, it is worth thinking about the project itself. The plan reflects such parameters as the number and purpose of premises, the size of the steam room and washing departments, the presence of additional compartments, and the number of floors.
Contrary to current stereotypes, a bathhouse project is expensive. This is true if you purchase a construction plan from a construction company. However, no one prohibits the use of template developments. In this article we provide the necessary drawings and diagrams, according to which you can develop your personal design for the location of functional elements.
For example, the layout of a 6x4 bathhouse can be easily obtained proportionally from a project of another multiplicity, where the sink and steam room will be located separately or adjacent.
Requirements for the washing department
Distinctive features of a washing room in a wooden bath are changes in temperature conditions and high humidity, which leads to the creation of comfortable conditions for long-term visitors.
For this reason, such a department must have a reliable ventilation system for good air exchange.
The results of insufficient ventilation are overheating of the body, the appearance of mold and mildew, and the concentration of unpleasant odors and moisture.
The washing room in the bathhouse must meet the basic technical requirements:
- Equipped with forced ventilation of supply or natural type with an air duct pipe. The pipe is equipped with protective flaps to regulate the air flow.
- The air pipe is brought out through a special hole in the ceiling to the roof.
- Installation of the supply pipe 200 cm above the soil level.
- Arrangement of hot and cold water supply systems.
- Carrying out various types of massage using bath cosmetics. For this purpose, a standard massage table or trestle bed is installed in the department.
Hot water options
A shower in a bathhouse needs not only cold, but also hot liquid. The type of equipment depends on the frequency of operation of the steam room and the technical features of communications. Among the popular designs there are 5 models.
Stove heating
Hot water is obtained from a heater designed for use in a bathhouse. Cold moisture entering the heat exchanger heats up and passes into the storage tank under high pressure. When you open the tap, warm liquid flows to the shower faucet.
Stove heating for showerSource texnotoys.ru
During consumption, users must ensure a constant supply of cold water. Comfortable conditions are only available when the stove is running. If there is no electricity in the bathhouse, then a hand pump or motor pump can be used to supply moisture.
Gas
In an area connected to a centralized supply of blue fuel, you can install a column. A flow-type gas heater quickly heats water for a shower in a bathhouse and does not depend on the availability of electricity in the steam room. To install the equipment, follow the operating rules.
Gas shower heaterSource master5.kiev.ua
Storage tank
The model consists of a reservoir and a heating element and works on the principle of a thermos. The liquid in the container is heated from the mains, so there is an outlet nearby. The structure is mounted on a reinforced wall in the dressing room. The capacity of the boiler is from 10 to 200 liters, the temperature range is from +55 to 80 C, so a mixer is installed in the shower.
Storage heater for showerSource altay-travel.ru
Flow-through electric heater
The operating principle is similar to a gas water heater, but the device uses electricity to heat. The compact box is installed in the dressing room on the wall, connected to a source of cold liquid and to a watering can. The speed of heating water for a shower in a bathhouse is affected by the power of the equipment (2-7 kW).
Electric heater Source ebuyshop.com.ua
Combined view
The structure is fed by a boiler from the steam room and a flow-through boiler. If the bathhouse is heated, then hot water comes from the heat exchanger. When the sauna is idle, liquid from an electric heater is used for showering. Shut-off valves ensure switching of water supply lines depending on the selected type of heating.
Shower heater and stoveSource feringer.shop
Features of finishing material for washing
The washing room in a wooden bath is practically not subject to heating, but is in contact with water, which eliminates the possibility of using wood for interior decoration. To maintain the overall design of the premises in a bathhouse made of timber, you can use its high-quality imitation.
When choosing materials for the interior decoration of the washing compartment, the following parameters are taken into account:
- resistance to high humidity;
- environmental safety;
- practicality and durability;
- convenient and affordable installation;
- ease of maintenance;
- price.
The most popular finishing materials include wood, tiles, stone, paint, and plastic.
According to their purpose, they are divided into types: for finishing floor, wall and ceiling surfaces. Each of the available options has its own advantages and disadvantages.
Installation of the log system
A mandatory stage in the construction of floors in a bathhouse, in which experts recommend laying the beams horizontally (if there is already a layer of waterproofing), and at a slope of 3 to 100.
Before making the flooring, the master must make sure that the levels of the foundation and coating match. If a leak-proof design is chosen, it is permissible not to fix the floorboards on the joists; in other cases, they need to be secured - each with a pair of nails (on both sides of the planks, driven in at 45 degrees). Attention, it is advisable to tighten the tongue and groove boards first, and they should be finally hammered in only after finishing and drying. At the final stage it is necessary to frame it with a plinth.
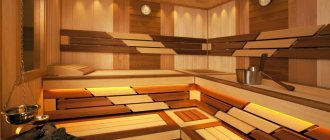
Wooden panels and lining
Wood is the most sought-after and popular material used for decorative cladding of wall and ceiling surfaces. Finishing a bathhouse sink with wooden panels and lining is the best choice for those who want to get an original interior style.
Due to the high content of resin compounds, the wood is resistant to high humidity, drying out and rotting.
With additional treatment of wood with protective paints, natural oils and wax, the service life of the material is doubled.
- Oil compositions are able to penetrate deeply into the wood structure and reliably protect it from the inside. Before processing, the wooden base is thoroughly cleaned and sanded. The oil is applied evenly in several thin layers. After drying, the surface becomes resistant to the negative effects of moisture.
- Wax is an alternative option for protecting wood, more expensive and durable. It is applied in a circular motion using a piece of soft cloth. Wax is capable of creating a thin film that protects the surface from darkening, drying out and rotting.
- Paints with moisture-repellent properties are used to treat wooden surfaces. They come in matte or glossy. The paint is evenly applied to the surface to be treated with a soft brush in 2-3 layers and left until completely dry.
Finishing a shower room in a bathhouse with clapboards or panels can be made from the following types of wood:
- Larch is a material with high performance characteristics. It is strong, durable and resistant to high humidity. Despite the difficulty in pre-processing, such wood has incredible beauty and aroma.
- Linden is a wear-resistant material that can be used for high-quality sheathing of a sink. It is resistant to darkening, drying out and rotting, and also exudes a pleasant medicinal aroma.
- Cedar, pine and spruce are wood species that are widely used for cladding ceiling and wall surfaces. They are impervious to heat and high humidity, and have a pleasant pine scent.
- Abashi is an exotic wood that is distinguished by its delicate texture and aesthetics, and is resistant to deformation and damage.
Wood finishes can be combined with decorative elements made from natural or artificial stone.
Rules for finishing floors in a bathhouse
The shelves in the steam room are made without the use of metal nails
The temperature on the floor surface does not exceed 30°C, so the rough level can be concrete, earthen or clay. The basic rule is to organize the fastest possible removal of water from the premises. In order to ensure safe movement, it is necessary to cover such a subfloor with a covering made of cork, possibly a fiber mat, or a plank flooring. Tile or sanded boards are also perfect.
The process of arranging a floor with wood is quite simple. First, the logs are laid, then the boards are laid. The logs are placed on brick pillars, which are located on a rough base.
Special sauna panels have excellent characteristics and look great
The selected log size varies from 20×20 to 25×25 cm with an installation step of approximately one meter, since the floor will not experience significant loads. For flooring, use edged, preferably tongue-and-groove boards. The wood used should have a thickness of about 30 cm. All material should be treated in advance with an antiseptic substance, which will protect against the growth of fungus and the spread of mold.
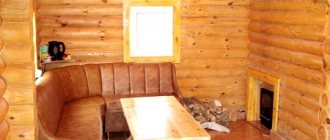
Interior of a bathhouse with a spacious relaxation room
If tiles are chosen for flooring, the installation process is as follows. The floor is first screeded, and the surface should be perfectly flat. The tiles are fixed with a special adhesive. To treat the seams, moisture-resistant grout is used, which helps protect the material from mold.
In the interior of the steam room it is necessary to use non-resinous wood species
Subsequently, low boards or wooden gratings must be laid on such a floor covering, which then, after each bath procedure, will have to be taken outside to dry. This is done to prevent the possibility of slipping on a wet surface.
Ceramic tile
Tiles are wear-resistant, strong and durable materials that have high moisture-resistant properties. It is distinguished by a wide range of colors, texture and size variability. Floors and walls up to 1.7 meters high are tiled.
Before tiling wooden walls, the surface is thoroughly cleaned, a layer of waterproofing is installed and leveled. A moisture-resistant adhesive composition is used to lay the tiles.
In order to properly tile the floor, it is necessary to properly arrange the drainage hole and make a concrete screed. The base is made at a slight angle with respect to the drain hole connected to the sewer pipe.
Tiles have important advantages:
- resistance to high humidity;
- high strength and wear resistance;
- environmental safety and durability;
- resistance to fading and darkening;
- ease of maintenance;
- wide range of colors.
The disadvantages of the finishing material include:
- slippery surface that can lead to injury;
- the difficulty of doing installation yourself (practical skills and knowledge are required);
- susceptibility to mechanical damage.
The ceramic tile finish is successfully combined with natural moisture-resistant paint.
Principles of work execution
Before finishing, you need to prepare the premises, building materials, and collect the required tools and consumables. It will be easier to understand the work process using the example of lining.
Preparation
To prepare the space you need:
- Take out construction waste.
- Consider the location of wiring and lighting points.
- Place the lining indoors and leave for 3–5 days.
The lumber must be coated with a special antiseptic in advance to protect it from the destructive effects of moisture.
Tools and consumables
Required tools and consumables:
- jigsaw, miter saw;
- Sander;
- screwdriver;
- hammer, mallet;
- wood hacksaw;
- fasteners;
- bars, slats;
- lamps, wires, corrugation.
Additionally, you need to prepare a vapor barrier and foil film, insulation.
Screwdriver (Photo: Instagram / instrument_tyumen)
Floor arrangement
The choice of finishing material depends on the type of floor:
- For concrete surfaces, it is better to choose ceramic tiles or porcelain stoneware.
- If the base is not solid, only with joists, you first need to make a subfloor, and then lay the floorboard.
Types of wooden floors:
- Solid - a massive wooden board, without free space between the individual boards.
- Leaky - between each board there is 2-3 cm of free space through which water flows into the ground.
Depending on the type of wooden floor, the option of arranging the drain changes. If the floor is solid, the drain is located at the lowest point of the room, and the flooring itself is sloped in one direction.
Wall covering
The decoration of the walls in the bathhouse is a multi-layer structure:
- Vapor barrier film.
- Wooden frame made of bars.
- Insulation.
- Foil film.
- Frame made of slats.
- Finishing material.
The insulation must be resistant to moisture. The best option is foam glass. Mineral wool is cheaper, but is not resistant to moisture.
Foam glass (Photo: Instagram / granulir)
Artificial and natural stone
Finishing the sink with stone is a practical and durable option. The material is suitable for cladding floors and wall surfaces up to 50 cm in height. An excellent solution for finishing a shower is a combined masonry made of natural and artificial stone.
Natural stone has a number of advantages:
- high environmental friendliness and safety;
- practicality and durability;
- inertness to mechanical damage;
- resistance to high humidity;
- attractiveness and aesthetics.
Among the disadvantages are:
- heavy weight;
- the difficulty of doing independent masonry;
- high cost.
An alternative to expensive natural stone is its artificial counterpart. It is less environmentally friendly, but at the same time lightweight and easy to install.
How to insulate
The floor is insulated during the construction stage, but this is already understandable. There is no way to insulate a torrential one with water draining under the bathhouse , but with the rest it’s already better.
Usually the insulation is placed on a layer of waterproofing (do not forget that it must be sealed and extend onto the walls). This can be polystyrene foam, expanded clay, or any other insulation material that can be poured on top with concrete and it will not lose its thermal insulation properties.
Also, for insulation, it is worth taking measures to seal the underground space - there should be no cracks or holes. But at the same time, if not necessary, then it is very desirable to have vents in the base, which should be closed during procedures, but in general are an important part of ventilation.
There is another option for how to insulate the floor in a steam room. A concrete screed or a clay castle is not always made. Therefore, the insulation can also be placed on boards that are attached to the bottom of the logs. That is, the logs are first attached to the foundation frame or grillage, then the cranial bars are nailed, boards are placed on them, a water barrier in the form of a film is placed on them, for example, and the space between the logs is filled with insulation .
Article on the topic: How to pour a foundation for a 3 by 4 bathhouse
It would be worth putting another layer of water barrier on top of the insulation, because water can penetrate from above. Next is the rough floor, and whitewash on top of it. At the same time, we must not forget about the slopes leading to drainage. This option is shown in the picture above. It goes without saying that the drain pipe is brought directly to the level of the finished floor, and the entire wastewater drainage system is done during the laying of the foundation (if it is strip) or later (if it is columnar or pile).
Here's another option in the video below.
Well, the surest way to make walking on the floor comfortable in any frost is to install electric heating. Most often this is done if the owner is laying ceramic tiles.
Plastic panels
Finishing a washing room in a wooden bath using PVC panels is an affordable and cheap option. This material is characterized by high moisture resistance, practicality and ease of installation. It is used for cladding ceiling and wall surfaces. Thanks to the wide range of models and variety of colors, you can choose the most suitable option for cladding wall and ceiling surfaces.
The walls and ceiling in the washroom, lined with plastic panels or lining, can look quite presentable.
The advantages of the material include:
- affordable price;
- practicality;
- resistance to high humidity;
- easy installation on a wooden grid or adhesive base;
- attractive appearance.
PVC cashing has some disadvantages:
- susceptibility to mechanical stress;
- tendency to darken and burn out;
- short service life;
- low environmental friendliness.
Important! Plastic panels are installed after installing waterproofing on wall and ceiling surfaces. All work is carried out only after the finished bath has shrunk, in order to prevent distortion and violation of the tightness of the lining.
Construction of concrete pavement
Concrete-type coatings are considered more reliable and durable (service life is more than 25 years) than wooden floors.
Technology for manufacturing concrete floors:
- First of all, it is necessary to make a pit to receive wastewater from the washing room. To do this, a drainage pipe with a diameter of 15–20 cm is laid in a dug hole, which is led into the building’s sewer system or into a drainage ditch.
- Then the soil is leveled and a cushion of crushed stone with sand or broken brick up to 20 cm thick is made, and this layer is carefully compacted.
- Before insulating the wash room in the bathhouse, lay a layer of waterproofing made of roofing felt or similar material.
- Then insulation is carried out by backfilling with a layer of expanded clay. The thickness of the layer depends on the climatic conditions of the area (most often the height is 5–10 cm)
- A reinforcing mesh is laid on top of the insulation and filled with cement mortar.
What do stove manufacturers offer?
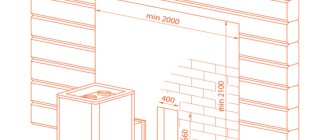
Some manufacturers have developed specialized models of sauna stoves with 3 compartments.
We suggest considering the most advertised design. It consists of the following elements:
- Firebox. The door of the extended fuel channel, which runs through the wall, is located in the dressing room and serves as the main source of heat for it. The powerful cylindrical firebox is designed for heating large rooms. It is installed between the washing room and the steam room.
- Open/closed heater. It is located above the firebox and slightly shifted to the side to be “in the territory” of the steam room.
- Container for water. A conventional rectangular storage tank with a valve for draining water is located in the washing area. The air in the room is heated by the tank.
The obvious disadvantage of this design is that it is installed precisely at the base of the T-shaped connection of the vertical partitions. There is a technological gap of half a brick between the tank and the heater. That is, a massive masonry is needed here, partially supported by the stove itself. Although these partitions do not have a load-bearing function, their own weight is significant.
Another problem is the mass-dimensional characteristics of the furnace itself. It weighs a fair amount even without stones and water, and its width is almost 70 cm. Four people have to carry it into the room, and this requires a fairly wide opening. The installation instructions contain a requirement: installation is allowed only on a concrete base. It will also need to be pre-filled. The stove will occupy a significant part of the area of all three bath rooms.
Interior styles
The style solution is a combination of external design (exterior) and interior decoration (interior). Unlike the design of an apartment or house, a minimum of furniture is used in a simple bathhouse. In the relaxation room, armchairs and sofas are replaced with spacious benches that are installed around the table. In the steam room, even less decor is used. The most common option is rustic style. This interior solution recognizes only simplicity bordering on primitivism. Untreated surfaces and the most “wild” appearance of the building are the hallmarks of the rustic style. For decoration, carvings are used that adorn the exterior of the house. Baths designed according to the principles of French Provence have a more elegant appearance. The decoration and surfaces are an imitation of antiquity. In such a room, the furniture is painted white, and the porch is decorated with a bench with a blanket and pillows in a cheerful flower pattern. The antique style is classified as an “ancient” style: it has managed to preserve its characteristics, having passed the test of time. Tiled tiles are used for interior decoration, and the room is decorated with fountains and decorative columns that support the domed vault. You can use antique amphorae and figurines as a highlight of the interior. Country style is characterized by a touch of recklessness. Brickwork or its imitation (prohibited in the steam room), metal elements and untreated wood are used in the interior and exterior. The strict loft breathes with unobtrusive luxury. The dressing room and rest room are decorated in style: expensive carpets on the floor, pillows on the benches, multi-level lighting, perhaps even a bar counter. The chalet style came down to us from the Alpine slopes: it is simple but elegant. The decor is dominated by rough wood and wide windows, which creates an almost homely feel.
Steam room
Only deciduous wood is suitable for the interior design of the steam room.
This type of wood does not heat up, does not emit resins, and, importantly, even with light ventilation it dries very quickly, preventing dangerous fungus from developing. We list the most common types:
linden – visually attracts attention, does not darken over time, has low density and heat capacity: it heats up quickly, but it is impossible to get burned on contact. When heated, it releases a pleasant, delicate aroma.
Linden finishing is quite popular, so it is quite affordable. aspen is a common material for northern regions. The wood is durable, difficult to split or split, and has bactericidal properties; alder – has a beautiful appearance, is pleasant to the touch, resistant to cold and hot water, condensation and steam, alkaline and acidic detergents, and is easy to process.
Abash is a tree from the tropics of Africa. Even in the hottest heat, it hardly heats up and maintains a temperature close to the human body temperature. Even under the influence of external factors (water, temperatures and steam) it does not darken at all.
Important! Wood cannot be coated with varnish or paint, even of the best quality. When heated, they emit an unpleasant chemical odor
During the installation process, nails (screws) must be covered at the top and set deeply, otherwise they may burn when heated. It is better to mount the lining vertically, as drops formed by condensation will drain faster. The junction of the floor and walls must be protected with high skirting boards made of a waterproof material.
Typically, the steam room has wooden floors made of hardwood. But still, tile will be preferable. It washes well, dries quickly and is resistant to fungus. If this coating seems cold to you, you can put a removable wooden grate on top.
The furniture in the steam room is predominantly round in shape and made of aspen, alder or linden wood.
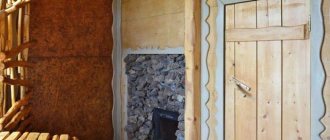
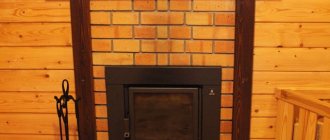
Making a brick partition
The partition in the bathhouse between the steam room and the sink can also be made of brick. Here it is better to use ½-brick spoon masonry (or, alternatively, a whole brick). Such a structure will weigh quite a lot, so to lighten it, you can use hollow bricks.
Making a brick partition
Stage one. Preparation
Before starting work, it is necessary to prepare all working surfaces. The plank covering is removed from the floor all the way to the foundation, then everything is cleaned with a wet broom. Next, the workplace is equipped with good lighting, all items that are not needed for work are removed from the room. The contours of the structure are outlined.
Stage two. Solution
To work you will need the following equipment:
- sieve;
- Sander;
- shovel;
- mixing tank.
Tools for work
Step 1. First you need to sift the sand to clean it from foreign objects. A sieve is constructed from a fine mesh chain-link mesh and 4 beams. The sand is carefully sifted.
Sifting sand
Step 2. Next you need to take care of the mixing container. It can serve, for example, as an old iron barrel, cut lengthwise into two parts. The barrel is firmly installed for ease of operation.
Step 3. Mixing proportions – 3:1. First, you should fill in six buckets of sand and two of cement. Water is added and the solution is mixed with a shovel. This volume of solution is enough for about an hour of work.
Step 4. The solution is mixed to the consistency of thick sour cream. At the end of kneading, it will begin to harden and shrink, but there is no need to add water - just stir it once every 15 minutes.
Stage three. Construction
For this stage you need the following tools:
- level;
- pick;
- trowel;
- plumb line;
- rule.
| Step, No. | Description | Illustration |
| Step 1. | The string is stretched - it will serve as a guide. The solution is laid and leveled with a trowel, and the horizontalness is checked. Then you need to wait a little for the solution to set. | First row - diagram |
| Step 2. | Another layer is applied on top of it and the laying of row No. 1 begins. | Second row |
| Step 3. | The first brick with mortar applied to the end is laid on the surface and pressed against the wall. Next, the brick is tapped and leveled with twine, and excess mortar is immediately removed. | Bricklaying |
| Step 4. | If a doorway is planned (and most partitions have one), then it needs to be set in advance. Using spacers, you should install the door frame. It is checked for horizontal/verticality and, if necessary, its position is adjusted. | Laying a brick partition |
| Step 5. | The brick is laid close to the box. To tie the partition to it or to wooden walls, metal strips are used: they should be bent and screwed to the side surfaces so that they (the strips) are between the bricks; You can also use reinforcing bars. | Door frame |
| Step 6. | At the end of laying row No. 1, the brick is broken into two parts using a pick. The second row begins with one of these halves. The string stretched horizontally is carried higher to make it easier to navigate. The third row begins in the same way as the first. | Laying brick partitions |
- Every five rows, steel strips or pieces of reinforcement are placed in the seams - this will strengthen the structure.
- The structure is tied to the walls with steel strips, and auxiliary reinforcement can be used for the door frame (ideally, this should be a channel of the appropriate size).
- The gap formed between the ceiling and the wall is filled with small pieces of bricks previously soaked in concrete. The pieces need to be pressed as tightly as possible to each other. All cracks are sealed with tow, also treated with cement mortar.
Good advice
- If you plan to plaster the partition, then when laying it you don’t have to put too much effort into the quality of the seams.
If a brick structure serves as a design element, then the seams must be neat, so excess mortar must be removed in a timely manner. Plastering a brick partition - If the partition is to be plastered, then it is quite acceptable to use even used bricks - this will significantly reduce costs.
- If any communications must pass through the partition, it is recommended to use a piece of pipe of the appropriate diameter for this purpose. The pipe is lined with brick, but is not attached to the structure with mortar - this way, in the event of any changes, the masonry will not be disturbed. The voids formed between the trim and the masonry are blown in with polyurethane foam.