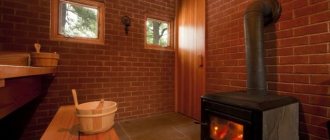
A stove in a bathhouse is not only a device for heating rooms, but also a stylish element of the interior. Therefore, special attention is paid to its external cladding. The construction market offers reliable and practical materials used for finishing the stove in the bathhouse.
The correct choice of suitable material depends on the design idea, interior style and financial capabilities of the customer.
Features of the decorative lining of the stove
High-quality finishing of a sauna stove must meet basic operational requirements: withstand high humidity, temperature changes, ensure durability and safety of the surface. The lined stove should quickly heat the bath rooms and create a comfortable microclimate inside.
Lining a stove in a bathhouse has a number of advantages, including the following:
- fast and uniform heating of rooms;
- heat accumulation for a long time;
- minimal risk of getting burned from a heated oven;
- the air does not dry out;
- simplicity and accessibility of maintenance of finished cladding;
- attractive appearance of heating equipment;
- resistance to mechanical damage and deformation.
Specifications
Before understanding the technical characteristics of the equipment, you need to consider the features of this metal:
- Cast iron, used for the manufacture of furnace equipment, has a high heat resistance. Its surface does not collapse during sudden cooling (for example, when exposed to water).
- The material transfers heat better than brick or other types of metal. Bathrooms heat up quickly with low fuel consumption.
- Cast iron parts must be cast because it is very fragile. Welded joints quickly lose strength when exposed to high heat. Therefore, individual parts are fastened together using a tongue-and-groove system or using bolts.
When considering the technical characteristics, you need to pay attention to several indicators:
- Power - selected depending on the size of the steam room. To correctly calculate the power, you can use a special formula - multiply the area of the steam room by 1.5. The resulting result is considered the optimal power indicator.
- Thermal capacity. The optimal range is from 15 to 35 kW. It is better to choose models with a heat capacity of 20 kW. They consume a small amount of fuel and retain heat for a long time.
- When choosing a material, it is better to give preference to gray cast iron.
The technical characteristics of furnace equipment are influenced by additional functions:
- secondary gas combustion system;
- ash drawer pull-out mechanism;
- vertical stiffeners that increase the strength of the structure.
Some stoves are equipped with a clean combustion function. It involves the location of a special hole above the firebox door. It is designed to remove air from the combustion chamber.
Cast iron furnace with secondary combustion
Types of stove lining
In addition to the fact that the stove is the main heating equipment, it also performs an aesthetic function.
The cladding of the sauna stove is made using practical and durable decorative materials:
- ceramic tiles;
- refractory bricks;
- artificial and natural stone;
- decorative plaster;
- tiles;
- frame made of metal plates.
All materials are distinguished by high performance characteristics and installation features.
Ceramic tiles - elegance and durability
The best material for lining a sauna stove is ceramic tiles. It is easy to install, affordable and durable.
The following types of tiles are used for facing work:
- Clinker room. It is made from red clay with the addition of fireclay, melting agent and dye.
- Majolica. Material with a pressed base, covered with a protective glaze layer. This type of tile is distinguished by its rich color scheme, decorative patterns and ornaments.
- Terracotta. A facing material whose performance characteristics are similar to majolica. Important differences are the porous structure and the absence of a protective glaze. Terracotta is characterized by durability, increased strength and resistance to mechanical damage. This type of tile is made in a round shape.
- Marble. This material is distinguished by its increased wear resistance, practicality and ease of installation, and is devoid of almost all disadvantages.
When choosing this type of finishing, stove owners ask themselves the important question of which tiles are best for covering heating equipment. Experts believe that the best option is a material that has a minimum coefficient of thermal expansion and a dense structure - clinker tiles.
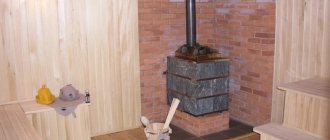
Firebrick: reliability and safety
Decorating a sauna stove with brick is the simplest and most budget-friendly option for owners who decide to do the cladding themselves.
The material has a number of advantages:
- fast and safe heating;
- accumulation and maintenance of heat for a long time;
- resistance to high moisture;
- low cost and ease of installation.
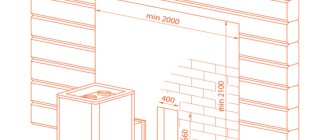
Work on lining the stove in a bathhouse with bricks consists of arranging a reliable decorative screen around the entire perimeter of the equipment. To increase aesthetics and attractiveness, it is allowed to combine materials of different colors.
To fill the joints, it is recommended to use grout that is resistant to high moisture and temperature changes.
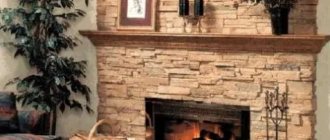
Artificial and natural stone: exquisite nobility
The main advantage of cladding with decorative stone is the creation of a noble and attractive appearance. High strength, durability, environmental friendliness, resistance to high temperatures, a variety of color palettes and textures allow the material to be used for finishing bath rooms.
The following types of stones are used for facing work:
Decorative stones can withstand an unlimited amount of heating; they accumulate thermal energy well and maintain a given temperature for a long time. In addition, this material is resistant to acids and alkalis.
In terms of their performance characteristics, artificial elements are not inferior to natural stones. With their help, you can qualitatively line a stove in a steam room or a fireplace in your home.
The technology for laying stones is simple and therefore does not require additional preparation. Non-standard shapes of elements can cause some difficulties during the fitting process, so before installation it is recommended to lay out the material on a flat base. The stones are numbered and fixed on the surface of the furnace using an adhesive composition.
Decorative plaster: simplicity and accessibility
A simple option for lining a Russian stove is plastering the surfaces. Over time, the decorative and protective properties of the plaster composition decrease, which will require frequent renewal of the cladding.
Important! Decorative plaster is used only for brick stoves and is not suitable for metal devices.
Plastering a stove in a bathhouse is simple; all work is performed in the following order:
- the surface is cleaned of dust, debris and remains of the connecting solution;
- the seams are cleared to a depth of 10 mm;
- Before the cladding begins, the oven warms up;
- a mesh of metal rods is installed on the surface with wire fixation;
- the surface is moistened and a primary layer of plaster mixture is applied;
- After the plaster has hardened, a second layer is applied.
The thickness of each subsequent layer does not exceed 6 mm. The plaster solution is applied using a trowel and leveled over the surface with a spatula. When plastering the surface, it is necessary to avoid the appearance of defects - air bubbles and sagging.
After hardening, the top layer is thoroughly cleaned until a smooth surface is obtained.
Tiles: originality and practicality
The use of tiles is an ancient method of cladding stove equipment for a bath. Tiles are tiles made from pottery plastic clay by firing in a kiln at a temperature of more than 1000 degrees. On the back of the tile there are pumps designed to fix the material on any surface. Tiles are presented in several categories:
- with a smooth surface;
- majolica;
- with glazed surface;
- with a relief surface.
Tiles are distinguished by high performance characteristics - durability, practicality, strength and high heat transfer.
The work of tiling should be entrusted to professionals who will do a good job of installing the material on the surface of the stoves.
Metal frame: accessibility and safety
A sauna stove can be lined with a metal frame, which is installed on top of the device and covered with protective shields. The steel frame provides reliable protection for the furnace portal and an optimal level of heating of the air in the room.
This type of cladding has the following advantages:
- accumulates released thermal energy;
- quickly heats the air and walls in the room;
- It is distinguished by its affordable price and ease of installation.
A serious drawback of such cladding is the likelihood of burns upon direct contact with the surface. Therefore, experts do not recommend installing metal frames for stoves in bathhouses in order to avoid possible injuries.
A competent choice of decorative material for cladding and adherence to the technological process will ensure the correct operation of the sauna stove and the creation of a comfortable microclimate in the premises.
Bookmark order
You have selected the largest specimens and are going to put them on the bottom. Their shape is arbitrary, often elongated to one side.
When installing, observe the following recommendations:
- Do not place oblong stones flat. It’s better to place them end-to-end, with the narrower side down. The rule is due to the greater speed of thermal energy propagation along the layers, and not across them. Another reason for this choice is the need for free passage of hot air between the stones. End masonry increases the number of gaps between specimens.
- In the bottom row you need to place rocks that will not quickly collapse from high temperatures. For example, it is a pity to put jadeite near the fire, because the stone is expensive, and such an arrangement will quickly crumble. For the bottom row, dunite, peridotite, and porphyrite are more suitable. These breeds are more adapted to high temperatures.
- After placing the first row, proceed to the second. Here, stones should also not be placed tightly. This is necessary for air circulation. Also, the distance between the stones is necessary to prevent destruction of the stove. The material expands when heated, and dense packing increases compression.
Using tiles
The tiles on the stove in the bathhouse are afraid of thermal expansion, therefore, when performing work, it is important to carefully follow the technological process. The lining of the stove in the bathhouse does not tolerate negligence.
Typically, 7 types of tiles are used for cladding:
- Terracotta is a tile that has not been glazed. It consists of terracotta clay and fireclay, which are mixed in a certain ratio. Such tiles have been known for several centuries. A correctly implemented technological process greatly influences the final quality of the material. This tile can be easily recognized by its characteristic red tint.
- Clinker tiles - clay is the main raw material. The material is obtained by pressing, then it is fired at a temperature of +1200 0 C. The crystal lattice of the clay changes and the tile acquires the properties of ceramics.
- Majolica is very difficult to produce. Previously, only manual labor was used for drawing. Now there are industrial designs. The glaze on the tile is obtained by firing. Properties resemble terracotta tiles.
- Tiles are the most preferred option due to the air gap between the tiles and the oven wall. This layer works as an additional heat insulator, allowing the stove to retain heat near itself even longer.
- Porcelain tiles can also be used for lining a stove. Marble chips added during the production of porcelain stoneware give the material unique decorative properties and high strength. Due to this, porcelain tiles are rapidly gaining popularity.
- Fireclay is able to withstand direct exposure to fire. Fireclay is pressed into blanks and fired at a temperature of +1300 0 C.
- Tile - only a material with a high heat resistance coefficient can withstand temperature loads.
Instructions
Do-it-yourself tiling of a sauna stove is done as follows:
- It is necessary to properly prepare the surface. All traces of old finishes must be removed from the wall. Each seam should be selected at 10-15 mm.
- We dilute a deep penetration primer and add marble chips to it. Carefully prime the surface. Do not forget that the primer must dry (at least 24 hours).
- We stretch and fix the metal mesh using dowels. Such reinforcement will significantly increase the strength of the structure.
- The tiles should not be laid on an uneven surface. We level the wall with plaster. We recommend using stove mortar that is specifically designed for plastering stoves. The plaster must be allowed to dry for 48 hours.
- Apply the facing adhesive evenly to the entire surface of the tile. Carefully cover the surface of the stove and press lightly. The tiles can be leveled in about 10 minutes. Then the glue will set. We check the correctness of the masonry using a level. The glue layer should not exceed 1 cm. To make the seams even, we use special crosses. The thickness of the seam is 2-3 mm.
- When the glue dries, we grout the joints.
Tiles
A stove with tiles is a rather labor-intensive process. Technology has simplified things a bit. But until now, the construction of such a furnace takes 4-5 months, if you use the classic version. The laying and lining of the furnace occurs simultaneously. Although, in a simplified version, you can line a finished stove.
Expert opinion Nikolay Davydov Stove maker with 15 years of experience
The drawing can be anything. Usually Russian folk motifs are used. The sizes of tiles are regulated by GOST 3742-47. Permissible deviations should not exceed 1 mm in all directions. Thanks to standardization, the cladding process has been significantly simplified. The most important thing is to choose the right material.
Instructions
You should be guided by the following rules:
- Material of manufacture. Impurities in colored clay will not allow the production of high-quality tiles, so it is not used. In contrast, white clay is an ideal raw material.
- The quality of a product is determined by its ability to absorb water. The more pores in a tile and the larger they are, the less quality the product will be.
- Choose tiles made by pressing.
- The surface of the product should not have a dull appearance and there should be no cracks on it. This happens when a product undergoes only one firing.
For cladding, tiles must be sorted by shade. They will need to be laid in such a way that the transition is not noticeable. The size is adjusted using a rasp and an angle grinder on all sides. Defective tiles should not be thrown away immediately. They can be used later.
The next step is to mark. The thickness of the horizontal seam should not exceed 3 mm, vertical - 1 mm. Now let's move on to installation.
Lay out the first row.
The process is very labor-intensive, but the result is worth it. The first thing to do is to properly prepare the tiles for installation. This will ensure the best result.
The installation order is as follows:
- immerse the tiles in water, waiting until the clay absorbs water;
- the clay in the tiller will increase the heat capacity, so you need to fill it halfway;
- steel brackets allow you to correctly connect the tiles to each other;
- We connect a row of tiles to a row of the stove using wire.
Scheme for fastening the tiles: 1 – lump, 2 – pin, 3 – wire, 4 – staples.
Subsequent rows.
- drill holes in the masonry;
- We use screws and wire as a connecting element;
- We fasten the steel pins using wire;
- we place the tile on the pin and bend the last one;
- the dry solution will fill all the voids between the tiles.
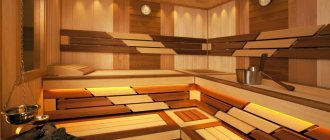
Sauna stove in tiles
Finishing the stove with bricks
Traditionally, the stove lining is made with brick. This material is also suitable for wooden walls near the stove. It is an additional heat accumulator.
The following types of bricks are used for cladding the stove:
- ordinary ceramic brick (solid);
- refractory fireclay brick.
It is not recommended to use silicate and hollow bricks. It will not hold heat well and will collapse. Fireclay brick is preferable to use, but it is more expensive.
Instructions
- The laying is done using a mortar specially designed for ovens. It will ensure optimal structural strength.
- The foundation design must be designed to withstand such a load. Otherwise, you will have to make a separate foundation.
- The masonry is done in half a brick. The brick is placed on the bed. We start laying from the corner, bandaging 1/3.
- For heat exchange, ventilation holes must be provided in the masonry.
- Between the rows we reinforce the masonry with mesh.
- After completing the masonry, we perform jointing.
Examples of brick lining a stove in a bathhouse in the photo:
Stone
Decorative stone will fit well into a modern interior. Finishing the stove in the bathhouse with decorative stone will give it a finished look and will serve as an additional heat accumulator.
Kinds
The stone for cladding a sauna stove can be natural or artificial. Both types can be used when lining a sauna stove with stone.
- Natural stone - serpentinite, jadeite - has been used since ancient times when deciding how to decorate a stove in a bathhouse. It is very durable and holds the temperature well in the steam room.
- Artificial stone is, in fact, the same tile that repeats the pattern of natural stone in a steam room. The main advantage of this material is its low weight, which allows you to line the stove without an additional foundation. Artificial stone is cheaper. Therefore, it is becoming increasingly popular in the steam room.
Instructions
Finishing a sauna stove with stone is done in the same way as tiling. The glue should be applied evenly to the surface of the stone and to the wall. The thickness of the layer is 1-2 cm. If, as a result of cladding, a certain pattern should be obtained, you first need to make markings, number the necessary stones and only then proceed to cladding.
Examples of stove finishing with stone in the photo:
Photo 1
Photo 2
Photo 3
Photo 4
Do-it-yourself finishing of a metal stove in a bathhouse with bricks and tiles
There is no bathhouse without a stove, so it must be included in any project. Usually they install a wood-burning stove, which can work as a heater to generate steam in the steam room. The boiler only copes with the heating function, but does not produce steam. If there is little firewood in the region, then they install the lowest-power heater, and compensate for the lack of heat with a boiler.
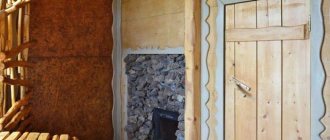
The sauna stove can be either ready-made or built independently from brick. In any case, finishing of the stove in the bathhouse is necessary. It is required as it protects wooden walls from overheating. You can finish either the stove or the walls, or both. The stove cannot be used without finishing, except in very rare cases when the stove is located in the middle of the room.
Care of the heater
To continuously enjoy your stay in the steam room, you should periodically sort through, wash, clean and replace cracked stones. Assessing the steam quality helps determine the need for overhaul.
If it becomes hard or the heater begins to heat up poorly and cools down quickly, then it is time to replace or rebuild the material.
As a result of prolonged use, stones begin to fade, crack and lose their abilities. It’s not for nothing that kiln masters sometimes call burnt out stones “dead”.
Please note! The smaller the stone, the more often it needs to be sorted and replaced earlier.
Finishing the stove in the bathhouse with various materials
The finishing around the stove in the bathhouse can only be made from safe fire-resistant materials. The most common one is brick, but this is not necessary. Other materials are also suitable:
- Red stove brick, decorative facing brick;
- Tiles, ceramic products for decorating fireplaces;
- Natural stone: various slabs and tiles made from it;
- Decorative plasters (applied only with a thick fire-retardant layer);
- Steel fire-retardant finish (requires good design work).
As you can see, the choice of materials is quite large. Brick is reliable and practical. The rest of the materials are taken either because of the design, or when the budget for bricks is not enough, but another fire-retardant material is already available. We will consider the finishing of each type of material in more detail.
cutting
Figure 8. Options for cutting stone and tiles
Stone on a concrete base is cut with a grinder with a diamond wheel. When laying ceramic granite, use a specialized tool - a tile cutter.
When decorating the corners of stone cladding, do not use tiled corners. Instead, they make a bevel - they cut the sidewalls at an angle of 45 degrees. On an industrial scale, electric tile cutters are used for this purpose, but in our case, a grinder is sufficient. If the stone is soft, the process does not require much effort and high qualifications. Cut corners can be effectively joined to each other.
Benefits of brick
This solution can be seen in almost any bathhouse. The brick finish protects the wall from overheating. Very often this protection is made even more powerful and extended to the floor. Finishing the stove in a bathhouse with brick performs both a protective and decorative function. For it, the same type of brick is taken as for the rest of the stove, or another facing brick of the required appearance is additionally purchased.
The rules for brickwork for walls, the stove and the protective portal around the stove are general.
Strict adherence to row levels and neat and thin seams are necessary.
On the walls and in the oven, bricks are laid with overlapping seams. If the portal is laid out in one layer, then it is not at all necessary to comply with this requirement. This is why you can often see protective portals where bricks are stacked on top of each other.
The horizontal row is checked by level. Covering the wall with bricks is plumb. For a corner stove, three planes are laid out with bricks, two on the walls and one on the floor.
For a stove near the wall, there are only two, of which one is located on the floor, and the second is on one wall. Brick, even if it is laid in one layer, has good thermal insulation ability. Its masonry is carried out directly on wooden walls and floors without other fire-retardant insulation.
It is advisable to lay out the horizontal part of the portal in one row between the foundation of the furnace and the subsequent masonry next to it. This advice should only be followed with brick sauna stoves. It is not suitable for metal ones.
In baths, thick fireproof cardboard, mineralite or basalt wool are most often used. There are also basalt cardboard and other materials that are a variation of the previous ones. Minerite is the most preferred. These are ready-made boards specially designed for thermal protection in areas around stoves.
Construction of the foundation
The strength of the structure and how long it will last depends on the foundation. It also happens that the old foundation fully meets the requirements. But if this is not the case, it is better to spend time and effort building a new structure. It should be taken into account that its weight after finishing work will increase significantly. Under no circumstances should you connect the foundation for the furnace to the main foundation of the building. The base should not be subject to deformation.
If the total mass of the furnace with brickwork is no more than 700 kg, no foundation is required. If there is an old metal stove in the room, it will need to be dismantled. After determining the location of the object, draw a rectangle along the floor surface with a marker. Boards are cut according to its contours. They need to be put aside for a while and work on arranging a pit 40 cm deep. For this you will need a bayonet shovel. Form the formwork necessary for the foundation.
Floor boards and pieces of plywood are suitable here. They must be connected and placed inside the recess. After this, waterproofing is started. This is one of the most important stages in the work. In the presence of wet and soaked soil, the foundation will be constantly exposed to adverse effects and will sooner or later collapse.
As soon as the formwork is waterproofed and fixed, a cushion is installed. It will retain moisture. Pour medium-fraction crushed stone and sand onto the surface of the pit, pour in cement mortar and lay a metal mesh. Level with building level. Next, the foundation is left to cool. This process may take up to 3 weeks.
Ceramic tile
Ceramic tiles have the same fire resistance as brick.
At the same time, she simply has an incomparably greater variety of appearances.
Now, instead of tiles, almost all manufacturers have mastered the technology of semi-dry pressing, which allows you to create any designs and textures on the surface of the tiles.
This material received the trade name “Porcelain stoneware”, although it does not contain granite. Finishing a stove in a steam room with tiles has its advantages, and the main one is the variety of design solutions. Unlike brick, tiles can be any color.
The side of the old tile had a size of 10-15 cm. With modern porcelain tiles, the side length can reach 40 cm. The longer the side, the more accurate the coating. It has fewer seams, but the complexity of installation increases significantly. Porcelain tiles should be laid by specialists.
This requires a lot of experience. If the tiles are small, you can do the tiling yourself. There are no particular difficulties here. Laying is carried out using a conventional solution on a sheet of heat insulation. It is better to use a special solution based on a dry construction mixture for the appropriate purpose.
Natural stone is as fire resistant as brick. It is equally suitable for finishing a stove, but its appearance is much more decorative.
The finishing of the stove is carried out not with raw stone, but with finished products made from it. These are tiles or special stone elements for finishing fireplaces.
Classic types of stone are used: marble, granite, but in a bathhouse they may be inappropriate in design and expensive. In this case, they are replaced by cheaper sandstone and slate stone. Slate stone is often cut into flat pieces, so its price is very low.
Finishing the stove in a bathhouse with decorative stone begins with the selection of material. Untreated stone is cheaper, but its surface in a bathhouse can quickly become dirty.
The part of the portal that is laid out on the floor is especially susceptible to contamination.
Despite the fact that untreated stone looks beautiful, it is recommended to use a polished and honed version for a steam room.
Tiles are a classic solution for finishing stoves. They have cheap production technology and very reliable installation. The external surface, finished with tiles, looks like high-quality, thick tiles.
This appearance will be achieved only if you use tiles without a pattern on the front surface. They do not produce a special decorative effect, since they do not differ much from the usual tiles. The only benefit is in the strength of the fastening, which is why other tiles with a three-dimensional pattern on the front side are more popular.
Tiles are laid in the same way as tiles, but require a significant thickness of the finishing layer. If a portal for a sauna stove is made from them, then part of the wall and floor is covered with tiles. They don’t have to be used on the floor if the stove foundation is raised above the floor by one or two brick rows.
If the tiles have holes for wire, then it must be used.
The diameter of the rods is selected according to the instructions. Larger diameter means higher strength, but the complexity of installation increases.
On average, tiles are the same thickness as one brick.
They can just as well be used to create the same protective layer.
Preparation of mortar for masonry
One of the important elements of masonry is the mortar.
To make the structure durable, heat-resistant and reliable, certain components are used for the solution; there are 3 main options:
- cement mixture, which is mixed with fireclay clay;
- sand-clay solution of sufficient plasticity so that cracks do not appear on it when heated;
- cement-adhesive mortar, to which a special adhesive composition for ceramic granite is added.
Decorative plaster
Plaster for stoves began to be used relatively recently. Indeed, a good stove does not need to be plastered. It is made either of high-quality brick, which in itself looks decorative, or of metal, which also does not need plaster.
In this case, we are not talking about plastering the stove itself, but about creating a protective separating layer of plaster between the walls and the stove. Plaster is quite suitable here.
Finishing the walls in the bathhouse around the stove with decorative plaster is especially often done when the stove is not placed in a steam room.
In this case, the requirements for moisture resistance are much lower.
Is it possible to mix different breeds?
The purpose of mixing different types of stone is to save money. Filling a large oven with expensive rocks is quite expensive. Therefore, the volume is diluted with minerals of lower cost.
You can stack the stones mixed or in layers. Rocks that heat up faster are laid down. Other varieties are placed on top.
From an aesthetic point of view, beautiful stones are placed along the edge so that they are visible and pleasing to the eye. Nondescript varieties are hidden inside.
Steel case
Steel is also a fire-resistant material. It cannot be left untreated, as it will instantly rust in a bathhouse. When finishing the space around the stove with steel, you need to keep in mind that unlike brick, tiles and stone, steel does not insulate heat at all.
A protective portal around the stove made only of steel will be completely pointless, since it will not be able to fulfill its main task - to protect wooden walls from overheating. In order for this function to be fulfilled, it is necessary to provide a good heat-insulating layer of another material, and then cover it with a facing steel sheet.
This heat-insulating separation layer is created from mineralite. Other fire retardant insulation materials can also be used. Simple mineral wool is not suitable, since after getting wet once it shrinks in volume, and this defect cannot be corrected by anything.
The insulation near the stove should not get wet. You need to take care of its waterproofing. Moreover, this waterproofing should only be on the side of the cold wall, but not on the side of the stove.
Steel has a metallic luster. This effect can be used to greatly increase the efficiency of the portal.
If made from uncoated polished stainless steel, it will act as an infrared reflector.
A similar element can very often be seen in electric fireplaces, heating stoves and any other heating devices.
The main difficulty of this solution is the need to use only stainless steel. Compared to ordinary steel, it costs 10 times more, but the total thickness of the sheets for the reflective screen can be small.
Stainless steel perfectly withstands any humidity. It can even be placed in rooms such as a steam room in a bathhouse; the decoration around the stove will be compact and with a modern design. In a steam room, all interior elements are usually made only from wood. Stainless steel would be appropriate next to a metal stove-stove.
Operating principles
When operating, you need to take into account a number of rules:
- do not perform assembly near water sources;
- use different types of firewood for kindling;
- carry out regular cleaning of the structure from accumulating ash and soot;
- Split wood for kindling there so that it does not protrude beyond the firebox.
You need to lay metal sheets on the floor so that random sparks flying out of it do not cause a fire.
Cast iron stoves for baths are very popular among bath attendants. This is due to the advantages of the material and its low price. If you don’t want to spend a lot of money on buying ready-made furnace equipment, you can assemble the structure yourself.
Fire protection system in the partition
To achieve maximum heating efficiency in a bathhouse, it is advisable to place the stove in a partition. In this case, it will heat the partition, and not the outer wall or corner, which is much more rational and profitable, since firewood or gas will be well saved.
The partition in the bathhouse near the stove should be well protected. All the same methods are suitable for this as for the usual placement of the furnace. You can use all the techniques described above (brick, tile, metal) both for the outer wall and for the partition.
A brick partition in a bathhouse near the stove will be the most convenient option. It should be noted that brick partitions are often found in wooden bathhouses. Basically, they are made there for design reasons because of the beautiful facing bricks, but the option with a stove is much more functional.
The result is a highly efficient bathhouse for heating; the partition-stove in it is located in the center of the building and does not lose heat. In this case, the portal around the furnace is made lighter. For its construction, it is appropriate to use the same brick as for the rest of the partition. In this case, you will not need to purchase additional materials. If the design requires it, you can use any other option.
Installation base
Installing a stove in a bathhouse begins with the design of the base for it. It is worth considering that this is hot metal, which means you will need to shield the floors. To do this, you can use a simple concrete screed or a special base that is fire resistant.
It is important to consider that the boiler must be installed in a bathhouse on a durable surface. A structure loaded with firewood or other fuel, along with stones for steam, is quite heavy. When installed on wood, it will gradually be pressed and deformed.
Restoring air exchange
In your case, the chimney is clean, the doors are fitted, but doesn’t that make it any easier? Then why does the stove smoke? Possible reasons can be found below:
- The pipe does not have a protective cap. In windy weather, blowing occurs. Wait until the disaster ends and take measures to install a life-saving “cap”.
- The cause of smoke from the stove door or ash pan may be a branchy tree hanging over the chimney. The obstacle prevents the outflow of air, gusts of wind are reflected into the pipe. A reverse draft appears, the smoke does not go up, but into the room. Exit: remove branches in the near-pipe space. By the way, try the method if you are puzzled by finding an answer to the question of why a new stove smokes. Possible reasons are on the surface, you just need to analyze the situation and inspect the area: is there a high wall nearby? This is also a risk factor in terms of air backflow. It is not necessary to destroy the barrier or cut down all the surrounding trees - protect the pipe with a cap.
- The roof ridge is located above the chimney. This interferes with normal air exchange. Extend the pipe and everything will go as usual.
- The masonry was destroyed by bad weather (it’s not in vain that evil winds, heavy rains, and severe frosts try their best). The wind blows through the crack. Air pockets form. The craving is broken. In this state of affairs, urgent repairs are needed.
Flaws
- Since the fuel in this case is wooden firewood, and the metal surface of the equipment is subject to strong heating, operation of the stove is associated with a high risk of ignition of surrounding elements.
Due to these circumstances, quite serious fire safety requirements are put forward for the use of a heating unit, especially when the stove is a privately produced product.
- To carry out engineering work independently requires special knowledge. In addition, a homemade design is susceptible to all sorts of malfunctions, since such manipulations require the most accurate compliance with all technological standards. It is extremely difficult to achieve such a result in non-production conditions.