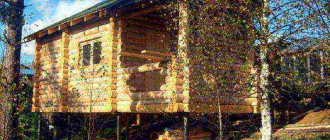
The key to the longevity of any structure is a reliable foundation. Pile driven foundations made of wood, often larch, were used by our ancestors for centuries in the construction of baths. Nowadays, they have been replaced by screw analogues, which, for ease of immersion in the ground, are equipped with a cone-shaped tip and blades on the surface of the pipe. What the floor in a bathhouse on screw piles should be like will be discussed in today’s material.
The floor in the bathhouse is on screw piles
The floor in the bathhouse is on screw piles
The method of arranging the subfloor and finished floor depends on the assembly method and material. If a bathhouse on stilts is built from ordinary timber or logs, then only a subfloor is installed in the room.
Laying of the finished floor begins only after completion of the shrinkage processes. If the frame and load-bearing elements of the bathhouse are assembled from glued profiled material, then rough padding, insulation, waterproofing and the finished floor can be laid within a couple of months after completion of construction.
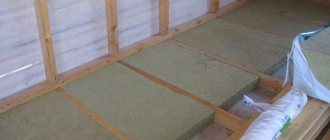
The level of packing of the lag beams of the subfloor is selected below the plane of the timber frame of the screw piles. The difference in height can be calculated by adding up the thickness of the padding boards, insulation and waterproofing membrane. After laying the sandwich on the floor, the plane of the foam insulation slabs should coincide with the piping line of the screw piles, as in the video
Bathhouse on screw piles: floor insulation
To assemble the subfloor of the bathhouse, an off-grade board is used; you can even use chain link or unedged lumber. The condition of the screw supports is not affected by the subfloor, the main thing is that the material is of the same thickness.
The boards are nailed onto the joist beams with ordinary nails, no screws, the fasteners are hit at the ends of the inch, moving 10-15 cm from the edge.
Sheet polystyrene foam is best suited for insulating the floor of a bathhouse on screw supports; you can take penoplex or technoplex. For middle latitudes, you can insulate the subfloor of a bathhouse with sheets 50 mm thick; if frosts in winter are more than 40 o C, then it is best to lay two layers of foam insulation.
Waterproofing the floor in a bathhouse on stilts
Before laying waterproofing on the subfloor in slab insulation, it is necessary to cut a hole for the outlet of the bellows cup of the water drainage system. The diameter of the hole in the polystyrene foam should be equal to or 1.5-2 mm larger than the cross-section of the corrugated or plastic pipe.
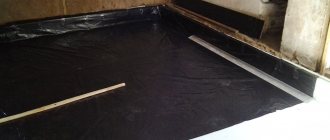
After installing the corrugation, film insulation can be laid. The best option for a bathhouse floor on screw piles is the EPDM rubber membrane. The material is rolled out as a single sheet over the surface of the insulation, and applied to the walls 25-30 mm per side.
To hold the waterproofing sheet around the perimeter of the washing or steam bath room, an aluminum threshold is stuffed, pressing the material against the insulation.
At the drain point, a hole with a diameter smaller than the internal diameter of the drain is cut, after which the upper flange of the drain device is installed and the structure is tightened with a mounting screw.
Shower floors in a bathhouse on stilts
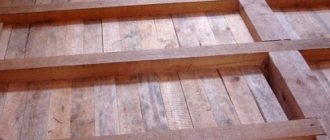
The next stage of building a bathhouse is installing the finishing floor. Metal mounting “moths” are first attached to the walls, on which the finished floor joists are laid. The distance between the beams depends on the size of the steam room of the bathhouse; the screw foundation ensures high rigidity of the base, but experts recommend installing the floor in the bathhouse on stilts with a step of 50 cm between the beams.
Floor boards are laid on the logs, usually 25-35 mm thick floorboards are made removable on wooden pins. The boards themselves are sanded and chamfered to avoid splinters and chips.
Between the floorboards there are gaps of 1.5-2 mm, this scheme ensures reliable drainage of water even with a large number of washes, and the removable floor of the bathhouse on a pile-screw foundation allows you to periodically remove the boards and clean the lower level.
Types of sewerage
Our ancestors did not think about solving the problem of water drainage. She passed the floor coverings and went into the ground. If you are interested in this option, then you need to build the bathhouse on a small hill so that water does not accumulate under the floor. This will speed up the process of wood rotting.
The installation instructions for such a sewer system do not have any difficult moments.
The only thing you should pay attention to is the sequence of installation of waste pipes if there is a toilet in the bathhouse. The pipe coming out of the trough must be in the general system after flushing the toilet
This is a civilized method of disposing of wastewater, and a bathhouse with a storage tank under the floor is warmer. The possibility of drafts is almost completely eliminated. In addition, it is possible to install insulating material on top of the trough.
Bathhouses on stilts located in summer cottages should be given a presentable appearance. It is unlikely that a design with a trough under the floor will seem appropriate. You can decorate the entire perimeter of the room with a variety of materials - from wood to brick. This finish is not only an aesthetic component, but also additional thermal insulation.
Floor insulation
Thermal insulation of floors in a house with a screw foundation is carried out in two stages: at the construction stage using the insulation method along the joists and during operation from the outside. Let's look at both options for floor insulation in more detail.
Internal insulation
Insulation of the floor from the inside in a house on screw piles is carried out using the method of insulation along logs. Conventional technology is used, which includes work in the following sequence:
- Cranial bars are packed along the lower edge of the joists.
- Then a rough base of boards is laid on these bars. They must be laid as tightly as possible, and the remaining cracks must be filled with foam.
- The next step is the installation of waterproofing material. For this purpose, roofing material or thick polyethylene film laid in several layers is used. Installation of waterproofing must be done with an overlap of at least 10 cm.
- Thermal insulation material is installed on the waterproofing layer. The materials used for insulation will be discussed below.
- The insulation is covered with a layer of vapor barrier material on top, after which the floor covering is installed.
The joists can be covered with floor tongue-and-groove boards or thick plywood. For additional insulation of floors, use linoleum on a thick base, carpet, or lay laminate flooring using a cork backing.
External insulation
During operation of a house on screw piles, additional insulation of the floor from the outside can be done. Let's study in detail the technology of how to properly insulate a floor using this method:
- Throughout the entire outer area of the house, a vapor barrier material is fixed to the bottom of the joists. It can be secured with glue or nailed with a construction stapler.
- After installing the vapor barrier material, a sheet heat insulator is installed, which is attached to the wooden base using self-tapping screws with disc-shaped caps.
Then the thermal insulation material must be covered with a wind membrane, which allows air and moisture vapor to pass in one direction: away from the thermal insulator, which allows it to breathe.
In some cases, the insulation of the floor on the outside of the house on screw piles is considered completed. But if desired, the heat insulator can additionally be covered with boards that are placed on the lower ends of the wooden beams of the base of the house.
Thermal insulation materials used
Modern technologies have helped to develop the latest highly efficient thermal insulation materials, which are used to insulate floors in houses on screw piles. Based on practical application experience, experts recommend using the following insulation materials:
- Extruded polystyrene foam. This modern insulation, perhaps, has the best performance characteristics of all the insulation used. Sheets of extruded polystyrene foam have excellent thermal insulation properties, are lightweight, easy to cut, and can withstand significant mechanical loads. In addition, expanded polystyrene practically does not absorb moisture, is not susceptible to rotting and mold, and has a long service life even in unfavorable conditions. The only disadvantage of this material is its fairly high price, which largely depends on the complexity of the technological process for manufacturing the insulation.
- Pressed basalt wool slabs have very low thermal conductivity and absorb various noises well. Light weight and installation also add to the popularity of this material. A significant disadvantage of mineral insulation is its hygroscopicity, which forces the use of multi-layer waterproofing during installation. That is why experts recommend using compressed types of wool for internal and external insulation of a house on screw piles. This heat insulator is more moisture resistant and durable, it is easier to install and secure.
- Polystyrene foam is low cost and light weight. Great for additional insulation. Due to its low cost, polystyrene foam is very popular. In addition, it has the following properties: low thermal conductivity, good moisture resistance, easy processing, durability.
- Foamed polyethylene on a foil base is used as a vapor barrier layer to protect the main insulation from external moisture. In addition, polyethylene foam enhances the thermal insulation characteristics due to the presence of a foil layer that reflects heat waves. Affordable price, easy installation and good performance properties make this material very popular.
Technology of work execution
Fastening the strapping elements
Professionals in the construction field recommend using a combination of two fastening devices when installing a foundation grillage on screw piles - mounting on a threaded connection and clamps. The presented method of fastening all connecting elements of the harness will ensure reliable contact and durability of the structure.
The only nuance when laying wooden beams is their preliminary treatment with antiseptic compounds, which helps prevent premature rotting of the wood and its subsequent destruction. Before carrying out work, it is more advisable to draw up a diagram of the placement of all connecting elements indicating the necessary measurements.
Fitting on a threaded connection
It is more rational to use the presented method in the case of placing U-shaped screw piles. To install the foundation piping with your own hands, you must perform the following steps:
- Install the grillage beam into the opening between the pile posts. Before laying the beam element in the U-shaped flange, we lay an insulating layer of roofing material treated with drying oil.
- We fix the connecting elements. From the sides we fasten the beam to the head using self-tapping screws, and directly to the pile - with anchors or through pins.
We recommend watching a video of how timber is fastened using fasteners.
Fastening with clamps
If it is not possible to secure the beams using self-tapping screws and anchors, it is more advisable to fasten the component elements using clamps.
The installation procedure includes:
Rectangular bars are laid on the heads of the pile elements. When using wood beams, fastening is done using self-tapping screws, and in the case of metal products - by welding
During fastening, it is important to control the verticals of the elements being placed at the building level. After installing the guide beams along the entire perimeter, we lay a U-shaped board (in this case, it plays the role of a “clamp” or a special casing that ultimately secures the guides). The ends of the U-shaped element after placement should be directed downward, while it is advisable to remove excess material protruding beyond the head. fastening the components of the grillage (using a similar method to the presented method, we fix the sides of the head of the pile support and its central part by using screws and anchors, respectively).
Watch the video on how the elements of the strapping structure are fastened together.
How to make the floor of a frame house on screw supports
The material for the frame structure is selected based on its technical parameters and the weight of the finished flooring. The base is point-based, a large load cannot be placed on it, and the house with decoration, furniture, and connecting grillage are also taken into account in the total pressure.
It is better to use light, dry boards; wet wood weighs much more. To make a warm floor, it is better to choose oak, aspen or coniferous species.
View of the floor covering from below
First, they build a foundation, then they erect a grillage, preferably made of wood. The next step is to assemble a frame with stiffening ribs from 10*10 cm timber. If the distance between the piles exceeds 3 m, additional intermediate supports will need to be installed.
The logs are installed every 55-60 cm, with a cross-section of 10*25 cm. The insulation is 25 cm thick.
If you need to cover several small spans, it is enough to take several smaller beams 5*25 cm.
Strapping elements are mounted under the beams for the installation of logs: the crossbars are inserted into pre-prepared cuts, fixed with self-tapping screws and nails.
Wooden elements must be treated with an antiseptic impregnation to avoid damage by insects or mold formation.
Ceramic tile cladding
A good facing material for decorating the floor in a bathhouse is ceramic or tiled floor tiles. As a rule, they do not put a solid board under it, but prefer chipboards, plywood and other materials that are attached to the bars in the floor.
On top of such flooring, you can safely lay ceramic tiles according to the standard pattern. In addition, it is even possible to organize “warm floors” of various types - electric, infrared or water.
Floor structure
When choosing building materials for the floor of a frame-type structure, you need to take into account the strength parameters and weight of the structure. It is better to minimize the weight of the floor covering in order to relieve the supporting structures from unnecessary load. Option - wood. Popular: aspen, oak and conifers.
Structure
High-quality wood at the base of a building is a guarantee of a reliable structure. Poor material will not withstand significant load.
The construction of the floor of a frame house begins immediately after the construction of pile supports and the completion of the grillage. It is recommended to combine a wooden covering when tying, using coniferous beams with a diameter of 100*100 mm. If the interval between individual supporting structures is more than 3 m, it is better to additionally erect another pile.
The lags are installed on top of the securely fixed beams. The interval between individual elements is 0.5 m. The recommended log size is 100 * 250 mm. An exception can be made for the bathroom and corridor. Buy timber 50*150 mm.
To quickly install the logs, the timber is marked with markings for the step size. The strapping products are equipped with landing recesses to match the width of the joists.
Lags
The logs are additionally fixed with screws or other fasteners.
Improving the strength characteristics of the floor is achieved by laying additional lintels. They are stuffed on top of the logs, with an interval of 1.5 m. Often, this is a necessary measure when constructing a frame building with reinforced concrete ties and heating. Other situations require separate floor insulation.
What insulation is better for the floor of a frame house?
Floor insulation in a frame house can vary depending on the purpose of a particular room. According to GOST (state standard), the following can be used as insulation:
- expanded polystyrene;
- Styrofoam;
- mineral wool;
- ecowool;
- penofol;
- penoplex;
- expanded clay and other types of insulation.
The thickness of the insulation for the floor of a frame house in central Russia is chosen to be 200 mm. For more northern regions - 300 mm.
To insulate the floor of a frame house, you must choose only high-quality insulation. Otherwise, you may end up with insufficient insulation, which will lead to unnecessary costs for heating the premises.
Insulation with polystyrene foam or expanded polystyrene is the best and simplest solution. It is actively used in budget construction. The only condition is the use of good waterproofing so that the foam does not disintegrate into individual elements. When temperature changes, the foam can still form cracks. This is its main drawback.
To prevent such unpleasant moments, you need to lay the sheets “under tension” so that the sheets are tightly clamped between the joists. Such work should be performed by knowledgeable specialists.
Laying foam plastic between floor joists “in tension”.
Mineral wool can be used with great success for insulation. It has high thermal protection, is not flammable, but is also resistant to moisture. Waterproofing in this case must also be of high quality. It is better to use mineral wool in the form of mats than in the form of a roll, because the mats are denser. Be sure to cover the gaps between the mats.
If you choose an insulation thickness of 150 mm, then it is advisable to lay a layer 100 mm thick and cover the cracks with another layer 50 mm thick.
Ecowool is an analogue of glass wool, but is more environmentally friendly, although many experts question this fact. Ecowool is sprayed using special equipment and forms a layer of seamless insulation. Ecowool retains heat better than mineral wool, but is more expensive.
Insulating the floor with penoplex, which is a type of polystyrene, but is more reliable in strength and has a higher degree of thermal protection, will cost much more.
Insulating a frame house with expanded clay is quite possible. Expanded clay is cheap, it is fire resistant, and is also environmentally friendly. It is quite possible to insulate a floor with expanded clay yourself, without resorting to the help of a construction team. True, expanded clay is inferior in thermal conductivity to the materials listed above.
When insulating a floor with expanded clay, it is imperative to use waterproofing, because expanded clay absorbs moisture well. A layer of expanded clay is laid on the waterproofing, a leveling screed is made on top of it, then another layer of waterproofing is laid.
In principle, absolutely any insulating material can be used to insulate the floor. In the simplest cases it can be sawdust. As a rule, the better the quality of the material, the higher its price. Each owner chooses which heat insulator to choose.
Thermal insulation of the first floor floor
If you decide to build a house on screw piles with your own hands, then special attention should be paid to insulating the floor of the first floor. The structural design of a wooden floor on the second floor does not require such careful thermal insulation
As a rule, the construction of houses on stilts is carried out using beams. To do this, we lay OSB boards or plywood along the slats attached to the bottom of the joists. The design in cross section will resemble the letter W.
Layout of a wooden floor on joists with insulation
Now you can begin installing hydro- and vapor barriers. To do this we do the following:
- We spread the waterproofing film over the joists so that it sag into the gaps between the joists. You can use membrane waterproofing or regular film.
- We place thermal insulation material in the spaces between the joists (on top of the film). Mineral wool is suitable for these purposes. If you want to properly insulate your house on stilts, then it is better to use basalt wool.
- The waterproofing film on the joists must be secured with a stapler.
- The structural design of the first floor floor in a house on stilts must include a vapor barrier. If you are building with your own hands, then do not forget that the vapor barrier material is laid with an overlap of 150 mm. The joints must be taped.
Using the method described above, the construction of the ground floor floor is carried out in any room, be it a bathroom, kitchen or living room. As for the structural pie of the second floor floor, it can be done without heat and waterproofing material. But in the bathroom and other places with wet processes, it is worth laying a waterproofing layer into the floor structure. In the video below you can learn in more detail about the construction of the floor of a house on stilts with your own hands.
Flooring installation
An example of laying tongue-and-groove finishing boards
The next layer of the structural pie is made with a board 3 cm thick. When laying the boards with your own hands, keep a step of 40-50 cm. This sheathing along the joists will allow you to get a ventilation gap. You can attach the boards to the joists with self-tapping screws.
We then proceed with the construction of the floor in the house in this order:
- We lay the subfloor on the sheathing of boards. It can be a tongue-and-groove board or a regular board. We fasten it to the sheathing with self-tapping screws.
- You can lay purchased flooring on the boards with your own hands.
Since the front layer of the floor in the bathroom and toilet will be tiles, it is better to lay plywood or OSB on the rough boards to level the surface. At the same time, the structural pie in such rooms must include additional waterproofing, which is laid over plywood.
Warm floor of a frame house
You can make a warm floor in a house on stilts with your own hands. This is not shown in the video below, but the process is simple and takes place in the following sequence:
- A structural heated floor pie includes the same load-bearing wooden frame as for a non-heated floor, with the only difference being that the plywood sheets are not laid on backing boards, but on cranial blocks attached to the joists with self-tapping screws on the sides. You can use a cranial block with a cross-section of 30x30 mm and fasten it in increments of 15-20 cm.
- After laying the plywood on the beams and performing waterproofing, we lay expanded polystyrene in the gap between the joists. The top surface of the polystyrene foam boards should be flush with the top of the joists.
- Next, you need to lay a layer of vapor barrier film, placing it on the walls above the expected level of the finished floor.
- We lay a reinforcing mesh over the film and fill it with a thin layer of cement mortar.
- Then we lay the heating mats of the underfloor heating system on the reflective layer of foil insulation. We perform concrete screed.
- We install flooring. If the floor is in the bathroom or kitchen, then you can use tiles.
For more information on how to make a floor in a frame house, watch the video below:
https://youtube.com/watch?v=SYV5vkZOWZk
Guidelines for choosing a design
Diagram of a concrete floor with ventilation in a bathhouse
When starting to build your own bathhouse, you must initially consider the type of water drainage and decide on the choice of material for the floor. In most cases, the floor is concreted or a covering of boards is laid on joists. A concrete foundation requires significant labor costs, finances and a lot of time. However, its service life can last up to half a century.
A simpler and cheaper option is to install lumber floors. It's not difficult to do. There is enough video and photo materials on this topic on our website. But this design is designed for 7-8 years. When this period comes, many elements will have to be replaced. Wooden structures, based on the type of water drainage and the associated complexity of the device, are divided into leaking and “non-leaking” types.
Insulated screed floor
It is made in the form of a continuous “pie” of covering from several layers, including insulation. Laying communications below its base can complicate the work and make it difficult to access them during operation. It is necessary to install in advance all elements that allow servicing utility networks, such as ladders, inspections, valves, etc.
The base level is set below the finished floor level to the height of the covering structure. The underlying layer of 0.15 meters is made of well-compacted medium-sized sand or gravel. A waterproofing membrane made of polypropylene film over 0.5 millimeters thick is laid on top of it. The panels are laid with an overlap of 10 centimeters, welded or fastened with adhesive. The edges of the film are placed on the walls of the grillage to a height equal to the thickness of the coating to prevent capillary filtration of moisture.
Ground floor with insulation.
A layer of solution 2-3 centimeters thick is applied to the membrane and insulation is laid. It is recommended to use special boards of extruded polystyrene foam or polyurethane foam. They have sufficient rigidity and low thermal conductivity; their edges have grooves and protrusions that allow the slabs to be joined without the formation of through gaps.
A leveling layer 5 centimeters thick is applied to the insulation, and a clean floor is installed on top of it. The screed is reinforced with a masonry mesh with a diameter of 3-4 millimeters with a cell pitch of 0.1 meters.
Instead of polymer thermal insulation, you can use expanded clay, as was usually practiced before. This solution is more complex and time-consuming, with dubious economic benefits. From 10 to 25 centimeters of expanded clay brand M-500, fraction 10-20, is poured on top of the waterproofing membrane. It needs to be compacted, leveled and poured with cement laitance, which will give structural rigidity to the backfill. After the binder has set, a reinforced cement-sand screed is laid over the insulation layer.
Filling screw piles with concrete solution
After screwing the supports into the ground up to the load-bearing layer, the technology for laying a screw-pile foundation involves cutting the tops of the piles to a single level. Next, the screw piles are filled with concrete. The essence of the operation is as follows. Concrete solution is poured into the cavity of the screw support. To prepare the mixture, the following grades of concrete are used:
- M-150 – for one-story buildings;
- M-200 – for two-story buildings;
- M-300 – for the construction of buildings up to 5 floors high.
The concrete mixture is prepared in the usual way. If the base is small, then the operation can be performed manually. To do this, use a funnel (schematically reminiscent of a watering can) and pour the concrete solution through it to avoid loss of the mixture.
The main requirement for this work is to prevent the occurrence of cavities during concreting of piles. For this purpose, the already poured concrete is compacted using reinforcement and other devices.
It should be noted that in some cases the last 20-30 cm of the support are filled not with concrete mortar, but with a dry sand-cement mixture. After concreting the pile shaft is completed, the tip is welded.
How to choose material for insulation?
Different materials for construction can serve as a layer for heat insulation
In a log house, it is important to consider whether the selected type of insulator can be used in high humidity. According to experts, you should choose one of the following insulation materials:
Glass wool or mineral wool
Mineral wool has a significant list of advantages, which include:
- Non-flammability, i.e. fire safety.
- Low thermal conductivity.
- Not damaged by biological organisms (mice, rats, insects).
Based on the type of raw materials used in production, the following types of mineral wool are distinguished:
- glass wool;
- stone wool;
- slag.
Styrofoam
It is characterized by low cost combined with high heat-protective qualities. When laying the material, it is necessary to take into account the fact that the combination of high humidity levels and negative air temperatures can turn the slab material into scattered small balls.
Extruded polystyrene foam (EPS)
Many people are familiar with this insulation under the name “Penoplex”. In appearance, it is very similar to foam plastic, but it does not have its characteristic disadvantages. This material is practically unable to absorb moisture, and also has an increased level of strength. This means that low-temperature exposure is not dangerous for this material. In addition, the composition of polystyrene foam includes special additives that prevent it from burning.
Expanded clay
It is an inexpensive material that can be used for thermal insulation of floors in houses on pile foundations. Its thermal insulation qualities are lower than those of the materials discussed earlier, but its price is very affordable. The insulator is non-flammable, and its installation is extremely simple.
Base design
Correct arrangement and insulation of the base along the perimeter of the building allows you to increase the degree of floor insulation with a pile foundation. The purpose of the plinth is that it insulates the space under the bathhouse and does not allow cold air to enter there, and also helps to improve the aesthetics of the appearance of the building.
Cladding with DSP and panels with imitation masonry
The cladding is made using thermal insulation boards and decorative panels that imitate various materials - wood, stone, brick. Slab insulation materials (foam plastic, penoplex) are used as thermal insulation materials.
Important! After the panels are installed and fixed around the perimeter of the bathhouse, the joints between them are sealed with polyurethane foam.
Base design options
What types of subfloors are there in wooden houses?
- According to the lags. Most often used as a base for finishing floor coverings with low load-bearing properties: laminate floors, linoleum, parquet boards or piece parquet. In these cases, subfloors absorb loads and distribute them evenly over the floor area. Sometimes such floors are called the base; this name is used by inexperienced builders, but has the right to life.
- Under the logs. At the bottom of the logs, cranial bars are fixed; they serve as the basis for fastening the subfloor, insulation, and vapor and waterproofing.
- Along load-bearing beams. In our opinion, this is the most successful option, but it needs to be thought through at the stage of designing a wooden house. Why do we think this?
The distance between the floor beams is ≈ 1–1.2 meters, specific values and thickness values are calculated depending on the load. Then logs are placed on the floor beams with a distance of 40–60 cm. Why do double work, it is much more expedient to install the floor beams a little more often, while reducing their size. These same beams will serve as joists. What will happen as a result? Significant savings in materials.
If you calculate the amount of timber for beams and joists in the traditional construction option, then the second option makes it possible to achieve savings of at least 40%. At modern prices for natural high-quality materials (and only the highest quality lumber is used for this work), the savings in monetary transfers amount to significant amounts. Another undoubted advantage is the increase in the height of the interior premises; with the height of the logs within ten centimeters, this is a noticeable increase.
Any low-quality materials can be used for the subfloor, except if it serves as the basis for installing finishing floor coverings. These can be either pieces of boards, OSB sheets, plywood or chipboard, or unedged boards. The thickness of the materials does not matter; boards or slabs with a thickness of one to three centimeters can be used on one floor. Thermal insulation materials will be laid on it; for them, minor differences in the height of the base are not critical. Of course, unedged boards must be sanded; wood pests breed under the bark.
Elements of subfloors
The second important point for all subfloors is protection from the negative effects of moisture. Currently, there are quite effective antiseptics available, which need to be used to soak the boards at least twice.
Fire protection of wood
No antiseptic - no problem. Just sand the boards, the effect will be exactly the same. Treat the ends of the subfloor boards with particular care. Inattention to the ends is one of the main mistakes of inexperienced builders. They first lay the cut boards on the supporting elements, and then use a brush to treat two surfaces, forgetting about the ends. The ends of the wood absorb the largest amount of moisture; in this place all the capillaries of the wood are open.
Drying oil
Treating wood with drying oil
And one last thing. Keep in mind that no antiseptics will help if the underground of a wooden house does not have effective natural ventilation. The subfloor will sooner or later lose its original properties. You will have to change not only it, but also the entire floor covering.
If you are afraid of rodents entering through the air, place metal grilles on them. If it seems to you that in winter the floors in the rooms on the first floor are very cold due to the vents (and this may be the case), then close them during the cold period. But be sure to open all the vents as it gets warmer. Ventilation, by the way, is a prerequisite for the durability of the lower crowns of a log house.
Installation of vents in the foundation
Correct placement of vents
Specificity of non-leakage type
An example of a dry wooden floor frame with a slope for water drainage.
This floor system, resting on a foundation or standing on stilts, has its own difficulties. Here you need to install two rows of boards. For the top flooring that goes over the logs, a tongue-and-groove pine or larch board is used, which is installed without gaps. Below there must be subfloors. This is a so-called “dry” floor; it is advisable to install it in a steam room and here it is necessary to insulate the space between the boards. It is advisable to place the floorboards on the finishing floor with a slight slope towards the wastewater collection. At the lowest point you need to make a hole to which a siphon is connected to drain the waste.
How to make a subfloor in a wooden house
Let's consider one of the most difficult options - installing subfloors on joists without floor beams. Such a floor is often found in small rooms of a private house or in cases of peculiarities of log house construction technology, when floor beams were not used.
Making a subfloor with your own hands
Step 1. Marking. Make a zero mark around the perimeter of the room using a water or laser level. This will be the finished floor level. From this mark you need to minus the thickness of the final coating and the lag. Make a second mark; the supports for the joists should be located at this level. They can be made from concrete, blocks or bricks. There must be concrete in the ground; only the above-ground part is allowed to be laid with bricks.
Marking the zero level using a laser level
Scheme for finding the level of the future floor
Step 2. Make supports in any way; the distance between them should take into account the linear parameters of the log and the total load on the floor.
Adjustable screw supports
Adjustable screw supports for logs - photo
Columns for logs
Step 3. Place all the logs under the rope, do not forget to insulate them with two layers of roofing felt.
Step 4. Secure the joists. To do this, you can use metal corners and fix them to the walls of the log house.
Attaching the log
The photo shows how to attach the logs to the wall.
Example of waterproofing lag
Do not forget to leave a gap of approximately 1–2 cm between the walls and the ends of the joists; take metal corners with oblong slots to ensure free longitudinal sliding. Tighten the screws in such a way that the logs can move in the slots. For reliability, it is recommended to attach the logs with dowels through at least one post; the side of the corner fixed to the log must also be movable.
Step 5. Prepare the material for the subfloor.
Oriented Strand Boards
We have already mentioned that in our case all the scraps are suitable, some can be covered with plywood or OSB, and some with pieces of boards or unedged materials. It is desirable that the sheets of plywood and OSB be moisture-resistant; if they are not, then soak them with drying oil or an antiseptic.
Plywood FSF
Step 6. Check the distance between the joists. If it is the same, then all the workpieces can be cut to a standard length.
Checking the distance between joists
Step 7. Place the boards on the prepared shelves. We have already mentioned that these can be either wide boards nailed at the bottom of the joist or skull blocks installed later on both sides. You should not try to make the subfloor continuous; small gaps do not affect anything. In order to save materials, it is recommended to specifically leave a distance of 5–8 centimeters between individual boards. But this can only be done in cases where pressed mineral wool or foam boards are used as insulation.
Sub flooring
Arrangement of the subfloor
Step 8. Vapor and waterproofing. If you have extra money and time, you can install hydro- and vapor barriers in any case.
Vapor barrier layer on subfloor
Vapor barrier laid on the floor
If you don’t want to act rashly, then figure out why such protection is needed. Mineral wool has excellent heat saving properties, does not rot, and does not promote the proliferation of microorganisms, including fungi. This is great, but it has two very significant drawbacks. First, with increasing relative humidity, thermal conductivity increases sharply. Water conducts heat well; there is no need to talk about any heat-protective functions. Secondly, it takes a very long time to dry. This means that all adjacent wooden elements will constantly be exposed to high humidity. There is no need to explain what the result of such conditions is.
Laying vapor barrier on the floor
If you insulate the ground floor with mineral wool, then a vapor barrier is required. It will prevent moisture from the ground from penetrating into the thermal insulation. If foam-based materials are used as thermal insulation, then such vapor barrier is unnecessary, these materials do not absorb water.
Vapor barrier on the floor - photo
Now about waterproofing. In any case, the subfloor below does not need to be covered with such materials; there are no “gushing” sources in the underground. But after thermal insulation is laid on the subfloor, it is necessary to protect it from moisture penetration from the finished floor. This applies to all types of materials, mineral wool and foam. Waterproofing protects not only them from water, but also the subfloor boards and joists.
Materials for floor insulation in a wooden house
Floor insulation with mineral wool
Insulating layer over mineral wool
Pile foundation
This type of foundation is usually used when constructing buildings on weak, water-saturated soils.
Pile foundations can be divided into the following subtypes based on the installation principle and materials used:
- Pile-screw. In this case, it is assumed to lay steel rods equipped at the ends with cone-shaped screws, reminiscent of huge drills. The design makes it possible to easily drive the rods into the ground.
However, due to its high cost, such a foundation is practically not used in the construction of baths. In addition, few people have the skills to install such rods. There is an additional need for professionals, which entails additional costs.
- Piling and driving. In this case, we mean a structure made of piles that are driven into the ground. The material can be reinforced concrete, asbestos pipes or wood. The third option is usually used when installing storage rooms, gazebos and other structures of similar design.
It can be argued that a wooden foundation would not be the best choice for a bathhouse, since wood begins to deteriorate over time, it is susceptible to rotting, so it does not last long.
Reinforced concrete piles are much stronger, more reliable, and, accordingly, more durable. The design of such piles already provides for reinforcement, so such a foundation would be an excellent choice for bathhouses. It is worth noting that this material is also not cheap, so for small baths such a foundation will also be expensive.
For asbestos piles, wells are made in advance so that their tops correspond to the design height of the bathhouse, after which they are filled one third with cement mortar. After this, the pipes rise slightly, after which a concrete cushion appears under them. The cost of such piles will be cheaper than the reinforced concrete version.
- Columnar. This subtype of foundation belongs to pile structures, so it is made of concrete, brick, wood, and rubble blocks. It can be considered an ideal solution for laying the foundation, which, moreover, is inexpensive and can be used in the construction of low-rise buildings located on slightly heaving lands.
In addition, a foundation of this type is easy to lay with your own hands, if, of course, you have at least minor construction abilities. The main thing in this case is to have instructions for arranging the foundation and strictly adhere to them.
From the information described above, we can conclude that columnar and pile-driven asbestos pipes are the answer to which foundation is better to place a bathhouse on. A list of other options, although it is possible to establish, is, however, impractical due to its high cost.
In other words, for moving soils at the site where the bathhouse is being built, it is better to install a pile-screw, driven or other foundation with similar functionality.
Insulation materials and their properties
Basic insulation scheme Unlike vertical structures, not only rolled mats or slabs, but also bulk or loose materials can be used to insulate the floor (methods for insulating a frame house are described in detail in our article). You just need to remember that they must be light, since the structure does not have the ability to rest on the ground. Therefore, such a fairly weighty material as expanded clay cannot be used in this case.
We invite you to familiarize yourself with the Board for the ceiling in a wooden house
But what is possible? We hope that the next chapter will help in choosing the right insulation.
Variety of materials These materials include:
- Mineral wool (GOST 4640-2011), produced either from the melt of gabbro-basalt rocks, or from volcanic or metallurgical slag. The advantage of these wools is not only the thermal conductivity coefficient required for this design, but also its almost absolute non-flammability. According to the standard, the temperature limit for them ranges from -180 to 700 degrees (read the article about insulating a frame house with mineral wool).
Basalt slab
Cutting mat made of slag wool
Glass wool in roll
- Foam plastics (GOST 15588-2014). This term may hide slabs made of foamed plastics, two types of which are actively used in construction. One is polystyrene and the other is polyurethane. The latter is also molded into slabs, but due to the higher price in this form it is less popular among the people. If it is used, it is often in the form of foam, but expanded polystyrene is in great demand. PPS slabs come in three types: the cheapest type “P”, which is cut from one large block and has a pronounced grain structure, and “T”, formed by pneumatic, vacuum or combined methods. Both options may contain graphite, which is added to improve thermal insulation characteristics.
Eps with graphite
Extruded polystyrene, type "T"
Polystyrene type "P"
Note: Polystyrene boards may have a quarter molded edge. But here this is not required, since the slabs are not joined to each other, but are laid between the logs. Therefore, to insulate the floor inside the frame, you need to take the option with a regular rectangular edge. The sizes of these slabs are different, as are the variations in thickness.
- Ecowool (GOST 16381-77). This term is usually used to refer to cellulose insulation containing fire retardant and biocidal additives, but according to the standard, the type of ecowool raw material used may differ. That is, they can be made not only from inorganic substances, but also from organics or a combination of both. So you shouldn’t rely on the absolute environmental friendliness of this material, which is so promoted by its sellers. However, it is quite suitable for floor insulation, especially if it is not loose wool, which can lose volume, but slabs or mats.
We invite you to familiarize yourself with Sagus wood bleach instructions for use
Ecowool board