Everyone knows that the floor in a bathhouse should be moisture-resistant, rot-resistant and warm, but only builders have an idea of how to make high-quality insulation of this part of the structure so that the surface meets the other requirements of this room. This is especially true for a frame bath. We will tell you how to make such a floor with your own hands. By strictly following our instructions and the description of the process from the video, you will get a comfortable floor that dries quickly between procedures, is strong and durable.
Instructions for installing a drain using your own skills
The installation of the drain pipe itself does not take much time, and it can be performed by any owner, even without special skills.
This work includes several successive stages, the strict observance of which allows us to ensure a high-quality result. First you need to prepare a hole with a trench, which should be directed towards the bathhouse. Next, a sewer pipe is laid in the trench. Then it needs to be covered with soil, but first it is advisable to insulate it. The flooring of the leaking floor is laid with a slope in the direction of the drain hole where the sewer pipe will be inserted. If you plan to use a concrete mixture to prepare the base, then it must be carefully leveled
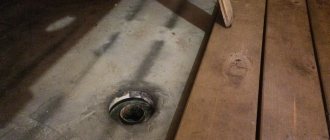
Particular attention should be paid to dents, otherwise moisture will accumulate in them and stagnant puddles will constantly be present. A special mesh must be installed over the drain hole to help filter out debris that can cause blockages. In a bathhouse with a concrete floor, it is allowed to finish it with tiles, after which you can put a wooden grate on it, first treating it with special compounds that will protect the wood from moisture and microorganisms.
Naturally, each owner, when choosing the preferred option for draining water in a bathhouse with his own hands, also focuses on financial capabilities. There are several options here:
The method is more expensive. Its essence boils down to the fact that, having measured a certain distance from the bathhouse, they arrange an equipped cesspool, and from it they lay a trench into which a pipe is placed to drain waste water. Before filling the pipe with soil, it is necessary to lay heat-insulating material on it. As a result, the pipe will be warm and will be able to work even in cold weather.
Budget method. It involves making a drainage pit directly under the washing compartment over its entire area. The bottom of the pit is filled with a sand and gravel mixture. As water flows into it, it will seep into the ground without stagnating.
Funnel method. It provides for the construction of a pit under the steam room and the washing compartment, but unlike other options, it is made in the form of a shallow funnel, and the walls are reinforced with concrete mortar or liquid glass. A drain pipe is installed in the center of the pit, and its opposite end is led into a drain pit, previously constructed outside the bathhouse.
The pit itself is made in the form of a well, lined with brick. Sometimes it can be an ordinary iron barrel without a bottom. The bottom must be filled with a layer of gravel, and a tight lid must be installed on top, with holes made in it for ventilation.
Available materials for building a drainage pit
The choice of suitable material for the construction of a drainage pit under a bathhouse depends on the design features of the structure, the volume of wastewater and the financial capabilities of the owner of the site.
Barrel pits
Tanks can be constructed from barrels, metal and plastic, of various sizes. Such a system involves the use of one or two drainage containers:
- One container. The bottom of the prepared pit is covered with a drainage mixture of crushed stone and gravel, then a plastic container without a bottom and with a perforated surface is lowered into it. The distance between the barrel and the pit is filled with drainage. A waste pipe is connected to the barrel at an angle. Some of the liquid will flow through the drainage holes into the soil for further cleaning.
- Two containers. Such a system involves the use of two barrels, with the first being installed 25 cm above the second. The containers are connected to each other by an overflow pipe. The wastewater enters the first container, in which foreign impurities and solid waste settle. Next, the purified liquid is poured into a second tank, to which perforated pipes are connected for drainage. Drainage elements are installed in trenches filled with drainage material and a dense layer of soil.
Brick pits
To construct drainage pits, ceramic bricks are used, the masonry of which is carried out with small gaps - they ensure the drainage of wastewater into the drainage pad and soil. The operating principle of such a drainage system is no different from the previous one, the difference lies in the material used. The distance between the brick reservoir and the earthen base is filled with drainage material designed to clean the wastewater and distribute it around the perimeter of the pit.
A brick pit is considered more durable and practical compared to a structure made from plastic barrels.
Concrete pits
Given the technical equipment and financial capabilities, it is possible to build a drainage pit from concrete rings with a perforated surface, which are mounted in a prepared pit. After the installation of the rings is completed, the bottom of the structure is covered with a drainage cushion of gravel and crushed stone.
In the case when the depth of the pit is at least 2 meters and the bottom of the tank is concreted, such a structure can be used both for drainage of wastewater from a bathhouse and for sewerage of a residential building.
Tire pits
Cesspools made from used tires are designed to drain liquid waste, so they are well suited for the needs of a bathhouse.
The arrangement of a drainage system when installing tires can be carried out in various ways, including lateral perforation of the walls, maintaining a technological gap between the installed slopes, cutting off the outer walls while maintaining the internal structure of the tires.
This is the simplest and most popular option for organizing drainage under a bathhouse, according to which the work can be done with your own hands.
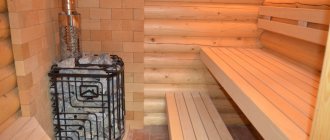
Installation of logs
As a rule, a frame bathhouse is built on a columnar foundation or piles. To connect the load-bearing elements of the base into one whole, a wooden or metal grillage is used. For a bathhouse on stilts, grillages made of steel channels or I-beams are more suitable.
First of all, the installation of a floor in a bathhouse begins with the construction of its frame, that is, the laying of logs. If you decide to build a bathhouse on stilts with a metal grillage, then on top of it you need to fix a wooden beam with a section of 150x50 mm. It is easier to attach logs to it. The construction of the floor of a frame bath on a columnar foundation begins with laying a wooden grillage from beams with a cross-section of 150x50 mm. Not only are the logs attached to it, it is also the basis for the walls.
Depending on the dimensions of the bathhouse, intermediate beams in a wooden frame may be needed for laying the logs. In addition, additional support pillars will need to be installed under intermediate beams and long joists. They can be made from brick. The logs are attached to a wooden grillage and intermediate beams in increments of 40 cm.
Recommended reading: How to properly make a floor slope in a bathhouse
Important: all wooden structures are treated with antiseptics and fire retardants. It is better to make logs under the steam room and washing room from moisture-resistant larch wood
The importance of the bath part called “drain”
The Russian bathhouse is a very extreme place. Temperature changes up to 150, especially in deep winter. High humidity and very serious temperature contrasts - up to 150. The only source of thermal heating. Fire hazard. Streams of water on the floor in the steam room and washing room. That’s why a well-made floor, and a well-made drain in the floor, is so important. It doesn’t even matter critically whether there is water supply in the bathhouse or not. In extreme cases, the barrel can be trained by hand. But the drain should function perfectly.
Principles of good drainage
- The drain must cope with any flow of water, especially in the washing room, and especially if a bucket with a chain is used.
- The drain must have a good water seal so that the smell from the sewer does not penetrate into the bathhouse.
- The drainage along with the pipes to the pit or septic tank must be designed in such a way that it never freezes in winter.
- The drain should be easily accessible in case of need for repairs: if the floors are cracked and there is a single drain below, then the boards should be easily removable; if the ladder is visible, then the ladder itself should be easily removable.
- The drain must be durable, so the pipes and the structure itself must be made of durable materials and parts.
Bathhouse on screw piles: features, types, advantages and disadvantages
A foundation on piles involves the installation of pillars sunk into the ground to the depth of soil freezing. This design is perfect for light-weight buildings, for example, a bathhouse made of timber. But for heavy structures, for example, a brick bathhouse, it is unsuitable.
Advantages of a pile foundation
- Possibility of installation on unstable ground;
- lack of sensitivity to soil heaving;
- increasing soil density. A pile foundation increases the reliability of the ground on which the bathhouse is built, which has a positive effect on the strength of the entire structure as a whole;
- durability. A foundation like this will last you for about a century;
- no need to do waterproofing;
- convenience and simplicity of supplying communications;
- the ability to install the foundation all year round, including in the winter;
- minimal shrinkage. Since there is practically no shrinkage, you can start building a bathhouse immediately after installing the supports;
- ensuring effective ventilation, since there is free space between the floor and the ground;
- the ability to repair the foundation if necessary;
- ease of installation. The foundation can be done by two people, without using special complex equipment;
- high installation speed. Construction of the foundation takes little time - about 1-2 days;
- efficiency. Building a foundation on piles will cost much less than building a strip foundation.
Disadvantages of a pile foundation
Piles are made of metal - a material susceptible to corrosion
To avoid premature destruction of the foundation, it is important to buy high-quality piles. When choosing, be sure to study the company’s reviews and carefully check the products
Another disadvantage is that ordinary piles are not suitable for rocky soil. In this case, a special type of piles is used or special equipment is used during installation. In any case, the final cost of building a foundation increases significantly.
Another disadvantage is that a bathhouse on screw piles does not have a basement. If you want to complete it, you will need to do hydro- and thermal insulation, as a result, the final cost of construction will increase.
If you are making a foundation using metal piles, then before starting work, be sure to protect the supports from the effects of groundwater and oxidation; to do this, it is enough to coat them with a special preparation.
Types of pile foundation
According to the method of immersion, piles are:
Screw. The popularity of this option is steadily increasing. It involves the use of metal pipes with special drills installed at the ends. Such piles can be installed without the use of special equipment. To install the foundation, you need to use the support levers to screw in the piles to the required depth. Screw piles are suitable for use on soils of any structure.
Hammers. Piles are a structure made of reinforced concrete, wood or metal with a pointed end. To drive such piles you need to use an industrial hammer, vibratory hammer or loader.
Printed. To install them, special equipment is used, it compresses the soil to the required depth, then a metal frame is placed in the resulting hole and filled with concrete.
Bored. This option involves preparing a hole in the soil with a drill, then its base is enlarged, and a “heel” shape is obtained. Reinforcing mesh is placed in it and poured with concrete mortar.
According to the type of load-bearing loads, the following types of piles are distinguished:
piles-racks. They sink to hard rock, completely transferring the weight of the building to the ground;
hanging piles. They provide good adhesion to the ground and exert a load on the soil with their side edges.
If you are going to make the foundation yourself, without special equipment, then the best options would be a screw foundation and a bored foundation.
Types of insulation
There are many known insulation materials for frame baths, each of which has certain pros and cons. Polystyrene foam is a universal material that can be used not only as insulation. Advantages:
- low price;
- versatility;
- resistance to prolonged exposure to moisture;
- ease of installation.
Polystyrene foam ignites when exposed to an open flame.
Mineral wool is a popular type of insulation material. Advantages:
- resistance to fire;
- durability;
- minimal shrinkage;
- environmental cleanliness.
Mineral wool quickly becomes unusable when moisture gets on the surface. Therefore, it is necessary to make reliable waterproofing without gaps.
Ecowool is the most unpopular material for insulating baths. For it you need to buy a fire retardant and antiseptic. Ecowool quickly ignites when exposed to an open flame and is afraid of water.
Glass wool is a classic insulation material that is gradually losing popularity. You need to work with glass wool carefully, wearing protective equipment - gloves, a respirator, goggles, a robe. Glass wool particles can get on the skin, causing redness and severe itching.
Liquid insulation is a good, but expensive option for thermal insulation. When working with this material you need:
- have practical skills;
- use special protective equipment.
If it is not possible to call a team to fill the empty spaces in the walls and floors with a liquid composition, it is recommended to choose foil material. Advantages:
- low price;
- ease of installation;
- heat reflection.
When choosing a material for insulating a bath, you need to pay attention to the requirements that it must meet:
- environmental Safety;
- resistance to moisture and temperature changes;
- resistance to fungi and mold.
If the material does not meet most of the requirements, it cannot be considered as insulation.
Technology for insulating a wooden bath floor
Here you should proceed in the classical way. The same waterproofing is laid between the subfloor joists. Afterwards, you can proceed directly to the process of insulation with various materials. The use of polystyrene foam has become very popular, although any other bulk insulation, for example, expanded clay, will work here. Then you should again insulate the insulation with a special waterproofing fabric and screw the subfloor boards, squeezing them with clamps. By the way, in a bathhouse on screw piles with purely wooden floors and joists, it is advisable to also insulate the base, this will be more reliable and warmer for your feet.
«>
https://youtube.com/watch?v=BBgdGeoNKpU
The arrangement of a recreation area on the shore of a reservoir or on a slope assumes that the floor in the bathhouse on screw piles will be installed taking into account the characteristics of alluvial or sedimentary soil. It is these rocks that make up the soil on the banks of a river or pond, slopes, and hills.
The foundation for a bathhouse on screw piles is suitable for location on a slope, so it is possible to adjust the height of the pile
Floor construction
We nail moisture-resistant OSB 0.6 cm thick to the bottom surface of the log
It doesn’t matter what kind of frame bath you build, on stilts or a columnar foundation, the floor insulation procedure follows the same sequence. Before you start building the floor, you should install the frame walls of the bathhouse
There is no need to insulate the walls yet, but it is better to install a moisture and wind barrier. The construction of the subfloor proceeds in the following sequence:
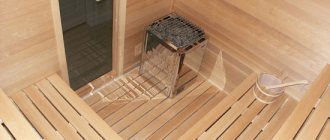
- We nail moisture-resistant OSB 0.6 cm thick to the bottom surface of the log. Under the washing room and steam room, small holes should be drilled in the slab for ventilation. Don't forget to make a hole to install the drain pipe under the washing room. As a result, you will get a design that resembles the letter “W”.
- The next stage of building the floor of a frame bathhouse with your own hands will be laying Izospan waterproofing. It will also serve as a windbreak. We lay the waterproofing on top of the joists so that it sag into the gaps between them and evenly covers the OSB sheathing. The joints of the waterproofing film are taped. The waterproofing is fixed to the joists by stuffing wooden slats with a cross-section of 50x30 mm on top of them.
- If you plan to make a stove in the bathhouse, then install a supply vent in the place where it is supposed to be located in the floor between the joists. For these purposes, you can use a steel pipe or an old ventilation duct.
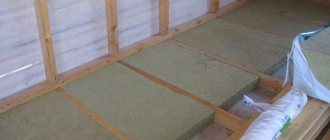
- When the waterproofing is laid, you can insulate the bathhouse floor with your own hands. We do it using ecowool, laying slabs between the logs. The surface of the heat-insulating material should be flush with the top edge of the joist. At the stage of laying the insulation, do not forget to lay the drain pipe in the washing room.
Laying vapor barrier film and insulation
Next, the floor is sewn over the logs with moisture-resistant oriented strand boards
In this case, it is important to ensure that the joining of the slabs falls on the logs. To fix the OSB between the joists and the bottom frame under the walls, it is worth attaching wooden blocks
We lay OSB with a gap of 0.2-0.3 cm between adjacent sheets. We attach them to the logs using self-tapping screws. When the waterproofing and the first layer of insulation are laid, you can make the second layer of insulation with your own hands. To do this, we lay sheets of extruded polystyrene foam 5 cm thick in a spaced pattern. In the place where the stove will be installed, laying thermal insulation material is not necessary. We waterproof the drain hole in the floor. To do this, we attach Izospan “D” film around the drain with double-sided tape. We install waterproofing using sealant, which is poured between the film and the pipe. A vapor barrier layer must be provided in the floor of a bathhouse on stilts and a columnar foundation. Its installation can be made using the Izospan “D” vapor barrier film. To do this, we attach it to sheets of polystyrene foam using a stapler. We lay the film with an overlap of 50 mm, sealing the joints with tape. To prevent rotting of the bottom trim, we place the film on the walls to a height of 100-150 mm and connect it to the vapor barrier material of the walls.
Where to buy a house kit for a small frame bath
It is much easier to build a frame bathhouse with your own hands, using a kind of construction kit - a house kit, which includes all the large-format elements for construction. The main components of a frame bath house kit are beams and panels. You can use ready-made house kits only if there is a foundation. All components are adjusted to size (if necessary), assembled and secured to the base.
A finished small frame bathhouse installed on a foundation of concrete pillars
House kits for small frame baths have some advantages over structures erected permanently. Firstly, the compact dimensions of the mini-bath allow its structure to be installed even in a modest area. Secondly, it is possible to quickly dismantle the structure and transport it to another location. Thirdly, the presence of internal communications wiring allows you to quickly connect and immediately use the bathhouse for its intended purpose.
Factory-made house kits are accompanied by bathhouse designs with assembly drawings and architectural sections. At the customer’s request, the company can offer services for obtaining permits and obtaining technical specifications for electricity, gas, and water supply. A package of all permitting documents is attached to the standard project.
Typically, the lowest cost of kits comes from those organizations that independently manufacture all components. Thanks to the factory assembly and adjustment of the panels, which accounts for more than 70% of the cost of all work, the cost of installing a bathhouse on the site is significantly reduced. The customer just has to build a lightweight foundation, choose the optimal design and purchase a prefabricated frame bath house kit.
Frame bathhouse of a small area, built with your own hands
How to do it right?
Of course, the easiest way is to make your own wood flooring. Work begins long before entering the site. You will definitely have to calculate the necessary structures and fasteners
It is equally important to calculate the consumption of insulating materials of all types. Important: you should take them with a reserve to avoid unnecessary problems and shortcomings
To build a wooden flooring, prepare:
- saw;
- screwdriver;
- screws or nails (for laying on joists);
- mallet for fine adjustment;
- an ordinary plumber's hammer;
- paint brush;
- antiseptic.
The first step in the process is to create a subfloor. A board or OSB boards are hammered onto the outside of the joist. Insulating materials are secured using a stapler. The gaps between the logs are filled with mineral wool slabs. A vapor barrier is placed on top of this insulation, OSB plates are fastened over it, and slats are hammered onto them, between which panels of extruded polystyrene foam are laid out.
Further arrangement of the floor is usually carried out by hammering a suitable board with an inclination to one side. In a more complex version, a reinforcing mesh is installed and a screed is poured. A finishing layer of finishing is made above the screed. It is necessary to think through the organization of drainage. In order for it to work smoothly, in any case, it is necessary to determine in advance the side for tilting the flooring.
Waterproofing the floor in a frame bath can be done using a coating composition. Most often, this function is performed by bitumen and sealant. But you can also use special polymer varnishes and plaster mixtures. If you choose the option with adhesive insulation, the surface must be primed before work. Professional plaster waterproofing can be done using gypsum, cement and polymer compounds. Also sometimes solutions and mastics of various compositions are used (this is called cast waterproofing).
Protection against rotting with antiseptics is certainly important. However, they must be used with caution: the fewer synthetic and potent components, the better. Floors in a frame building can be insulated using expanded clay, mineral wool, foam glass, and cement mixtures (to which various substances are added to improve quality). It is necessary to select insulation taking into account the developer’s budget and climatic requirements. The boards need to be dried thoroughly.
For information on installing floors in a frame bath on screw piles, see below.
Recommendations
- Before choosing a material, you need to carefully examine it for the presence of fungus, mold, and rotten knots.
- If the bathhouse will be used in winter, it is not advisable to make a leaking flooring.
- Before installing the floor, you need to dry the boards.
- The drain must be discharged into a waste well, which can be located 1–3 meters from the bathhouse.
Assembling a floor in a frame bathhouse is not difficult, but to do this you need to take into account the features of such a building, know how to properly insulate it, and protect the base from moisture. It is easier to make a wooden floor, since laying a concrete floor requires a lot of investment.
Leaky floor installation
When building on sandy soils that absorb water well, it is enough to fill in 20 cm of gravel - you will get a kind of filter through which moisture will go into the ground. On clay soils, you must first dig a gutter and take it outside the bathhouse into a septic tank or drainage pit.
Beams are installed strictly horizontally on the foundation with roofing felt laid on it, which can be made in two versions:
- Beam 100x150 mm made of softwood, treated with antiseptic. Its length should provide a ventilation gap of 2-3 cm between the beam and the wall. In the middle of the span, you can install concrete or brick pillars.
- A metal channel with a height of 160 mm, onto which a wooden beam is secured with self-tapping screws. The structure is mounted to the foundation by welding or using anchors.
Advice! To ventilate floors from below, a ventilation gap of at least 300 mm must be provided between the lower edges of the beams and the ground.
Further installation of the covering is made from planed edged boards 30 mm, 2-3 cm short of the walls. They are treated with moisture-proofing compounds and laid on beams, leaving 5 mm gaps between them. The boards are fastened in several places with self-tapping screws.
Floor covering device
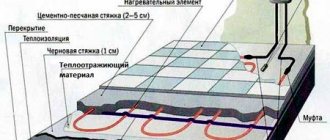
Scheme of the floor “pie” (from bottom to top):
- subfloor rolling – OSB-3 (thickness 6mm);
- waterproofing and wind protection – “Izospan A”
- insulation – ecowool
- OSB-3 shield (thickness 18 mm);
- insulation – EPPS, 5 cm;
- vapor barrier – “Izospan D”;
- reinforcing mesh;
- underfloor heating cables;
- screed;
- tile adhesive;
- tile.
Now let's talk more about each layer.
Step #1 - rolling the subfloor
OSB-3 sheets 6 mm thick were nailed to the bottom side of the joists. They have drainage holes drilled for ventilation. A hole was also cut for the drain outlet.
Installation of a subfloor from OSB-3 sheets
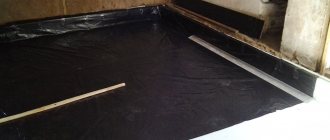
Step #2 - waterproofing the floor
Waterproofing and windproof film “Izospan A” was laid on the roll. All joints were taped with construction tape.
Waterproofing subfloor roll-up with Izospan A film
According to the plan, the supply ventilation hole in the bathhouse will pass under the stove. To organize it, a metal hood box was installed between the joists. A drain tee is also installed.
Installation of the supply ventilation duct
Step #3 - insulation with ecowool
The first layer of insulation is ecowool. But since niches were formed in the ceiling between the joists and the lower frame of the walls (where it is difficult to deliver ecowool), they were filled with Rockwool insulation.
“Rockwool” insulation is laid in niches under the wall trim
I beat the ecowool with an electric drill. During the process, the material increased approximately 2.5-3 times its original volume. The fluffed insulation was laid manually between the joists on the waterproofing. The surface was compacted and leveled with the rule flush with the joists. At this stage, the drainage organization is completed.
Laying ecowool between floor joists
Step #4 - OSB-3 sheathing
Next, the ecowool was covered with another layer of OSB-3. The sheets were cut into pieces so that their edges were located on the joists. Between the logs and the lower frame of the walls, wooden inserts are also fixed, serving as supports for OSB-3.
Embedded timber for OSB-3 support
Taking into account possible expansion (swelling), OSB-3 was laid with a small gap of 2-3 mm. They were secured with self-tapping screws to the joists.
Covering logs with OSB-3 sheets
Step #5 - insulation with EPS boards
The next step is additional insulation of the floor with a layer of EPS (extruded polystyrene foam). The slabs were laid in staggered order. To do this, entire slabs had to be cut with a construction knife (if you have a jigsaw, it’s better to use it).
Floor insulation with EPS sheets
The drain has been waterproofed. “Izospan D” is glued around the drain with double-sided tape, and the joints between the pipe and the film are filled with sealant.
Waterproofing the drain using Izospan film and sealant
Space has been left for installing a concrete slab under the stove.
In the place where it is planned to pour a concrete slab under the furnace, EPS does not fit
Step #6 - Placement of Vapor Barrier
A vapor barrier film “Izospan D” was laid on top of the EPS, and stapled to the EPS. The film is laid with an overlap (by 5 cm), the joints are taped with construction tape. To prevent rotting of the lower framing of the frame, the film is placed on the walls (10-15 cm) and connected to the vapor barrier of the walls.
Organization of a vapor barrier layer from Izospan D film
Stage 1: Design
Frame construction is suitable both for the construction of small steam rooms on the site, and for the creation of real country houses for relaxation. The choice of design and area depends only on the size of the site, personal budget and needs. Before starting the main work, you should decide on the location of the bathhouse construction
To do this, it is important to take into account the location of utilities, the topography and layout of the site, the presence of a reservoir and other water bodies nearby. In addition, it is advisable to conduct a geological analysis of the soil, since the type of future bathhouse foundation depends on this
Upon completion of the preparatory work, you should have a detailed plan of the area, a drawing of the building with all the necessary elements, and an approximate estimate for materials for construction. If you are not confident that you can draw up a competent project yourself, it is better to turn to professionals - this will allow you to avoid serious mistakes and miscalculations in the future.
Design options for different types of foundations
Depending on the type of foundation for a frame bath, we will consider installing the floor on the following basis:
- pile or columnar;
- tape;
- slab
Pile or columnar
The most convenient and easy to install is the floor in a frame bathhouse on stilts.
He is not afraid of either dampness or frost. Such a foundation can be easily corrected in case of subsidence (it is enough to jack up the corner and place a pad on the pillar or pile). The cross-sectional design of all floor elements is the same as that used to organize leaky and non-leaky floors in a frame bathhouse.
Tape
It serves as the basis for a frame bathhouse, which is distinguished by its large dimensions and, as a rule, includes several rooms. The construction of the floor in such buildings is also capital, most often it is a concrete floor. When organizing a floor covering, the cross-section of the structural pie has the following form:
- A sand cushion laid on compacted soil.
- Waterproofing layer.
- Insulation (extruded penoplex).
- Reinforcing mesh.
- Heated floor system.
- Screed.
- Clean floor covering.
When installing such a floor, even before pouring the foundation, you should decide in which direction the water should be drained and the sewer pipe should be laid.
Slab
When building frame baths, slab foundations are quite rare, especially in cold latitudes, for a number of reasons:
- The bulkiness of the structure.
- Difficulty in laying communications and draining water.
- Difficulty in heating during the cold season.
- Significant financial costs when pouring the foundation.
Nevertheless, the floor cake with this basis has the following structure:
- Sand pillow.
- Expanded clay layer.
- Reinforced concrete slab.
- Waterproofing layer.
- Insulation.
- Warm floor.
- Screed layer.
- Finish floor covering.
Insulation on a concrete floor
For most, this option is desirable; it will save the owner of the bathhouse from the hassle of replacing the joists of the rough wooden floor.
diagram of an insulated floor in a bathhouse
Everything is simpler with a concrete base; after installing the slab or monolithic layer, the insulation is laid or filled in an even layer. Then waterproofing and reinforcing metal mesh (fiberglass is also suitable) are laid on top of the heat insulator. And then they concrete it with a new thin layer of 5–10 cm. Only after that can a wooden finishing surface be built and laid. The technique described in general terms is very relevant for washing rooms, where it is necessary to organize water drainage through a drain along the subfloor. Only the subfloor should be insulated. Before installation, the insulation must be insulated with a waterproofing material, such as polyethylene film, roofing felt or vapor barrier
It is very important to join the insulation on the concrete base tightly, but so that it does not run over each other, if it is a mineral wool slab. For other piece materials, it is enough to compress them together, for example, foam sheets
Rot protection
To prevent boards from rotting in a wet bath, experts advise treating them with a special water-based varnish with increased heat resistance. Such a coating can withstand heating of more than 100 degrees, thereby providing the structure with effective protection from heated steam, humidity and various types of dirt. The protective varnish must be applied to the plank base with a brush in at least 3-4 layers. All work must be carried out in a ventilated room with an air heating level ranging from 4 to 25 degrees.
In addition, you can find all kinds of natural-based impregnations on sale. As a rule, they have a shorter exposure period and require regular renewal.