Tiled bath floors have recently become very popular. This is facilitated by the numerous advantages provided by the use of tiles in the steam room and washing room. Modern ceramic tiles make it possible to fully satisfy all operational requirements, while still having aesthetic appeal. High-quality and reliable bath flooring with tiles can be installed on your own, which will significantly reduce financial costs.
Construction of frame bath walls
The wall of a frame bath is a wooden frame, the voids of which are filled with insulation, lined with sheet materials or clapboard.
This design stores heat well, does not require heating costs, is easy to repair, and local and spot repairs are allowed. It is important not to confuse frame and frame-panel baths, these are two different construction technologies
The advantages also include the almost absolute absence of shrinkage, which allows for final finishing immediately during construction. Requirements for the composition of the walls are moisture resistance and the absence of release of toxic substances when heated.
Advice! You should also carefully monitor fire safety, since the traditional source of heat in a bathhouse is a stove, an element that is risky in itself. Therefore, it is advisable to use non-flammable and non-toxic materials when insulating.
Pie wall frame bath
The multi-layer construction of walls with insulation, vapor barrier or, as an option, a multifunctional membrane, has received the name “pie” among experts. The construction of such a pie is the main reason for the abundance of advantages and useful properties of frame walls.
The composition of the pie usually includes:
- Timber 150 by 50. Edged boards are often used.
- Mineral insulation located in the spaces between the wooden parts. The most preferred option is mineral wool slabs.
- Oriented strand board (OSB), thickness must be at least 15 mm.
- Horizontal sheathing.
- A layer of insulation for horizontal sheathing.
- A layer of waterproofing (or multifunctional membrane).
- Vertical sheathing.
- Exterior finishing.
- Vapor-releasing material.
- Interior decoration. Most often this is lining.
Photo
Option 1
Option 2 (easier)
Option 3 (the simplest)
This set allows you to store heat, does not get wet, is protected from atmospheric influences from the outside and from the absorption of water vapor from the inside. The effectiveness of the pie has been tested many times and there is no doubt about its reliability.
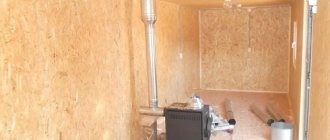
Insulation procedure
The insulation process begins after the construction of the wooden frame, and then the wall pie of the frame bath is created. The first step is to fill the voids between the frame boards with insulation. The material is cut exactly to size and placed into gaps.
Important! It is necessary to carefully adjust the pieces of insulation. All cracks and voids must be additionally filled with polyurethane foam to avoid the formation of cold bridges
foil inside. A layer of membrane or wind protection is laid on the outside
A sheathing is installed on top of it, on which the outer cladding is mounted. Between the outer skin and the insulation, due to the sheathing, an air gap is created that promotes ventilation and drying of condensate
A layer of membrane or wind protection is laid on the outside. A sheathing is installed on top of it, on which the outer cladding is mounted. Between the outer skin and the insulation, due to the sheathing, an air gap is created that promotes ventilation and drying of condensate.
Protecting thermal insulation from moisture
As already mentioned, protection from moisture is a layer of vapor barrier reinforced from the inside of the wall. As an insulator, ordinary aluminum foil or foil on kraft paper is used, which is somewhat easier to install. The vapor barrier strips (or membranes) are supposed to be connected to each other with aluminum tape to obtain a hermetically sealed seal. On the outside, a similar windproofing film is used to protect against external moisture.
Wall thickness of frame bath
The main value is the width of the frame boards. Recommended – 150 mm. Adding to this the thickness of two layers of sheathing, internal cladding and external cladding, we obtain a total wall thickness of about 250 - 270 mm. The dimensions are arbitrary; in each specific case, the builder’s choice may fall on materials of other thicknesses. The main condition remains compliance with the principle of operation of the cake, which provides insulation and eliminates the effects of condensation.
Hint: there are opinions that 10 centimeters of insulation is enough, in which case, the above can be reduced by 5 cm.
The walls are insulated directly during the construction of the bathhouse. Actually, insulation and construction are, in fact, one process that can be conditionally divided into certain stages. Nuances may arise due to the use of different types of insulation, adding or, conversely, excluding certain technological operations. For example, insulation with foam plastic entails the need for additional filling of cracks and voids with polyurethane foam. The final sequence of actions is determined by the material of the insulation used.
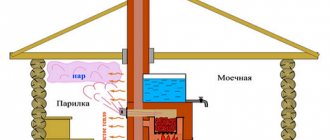
Installation of a heated floor system
The presence of a heated floor promotes the rapid evaporation of moisture from the heated floor surface. This type of floor dries quickly and mold and mildew do not have time to form on it. And the constantly warm surface is very comfortable for bare feet! These reasons determined the choice of electric flooring for the steam room, washing room and rest room.
To facilitate cable installation, a 50x50 mm masonry mesh is laid on the surface of the vapor barrier. The mesh parts are connected with wire.
Installation of masonry mesh for vapor barrier
The cable was secured with 100 mm ties. A heated floor sensor is installed in the wall.
Laying underfloor heating cables on a grid
Installation of a heated floor sensor on the wall
Before pouring the mortar, the masonry mesh was raised 1 cm from the floor. To do this, pieces were cut from the remains of foamed polyethylene (left over after insulating plumbing pipes) and placed under the mesh. You can use any other material that does not wrinkle, does not bend and holds its shape.
The thickness of the floor screed is 30 mm. In the steam room, relaxation room - without a slope, in the sink - with a slope of 5 mm/1 m towards the drain. To form a flat surface, beacons were used - a U-shaped profile 19x20mm. First, wood grouse were placed on the floor surface using a laser level, and beacons were laid on top of them.
Exposed beacons for screed installation
The screed was filled with a cement-sand mixture with a plasticizer (PVA glue) and fiber (reinforcing additive). Mixed in a concrete mixer. The solution turns out to be gray, dense, and almost as strong as metal.
The next day, the beacons were removed from the fresh screed and the wood grouse were unscrewed. The resulting holes are filled with mortar and rubbed flush with the hardened screed. Afterwards, the screed is moistened with water and covered with a film to prevent cracking. The film is removed after the screed has completely hardened. I did it after 5 days.
Screed device for subsequent tiling
Laying tiles when the drain is located horizontally near the wall
In this case, installation should begin from the center of the opposite wall.
Sequencing:
Laying tiles at the location of the drain
- The first tile must be placed to the right of the center, and the rest from it to the right and left. The first row is ready;
- the tiles are laid using glue, which is applied to the back side with a notched trowel;
- special crosses are installed between the tiles, which ensure the required width and uniformity of the seams;
- First, whole tiles should be laid out, the outer ones are cut off;
- Excess glue is constantly removed with a damp cloth. Once it dries, it is very difficult to remove.
The floor with the laid tiles should be left for a day for the glue to dry completely.
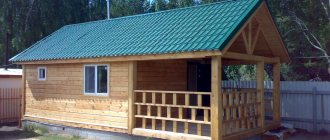
Features of building a frame bath with your own hands
Before you begin construction work on the construction of a frame bath, you need to know some of the features of the work
Experts recommend paying attention to three important points - vapor barrier, thermal insulation and choice of wood type
Vapor barrier
Please note: it is better not to use roofing felt as a vapor barrier material when building a frame bath - when heated, it emits a rather specific, unpleasant odor into the air. A vapor barrier layer is laid between the inner lining of the bathhouse and the insulation layer. A vapor barrier layer is laid between the inner lining of the bathhouse and the insulation layer
A vapor barrier layer is laid between the inner lining of the bathhouse and the insulation layer.
Thermal insulation
Experts say that mineral wool and/or fiberglass can be safely used as a thermal insulation material for a frame bath.
Wood for a frame bath
The main requirements for choosing wood for building a frame bathhouse with your own hands are:
- the material must be well and completely dried;
- the best choice would be larch, aspen or linden - they have a low thermal conductivity threshold;
- for external walls you will need boards 30 mm thick;
- the external cladding of the building can be made of pine or larch;
- The internal lining is made of wood of any species, but preference is best given to linden.
Grouting tile joints
It is carried out no earlier than one day after cladding. The spaces between the tiles and their surface are pre-cleaned of glue.
Grouting tools
The grout must have water-repellent properties. After its application, the entire surface becomes waterproof. It is good to use two-component epoxy grout. To give the desired shade, pigment is added to the grout mixture. It is better to make the tone of the grout a little darker than the tile. Light-colored grout quickly gets dirty and becomes unattractive. Remains of the grout mixture must be immediately removed from the surface with a damp sponge.
For high-quality work, you need to choose the right material - durable and moisture-resistant tiles, porcelain stoneware, other moisture-resistant and heat-resistant materials, heat-resistant glue and moisture-resistant grout. And follow the installation recommendations.
Selection of materials for insulation
Expanded clay, polystyrene foam, extruded polystyrene foam, basalt wool can be used as insulation for sauna floors, but the highest quality insulation can be achieved when using polystyrene foam boards, which not only meet all the requirements for heat preservation in the sauna, but also do not collapse from exposure to high humidity and temperatures, resistant to biological damage.
Floor installation on supports
To maintain heat in the bathhouse, you will have to make a base that will cover the free space under the floor, blown by the wind. Do-it-yourself basement cladding not only protects floors from freezing, but also improves the appearance of the building's facade, allowing you to design the site in a certain style.
It’s easy to make concrete or wood floors with your own hands; both options have their advantages and disadvantages.
Concrete flooring has a fairly high cost, its installation is highly labor-intensive, but the service life of a concrete floor covering reaches over 50 years. Wooden floors are distinguished by high comfort - feet step on warm wood, heated floorboards have a wonderful aroma of wood, and the floors heat up quickly.
Wooden floors are susceptible to rapid deterioration when exposed to increased moisture, and therefore are short-lived. The service life of wooden floors in bathhouses does not exceed 7 years. However, wood is a very inexpensive material, easy to process and not in short supply. Therefore, relaying the floor with your own hands will not be difficult; during repairs, it is easy to insulate old floors again.
We recommend watching a video on how to install a floor with your own hands.
general information
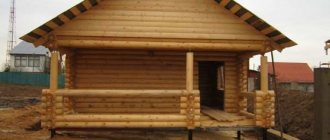
One of these structures is a frame bathhouse, the construction of which does not take much time.
Such a structure does not require a particularly strong foundation - to build it, it will be enough to build a strip foundation, pour columns, or use the pile-screw method. The technology for creating a foundation depends on the condition and moisture of the soil at the construction site. And also, depending on the future operating conditions of the structure, its reliable insulation should be ensured in order to ensure a long service life. At the same time, one of the most important stages in the construction of such a bathhouse is the installation of the floor.
Types of insulation for baths
It is better to use insulation for a frame bath in the form of mats.
If you choose the wrong insulation or lay it in an insufficient layer, the functionality of the steam room will be lost. Materials for insulating a frame bath can be natural or artificial. Bathhouses and synthetic insulation are incompatible; of course, the design will be cheap, but some can emit harmful fumes when heated. Natural ones include:
- Wood-fiber.
- Basaltic.
- Made from linen.
For artificial ones:
- Fiberglass.
- Expanded polystyrene.
Depending on the shape of the frame bath, choose the types: tiled or matte. A rolled one is also suitable, but it will be more difficult to place it in a frame cake. Any beginner can cut and lay insulation in the form of slabs or mats; just understand the technology and finish reading this article.
Wood fiber insulation
Wood fiber insulation is made from waste lumber.
The basis of the material is wood fibers, which are knitted with various synthetic fibers. It is non-allergenic and does not cause irritation to the skin when styling. The material is made by recycling lumber. It is a misconception that such insulation is made from waste paper. Thanks to its ability to absorb moisture and also quickly release it, a frame bathhouse will breathe like a full-fledged wooden one. One of the brightest representatives of insulation based on wood fibers is ecowool, the price of which starts from 120 rubles. /kg.
The main disadvantage is its ability to absorb moisture. If the hood in the bathhouse is performed incorrectly, then moisture can linger in the wall structure for a long time and they will begin to rot.
Basalt insulation
Basalt wool is made from mineral fibers by binding them with an adhesive composition. The main advantages include:
- High heat-saving properties.
- Does not burn, can withstand temperatures up to 900° C.
- It does not lose its quality characteristics over the years, so its service life is more than 20 years.
- Increases sound insulation.
- Does not absorb moisture and does not retain it in the frame structure.
The main disadvantage of the material was discovered at the end of 2014. Previously, it was considered one of the most environmentally friendly materials. It turned out that the adhesive composition used for gluing basalt fibers can release minor formaldehyde vapors. Whether or not the reaction intensifies during heating of the steam room, no studies have been conducted.
Linen fiber insulation
Flax mats began to be used not so long ago. The material is made from compressed flax fibers. There are no additives in the composition, such as formaldehyde. the material is completely environmentally friendly and is able to absorb and release moisture. And due to the dense pressing, the slabs have a high ability to conserve heat.
The main disadvantage of the slabs is the lack of time-testing and rodents. Mice love to build nests in flax fibers and chew holes in walls. Over time, the bathhouse will lose its thermal insulation properties.
Fiberglass insulation
Glass wool releases small particles of glass fiber during operation. which are dangerous to human health.
Glass wool is made from glass fibers bound together with synthetic glue. It is difficult to work with the material with your own hands, since when fibers enter the air, they settle on the skin and enter the respiratory tract. They may cause skin irritation and allergic reactions.
Glass wool has no less advantages:
- Does not burn.
- Its price is low.
- Easy to install.
- Has high thermal insulation.
- Creates slight sound insulation.
If the choice fell on glass wool, then all work on insulating a frame bath must be carried out in protective clothing and a respirator.
Expanded polystyrene for insulation
Polystyrene foam can be used to insulate the walls of a frame bath.
Expanded polystyrene is made by foaming polystyrene. Moreover, the larger and smaller the air bubbles in the material, the higher its thermal insulation properties. One of the brightest representatives of polystyrene foam. It is possible to insulate the walls of a frame bath with polystyrene foam, but it is not recommended. Moreover, insulate the ceiling and the space around the chimneys. Expanded polystyrene has a high fire hazard. It ignites from any spark. If the structure is insulated with foam plastic, then the cake must have protection. The material has a number of advantages:
- Low price. (The cheapest insulation option).
- Waterproof.
Any of the listed materials is used to insulate a frame bath. The main thing is to carry out the installation, observing all the rules.
Floor design in baths
It makes sense to analyze each type of flooring in detail when it comes to residential or public buildings. However, installing a floor in a bathhouse on screw piles is possible even with minimal knowledge and skills.
If a sufficiently high grillage is provided, then a hanging non-leaking plank floor in a frame bathhouse on stilts will be the optimal solution. An additional layer of insulation will allow you to use the bathhouse at any time of the year, otherwise in winter such a floor will be very cold.
A pile foundation allows you to protect the lower part of the deck from any external influences, in particular precipitation, flooding or simply moisture. But from the inside, such a floor is constantly subject to changes in temperature and humidity, because condensation forms in the steam room, and water is also supplied to the washing room.
Recommendations
Adviсe:
- Before choosing a material, you need to carefully examine it for the presence of fungus, mold, and rotten knots.
- If the bathhouse will be used in winter, it is not advisable to make a leaking flooring.
- Before installing the floor, you need to dry the boards.
- The drain must be discharged into a waste well, which can be located 1–3 meters from the bathhouse.
Assembling a floor in a frame bathhouse is not difficult, but to do this you need to take into account the features of such a building, know how to properly insulate it, and protect the base from moisture. It is easier to make a wooden floor, since laying a concrete floor requires a lot of investment.
How to make a floor in a bathhouse on screw piles - sequence with examples
The invention of the pile foundation belongs to the designer Alexander Mitchell, who first tested this technology during the construction of a lighthouse in Delaware Bay back in 1850. The essence of the method was that the piles were not driven into the thickness of the soil, but were screwed in by giving one of the ends of the pillar a pointed shape. This method was not only effective, but also stood the test of time and is still used today.
The military began to use pile foundations especially actively to accommodate rolling stock. This technology is also extremely relevant in hard-to-reach areas. In particular, in the northern regions, columnar foundations and the method of driving in supports were almost abandoned, replacing them with screw piles.
If we talk about the Russian Federation, then in some areas where the climate is especially harsh, screw piles are used as the most acceptable type of foundation for residential and industrial construction.
If you want to build a bathhouse on your site from laminated veneer lumber or a log frame, then a pile screw foundation is perfect.
Features of flooring on stilts
I usually use a pile foundation in the following cases:
- carrying out work on aggressive soils (rocky, marshy, etc.);
- with uneven ground surface;
- limited construction periods;
- impossibility of bringing the soil foundation into a condition suitable for construction.
This type of foundation consists of metal pipes with a metal tip installed at the edges. A cone-shaped tip is inserted into the thickness of the earth and firmly fixed in it. If the soil is loose, then I compact it additionally with soil.
To evenly distribute the weight of the structure on the foundation, the tops of the piles are cut at the same level, the caps are installed, and a circular winding is installed on top. They combine the pillars into a continuous structure.
Keep in mind that screw piles are not driven into the soil, but are screwed in manually or mechanically!
Types of floor coverings in the washing room
In private households, wooden (leaky or non-leaky) and concrete floor structures are usually laid in the washing sections of bathhouses.
As practice shows, the easiest option in terms of implementation is the leaking floor shown in the photo. On a pre-prepared base, which can be a concrete screed, a lower crown, support pillars, etc., logs are attached - they will become the basis for installing flooring from boards.
Floor elements are laid at intervals of 3-5 millimeters. It is through these gaps that water will be drained. Typically, leaking floor coverings are made dismountable. This design allows, if necessary, to remove the flooring and efficiently dry the boards outdoors.
Foundation cladding
In order for the support pillars to have a more presentable appearance, as well as to protect them from dirt and dampness caused by melting snow or flooding with water from a reservoir, they should be additionally finished. Various facing materials will help protect the floor in a bathhouse on screw piles, as well as emphasize the appearance of the building itself.
Since the main damage can be caused by snow and flows of dirty water in the off-season, special attention should be paid to the waterproofing qualities of cladding materials.
A good facing material for decorating the floor in a bathhouse is ceramic or tiled floor tiles. As a rule, they do not put a solid board under it, but prefer chipboards, plywood and other materials that are attached to the bars in the floor.
Tool
To lay the tiles we will need:
- Building level;
- Notched spatula (tooth height 8-9 mm);
- Drill with a nozzle for mixing glue;
- Plastic crosses;
- A device for cutting tiles (tile cutter).
In principle, ceramic tiles can be cut with a glass cutter, but it is still better to purchase a tile cutter. Tile cutters are either electric or manual. If you plan to limit yourself to laying tiles only in the bathhouse, then a manual tile cutter will be sufficient.
To learn how to choose a manual tile cutter, watch the video.
Step-by-step DIY installation instructions
Let's consider the procedure for creating a pile-screw foundation.
The work is carried out in stages, the sequence of actions has a strictly defined order:
Preparation
A pile-screw foundation has an important feature - it can be created on uneven terrain that does not require preliminary leveling (planning).
It is possible to build on slopes or in folds, which makes it possible to effectively use areas that are inconvenient from the point of view of traditional construction. Therefore, preparatory work can be reduced to clearing the area of plants and foreign interfering objects.
Make markings and mark all pile installation points with pegs. Then, small (up to 30 cm) recesses are made at the installation sites, which facilitate the entry of the blades into the ground.
The fertile layer of soil creates noticeable resistance due to the abundance of roots, plant stems and other obstacles, so it is better to remove it.
Driving piles
Installation of screw piles is done either manually or mechanically. Manual installation is possible in the presence of relatively soft soil without man-made inclusions or rock debris.
The diameter of the barrels available for manual immersion is limited to 87 mm.
The most common 108mm diameter piles are often too difficult to construct due to the high soil resistance.
The machine method allows you to obtain high-quality installation of screw piles, observing a certain angle, screwing force and depth.
The power of construction equipment allows you to freely work with piles up to 159 mm in diameter, which is quite enough for the construction of a fairly large private house.
The piles are driven to a predetermined depth. Usually it is determined by the level of occurrence of dense layers, or the soil resistance force exceeds the force permissible for a given shaft, which breaks off the technological hole.
A pile that has reached the required level of adhesion to the ground rotates with great effort or stops doing so altogether.
You cannot try to continue rotating - the welding may not hold up, the blades will come off and the pile will become unable to perform its functions.
NOTE! When installing screw piles, it is forbidden to reverse - try to unscrew the trunk back. This weakens the adhesion of the blades to the ground and eliminates the possibility of repeated immersion in this place
Harness
After installing all the piles, trimming is performed. This is a procedure that allows you to adjust the height of trunks protruding from the ground to a single level and form them into an even horizontal plane.
Install a laser level with the function of constructing planes at the required height and cut off excess sections of pipes.
After trimming, the internal cavities of the piles are filled with concrete, increasing their strength.
Then they install the strapping (grillage) - a belt that connects all the piles into a single system and at the same time serves as a supporting element for the walls of the house. The cut tops are covered with caps with horizontal platforms on which metal or wooden beams are installed.
For fixation on the platforms there are technological holes for bolted connections.
IMPORTANT! Sometimes the trim and grillage are different elements. The piping is performed below the level of installation of the grillage and connects all the piles together, forming a system like a lattice. Metal sections of a channel or I-beam are used, welded to the walls of the trunks
Metal sections of a channel or I-beam are used, welded to the walls of the trunks.
Types of floor coverings in the washing room
In private households, wooden (leaky or non-leaky) and concrete floor structures are usually laid in the washing sections of bathhouses.
As practice shows, the easiest option in terms of implementation is the leaking floor shown in the photo. On a pre-prepared base, which can be a concrete screed, a lower crown, support pillars, etc., logs are attached - they will become the basis for installing flooring from boards.
Floor elements are laid at intervals of 3-5 millimeters. It is through these gaps that water will be drained. Typically, leaking floor coverings are made dismountable. This design allows, if necessary, to remove the flooring and efficiently dry the boards outdoors.
When creating a non-leaking floor from wood materials, its elements are laid without gaps. This design does not provide for the disassembly of boards. It is equipped with a slope in the direction of the drain hole. Next, the water enters the reservoir and is discharged outside the building through a pipeline.
Non-leakage flooring in the bathhouse in the washing department requires the presence of a rough base and laying a layer of thermal insulation
Particular attention should be paid to solving the problem of ventilation of the underground space. One or more holes are made in the floor for ventilation - their number depends on the area of the room
Plastic pipes with a cross section of 50 or 100 millimeters are inserted into them.
By the way, when a bathhouse is built, heated floors in the washing room are designed to be leak-free.
Concrete floors in the garbage room are made quite often, because they have many advantages:
- simple device;
- durability, strength and reliability;
- ease of care.
There are several ways to solve this problem:
- move in special shoes;
- insulate the floor;
- install a floor heating system, which will require considerable financial expenses.
Preparing the base
Before pouring concrete on the bathhouse floor, it is necessary to properly prepare the base. Otherwise, the floor will have low strength and reliability characteristics, will last much less and is unlikely to provide adequate comfort.
Alignment
The drainage system from the pit is carried out beyond the foundation and is realized through a drainage pipe with a cross-section of 10-20 centimeters dug in the corner under a slope. Thanks to this design, it will be possible to ensure maximum comfort in the operation of the bath and avoid the accumulation of large volumes of water.
Seal
Before concreting, the surface must be compacted with a vibrating plate or a manual tamper made from scrap timber or logs. Sand is poured onto the compacted soil in a layer of 5-10 centimeters, then a layer of gravel 10 centimeters thick.
Both layers must be thoroughly compacted. They will protect the concrete floor in the bathhouse from rising moisture from the soil and other troubles.
How to build a structure correctly?
The process consists of the following steps:
- After the foundation has been arranged, construction of the bathhouse begins:
- First, determine the height of the walls and the type of roof.
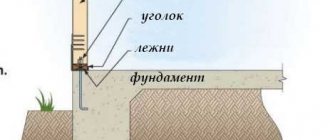
- At the corners, the supports are made of beams, fastening them with corners.
- Then edged boards are attached to the grillage. Struts are installed between them.
- The process is completed by connecting the parts with the top trim.
- Next, a reliable floor is built, immediately insulating it. To secure the floor covering, it is necessary to install the logs on the grillage, connecting them to the base using metal corners.
After completing the subfloor, the installation of walls begins. The technology here is somewhat different for timber and frame structures.
From timber
A month after the construction of the base, they begin to attach the crown of the strapping
The bottom block is treated with an antiseptic. Nails are used to connect elements. When the beams are laid, they pause to allow the frame to shrink.
This process lasts about six months. Then the cracks are sealed using tow or sealant. First they caulk the lower crown, after which they gradually move upward.
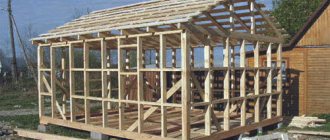
Construction of a frame structure
The contour in the form of a frame is erected from timber treated with an antiseptic. Its cross-section is selected taking into account the insulation used and the load-bearing capacity of the material. For the strapping and corner posts you need a more massive beam.
Installation begins from the corner, connecting the timber with nails. Before laying, cover the grillage with roofing felt. Braces are attached in all corners. It is better to assemble the frame on the site. For its external cladding, it is recommended to use carriage boards, although other materials are also suitable. The lining is fixed horizontally, laying waterproofing underneath it.
An important stage of construction is thermal insulation of the structure. Mineral wool is often used as insulation. It has a good vapor permeability, the material does not burn, and allows the walls to “breathe.” You can also lay mineral fiber rolls. The slabs are mounted between the racks.
Waterproofing in the form of a film is attached between the insulation and the outer skin. The inside is lined with aluminum foil with a polyethylene layer. The joints are taped, then the interior finishing is done.
When equipping floors, take into account the purpose of the room. Where there is a lot of water, a torrential foundation is installed. It consists of a boardwalk with gaps allowing drainage to pass down. Such floors do not provide insulation.
Small gaps are made between the boards, leaving gaps around the perimeter as well. If there is sandy soil under the bathhouse, crushed stone is poured on top of it, leaving a gap of 10 cm to the floor. If the soil is clayey, a tray is built that directs water to the drain tank.
Recreational areas require a floor that does not leak. First, make a rough flooring using a couple of layers of boards. A continuous pine covering is installed on them, with insulation placed underneath.
Step-by-step creation of a steam room
Creating a steam room indoors is a step-by-step process consisting of waterproofing, insulation and finishing work.
Insulation against steam and water
To prepare the steam room for finishing, perform the following steps:
- Outside and inside the steam room, all the cracks in the logs or beams are filled with flax.
- A vapor barrier membrane is attached to a bare wall using a stapler.
- A sheathing made of beams is mounted on top of the film. They are connected to each other, creating cells of 60 cm. First, using a level, guides are fixed on the wall using corners, and then racks, the position of which must be checked with a level. In the installed racks, grooves are cut into which bars of a smaller cross-section are inserted. The sheathing is attached to the wall using self-tapping screws.
Laying insulation
Immediately before finishing the steam room, do the following:
- Mineral wool is placed into the manufactured frame. To insure it from deformation, polypropylene twine is used for fastening. The vapor barrier material is again fixed on top of the insulation.
- Thermal insulation material is attached to the ceiling, which is usually protected from dampness with sheets of aluminum foil. Then the planed boards are nailed down. Between them leave gaps of 1 cm, necessary for ventilation of the room.
- Cut the lining to the required length. After this, it is treated with antifungal impregnation. The work is postponed for several days, giving the material the opportunity to dry thoroughly.
- The lining is horizontally attached to the walls of the steam room, starting from the area near the stove. The wooden planks are connected so that each previous one overlaps the next by 1 cm. This will insure the material from the formation of cracks, which may be the result of deformation or shrinkage of the lining. The planks are held in place using discreet clamps that do not heat up like nails. But the bottom boards are attached with self-tapping screws, which in the future will make it possible to replace rotten planks without resorting to complete dismantling of the material. The lining is not installed all the way to the floor. At the bottom of the wall, be sure to leave space for attaching one row of ceramic tiles.
Floor finishing
To finish the floor in the steam room, do the following work:
- A fishing line is pulled along the perimeter of the floor so that in the future you can check the evenness of the surface. Having created formwork from the boards, the floor is filled with a mixture of cement and sand, forming a concrete screed 5 cm thick. It should have a slope towards the drain pipe pre-installed in the cement.
- Ceramic tiles are immersed in water for 10 hours. The heat-resistant mastic for fastening the material is mixed well and, making sure that the consistency of the composition is similar to whipped cream, proceed to gluing the tiles to the concrete screed. If the mastic is liquid, then add a little sand to it.
- The tiles, treated with mastic on the inside, are attached to the floor and the lower part of the wall from bottom to top. Each row of ceramic material is leveled and seated using a level and a spatula. To obtain even seams, crosses are laid on all sides of the tile, which are removed after installation of the material. When fixing the tiles in the place where the water drains, the corners of the four elements are cut off.
- The seams between the tiles are filled with heat-resistant grout. Before use, the powder product is poured with water and mixed with a mixer. The prepared grout is poured into a construction gun. The nozzle of the tool is inserted into the seam, and the grout is squeezed out so that it does not rise above the level of the tile.
Floor covering device
Scheme of the floor “pie” (from bottom to top):
- subfloor rolling – OSB-3 (thickness 6mm);
- waterproofing and wind protection – “Izospan A”
- insulation – ecowool
- OSB-3 shield (thickness 18 mm);
- insulation – EPPS, 5 cm;
- vapor barrier – “Izospan D”;
- reinforcing mesh;
- underfloor heating cables;
- screed;
- tile adhesive;
- tile.
Now let's talk more about each layer.
Step #1 - rolling the subfloor
OSB-3 sheets 6 mm thick were nailed to the bottom side of the joists. They have drainage holes drilled for ventilation. A hole was also cut for the drain outlet.
Installation of a subfloor from OSB-3 sheets
Step #2 - waterproofing the floor
Waterproofing and windproof film “Izospan A” was laid on the roll. All joints were taped with construction tape.
Waterproofing subfloor roll-up with Izospan A film
According to the plan, the supply ventilation hole in the bathhouse will pass under the stove. To organize it, a metal hood box was installed between the joists. A drain tee is also installed.
Installation of the supply ventilation duct
Step #3 - insulation with ecowool
The first layer of insulation is ecowool. But since niches were formed in the ceiling between the joists and the lower frame of the walls (where it is difficult to deliver ecowool), they were filled with Rockwool insulation.
“Rockwool” insulation is laid in niches under the wall trim
I beat the ecowool with an electric drill. During the process, the material increased approximately 2.5-3 times its original volume. The fluffed insulation was laid manually between the joists on the waterproofing. The surface was compacted and leveled with the rule flush with the joists. At this stage, the drainage organization is completed.
Laying ecowool between floor joists
Step #4 - OSB-3 sheathing
Next, the ecowool was covered with another layer of OSB-3. The sheets were cut into pieces so that their edges were located on the joists. Between the logs and the lower frame of the walls, wooden inserts are also fixed, serving as supports for OSB-3.
Embedded timber for OSB-3 support
Taking into account possible expansion (swelling), OSB-3 was laid with a small gap of 2-3 mm. They were secured with self-tapping screws to the joists.
Covering logs with OSB-3 sheets
Step #5 - insulation with EPS boards
The next step is additional insulation of the floor with a layer of EPS (extruded polystyrene foam). The slabs were laid in staggered order. To do this, entire slabs had to be cut with a construction knife (if you have a jigsaw, it’s better to use it).
Floor insulation with EPS sheets
The drain has been waterproofed. “Izospan D” is glued around the drain with double-sided tape, and the joints between the pipe and the film are filled with sealant.
Waterproofing the drain using Izospan film and sealant
Space has been left for installing a concrete slab under the stove.
In the place where it is planned to pour a concrete slab under the furnace, EPS does not fit
Step #6 - Placement of Vapor Barrier
A vapor barrier film “Izospan D” was laid on top of the EPS, and stapled to the EPS. The film is laid with an overlap (by 5 cm), the joints are taped with construction tape. To prevent rotting of the lower framing of the frame, the film is placed on the walls (10-15 cm) and connected to the vapor barrier of the walls.
Organization of a vapor barrier layer from Izospan D film
Waterproofing sand cushion
After the sand has settled, you need to spread a plastic film over its surface with an overlap of at least 30 cm at the joints of the strips. This is enough to prevent the groundwater from rising higher. We overlap the film onto the walls by at least 10 cm on each and fasten its edges to a wooden beam using a construction stapler so that they do not fall down. Then we lay PVC film on top of the polyethylene film to waterproof the pools.
On top of the PVC film, for swimming pools, we lay guide bars for the base of the floor (joists). We fill the space between them with sand (if it is a steam room) and polystyrene foam if it is a rest room or washing room. We lay a vapor barrier membrane on top of the bars and fasten it to the staples with a construction stapler. Then we place construction plywood on top of it with a thickness of at least 16 mm.