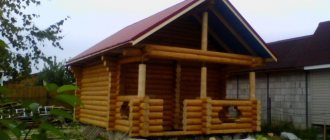
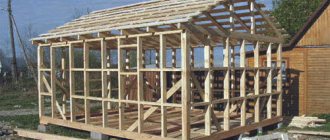
Every person who has their own country house wants to build a bathhouse or sauna. Such a building allows for health procedures that increase the tone of the whole body. But building a sauna stove with a water tank is not always an easy task, requiring certain knowledge and skills. To learn how to independently equip a country house with a bath complex, you need to familiarize yourself with all the recommendations given in this article.
Design Features
The main purpose of a wood-burning sauna stove with a water tank is to warm up the steam room well and maintain an acceptable room temperature for a long time. To get maximum results, the design is equipped with the following elements:
- Firebox
. The main purpose of this structural part is to be able to burn fuel to generate thermal energy. A grate is installed here, which has a certain angle of inclination towards the door. Due to this, combustion products are moved to a convenient place so that they can be easily removed. - Kamenka
. It consists of a large number of stones that gain sufficient temperature due to the combustion of fuel. Cobblestones transfer thermal energy to the room. Hot stones produce steam when water is poured over them. - Heat exchanger
. Most often they are a large tank of water. As wood burns, the liquid heats up. - Chimney
. It can be made of bricks or consist of a solid metal pipe. The main purpose is the removal of gases and combustion products. Due to this design feature, wood-burning sauna stoves with a water tank have low efficiency. - Ash pan
. The part of the structure that is located below the firebox. Solid combustion products come here. - Door with passage tunnel
. A similar structural element of a sauna stove with a heat exchanger is provided if lighting and maintaining combustion is carried out from a dressing room or other room.
Basic safety requirements
Correctly hitting a brick
The brick is hit with a pick in a direction away from you, placing it on its edge. The tool must be firmly seated on the handle (wedged) and secured with a nail or self-tapping screw. Handles should not have burrs or chips.
Scaffolding and decking must be securely connected to be stable. The materials for the solution are filtered to remove small pieces of glass and sharp stones.
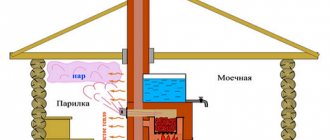
The principle of operation of a sauna stove with a water tank
Heating units have the following operating pattern: fuel (wood) is placed in the firebox and set on fire. During the combustion process, a sufficient amount of thermal energy is released. Warm air moves from bottom to top and heats the cobblestones in the heater. This way the stones heat up and maintain the desired temperature in the room.
The wood is ignited from below. Some models of sauna stoves need to constantly add fuel, otherwise the stones quickly cool down.
Other types of units have a longer combustion period. They can work for 7-20 hours without constantly adding firewood. This possibility is achieved due to the reverse direction of combustion - from top to bottom.
It is best to use peat briquettes, alder logs or coal as the main fuel. To warm up the room faster, use only dry firewood. There is no need to use logs made from coniferous trees; they will quickly pollute the chimney, releasing a large amount of soot.
Types of sauna stoves with a water heat exchanger
Units for heating a steam room can be made of several types, depending on the material of manufacture. The following types exist:
- Metal
. Most often made of steel or cast iron. There are many factory-made stove models on the market. Despite this, they can be made independently in various shapes (square, oval, rectangular). Depending on the design features, they may have heat exchange containers and different doors.
The main positive aspects of metal sauna stoves are: ease of installation, affordable price, quick heating of the room, no need to make a strong foundation, possible installation of a water tank on the chimney.
The negative characteristics of a wood-burning stove in a bathhouse with a water tank are poor performance under sudden temperature changes, rapid loss of thermal energy (cooling).
- Brick
. Brick stoves for baths, equipped with a water tank, powered by wood, are distinguished by the absence of negative parameters that metal options have. Thanks to the stone construction, it is possible to retain heat for a long period. Beautiful appearance also plays a big role when choosing a heater material; brick options look much more beautiful.
Despite the large number of positive characteristics of a brick kiln, some disadvantages stand out: high construction costs, high complexity of construction, and the need to create a massive foundation.
Advantages and disadvantages
Advantages:
- possibility of simultaneous heating of the room and water;
- installing the tank in a convenient position;
- the tank can be located in the steam room or in an adjacent room;
- you can make a shower or connect a battery to heat the dressing room in winter.
Flaws:
- stoves with a tank are much more expensive than simple designs;
- you need to monitor the tank, as there should always be water in it when the stove is operating;
- Some materials react poorly to temperature changes.
Possible options for the location of the tank for the stove in the bathhouse
Wood-burning stoves for baths differ in the type of location of the water tank:
- mounted;
- remote ones, which are placed in a place separate from the oven;
- attached;
- built-in;
- chimneys
Mounted
A stove for a Russian bath with a hanging tank is mounted directly on the body. The container has a lid and a tap for draining water.
A unit with a hanging tank is most often made of stainless steel, since such material can withstand large changes in temperature and is not subject to corrosion.
The water tank can be coated with enamel. This solution is not entirely justified, since over time the coating deteriorates and the container ceases to fully perform its functions.
Thanks to the simple fastening, you can quickly place the water tank on the side surface of the stove; they fit perfectly into the interior of small baths.
The disadvantages are:
- it is impossible to create a shower, since there is no way to isolate the hot surface;
- receiving low-quality steam. This is achieved due to the fact that the water heats up quickly, and the room does not have time to warm up.
To get the right steam, you need to hang the water tank after the steam room has completely warmed up.
You can order a stainless steel tank for a bath in specialized stores or create it yourself.
Remote
This arrangement of the heat exchanger tank is considered one of the best. In this case, the steam room is heated only by the stove; the remote water tank increases the temperature of the room in which it is located by releasing some of the energy. This way moisture does not spread until the room reaches the desired temperature.
These stove tanks are made of stainless steel and are installed in the nearest room. The components are connected using a pipeline.
Pipes must withstand significant temperatures. This is the main parameter by which they are selected. At a distance of 50 cm from the stove, you need to use a metal pipeline; at the remaining distance to a small tank, you can use a metal-plastic one.
According to the rules, a sauna stove with a similar water circuit should not be ignited until water is poured into the system. If this recommendation is not followed, the register may be damaged due to sudden changes in surface temperature.
Correct installation
of a sauna stove with an external heat exchanger implies:
- the connecting pipeline should not be longer than 3 meters;
- the distance between the register and the container must be more than 50 cm;
- only pipes with a diameter exceeding 25 mm are used;
- there should be no sagging;
- the tilt angle is within 2-5 degrees.
The positive aspects are: the heating capabilities of a sauna stove with a water circuit; you can connect a shower or use it for a sauna.
Disadvantages: high cost of components, complex installation and connection.
Attached
The design of tanks for sauna stoves is distinguished by its simplicity. To heat water, the heating unit has a special pipe welded at a certain angle. The upper part is placed in a container of water, which has a large height.
The liquid is heated according to the following principle:
- water enters a small diameter pipe and then boils;
- at a temperature of 100 degrees, bubbles form and move upward. When they reach cold water, they burst;
- In this way, the liquid circulates and heats it quickly.
Built-in
As a rule, such sauna stoves are equipped with an iron water tank, which is placed above the firebox or on either side. The shape of the aggregates varies. Rectangular models are very popular. You can make sauna stoves with a closed or open heater with your own hands.
Built-in devices have a big drawback - there must always be water inside. This affects the high concentration of humidity inside the bath. It is inconvenient to control the liquid level. In order for the device to work properly, it is necessary to regularly replace the water.
Chimneys
Typically, the tank on the sauna pipe is made of stainless steel. This configuration of units is popular due to its ease of installation and simple operation. A sauna tank on a pipe is called a samovar type due to its similar operating mode. The water is heated by a tank installed on the chimney. Hot gases pass through the pipe, releasing thermal energy along the way.
They can be oval, rectangular, round or square in shape. Thanks to such a variety of shapes, you can choose the appropriate option.
A chimney
mounted tank for a sauna stove has the following advantages:
- long period of operation of the chimney;
- saving the maximum amount of heat indoors by heating water with gases;
- the small size of the unit allows you to save precious space;
- Cold steam does not form, which occurs with other models.
There are also negative sides:
- difficulty in determining the temperature and liquid level;
- massive structure to hold the water tank;
- filling the container with liquid is inconvenient, since the inlet is located at the top;
- To get fine steam, you need to avoid boiling.
Device Specifications
The volume of the tank should not be too large relative to the furnace.
Two characteristics are important for operation: system capacity and productivity.
When making a simple stove for a bath, you need to know that 1 m² of heat exchanger, which is exposed to an open fire, is capable of “taking away” a power equal to 10 kW from the stove.
On average, a homemade stove produces 6–7 kW of heat; the heat exchanger should not be made too voluminous. There is a risk that most of the energy of the burned fuel will be spent on heating the water rather than the steam room air.
It is known from practice that for the entire complex of paired procedures one person needs about 10 liters of water at room temperature or about 5 liters of liquid heated to 80 °C. Based on this volume, water heating systems are manufactured.
Heater with water tank for gas bath
The design is almost no different from a standard unit that runs on wood. Gas sauna stoves are easy to use. They can be connected either to the main gas pipeline or run from cylinders.
When installing a stove with a water tank, you need to take into account the following elements that distinguish it from other models operating on other types of fuel:
- fuse (the ability to control proper operation);
- gas chamber (sealed);
- thermostat (allowing you to regulate the temperature);
- gas cylinders.
An approximate calculation of fuel consumption shows that to ensure high-quality heating of the room for 12 months, you need to have 65 gas cylinders (50 liters each).
The operating principle of the furnaces is based on the passage of gas through a special chamber in which oxygen saturation takes place. It is supplied through a special pipe connected to a central gas pipeline or cylinder.
If a sauna stove with a heat exchanger for heating is heated by gas cylinders, they should be located in a specially designated area. It is best to install them outside the premises so that residential buildings are located at a great distance.
About the chimney
The heating device can have a completely brick chimney or pipe. Usually they use a combined version: a brick goes up to the ceiling, and then an asbestos pipe. Laying a brick chimney begins with laying out a row covering the firebox area. At first there are two air channels, but later they converge into one. The exhaust area gradually narrows and moves to the side. One or two valves regulate the width of the chimney and the speed of hot air exit.
When doing the work yourself, it is important to make the chimney without cracks and correctly calculate the cross-section of the exhaust pipe. Violation of these parameters will lead to condensation accumulation and excessive cooling of the oven during operation. You can immediately feel the poor quality of the assembly by the soot on the walls of the bathhouse.
The removal of the pipe from the bath can be done in two directions:
- up, through roofing sheets;
- towards the wall.
For the external version, the horizontal section of the pipe should not be longer than a meter, otherwise the draft will be very weak. The chimney pipe at the bathhouse should be removed from other structures that can ignite by at least half a meter. It is not advisable to secure the pipe rigidly to the roof. Among other things, it should be noted that there should be no joints in the ceiling area for fire safety reasons.
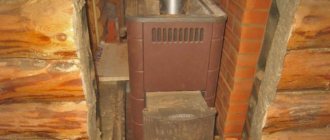
Do-it-yourself brick stove for a bathhouse
Before you make a homemade heater with a water tank with your own hands, you need to have additional fittings - a valve, an ash pan grate, vent doors and fireboxes. A similar brick stove can also be used for a sauna if it is managed correctly.
The figure shows a unit with a remote tank, which makes it possible to reduce its dimensions in plan. In this case, you can independently regulate the volume of hot water.
The remote tank must be installed at a certain height. In this way, water will flow into the bath tanks by gravity, which allows you to save money on purchasing a pump.
To receive an additional portion of steam, a steel pipe is provided in the design. It should be as close to the floor as possible. This design solution is aimed at heating the lower layers of air, which are the coldest.
The sauna stove with a water tank has a convective zone. It is located immediately above the firebox. Due to this, the hot smoke transfers its thermal energy to the lower part of the device. After that, they heat a steel pipe with water, which is connected to the main tank. Thus, the exhaust gases cool almost completely, are highly efficient and are released into the atmosphere.
The stones are heated by the action of open fire on them and are placed in a cast iron pan.
The brick sauna stove
has a simple design:
- the hole for the blower is located at the very bottom, just above is the firebox;
- above there is a widening, which indicates the beginning of the heater, and a passage for the exit of smoke. The heater is designed to create a smoke circulation system due to the large number of stones;
- in most cases, the heater has a volume of less than 0.1 cubic meter. Half of the space is filled with stones; you can combine them with large metal elements (pieces of rails). This allows you to increase thermal performance;
- the heater must always be closed with a door;
- the chimney is located above;
- Mounting the water tank on the side works well; its capacity should be about 100 liters.
Each person who wants to build a brick wood-burning stove for a bathhouse can make their own design changes. For example, make sure that the smoke passes through the heater and goes straight into the chimney.
Before making a stove with a water tank, you need to draw up a detailed layout of the rows of bricks. To do this, you can use checkered paper. After this, they begin to create the foundation.
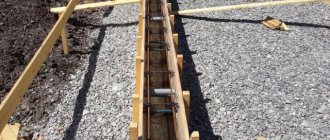
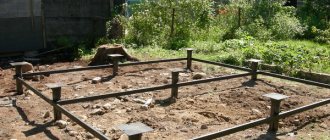
Foundation
In order for the foundation to withstand a large load from the structure being erected, a slab foundation is installed:
- the fertile soil layer is removed and a pit 30 cm deep is dug;
- a 10 cm layer of crushed stone is poured onto the bottom, and a similar layer of sand is placed on top. Tamping is carried out and the surface is leveled;
- reinforcing bars are added to increase strength;
- wooden formwork is installed;
- concrete is poured. The foundation should be 10 cm larger in size than the dimensions of the future furnace with a heat exchanger. The height should not reach the floor of the bath by 8 cm.
After drying, proceed to bricklaying. First, flat slate is laid, which is secured with mortar. Next, the first row of brickwork is installed, using clay mortar as a binding material.
It is best to buy the binder mixture in the store. But there is an opportunity to make it yourself, following the recipe:
- Use only high quality clay. To ensure good adhesion between the bricks, it is recommended to freeze the clay. After thawing it will become more pliable. The clay is soaked for several days, with a 1:1 ratio. Solid impurities are removed using a mesh through which wet clay passes. The mesh should have cells of 3 mm.
- Place purified clay with sand. Both materials are mixed together in equal parts. The mixture, when squeezed, should form a tight lump. If cracks appear, add sand; if cracks begin to fall apart, add clay. The resulting solution is placed on the brick in a layer of up to 8 mm. When using materials, all building regulations must be met.
The heater elements (bricks) are installed in the correct position, which is provided for by the project. It is important to have detailed drawings and diagrams. Each row should be level. The correctness of the masonry is checked using a level and plumb line. All stones are tapped with a hammer from all sides.
To obtain a smaller element, you do not need to use a hammer; it is recommended to use a grinder with a stone circle. After all, a small increase in the seam can affect the load-bearing capacity of the entire structure, which will be located in harsh conditions.
Only high-quality bricks are selected
. The combustion chamber and the lower part of the heater must be made of refractory bricks laid on a special mortar that can withstand high temperatures. This stone is large in size, so the seams are made thinner.
Fire-resistant bricks are also used for the chimney. The binding material is clay. After the first fluffing, you can use ordinary cement mortar. In the upper part of the structure facing the street, rain protection and a deflector must be installed. They can be made from brick. In other options, you can use profiled or galvanized sheets.
2 weeks after completing the construction of the chimney for a wood-burning sauna stove with a water tank, the first proper kindling can be carried out. The pre-blowing hole is closed with a tin.
Tips for choosing materials
The main material is solid brick. You cannot use lightweight elements with voids inside. Sand-lime bricks are not suitable, because structures made from them absorb moisture and vapor, and therefore quickly collapse. Used bricks are thoroughly cleaned of soot and mortar and their integrity is checked.
Fire brick
The material is used in the form of internal lining of fireboxes, chimneys, and fireplaces. The elements insulate the walls from the flame, as they form a protective layer from hot fuel.
Refractory brick can withstand heating up to +1000°C without losing its original properties, resists repeated heating and cooling, and has low heat conductivity.
Ceramic brick
Ceramic bricks
are obtained by processing clay and firing raw elements in ovens. Used for laying the main body of the stove and chimneys. For the outer layer, facing bricks with improved decorative qualities are used.
Based on strength, they are divided into grades from M100 to M300, the number after the letter indicates how many kilograms 1 cm² can withstand.
Cement
The cement-sand mass is not used for laying the stove; it is used to prepare the base for the stove, adding crushed stone to the mixture. Prepare this solution in small portions in order to place it in the installation position before setting.
Clay
Sand is added to the solution and a mixture is prepared in a concentration of 1:1 or 1:2, the composition is based on the fat content of the clay. Soak it 24 hours before mixing to obtain a mixture with the consistency of liquid sour cream.
The mass is strained through a sieve, added with sand, and mixed until smooth. A good solution does not stick to the shovel and has no lumps.
Sand
Construction and fireclay sand is used. The second type is used for laying the firebox, since the material is obtained by grinding fireclay bricks.
To make the solution, the sand is cleaned of grass, gravel, and roots, then sifted through a sieve. Small grains will give a thin seam when installing bricks. The amount of sand is determined by the fat content of the clay.
Water
You cannot take water containing silt; it must be low-mineralized and clean. Many minerals in the water lead to stains appearing after the masonry dries. Such stains are difficult to remove with plaster. It is best to use water collected after rain.
Stones for the heater
The first elements you come across will not work. The raw materials for the sauna must be heat-resistant, high density and good heat transfer. Wood-burning stoves are equipped with stones of 7–14 mm, and electric stoves with 5–8 mm.
For the heater, sea and river pebbles, basalt, vulcanite, soapstone, jadeite, white quartz and crimson quartzite are used.
Metal sauna stove with water tank
They can be made from different materials. Cast iron stoves for wood-fired saunas equipped with a water tank are not recommended for use, since the metal cannot withstand sudden temperature changes and is destroyed.
A do-it-yourself sauna stove made of metal does not require a massive foundation. To protect the floor surface, you need to lay a metal sheet. It will prevent possible fire due to fallen coal. An asbestos cement sheet is added on top of it.
A detailed design of an iron furnace with a water heat exchanger is being developed. All structural elements must be taken into account: heater, valve, firebox, ash door. Additional fittings may be required, which are made of steel for a good connection using a welding machine.
A cast iron (metal) sauna stove is usually equipped with an iron pipe. In this case, the valve is located at the top of the furnace, since it is convenient rather than reaching up to the pipe.
What to make it from? You can use any iron sheets or devices (cylinders, car rims, barrels), but it is better to use special 20K steel (boilers are made from it). Steel 20X13 can also be used to create heat exchangers or fireboxes for sauna stoves. The second option is more expensive. The thickness of the sheets is taken to be more than 5 mm.
Options from manufacturers can be equipped with a built-in tank or have remote tanks. The main material is high-quality cast iron, which lasts a long time and does not fade. Heating water in a bathhouse using a metal heater is almost no different: the brick version takes longer to heat up, but retains heat for a long time, the steel version warms up quickly and cools down quickly.
The features of the device must be reflected in the completed project. Welding work is carried out in accordance with the drawings and recommendations.
Design features
By easily changing the size of the combustion chamber, the power of the furnace can be adjusted.
The remaining important compartments are no different from the brick version. At the very bottom there is a firebox, which has a blower hole. Above is a heater for placing cobblestones. Then a valve is installed that allows you to regulate the heating power of the water tank.
The heater is made to the maximum size that fits on a homemade device. To increase maximum heat transfer, a special casing is added to the design. This is a unique alternative to the smoke circulation of stone stoves.
The advantage of a metal heater is the ability to attach a water tank to a sauna pipe. It is easy to build if you have welding skills.
In most cases, a do-it-yourself sauna tank is made of various types, depending on the selected equipment configuration (mounted, internal, etc.). The material is high-quality metal sheets or stainless steel.
How to get rid of rust in a sauna stove tank
Many people ask the question: “How to stop the development of corrosion processes inside a container of water?” The fact is that a self-made sauna tank does not have any self-cleaning systems.
An orange impurity in the water exists in many bath complexes. Corrosion processes take place only in tanks made of ferrous metal. Such vessels operate under difficult operating conditions, at constant elevated temperatures. If you do not protect the surface, rust will be a constant problem.
To prevent external, chimney and other tanks from rusting, two different methods of processing the internal walls are used - “folk” and high-tech.
Traditional technology
Baths began to be built a long time ago, and the fight against corrosion was constantly carried out, even before the advent of special materials. Previously, three technologies were used:
- Iron minium. It can be found in almost all stores. This component is added to produce paints that perform well in weather conditions.
- Aluminum powder. To obtain a protective coating, you need to mix it with liquid glass. Such a solution can withstand high temperatures (700 degrees Celsius). The protective layer does not contribute to changes in the chemical composition of water, is environmentally friendly, and effectively protects against corrosion.
- Cement-lime solution. Both materials are mixed together until a thick mass is obtained (proportion 1/1). With its help, the walls of the water container are coated.
From disks
Are you a car enthusiast? You probably have some worn out old car wheels lying around. Don’t rush to throw them away - they are perfect for making a stove. Especially if you don't want to bother with pipes. In order to make a stove from disks for a bathhouse, it is best to choose wheels from trucks :
- larger diameter;
- thicker metal.
Accordingly, such an improvised stove will last much longer and will be able to withstand very serious loads. But if you only have wheels from a car, you won’t be able to use them to make a reliable stove for a full-fledged steam room. Detailed manufacturing instructions are in the next video.