Low bearing capacity, water content or the possibility of seasonal flooding, excessive looseness of the soil - all these conditions make the use of traditional strip foundations inappropriate.
In such situations, practically the only effective solution to the problem is a pile foundation, which uses deep, hard layers of soil as support, passing through unreliable surface layers until full contact with reliable support appears.
Such conditions are typical for many regions of Russia, which has made pile types of support structures quite common and widespread.
A separate issue is the possibility of using piles for the construction of utility or auxiliary buildings.
Consider the use of a pile foundation for the construction of a bathhouse.
Is a pile foundation suitable for a bathhouse?
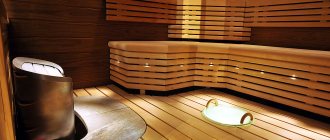
A bathhouse is a completely enclosed and heated structure, which has its own stove and actively uses water. Operating conditions include significant changes in temperature and humidity.
All these features require for construction to have a reliable and resistant foundation that can withstand existing loads without loss. A pile foundation is quite capable of providing such support, and in regions with problematic soils it becomes the only possible option.
Moreover, there are types of piles that allow you to get a reliable support system much faster and cheaper than creating a traditional strip foundation . Therefore, there is the possibility of using piles to build a bathhouse, and it is not some kind of exception or compromise option.
Piles are good for any building, regardless of purpose. The main selection criterion is the condition and characteristics of the soil.
Features of the structure
When the territory of the site abuts a body of water, the opportunity arises to implement a unique project - a water bathhouse. Many owners of dachas or country houses dream of such a structure. And usually a structure is erected, one end of which stands on the shore, and the other goes into a lake or river. And piles help keep the bathhouse above the surface of the water.
The idea is not new. Pile foundations for bathhouses have been used for many centuries. It’s just that hardwood was always used as support. And the most common tree in our regions was larch. After all, it has one unique advantage - it does not rot. Therefore, it can stand in water for several decades.
With the development of technology, it increasingly began to be replaced by metal. This slightly increased the cost of construction, but significantly increased the service life. And the use of this method is not only aesthetic in nature. Pile foundations are widely used and are used where it is impossible to install a tile or strip foundation.
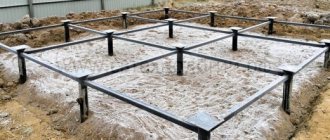
Pile foundation for a bathhouse Source rostern.ru
Conditions under which it is necessary to install piles:
- The region often alternates between soil freezing and subsequent thawing. This causes soil movement.
- The area is characterized by regular floods. Groundwater is located too close to the surface.
- There are sharp elevation changes on the site (hillocks and slopes).
- The building must be erected above the water.
To ensure reliability, many factors must be taken into account. But for all cases there is one general condition. The pile must be buried at a distance of 1.5 to 2 meters. Such parameters will ensure the stability of the structure even in active seismic zones.
Advantages and disadvantages
The positive aspects of a pile foundation for a bathhouse include::
- Independence from soil properties or hydrogeological conditions.
- Significant reduction in construction costs, especially when compared with buried strip foundations.
- High speed of foundation construction.
The disadvantages of piles are:
- The relative complexity of the work, the need to survey and analyze soils on the site.
- We have to abandon the traditional bathhouse with pouring floors and create a high-quality drainage system.
- In some cases, the use of construction equipment is required, which is not always possible in a landscaped area.
NOTE!
When choosing the type of foundation, you need to take into account both the pros and cons, so as not to find yourself in a difficult situation later.
Subtleties of construction
In those areas where the soils are non-chernozem, traditional columnar and strip foundations have faded into the background (read also: “How to make a columnar foundation for a bathhouse - types of construction options”). Instead, screw piles are actively used, since they are not only more reliable, but also much more affordable financially for a wide range of buyers.
One of the features of screw piles is that there is no need for additional joining with timber or channels. The lower rim of the log house serves as a grillage.
Many people prefer to build a bathhouse on stilts with their own hands, choosing areas near water bodies or on hillsides. Since in such places the soils are usually alluvial or sedimentary, and sometimes peat, the use of piles in such cases is more than justified.
Kinds
To create the supporting structure of the bathhouse, the following types of piles can be used:
- Hammers . To immerse into the ground, special equipment is used to install supports by driving them into the ground. Work near existing buildings can cause undesirable changes in the condition of the foundation, causing subsidence or movement of the foundation. Ready-made piles are used, the speed of work is usually high, the process takes one day.
- Bored . They are made directly on the construction site by pouring concrete into a reinforced well. There is an opportunity to do everything yourself . At the same time, complex soils may not hold the well due to the walls crumbling or the cavity filling with water. In addition, it is necessary to wait about a month until the concrete gains structural strength, during which no work can be done.
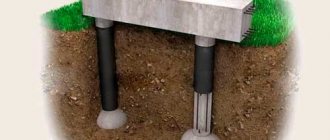
- Screw . They are purchased ready-made and immersed in the ground either using special equipment or manually. They do not pose a threat to buildings located nearby and can be installed close to them. They allow you to build a bathhouse on slopes and folds of the foundation without preliminary preparation of the site . The disadvantages of screw piles are the inevitable corrosion of metal in the ground and a lot of hand-made supports that do not meet existing requirements.
IMPORTANT!
There are also columnar supports, which many try to classify as pile foundations. They are not immersed in the ground, so they are simply a budget-friendly and quick solution to the issue for the construction of auxiliary buildings. They are rarely used on difficult soils, as they do not provide stability in the event of seasonal movements or flooding.
Basic methods of mounting piles
Production practice shows that the following should be considered the main types of installation of pile elements during bath construction:
- Driven - which are immersed directly into the ground, without excavating the latter. The mechanisms for such an operation can be either primitive tools, such as a hanging headstock on a tripod, or various high-tech devices, such as a vibrating hammer or attaching a hydraulic hammer to construction equipment;
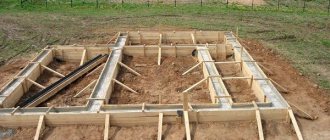
- Pressed ones - are constructed by laying a concrete mixture into a metal-reinforced, pre-drilled well. In its main technological aspects, this method has something in common with the construction of a standard column-type foundation;
- Drilling rigs - are constructed by installing ready-made elements made of reinforced concrete in drilled wells;
- Screw - due to the presence of a guide screw groove at the tip of the pile, such elements are screwed into the ground with special devices, with two forces simultaneously applied to the heel of the pile: rotational and pressing.
A word from Experienced! It is quite obvious that screw piles have recently become increasingly popular in bathhouse construction, primarily due to small-scale mechanization devices that make it possible to implement this method in practice more and more widely. A positive aspect of this option is the virtual absence of hard shock loads characteristic of the driven installation method.
Why should you choose screw piles for self-installation?
The choice of screw piles is determined by their safety for surrounding buildings.
In addition, screw piles can be driven into the ground independently, which allows you to work at a time convenient for you and significantly save on hiring a special team.
The installation technology is extremely simple and does not require preliminary site planning, which is a big plus. Excavation work takes time and subsequently requires a lot of labor to improve the site, so the opportunity to skip this stage is very attractive to any owner.
How to do it yourself?
The first stage is creating markings on the site. It is necessary to designate the places where the screw supports will be installed, carefully checking all distances and angles.
At the designated points, shallow excavations of 15-30 cm are made. This will avoid spontaneous displacement of the piles at the very beginning of their screwing into the ground. The distance between the support points should be 2-3 meters, depending on their size, bath area and bearing capacity of the soil.
To screw in piles manually, long metal crowbars are used, which act as levers. This work should be done by two or three people. If it is possible for special equipment to enter the site, installation can be carried out mechanically. This will make it possible to save time and effort.
Screw piles must be immersed in the soil to a depth of at least 1.5 m. The structures are screwed into the ground until their tips reach the dense layers of the earth. At the same time, it becomes much more difficult to rotate the piles manually, which is a sign of the final immersion of the support.
During the screwing process, it is necessary to carefully ensure that the structures are located in a strictly vertical position. Only minor deviations of 1-2 degrees are allowed.
When all the supports are installed and leveled in height, they are concreted from the inside. Concrete mixture is fed into metal pipes, which should preferably be mixed immediately before pouring.
When the cement-sand mixture has finally hardened, caps are installed on the upper parts of the piles. Next, the strapping is installed. For a wooden bathhouse, the best choice would be a timber structure.
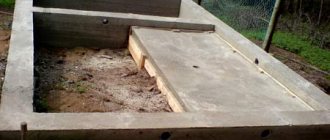
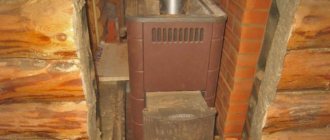
An important point is the arrangement of the foundation for the stove. Brick, cast iron and steel fireboxes place a fairly large load on the surface of the base, so they cannot be built directly on the floor. Additional foundation structures must be located underneath them.
The dimensions and area of the additional foundation are selected taking into account the width and length of the furnace that will be built on it.
To prepare the foundation for a massive furnace, you should prepare a foundation pit in the selected area according to pre-made calculations. Its depth should reach the level of soil freezing.
A sand and gravel cushion is poured onto the compacted bottom. The layer of crushed stone should be at least 15 cm, the layer of sand - from 20 cm. On top of the sand layer, you can fill another layer of crushed stone of the same thickness.
Next, wooden formwork is installed around the perimeter of the furnace foundation, and a reinforcement frame is placed in it. The next stage is pouring concrete. The upper level of the base should be approximately 5-6 cm below the floor that will be installed in the bathhouse. When the concrete has completely hardened, you need to remove the formwork and treat the walls of the furnace foundation with waterproofing - for example, tar.
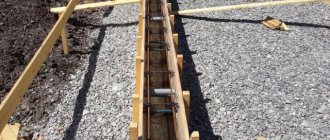
This design is created according to a simple scheme: rigid metal channels or I-beams are fixed to the pile heads along the entire perimeter of the foundation, as well as in its central zones. These elements are connected to the heads using electric welding.
Types of piles and which ones are better to choose
There are different types of screw piles:
- Single or multi-blade.
- With cast or welded tip.
- With or without protective zinc coating.
In addition, they differ in the diameter and length of the barrel and the type of blade. The choice of screw piles is made based on the properties of the soil and the weight of the building.
For an ordinary family bathhouse, measuring 6:4 m, made from rounded logs or timber, weighing about 5-7 tons, single-bladed screw piles with a diameter of 57 or 76 mm are quite suitable.
Their permissible load per unit reaches 1 and 2 tons, respectively, which is quite acceptable for such a building.
NOTE!
The smaller the diameter of the trunk, the easier it is to immerse it in the ground with your own hands.
Protect and decorate
Closed bathhouse base
Installing a bathhouse on a raised platform using screw piles with your own hands will be completely completed after installing the base. It will protect against the accumulation of debris under the house, in winter - from snow drifts, create an additional barrier to heat loss and decorate the view. Depending on the height above ground level, floor design, and the concept of the entire building, you can use siding, artificial stone, and decorative coverings.
We must not forget to equip technological manholes for inspecting the foundation. Clear the interior space of the fertile layer and fill it with crushed stone and sand.
How to calculate diving depth
The depth of immersion of screw piles is determined by the depth of dense layers of soil. Attempts to use “hanging” screw piles usually end in gradual subsidence or deformation of the grillage, leading to the destruction of the external walls.
The usual calculation of the bearing capacity of the soil gives quite accurate data, but they only show the current situation on the site. When the situation changes—rising groundwater levels, seasonal shifts, and the occurrence of frost heaving loads—the calculated data becomes irrelevant.
Therefore, the only correct and effective solution to the issue is test drilling or, at a minimum, driving a test pile . The depth at which contact with solid layers occurs is the desired value.
Furnace base
Many novice craftsmen do not know whether they need to install a special base under the stove. The presence of a foundation is determined by the weight of the heating structure. A small stove weighing up to 250 kg does not require additional reinforcement of the floor. In this case, the coating does not need to be reinforced, but simply treated with a fire protection agent. The material under the stove must be reliably protected from overheating.
For a brick oven you need to make a special foundation. The weight of such units can vary from hundreds of kilograms to tens of tons, which creates an increased load on the base of the structure. If the weight of the heating device reaches 750 kg, then in this case it is necessary to design an individual base. The stove creates an uneven load on the floor of the bathhouse, which will lead to partial subsidence of the weak foundation. Therefore, the foundation of such a bathhouse must be strong, the structure must resist soil movement.
It is possible to build the correct foundation only taking into account the depth of soil freezing. For competent construction, you need to take into account a number of important points:
The supporting structure for the bathhouse is erected simultaneously with the construction of the main foundation of the bathhouse. The depth of additional reinforcement and the foundation of the building is maintained at the same level. Filling the screed after installing the reinforcement is unacceptable due to the difference in the degree of shrinkage. This difference will lead to destruction of the heating system
For such purposes, craftsmen recommend paying attention to the pile foundation. Since the walls of the bathhouse are not erected simultaneously with the construction of the foundation, a distance of 50 millimeters must be maintained between the installation of the stove structure of the future wall. This gap is subsequently filled with sand and compacted well.
Such a system resists uneven settlement of the base.
- The dimensions of the foundation must be correlated with the dimensions of the furnace at the stage of developing design documentation. The boundaries of the foundation slab must extend beyond the boundaries of the heating system by at least 50 millimeters. The most optimal distance is 60-100 millimeters.
- The chimney should be located as close to the center of the foundation as possible. This arrangement of the furnace will ensure an equal load on the entire structure. A powerful chimney requires additional protection and reinforcement, and therefore risks creating an excess load on the foundation. Regardless of the choice of foundation type, these features must be taken into account.
- When installing a heating system, it is necessary to additionally install a waterproof layer. Ruberoid is laid out in two layers and attached to the foundation. Craftsmen use bitumen mastic as glue. This material will provide additional protection to the structure.
Calculation of height above ground
The lifting height of piles depends on several conditions:
- The amount of snow cover in winter.
- Water level during floods or floods.
- Depth of groundwater.
Some values can be found in SNiP annexes, other values can be obtained from local geological exploration or meteorological organizations.
The main task is to ensure such a rise above ground level in order to minimize the consequences of various natural influences.
In most cases, the height of the bathhouse above the ground level is taken to be within 40-60 cm. To cut off the walls from contact with snow masses, this is usually enough, as in case of flooding.
No one can predict critical situations, and building a bathhouse that is too high is impractical.
This does not apply to buildings on slopes or uneven terrain, where the height is determined by the lowest value.
Foundation installation process
If you have enough funds, you can build a bathhouse on a pile foundation using any of the options. However, if you plan to carry out all the necessary work yourself, the best choice would be to use drilled or screw piles.
The process of making a screw foundation for a bathhouse is as follows:
- The estimated number of elements is purchased based on the approximate distance between them of 1.2 m. Depending on the final weight of the structure, this distance may vary.
- The construction site is cleared of debris and the territory is marked.
- Mark the points where the piles will be mounted.
- A depression of 30-50 cm is made in each area.
- Piles are inserted into the hole, into which a lever is threaded for maneuvering.
- By turning the support, it is gradually deepened to the desired level. As a rule, a depth of 1.5 m is sufficient, however, it all depends on the soil.
- The pile is installed with constant vertical control using a magnetic level attached to the support.
- All supports are trimmed to the required height. To ensure that it is the same everywhere, first measure the level of one pile. Then, using a level and a wooden block, transfer the height to all other supports, after which they trim.
- At the final stage, a square is welded to the upper end of the piles, on which the floor beams will be laid. For example, the size of the platform can be 20x20 cm.
It is noteworthy that screw-type piles are quite easy to make with your own hands. To do this, take a pipe approximately 80 mm in diameter and cut out sections in its lower part to form triangular teeth. They are bent inward, forming a cone, and the seams are boiled, which are then cleaned.
If drilling supports are chosen for a bathhouse on stilts, then the following work has to be done:
- Using a hand drill, holes are selected in the soil for the piles. As a rule, the diameter of the drill is 30 cm. The supports need to be buried 0.5 m below the soil freezing line.
- The lower part of the recess is slightly expanded with a special device, making a “heel”.
- A layer of roofing material, film or other insulating material is laid around the perimeter of the hole to avoid the effects of soil heaving.
- Reinforcing rods 8-12 mm thick are lowered into the pit, and their length should coincide with the depth of the pit.
- A solution is prepared from M350 cement.
- Liquid concrete is poured into the recess, simultaneously compacting it with a vibrator so that the support is monolithic and free of voids.
- To fill the above-ground part of the pile, formwork is pre-installed under it. This function can be performed by pipes of the required thickness buried a short distance.
Step-by-step installation instructions
Let's consider the procedure for installing a pile-screw foundation for a bathhouse. We’ll skip the design and calculation process and go straight to practical actions.
The work is carried out in stages, the following operations are performed:
Preparation
The area is cleared of unnecessary objects, plants and other obstacles. It is necessary to provide access routes for equipment if mechanical installation of piles is planned . Purchase and delivery to the site of the required number of trunks of the required size.
You will need the following materials and tools:
- Shovel.
- Roulette.
- Scrap metal and two pieces of pipe, 1.5-2 m each, into which this scrap fits freely, but without unnecessary play.
- Grinder with cutting wheel.
- Welding machine with electrodes.
- Heads for the pile size used.
- Cement and sand for making concrete.
- Pegs for marking.
- Laser level.
- Coating for metal parts, protection of welds.
- Channel, I-beam, strapping rail.
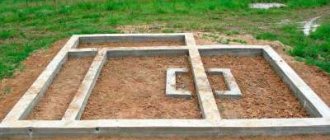
Marking
Using pegs, the installation locations of the piles are marked according to the design data. Marking should begin from the corners, immediately checking the equality of the diagonals . Until they are aligned, marking cannot continue.
The installation points of the piles are marked with pegs. After marking the corners, they move on to the intermediate piles and mark their position. Then, using a shovel and personal courage, small depressions up to 30 cm deep and a width equal to the diameter of the blades are dug at these points.
This will allow the piles to enter the ground more easily and provide less deviation from the vertical.
Dive
Screwing of piles is carried out according to a certain pattern. This is done so that the already installed trunks do not become an obstacle to other supports . This is especially important when installing by machine, where the equipment must come close to the immersion point.
Usually they start from the center and move sequentially to the edges in a spiral or snake.
When driving piles, it is necessary to constantly monitor the vertical . It is especially important to do this at the initial stage, when the barrel swings quite freely and can be installed at an angle.
It is forbidden to twist the pile back for leveling; it is prohibited to install it at this point a second time due to the violation of the strength of the soil after contact with the blades. All corrections are made at first, when the barrel is immersed to a shallow depth.
Trimming, tying, pouring concrete
After installation of all piles, trimming is carried out. A laser level is installed to mark the horizontal plane at the required height, and cutting lines are marked on the surface of the piles with chalk or a white marker.
Use a grinder with a cutting wheel to cut off excess pieces of pipe.
After this, the strapping is performed. All piles are connected to each other in the longitudinal and transverse directions by welding. Pieces of channel, I-beam or other type of rolled metal cut to size are used.
After connecting the piles into a single system, you should immediately paint all welding areas with a protective layer of paint, kuzbasslak or other material.
Then the internal cavity of the piles is filled with concrete. This gives the trunks additional rigidity and resistance to lateral heaving loads. It is necessary to use thick stamps, starting from M200 and above.
Heads are installed and fixed onto the filled piles, forming platforms for installing a grillage and intermediate (internal) supports.
Grillage
For a bathhouse, a wooden beam with a cross section of 150: 200 or 200: 200 mm is usually used. The beams are laid on the head platforms, having previously placed a double layer of roofing felt on the metal . The corners are connected halfway through the tree.
They carefully check the equality of the diagonals, align the beams along their axes, and then fasten them to the heads using specially created mounting holes. Wooden beams should be immediately covered with waterproofing material to protect them from moisture.
Reviews and recommendations
The technology of constructing baths on pile-screw foundations is very popular . Reviews from owners of private plots confirm that the construction of such structures takes much less time, effort and money compared to monolithic, strip and other foundations and other foundations.
Experienced users recommend using piles with cast screws and galvanized surfaces - such products are highly reliable and are not subject to premature wear.
A fairly common mistake made by self-taught builders is strengthening pile-screw foundations with additional blocks that are installed under the partitions. This method is ineffective and even dangerous.
With seasonal temperature changes, the soil under the blocks can swell, which is why the floor in the bathhouse begins to “play” and deform. Foundations on screw piles, built in accordance with the technology, do not require strengthening with such dubious methods. This topic is discussed on the forum.
Everything you need to know about the design and construction of a pile foundation can be found here.
Floors in the bathhouse
Ordinary poured floors used in a traditional Russian bathhouse are not suitable in this case:
- Water flowing between the floor boards penetrates the soil and gradually destroys the metal of the piles and weakens the strength of their adhesion to the ground.
- It becomes difficult to maintain the temperature in the bathhouse due to the high altitude above the ground. Having an uninsulated space will require unnecessary fuel or electricity consumption.
The best option is to create an insulated floor with a reliable waterproofing coating. A layer of screed with pre-installed funnels for water drainage, which are connected to the sewer system, is poured onto the surface.
Ceramic floor tiles are laid on the screed, and for greater comfort it is recommended to lay wooden platforms with wide slats (8-10 cm) and gaps between them for free flow of water.
Materials for floor insulation
The following types are suitable:
- Basalt, glass wool. Both varieties have a high level of heat conservation. But laying such material requires high-quality waterproofing. Otherwise, wet cotton wool loses its properties. It is better to use for ceiling insulation than for floors.
- Polystyrene. An excellent option for arranging the flooring of bath rooms. Has low weight. It's inexpensive. Waterproof. Installation is quick and easy. Installed with vapor barrier polyethylene. Suitable for plank and concrete bases.
- Expanded clay. Small light pebbles made of foamed slag and clay. The structure is porous. It is actively used for thermal insulation of floors in residential premises. It is poured dry onto the subfloor or mixed with cement mortar.
- Penoizol. Foam insulation. Reminds me of polyurethane foam. They fill any gaps, cracks in the foundation or basement. Serves as a good sealant. Does not create a load on the floors. Suitable for insulating wooden floors.
For insulation, craftsmen use cement mortar with the addition of perlite (layer up to 10 cm), slag (up to 30 cm), foam concrete (up to 25 cm).
Method of installation of the building base
Upon completion of the foundation work, as well as after it has completely dried - in the case of concrete supports, you can proceed directly to the construction of the walls of the bathhouse structure.
First you need to clear the area under the bathhouse from any vegetation - you can even remove a layer of soil and also add a sand cushion. To do this, strips of roofing felt are first spread on the ground with an overlap of 10 cm, and a layer of sand 15-20 cm thick is poured on top of it. All this is compacted and spilled with water.
Next, grillage bars are laid on the foundation for the bathhouse on screw piles. The minimum size of logs is 15x15 cm in thickness. If the building is heavy, then thicker logs within 20x20 cm would be useful. The length of the grillage will be equal to the total length of all walls and partitions of the building.
In the case of concrete supports, a layer of waterproofing in the form of roofing material, bicrost or plastic film is laid under the grillage wood.
Initially, the beams are laid on piles simply for fitting and making joints. To join logs together, a groove is made in the end part of one of them, the width of which is equal to the size of the beam being laid in it, and the depth reaches half its width.
The external corners are fixed with self-tapping screws, after which the diagonals are checked. To achieve symmetry, some displacements of the logs relative to each other are possible.
Once all structural elements are adjusted, you can tighten the second screw. For reliability, the inner corner can be reinforced with a metal corner.
When working with metal piles, the grillage will be attached directly to the platforms welded to the supports. Fastening with self-tapping screws is done from below through pre-drilled holes. But the concrete piles are fastened to the grillage with anchors.
During the installation of the lower row of logs, you need to take care of the supply lines, as well as ensuring the drainage of wastewater from the bathhouse. To do this, you can connect to the central sewer system or organize a drain into a cesspool.
Alternatively, directly under the washing compartment, you can concrete a section of soil, organizing a slope to direct the water towards the pit.
Concrete floor installation
Before starting work on pouring a concrete floor, it is necessary to carry out a number of preparatory measures:
- Install water and sewer pipes.
- Install a drain ladder.
- Prepare the base - compact it and prepare it for pouring concrete.
The principle of constructing a concrete floor
Table 1. Floor arrangement
| Illustration | Description |
| Concrete mortar, about 5 cm thick, is poured onto a compacted base on the ground. | |
| Insulation is laid over the waterproofing layer and covered with film. | |
| Pour a second layer of concrete screed reinforced with metal mesh. | |
| The surface is leveled. | |
| CREATOR: gd-jpeg v1.0 (using IJG JPEG v62), quality = 90 | The finishing material is laid, often tiles. |
Sequence of preparing concrete mixture
Floor insulation is carried out using expanded clay, perlite, extruded polystyrene foam or mineral wool.
Types of insulation
Before laying the insulation, the rough screed is cleaned of debris, dust-free and covered with rolled waterproofing. If fractional insulation is used, then it is applied in the form of a special mixture, after drying, which can be used to begin pouring the second layer of concrete mortar.
Insulation of concrete floor
When using insulation in the form of slabs, the joints that are formed during their installation will need to be sealed with polyurethane foam. A second layer of waterproofing is laid on top. The second layer of concrete screed must be reinforced with metal mesh.
Insulation with expanded clay
What is the best way to sheathe the frame?
In Russian baths they often use a wooden frame.
The lathing takes on the functions of ventilation. The gaps will prevent moisture from accumulating on the surface of the timber and insulation. Ventilation gaps provide good air exchange, where there is no room for dampness or fungus.
Fastening is carried out vertically. To insulate the walls of a bathhouse, not all types of thermal insulation can be used.
It is prohibited to use flammable cheap polystyrene foam or polystyrene foam.
Expanded clay and ecowool are not suitable due to the fact that they quickly become saturated with moisture and lose their working properties.
The best insulation options:
- basalt wool;
- kaolin wool;
- vermiculite
Photo: wall construction of a frame bath.
The outside of the frame structure can be finished:
- siding;
- decorative plaster;
- edged board;
- half beam;
- clapboard;
- croaker;
- tiles;
- block house;
- plastic panels.
The cladding with a block house that imitates a log looks beautiful.
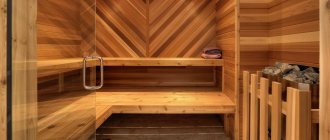
For interior work, lining is considered a universal ceiling and wall material. It is convenient for her to sheathe the steam room and dressing room. The lining does not heat up and is easy to install. To decorate the shower, choose ceramic tiles or moisture-resistant wood.
It is forbidden to paint or varnish the finish in the steam room, otherwise when heated it will begin to release toxic substances that are harmful to health.
It is allowed to use moisture-resistant plasterboard for covering the walls in the locker room. OSB and MDF boards are suitable for the same purposes.
The procedure for internal lining of the bathhouse is given in more detail in the section below.
Advantages and disadvantages
Pile foundations have many advantages over other types of foundations. One of their main features is that they can only support light, small buildings. The bathhouse fully meets these criteria.
Among the obvious advantages of a bathhouse on stilts:
- It can be built on almost any soil. Soil characteristics are not very important. The only exception is rocky soil.
- The budget for such a design will be record low. Compared to other types of foundations, pile foundations stand out due to their low cost.
- In terms of speed of construction, the pile foundation also comes out on top. The base can be built literally in one day. And then you can immediately begin building the box. There is no need to wait for the foundation to gain a safety margin, as is the case with strip foundations.
In fairness, it is necessary to say about the existing shortcomings:
- The technology for constructing a foundation is not as simple as it seems at first glance.
- Driving the piles requires special equipment. Sometimes it is not possible to place it in cramped conditions on an already built-up site.
- The floor in a bathhouse on stilts requires a special drainage system. You will have to abandon the usual pouring floor.
Waterproofing
Waterproofing serves to achieve the same goal as insulation - to ensure is dry and indestructible .
This is done by painting or gluing with insulating materials. There are vertical and horizontal types of waterproofing. The most common method is horizontal, which means laying 2-3 layers of roofing material for maximum effect.
The vertical method is the distribution of insulating material over the entire height of the base. The most effective combination of both methods is gluing layers of roofing felt with heated bitumen. It is used in the same way as insulation, only for concrete foundations buried in the ground.
Making a foundation requires time and money; the operation is quite labor-intensive and responsible. But the durability and reliability of the finished building is quite a decent price for labor and expenses, compensating for costs and ensuring high-quality service of the building.
Arranging a foundation for a bathhouse from foam blocks with your own hands allows you to think about the question: is it possible for a contractor without construction skills or with minimal skills to build a structure on his own?
Foam blocks, which have a wide range of advantages, are not the only attractive material for building a bathhouse. The traditional solution is to build from timber or logs, which are often compared to the first type of lumber. Frame baths are popular.
Manufacturing process
First of all, it is necessary to mark the site, determine the number and location of pile installation points - install pegs in these places
Before installing the supports, it is important to check the diagonals and angles. The distance between supports is also carefully controlled
At the initial stage, screw piles are screwed into the ground. In the places where they will be installed, holes should be made in advance with a depth of 10-15 centimeters.
The supports are screwed into the soil using a rod, and it is important to control the verticality of the entry of the element into the soil. The deepening is carried out until the support reaches a level at which the soil does not freeze in winter.
After the elements are screwed into the ground, the upper ends of the supports must be leveled. A grinding machine is used for this; it can be used to easily trim off excess pipes. After this, a concrete mixture should be poured inside the products, this will increase the strength characteristics of the pipes and significantly reduce the rate of metal corrosion.
At the final stage of installation, it is necessary to take metal plates. It is best to use products whose thickness is 10 mm. They are welded to each support so that they extend beyond the rack on each side, protruding a few centimeters. The foundation for a frame bath on screw piles (with your own hands or by a contractor) is done in exactly the same way.
The supporting elements can be connected to each other using a special structure, it is called a grillage.
Most often it is made of concrete, but rolled metal and reinforced concrete can be used. The structures are made prefabricated and monolithic.
In addition, a foundation on piles for a bathhouse can be made from a ready-made set of supporting elements; they are available for sale in hardware stores.
If there are available funds, installation can be entrusted to specialists.
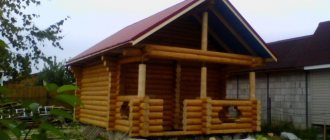
Bathhouse made of timber
The number of buildings of this type being erected has increased significantly recently. The work can be done with your own hands; the speed of erecting a foundation for a bathhouse on screw piles is very high.
Important! All supports, if they were made of metal, must be treated with an anti-corrosion agent before being immersed in the ground. This will significantly increase their service life
The process of screwing the pile into the soil will be simplified due to the presence of special blades at the sharp end of the pile. Products need to be screwed into the soil.
When calculating the foundation for a bathhouse, it is necessary to take into account SP 24.13330.2011, in addition, the edition of SNiP 2.02.03-85 can be used. If it is difficult to do the calculations yourself, then you should contact a designer. Foundation elements must be purchased taking into account the recommendations of a specialist.
How to drain?
When constructing a foundation for a bathhouse, it is important to drain. Since the bathhouse will be installed on screw piles, a regular drain with a water seal will not work - in winter the water in it will freeze
The drain must be planned so that water cannot accumulate anywhere in it. To do this, you can use an ordinary sewer plastic pipe with a diameter of 40 or 50 mm, securing it, for example, to a metal tape for mounting drywall or to other fasteners every 50-70 cm of the pipe, to the bottom piping of the bathhouse or to the subfloor.
Attention! The minimum acceptable slope for water drainage is 1:30, that is, approximately 3-3.5 cm per 1 meter of pipe. To prevent cold air from flowing through the drain under the bathhouse on screw piles, there is a very simple, proven and cheap way - place a rubber ball with a diameter of 40-60mm on the drain hole
When water enters there, the ball will float up and release it. And when water is not used, it will prevent cold air from entering the room
To prevent cold air from flowing through the drain under the bathhouse on screw piles, there is a very simple, proven and cheap way - to place a rubber ball with a diameter of 40-60mm on the drain hole. When water enters there, the ball will float up and release it. And when water is not used, it will prevent cold air from entering the room.