- Types of installation: where to install
- How to choose the size and shape of a chimney
- Preparatory stage
Before you begin installation, familiarize yourself with how to properly install a chimney pipe in a bathhouse with your own hands. The process largely depends on how competently you can choose a design, based on the parameters of the stove and the volume of the steam room.
In addition, it is necessary to consciously approach the choice of material, set of elements and installation method. And also in this article we will talk about the main design features of chimney systems, and the problems that can arise if installed incorrectly.
Design features of a chimney for a steam room
- The chimney is a vertical structure mounted inside the bathhouse or on the facade of the building. Its main task is to remove fuel combustion products at a speed sufficient to maintain natural draft in the furnace.
- A well-designed design ensures quick heating of the bath, maintaining the necessary microclimate in the steam room and economical fuel consumption.
- The most common problems with smoke exhaust ducts: Extremely strong draft, which will lead to rapid burning of fuel without adequate heating of the steam room. Traction too weak. An inadequate amount of oxygen enters the firebox, as a result of which the combustion process is interrupted, and then the thermal conductivity of the stove decreases.
- Proper installation of the chimney is a guarantee of your own safety and the longest possible service life.
Choosing material for a chimney in a bathhouse
The market offers a wide range of raw materials for the production of smoke exhaust structures; let’s briefly name each of them.
Asbestos cement pipe
It is low cost and easy to install, however, due to its porous structure it can accumulate condensate.
Black metal
It conducts heat very well and heats up quickly, but lacks corrosion resistance. It has a large mass, which complicates the installation process and also requires the construction of a foundation.
Brick chimney
The model is quite expensive and difficult to install, although its appearance is very pleasant. If you do not line the inside, the structure becomes clogged with soot, susceptible to condensation, dampness, and subsequently cracking and allowing carbon monoxide to leak.
Ceramic chimneys
Due to its strength, ceramics can withstand high temperatures, are durable and can be used with any type of boiler. However, the installation of such a chimney is very expensive, and the design itself is poorly maintainable. Therefore, installation should only be carried out by a qualified technician, and the owners will have to treat this ventilation system with care.
Stainless steel
Most bath complexes - home or commercial - use this option. This is due to excellent resistance to atmospheric agents; soot virtually does not accumulate, and the installation will last for many years. The appearance fits well with any bathhouse exterior; the shiny surface is pleasing to the eye. In addition, this design is quite easy to maintain.
Our production
Single wall chimneys
Double wall chimneys
Mounting elements
Glass
A glass smoke duct is a good choice, since this material has minimal inertness and is resistant to moisture and corrosion. The constant increase in the cost of installing such a structure is due to the complexity of the process and the high cost of fire-resistant glass in general. Therefore, such chimneys are the most expensive systems these days, although the cost is fully justified by the advantages of this option.
Exterior works
The fragment to be removed is marked from the outer part of the bath. Insulation is installed at the point where the pipe passes through the wall, taking into account the required amount of material.
The thickness of the walls is measured, strips of basalt wool with foil are cut. They are installed along the prepared contour with the shiny surface inward. When laying mineral wool, maintain a minimum of gaps between parts of the insulation. The process continues until there remains a hole similar to the diameter of the outlet pipe.
What pipes are used
You need to know that the likelihood of using the sauna without a threat to your health depends on how the chimney of the sauna stove is installed.
The chimney installation scheme comes in two configurations: internal and external. Depending on this, the chimney elements are selected.
Types of installation: where to install
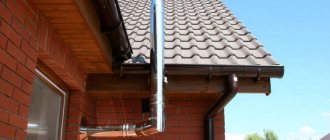
Installation can take place on brackets through the wall or straight through the roof.
In the first case, the entire system is carried into the wall, and then rises, adjacent to the bathhouse, but without passing through it. This looks more aesthetically pleasing, and has the following advantages:
- the free space of the steam room is not used;
- there is no risk of getting burned on steel or stone;
- less chance of fire;
- it’s easier - you don’t need to make a hole through the entire attic;
- cases of smoke are easier to detect, as well as to track the general condition.
But at the same time:
- heat loss increases, since steam actually immediately enters the outside;
- the installation itself is more difficult due to the need to comply with the dimensions of the connection between the hole in the wall and the parts of the product;
- The heating of the pipe is greater due to the fact that the gases escape in the horizontal direction. With this arrangement, the resistance of the flue gases when moving through the channel increases;
- In terms of the number of elements, this option is 10% more expensive than the usual one.
When installing smoke exhaust systems in a straight line through the roof, the chimney is located straight, without bends, it departs from the boiler and goes upward, where it crosses the ceiling and exits on the back side of the roof. Advantages of such a connection:
- Stable draft due to the location of the chimney closer to the roof ridge.
- The condensate container is kept warm, so its cleaning pocket is dry and clean. This extends the service life.
- Cold bridges do not form in the walls, and thermal insulation is not compromised.
- The stability of the smoke exhaust duct is higher due to the fastenings to the roof. The fasteners themselves can be chosen cheaper than for the option on the facade.
- The aesthetics of the structure are not spoiled by side smoke outlets.
- Only a small part of the structure is located outside, which deteriorates over time from snow and rain. You can inspect and clean most of it without leaving the building.
- You can use non-insulated parts of the chimney that are located inside the bathhouse.
- This option is easier and 10% cheaper to install than when outputting through a wall.
- Flue gases go up, there is no obstacle to their exit. Heating is less than with a horizontal connection, since the resistance to smoke flow is minimal.
However, there are also weaknesses:
- The probability of “missing” the occurrence of a fire is higher, since smoke occurs in the ceilings that are located in the attic and on the roof, and they are simply not visible until the fire appears.
- Heat loss through the roof. Tightness is restored when waterproofing is installed before coating.
- Reduction of usable area, since according to safety requirements there should be nothing around the stove pipe for a bath.
- Increased costs for changing the roof and ceiling of the steam room, in particular, after finishing the final finishing.
- If the integrity of the smoke exhaust structure is damaged, the bathhouse begins to smoke.
- Condensation leaks and accumulated soot spoil the appearance of the roof.
- Burns from heated parts are possible in emergency situations.
When deciding on the installation method, the following nuances must be taken into account:
- dimensions of the building - if it is very small, then it is logical to make an external structure;
- the steam room is built from scratch or in an old room - in the first case, you can immediately think about the issue of insulation;
- Do you need to heat adjacent rooms?
External placement
An external smoke channel device is more expensive and difficult to install. This is due to increased requirements for compliance with the dimensions of the connection between the hole in the wall and parts of the product. For external installation, it is necessary to use double-walled chimneys to avoid the formation of condensation and fire. It is external structures that are the least flammable, since the smoke is instantly directed outside, rather than circulating through a pipe located in the building. The advantage of such a system is the absence of the need to make a hole in the ceiling and roof and saving of internal space. This reduces the risk of carbon monoxide poisoning.
Internal placement
The main advantage of the internal location of the chimney is the easy provision of draft in the chimney structure, which is achieved by the vertical direction of the exhaust gases. In this design, the main part will be located in the interior of the building, which allows the bath room to heat up much faster. However, from a fire safety point of view, this design is more dangerous, since it is much more difficult to notice smoke in the ceiling or in the attic.
Cleaning
This topic deserves a separate discussion. After all, a smoke duct, like any device, requires maintenance. In this case, this means cleaning it. Over time, a layer of soot forms on the walls of the chimney system elements. As mentioned above, this not only impairs traction, but can also cause uncontrolled combustion, which can cause a fire. The most effective and, accordingly, the most common method is mechanical cleaning.
Chimney cleaning must be carried out regularly, as soot accumulates on the walls of any pipe.
Important! The fact is that not all chemical compositions are capable of effectively solving such a problem with regard to a chimney in a bathhouse.
For mechanical cleaning, the performer will need brushes, scrapers, and ruffs of various shapes and sizes. In some cases, you may need a special core to which the cable is attached. To break through fairly dense blockages, sometimes you cannot do without such a device.
It is best to start work from the top section of the pipe, gradually moving down. But first of all, you need to install a ladder on the roof and secure it securely. You should also tightly close the openings of the ash pan, as well as the firebox, and, conversely, open all the dampers. In addition, the head of the chimney is first removed. All work must be carried out wearing a respirator.
Next, using a stiff brush with iron bristles, remove the soot from inside the pipe. To clean areas that cannot be reached by hand, use a flexible brush. This accessory looks like a flexible cable, equipped on one side with a handle for rotation, and on the other side there is a special nozzle. Its diameter should slightly exceed the value of this parameter of the pipe itself.
Move the cable along the smoke channel as carefully as possible by smoothly rotating the handle. If the brush stops moving, it means that there is a dense blockage on its way, which will have to be broken through with the help of a core. The cannonball should be lowered into the chimney with sudden movements. In this case, it is necessary to prevent it from touching the walls. This is especially true when the chimney system is made of brick. Once the clog is cleared, continue cleaning using a flexible brush.
After using this accessory to pass the entire pipe through the cleaning doors, remove any soot that has fallen from above. Then, using a scraper and a brush, clean the walls of the chimney channel, moving gradually down to the location of the firebox.
All surfaces of the chimney and the stove itself must be cleaned of ash and soot to prevent deterioration in draft due to blockage
The chimneys of some stoves are a straight structure with no cleaning doors. In this case, the soot, cleared from the walls of the smoke exhaust channel, is lowered into the firebox. The final stage is cleaning the ash pan and firebox. To perform this, it is permissible to use a vacuum cleaner pre-equipped with a disposable paper garbage bag.
At the end of the work, light the stove and check whether there is draft in the chimney and whether its level is sufficient. If there are no comments, mount the previously removed head on top of the pipe.
Is it possible to install a sandwich chimney in a bathhouse with your own hands?
The use of this design allows you to prevent and protect the room from possible fires. Thanks to the insulation, the heating temperature of the pipe usually does not rise.
There is a certain sequence that accompanies proper self-assembly. Strict compliance with the rules and recommendations of the manufacturer, guaranteeing the uninterrupted operation of the chimney system.
What should you pay attention to when installing a chimney in a bathhouse?
Below are guidelines on what to focus on first.
How to choose the size and shape of a chimney
The small cross-sectional size will prevent the removal of fuel products in the required quantity. The volumetric section, on the contrary, contributes to the movement of smoke too quickly, which will not allow the bathhouse room to be properly heated. This, in turn, will increase fuel costs. You should take this point seriously, since the result will depend on it.
Deciding on the form is easy if you take into account the basic principle of its operation. Chimneys tend to heat up unevenly, as a result of which smoke comes out to the roof surface along the central axis. It follows that the correct shape is a circle. Cylindrical structures heat the room much faster and do not require unnecessary financial costs.
A chimney with a rectangular cross-section provokes turbulence that interferes with the necessary draft. A rectangular configuration is permissible only when we are talking about heating devices that do not require powerful traction.
Pipe diameter
The scale is determined by the degree of power draft of the sauna stove and is located in the intermediate range from 115 to 270 (mm). However, in order to accurately determine the diameter, you need to familiarize yourself with some of the requirements specified by the manufacturer in the instructions. If you do not have a diagram for installing a chimney for a bathhouse with your own hands, then it will be enough to know the ratio of the cross-sectional diameters of different shapes. It looks like this:
- cylindrical – 1 to 10;
- rectangular - 1 to 1.5.
For brick chimneys, the minimum cross-sectional diameter should be 140x140 mm.
The successful operation of a chimney system primarily depends on how accurately the pipe size is determined.
Flue height
According to the standard, its height should be at least 5 meters. The calculation of the height of the chimney is carried out in accordance with the basic technical characteristics of the materials.
The channel should be located at least half a meter above the roof ridge and not below its level. In this case, it is worth taking into account the thickness of the roofing covering and the angle of inclination of the roof slope. The height is selected without taking into account the chimney “umbrella”.
Requirements for the manufacture of the structure
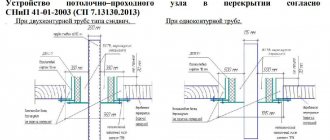
It is important to make gaps where the pipe passes through the holes.
When preparing to build a chimney, you need to familiarize yourself with the standards that the chimney must comply with:
- If the pipe comes out of the roof at a distance of one and a half meters from the ridge, then it makes more sense to mount the structure at a height of 50 cm above the very top part of the roof;
- When the distance between the ridge and the chimney is at least one and a half and no more than three meters, it is more advisable to install the chimney at the same level as the roof deck;
- If the ridge and pipe are more than 3 meters apart from each other, the chimney should be mounted above the dotted line, which is conventionally drawn horizontally from the highest point of the roof at an angle of 10 degrees;
- Only 1 meter of chimney should go out from the flat roof;
- The chimney, located one and a half meters above the roof, is certainly secured with guy wires.
General installation recommendations
It is necessary to study in as much detail as possible the information on how to properly make a chimney pipe in a bathhouse and all the details related to its installation, because reliability, service life, performance and, above all, your safety will depend on its quality. Any seemingly insignificant mistake can provoke irreversible consequences.
First you need to familiarize yourself with the main instructions of specialists and instructions (if available).
Preparatory stage
The areas where the smoke channel passes through the ceilings must first be protected. The step-by-step guide for this stage of installing a chimney in a bathhouse with your own hands is as follows:
- Preparing the passage pipe. It is required to fill its exterior with basalt wool.
- Next, you need to insulate the inside of the unit - decide on the installation point on the ceiling and prepare a hole of the desired shape.
- In the area where it meets the ceiling, spread another thermal insulation layer and then proceed to the cutting device.
- Be sure to leave a small gap between the passage unit and the smoke channel.
Roof work
Start this stage by dismantling the roof:
- It is necessary to determine the dimensions from both the internal and external areas of the roof, taking into account the roof slope (slope).
- Cut a hole inside the roof. To do this, cover the opening areas with metal sheets on both edges, the thickness of which should be 0.5 (mm). You need to make 4 holes measuring 450 by 450 (mm), using the square section method. The scale depends largely on the adapter.
- A roof flashing or master flash is used to pass the chimney through the roof. Their main task is to seal the passage and protect against moisture.
Please note: the master flush must be placed under the top edge of the roof to avoid leakage. Also, seal the joint with the pipe and secure everything with roofing screws.
Passage through the wall
We invite you to familiarize yourself in more detail with two installation schemes with detailed descriptions.
In the case of installing a chimney for a bathhouse with your own hands with a side outlet, the process is carried out as follows:
1 installation option
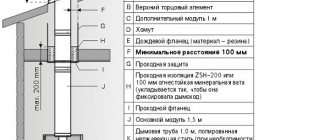
Passage through the wall, outside the bathhouse. When choosing a chimney for a wood-burning stove in a bathhouse, you need to choose a stainless steel pipe 0.8 mm thick. We install an adapter on the furnace pipe (if you have a metal one) (this is the starting element when assembling condensate), then a single-wall pipe of at least 0.5 m or a pipe heat exchanger (if you plan to have hot water in the washing room). We install a damper on the heat exchanger. We will talk about the need for a gate in a separate article.
Next, we place a 90° elbow on the gate, place a start-sandwich on it to transition from a single-wall pipe to a double-wall, and then a 1.0 m sandwich pipe. If your wall is not wide, then you can put a 0.5 m pipe.
An important point: to pass through walls and ceilings, it is necessary to use a sandwich.
The section of the wall (as well as the ceiling) is the most fire hazardous in the bathhouse, so it is necessary to take the equipment of this unit seriously. We propose installing a PPU (ceiling-passage unit) inside the steam room; the opening is closed from the outside with a screen (stainless steel sheet). If your wall is wide, then you will need a second PPU for installation outside. Ferrum's assortment includes polyurethane foam of various configurations. We will go into more detail in a separate article on this element.
It is necessary to loosely lay kaolin wool or sheets of technical mineral wool into the passage unit in a layer of 5-7 cm in order to remove “excess” heat. There is no need to add more cotton wool, as this may cause the sandwich to overheat. Next, we attach a sandwich tee to the pipe outside the bathhouse. We install a condensate drain at the bottom of the tee. On top of the tee we attach 1.0 m sandwich pipes in the amount of 3 pieces or more, depending on the height of the bath.
Given the weight of double-walled chimneys, you will need to install a mounting platform and a console from below to strengthen the kit. For stability from above to the wall of the bathhouse, we attach the chimney with a wall clamp. The final element of the main pipe will be the head.
The next stage of work will be connecting a 75 liter water tank to the heat exchanger, but we will talk about this separately.
Special instructions:
- After you have checked that all the chimney elements are in place and fit together well, we recommend sealing the joints with silicone sealant at 150° before installation.
- During installation, all modules are attached inside the previous element with the narrow end (along the condensate).
- Do not forget that all joints of the sandwich pipe, elbow, tee and adapter must be secured with clamps. All these elements are available in a wide range in the Ferrum line, the price list for which can be found on the website.
- The lengths of the chimney elements must be selected so that the connection does not end up inside the ceilings.
- If there is a tee in the chimney, then it must be placed on the mounting platform with fastening. The distance between sites must be at least 5.0 m from each other.
- To pass through the floors, it is necessary to use a ceiling-passage assembly.
Installation option 2
Internal location of the chimney. In terms of the set of elements, this option is almost no different from the first. It is imperative to use a sandwich pipe to pass through the ceiling.
An additional element when installing inside a bathhouse is the roof trim.
Making and installing a protective (pass-through) box with your own hands
- Make 4 metal sheets on a scale of 50 by 50 (cm) with holes cut out (in the middle) in accordance with the size of the pipe.
- Using a welding machine, connect the existing sheets to each other or fasten them with self-tapping screws.
- The resulting metal box is insulated using basalt wool, and a foil coating is made on top of the previous layer.
- A pipe is inserted into the box. The box is installed in the ceiling passages and secured with screws.
- Then attach a steel sheet with a pre-cut hole for the chimney to the roof surface.
Assembling the chimney structure
When the stove is not located clearly under the ceiling opening, an elbow (bend) is used. But you shouldn’t overuse it, as soot and fumes can accumulate inside.
A head is attached on top, which you can build yourself in a simple way. But it is still recommended to purchase a ready-made version.
The outer pipe is designed as follows:
- First, the knee is attached to the wall, and only then the main device.
- A ready-made protective box filled with expanded clay is attached to the wall, from which the main part rises outward.
- Then, from the outside of the room, a tee is attached to it. Each of the parts is connected in turn.
Fastening: how to properly install a chimney pipe in a bathhouse
Upon completion of the chimney assembly, attach the tee to the mounting platform and tightly compress all existing joints with clamps. A cone is placed on the last pipe (sandwich), an umbrella or deflector is placed on the cone to prevent precipitation from entering and wind blocking the smoke channel.
The pipe is more than 1.5 meters higher than the roof and is secured with a tension clamp.
Installation of a chimney
A window measuring at least 50x50 cm is cut into the ceiling or wall covering. A passage unit with a hole equal to the diameter of the pipe, plus 3-5 mm, is mounted into this hole for free installation, which must be secured with special metal fasteners in pre-made holes, after which, fastened with a wall. Then the pipe is inserted into the protective box. From the attic side, fill the metal box with expanded clay. As a decorative element after installation, you can use a stainless steel protective screen, which increases fire safety.
Completion of installation work
Next, when you have completed the installation process, be sure to remove the additional coating from the pipes and apply a fire-resistant sealant instead.
Electric oven installation
It is much easier to solve the problem of how to properly install a stove in a bathhouse powered from the mains. The placement of such a unit is simplified due to its more modest dimensions and the absence of connection to the chimney, which is not necessary.
But in this case, other requirements arise, primarily related to electrical safety.
The main advantage of an electric furnace is independent installation. Source usproekt.ru
When installing an electric furnace, it must be grounded. If this is difficult to implement, then grounding is used by connecting the ground wire of the unit to the neutral terminals on the distribution panel. Also, to avoid short circuits during power surges, a residual current device (RCD) is installed.
Certain requirements are also imposed on the wiring: its cross-section must correspond to the power consumption and voltage in the network. And the shell material must be heat-resistant.
Mistakes when installing a chimney in a bathhouse
- Assembly based on smoke, not condensation. The most common and common mistake that very quickly damages the pipe.
- Placement of wooden floors close to the pipes in the ceiling and walls. Savings on polyurethane foam.
- The use of materials that are strictly contraindicated for use as a smoke exhaust, since some of them can cause a fire.
- Insufficient chimney height.
- Grouping several chimney structures into one.
- Arbitrary calculation of the scale and diameter of materials.
Installing a chimney is a very serious process that requires the necessary skills, attentiveness, patience, and a responsible approach to studying information about various installation methods. If you strictly follow the manufacturers' instructions or the tips given in this article, you will definitely not make mistakes in the process.
Remember that chimney repairs often cost many times more than just installation services. It is for this reason that it is better to follow all the rules and recommendations at the bathhouse design stage.