Good day, dear reader! The most effective smoke exhaust system in a bathhouse is a vertical structure, leading straight up through the roof. However, it is not always possible to implement such a scheme, since models of modern stoves - heaters or potbelly stoves may, for example, have a side outlet, a rafter system of a complex configuration, or the building was built a long time ago, and it is dangerous to violate the integrity of the roof structure. In this case, the chimney in the bathhouse is led out through the wall.
What is it and what is it for?
Most heating devices in the bathhouse operate on solid fuel, the combustion of which produces carbon monoxide, steam and finely crushed solids.
To remove fuel combustion products from the room and provide draft for the stove, a chimney is needed - a vertical channel, round or rectangular in cross-section, facing the street. Not only the cleanliness of indoor air, but also fuel consumption and ensuring fire safety in the bathhouse depend on the quality of its execution.
How the chimney works
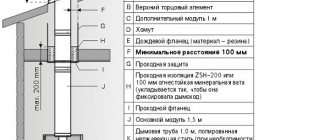
A chimney with an exit through a wall consists of a horizontal or inclined section and a straight structure located strictly in a vertical position.
All pipe parts are connected using various fittings. When choosing them, it is necessary to take into account the need for regular cleaning of the channel during operation. Soot will most likely accumulate in a regular elbow, so for the connection it is better to use a tee with a removable glass, which will make it easy to clean the chimney in the warm season.
To ensure safe passage of the chimney through the wall, a special pipe is used, which is inserted into the hole where the pipe passes.
The chimney pipe is fixed to the wall with special brackets at intervals of no more than 2 m. A special fungus installed in the upper part of the structure protects the smoke duct from rain and snow.
How to make a brick pipe in a bathhouse through a wooden ceiling
A chimney made of brick is the most reliable design. Before you begin installing the structure, you need to design a chimney
During design, you should pay attention to the features of the stove that is installed in the bathhouse. Also take into account that installing a massive brick chimney is not practical in small bathhouses. Technology for installing a chimney on the roof:
Technology for installing a chimney on the roof:
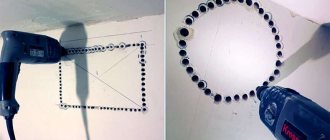
- Make a hole for the pipe. The diameter for the passage should be 20 centimeters larger than the diameter of the pipe itself.
- Then you need to remove the product through the roof.
- Insulate the pipe using a metal sheet.
- Seal the structure by placing the edge of the sheet under the roof.
- Attach a metal umbrella to the chimney. It will protect the structure from moisture.
- Apply heat-resistant paint to the chimney. It will protect the metal parts of the structure from corrosion.
Types and designs
To build a chimney for a bath through a wall, use:
- a pipe made of stainless steel or ordinary black steel with a thick wall;
- double-walled pipe with a layer of fire-resistant insulation - sandwich - chimney.
According to the type of construction, chimneys are divided into:
- external They have a horizontal or inclined section that extends from the heating boiler, penetrates the outer wall, and connects to the vertical section of the structure;
- internal. When installed internally, the vertical chimney pipe passes through the ceiling and roof.
Internal smoke exhaust option
In this case, combustion waste passes through a chimney laid inside the bathhouse building and discharged outside the building through the roof. This design feature allows the use of fuel with maximum efficiency, since the pipe releases thermal energy along its entire length and thereby heats the room.
When installing an internal structure, the biggest problem is the removal of the chimney through the roof and other obstacles. In order for the pipe to be on the street, it is necessary to make holes in the roof and ceiling. It will not be so easy to eliminate the gaps in the places where the chimney elements meet the roof material, as a result of which the gaps become the cause of leaks.
Advantages and disadvantages
The advantages of an external type chimney include:
- increased level of security. The pipe will not have to violate the integrity of the roof and attic floor, which will eliminate the risk of rain and melt water leaking into the gaps between the chimney walls and the roofing elements;
- fire safety. The main part of the chimney is located outside the room, which is safer for such buildings, where the creation of unstable temperature and humidity conditions is initially expected;
- compactness. This type of design does not take up much space inside the bathhouse, which is especially important for small rooms;
- ease of installation. When assembling the channel, it is necessary to equip only 1 passage through the building envelope.
Quite significant disadvantages of installing such a chimney are:
- rapid cooling of the structure, which means condensation will form inside it. Such a structure requires significant costs for enhanced insulation;
- presence of turns. The smoke exhaust pipe exiting through the wall is configured with one or two turns, which reduce the draft inside the structure and interfere with the normal functioning of the stove. To correct this drawback, products of larger diameter are used.
Insulation materials
When choosing insulation to insulate a chimney, it is important to pay attention to its properties. The material must have good thermal insulation characteristics and not be flammable. It is desirable that the insulation has low hygroscopicity
It is desirable that the insulation has low hygroscopicity.
The best options for insulating a chimney in a bathhouse or house are several types of materials.
Mineral wool
Mineral wool absorbs moisture over time and becomes unusable
It is a fibrous material that has an air layer. Thanks to special treatment, mineral wool does not ignite, but retains its shape even when exposed to high temperatures. It's inexpensive.
Mineral wool insulation has several disadvantages:
- susceptibility to deformation over time;
- ability to absorb moisture.
Basalt wool
Basalt wool can withstand high temperatures and lasts a long time
This insulating material has the following technical characteristics:
- Low thermal conductivity, which can be compared with polystyrene, cork materials, and rubber.
- High level of fire resistance. Basalt wool can withstand temperatures of more than +1000 °C without losing its thermal insulation properties.
- Excellent waterproofing properties. Water is not able to penetrate inside the basalt wool.
- Resistance to mechanical stress. When producing basalt wool, the fibers in it are alternately arranged vertically and longitudinally. This design allows it to withstand fairly high compressive loads.
Basalt wool is produced mainly in slabs. Therefore, to insulate the chimney, you will have to build a special outer box.
Kaolin slabs
Kaolin board is suitable for protecting brick chimney from destruction
Kaolin is absolutely safe for human health. Does not emit toxic substances into the atmosphere even at high temperatures. Kaolin boards are resistant to fire, so they can be used to insulate chimneys of fireplaces and open-fire stoves.
Working with viburnum slabs is easy because they are light in weight. The peculiarity of the insulation is that, with a minimum density, its insulating ability is quite high. This means that when carrying out repair work, it is possible to preserve the usable area around the chimney inside the room.
Roll filters
Externally, they are cylinders, the outer part of which is made of foil material, and the inner part is made of foam. Roll filters are especially good for galvanized steel pipes. Such insulation can withstand high temperatures, is resistant to fire and high humidity. The only condition for installing roll filters is reliable sealing of the joints in the upper open part of the roll from atmospheric precipitation.
Folgoizol
It is a two-layer material consisting of a heat-insulating component and foil. Thanks to the reflective layer, the room does not cool down so quickly, because up to 90% of the heat is retained inside the bath, so it is a very high-quality insulator.
Folgoizol is highly environmentally friendly, because thick food foil is used as a raw material. This material is not afraid of ultraviolet radiation and strong temperature changes - the operating range is from -65 ºС to +175 ºС. Therefore, it will be a completely worthy choice for wrapping a pipe in a bathhouse.
Note that foil insulation is often installed not only around the chimney, but also on the walls and ceiling of the steam room. It serves for high-quality vapor and waterproofing, and also insulates the bathhouse well.
Sandwich pipe as a chimney
Recently, various manufacturers have begun to produce new safe sandwich pipes for baths and saunas. With such a design, there is no longer any need to worry about how to protect the pipe in the bathhouse (for more details: “Advantages of a pipe for a sandwich bathhouse when building a chimney”). The design of such pipes involves quick and convenient assembly of sections inserted into each other. Moreover, it is optimal to use such pipes with an iron stove.
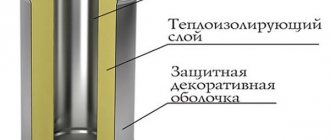
The sandwich pipe is a multilayer structure, inside of which there is a stainless steel frame, then insulation made of mineral or basalt wool is laid, and a galvanized casing is placed on top. Thanks to this structure, soot does not accumulate inside the chimney, the outer layer of metal does not experience overheating, and the entire structure looks beautiful and laconic.
Tips for choosing
To build a chimney in a bathhouse through a wall, you need to choose metal with a thickness of at least 2 mm. The pipes must be made of a high-alloy steel alloy that is resistant to corrosion.
Sandwich pipes are becoming more and more popular, but their price is quite high. If you want to save money, you can take two pipes of different diameters and place thermal insulation material between them. The cost of such a design will be significantly less.
Construction of a crossing over the ceiling
Let's look at how to make a chimney in a bathhouse through the ceiling. This can be done in two ways.
- Use ready-made cuts;
- Install the pass-through unit with your own hands.
Application of ready cuts
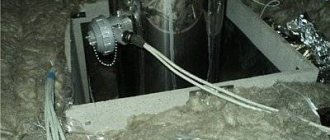
In order to fully protect the roof elements from the effects of high temperatures that arise when combustion products pass through the chimney, and at the same time secure the pipe in the required position, the so-called ceiling cutting is used.
To construct a chimney passage through the ceiling, you need to purchase a chimney passage through the ceiling at a hardware store. It is a box made of mineralite or metal connected to a stainless steel plate. There is a hole in the center of the structure into which the sandwich is placed. Such a device also performs, among other things, a decorative function. A plate attached to it covers the ceiling hole, giving it a more aesthetic appearance. In addition, insulation rests on this plate, which fills the space between the ceiling elements and the pipe.
They come in two types:
- with insulation, looking like two plates combined with an insulated pipe;
- without insulation, which is a box made of metal, which must be filled with insulating materials with your own hands and a hole intended for installing pipes.
Cuttings come in different forms. Sometimes they look like a metal cylinder, in which case the plate is significantly larger than it. If such a device is used, and the ceiling hole is square in shape, then it is still necessary to comply with all the listed parameters required to ensure the fire safety of the structure. At the same time, it is necessary to strengthen the protection of wooden bath structures using metal strips.
https://youtube.com/watch?v=OloeKgcB2Yo
Installation of a ready-made adapter
- Cut a hole in the ceiling, taking into account the overall dimensions of the cut;
- If necessary, carry out insulation;
- Install the chimney passage unit into the ceiling;
- Bring the pipe to the ceiling, and its length should be 100-150 mm less than the height;
- Connect the section of pipe located on top of the roof;
- Seal all joints that occurred during the passage of the chimney through the wooden ceiling.
Installation of an adapter made by hand
It is possible to carry out a chimney through the ceiling in a bathhouse without factory components.
Let's look at how to make a ceiling passage unit with your own hands. To do this you will need:
- chimney pipe;
- material chosen for thermal insulation of the pipe passage through the bathhouse ceiling;
- metal plates.
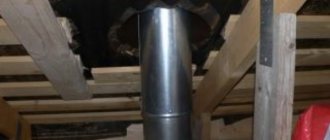
The pipe in the bathhouse through the ceiling and roof is installed following the recommendations described below.
- Cut a hole in the ceiling that is 13-18 mm larger than the size of the pipe;
- One edge of the pipe is inserted into the hole made;
- From inside the room, a plate is placed on the ceiling;
- The chimney passage through the ceiling is insulated. It is optimal to make thermal insulation for the ceiling passage unit from mineralite.
- The space remaining between the ceiling and the plate must also be filled with a layer of insulation.
- The plate is attached using self-tapping screws.
When considering how to install a pipe in a bathhouse through the ceiling, be sure to pay attention to such an important factor as choosing a suitable location for the passage of the ceiling for the chimney. The main function of the adapter is fire protection
The main function of the adapter is fire protection
It can be installed either directly on the ridge, providing good traction and no accumulation of sediment; or next to the ridge.
Cutting a chimney installed by yourself will require a little more time than purchased in a store, but will help save money, which is so necessary during construction.
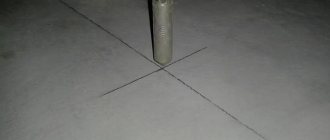
When installing a chimney in a ceiling-roof slab, craftsmen are often faced with such a difficulty as the need to make a chimney in a bathhouse through the ceiling strictly vertically, placing it in the center of the passage. To do this, we can recommend using a plumb line. It is lifted up and lowered into the center of the chimney. This point is marked on the ceiling and used as an appropriate mark before making a pipe passage through the ceiling of the bathhouse.
Building regulations
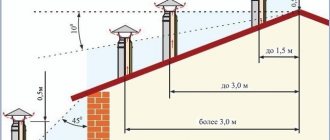
Installation of the external chimney is carried out in accordance with the requirements set out in SNiP 2.04.05 - 91 and DN V.2.5-20-2001. Namely:
- the height of the passage through the pipe wall should be within 1 - 1.5 m from ground level;
- the minimum height of the structure is 5 meters;
- the smoke exhaust duct cannot have more than 3 turns with a radius of curvature not less than the internal diameter of the structure;
- the vertical part of the chimney must be located at a distance of at least 1.5 m from the edge of the roof overhang of the building and at least 1.5 - 3 m from the residential building;
- the total length of horizontal or inclined links should be no more than 1 m. Otherwise, there is a danger of more intensive fouling of the walls of these areas with products of incomplete combustion of fuel, which will impede the movement of smoke;
- elevation above the roof should be done:
- up to 50 cm if the roof is flat;
- up to 50 cm above the parapet or roof ridge, if the chimney is located closer to them than 1.5 m;
- not less than the axis of the parapet or ridge, if the pipe is 1.5 - 3 m away from them.
- The design of the smoke channel must include pockets 25 cm deep, used for cleaning combustion products.
Fire safety rules
The distance from the brick wall to the chimney is 130 mm. If the structure is wooden, then this parameter increases to 260 mm. When pipes pass in close proximity to rafters or through flammable materials, these places must be insulated.
Fire protection of a chimney Source petropech.ru
When using solid fuel equipment, the chimney is equipped with a mesh metal spark arrester, regardless of the material from which the building is constructed. The cell size does not exceed 5*5 mm. In addition, there are other rules:
- the chimney head must be positioned correctly relative to the roof;
- to reduce moisture condensation, the temperature at the outlet of the structure should be 15°C higher than the dew point temperature (60°C);
- if the chimney height is less than 5 m, then the installation of an electrically driven smoke exhaust is required.
The outer wall is separated from the structure by an asbestos-cement sheet or basalt overlay.
Traction force
Insufficient draft force may be due to improper design, non-tight connection of parts, small diameter of the chimney, large accumulation of soot and ash inside the duct or in the boiler, as well as poor thermal insulation of the outer sections of the structure.
To avoid having to think about how to increase draft in the chimney, you need to:
- When installing the structure, monitor the quality of the connections of the parts;
- install a grate (grid-irons), which will ensure that the ash itself pours out of the combustion chamber;
- insulate the outer part of the pipe with basalt mineral wool on an asbestos sheet;
- When firing the stove, ensure that the ash door is sufficiently open to ensure adequate air exchange in the heater.
Making and installing a chimney with your own hands
Before you remove the chimney through the wall with your own hands, you need to decide on its installation location and dimensions, and also develop a design diagram.
Drawing and diagrams
Options for correct placement of the chimney are presented in the following diagram:
Size calculation
The main parameter for choosing a chimney pipe is its internal cross-section. The internal diameter is calculated depending on the power of the heating device. Just keep in mind that the cross-sectional size should not be too large, otherwise heat will not be retained in the heater, and a pipe with an excessively small diameter will not create the required level of draft for smoke removal. And, of course, the diameter of any section of the structure should not be less than the outlet of the heating device pipe.
For stoves of low and medium power, the diameter and height of the chimney can be selected according to the table:
| Boiler power, kW | Diameter, cm | Height, m |
| 18 | 13 | 7 |
| 28 | 15 | 8 |
| 45 | 15 | 9 |
| 65 | 20 | 10 |
| 90 | 25 | 13 |
Selecting the location of the chimney outlet
The place for the chimney pipe outlet should be a blank side wall, where there are no attic windows, balconies or second floor windows.
Also, smoke exhaust ducts should not be laid through closed loggias, corridors and entrances.
Construction of a gable roof for a bathhouse
Construction of the rafter system
The roof structure is based on a rafter system, which is a complex of wooden elements:
- Mauerlat - a base that creates support for the entire structure on the walls of the building;
- Rafter trusses are elements in the form of isosceles triangles, the legs of which are the rafter legs. It is the shape of the triangle, as the most stable figure, that allows the gable roof to withstand large external loads;
- Lathing is a sparse or continuous system that allows roofing material to be attached to the rafters.
All wooden elements of the rafter structure are made from dried wood with a moisture content of no more than 20% without knots and cracks. Before installation, the wood is treated with special means to prevent the formation of mold, mildew and pest damage to the wood.
There are two ways to build a truss structure:
- Hanging. Suitable for small buildings. The rafters in this system have only two points of support: the mauerlat and the ridge beam. This type allows you to avoid supports in the center, which allows you to make maximum use of the attic area.
- Layered. Used in large buildings. The rafters have additional support points in the center of the house in the form of load-bearing walls.
When calculating and choosing material for the rafter system, the total load on it is taken into account, which depends on the weight of the structure, snow load, etc. As a rule, rafters are made of wooden beams with a section of 50 * 100 mm.
Let's look at how to properly make a rafter system for a gable roof:
- The Mauerlat is laid on walls insulated with a layer of roofing felt and secured to them with anchor bolts, studs or twisting. In a bathhouse made of timber, the role of the Mauerlat is performed by the upper crowns, fastened with staples;
- The trusses are fastened at the top with a metal plate. First of all, the outer trusses are mounted, and then, according to the level specified by them, the rest are set at a gap of approximately 60 cm. The rafter legs can be attached to the mauerlat by notching or metal elements.
Roof lathing and insulation
An important point in the construction of a roof structure is its vapor and waterproofing. The protective material is spread over the rafters with an overlap of up to 10-15 cm at the joints of the material and fixed with nails or staples
It is important to create ventilation gaps between the waterproofing and the roof. For this purpose, a counter-lattice is created under the lathing system.
Next, the sheathing is filled, the pitch of which depends on the selected roofing material. For soft roofs, a continuous sheathing is made of moisture-resistant plywood; for other materials, the pitch of the system can be increased to 40-50 cm, depending on the slope of the slopes.
If you want to create a warm roof for the bathhouse, insulation is used, which is laid on the attic side between the rafters and covered with a layer of vapor barrier material.
Installation of roofing material and pipe outlet
One of the final types of work is the installation of roofing material on the bathhouse roof. Regardless of the chosen roof, the work order will be as follows:
- Laying the first row of roofing along the eaves, maintaining the level and firmly fastening the first row of material;
- Installation of the next rows of roofing from the eaves up to the ridge. Each next row is laid with an overlap of 10-15 cm with the previous one to avoid roof leaks;
- Lastly, the roof ridge is installed, the options for which vary depending on the chosen roofing material.
An important point when building a roof on a bathhouse is the question: how to make a chimney? It is most advisable to route the pipe in the bathhouse through the roof 30-50 cm from the ridge with an elevation of 50 to 100 cm above the roof. The passage of a pipe through a roofing pie, the materials of which easily and quickly catch fire, must be associated with mandatory insulation of the pipe. To do this, a special hole is made in the constructed roof, the walls of which do not allow the pipe to come into contact with the flammable elements of the roof.
The final work is the installation of a drainage system, covering the roof overhangs and cladding the roof gables.
Installation features
When installing a chimney, there are several nuances that must be taken into account during the work:
- the first horizontal link should have a slight slope from the stove, which will protect the device from condensation;
- There are two ways to remove the smoke exhaust duct through the wall: raise part of the pipe to the ceiling and at this level bring it outside, or place the exit point of the duct to the street at the level of the stove inlet pipe. The second method is more preferable, which involves the use of a smaller number of shaped parts (only one rotary elbow);
- the entire chimney structure must be assembled from pipes identical in technical characteristics;
- in the area of passage through the wall, the pipe must be solid, without joints;
- the joints of sections and shaped elements should be coated with heat-resistant sealant before assembling the system, and after installation they should be additionally secured using special wide clamps;
- A protective umbrella must be installed on top of the pipe.
Video description
How to pass a pipe through a wooden base is shown in this video:
- Making a hole for the box. At this stage, the diameter of the product is taken into account, as well as the space for the insulating material (basalt wool inserts).
- Pipe installation. An asbestos sheet is laid between its walls and the box. The element is displayed strictly at a right angle. Any deviation will impair the operation of the boiler.
- Attaching a protective screen outdoors. This is a steel plate fixed to the outside of the wall. It protects the wood from overheating and reduces the risk of fire.
Pipe protection with insulating material Source petropech.ru
- Tee installation. A vessel for collecting condensate is attached to its lower part.
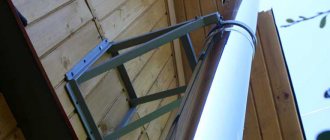
- Installation of support. It is screwed to the wall or rests on the ground. Its task is to maintain the vertical part of the structure.
- Chimney connection. Condensation should not get into internal joints. Every meter the structure is fixed to the wall with brackets. During fastening, a building level is used to maintain the strictly vertical position of the pipe. The last clamp is installed under the roof.
Lastly, a protective fungus is put on the pipe.
Maintenance and cleaning
Over time, the walls of any type of chimney become covered with a coating of soot, which reduces the size of the passage, which leads to a decrease in draft in the stove. There is another danger - when heated, soot can ignite, leading to a fire. Therefore, the pipe must be cleaned regularly.
There are several ways to clean a sauna chimney:
- mechanical cleaning. It is performed using a special rod, preferably a collapsible one with brushes. This is a rather labor-intensive, and most importantly, dirty method. Therefore, before starting work, it is necessary to empty the bathhouse of things, and cover the surface of the walls, ceiling and floor with sheets of plastic film;
- using chemicals. A special product called “Chimney Sweeper log” is placed in the stove, which creates good draft and intense heat during combustion. The soot will burn off and come out through the chimney as ash. This method is mainly used for preventive purposes to increase the time interval between mechanical cleanings.
Video description
This video clearly shows an example of violation of the rules for installing a sandwich chimney:
- The position of the pipe is not observed. It is installed strictly vertically. When insulating main walls with foam plastic or mineral wool, long dowels are used to secure the chimney.
- There is no ebb on the side roof slope. In this case, precipitation can get on the insulation and impair its functions.
- Insufficient overall vertical height. This error leads to poor traction.
Problems arise when using low-quality insulating material. Cheap insulation shrinks over time, so there is a possibility of local overheating of some parts of the chimney.
Expert advice
When constructing a chimney in a bathhouse, it is important to comply with all building codes and regulations in order to ensure maximum safety when taking bathing procedures. In addition, experts advise:
- install the deflector. It increases the efficiency of the furnace;
- provide a small door at the pipe outlet for cleaning the structure;
- at the junction of the vertical and horizontal sections, it is better to install a tee, which will allow you to connect a condensate drain to the system;
- Upon completion of installation, check the system for leaks. To do this, you need to heat the unit and check for leaks.
How to insulate
To insulate the external sections of the chimney through the wall, basalt wool is used. It is produced in the form of plates or split cylinders and has:
- high thermal insulation qualities;
- good vapor permeability;
- high heat resistance (withstands heating temperatures up to +100ºС);
- resistance to mold and mildew formation.
Installation of insulation begins from the inlet pipe of the furnace, gradually wrapping it around the pipe until a layer of the required thickness is formed. Then it is tightened with a crimp clamp. The insulated area is covered with a steel pipe of larger diameter. A heat-resistant sealant is used to treat joints.
When using a basalt cylinder, first a casing is installed on the chimney, and then a cylinder is lowered into it, the inner surface of which and the connecting elements (“tenon” and “groove”) are treated with sealant.
Metal pipe: step by step process
In bathhouses with an installed heater, it is better to use brick chimneys, since refractory brick retains heat for quite a long time.
Many people wonder how to decorate the walls in the bathhouse near the stove, because these places also need protection.
Typically, sheets of asbestos or galvanized steel are used where the chimney comes into contact with the roof and ceiling.
Galvanized steel sheets are also used to protect walls near the stove.
Information. To insulate walls from a hot stove, it is better not to use iron sheets, since they are quite susceptible to corrosion.
A metal pipe without a heat-insulating layer is the most fire-hazardous option for arranging a chimney. In this case, there should be a distance of 60 cm, no less, between it and the nearest combustible elements.
Important! Even maintaining the optimal distance between the pipe and flammable elements will not protect you from burns when you come into contact with its surface. That is why you should take care of your own safety in advance by installing a high-quality thermal insulation layer. The most popular and simplest option for insulating a pipe is to use heat-resistant insulation for its winding
Basalt wool is most often used as such insulation, which is protected on top with plaster or metal sheet
The most popular and simplest option for pipe insulation is the use of heat-resistant insulation for its winding. Basalt wool is most often used as such insulation, which is protected on top with plaster or a metal sheet.
Isolation occurs as follows:
- The first step is to stock up on mineral wool slabs, the thickness of which should be more than 5 mm. Next, the insulation material is used to completely wrap the pipe. The insulation is secured with steel wire, which also needs to be wrapped around the pipe;
- On top of a pipe equipped with a heat-insulating layer, it is necessary to construct a reinforced mesh. Next, a cement-limestone mortar is made, with which the mesh is plastered;
- Instead of plaster, you can use a metal sheet.
To do this, you need to roll it around a pipe with insulation and rivet the edges at the fastening point.