Is it possible to eliminate the disadvantages of a steel sauna firebox yourself?
Stoves with steel fireboxes can be purchased both in regular and online stores. Often, factory-made furnace devices do not need additional brick protection, since their own is already thought out. However, this solution leads to temperature changes: first we are faced with rapid heating of the firebox, and then with its rapid cooling. Therefore, bricks and tiles for the stove in the bathhouse should be used for a more uniform distribution of heat, so that there is no overheating, followed by a sharp cold snap.
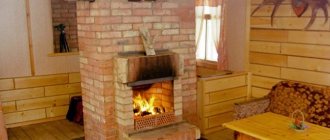
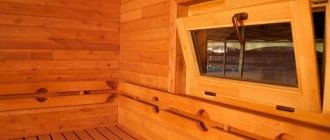
stove with a remote firebox for a bath without lining
You can make a metal stove yourself if you have welding skills. In this case, you can make even more accurate dimensions to suit your bathhouse project. However, it is worth noting that factory fireboxes use the experience of several craftsmen and designers, which you may not be aware of. Therefore, on the one hand, you can win in price and accuracy, but on the other hand, you can lose in the quality of heat removal and the ability of the stove to burn fuel (in some factory models this figure is extremely high and has been achieved through developments for many years). In general, it’s up to you: really assess your strengths and make a decision.
Important point! You should not be negligent in selecting filler for a heater stove, which is often used in baths. Some pebbles can turn a steam room into a room with a dangerous accumulation of carbon monoxide. White veins and inclusions on them are a sure sign of a low-quality product.
Review of the most popular models
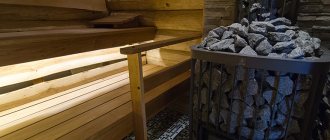
The Steam Master Tunnel WT stove-heater from the Finnish company Narvi has an external firebox equipped with a glass door in a decorative frame. Connoisseurs of high-quality steam will appreciate such a sauna stove, which can cope with a steam room with a volume of up to 25 cubic meters. m.
Heated, moist air that is particularly soft is created in the room thanks to efficient air exchange and a unique lid design equipped with a thermal hood. When the heater heats up, the top element closes, as a result of which the heat is contained in the stone compartment and does not dry out the humid air in the room. To prepare the steam room for use, the oven needs to be thoroughly heated for an hour and a half.
In the production of the Steam Master heater, enameled and especially durable steel is used. The first type of material is needed for the manufacture of the outer casing, the second - for the arch of the firebox and pipes. The ideal installation of the unit is ensured by equipping the heater with adjustable legs. The dimensions of such a stove with a firebox from the dressing room are 1000x470x520 mm, and the weight is 220 kg. The unit is estimated at 70 thousand rubles.
The Fero JK model from Kastor (Finland) is a wood-burning stove with an external firebox, which is used for heating saunas and baths with a volume of 12-22 cubic meters. m. An innovative cumulative unit with a ceramic firebox and an insulated casing can heat up in literally an hour and a half using dry chopped firewood. Due to the finishing of the internal walls with vermiculite, which has increased heat resistance (up to 1300 degrees), the oven can heat up to maximum temperature. At the same time, the stones will have time to become red-hot and will provide an excellent vaping temperature for many hours. A heater of this type is filled with heat-resistant natural or artificial ceramic (KERKES brand) stone. The dimensions of the device are 570x1225x510 mm, the weight of the cobblestones is 75 kg. The cost of the unit is 125 thousand rubles.
Stove with remote firebox: dressing room or street?
Installing a stove with an external external firebox in a bathhouse usually involves two options for placing the firebox door:
- taking it outside;
- creating a corridor in the wall for connecting the steam room and dressing room with a stove device.
The first option has a number of unpleasant moments:
- constant work as a stove maker, throwing firewood while we steam;
- If you do it yourself, you won’t be able to steam comfortably.
This option is acceptable if the steam room is heated with coal. In this case, we will avoid contaminating the dressing room with fine coal chips and unpleasant odors.
What should you pay attention to when installing an external firebox in a bathhouse?
It is important to consider the following:
- take care to ensure the fire safety of the structure. First, look at the regulations that apply to combustible building materials such as wood. For example, if the distance between the wall log and the stove is less than 1 meter, this is considered a violation, so it is better to install bricks between them;
- position the combustion door so that it does not interfere with anyone and opens all the way, that is. had no obstacles to the normal laying of firewood.
Life hack - how to heat a sauna with raw wood
Of course, this is a more unreliable method, but since different situations can happen, it is better to know how to use wet firewood for kindling.
In this case:
- Several small splinters are cut from the log. There should be at least 20 of them, since the fire will have to be maintained for 15-20 minutes until the firebox warms up.
- Half of them are folded into a “hut”. Place dry paper or newspaper inside.
- They set it on fire and wait until the fire burns well.
- Then you can put logs inside. However, they should be quite thin.
- When the first logs burn out, add the next bookmark and cover the ash pit.
- The fire must be monitored at all times so that it does not go out.
Foundation for a sauna stove
The installation of any stove begins with the foundation, and when the floor of a country house is concrete, this already solves one problem - there is no need to make a special foundation. Here you can only decorate the floor with ceramic decorative tiles for beauty and ease of cleaning. It was a completely different story when we built a wooden house.
Here you already need to take care of sufficient thermal insulation of the floor. Fire safety is also of paramount importance: metal sheets must occupy a space of at least 40 cm in front of the door. This is necessary in order to avoid coals falling out of the stove onto the wooden floor.
Is a foundation always needed for a stove?
If the stove-heater does not exceed 700-750 kg, there is no need for a foundation. Steel fireboxes supplied by online stores are still usually less than this weight. But if you love cast iron structures, you most likely cannot do without pouring concrete. Likewise, a foundation will be required if the firebox is surrounded by large brickwork. In any case, in controversial situations it is better not to neglect safety and carry out the appropriate work.
The procedure for carrying out work on the construction of the foundation
The stove foundation is an important element of the future bathhouse. The quality of work on its installation greatly influences the following parameters:
- stove safety;
- its service life;
- correct operation of all components of the heating device.
Let's look at the step-by-step procedure for constructing a stove bath foundation:
- At the location where the firebox is installed, a pit is prepared, the perimeter of which is 15-20 cm larger than that of the stove being installed, and the depth is 50 cm;
- After compaction, the bottom of the pit is sprinkled with a mixture of crushed stone and sand;
- Waterproofing is laid in the form of a polyethylene film;
- The road mesh reinforcing the foundation is attached to the reinforcement using wire or welding. The mesh frame has a perimeter 5-7 centimeters smaller than that of the oven being created;
- A concrete solution is prepared from a mixture of sand and cement in a ratio of 3:1, which is used to fill the foundation pit;
- The leveling is carried out using a vibrating screed, and then the result is checked using a level;
- When the solution has hardened, it is covered with two layers of roofing material;
- Using fireclay bricks, they form the basis for the future furnace.
Installation base
Installing a stove in a bathhouse begins with the design of the base for it. It is worth considering that this is hot metal, which means you will need to shield the floors. To do this, you can use a simple concrete screed or a special base that is fire resistant.
It is important to consider that the boiler must be installed in a bathhouse on a durable surface. A structure loaded with firewood or other fuel, along with stones for steam, is quite heavy. When installed on wood, it will gradually be pressed and deformed.
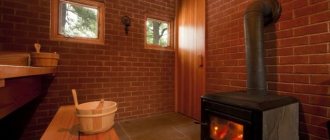
Preparing the stove for installation in the dressing room wall
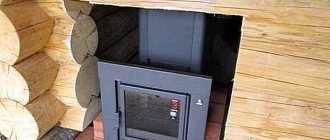
dressing room with remote firebox
Step 1. Mark a hole in the wall slightly larger than the size of the firebox and cut it out. Allowances vary between 20-30 cm.
Step 2. Depending on the method of exit of the chimney, a hole is cut in the wall, the diameter of which should be wider than the pipe being installed. Why is this so? The following arguments are usually given in favor of installing a chimney not through the roof, but through the wall:
- there is no need to carry out complex fire safety work on the roof and ceiling;
- there is no need to purchase the roof elements necessary to cover it in this case;
- Leaks are effectively prevented.
Step 3. Check that the firebox matches the space cut out for it. If deficiencies are identified, repeated corrections are made until the stove fits in all the holes made for it. If there are no complaints, we proceed to installing the heater.
After bringing the firebox into the room next to the steam room, we fill the gap between the walls and the stove with brick, and cover the top with metal or cover it with plaster. On the floor we lay a square sheet of non-flammable material (the most practical is metal) with a side of 40-45 cm.
Lighting up a black sauna
After the firewood has been selected, you need to start preparing the room.
Previously
- Completely clear the building of debris and sweep.
- Clean the oven from residues from the last time, if any.
- Pour water into containers.
Next, the preparation is divided into several steps.
Kindling and first bookmark
This will take no more than an hour and a half. For the first time, do not pack the oven tightly. There should be enough free space between the logs. It can be filled with dry newspapers or thin paper.
Important! There is no need to add any additional fuel. If the wood is dry, everything will catch fire quickly.
Naturally, you need to check the oven periodically.
Advice! When laying for the first time, it is better to provide intensive ventilation, for which purpose open windows, doors, dampers, etc.
Second batch
Once the first batch has burned through, it's time to add the second. This time you don’t have to skimp on logs. They will quickly catch fire from the previous heat.
Advice! At this point, it is better to enter the steam room bending down and covering yourself with some kind of cloth in order to be less exposed to carbon monoxide.
When the firewood is almost burnt out, you need to stir it well with a poker. It is important to ensure that the coals are evenly distributed throughout the stove.
At this stage, many believe that the bathhouse is already ready. Simply extinguish the coals, take them out and let the carbon monoxide escape.
However, old-school bathhouse attendants advise doing this:
- After the coals burn out, close all ventilation holes in the bathhouse except one.
- Let the bath mature. To do this, you need to wait until the coals turn completely white.
- Next, open all the ventilation holes and begin washing the floors.
- After washing, carbon monoxide will definitely leave the room. All holes should be closed again and you can begin bathing procedures.
Expert opinion
Lovkachev Boris Petrovich
Bath master who knows everything about steaming
Advice! Before starting the procedure, do not pour water on the walls and ceiling. Contrary to what is often recommended, such a procedure will not bring the desired effect. Only a small part of the soot will be washed off. The rest will simply be smeared on the walls.
To add humidity in the bathhouse, simply splash water on the stones.
Installation of a chimney through a wall
Previously, we talked about two ways to remove smoke gases through a chimney, through the roof and through the wall. Let's consider the second installation option step by step.
- At this stage we need to select a metal pipe of the required size. In our case, we will need 2 or more elbows. This minimum is necessary because one turn of the pipe will be directly above the boiler (initially the pipe runs horizontally inside the house), and the second time the chimney will turn vertically upward on the street.
- We measure the distance from the stove to the wall (taking into account the size of the elbow), and then set the distance upward to the location of the future hole for the pipe to be brought out.
- When we have marked where the chimney will go outside, we make a hole in the wall. Since the wall materials may be different, the tools for the work will also be different. We will show you what you need using the example of a wooden country house. We will need long drills for woodworking, a chisel and, possibly, an electric saw. A lot of holes are drilled with a drill, the remaining wood is removed using a chisel, and the edges are cleaned with a saw. To avoid wasting time aligning the edges of the circle, it is easier to make the hole square. It is easier to cut it with an electric/chainsaw. In this case, basalt wool with foil-coated front surfaces is laid along the edges as close as possible to the pipe being installed.
- The pipe is cut so as to take into account the allowances for the connection in the sockets. This helps prevent the effect of turbulence, which reduces the draft in the chimney.
- We treat parts of the chimney that are planned to be installed inside the bathhouse with a sealant that can withstand temperatures from 2000 degrees. At a minimum, these are two pipes arranged sequentially vertically and horizontally, and an elbow connecting them. The length of the last link should be such that 10-15 centimeters protrude from the outside.
- As mentioned above, basalt wool will serve as insulation in the hole made. You can also insulate the tree with sheet steel, securing it with self-tapping screws.
- Outside, the chimney should consist of one elbow and a vertical pipe. Otherwise, the oven may not work well. However, a condensate collector can be installed there, which only has a positive effect on the operation.
- Next, using standard brackets, our chimney is attached to the wall like a drainpipe.
- At the final stage, it is necessary to test the chimney for leaks. To do this, you need to use water to find out whether the joints of the structure are airtight. If water appears in some places, you need to reassemble the chimney. After all, condensation can destroy the chimney and is a source of ice plugs. Its danger lies in the fact that such problems can lead to the appearance of carbon monoxide in the living room.
Often steam room owners have an important question: is it necessary to install dampers in sauna stoves? Of course not, because this can cause carbon monoxide poisoning if you rush to close them.
So, the chimney is installed. What to do next? At the next stage, you can start lining the stove with bricks. It will not only protect against burns, but will also help the stove release heat more evenly. Additionally, for aesthetic purposes, you can line the stove structure with tiles.
Questions and answers
Is it possible to use something other than paper and bark for ignition?
Any dry material is suitable for ignition. In the old days, hay, sawdust, dry wood chips, pine cones, unnecessary rags, etc. were used. Any option can be used.
To what temperature is it better to heat a sauna?
It depends on individual preferences. Experienced bathhouse attendants advise not to heat above 60°C. The temperature and humidity of the room as a whole should be 120 conventional units. You need to build on this parameter at your own discretion.
How many logs do you need the first time you put them in?
In terms of volume, they should occupy no more than a third of the oven. It is better to lay them in a well.
Why can’t a bathhouse be heated with coniferous wood?
It is possible to burn with coniferous wood, but it is not recommended. In the process, this wood shoots too many sparks, in addition, due to the presence of resins, a lot of soot is formed, which as a result clogs the chimney. It is better not to use this heating method often and periodically alternate it with hardwood.
What is the best way to heat a sauna in cold weather?
You can use oak, since its heat transfer is the highest.
Lining the stove with bricks step by step
- We make markings on the floor, taking into account a distance of 3-4 cm from the firebox.
- It is necessary to lay waterproofing around its perimeter to help the floor dry.
- After thoroughly mixing the concrete solution, spread it around the perimeter.
- We lay the bottom row of bricks on it. Next, taking into account all the features of the brickwork construction, the walls of the furnace are erected. Sealing of joints is carried out using a solution that has not yet hardened.
The stove is ready for use after all layers of masonry have completely dried.
Preparing the wooden base
If there is a wooden floor, the arrangement must begin from the base. These can be different options:
- Installation takes place on a brickwork pad.
- We are thinking about how to install a boiler in a bathhouse on a pile-grillage foundation.
- A shallow, integral base is used.
Additionally, it would be a good idea to use fireproof protection. Its role is played by a steel sheet or porcelain stoneware slab. With such a foundation, it’s easy to figure out how to install an iron stove in a bathhouse and maintain safety.
The influence of the stove design on the location of the remote combustion door
As a rule, sauna stove structures with an external remote firebox are made of materials such as cast iron or steel. What is their difference from conventional ovens? First of all, we are talking about a remote channel, which in massive structures can be removable, and in lightweight ones it can be made of stainless steel and welded.
As we said earlier, in this option the fuel loading areas can be located both in the dressing room and on the street side. With any option, the advantage is that the steam room is not cluttered with firewood, and smoke does not get into it at all. Comfort, in a word!
The external channel is made in two versions: in the form of a pyramid or a rectangle. It should be wider where the door is attached. Models of stoves for dressing rooms with panoramic glass may be interesting due to convenient control over the rate of fuel combustion without constantly opening the door. An option such as glass blowing eliminates the layering of soot on the elements inside the furnace.
The main part of the furnace structure, as we have already learned, is placed on the foundation and is separated from the outer part by thermal insulation materials. The combustion glass should be positioned so that opening the door between rooms does not interfere with the addition of fuel.
Let's consider this option when the remote firebox is placed outside the bathhouse. Of course, going outside is not always pleasant and convenient, however, if you have an employee, and, in principle, we are dealing with a commercial project, no problems arise. Also, this measure saves when there is a catastrophic lack of space inside the bathhouse.
In addition, in a private house such a solution is acceptable in warmer climatic conditions than central Russia. If there is a fence around and the temperature does not drop below 20 degrees, then this approach is completely justified. In addition, coal heating clearly suggests that an outdoor location of a stove with an external firebox is preferable due to the fact that this fuel, although energy-intensive, very pollutes the room. The best place for him is outside the bathhouse building!
What else can influence the choice? What is the best location for the remote firebox door?
Please note that there may be dampness inside the premises. This can be observed not only in the steam room or washing room, but also in the dressing room. This leads to the fact that the firewood will be damp. Also, if the ventilation constantly draws smoke into the steam room, it is better to organize the loading of fuel cells from the street side.
The advantage of placing a door with large glass indoors is the ability to enjoy the view of the fire in the relaxation room. By decorating the stove with a tiled panel, you can greatly transform the interior, adding a large portion of comfort. With this option, firewood can be stored in the dressing room. This will allow you not to go outside and be in a constant comfortable state.
Baths, saunas and swimming pools
0 votes
+
Vote for!
—
Vote against!
Due to the peculiarities of the Russian climate, which is sometimes excessively harsh in certain regions of the country, close attention is paid to hardening and taking water hygienic procedures, including baths, which combine both previous concepts. To get the maximum benefit from bath procedures, you need to take care of the proper arrangement of the bath, which is the key to a useful and, importantly, safe use of water hygiene procedures. At the same time, in the process of arranging a bathhouse, an important role belongs to the stove, which is a key figure in any room equipped as a steam room. Despite the fact that a stove is a traditional attribute of any bathhouse, and it would seem that everyone has an idea of what a modern sauna unit should look like, debates about the most optimal characteristics of sauna stoves continue to this day, misleading newcomers to this construction industry. The temperature regime and other microclimatic parameters created in the bathhouse depend on the heat generator, and therefore, its choice must be approached consciously, having previously provided for the necessary operational characteristics of the units, the microclimatic parameters created during its operation and the most acceptable methods its installation. Today, experts recommend giving preference to stoves with remote fireboxes, since their use greatly increases the comfort and safety of bathing procedures. In this article we will look at the characteristics of the most common sauna units, and also tell you how to install a stove with a remote firebox.
Content
- Furnaces with a non-removable firebox: main advantages and disadvantages
- Wood-burning stoves with remote firebox: general advantages and placement options
- Firebox exit to the rest room: arguments for and against
- Firebox located in a special room
- Taking the firebox outside: exceptional cases
- Features of stoves with a remote firebox: how to place the unit in the bathhouse?
- Installing a stove with a remote firebox with your own hands: a step-by-step guide
- How to pour the foundation correctly?
- Embedding a stove into a wall: recommendations from experts
- Chimney installation: possible options
Furnaces with a non-removable firebox: main advantages and disadvantages
The most important point that must be taken into account at the installation stage of a sauna stove is the location of the sauna unit. Taking into account their operational characteristics, there are stoves presented in the classic version and stoves with a remote firebox. Thus, you have two options at your disposal: install the stove entirely in the steam room or move the fuel door outside of it - into an adjacent room. Each of these options is characterized by its own advantages and disadvantages, which will be discussed below.
By installing a traditional stove with a non-removable firebox, you will be able to control the heating process without leaving the steam room. Furnaces of this type are equipped with doors made of heat-resistant tempered glass, the presence of which allows monitoring and, if necessary, adjustment of the heating process. Unlike traditional stoves, which are equipped with an ordinary metal door, stoves equipped with a door made of heat-resistant glass belong to a higher price category.
Proponents of stove designs with a non-removable firebox clearly justify their position, citing the following arguments in their favor:
- By installing a stove with a non-removable firebox in the bathhouse, you will be able to control and regulate the temperature in the steam room without leaving its limits;
- If during the installation of the stove you organized a supply system that ensures the flow of outdoor oxygen to the stove, this will help improve air circulation in the steam room. Otherwise, if there is no fresh air supply, over time it will become heavy and oxygen-depleted;
- Proponents of installing a stove with non-removable fireboxes will never be faced with the issue of heat loss through a hole in the wall, and therefore they will not have to think about the need to carefully insulate it;
- If your steam room has an impressive area, you can move it further away from the wooden walls, which will significantly reduce the risk of fire;
- If you want to increase the temperature in the steam room, this can be done by simply opening the firebox door;
- Unlike a stove with a remote firebox, the design of traditional bath units is characterized by greater efficiency and ease of installation.
As for the disadvantages of stoves equipped with a non-removable firebox, they also exist and are as follows:
- If the sauna stove is placed entirely in the steam room, it is necessary to separately organize the heating of the remaining rooms of the sauna. And if in the summer the solution to this issue can be postponed, since the temperature in the room allows you to undress or wash without additional heating of the air, then in the winter, it is necessary to organize heating in all rooms of the bathhouse.
Wood-burning stoves with remote firebox: general advantages and placement options
If we examine the statistics of surveys that were conducted on most construction forums, we can come to the conclusion that the most experienced experts in the field of sauna construction prefer to place the firebox of the sauna stove outside the steam room, which will allow simultaneous heating of not only the steam room, but also the adjacent room. However, this is not the only advantage that you can appreciate by choosing this type of placement of a sauna stove. Let's look at them in more detail.
- If the firebox is located outside the steam room, there is no debris from firewood in this room, snow that can be brought into the steam room, as well as traces of dirty shoes, etc.;
- To maintain the optimal air temperature in the bathhouse, you do not need to constantly enter the steam room, opening the doors and letting out warm air;
- If a stove is closed with unburnt fuel left in it, there is virtually no chance of carbon monoxide poisoning;
- By placing the firebox outside the steam room, you can save at least 1 sq. m of free space, as well as free up additional space and make the room visually more spacious due to the lack of firewood underfoot;
- Another advantage will be especially relevant for commercial baths and saunas, and in order to experience the maximum benefit from installing a stove with a remote firebox, it is recommended to give preference to the design of a bathhouse with a remote firebox located on the street or in the boiler room. Its essence lies in the fact that a stoker who decides to pay a visit and add firewood to the firebox will not cause unnecessary inconvenience to those who are currently steaming in the bathhouse.
Installation of a furnace with a remote firebox can be carried out in several ways, each of which has its own advantages and disadvantages.
Important! Experts do not recommend placing the firebox in a washing room, which, at first glance, is an ideal option. This is explained by the fact that such a placement of the firebox will not bring obvious differences to the overall picture, since garbage remains underfoot, and the danger of carbon monoxide poisoning is the same both in the steam room and in the washing room. However, if the washing area is much larger than the steam room area, placing a firebox in this room is quite acceptable.
Firebox exit to the rest room: arguments for and against
Advantages of such placement:
- If the firebox is equipped with a glass door, while relaxing you will be able to watch the blazing flames, which, according to true connoisseurs of the sauna spirit, is an integral part of such procedures;
- In winter, to provide additional heating for the rest room, just open the firebox door;
- You can exercise control over the heating process without leaving the bathhouse, simply by moving from the steam room to a cozy relaxation room;
- If you decorate the firebox located in the rest room, it will become the main decorative element of the interior of the room;
Disadvantages of such placement:
- Considering that most vacationers are indoors without shoes, they are unlikely to be happy with wood chips, bark and snow water under their feet;
- In the summer, the air temperature in the rest room where the firebox is located may go beyond comfortable levels, but to equalize them, it is enough to open the door to the street.
Firebox located in a special room
Despite the fact that there is a generally accepted understanding of the word “dressing room,” which is synonymous with the concept of “rest room,” many are still convinced that a dressing room is a small room, reminiscent of a vestibule, where a firebox can also be located. In addition, it has received many names used in everyday life. Among them you can find a vestibule, a furnace, and a sauna boiler room... Such an extension can be called differently. It is important to note that all the advantages of a stove with a remote firebox, described in the previous paragraphs, are most noticeable precisely when the bathhouse is equipped with a special extension in which the firebox will subsequently be located. Thanks to the presence of such an extension, you will prevent the smell of smoke from appearing in the “clean” sector of the bathhouse, and in bad weather you will be able to stack firewood in a kind of sauna boiler room, where it will not disturb anyone. In addition, if you install an external firebox in a specially equipped extension, this room will acquire the function of a kind of thermal curtain for the remaining rooms of the bathhouse used for their intended purpose.
Taking the firebox outside: exceptional cases
Despite the fact that placing the firebox outside is not the best idea, this option also has a right to exist, although it is used extremely rarely. When developing a project for a bathhouse equipped with a stove with an external firebox, which is placed outside, most often they do not mean a firebox door that opens to the street, but the option described above and which implies a firebox located in the vestibule.
Important! The design of a bathhouse with a firebox placed outside may be of interest to residents of the southern regions of the country or owners of summer cottages who use the bathhouse only in the summer. But even in these cases, experts recommend equipping the firebox exit with at least a minimal canopy, as well as an additional box lid, which is necessary to cover the door after you have heated the bathhouse.
However, this option also has an advantage. If you use coal as an energy source, a stove with a firebox placed outside is the only way to get rid of the unpleasant odor and soot in the bathhouse.
Features of stoves with a remote firebox: how to place the unit in the bathhouse?
In accordance with the typical installation diagram, the main structure must be placed in the steam room, while the firebox must be taken outside. To accomplish this, it will be necessary to install a special combustion channel, in which the doors are directed into the dressing room. As for the main furnace structure, it is located near the partition, to protect which thermal insulation agents are used. The installation relative to the door can be quite variable - the stove can be placed either on the right or on the left, which depends on the characteristics of a particular room. The design with a remote firebox compares favorably with traditional units, as it can evenly heat several rooms at the same time. In addition, due to the location of the combustion door outside the steam room, during operation of the furnace structure there is no additional oxygen consumption in the steam room, which will save you from the need to install a supply and exhaust air conditioning system. To implement a project for installing a furnace with an external firebox, it is necessary to strictly follow all the recommendations provided by specialists regarding installation technology.
Choosing the location of a furnace with a remote firebox is one of the most important stages in arranging the structure, which needs to be given close attention. Due to the fact that in most cases, stoves with remote fireboxes are metal structures that become very hot during operation, it is necessary to strictly follow fire safety rules. First of all, this requirement concerns the distance from the side or rear wall to the stove, which must be at least 50 centimeters. At the same time, in order to provide additional protection to the surface of the walls, it is necessary to trim them with sheets of heat-insulating material or make brickwork.
If during the installation of a stove with an external firebox you do not plan to install thermal insulators or protective screens, you must maintain a distance from the unit to the ceiling of at least 1.2 meters.
The direction of the doors and the distance from the firebox door to the nearest wall or door is another important parameter, compliance with which is mandatory during the installation of a stove with an external firebox. In most cases, the firebox door should be directed towards the entrance to the bathhouse, and the distance between the firebox door and the nearest door should be at least 1.25 meters.
Important! If you prefer elongated models of fuel chambers, the design of which allows them to be passed through partitions and walls, you need to know that they must be located at a distance of at least 40 cm from wooden surfaces. However, this gap can be reduced to 25 cm through the use of special protective screens.
Due to the fact that most bathhouses are compact, often in the process of installing a stove with a remote firebox with your own hands, a number of difficulties arise, and taking into account the fact that wood is used to build a bathhouse, the master’s task becomes even more complicated, since strict requirements must be met requirements for fire safety. To satisfy them, it is necessary to use special heat screens that act as partitions that are installed between the hot surfaces of the furnace and the wooden wall. Despite the effectiveness of this method, some experts recommend abandoning the use of specialized materials and covering the stove with brick or heat-resistant tiles. And in order to prevent fire from coals falling from the firebox, it is recommended to lay a steel sheet on the floor.
Installing a stove with a remote firebox with your own hands: a step-by-step guide
How to pour the foundation correctly?
In most cases, one of the main stages of self-installation of a stove with an external firebox is the arrangement of the foundation. This stage is given increased attention, since a foundation poured in accordance with all the rules is the key to full and long-term operation, and will also prevent the occurrence of dangerous situations. However, there are situations when you can do without a foundation, but a condition must be met - the floor base must be a high-quality screed or its surface should be laid with porcelain stoneware or heat-resistant ceramic tiles. If this condition cannot be met, it is necessary to construct a non-combustible concrete base using the following technique:
Determining the dimensions of the foundation . First of all, it is necessary to determine the dimensions of the foundation. The standard screed height at which a sauna stove can be installed is 20 cm. This indicator is the most optimal if you are planning to equip a structure characterized by the presence of a “brick jacket” and a massive chimney. When installing a concrete screed, you need to prepare for the fact that the floor will rise somewhat. Sometimes stoves with a remote firebox are built on a “brick bed”, but in this case it is necessary to make careful calculations, since if you add the height of the foundation to the height of the brick bed, the ceilings will drop significantly.
Determining the foundation configuration . If the stove is located in close proximity to the wall, there should be no contact points between the foundation and the concrete base of the bathhouse.
Installation of concrete screed. First of all, it is necessary to dig a pit in which a small formwork is installed. Due to the fact that the expected load on the foundation will be small, reinforcement can be abandoned. To make the mortar, you need to use one part cement and 3 parts sand. After you have prepared the concrete mixture, let it sit, and at this time lay a double layer of waterproofing materials, for example, roofing felt. Next, prepare a concrete screed, on top of which you need to build brickwork.
Important! If the total weight of the structure does not exceed 700 kg, the concrete screed used as a base can be replaced with thick boards or logs treated with fire retardant impregnation. However, in the process of calculating the total weight of the structure, it is necessary to take into account not only the weight of the metal stove, but also the weight of the brick, protective framing structures and the weight of the chimney.
Embedding a stove into a wall: recommendations from experts
If, during the installation of a sauna stove with an external firebox, the structure needs to be built into a wall located between two rooms, we recommend that you follow the following instructions:
Preparing the walls . Ideally, such an installation scheme would be appropriate only if the walls are made of any non-combustible material, including brick. Otherwise, if the walls are made of traditional wood, it is recommended to pre-clad them with fire-resistant insulating materials.
Determination of opening parameters. This indicator is equal to the distance between the firebox and the fuel base and is calculated taking into account the power of a particular unit. The specified data can be found in the passport of each model along with installation recommendations proposed by the manufacturer. If the stove is made by yourself, it is recommended to use approximate standards - 25 cm when using fire-retardant materials and 40 cm if they are not available.
Installation of brickwork , which should be arranged in the upper part and on the sides of the wooden wall. At the same time, during the installation of brickwork, it is not recommended to bring it close to the remote fuel chamber assembly, maintaining an air gap, the dimensions of which are calculated taking into account the data presented in the accompanying instructions for the stove. However, it must be at least 2.5 cm. Subsequently, the remaining gap must be filled with insulating material, which can be basalt or stone wool.
Chimney installation: possible options
This stage is final and can be carried out in several ways. If you prefer a classic wood-burning stove with an external firebox, the chimney can be installed using brick, metal or ceramics.
The construction of a brick chimney is a continuation of the installation of a “protective brick jacket”. In this case, the pipe is lined and used as an independent air duct. During the installation of this element, it is necessary to remember that the chimney is a heavy structure, the loads of which are placed on the frame of the bathhouse building. In this case, the main loads are placed on the foundation of the furnace, the installation of which must be made of concrete.
Installing a furnace with an external fuel channel is a rather labor-intensive process, which is due to the need to comply with fire safety rules and the design features of the installation scheme.
Safety measures in bathhouses with remote fireboxes
A metal sauna stove heats up to thousands of degrees during operation, therefore preventing dangerous situations by taking safety measures is one of the most important tasks. We all know cases where neglecting them led to great disaster. Therefore, measures to ensure fire protection are, literally, vital for bath complexes, especially during commercial operation of the structure. The reason is simple: for legal entities and officials, the penalties are usually more severe.
Installation requirements from a fire safety point of view
If your firebox is not equipped with factory-installed protective screens to protect walls and floors, these tips will be useful when installing stoves with a remote firebox.
- Place the stove at a distance of 0.5 m from the walls surrounding it, and install a thermal insulation screen next to the partition inside which the combustion channel runs.
- If the side wall has metal or cement protection at least 1 mm thick, the gap can be half as much (0.25 m). Accordingly, a double sheet makes it possible to reduce the distance to the walls by 4 times (0.12 m). It is worth remembering that the heat-insulating material should not come into contact with the ceiling and floor and it is necessary to have a gap of 2-3 centimeters between it and the wall.
- There should be no less than 1.2 meters between the top of the structure and the ceiling. It is better to retreat the same amount from the door of the room to the edge of the furnace room. The firebox channel should be located 0.4 m from the wall made of timber and other wooden materials. If there is a screen, the distance, as mentioned above, is reduced.
- Finishing work with materials such as stone and brick is not only aesthetics and heat collection, but also one of the fire protection measures.
- To conclude the description of protective measures, we can highlight
- In order to ensure fire safety, the walls of the metal unit must be lined with stone or brick. Finishing the firebox of a sauna stove is a necessary undertaking. A steel sheet is placed under the stove structure, which will prevent fire if coals get on the floor. A square measuring 40x40 centimeters is placed in front of the firebox door.
Required Security Measures
First of all, you need to maintain fire distances. There should be at least 400 mm from the stove body to the wooden cladding of the walls of the bathhouse, but if the surface is lined with a brick or steel screen, then the distance is reduced to 250 mm. At the same time, the screen itself must be larger in size than the side profile of the stove by at least 10 cm in one direction. The wall itself is laid out in ½ brick, it is not worth doing less.
The safety ventilation gap between the wall and the furnace body, 50 mm wide, is often sealed with a fire-resistant heat insulator, for example, basalt fiber. As a result, the brickwork of the wall heats up less, which reduces the risk of cracking of the masonry. Experts recommend not doing this, since the stove and remote firebox are cooled unevenly, and cracks may appear in the housing. In addition, using open mineral wool in a bathhouse can lead to an allergic skin reaction.
The second requirement is the installation of a heat shield for the chimney. The distance from the ceiling of the bathhouse to the stove body must be at least 1200 mm. The wooden cladding of the walls from the ceiling to the body above the firebox must be covered with a heat insulator, possibly with vermiculite cardboard, and sewn up with a stainless steel sheet.
Types of chimneys and the procedure for their installation
Chimneys are channels that remove combustion waste. They can be made from non-combustible materials such as brick, metal and high temperature ceramics.
- The first option involves creating a massive foundation, since the brick structure itself has significant weight.
- The simplest and most inexpensive installation solution is a metal chimney. However, it also has its drawbacks: it is necessary to ensure that its elements do not become excessively hot, otherwise the wooden structure may catch fire, and a person may get burned.
- Ceramics are resistant to corrosion and high temperatures. It is considered safe from a fire protection point of view. Of course, a ceramic chimney is more difficult to install than a metal one, but much easier than a brick one. And the durability will surprise anyone - 30-35 years.
Self-installation of the furnace outlet channel can be fraught with a number of difficulties, so do it using the drawings. And without minimal skills, it is better to entrust such an important part of furnace installation to specialists.
How do you install a chimney onto the roof yourself?
Have you decided to connect a pipe through a pipe to the stove to independently bring the outlet channel to the roof? To simplify your work, pass the steel chimney through a special sleeve installed in the ceiling. It is sold in many large stores. If this option is not for you, read on.
The output channel is laid as follows:
- A hole is cut in the ceiling with a distance from the chimney walls to the floor beams and the ends of the boards of at least 0.25 m on all sides.
- A protective box made of galvanized steel is bent, the corners of which can be fastened with self-tapping screws.
- The resulting box is inserted into the hole under the chimney. Moreover, this should be done from above, and its surface should not protrude into the steam room. Basalt heat-resistant cardboard is inserted between the walls of the box and the ceiling.
- At the bottom you can attach moisture-resistant drywall with a hole made in it for the chimney.
- We install the firebox chimney pipes, and then fill the voids with pieces of basalt wool.
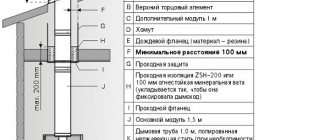
We may need a "Flash Master" when passing through the roof. This is a silicone rubber sleeve that can withstand high temperatures. It is important to remember that the chimney must be at least 0.8 m above the roof.
As you can easily understand, when installing stoves with a remote firebox for a bathhouse on your own, certain difficulties may arise, for example, understanding the nuances of assembling the structure. Whether your stove will be safe and the process itself will be comfortable depends on following all the recommendations.
We recommend that you familiarize yourself with our tiled sauna stoves. A double-sided sauna stove with an external firebox may be of interest on the topic of the article.
Base structure
The rules for installing a stove in a bathhouse require a careful approach to arranging the base. To do this, you will need to create a special pillow, which is especially important for wooden floors. It is convenient if during construction the foundation was immediately laid in a designated place. Or the place where the unit will be is initially marked.
Installing a stove in a bathhouse with your own hands begins with the pillow. An excellent base would be a mineral slab, which will ensure a stable position. Then continues with the creation of the foundation. This is brickwork with fire-resistant mortar, which is located horizontally. Step-by-step instructions involve attaching porcelain tiles, which can easily withstand high temperatures. This is the most popular pillow option.
View this publication on Instagram
Publication from the Grigoriev Workshop (@masterskaiagrigorevyh)
Calculating the weight of the furnace to select a base
To understand how to install a boiler in a bathhouse, as well as prepare a podium for the stove in a bathhouse, you need to calculate its weight. To do this, you need to find out the weight of the material and structure, add about 20-30 kg. This is the approximate weight of stones and firewood with a small margin. After this, the installation of the sauna stove and chimney begins.
Negative sides of the firebox door from the street side
I specifically read reviews about heating the steam room from the street side and found several positive comments. Basically, they boiled down to the following comments: “It’s like this for me, so what” or “I’ve been worrying like this for several years and still haven’t died.” In no case am I going to convince anyone that such a device is extremely bad and if you are happy with it, use it for your health. I just consider a steam bath a relaxation area where you and your friends can enjoy not only the beating with a broom, but also the smell of the wood that you put in the stove.
Based on the above, I can point out the following disadvantages of moving the firebox outside:
If you are not bothered by such inconveniences, you can heat the bathhouse from the street and, as I said at the beginning of the article, this approach will not change anything technically. But, I want to remind you once again that we all go to the steam room to rest and relax, therefore, the less inconvenience - the higher the level of comfort.
Preparatory work and necessary tools
When preparing for the construction of the system, it is necessary to acquire the appropriate equipment, tools and materials. For furnace work, heat-resistant fireclay bricks are recommended. Moreover, only the “heavy” variety is suitable.
There is also a “light” fireclay that does not allow heat to pass through. It is applicable for melting furnace. But the outer walls of such a bath unit will not transfer heat to heat the room.
Although the “light” version of the material can be used when constructing a chimney. Additional thermal insulation is practically not needed. You can distinguish between two types of bricks by weight. When creating masonry, you will need a cement-sand mortar. Clay is not suitable for a bath, since over time it will simply “wash out” with use. This will require additional repairs.
To avoid cracks in the masonry cement layer, it is recommended to slightly reduce its thickness.
The materials will require waterproofing, which is not necessary when using fireclay bricks, as they are resistant to moisture. Take ordinary plastic film in two layers. Ruberoid looks less beautiful.
Another question: what to build a chimney from. For example, it is made of brick. But it is possible to make a structure using metal pipes, which also need to be purchased in advance.
The following tools will be required:
- building level;
- trowel, spatulas;
- hammer;
- ruler, tape measure;
- buckets;
- shovel;
- construction mixer for mortar;
- other.
Having prepared everything you need, purchased equipment and materials in reserve, you can begin to carry out the work.
Stove with firebox in dressing room
A little about theoretical heat engineering
A firebox for a wood-fired sauna, or rather for a sauna stove, is a technological unit in which wood fuel is burned in order to produce heated flue and flue gases, which, transferring their energy to the surrounding space, will heat the sauna room and its individual functional areas to required temperature. The combustion chamber of a furnace can have different sizes and shapes, which determine its thermal properties and qualities. The firebox for a bath has a number of defining indicators that are fundamental, namely:
- Volume, that is, the internal space that can be filled with fuel without harming the combustion process;
- Thermal power - which is predetermined by the volume of the combustion chamber and the amount of fuel of a certain calorific value that can be burned in a given period of time;
- The composition of combustion products, that is, the volume or percentage ratio of mechanical and chemical underburning products in the exhaust gases, the proportion of harmful and parasitic substances that determine the efficiency of a given heating system.
Important! The processes occurring in the furnace space of the furnace also determine its safety, in particular, the possibility of the formation of carbon monoxide and poisoning, which are extremely dangerous.
Furnace device
The classic combustion chamber of a sauna stove consists of the following basic elements:
- Front - the front part of the combustion space in which the loading door is located.
- The rear wall, in which, depending on the design of the furnace, there may be an outlet window for removing flue gases.
- The arch of the firebox or ceiling, which may also contain an exit window.
- The sole is the lower horizontal part of the closed combustion volume.
Most sauna stoves operate on the principle of the so-called layer firebox, in which fuel combustion occurs on a grate. Carbon oxidation occurs in a stream of naturally circulating atmospheric air, which passes through the grate in the direction from bottom to top, washing the fuel layer in its entirety.
Among other things, layer-type fireboxes can be open or closed. An open firebox is a kind of prototype of sauna stoves - a hearth with the help of which black baths were heated. A closed firebox is a classic firebox, known to us from stoves of modern designs. A much more fundamental relation in the implementation of heating a bath in today's realities is the difference in the location of the firebox. It can be internal, located directly inside the furnace lining, or remote, when, through a tunnel, fuel can be loaded from an adjacent room or even from the street.