The bathhouse has always been a traditional place for Russians where a person relaxes, as they say, “cleanses the spirit and body,” and receives a charge of vigor and health for the entire upcoming working week. But in order for a bathhouse to live up to the expectations placed on it, it needs a good stove. It doesn’t matter whether this heating unit is purchased ready-made or built with your own hands - the main thing is that it is able to create the necessary specific atmosphere in the premises and is as safe as possible in operation.
Installing a stove in a bathhouse with an external firebox
There are two main ways to install this heating device:
— Installation of the stove in a bathhouse with an external firebox.
— Placement of the entire structure in the steam room.
Each of the proposed options has its own positive and negative sides, but it is advisable to decide on the choice of installation method at the stage of building the bathhouse. If you plan to move the furnace firebox to an adjacent room, then when constructing a dividing wall between the steam room and the dressing room, an opening is immediately installed in it. However, if you decide to reconstruct an already finished bathhouse, then it is quite acceptable to cut out the necessary window in the wall to remove the furnace door of the stove into the dressing room.
Features of installation work
How to install a stove in a bathhouse to avoid ridiculous mistakes? There are several tips from craftsmen who have performed such work several times and built the heating themselves. Tips from stove makers.
- Firebox door location. You need to think about the door exit for any design. The door should be opened where there will be no people present. Throwing firewood while washing is inconvenient.
- Separate steam room. How to place the product so that the steam is directed directly into the steam room needs to be thought out in advance, even on the drawings. You can steam without any problems. A person will not interfere with those who are simply washing.
- Ventilation lines. The accumulation of steam and heat should not exceed the norms. Stale air will not create the atmosphere of lightness and healing that is expected from a Russian bathhouse.
Those who like to spend time in the steam room will receive the maximum temperature; they will not need to get up for each portion of steam if everything is at hand.
Installation of sauna stoves is carried out in accordance with fire and electrical safety requirements. Each rule requires precise execution. All electrical lines require protection from any possible sparks or damage.
The next video contains recommendations for installing a stove in a bathhouse.
Choosing a location for the oven
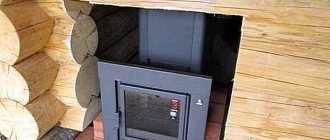
The most correct decision would be the initial design of the bathhouse, taking into account all the rooms and the location of the stove. If it is possible to heat all other rooms from another source, it is placed in a steam room. If not, consider the option of installing a stove in a bathhouse with a firebox from the dressing room so that it heats both it and the washing compartment. To do this, an opening is provided in the partition between these compartments, which is subsequently lined around the firebox with fireproof materials.
Project of a bathhouse with a steam room and showerSource sk-ac.ru
Both options have their positive and negative sides:
- Installation in a steam room allows you to control the operation of the stove without interrupting bath procedures. But the firebox and the space in front of it take up extra space; with this placement, the oxygen in the room burns faster, which requires the installation of a ventilation system. And most importantly, you have to organize autonomous heating of the dressing room, locker room, bathroom and other rooms of the bathhouse, or conduct it from home.
- The second option is much more effective and economical, since installing a stove in a bathhouse with a firebox in the dressing room is not much more difficult, but there are more advantages. The steam room maintains a normal microclimate and frees up useful space; all rooms are heated from one stove. But the bathing procedures have to be interrupted in order to add firewood to the firebox.
However, convenience is not the only and not the most important criterion for choosing a suitable location for a heating unit. The issue of fire safety is much more pressing.
Correct corner placement schemeSource banyabest.ru
First of all, you need to decide how and where to bring the chimney through the roof. It is best if it is connected to the stove in a straight line, without unnecessary bends or turns.
When placing it in a corner or against one wall, you need to follow the rules for installing a stove in a bathhouse with a firebox from a dressing room in a wooden log house. The distance from the metal body to walls made of flammable materials must be at least 50 cm on any side. It can be reduced by insulating the walls with fireproof shields. This can be sheets of mineralite, asbestos cardboard or basalt cardboard, as well as facing with ceramic tiles or a screen made of red ceramic brick.
Insulating walls with mineralite slabs before installing a stoveSource bg.aviarydecor.com
A distance of at least 120 cm should be maintained from the firebox door to the front door. And in front of the firebox, be sure to lay a metal sheet or cover the floor with tiles.
It is easier to provide for all these points at the design stage. If this has not been done, the task will become more complicated, and there will be fewer options for convenient placement of the stove.
Fire safety requirements
When installing any sauna stove, it is necessary to strictly comply with fire safety requirements, since the walls of the device heat up to fairly high temperatures during its operation. In order to ensure maximum safety and not have problems with regulatory organizations, it is recommended to install the stove in accordance with the provisions prescribed in SNiP 41-01-2003 (Chapter 6.6).
- The first thing that needs to be done is to equip a reliable foundation for the main structure of the stove, which will be adjacent to the wall dividing the room. The foundation should be covered with heat-resistant material and then with metal sheet. Asbestos sheets were previously used as heat-resistant insulation. Today on sale you can find panels of pressed mineral wool, which is less dangerous from an environmental point of view, sheets of foam glass or EZHKAKH (heat-resistant structural mica plastic).
- It is also necessary to provide a metal flooring in front of the combustion door, which will prevent the wooden floor from catching fire and simplify debris removal. The size of the pre-furnace sheet must be at least 400×800 mm.
- If the partition between the steam room and the dressing room is wooden, then the opening through which the fuel channel will pass must be separated from the wood by brick or stone masonry. The distance between the stove and wooden walls should be 400÷450 mm.
In the version shown, the owner chose to fill the opening with bricks
- Provided that an opening is installed along the end part of the wall through which the combustion channel will pass, a gasket made of heat-insulating material (mineral basalt wool or cement-fiber sheet) with a thickness of 40÷50 mm, the distance between the part of the wall built from combustible material and the outer wall oven can be reduced to 250 mm. If thicker thermal insulation material is installed, the safe distance can be 125 mm.
- The distance between the ceiling of the bathhouse and the surface of the stove should not be less than 1200 mm.
- The distance from the edge of the combustion door to the nearest door must be at least 1250 mm.
- If you purchased a non-factory-made stove, or the device is independently made from sheet metal, then it is best to cover it with brick. Thus, it is possible to protect the structure of the bathhouse from fire, and people taking water procedures from burns. Factory products, as a rule, are made with double walls, between which thermal insulation material is laid or convection channels pass through.
Prices for foam glass
foam glass
Criteria for choosing a heating device
The installation of a sauna stove begins after its purchase. When choosing a device for heating rooms for thermal therapy, it is recommended to take into account a number of distinctive characteristics of the products. These include:
- heated area and layout of the bathhouse;
- location of the firebox: inside the steam room, adjacent room, with removal to the street;
- overall dimensions, configuration, weight of the device to create a comfortable microclimate in bath rooms intended for high-quality thermal therapy;
- the power of the stove, which must correspond to the volume of the steam room;
- compliance with the price of the product, quality and performance characteristics;
- consumption of fuel resources, which determines the production of thermal energy in the bathhouse and the rate of heating of the premises;
- sauna stove manufacturing company.
Taking into account such criteria will allow you to become the owner of the best option for a sauna stove that will correspond to your wishes, preferences and financial capabilities.
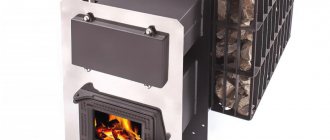
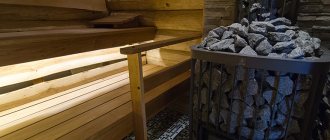
Nowadays, among a wide range of products, iron sauna stoves most often attract the attention of consumers
Today we will look at the rules for installing just such models inside a building
I would also like to draw your attention to multifunctional units with a special water tank heater. It's called a heat exchanger
The heat exchanger is installed in a production environment. Purchasing multifunctional sauna stoves, in my opinion, is considered the right, rational and cost-effective decision.
Installation of a chimney pipe for a sauna stove.
This work will require several operations:
1. Modern sandwich pipes are used for work. They are mounted using socket connections. The main advantage is that each part consists of an internal and external steel pipe and an internal thermal insulation layer. The first pipe is connected to the chimney pipe coming out of the stove. The parts are secured using special clamps.
2. The pipe is brought out through the roof structure into a hole prepared in advance, a special glass or coupling with an inner layer of thermal insulation is inserted. The glass should fit tightly onto the pipe.
3. The chimney and glass are secured to the wooden rafters using self-tapping screws using a special clamp.
4. A protective skirt is placed on top, exceeding the size of the hole by 100-150 mm, the roof surface is covered with a layer of thermal insulation, then a coating is applied and the skirt is mounted on top. Its inner surface is treated with sealant, the protection is pressed tightly against the roof surface and secured with self-tapping screws; rubber gaskets are placed under the heads to seal the attachment point.
5
Now it is important to first check the tightness of the installation. To do this, pour several buckets of water above the pipe outlet and check the connection inside the bathhouse
If there are defects, they are again treated with sealant, secured and re-bleeded.
6. The chimney pipe should protrude 1000 mm above the roof ridge. The top is covered with a special cap.
Choosing a place for the stove in the bathhouse
Installation of a sauna stove begins with choosing a location
Pay attention to the location of the floor beams and roof. All hot elements of the stove, firebox and chimney must be thermally insulated in relation to wooden structures
When positioning the stove, it must be taken into account that each case is individual. Chimney bends are needed in two cases: for greater heat transfer of burnt gases and to create dynamic resistance when the diameter of the chimney is too large in relation to the volume of the firebox, or the draft is too strong (high chimney).
Since the combustion side of the furnace in our case is led out into the adjacent room, the place must be chosen where it is possible to cut out part of the wall for this. In this case, it is necessary to take into account the characteristics of two rooms at once.
In order for the combustion process in the furnace to be stable, it is necessary to ensure a flow of fresh air into the furnace room. Otherwise, incomplete combustion may result in carbon monoxide poisoning.
Electrical
And finally, let’s look at several ways to use electricity to heat a bathhouse. I’ll say right away: take care of the electrics in this case. Since the load on thermal electrical appliances is large, the quality of the electrical wiring should not be in doubt. Consider the total load, wire cross-section, wiring diagram and quality of electrical work.
Electric heating
Firstly, your room can be heated using an electric heater. True, in this case you will have to take care of heating the water in the shower in advance (for example, by installing a direct or indirect heating boiler). This type of heater does not require additional arrangement of the chimney and is considered environmentally friendly.
Secondly, the bathhouse (in particular the relaxation room) can be heated using electric convectors placed on the walls.
Well, thirdly, infrared film can come to your aid - the newest type of heater, which allows you to easily and quickly create warm floors both in the house and in the bathhouse. Detailed technology for installing heated floors is discussed in other articles.
Please note that the installation of heated floors is possible without the use of infrared film, but by laying electric heating cables. They are used both in underfloor heating systems and for heating water pipes.
It is quite possible to use infrared heaters as an additional source of heat. I hung it on the ceiling and forgot about it.
Infrared heaters
Using electricity to heat a bath undoubtedly has its advantages. You can safely use all the structural elements (heater, heated floor, boiler) at any time all year round. At the same time, you don’t have to worry about fuel or worry about pipes freezing. The only serious drawback can be considered the high energy consumption.
Additional wood processing
Fire safety standards require wood to be treated with special impregnations to reduce its flammability. But many people know that impregnations are not particularly useful, especially in a bathhouse, where high temperatures are deliberately planned, at which chemicals will begin to be released into the air and poison a person’s lungs. This is not the result you want to get from visiting a bathhouse.
However, not the entire bathhouse has a high temperature; as a rule, only the steam room. Therefore, in order to avoid fires in other parts of the room from sparks, for example, in the chimney area, experts advise treating the wood with fire retardants at least there.
Important! It will not be possible to treat wood once and forget it for the entire time it is used in the house. You can do a small check: if the wood chips ignite with a match, then it’s time to renew the impregnation
On average, the frequency is once every two years.
Step-by-step instructions for installing a metal stove are as follows:
- Having chosen a place to install the stove, we dismantle the old floor, taking 10 - 15 cm more than the bottom of the stove on each side;
- We dig a hole half a meter deep, compact the bottom and pour a thin layer of sand and crushed stone into it;
- We lay out plastic film to waterproof the slab (double layer);
- We cut out a frame from the road mesh, which is 5 cm smaller in width than the hole, and place it on stands made of pieces of reinforcement resting on the floor, tied to the mesh with wire;
- Fill the hole with concrete. Formwork from boards on top will make the edges smoother and raise the level of the slab. Horizontalness can be checked using a level;
- As soon as the slab hardens, we cover its surface with roofing felt, consisting of two layers, and then 1-2 layers of fireclay bricks so that the base level is equal to the floor level. It happens that the base rises above the floor by 5 - 10 cm;
- After the brick has cooled and hardened, we install the stove according to the design;
- We install an adapter in the wall with welded plates that protect the wall near the chimney;
- We weld the chimney pipe to the adapter;
- On the outside of the bathhouse, we weld another part of the pipe and cover it with a special nozzle to prevent the ingress of precipitation and debris;
- We also install a chimney there;
- We protect the slab from three walls with facing or fire-resistant bricks;
- We line the stove itself with bricks;
- We fill the tank with water, lay the stones;
- Making the first test firebox;
- We control that there are no smoke leaks in places of welding and connections, water leakage from the tank onto the stones or into the firebox, etc.
Preparing the base
The stove must be installed on a flat, solid base made of non-flammable material. For iron stoves weighing less than 500 kg, a regular reinforced screed is suitable, but if the weight is more than half a ton, then a full-fledged foundation is necessary. If the floor in the bathhouse is concrete, then you can do without pouring a screed: just place a thick sheet of iron or a porcelain stoneware slab under the firebox.
Advice! If you plan to install a brick sauna stove with a firebox from a dressing room, then you cannot do without a powerful foundation.
Stages of foundation construction:
- The wooden flooring is dismantled to the size of the foundation (dimensions of the firebox plus 50 cm on each side).
- A pit is dug 50 cm deep.
- A sand and gravel cushion is poured into the bottom and compacted with a layer of 15 cm.
- A double layer of waterproofing (roofing felt or similar material) is laid.
- Then wooden formwork is installed and concrete is poured. To compact concrete, the formwork is tapped with a hammer until a cement slurry forms on the surface, which is leveled according to the rule.
- After the concrete has set (after 4–6 hours), it is covered with another layer of waterproofing, after which several rows of bricks are laid out to raise the base to the required level (10 cm above the finished floor covering).
The installation of a furnace with a firebox from the dressing room is carried out after the concrete has completely dried - after 2-4 days. At this time, an opening in the wall is prepared.
Design and principle of operation
Comparing a stove with a remote firebox and a conventional stone stove, the second option is easier to construct and install. But the advantages of the first option make you get confused and forget about the complexity. For a home bath, the best option is really a stove with a firebox from the dressing room.
Among the advantages of a stove with a firebox from a dressing room:
- the stove heats both the steam room and the dressing room, that is, it maintains a high temperature in both;
- the steam is light due to the fact that the main part of the stove is located in the dressing room;
- the steam room itself does not become clogged with debris from the firebox;
- There is much more space in the steam room.
To summarize, a stove with a remote firebox works more efficiently. It is located in the dressing room, and only one part of the structure goes into the steam room. You save space and expand the function of the stove to two rooms at the same time.
Video description
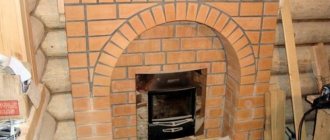
The video will show what a stove looks like in a bathhouse with a firebox in the dressing room, metal, lined with brick:
Exiting the firebox through a stone wall
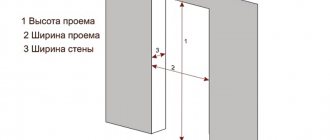
A window is cut out in a concrete or brick partition. Its location is precisely measured using the dimensions of the oven. Since the designs of stoves with remote fireboxes are varied, the height of the window can vary from 40 to 60 cm. And the width can be from 25 to 50 cm.
But to the exact dimensions of the external firebox you should always add 20 mm in each direction. This must be done because metal expands when heated. And all gaps are sealed with elastic, heat-resistant material. The most commonly used is asbestos cord.
In addition, it is necessary to install a metal fence. All free space between the fuel channel and the facing material is sewn with a steel sheet. Since most often all surfaces in the bathhouse are covered with clapboard, the distance from the wood to the firebox should be at least 25 cm. Taking into account that a fairly thick insulator is used.
Types of stoves
Main types of sauna stoves:
- metal;
- wood stoves;
- gas;
- electric stoves in the sauna.
Advantages of a furnace with a remote firebox
Fireplaces and devices with a remote firebox have many advantages over the classic version of the stove:
- Safety – the possibility of carbon monoxide poisoning is almost non-existent, even if there is unburnt firewood inside and the door is closed.
- Comfort - such devices heat 2 rooms at the same time, because they are adjacent to adjacent walls.
- Cleanliness - shoes are removed in the steam room, especially if it is your own bathhouse, and branches and debris from them do not lie under your feet.
- Space – the combustion chamber, moved outside the room, will free up 1 m² of space.
- The steam will not be as dry because the bypass oven will not burn oxygen. There is no need to make an additional ventilation system in the room.
Briefly about the main thing
Exiting the furnace firebox to the dressing room is largely considered a practical solution. In this case, two rooms are heated at once. Therefore, the rest after taking paired procedures is more comfortable. It is also easier to maintain the required temperature in the steam room and restore order. Because there is much more freedom of movement in the waiting room.
The most difficult thing to implement is the classic version of a brick stove, since its construction requires some experience. But if you follow all the recommendations of experts, you can build a fully functional stove. And also take care of the fire safety of the premises.
It is much easier to use a ready-made factory-made oven. It is more reliable and even compact. Its installation in a steam room is not difficult. The only problem will be arranging a niche for the fuel channel. But following the instructions of specialists, covering the opening with bricks and insulating it will not be difficult even for a beginner in this matter.
Insertion into the wall and installation of a sauna stove
To bring out the combustion part of the stove, a rectangular hole is cut in the wall. Its dimensions depend on the design of the stove, especially that part of it that will go into the adjacent room.
The exact size of the gap between the body and the combustible parts of the wall is indicated in the stove passport. Installing an iron stove in a wooden bathhouse involves covering the contour of the hole with brick, basalt wool, plaster or any other non-flammable and moisture-resistant heat insulator.
For a homemade stove, we can recommend gaps of 30 cm, provided there is good thermal insulation. Glass wool or wool for wall insulation cannot be used for this purpose. This material does not hold up well to heating above 150 degrees and begins to crumble. In addition, the use of glass wool is not safe, since combustion products are harmful to the human body.
Video description
For information on how to install an iron stove in a bathhouse with a firebox from the dressing room, watch this video:
Firebox outlet through a wooden wall
If the partition is wooden, then you can’t get away with a window. It will be necessary to create a full opening to the floor, which is then covered with bricks. And already in the masonry a window for the fuel channel is equipped.
To find the height and width of the opening, you need to mark exactly where on the wall the door to the firebox will be located. Having transferred its contours to the surface of the partition, you need to add 25 cm up and to each side. And already using these marks to cut out the opening.
When creating a window for the fuel channel, which is required by installing an iron stove in a bathhouse, you must follow the recommendations described above.
What to do when the wall thickness is significant
It happens that the stove design has a very short fuel channel. And if the wall thickness is significant, then the door does not extend beyond its surface. In this case, it is necessary to cut an opening in the wall and lay a stone niche made of decorative bricks in it.
And for reliability, a flat jumper is installed above the masonry. A metal sheet with a thickness of 8 to 10 mm is selected for it. As in previous cases, you must remember to seal all gaps with asbestos materials.
Test firing of the furnace
Test firing of the sauna stove from the dressing room is very important. It is at this stage that the results of your work and all the miscalculations that could come out are immediately visible.
For a test fire, you need to light the stove at full load for 2 hours. Then it is worth checking individual elements of the structure for heat resistance.
The following standards should be adhered to:
- all elements should not overheat, much less glow,
- the traction must be strong,
- the stove should not smoke much,
- The oven should heat up evenly.
If everything went well and you did not notice any failures, you can safely use the oven for its intended purpose.
Installation on a wooden floor
Options
There are three options for installing a heat-resistant base:
- a metal sheet;
- brick;
- natural or artificial stone;
- ceramic or porcelain tiles. The minimum size of protection should be 40 cm.
Preparing the walls
As already mentioned, it is easier to decorate the walls with refractories than to take away useful space from the steam room. The most economical, but not the best option is to nail a sheet of metal to the wall on bars.
In general, we have the following options:
- attach the refractory sheet to the wall;
- plaster it (it is better to make the layer more than 2.5 cm);
- make a brick casing for the stove;
- lay it out with bricks instead of a wooden wall.
If the stove is located close to the wall, then you will need a two-layer mineralite with an air gap of 3 cm between these layers of ceramic bushings. It looks something like this: wooden wall - first layer of mineralite - bushings - second layer of mineralite.
When space allows, you can get by with one layer, but grommets are also used to attach it to a wooden wall.
Heat-resistant tiles or mirror stainless steel are sometimes placed on top of the mineralite. The latter perfectly reflects heat, but heats up itself, so it can be attached to any refractory material - mineral wool, ceramic fiber, superisol, etc.
Those who brought the firebox into the dressing room either put up a brick wall, or then cut out part of the timber. A space is left in the brick with a reserve for the combustion tunnel, where a heat insulator, for example, mineral wool, is subsequently placed. It is also used at the junction of brick and wooden walls. If you don’t want to replace the entire wall, make a portal - at least a meter wide.
Ceiling preparation and chimney installation
Often the cause of a fire is the section of the ceiling where the chimney is located. There are many errors associated with the passage of a chimney through ceilings.
The specific cause of the fire may be:
- pipe overheating;
- cracks in the pipe allowing sparks to pass through;
- shortcomings in the distance to combustible objects.
If you haven't thought about the position of the stove in advance, there may be a beam above it. In this case, part of the beam is cut out and fastened with jumpers to adjacent beams. The empty space above the center of the pipe passage must be at least 90 cm in diameter.
The chimney is installed from the pipe that comes out of the stove. In the case of a larger diameter monopipe, an adapter is put on the pipe. The first pipe passing through the steam room will be a monopipe
A gate is installed on it, then it continues again, but not to the end (this is very important!) of the overlap, because there they put a “start” on it - an adapter for a sandwich pipe that will pass through the ceilings
Pipe connections should not be in overlap areas.
It is important to know here that although sandwiches are the most common, they are a dangerous type of chimney. An analogue of sandwich pipes is ceramic or brick chimneys, but both options are heavier and more expensive
The outer side of the box can be wrapped with basalt cardboard to prevent it from touching the wood. The pipe is then laid on the roof through a hole larger in diameter than the pipe itself. Next, it is sealed with sealant, a master flush is put on and secured to the roof with self-tapping screws at intervals of 5 cm. Finally, a deflector or umbrella is installed.
Preparing the oven
Before installing the chimney, the stove should already be located in its designated place. It is recommended to heat it outside first
It is extremely important to do this, because... the first fire is usually accompanied by burnout of industrial heat-resistant paint
The oven may smoke a little and smell. This is a normal state for her. At the same time, you will find out whether it has any manufacturing defects.
New stones should also be tried out in the fresh air, not inside, because they can also sting the throat and eyes.
Strictly follow the step-by-step instructions for installing a metal stove.
How to determine the required thermal power of a sauna stove?
The power of heating devices is measured in kilowatts. However, manufacturers of sauna stoves take a different approach - they indicate how much steam room volume this model will be guaranteed to be able to heat to a level corresponding to the required microclimate in the steam room. Naturally, subject to high-quality thermal insulation of the latter.
This is usually indicated in passports - for rooms, for example, from 10 to 16 m³.
It would seem that everything is very simple. It is not difficult to determine the volume of the steam room, and it will be just as easy to choose a model. However, the features of the arrangement of the bathhouse can make their own adjustments.
Below is a calculator that will calculate, so to speak, the conditional or reduced “volume” of your steam room, that is, taking into account all the necessary amendments. Based on this value, it will be possible to more accurately select the optimal oven.
For example, if the result is that a stove of 11 m³ is needed, then they try to choose so that this value is approximately in the middle of the range of capabilities of the purchased model. That is, say, a stove designed to heat from 8 to 14 m³.
A few explanations on the calculation.
- It is clear that first of all the actual volume of the steam room is taken into account. To do this, you need to indicate its linear dimensions: length, width, height.
- Sauna stoves are designed for operation in high-quality insulated rooms. But in practice, it happens that log or timber bathhouses are not insulated from the inside. In this case, a fairly significant part of the heat will be spent on heating the walls, which have considerable heat capacity. Therefore, an amendment is necessary.
- If the stove is located entirely in the steam room, then all the heat generated remains inside this room. But if the firebox is made external (just on the topic of this publication), then part of the thermal energy will involuntarily be wasted on warming up the dressing room and the entire created structure of the “inset” of the stove into the wall. That is, it will also be appropriate to adjust the result.
- The quality of the door leading to the steam room is of great importance. If this is a well-insulated door with a good fit, then significant heat losses through it are not expected. But ordinary panel doors are often installed, as well as glass doors that are becoming fashionable. Of course, their thermal insulation qualities are much lower, and this will also be taken into account when carrying out calculations.
- A window to the street is not a mandatory element of the steam room interior, but it is still often present. That is, another loophole appears for heat leakage. Both the quality of the window and its area matter here. If the window is taken into account, then additional fields for entering this data will appear in the calculator.
- Areas in the steam room (on its walls or floor) lined with ceramic tiles, bricks, and stones can also play a role. Warming up such heat-intensive surfaces will require additional furnace power.
- The result will be shown in standard cubic meters, which should be used as a guide when choosing the optimal sauna stove model.
Installing a stove in a bathhouse with an external firebox - what to do and in what order
In order for the bathhouse to become a place where all family members can take wellness treatments, it should be equipped according to technology. A properly selected stove will ensure comfort and coziness in the steam room.
Regardless of whether you purchased a modern design or built the stove unit yourself, the main requirement for it is the ability to heat several rooms at once and absolute safety in operation.
There are two ways to install a sauna stove:
- place the firebox in the next room;
- install the structure directly in the steam room.
Each option has both advantages and disadvantages, so the choice must be made at the design stage of a bathhouse building. In the case where it is planned to install a stove in a bathhouse with an external firebox, it is advisable to create an opening in the wall during the construction of the building. True, the heating structure cannot be installed immediately, for which purpose a hole is subsequently created in the already built wall.
Foundation
There may be two options here.
First - the bathhouse floors have already been laid
The option, let’s say right away, is not very pleasant. How to solve the problem? First you need to approximately calculate the total weight of the stove along with the brickwork.
The weight of the stove can be found in the manufacturer’s passport or catalog
The weight of one red solid brick is ≈ 3.5 kg, the masonry will be half a brick. There is no longer a need, such a thickness will ensure both normal heat transfer and sufficient stability of the structure.
Red brick weight
Weight of a pallet with bricks
There are recommendations to do quarter masonry (put the brick on edge), but we would not recommend it. Firstly, laying on edge requires considerable experience. Secondly, the stability of the structure is unsatisfactory.
For reference. The dimensions of a standard single brick are 250×120×65 mm. For one cubic meter of masonry you need approximately 520 pieces with a mortar thickness of approximately one centimeter. To make calculations easier, you need to remember that for 1 m2 of half-brick masonry you need ≈ 53 bricks. Take with reserve, there will inevitably be waste.
Standard sizes of solid bricks
Find the location of the floor beam, you can find it by the floor nails. As a rule, during the construction of a bathhouse, timber is used under the flooring with a size of at least 100×100 mm; it can withstand up to 500 kg of weight. This is quite enough for a small metal stove; there is no need to reinforce the timber.
Photo of floor beams
Place a sheet of metal under the perimeter of the stove, it is advisable to make a thermal protection, strictly follow the rules of SNiP III-G.11-62.
SNiP
It is not recommended to use asbestos sheets as a thermal insulation material; today there are harmless materials made from pressed mineral wool on sale.
For brickwork you need to make waterproofing (for fireclay - no need, it is not afraid of moisture). For waterproofing, it is better to take two layers of ordinary transparent polyethylene film - it is much more beautiful than black roofing felt. The protruding film must then be carefully trimmed around the perimeter of the masonry. Do not be afraid that such a stove base raises doubts about its reliability. If the chimneys were brick, yes, even minor “wobbles” of the stove could cause big problems. In our version, the chimneys will be made of metal pipes. At the connection points and at the points where they exit outside, the structure is “floating” and is capable of compensating for small vibrations.
Types of chimneys for baths
Second option. The floors have not yet been laid
The best option is to make a stable foundation for the stove. And the presence of a foundation significantly expands the possible options for stoves both in weight and design features. How to make a foundation?
| Step, No. | Diagram or photo | Explanations |
| Step 1. | Foundation diagram | Mark the dimensions of the pit; along the perimeter it should be 10 cm larger than the dimensions of the stove. |
| Step 2. | Digging a hole for the foundation | Dig a hole 50÷60 centimeters deep; it is not worth it deeper for two reasons. Firstly, in a bathhouse the depth of freezing of the soil is much less than in an open space. Secondly, the stove is not a design that requires a strong, stable foundation. |
| Step 3. | Foundation diagram | Make a sand cushion at least 15 cm thick and compact it. It compensates for soil swelling, if such a fact occurs. |
| Step 4. | The foundation for the furnace is laid out from foundation blocks with dimensions 200x200x400, 200x300x400, 200x300x600. Masonry is carried out using cement-sand mortar gas silicate stove foundation (example) | For the furnace, you can install a simplified foundation made of concrete blocks, this is much faster and easier. Take concrete blocks of any size, the quantity depends on the size of the hole, place them on the cement mortar. Keep an eye on the horizontal position at all times. We do not recommend cutting blocks if their height exceeds the height of the floor. Firstly, it is quite difficult; you need a large diameter diamond disc. Secondly, the foundation protruding a few centimeters does not affect comfort in any way. |
At this point, the preparatory work is completed, and you can begin to directly install the stove with an external firebox.
Calculations
A metal stove, together with a heater, a water tank and a chimney, has a certain weight. Cast iron units are especially massive, as well as stoves lined with brick.
If a foundation is laid under the furnace, and also if there is a reflective brick screen, the load on the beams and floorboards is quite significant. Before installing the stove, you should find out its weight, then calculate the strength of the floors so that the floor does not break under the unit under any circumstances.
Example of a brick-lined oven
Floor beams can be made from solid solid deciduous/coniferous trees, provided their length is up to 5 meters. If it is necessary to use beams over 5 meters in length, it is better to use glued beams that can withstand increased loads.
Beam 10×15 cm, solid
It is important to know the exact length of the beam. This value is taken to be equal to the length of the span that will cover the joist plus the depth of the “nest” or notch made to secure the element
The length of the notches is usually from 70 to 150 mm.
The cross-section of the beams is selected rectangular or square, less often - an I-beam profile (a combination of solid wood and OSB/plywood). The best cross-sectional ratio of a rectangular beam is 1.4 to 1. The beams are made with a width of 40 to 200 mm and a height of 100 to 300 mm. Rounded logs (11-30 cm) are rarely used for arranging the floor in a bathhouse, despite their high resistance to bending deformation.
Wooden I-beams
The pitch between the beams is usually chosen within the range of 30-120 mm, guided by the width of the slab insulation, the location of the support posts of the frame bath, or the dimensions of the subfloor sheets.
Load calculator
Table for determining the minimum permissible cross-section at a step of 1 m
About loads and rigidity
According to the set of building codes numbered 2.01.07-85, any loads are divided into:
- permanent (they are also long-lasting) - from interior partitions and external walls, roofs, soil pressure, etc.;
- variables, i.e. arising from furniture installed in the bathhouse, equipment (including stoves) and visitors, as well as snow, wind loads and some others.
Rigidity is characterized by the ratio of the deflection to the length of the beam (beam). This figure for interfloor beams is 1/350.
The values of the maximum breaking load on the beams are presented in the table.
Table for calculating the breaking load (kgm2) on the floor joists (beams) of a log house
Video - Floor calculations
Accurate calculations of the maximum load on a wooden floor are quite complex; they are performed by specialists when designing large objects. For the floor of the bathhouse on which the stove will be installed, you can use approximate values of the maximum load.
Thus, if the heating device, together with the base plate and other structural elements, weighs no more than 400 kg, then it can be installed on floors with support joists of the following sizes:
- if the step between the logs is 60 cm, then the dimensions for a span length of 2 meters are 75×100 mm, 3 m – 75×200 mm, 4 m – 100×200 mm, 5 m – 150×200 mm; 6 m – 150×225 mm;
- if the step between the logs is 1 m, then the dimensions for a span length of 2 m are 75×150 mm, 3 m – 100×175 mm, 4 m – 175×200 mm, 5 m – 150×225 mm, 6 m – 175×250 mm.
If your stove weighs more, then it is worth reducing the pitch between the logs or increasing their cross-section. For stoves weighing more than 700 kg, a separate base is required, not connected to the main foundation. Installing such structures on a wooden floor is unacceptable. However, only brick sauna stoves with brick chimneys have this weight.
It is recommended to fasten floor boards 50 mm thick on top of the joists. Moreover, humidity levels should not exceed the norm.