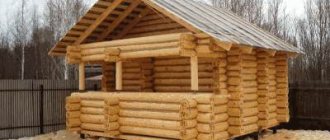
The bathhouse has always been a traditional place for Russians where a person relaxes, as they say, “cleanses the spirit and body,” and receives a charge of vigor and health for the entire upcoming working week. But in order for a bathhouse to live up to the expectations placed on it, it needs a good stove. It doesn’t matter whether this heating unit is purchased ready-made or built with your own hands - the main thing is that it is able to create the necessary specific atmosphere in the premises and is as safe as possible in operation.
Installing a stove in a bathhouse with an external firebox
There are two main ways to install this heating device:
— Installation of the stove in a bathhouse with an external firebox.
— Placement of the entire structure in the steam room.
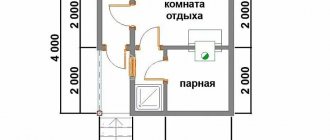
Each of the proposed options has its own positive and negative sides, but it is advisable to decide on the choice of installation method at the stage of building the bathhouse. If you plan to move the furnace firebox to an adjacent room, then when constructing a dividing wall between the steam room and the dressing room, an opening is immediately installed in it. However, if you decide to reconstruct an already finished bathhouse, then it is quite acceptable to cut out the necessary window in the wall to remove the furnace door of the stove into the dressing room.
Advantages of a design with an external firebox
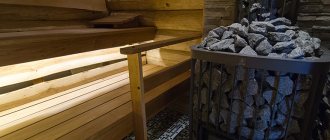
A classic Russian bath involves the use of a real wood-burning stove, and not its imitation. And in order to create the necessary atmosphere in the steam room, a means of heating the room is installed directly in it. This is the only way to achieve the desired temperature for steaming the entire body.
It’s good when the stove is heated with selected wood. The room is saturated with an indescribable pleasant aroma. True, there is always a possibility that harmful gases generated during combustion will fill the steam room, despite the fact that the stove should work as an exhaust ventilation. And this happens anyway when the firebox door opens.
The second unpleasant moment is the garbage in the steam room, which cannot be avoided when bringing firewood into it. And manipulating the stove in a cramped room, when they are already taking thermal procedures and trying to relax, is completely inappropriate. Therefore, the option when the stove is heated from another room looks very attractive.
Firebox in the rest room Source cstor.nn2.ru
In addition, a stove in a bathhouse with a firebox in the dressing room has a lot of advantages:
- Not only the steam room is heated, but also the adjacent room.
- There is nothing stopping you from regularly adding firewood to the stove. This means crowded conditions and people in the steam room.
- It becomes possible to protect a hot oven with a safety screen. And this will avoid accidental burns.
- The steam room will be kept perfectly clean.
- In the room where the firebox is located, you can arrange a place for drying firewood. There are situations when such a problem is very relevant.
- The air in the steam room always remains clean and pleasant to breathe. After all, the steam in this case turns out to be light.
- The steam room will receive more usable space, since the space occupied by the open firebox door will be freed up.
- If desired, the firebox can be taken not only into the next room, but also outside.
The latter circumstance is especially relevant when you need to heat the bathhouse with coal instead of firewood. In this case, combustion products are more harmful and it is better that they do not even get into the dressing room. In addition, there is much more dirt from such fuel.
Taking the firebox outside Source oboiman.ru
The option has a significant disadvantage. In order to add fuel to the stove, you must interrupt the bathing procedures and leave the room. Therefore, this approach is justified in commercial organizations, when a special employee monitors the kindling. But since coal provides more heat than wood, some bathhouse owners deliberately accept certain inconveniences.
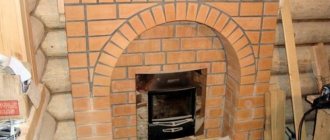
Having a certain skill, the stove in a bathhouse with a firebox from the dressing room is laid out independently from brick. This approach will support the traditional foundations of bath procedures, since the heater has always been considered an indispensable attribute of the Russian bath. But progress also brings its advantages, which are more practical.
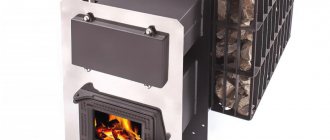
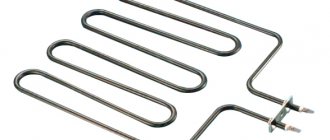
For example, metal stoves heat up faster and therefore require less fuel. In addition, in steel structures, the outlet channel is already welded to the boiler and all that remains is to equip an opening in the wall for it. And some heavy cast iron stoves have a removable firebox. And this adds new possibilities when used.
Installation of a cast iron stove with a remote firebox Source oboiman.ru
Modern stoves are equipped with a firebox door with transparent protective glass. There are both disadvantages and advantages to this. Since such material does not heat up, in the closed position no heat enters the dressing room. To heat the room, you will either have to regularly open the door slightly or install an additional heater.
But if there are no problems with the temperature of the rest room, then such a design can serve as a fireplace. If you move chairs to the firebox, you can observe the fire through the transparent glass. This type of relaxation is especially pleasant after couples treatments.
See also: Catalog of companies that specialize in the design and installation of fireplaces and stoves
Useful tips
When heating the stove, the smoke must go freely into the chimney, since if carbon monoxide is not removed through the hood, it can cause serious harm to the human body. If a problem exists, you must immediately find the cause of the weak draft and eliminate it.
Several ways to determine the absence or interruption of furnace draft:
The easiest way is a regular sheet of paper or a lit match, brought to the open door while the stove is firing. If the sheet or flame of a match deviates inward, then there is a draft. If there is no deviation or it occurs outward, then there may be a so-called backdraft, which can be very dangerous.
- One of the reasons for weakening draft may be a depressurized chimney, crack, break, pipe shift, or other defects.
- Another danger is an accidental spark falling into a crack in the chimney onto flammable material, which leads to a fire.
- The small size of the blower through which the exhaust is made can lead not only to the occurrence of reverse draft, but also to an insufficient supply of oxygen to the fuel combustion process.
- Blockages in the chimney can also interfere with the process of normal draft. In this case, regular chimney cleaning will help restore normal air movement. It should be noted that the presence of even one elbow in the pipe, where the bulk of soot accumulates as a result of aerodynamic processes, will greatly complicate the work of the “chimney sweep”.
- If for some reason the stove cannot be heated for a long period of time, an air plug consisting of dense air layers may form in the chimney. As a rule, it resolves immediately after regular heating begins on its own.
- Insufficient firebox volume.
- A wide and long chimney does not work with a small firebox.
Safety requirements
Installing a sauna stove with an external firebox requires the introduction of additional protective measures. But we also shouldn’t forget about the basic ways to comply with fire safety in order to protect people visiting the steam room from injury, and yourself from penalties from supervision. And the implementation of all the recommendations prescribed in the sixth chapter of SNiP number 41-01-2003 will help in this.
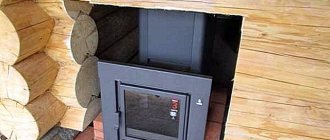
Installation of an iron stove with the firebox removed to the dressing room Source oboiman.ru
And in a few words, all the basic requirements boil down to the following:
- A reliable foundation is erected under the main structure of the furnace, which should be adjacent to the wall of the room where the firebox will be installed.
- The remote fuel duct made of iron should only pass through a stone wall. Therefore, if the latter is made of wood, it is necessary to equip a niche in it, which is lined with brick.
- The distance between the metal parts of the stove and the wooden wall must be at least 40 cm.
- This parameter can be reduced if the fuel channel is laid with a reliable insulator. For example, basalt wool or cement-fiber material. If the insulation thickness is at least 5 cm, then the distance can be reduced to 25 cm. When an even thicker gasket is used, then even to 12.5 cm.
- Before the firebox, a steel sheet with dimensions of at least 40x80 cm must be laid on the floor. It will not only prevent fire from coals falling out of the stove, but will also help in removing debris from the fuel.
Steel sheet in front of the firebox Source remontnik.ru
- The distance from the stove to the ceiling of the steam room must be at least 120 cm.
- The edge of the combustion door should be 125 centimeters from the nearest door.
- A homemade iron stove must be lined with bricks.
This last measure will help to avoid a fire in the room if, through negligence, wooden objects, of which there are plenty in the sauna room, interact with the stove body. Factory-made products are usually protected by double walls.
Chimney outlet through the roof
A more complex option requires increased care and the purchase of additional elements. Consider the option of a metal roof.
Step 1. Make precise markings in the ceiling where the pipe exits, make a hole
Make sure that the hole does not hit the roof beam! The dimensions of the hole in the ceiling should be 10 cm larger around the perimeter than the diameter of the pipe. The ceiling is made of boards - making a hole in it is not a problem
Scheme for arranging a hole in the ceiling
Pipe passage through the ceiling
Pipe passage through the attic
Step 2. Mark the place where the pipe exits on the roof, watch the verticality and location of the rafters and sheathing. The hole in the roof should not damage the elements of the rafter system.
Step 3. Use a cylindrical grinder to cut a hole in the roof; its size should correspond as much as possible to the diameter of the pipe.
Step 4. Fix the vertical position of the chimney in the ceiling with pads, insulate the opening with mineral wool and nail galvanized steel sheets on both sides.
Insulating the opening with mineral wool
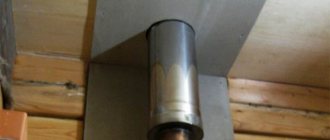
Step 5. To seal the pipe outlet on the roof, you need to buy special additional products: a metal skirt and a glass. The diameter of the glass must correspond to the diameter of the pipe. It is quite difficult to make such products yourself; it is better to buy them ready-made.
To close the pipe on the roof, roof penetrations, for example, of circular cross-section, are used
Step 6. Use a metal clamp to attach the chimney pipe to the rafter system structures. There is no need to insulate anything; at this distance from the boiler, the metal chimney has time to cool down.
Step 7. Place the glass skirt over the chimney. The glass has the ability to rotate and tilt in the skirt, which greatly simplifies the installation process.
Chimney passage through the roof
Step 8. You need to cut off the roofing sheet. The width should be 10÷15 centimeters greater than the width of the skirt, the length should correspond to the distance from the top edge of the skirt to the nearest formwork strip. When marking, carefully ensure that the waves in the cut piece of roofing coincide with the waves on the roof.
Construction of a brick kiln
Having the skill of bricklaying, you can install the stove in a bathhouse with a firebox from the dressing room yourself. To do this, you need to stock up on the necessary materials and tools. You will need clay, sand and fire bricks. You will also need grates and doors for the firebox. You can’t do without a steel corner.
The work cannot be completed without a construction trowel and levels of different lengths. And initially you need to decide on the layout of the furnace. If your work experience is minimal, then it is better to abandon sophisticated projects and stick to the simplest ones.
Laying a stove for a bath Source remontik.org
Putting the stove into operation
During the first kindling, the stove is heated for 1.5 hours, then proceed to a full-fledged firebox.
The brickwork is dried at a temperature of +5 - +30°C. At this time, doors and valves are opened around the clock. The first kindling takes place without the use of flammable liquids and flammable materials. Use dry newspapers and small wood chips. After obtaining a stable fire, you can add logs in small portions.
The ashpit is kept open, the intensity of combustion is controlled by closing or opening the door. Check the draft and heating rate. The heating process lasts 1 - 1.5 hours, then you can proceed to normal heating of the stove.
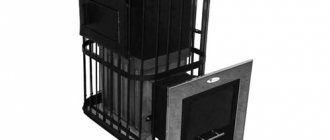
Installation of a metal structure
Today, manufacturers produce a large number of designs of iron stoves for baths. And options with the removal of the firebox to an adjacent room are especially popular among buyers. In addition, the remote channel is often equipped with a door with panoramic glass. And this helps to monitor the kindling process without opening the stove.
The installation of a metal stove in a bathhouse takes place on a foundation located near the partition. In the latter, an opening is cut for the fuel channel. Before installation, all surfaces are carefully insulated to protect them from excessive heating.
For the same purposes, metal stoves are often lined with brick. But this measure is more common for home-made structures. Because factory-made ovens have very reliable protection and do not need additional protection. Therefore, their lining is purely decorative.
How to install a heating device
Many home craftsmen ask how to properly install a sauna stove on an already poured foundation.
There is no need to attach the heater to the foundation, but sometimes experts advise attaching the legs to anchor bolts.
If you are installing a model with a protruding channel, then it is important to well insulate the portal from fire - this can be done using polyurethane foam or other material that does not ignite.
Video description
The video will show what a stove looks like in a bathhouse with a firebox in the dressing room, metal, lined with brick:
Exiting the firebox through a stone wall
A window is cut out in a concrete or brick partition. Its location is precisely measured using the dimensions of the oven. Since the designs of stoves with remote fireboxes are varied, the height of the window can vary from 40 to 60 cm. And the width can be from 25 to 50 cm.
But to the exact dimensions of the external firebox you should always add 20 mm in each direction. This must be done because metal expands when heated. And all gaps are sealed with elastic, heat-resistant material. The most commonly used is asbestos cord.
In addition, it is necessary to install a metal fence. All free space between the fuel channel and the facing material is sewn with a steel sheet. Since most often all surfaces in the bathhouse are covered with clapboard, the distance from the wood to the firebox should be at least 25 cm. Taking into account that a fairly thick insulator is used.
Plating methods
Stove makers use three methods:
- Continuous cladding. The method accelerates heat transfer. Rarely used, mainly for decoration.
- Creation of a heat shield. Acts as a partition. Increases the comfort of people sitting next to you in the bathhouse. Improves the level of heat transfer.
- The lining performs the function of a convector with vents. The best option for a bath. Suitable for any metal stoves. The area of the steam room is not important.
The layout of the lining will depend on its purpose and the functions of the stove. For decorative purposes, it is made in full brick. If the equipment acts as a water heater, then it must be laid in half a brick.
To correctly calculate the distance from the brick screen to the stove body, you need to add 2 cm per 1 kW of unit power.
There is no point in placing it close to the body - the lining will not perform the necessary functions.
People are also interested in:
- DIY metal sauna stove
- Brick stove for a bath
Video description
For information on how to install an iron stove in a bathhouse with a firebox from the dressing room, watch this video:
Firebox outlet through a wooden wall
If the partition is wooden, then you can’t get away with a window. It will be necessary to create a full opening to the floor, which is then covered with bricks. And already in the masonry a window for the fuel channel is equipped.
To find the height and width of the opening, you need to mark exactly where on the wall the door to the firebox will be located. Having transferred its contours to the surface of the partition, you need to add 25 cm up and to each side. And already using these marks to cut out the opening.
When creating a window for the fuel channel, which is required by installing an iron stove in a bathhouse, you must follow the recommendations described above.
What to do when the wall thickness is significant
It happens that the stove design has a very short fuel channel. And if the wall thickness is significant, then the door does not extend beyond its surface. In this case, it is necessary to cut an opening in the wall and lay a stone niche made of decorative bricks in it.
And for reliability, a flat jumper is installed above the masonry. A metal sheet with a thickness of 8 to 10 mm is selected for it. As in previous cases, you must remember to seal all gaps with asbestos materials.
How to determine the required thermal power of a sauna stove?
The power of heating devices is measured in kilowatts. However, manufacturers of sauna stoves take a different approach - they indicate how much steam room volume this model will be guaranteed to be able to heat to a level corresponding to the required microclimate in the steam room. Naturally, subject to high-quality thermal insulation of the latter.
This is usually indicated in passports - for rooms, for example, from 10 to 16 m³.
It would seem that everything is very simple. It is not difficult to determine the volume of the steam room, and it will be just as easy to choose a model. However, the features of the arrangement of the bathhouse can make their own adjustments.
Below is a calculator that will calculate, so to speak, the conditional or reduced “volume” of your steam room, that is, taking into account all the necessary amendments. Based on this value, it will be possible to more accurately select the optimal oven.
For example, if the result is that a stove of 11 m³ is needed, then they try to choose so that this value is approximately in the middle of the range of capabilities of the purchased model. That is, say, a stove designed to heat from 8 to 14 m³.
Calculator for calculating the conditional power of a sauna stove
Go to calculations
A few explanations on the calculation.
- It is clear that first of all the actual volume of the steam room is taken into account. To do this, you need to indicate its linear dimensions: length, width, height.
- Sauna stoves are designed for operation in high-quality insulated rooms. But in practice, it happens that log or timber bathhouses are not insulated from the inside. In this case, a fairly significant part of the heat will be spent on heating the walls, which have considerable heat capacity. Therefore, an amendment is necessary.
- If the stove is located entirely in the steam room, then all the heat generated remains inside this room. But if the firebox is made external (just on the topic of this publication), then part of the thermal energy will involuntarily be wasted on warming up the dressing room and the entire created structure of the “inset” of the stove into the wall. That is, it will also be appropriate to adjust the result.
- The quality of the door leading to the steam room is of great importance. If this is a well-insulated door with a good fit, then significant heat losses through it are not expected. But ordinary panel doors are often installed, as well as glass doors that are becoming fashionable. Of course, their thermal insulation qualities are much lower, and this will also be taken into account when carrying out calculations.
- A window to the street is not a mandatory element of the steam room interior, but it is still often present. That is, another loophole appears for heat leakage. Both the quality of the window and its area matter here. If the window is taken into account, then additional fields for entering this data will appear in the calculator.
- Areas in the steam room (on its walls or floor) lined with ceramic tiles, bricks, and stones can also play a role. Warming up such heat-intensive surfaces will require additional furnace power.
- The result will be shown in standard cubic meters, which should be used as a guide when choosing the optimal sauna stove model.
Briefly about the main thing
Exiting the furnace firebox to the dressing room is largely considered a practical solution. In this case, two rooms are heated at once. Therefore, the rest after taking paired procedures is more comfortable. It is also easier to maintain the required temperature in the steam room and restore order. Because there is much more freedom of movement in the waiting room.
The most difficult thing to implement is the classic version of a brick stove, since its construction requires some experience. But if you follow all the recommendations of experts, you can build a fully functional stove. And also take care of the fire safety of the premises.
It is much easier to use a ready-made factory-made oven. It is more reliable and even compact. Its installation in a steam room is not difficult. The only problem will be arranging a niche for the fuel channel. But following the instructions of specialists, covering the opening with bricks and insulating it will not be difficult even for a beginner in this matter.
Ratings 0
Where to order or buy
Customers are given the opportunity to purchase a stove from one of the suppliers and install it themselves or contact specialists from companies that provide services for the construction of bathhouses and installation of units.
A metal stove is neither very beautiful nor very safe, since cast iron not only heats up quickly, but literally gets hot. Moreover, after rapid heating, an equally rapid cooling occurs.
But these shortcomings can be easily corrected by brick lining. The brick-lined structure looks no worse than a completely brick heater, and its construction requires minimal skills.
Variations on the theme of refractory bricks
In general, the laying of bricks for cladding in terms of technology is no different from the laying of stove walls. However, when deciding to line a cast-iron or iron stove with brick, pay attention to the important points listed below.
- every 4th row of facing masonry with wire or steel strip. The firebox opening (including the opening of the remote firebox) is reinforced with a metal corner.
- During the DIY cladding process, you will need a heat insulator. Asbestos or basalt cardboard can be used as it.
- Review all purchased bricks for defects (chips, cracks, etc.). Take the time to lay out the material on the floor, adjusting brick to brick so that the pins touch with the smallest possible gap. Follow the same order when you lay the bricks on the mortar.
- The masonry mortar must match the chosen type of brick. However, there is no need to rack your brains here. Usually, when purchasing building materials, you will immediately be offered a dry mixture, which you only need to dilute with water according to the instructions.
- Watch the thickness of the seams, do not make them too wide. The thinner the seams, the better thermal conductivity the lining will have.
- Be sure to check the verticality of the corners with a plumb line, as well as the horizontality of the rows with a level.
Foundation or floor - which is better and more reliable?
It is important that the brickwork rests on a solid foundation, so before starting work, you need to assess the load-bearing capacity of the floor. Calculate the mass of the planned masonry. To do this, multiply the number of rows of a brick screen by the number of bricks in each of them, and then also by the mass of one brick.
If the mass is less than 700 kg, it is quite possible to do without a foundation, but at the same time take measures to strengthen the logs. It is necessary to lay additional logs, fastening them with a frame to the main ones. Then you should equip a non-combustible base, which can be a sheet of metal (on top of a layer of thermal insulation), two rows of brickwork (placed directly on a wooden floor), ceramic heat-resistant tiles or artificial stone.
But if you doubt the strength of the logs, it is better to make a separate foundation for the heater. The size of the foundation should take into account the area of the furnace itself, the thickness of the facing masonry, as well as the gap between the metal and the brick (about 3-5 cm), and also include an additional 15-20 cm to the dimensions of the furnace screen. As the gap width increases, the heating of the facing masonry slows down.
If the decision to cover a metal stove came much later than the stove itself was installed, and it was installed WITHOUT a foundation, use hollow brick. It heats up quickly and doesn't hold heat for too long. But it weighs much less, and in the absence of a foundation this is an important argument in its favor.
However, it is better to dismantle the floor and dig a pit with a depth identical to the depth of laying the foundation of the bathhouse itself. In this case, the base for the stove should not be connected to the foundation of the bathhouse building and should be located at a distance of at least 5 cm from it (this distance is filled with heat-insulating material). The height of the base under the stove should be approximately 10-15 cm below the floor level.
After pouring the foundation and allowing it to dry for 30 days, lay the following materials on it in stages: two layers of moisture-proofing material (for example, roofing felt), two rows of bricks on a clay-cement mortar.